Samsung Electronics Co SCX4720F Multi Function Printer User Manual 4x20 EN
Samsung Electronics Co Ltd Multi Function Printer 4x20 EN
UserManual.wiki
>
Samsung Electronics Co
>
SCX4720F User Manual
>
Users Manual 2
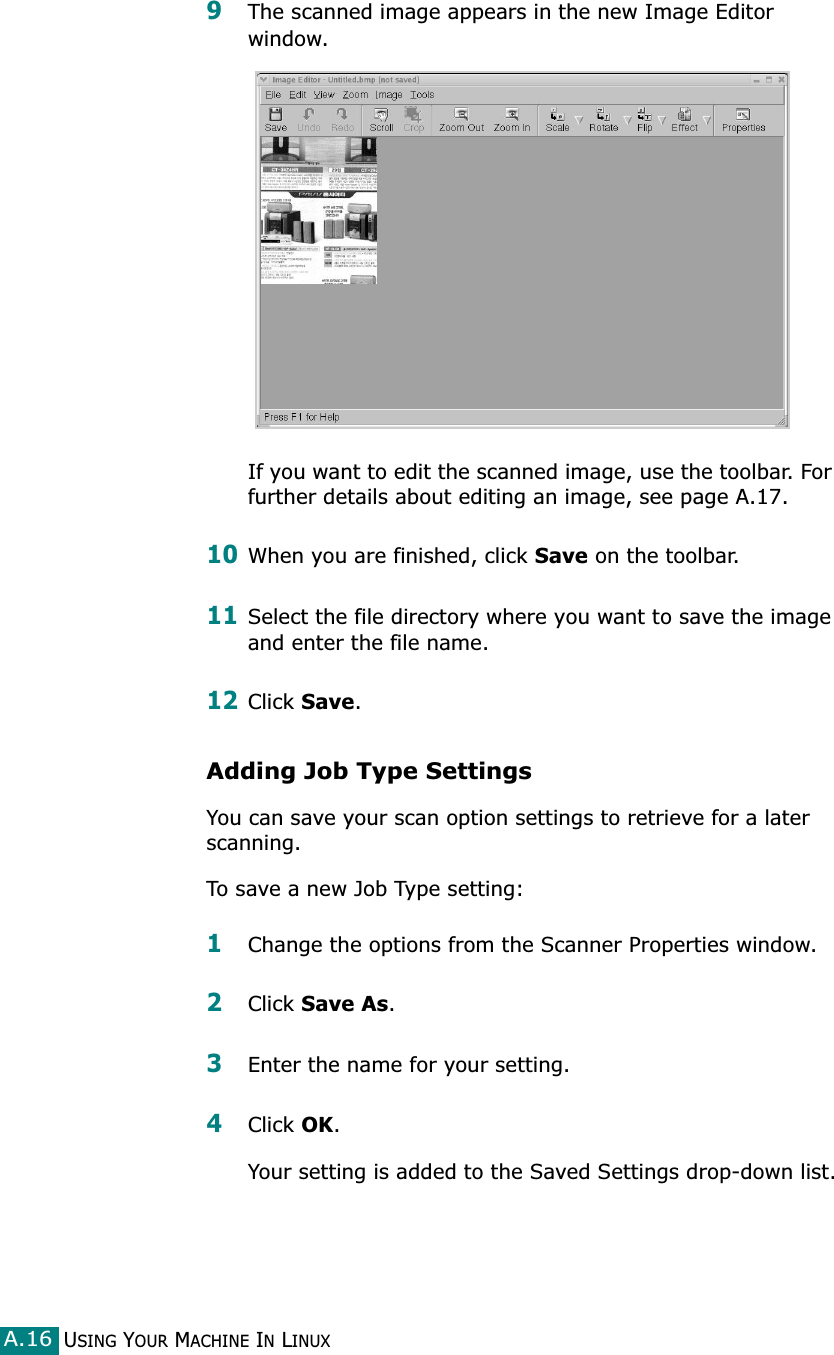
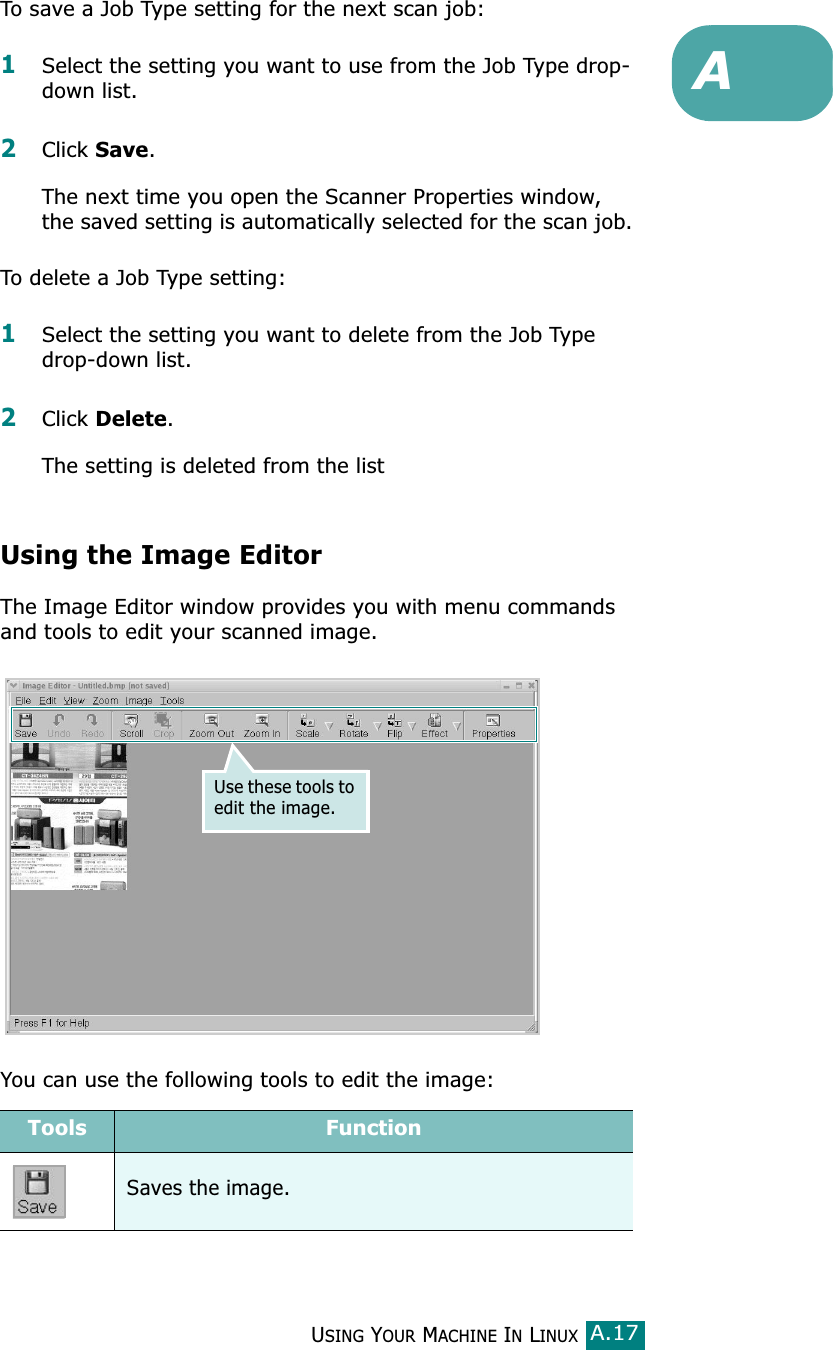
Contents
1.
Users Manual 1
2.
Users Manual 2
Users Manual 2
Navigation menu
Upload a User Manual
Namespaces
Wiki Guide
HTML
PDF
Info
Views
User Manual
Discussion / Help
Navigation


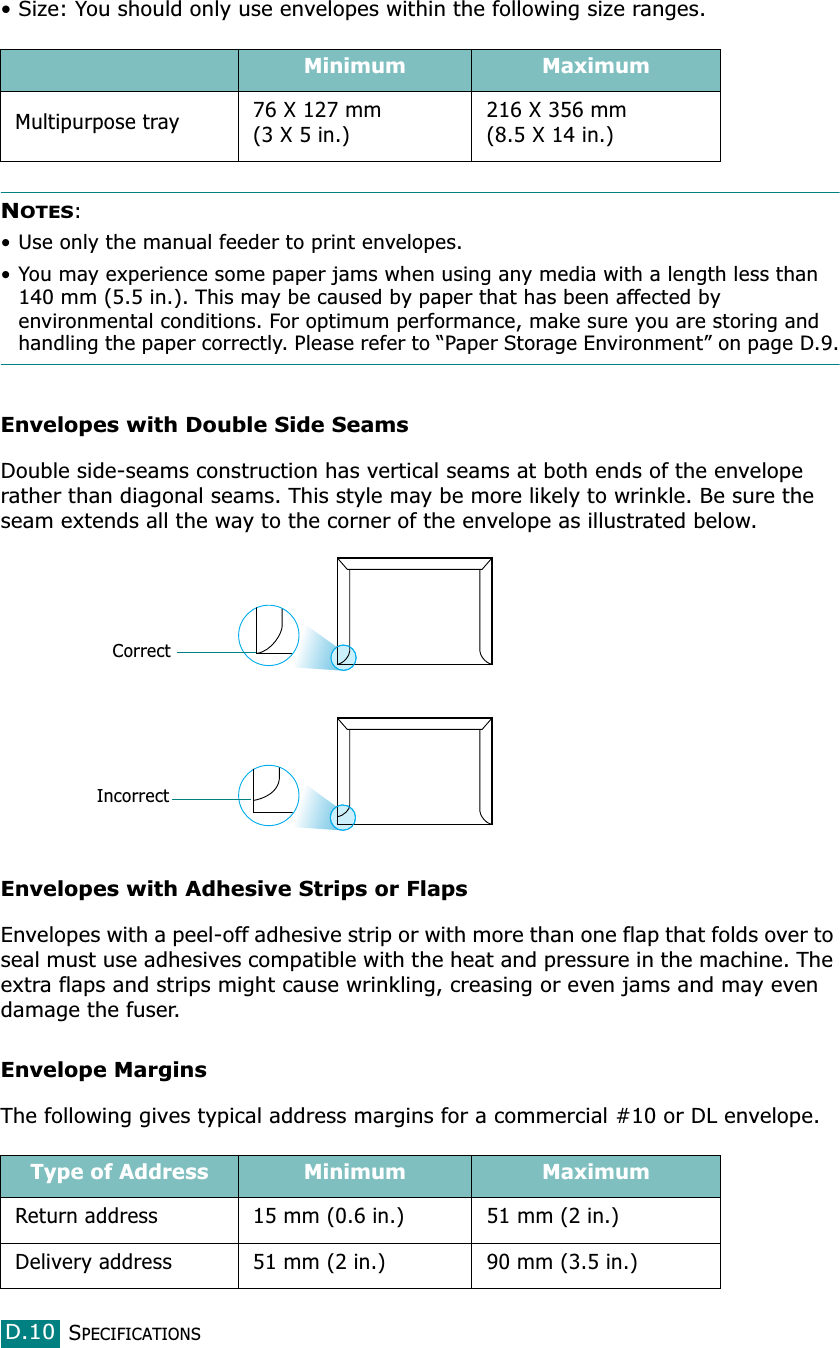
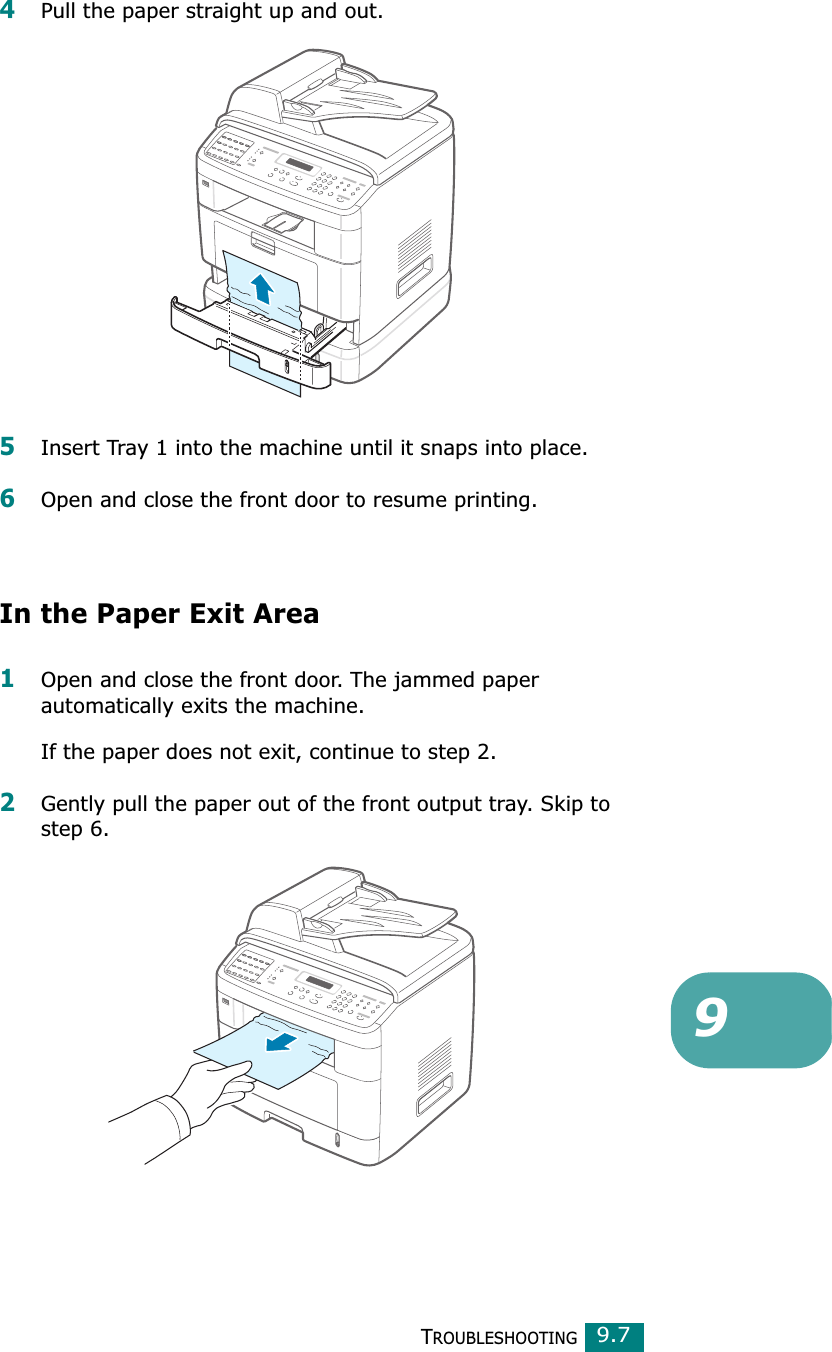
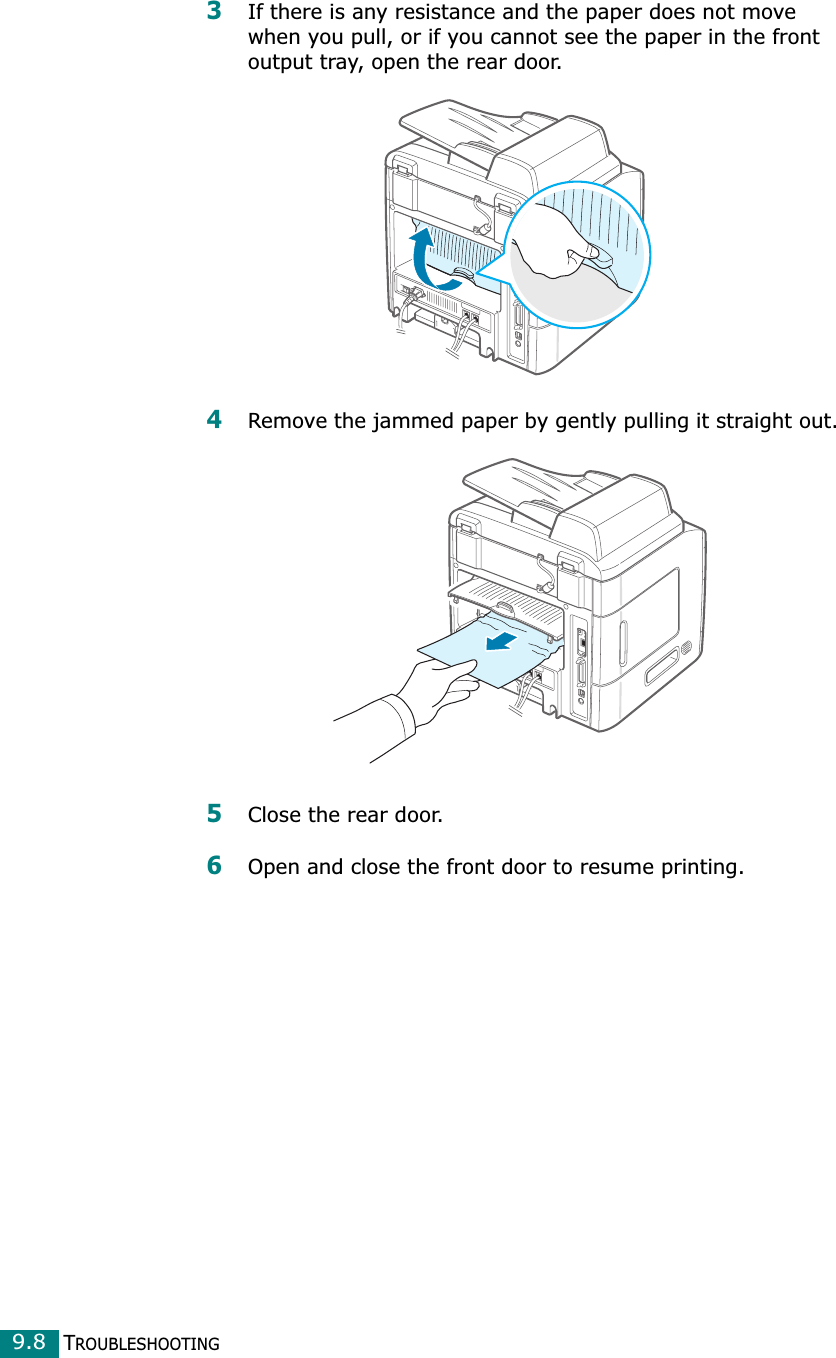
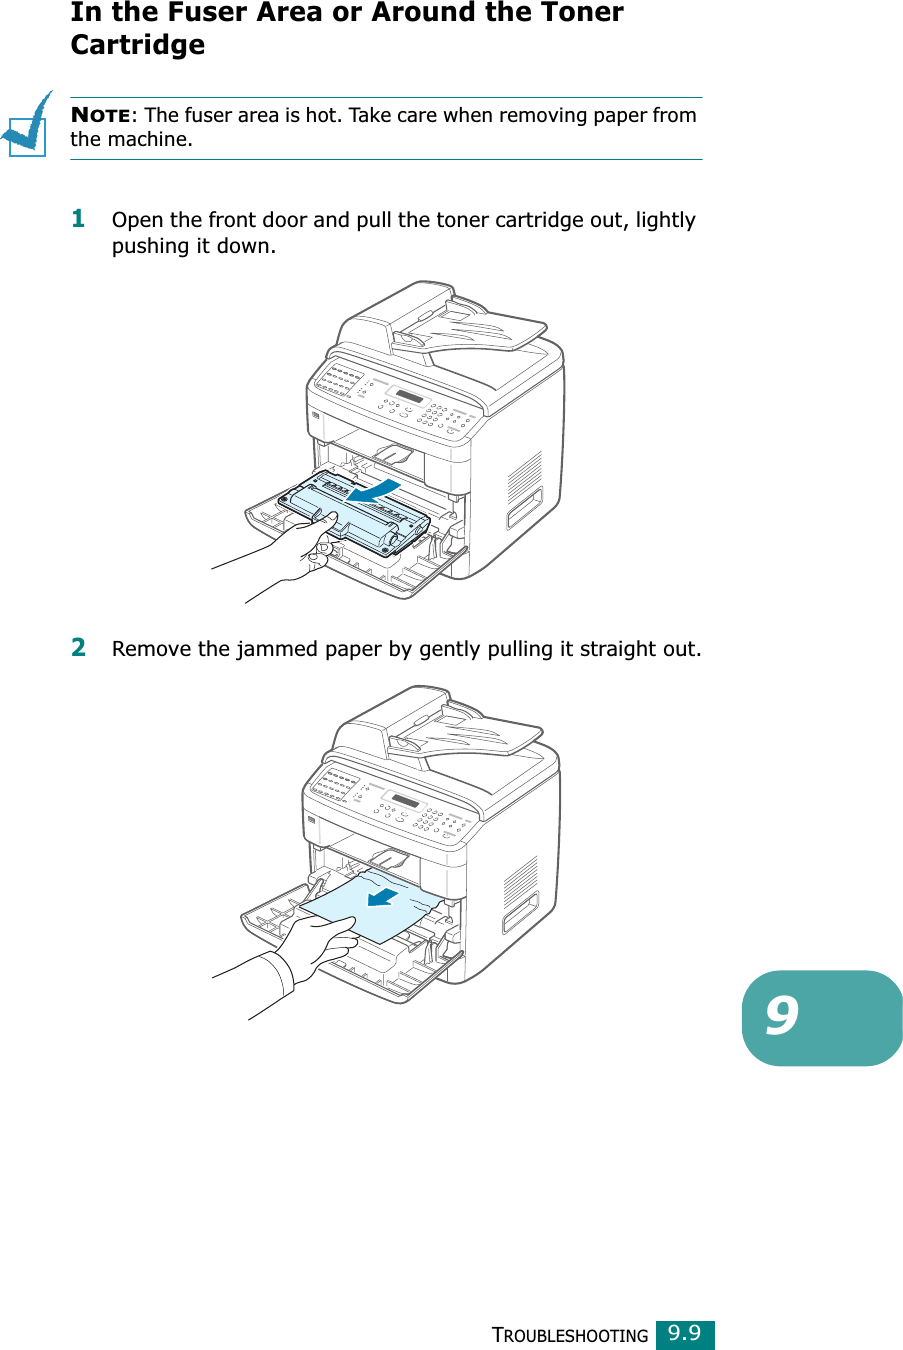
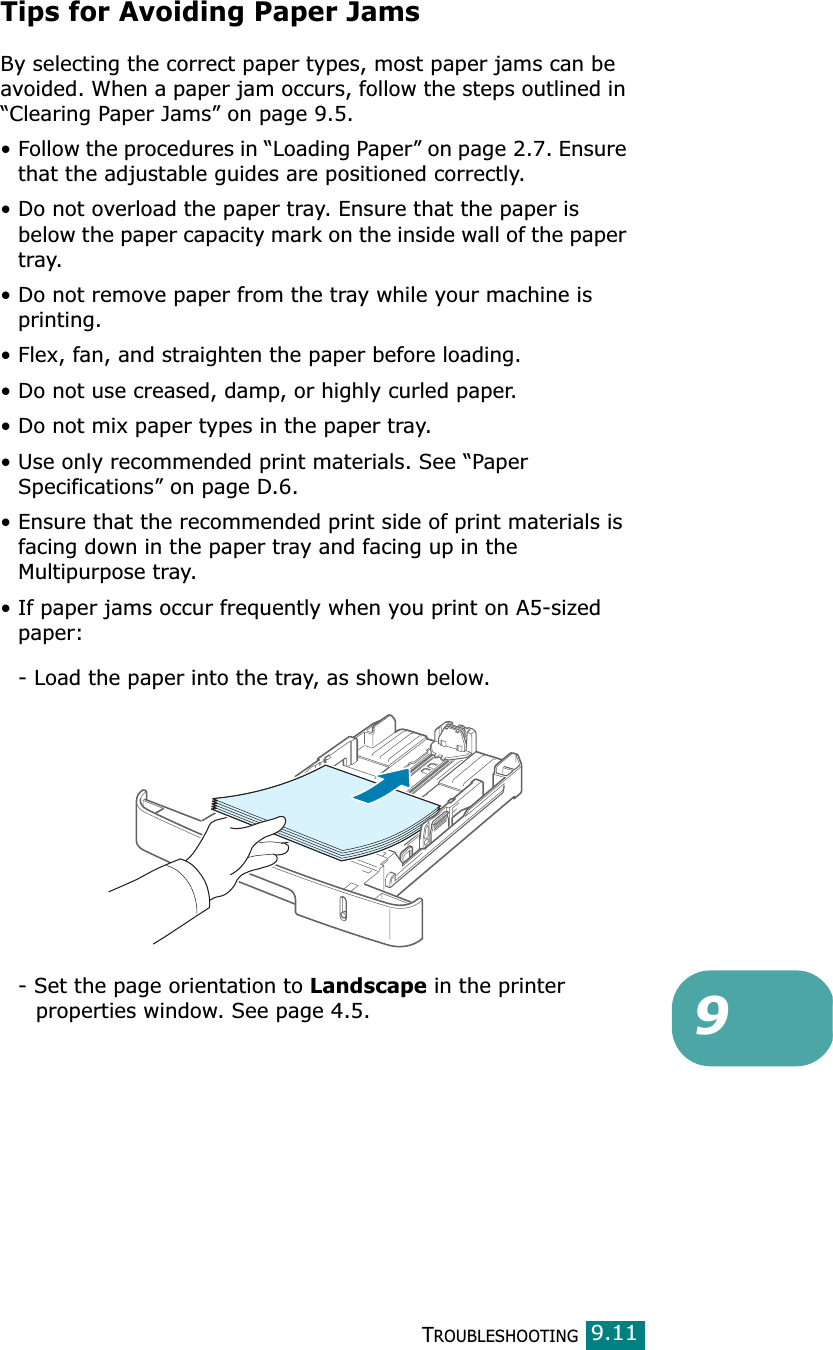
![TROUBLESHOOTING99.5Clearing Paper JamsWhen a paper jam occurs, “Paper Jam” appears on the display. Refer to the table below to locate and clear the paper jam.To avoid tearing the paper, pull out the jammed paper gently and slowly. Follow the instructions in the following sections to clear the jam. In Tray 11Open and close the front door. The jammed paper automatically exits the machine.If the paper does not exit, continue to step 2.2Pull Tray 1 open. Message Location of Jam Go toPaper Jam 0Open/Close DoorIn the paper tray(Tray 1 or Tray 2)below andpage 9.6Paper Jam 1Open/Close DoorIn the paper exit area page 9.7Paper Jam 2 Check InsideIn the fuser area or around the toner cartridge.page 9.9MP Tray Jam[Door Open]In the Multipurpose tray page 9.10](https://usermanual.wiki/Samsung-Electronics-Co/SCX4720F.Users-Manual-2/User-Guide-440244-Page-51.png)
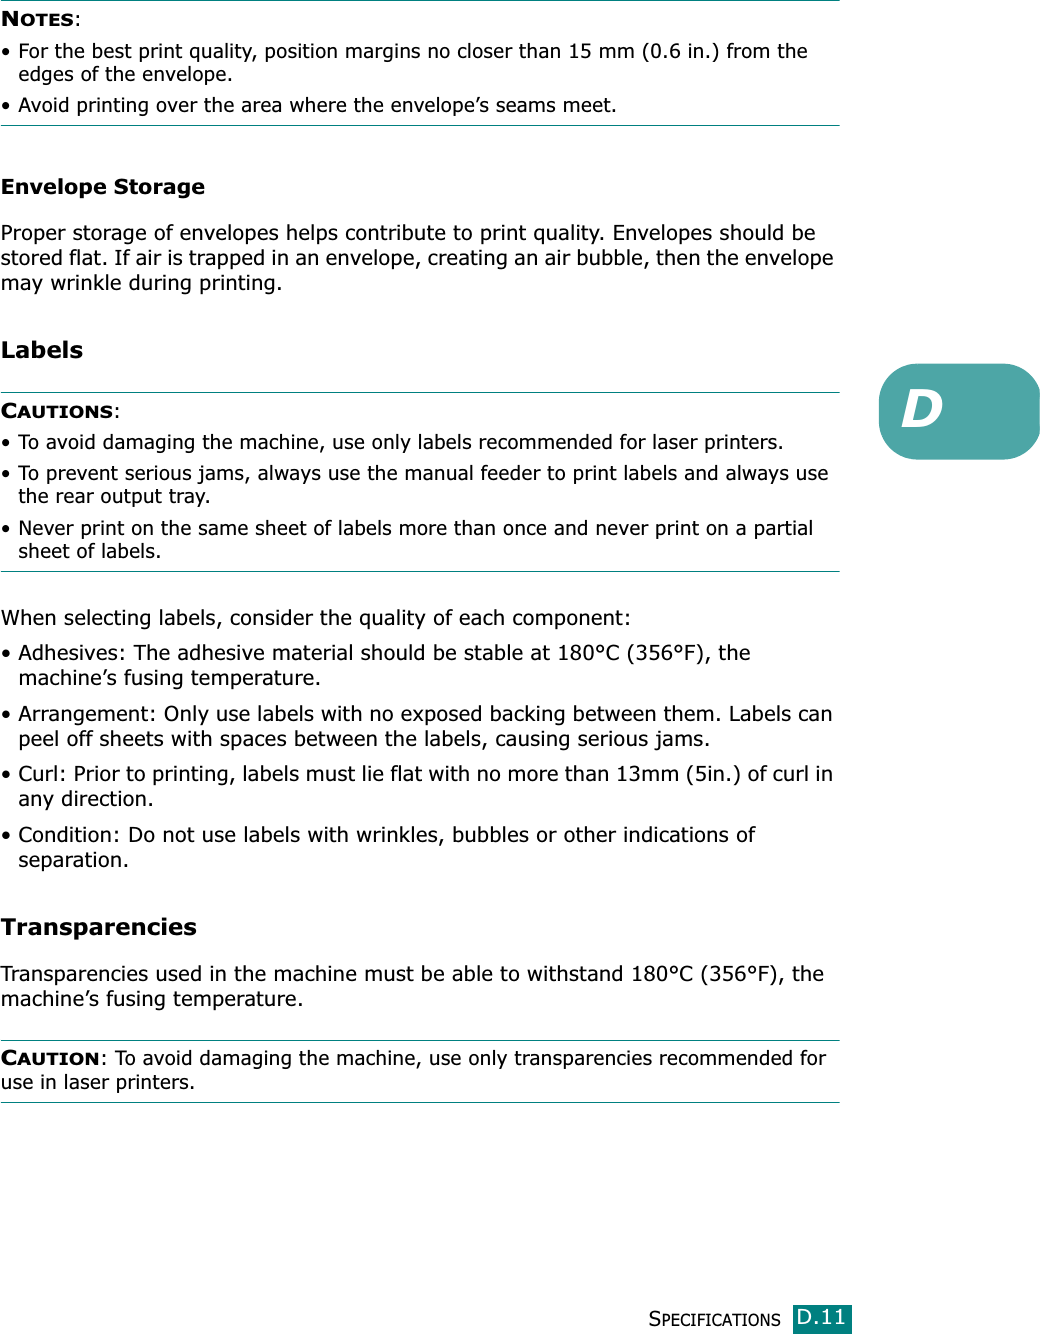
![TROUBLESHOOTING9.103Replace the toner cartridge and close the front door. Printing automatically resumes.In the Multipurpose Tray“MP Tray Jam [Door Open]” appears on the display when you try to print using the Multipurpose tray and the machine does not detect paper. This may be a lack of paper or improper paper loading.If the paper is not feeding properly, pull the paper out of the machine.To resume printing, open and close the front door.](https://usermanual.wiki/Samsung-Electronics-Co/SCX4720F.Users-Manual-2/User-Guide-440244-Page-56.png)
The machine has a communication problem.Ask the sender to try again.Delayed Function Full(only for the SCX-4720F)The delayed fax jobs queue is full.Cancel unnecessary delayed fax job.Document Jam The loaded document has jammed in the ADF (Automatic Document Feeder).Clear the document jam. See page 9.2.[Door Open] The front door is not securely latched.Close the door until it locks into place.Enter Again You entered an unavailable item.Enter the correct item again.Low Heat Error There is a problem in the fuser unit.Unplug the power cord and plug it back in. If the problem persists, please call for service.Open Heat Error[Over Heat]FunctionImpossibleYou have tried to use a combination of machine functions that can not be used at the same time.Reduce the number of selected functions or use only one function at a time.Group NotAvailable(only for the SCX-4720F)You have tried to select a group location number where only a single location number can be used, such as when adding locations for a broadcast operation.Use a speed dial number or dial a number manually using the number keypad.](https://usermanual.wiki/Samsung-Electronics-Co/SCX4720F.Users-Manual-2/User-Guide-440244-Page-58.png)
The remote machine did not have the requested feature, such as a delayed transmission.This message also occurs if the remote machine does not have enough memory space to complete the operation you are attempting.Reconfirm the remote machine’s features.[Jam 1] or [No Cartridge]Paper has jammed in the paper exit area.Or, the toner cartridge is not installed.Clear the jam. See page 9.7.Or, install the toner cartridge. See page 2.5.[Line Busy](only for the SCX-4720F)The receiving party did not answer or the line is already engaged.Try again after a few minutes.[Line Error](only for the SCX-4720F)Your machine cannot connect with the remote machine or has lost contact because of a problem with the phone line.Try again. If the problem persists, wait an hour or so for the line to clear and try again.Or, turn the ECM mode on. See page 7.40.Load Document You have attempted to set up a copy or fax operation with no document loaded into the ADF.Load a document into the ADF and try again.[LSU Error] A problem has occurred in the LSU (Laser Scanning Unit).Unplug the power cord and plug it back in. If the problem persists, please call for service.Memory Full(only for the SCX-4720F)The memory is full. Delete unnecessary documents and retransmit after more memory becomes available. Alternatively, split the transmission into more than one operation.MP Tray Jam[Door Open]A paper jam has occurred in the Multipurpose tray.Or, the machine detects improper feeding from the Multipurpose tray.Clear the jam. See page 9.10.Or, load paper in the Multipurpose tray correctly. See page 3.6.Display Meaning Suggested solutions](https://usermanual.wiki/Samsung-Electronics-Co/SCX4720F.Users-Manual-2/User-Guide-440244-Page-59.png)
The receiving fax machine has not answered after several redial attempts.Try again. Make sure that the receiving machine is operational.No. NotAssigned(only for the SCX-4720F)The one-touch or speed dial location you tried to use has no number assigned to it.Dial the number manually using the number keypad or assign the number. For storing a number, see “Automatic Dialing” on page 7.19.No. NotAvailable(only for the SCX-4720F)You have tried to delete the number for a delayed fax job.Verify the number to be deleted and try again.Or, delete the number after the delayed fax job has been sent.[Non-Samsung][Cartridge]You have used an unauthorized cartridge.You must use a Samsung approved cartridge.[No Paper]Add PaperThe paper in the paper tray has run out.Load paper in the paper tray. See page 2.7.Operation Not Assigned(only for the SCX-4720F)You are doing the Add/Cancel operation, but there are no jobs waiting.Check the display to see if there are any scheduled jobs. The display should indicate them in Standby mode; for example, Delay Fax.Paper Jam 0Open/Close DoorPaper has jammed in the feeding area of the paper tray.Clear the jam. See page 9.5 and page 9.6.Paper Jam 1Open/Close DoorPaper has jammed in the paper exit area.Clear the jam. See page 9.7.Paper Jam 2Check InsidePaper has jammed in the fuser area.Clear the jam. See page 9.9.[Power Failure] Power has turned off then on and the machine’s memory has not been saved.The job which you were trying to do before the power failure must be completely re-done.Priority FaxFunction Full(only for the SCX-4720F)The priority fax jobs queue is full.Cancel unnecessary priority fax jobs.[Retry Redial?](only for the SCX-4720F)The machine is waiting for a specified time interval to redial a previously busy station.You can press Enter to immediately redial, or Stop/Clear to cancel the redial operation.Display Meaning Suggested solutions](https://usermanual.wiki/Samsung-Electronics-Co/SCX4720F.Users-Manual-2/User-Guide-440244-Page-60.png)
![TROUBLESHOOTING99.15Scanner Locked The scanner module is lockedUnlock the scanner (see page 2.3) and press Stop/Clear.[Stop Pressed] The Stop/Clear button has been pressed during a copy or fax operation.Try again.[Toner Empty]Replace TonerThe toner cartridge has run out. The machine stops printing.Replace the toner cartridge with a new one. See page 8.8.[Toner Low] The toner is almost empty.Take out the toner cartridge and gently shake it. By doing this, you can temporarily reestablish printing operations.Display Meaning Suggested solutions](https://usermanual.wiki/Samsung-Electronics-Co/SCX4720F.Users-Manual-2/User-Guide-440244-Page-61.png)

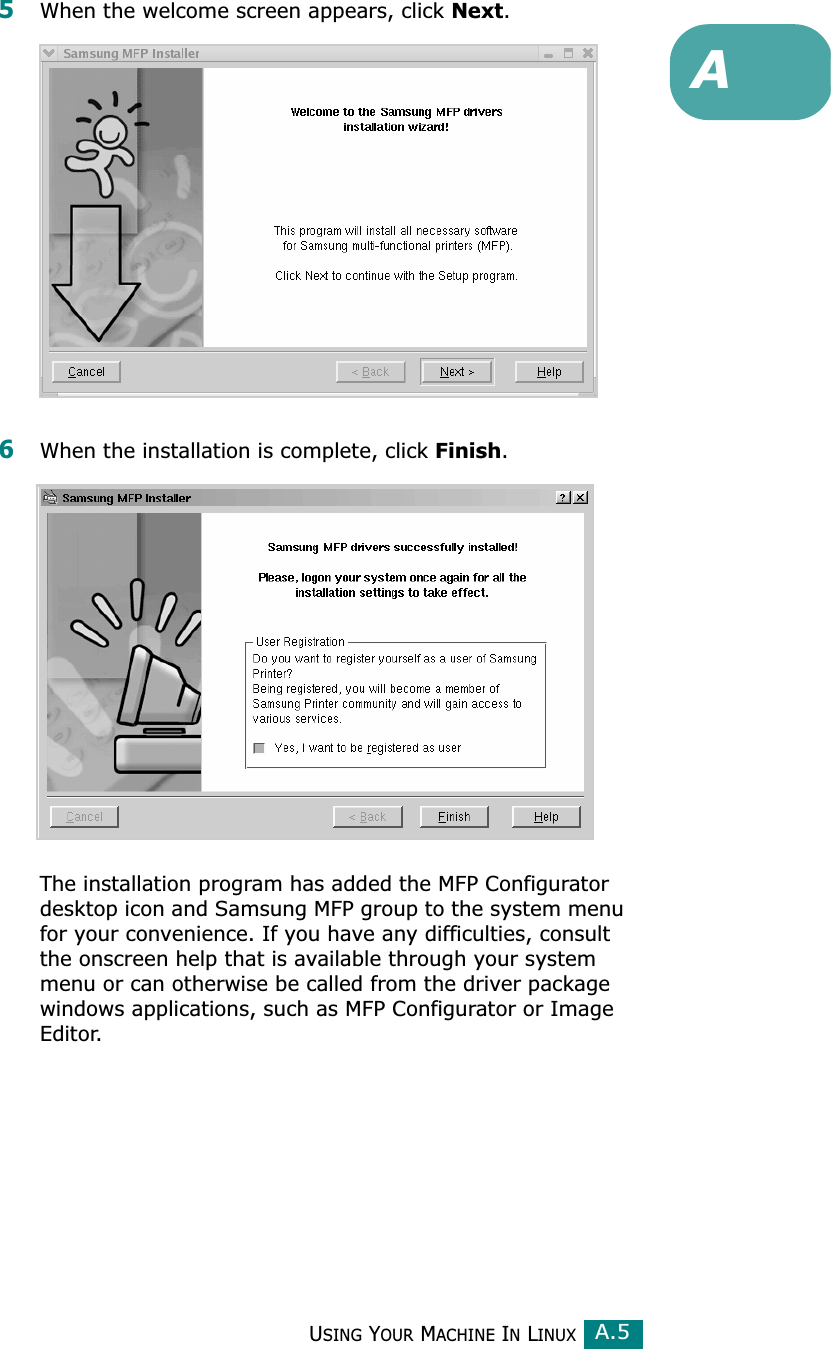
![USING YOUR MACHINE IN LINUXA.4Installing the MFP Driver1Make sure that you connect your machine to your computer. Turn both the computer and the machine on.2When the Administrator Login window appears, type in root in the Login field and enter the system password.NOTE: You must log in as a super user (root) to install the printer software. If you are not a super user, ask your system administrator.3Insert the printer software CD-ROM. The CD-ROM will automatically run.If the CD-ROM does not automatically run, click the icon at the bottom of the desktop. When the Terminal screen appears, type in:[root@localhost root]#cd /mnt/cdrom/Linux[root@localhost root]#./install.sh NOTE: The installation program runs automatically if you have an autorun software package installed and configured.4Click Install.](https://usermanual.wiki/Samsung-Electronics-Co/SCX4720F.Users-Manual-2/User-Guide-440244-Page-92.png)
![USING YOUR MACHINE IN LINUXA.6Uninstalling the MFP Driver1When the Administrator Login window appears, type in root in the Login field and enter the system password.NOTE: You must log in as a super user (root) to install the printer software. If you are not a super user, ask your system administrator.2Insert the printer software CD-ROM. The CD-ROM will automatically run.If the CD-ROM does not automatically run, click the icon at the bottom of the desktop. When the Terminal screen appears, type in:[root@localhost root]#cd /mnt/cdrom/Linux[root@localhost root]#./install.sh NOTE: The installation program runs automatically if you have an autorun software package installed and configured.1Click Uninstall.2Click Next. 3Click Finish.](https://usermanual.wiki/Samsung-Electronics-Co/SCX4720F.Users-Manual-2/User-Guide-440244-Page-94.png)