Samsung Electronics Co SLC480FW Printer User Manual 3
Samsung Electronics Co Ltd Printer 3
UserManual.wiki
>
Samsung Electronics Co
>
SLC480FW User Manual
>
User Manual 3
Contents
1.
User Manual 1
2.
User Manual 2
3.
User Manual 3
4.
User Manual 4
User Manual 3
Navigation menu
Upload a User Manual
Namespaces
Wiki Guide
HTML
PDF
Info
Views
User Manual
Discussion / Help
Navigation
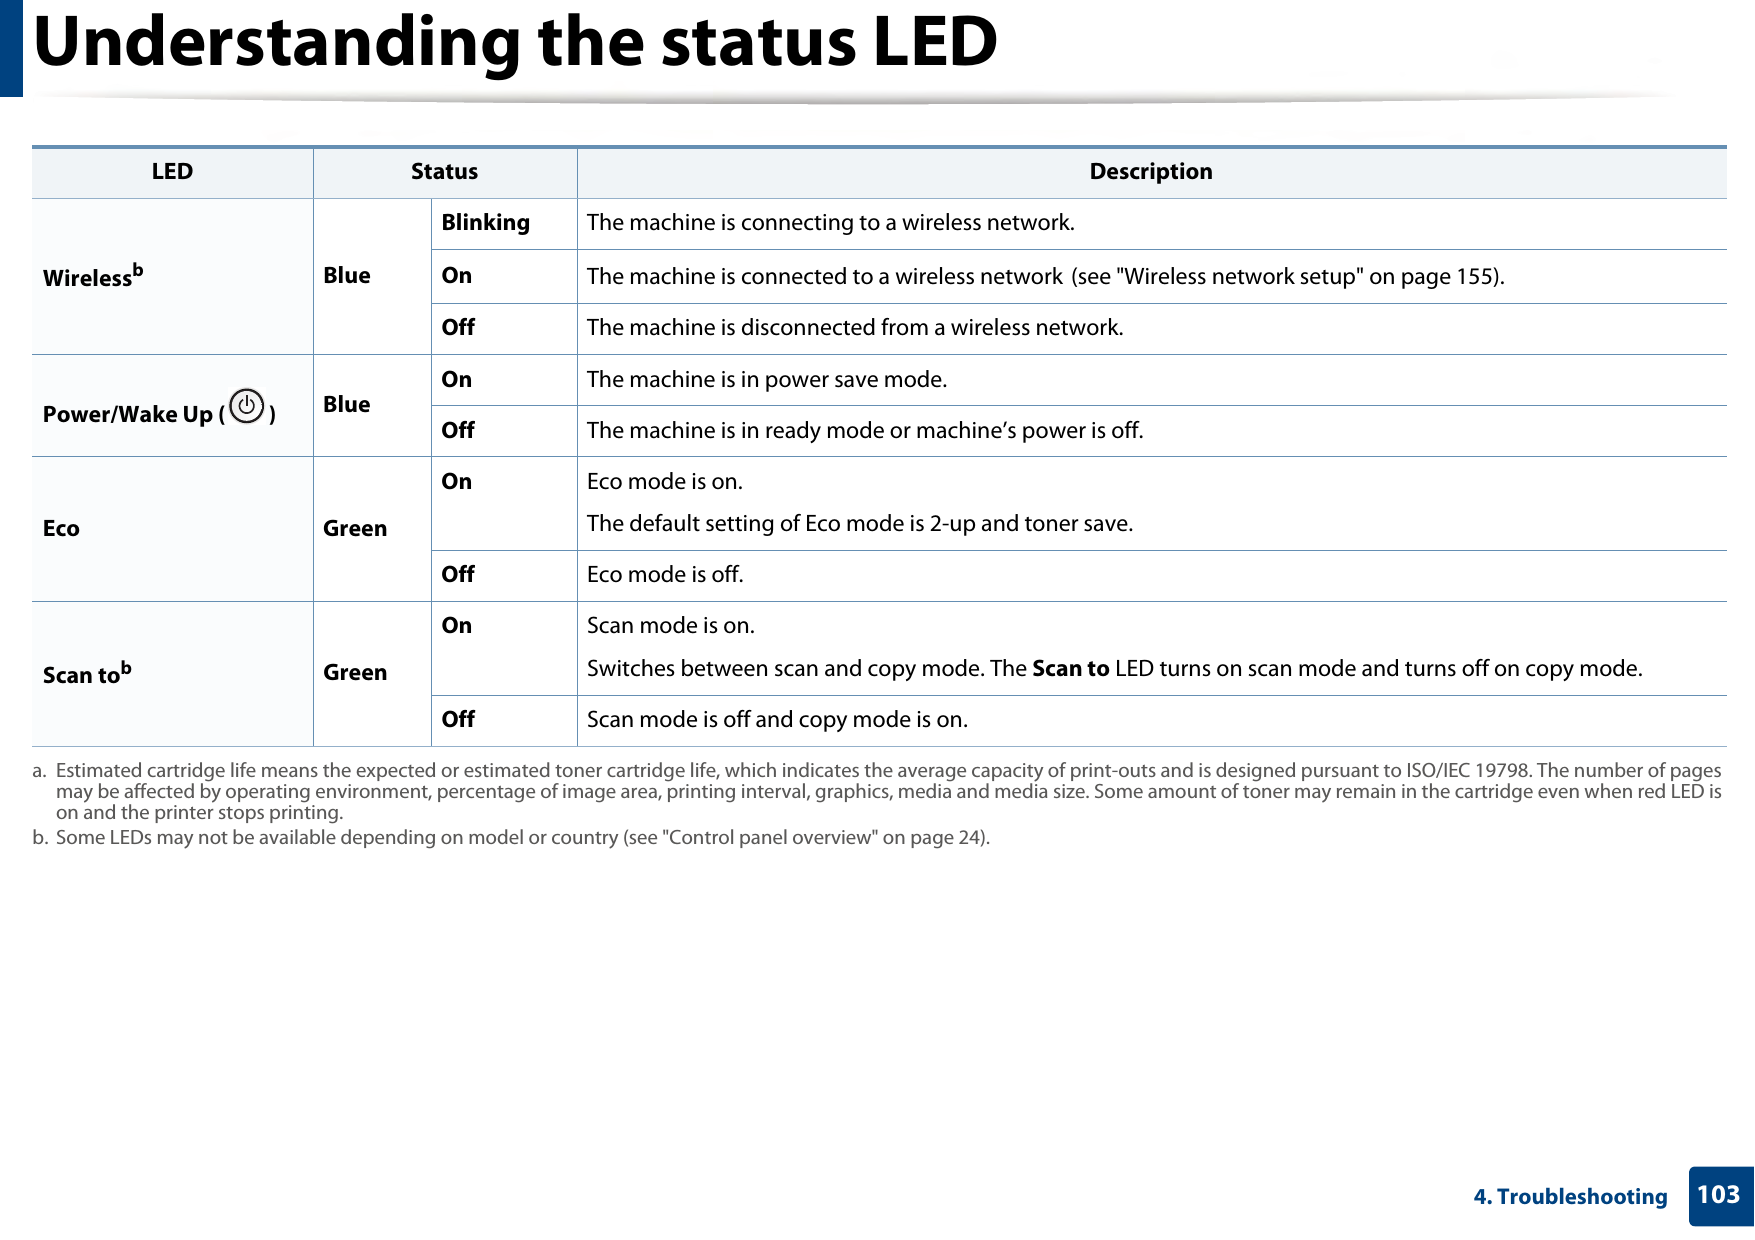
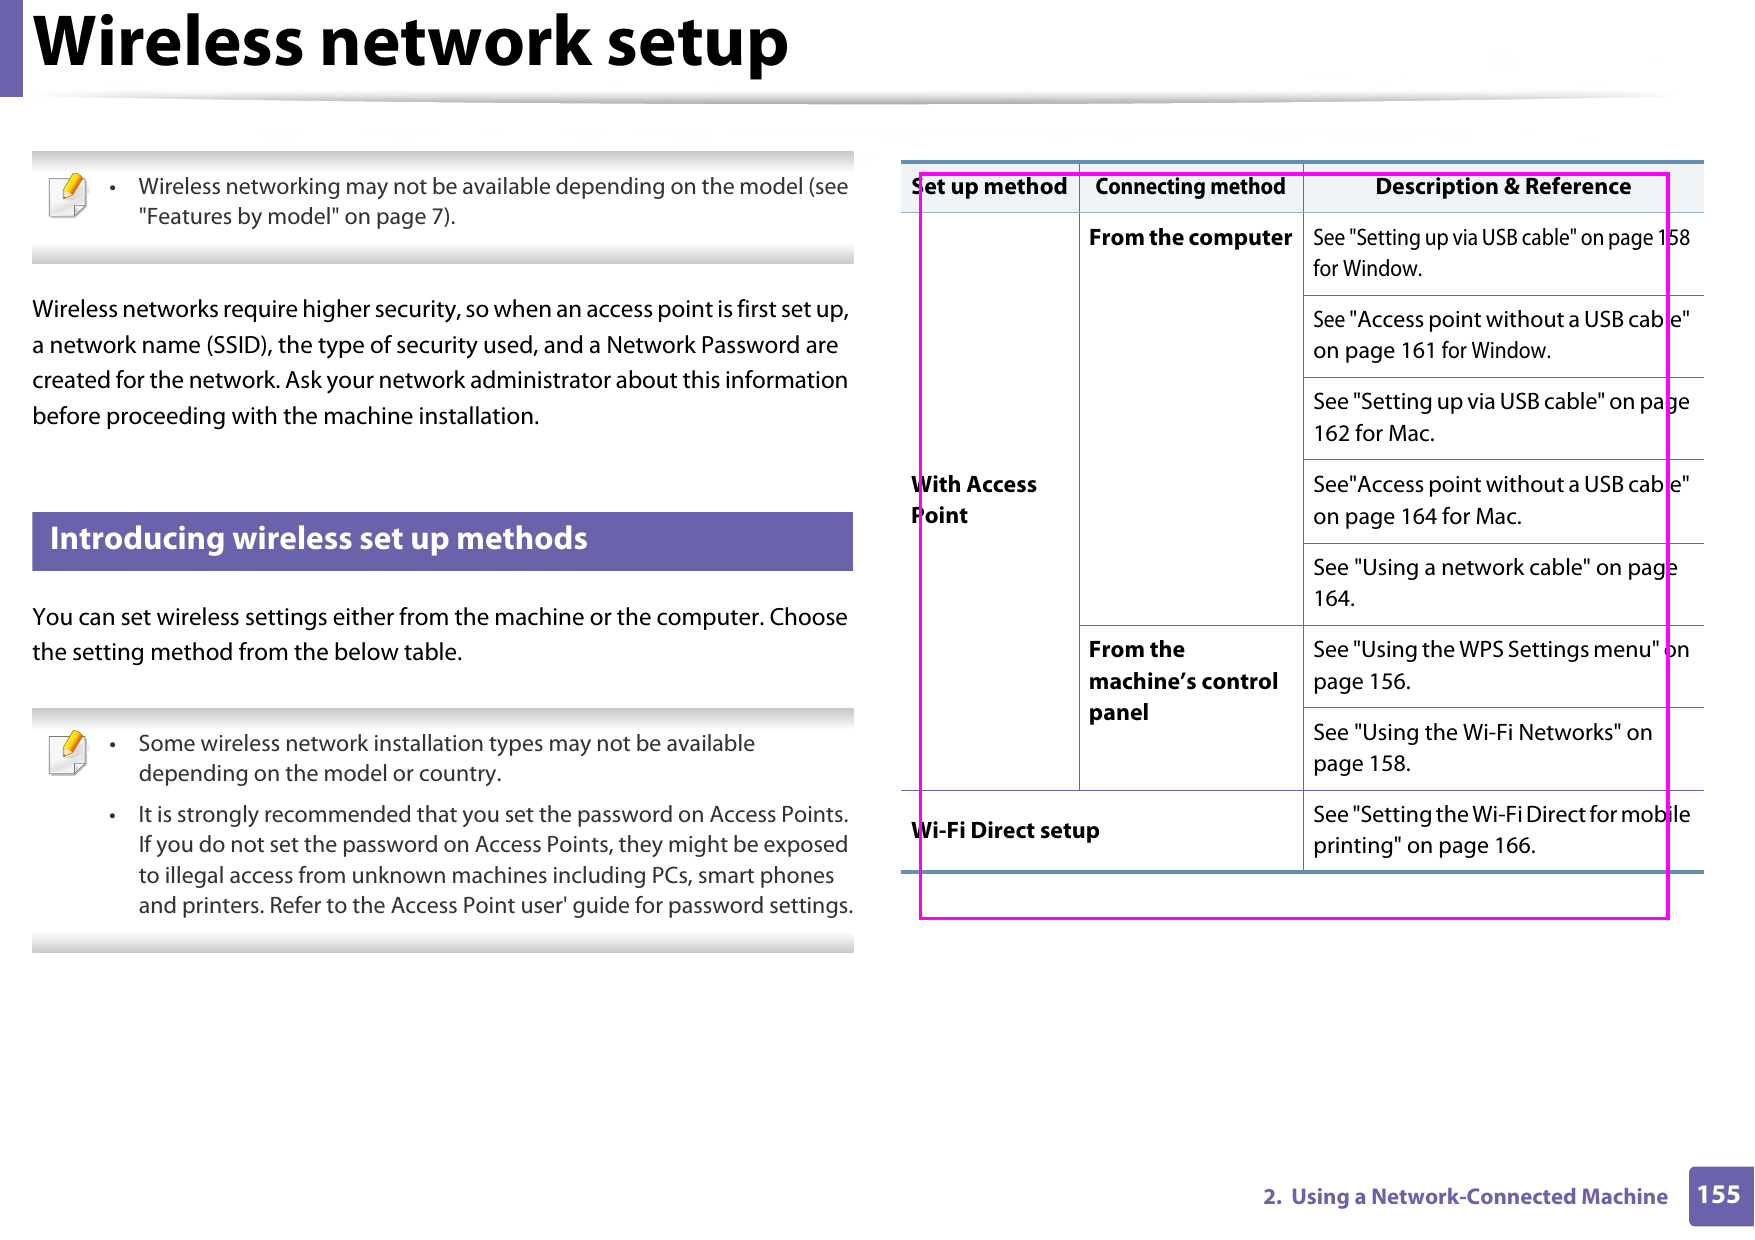
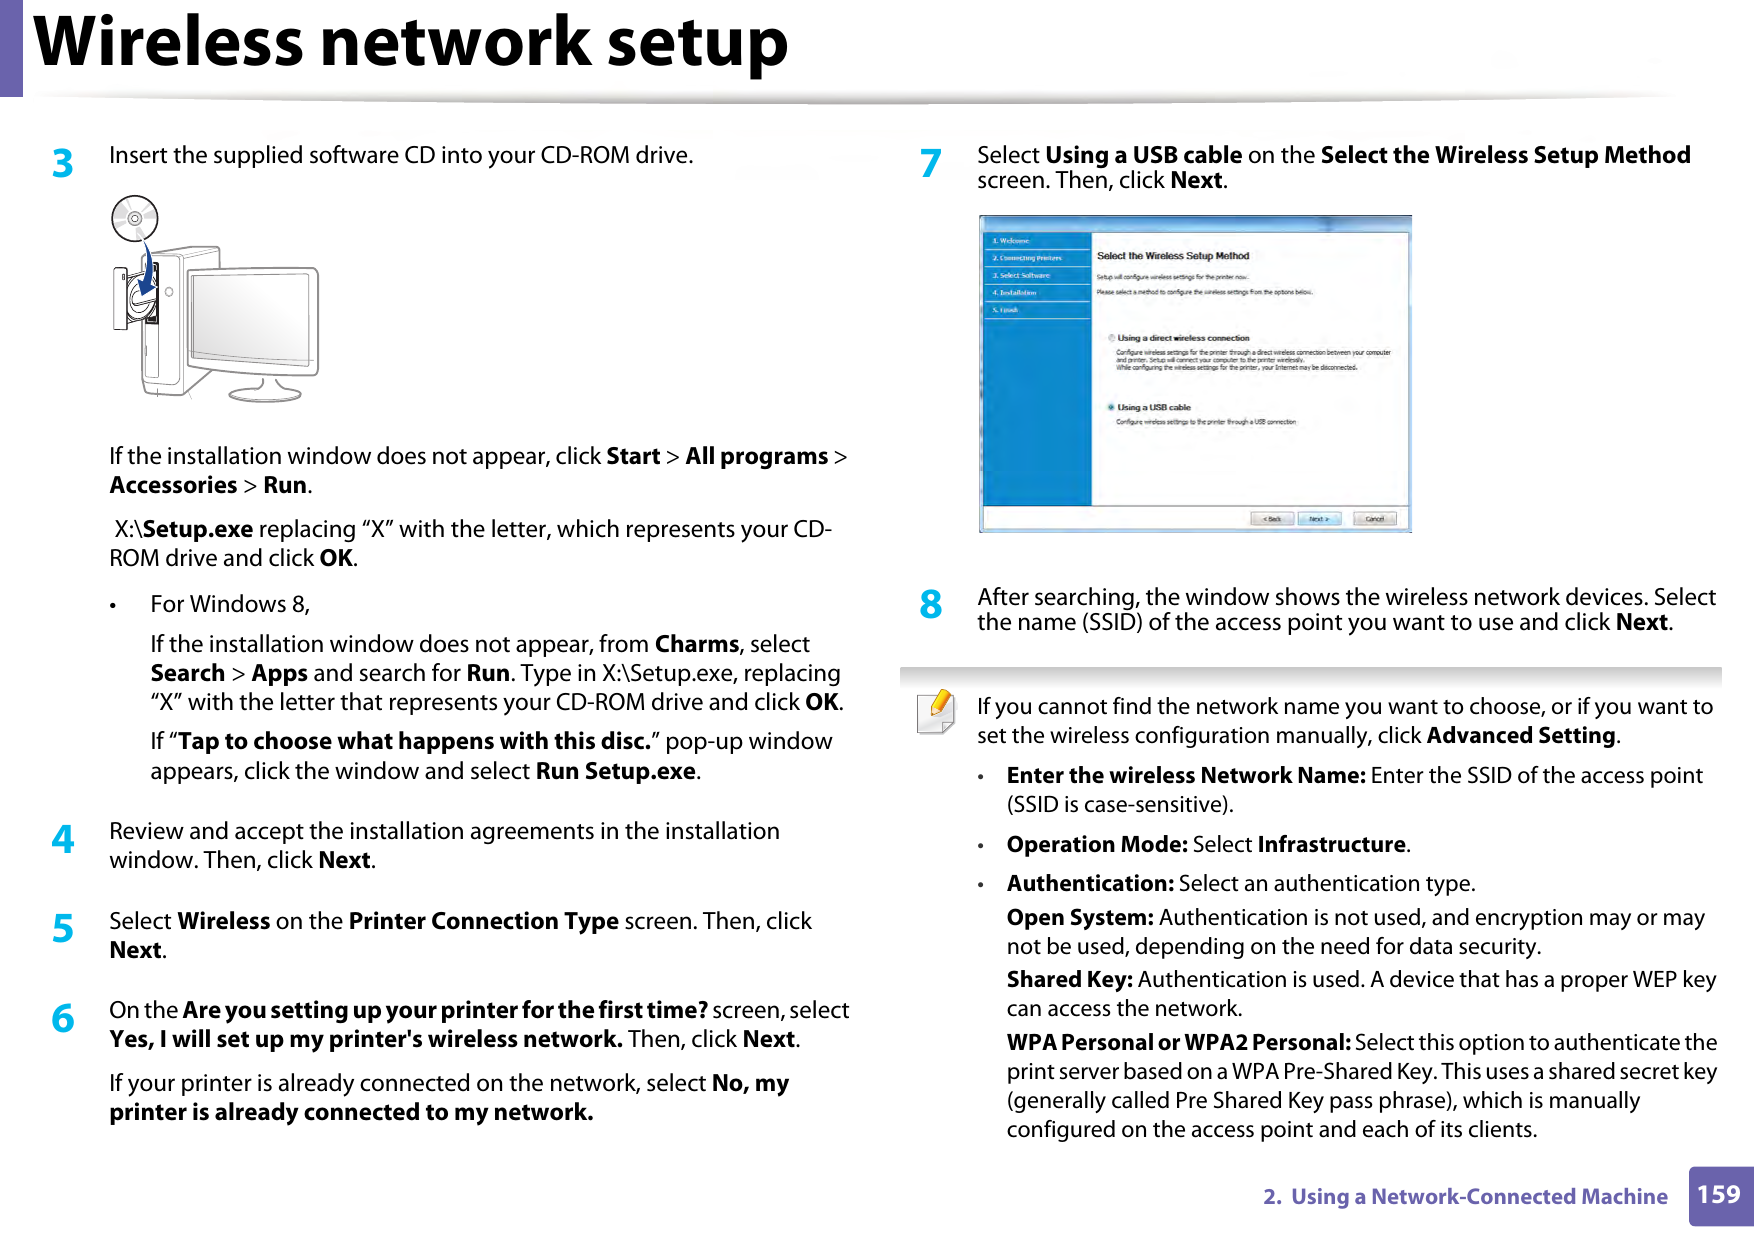
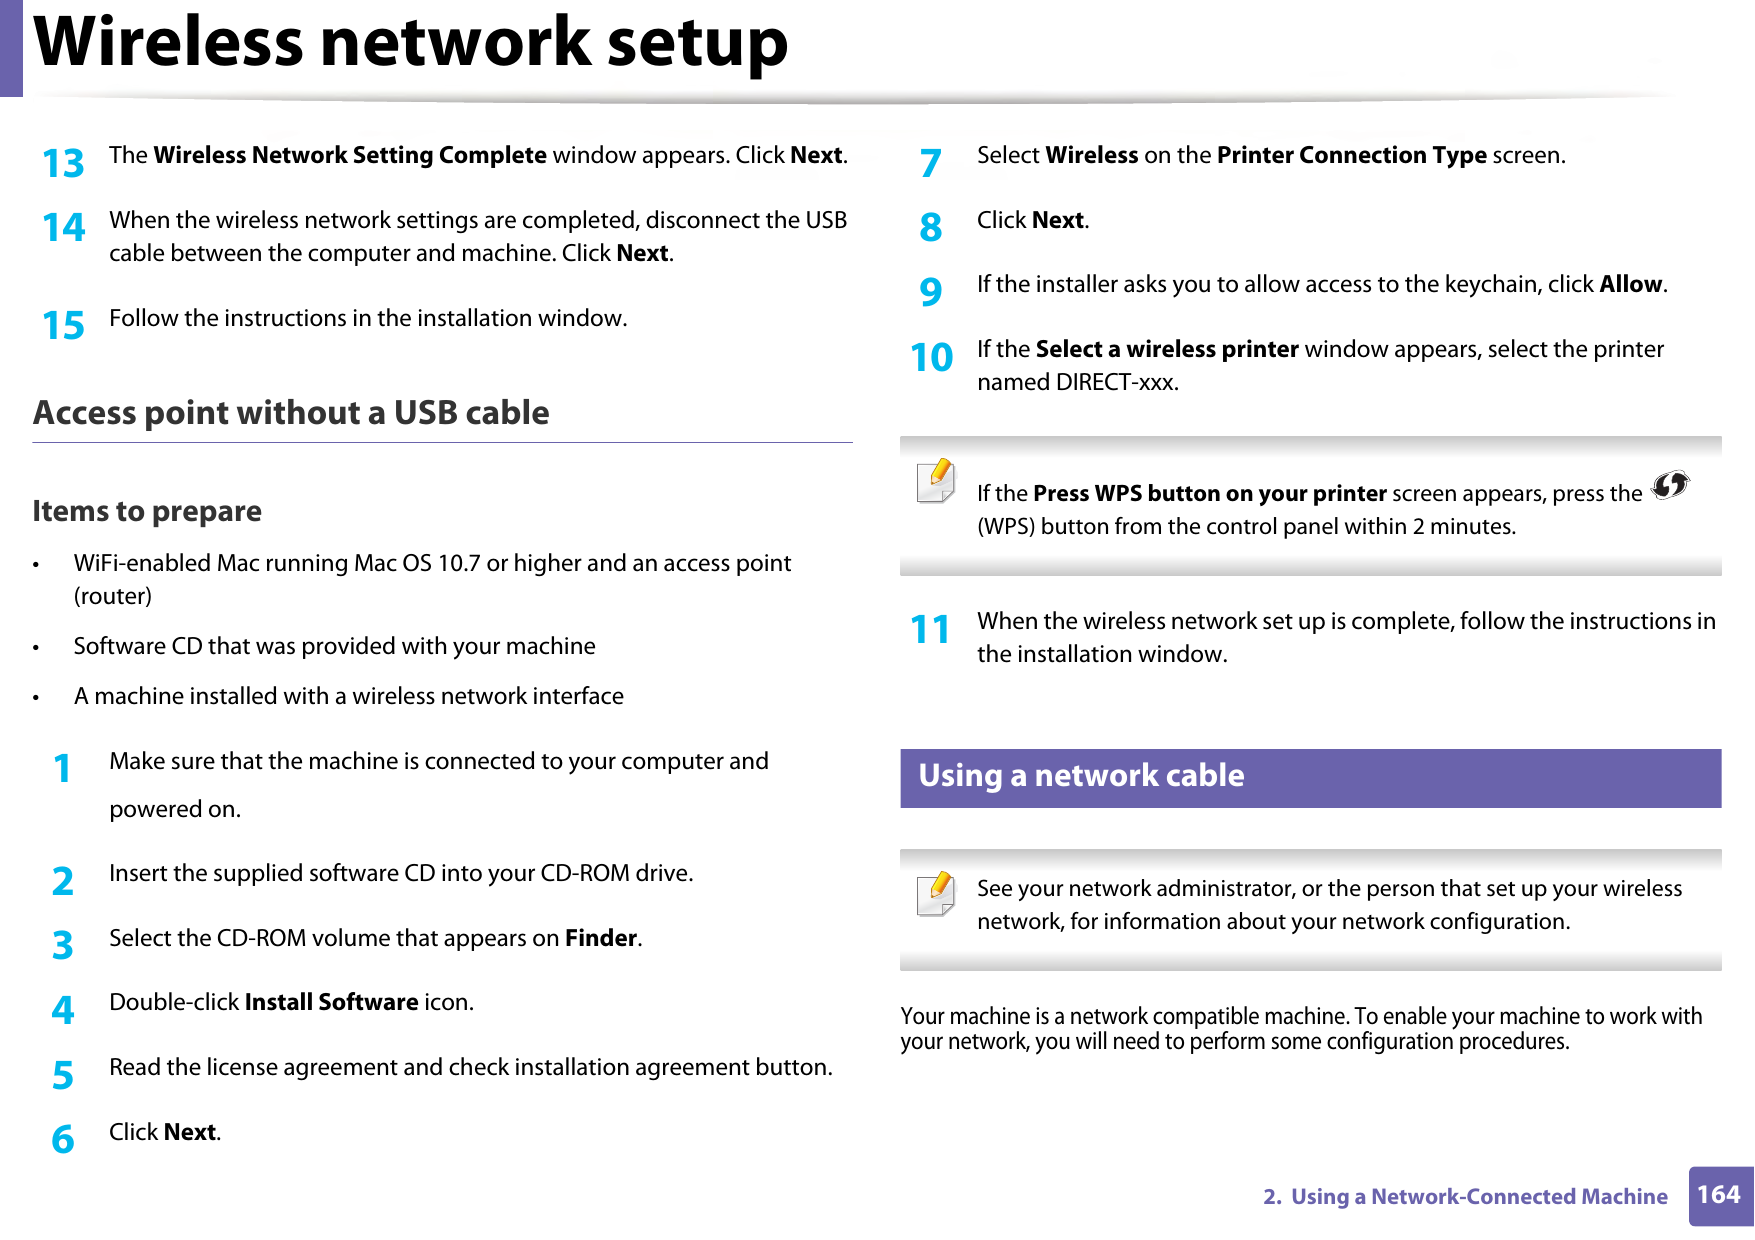
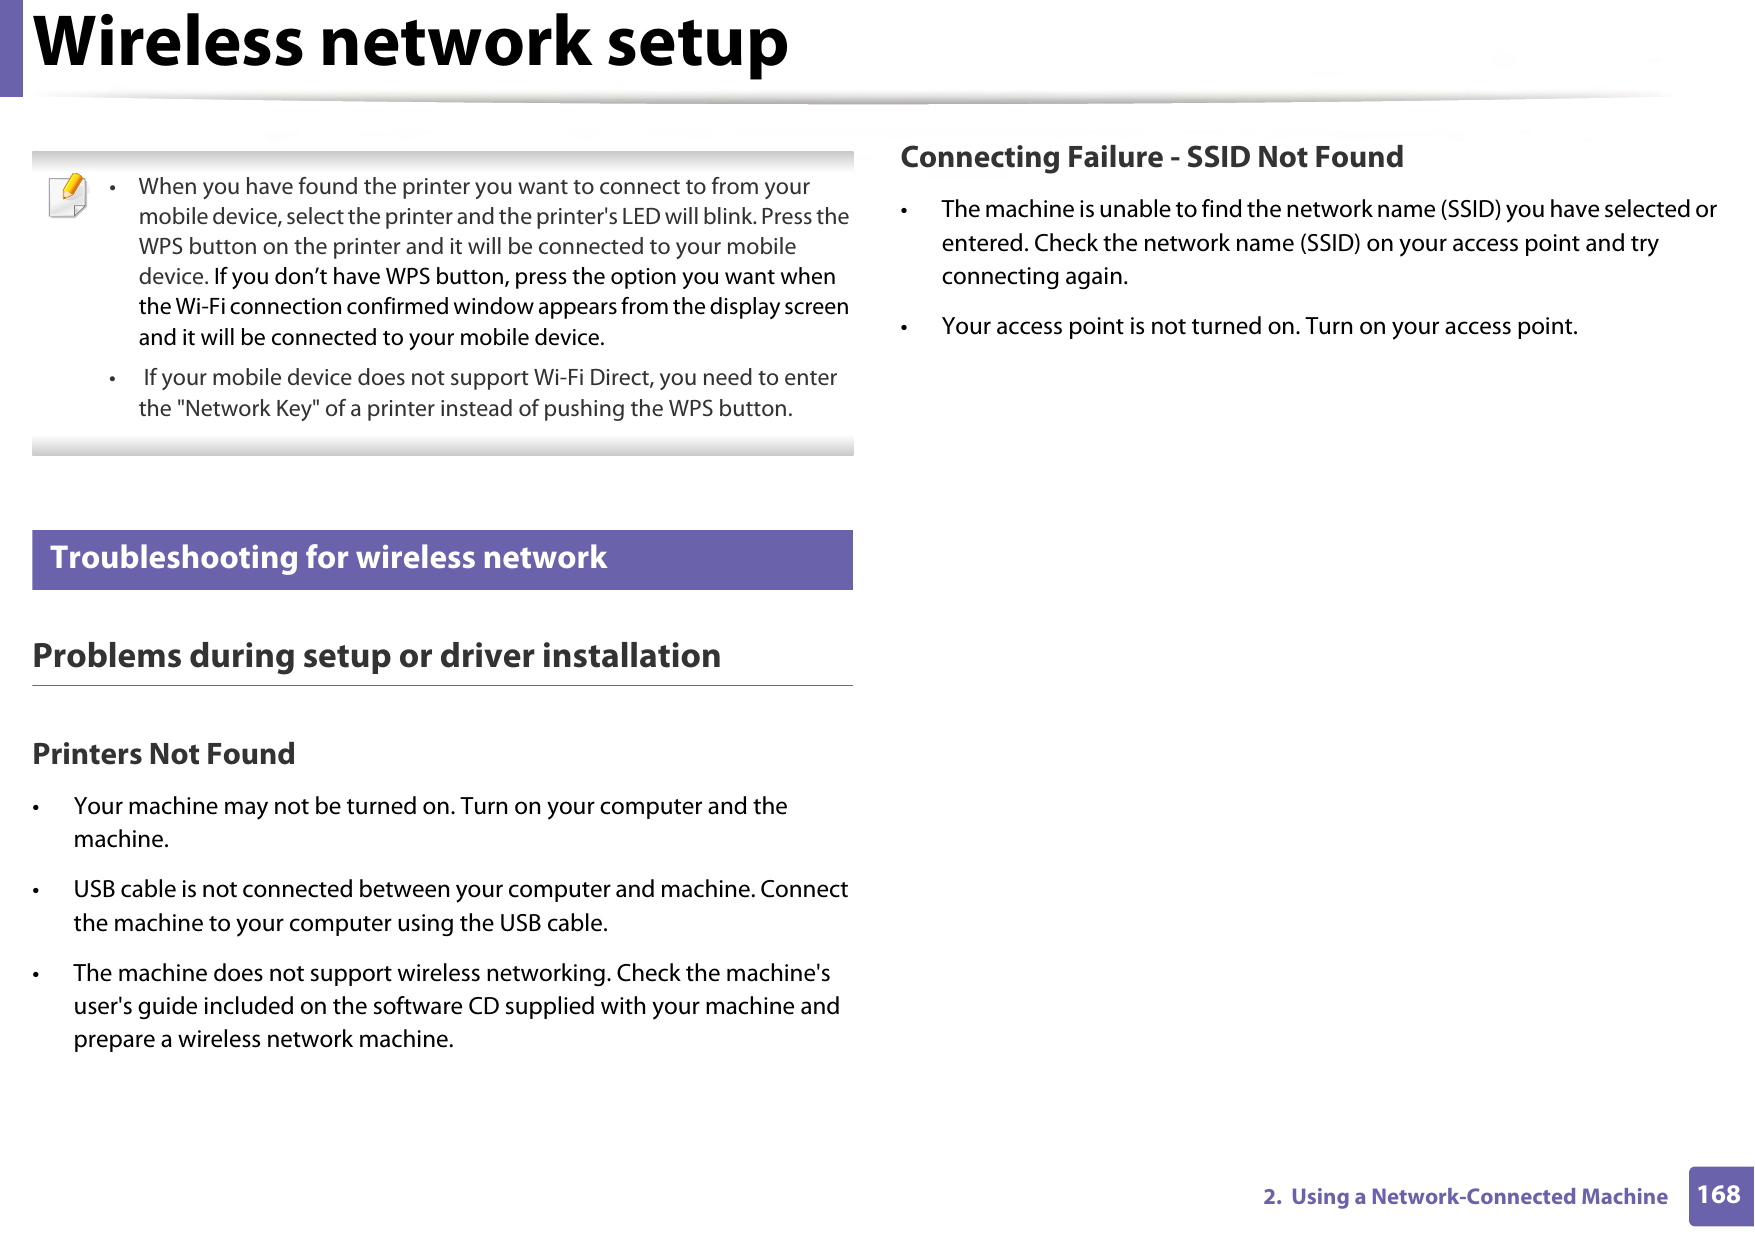
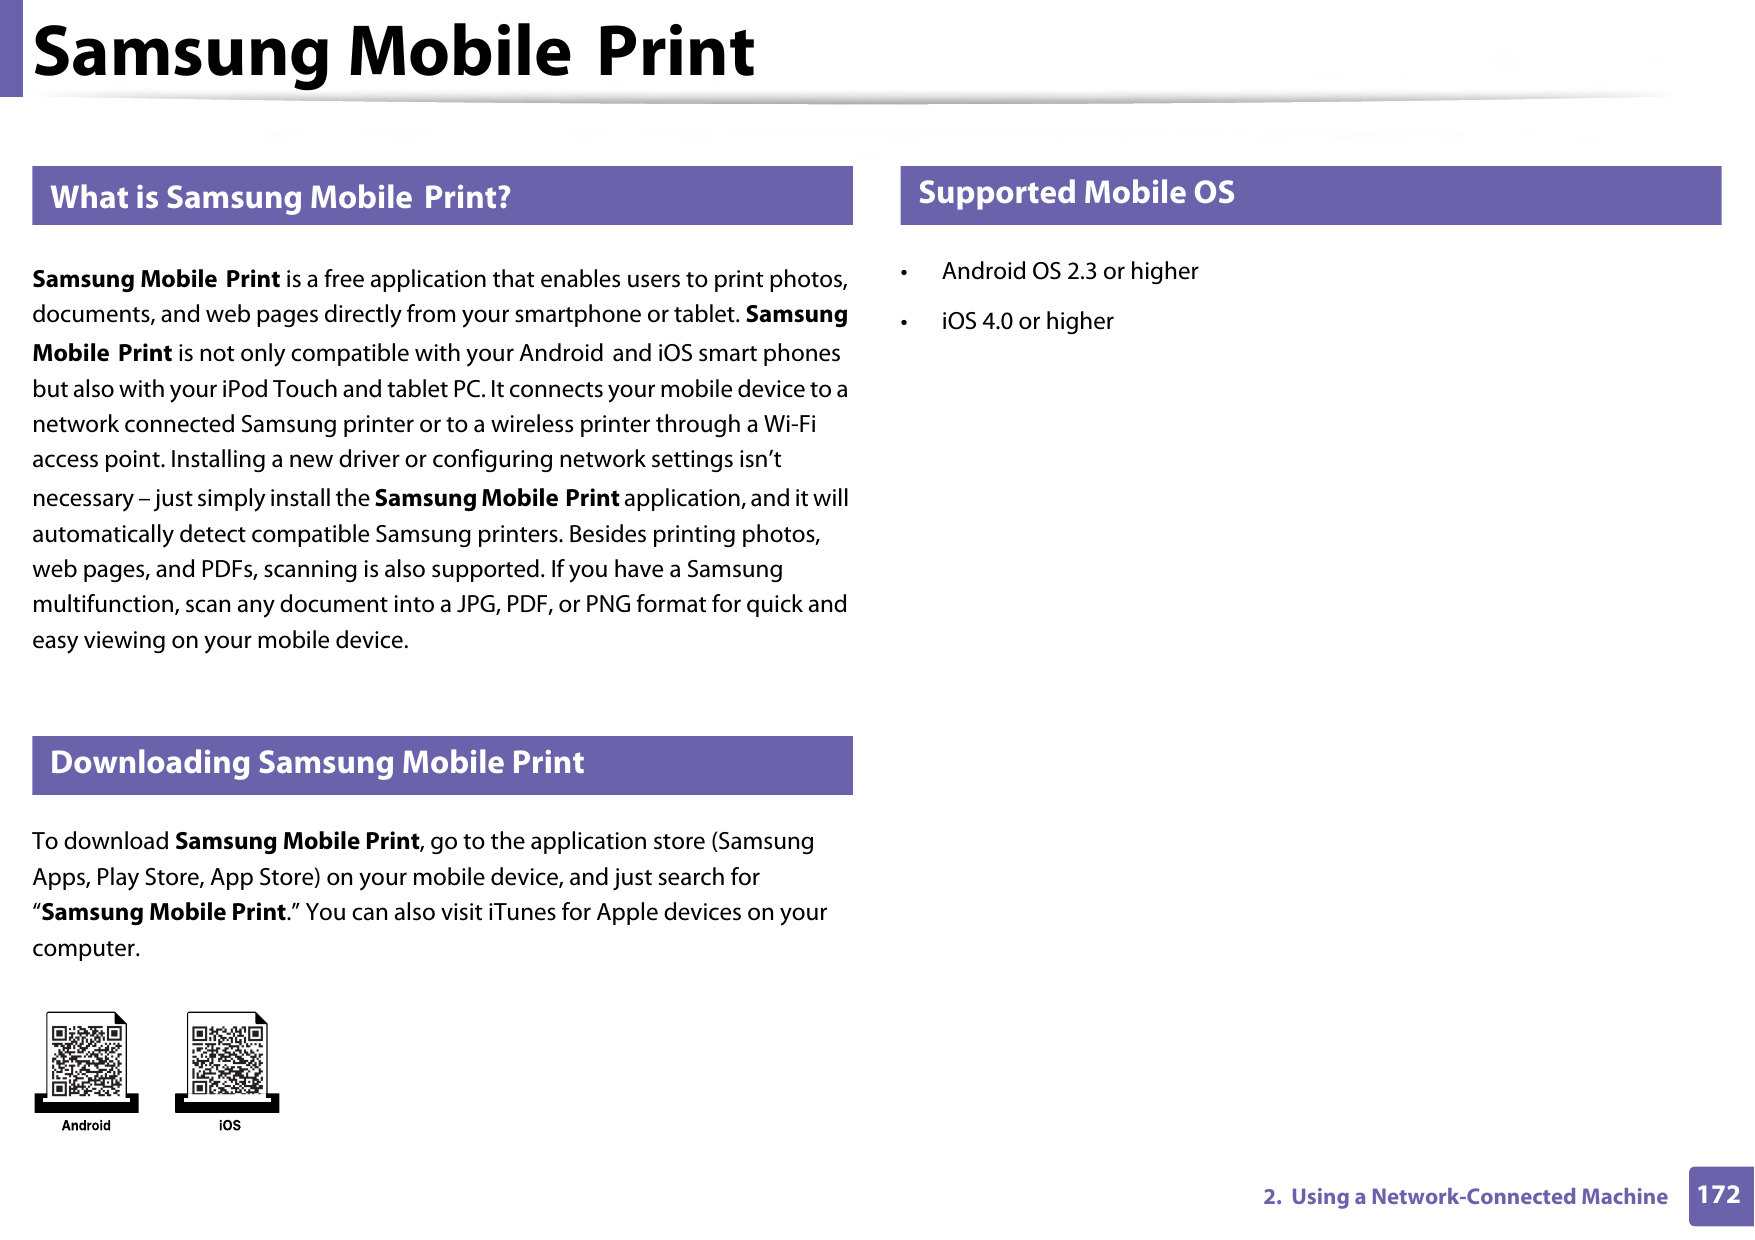
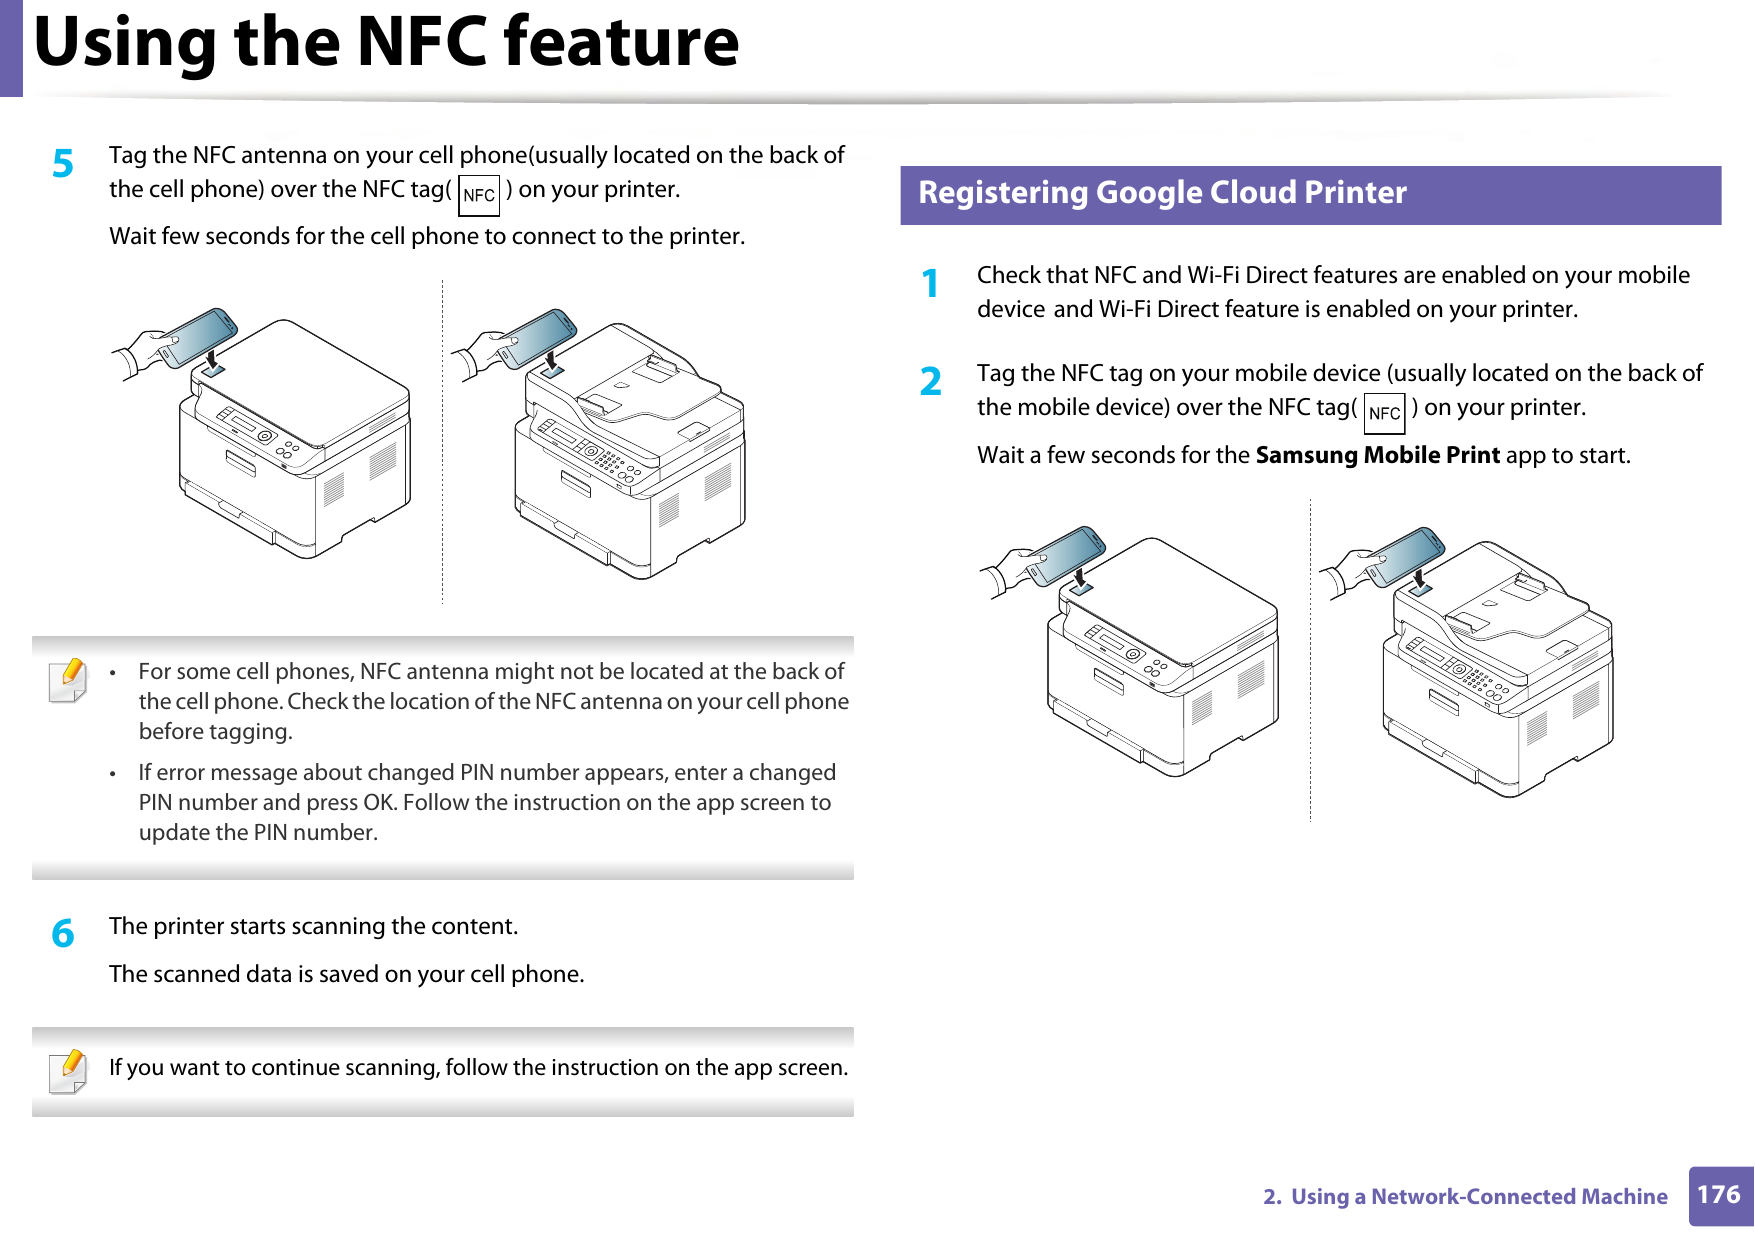
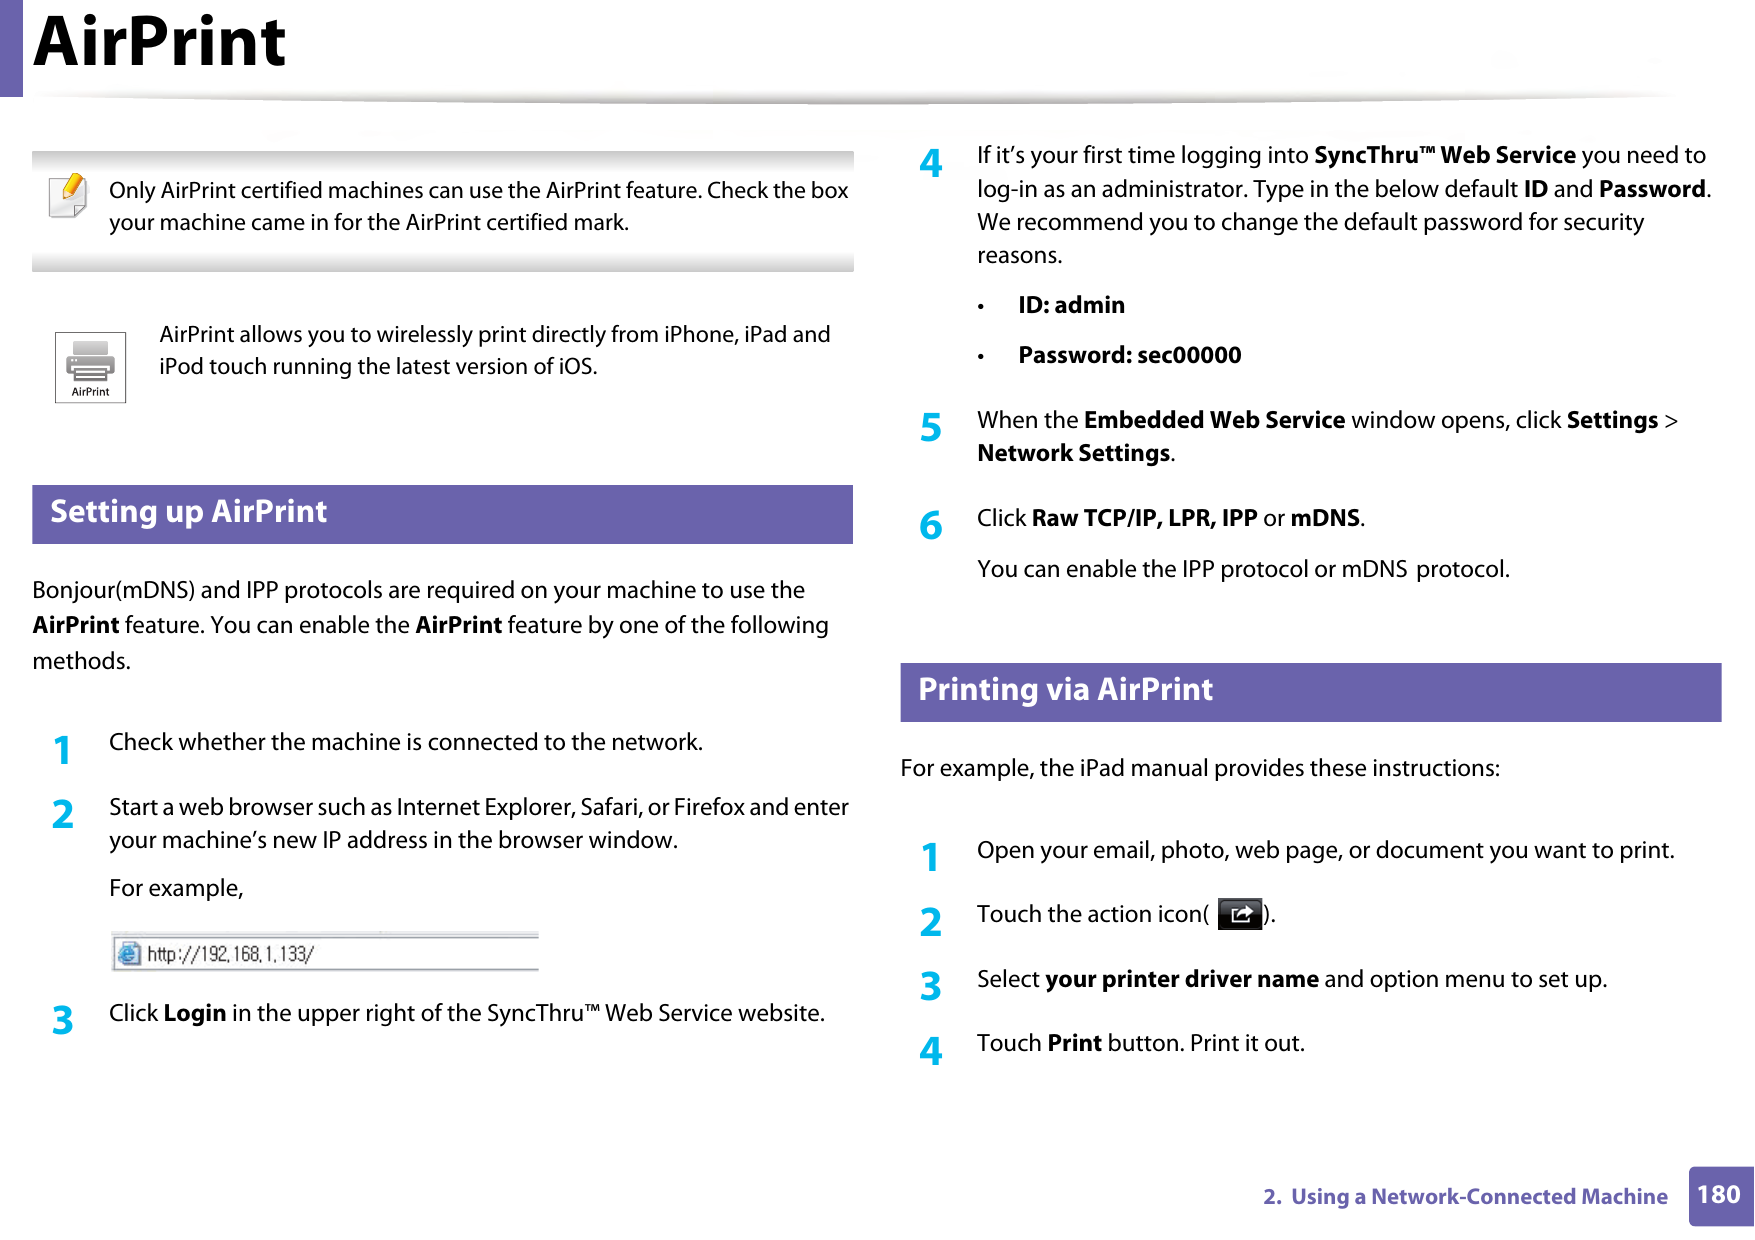
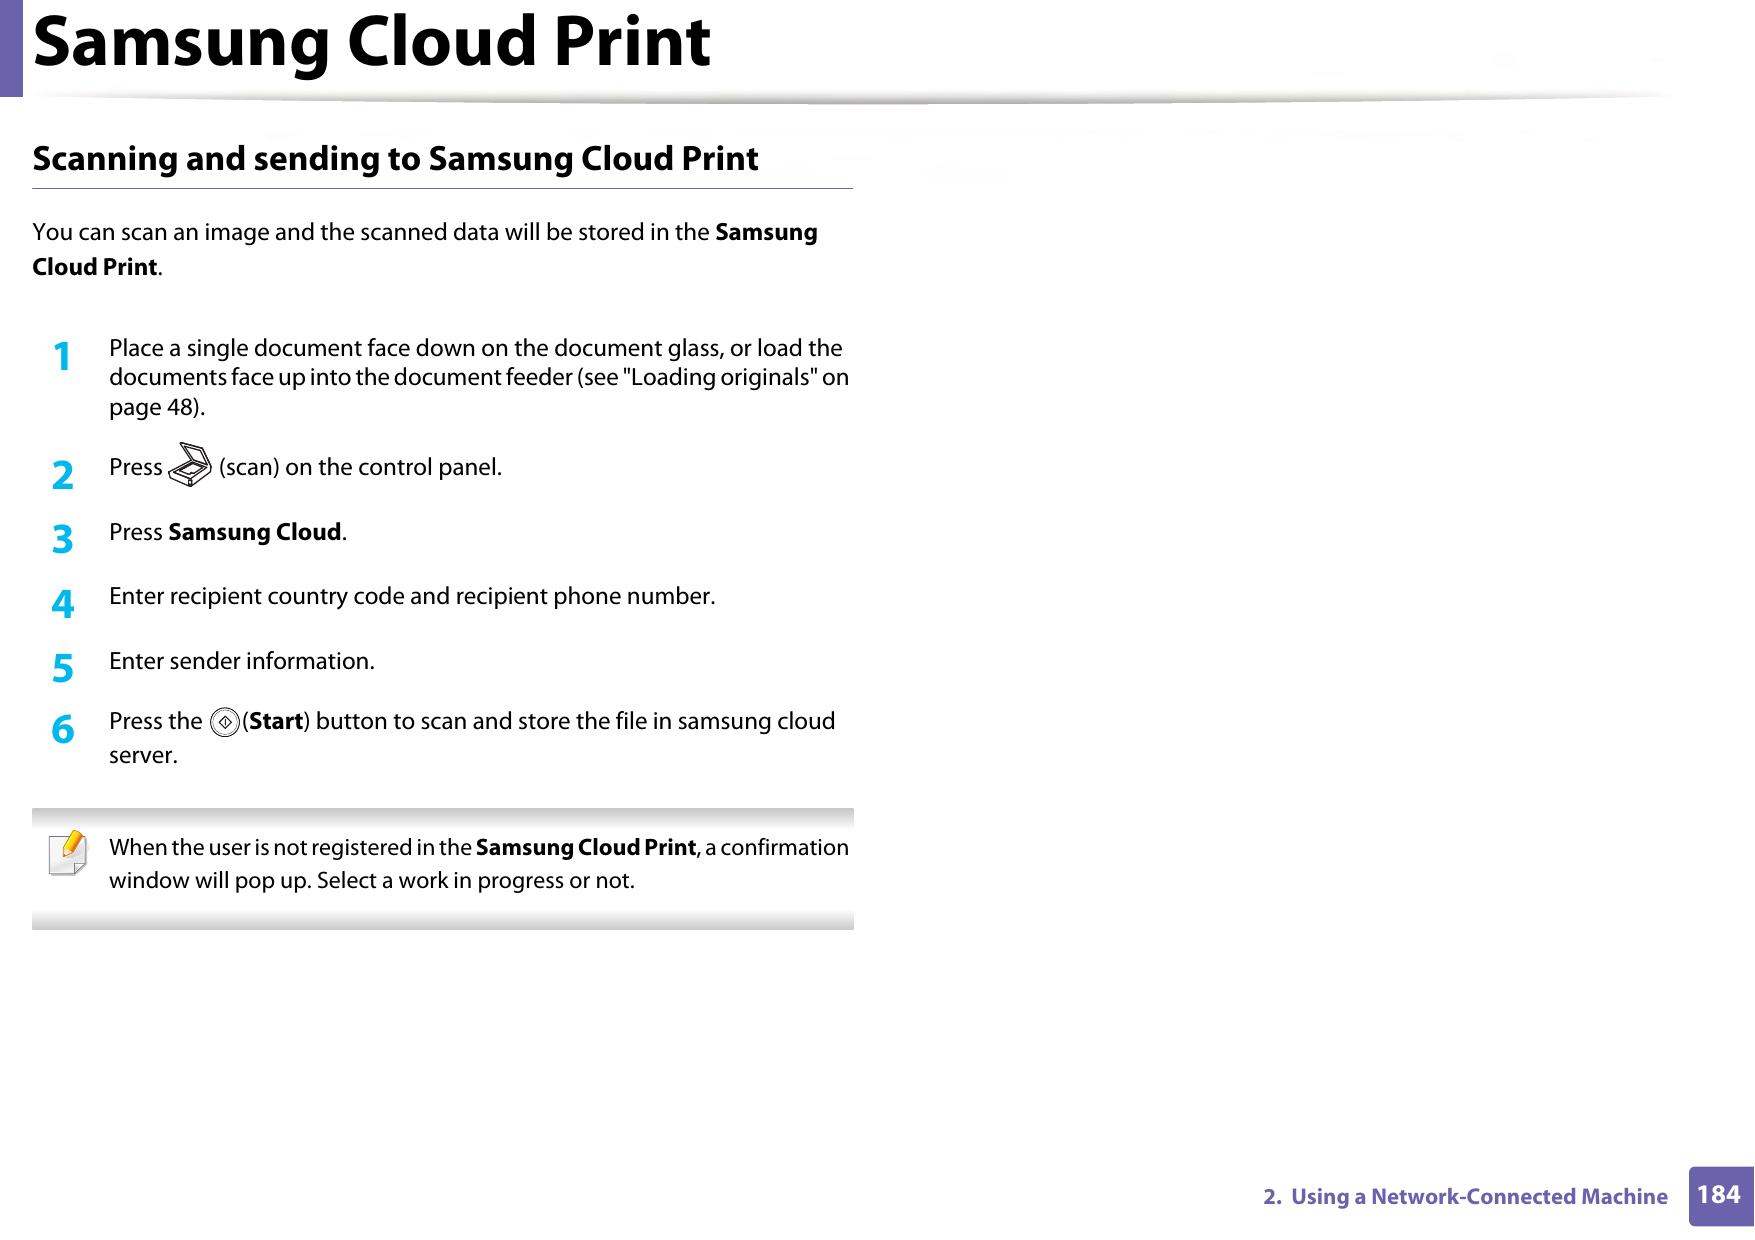
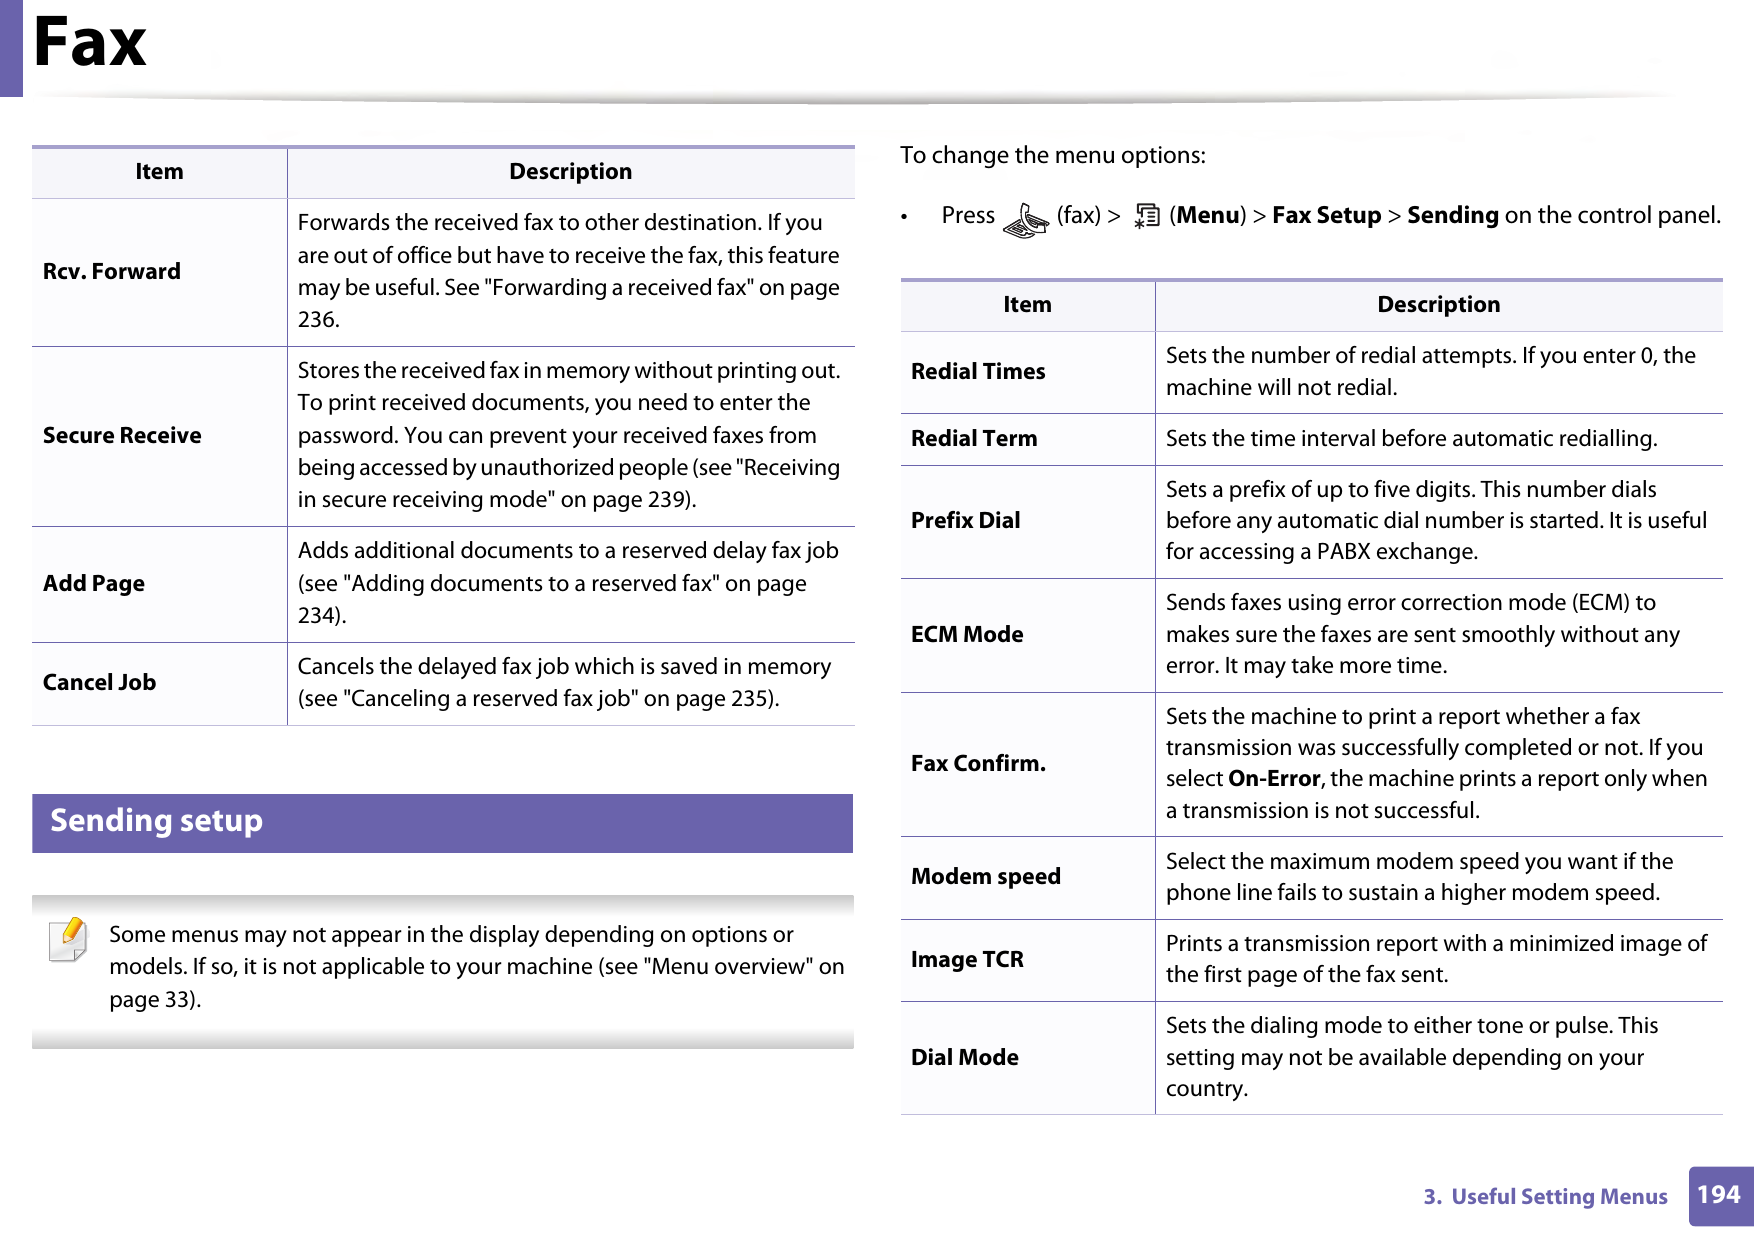
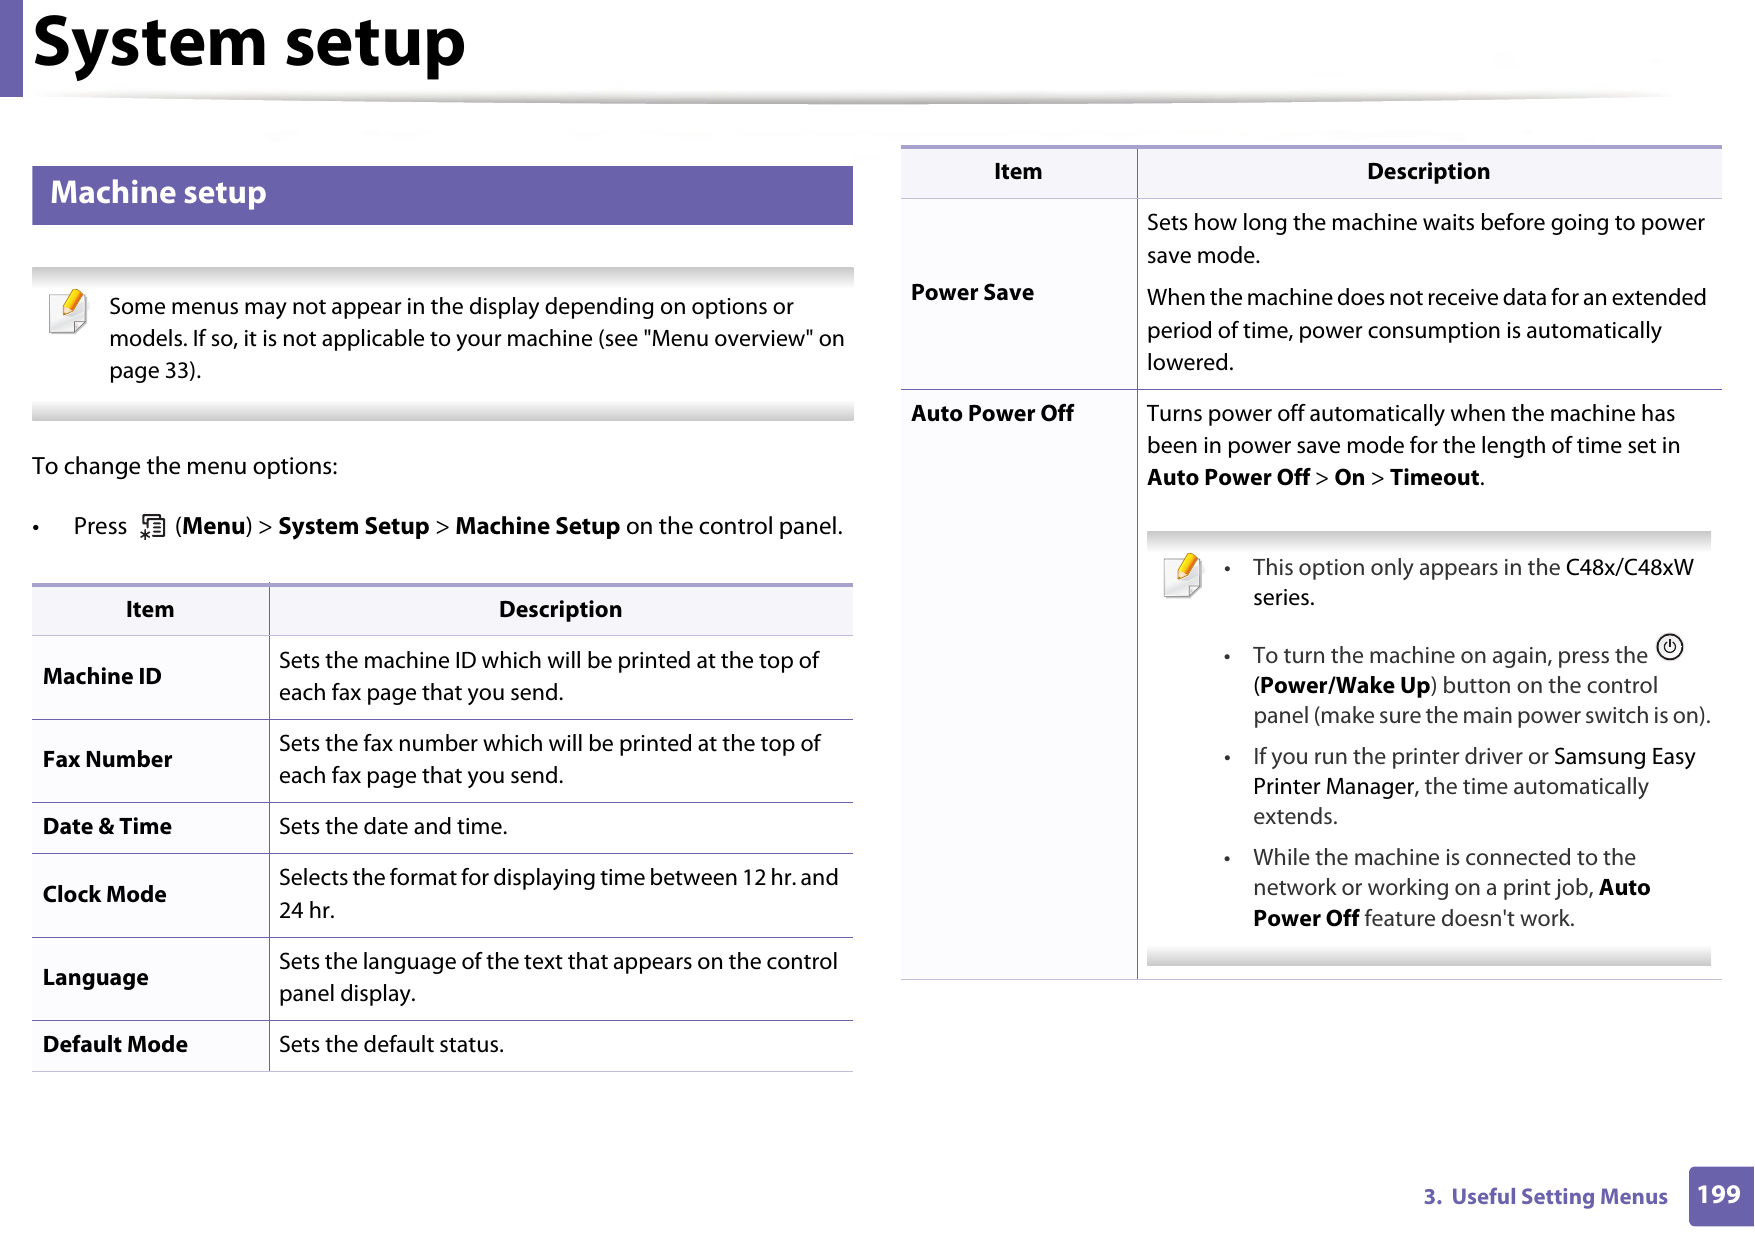
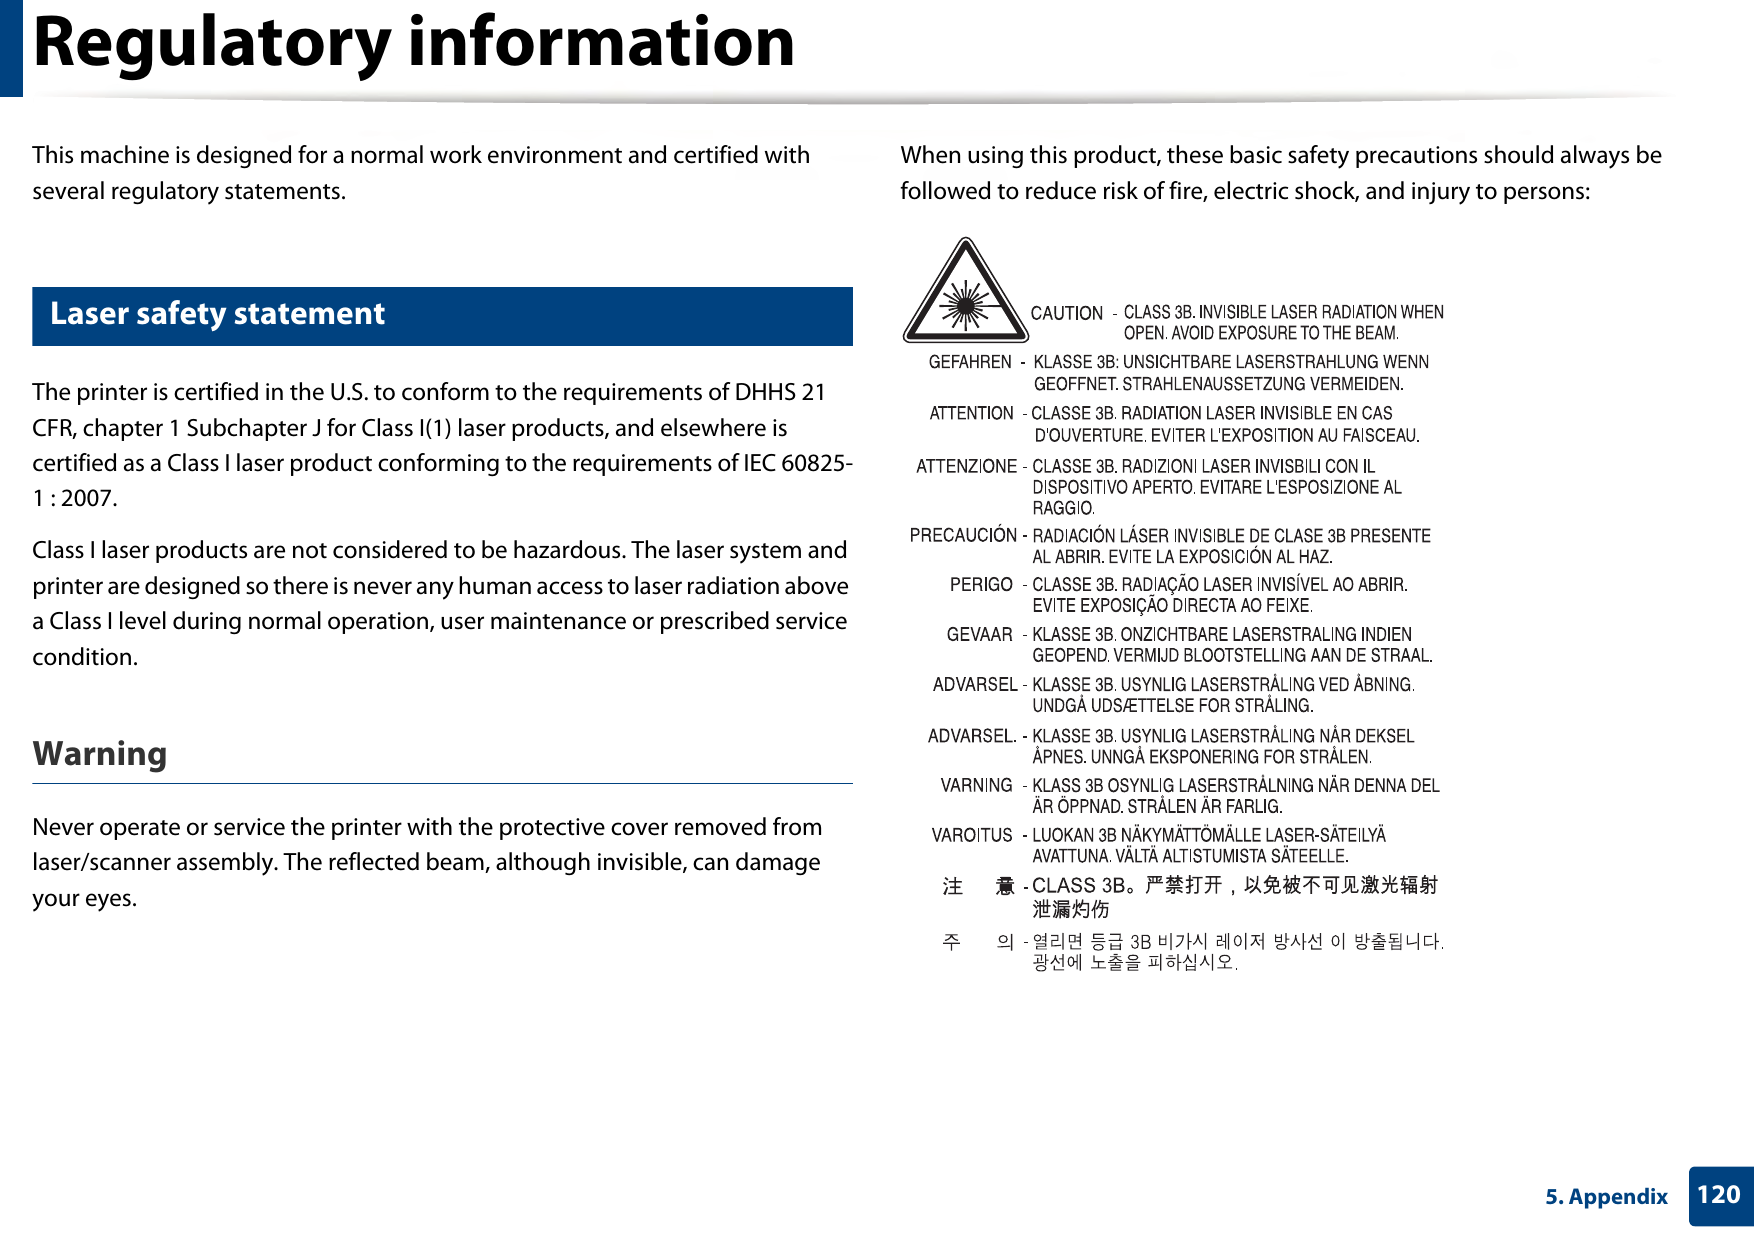
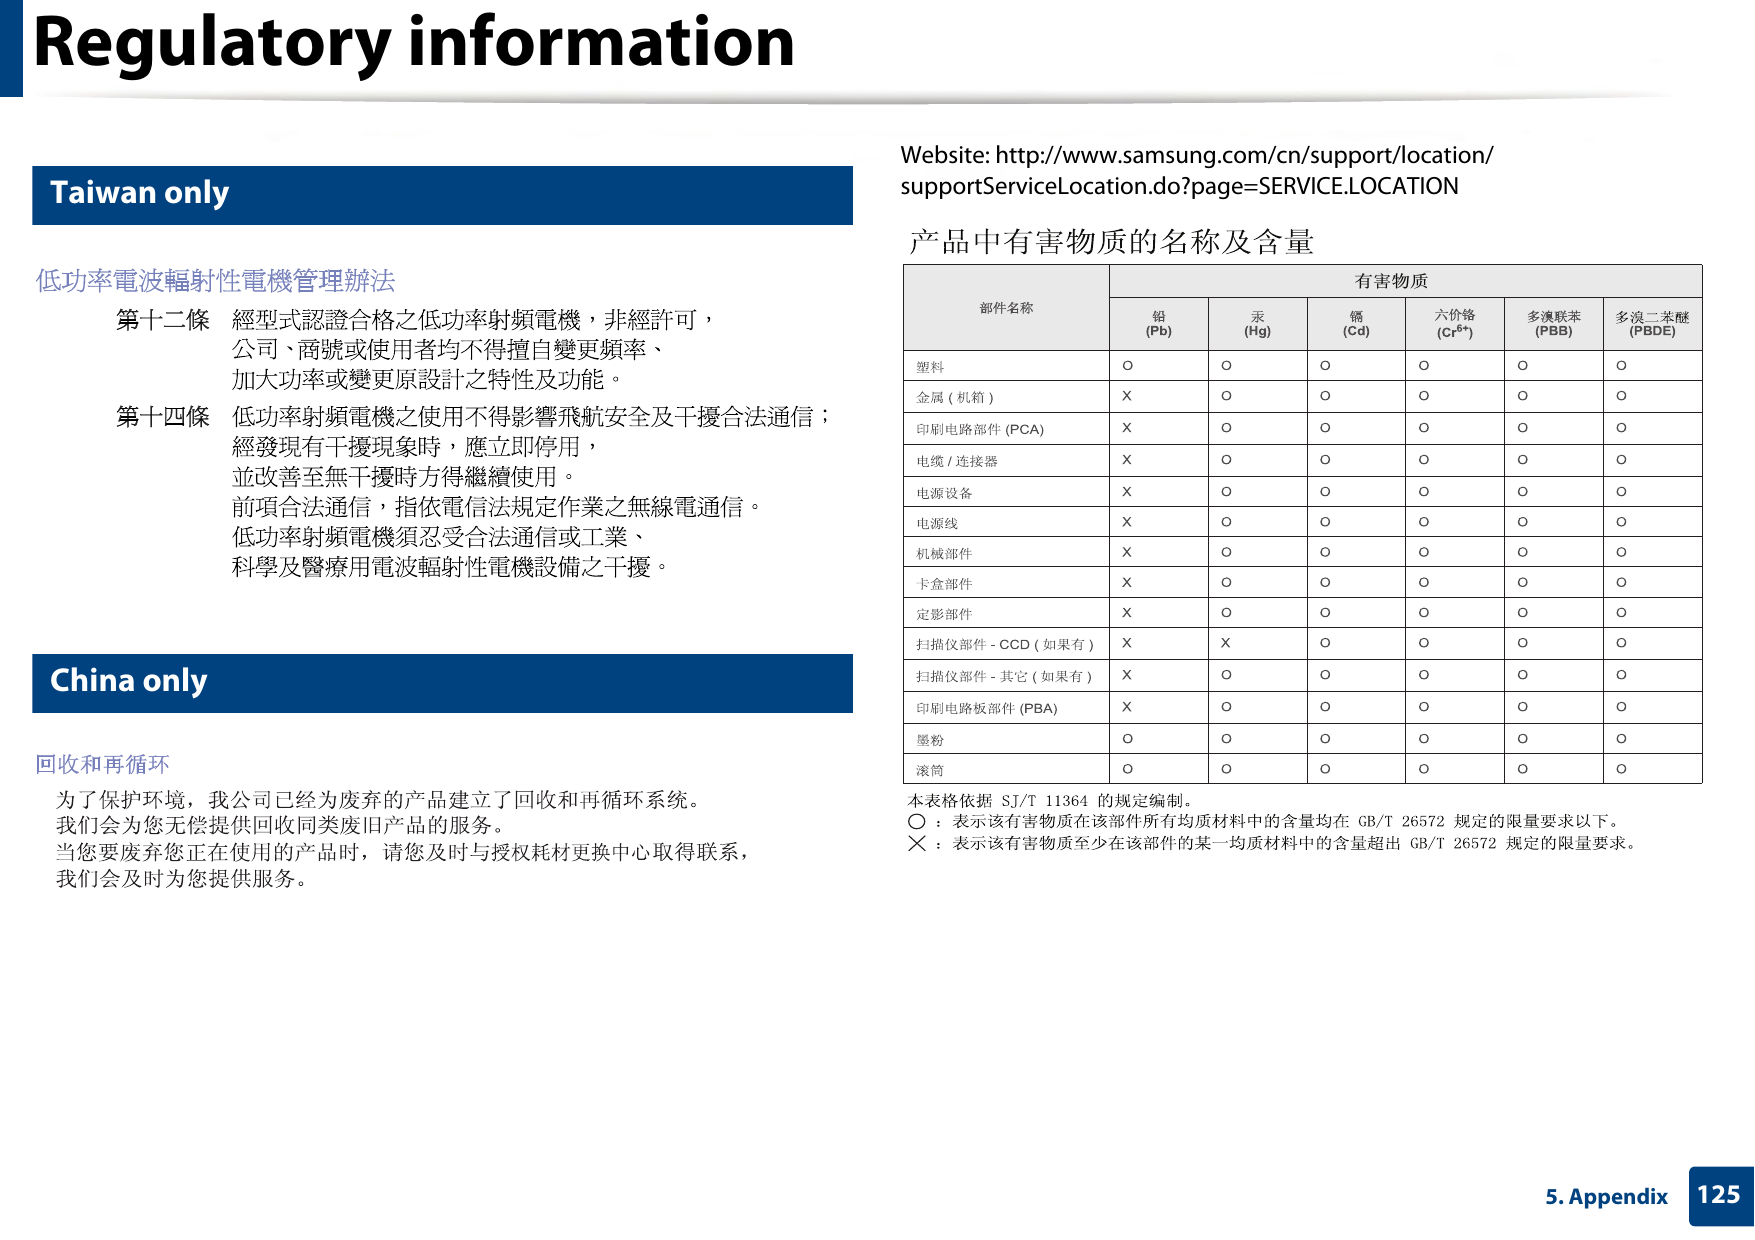
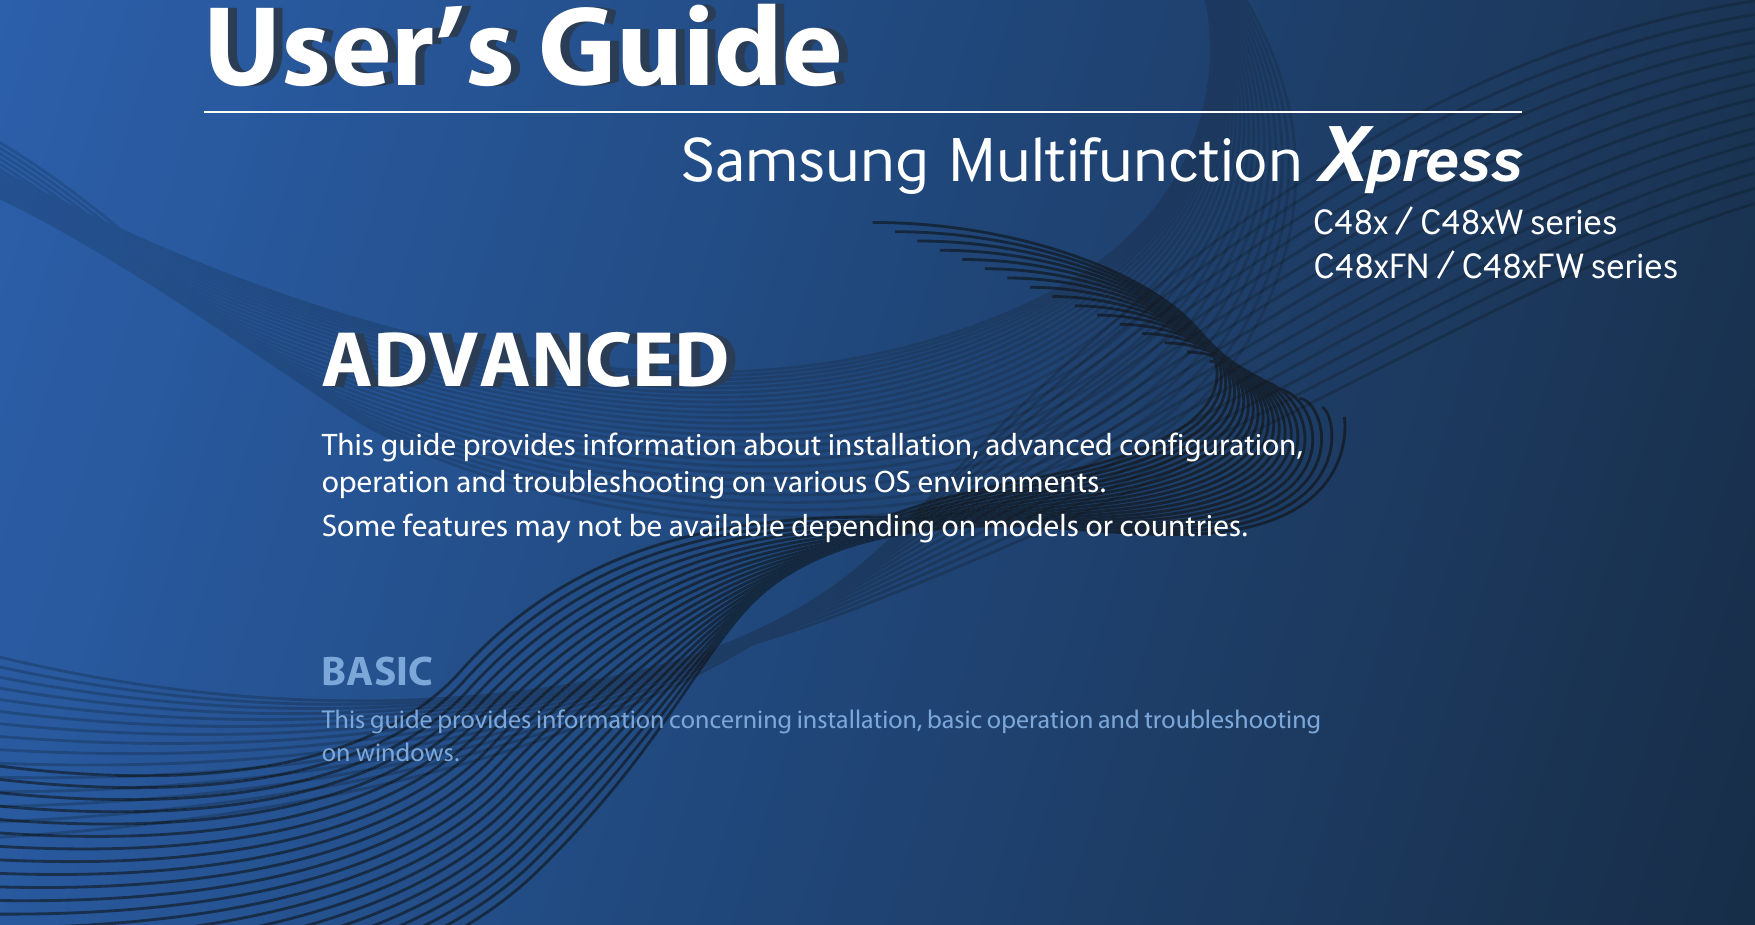
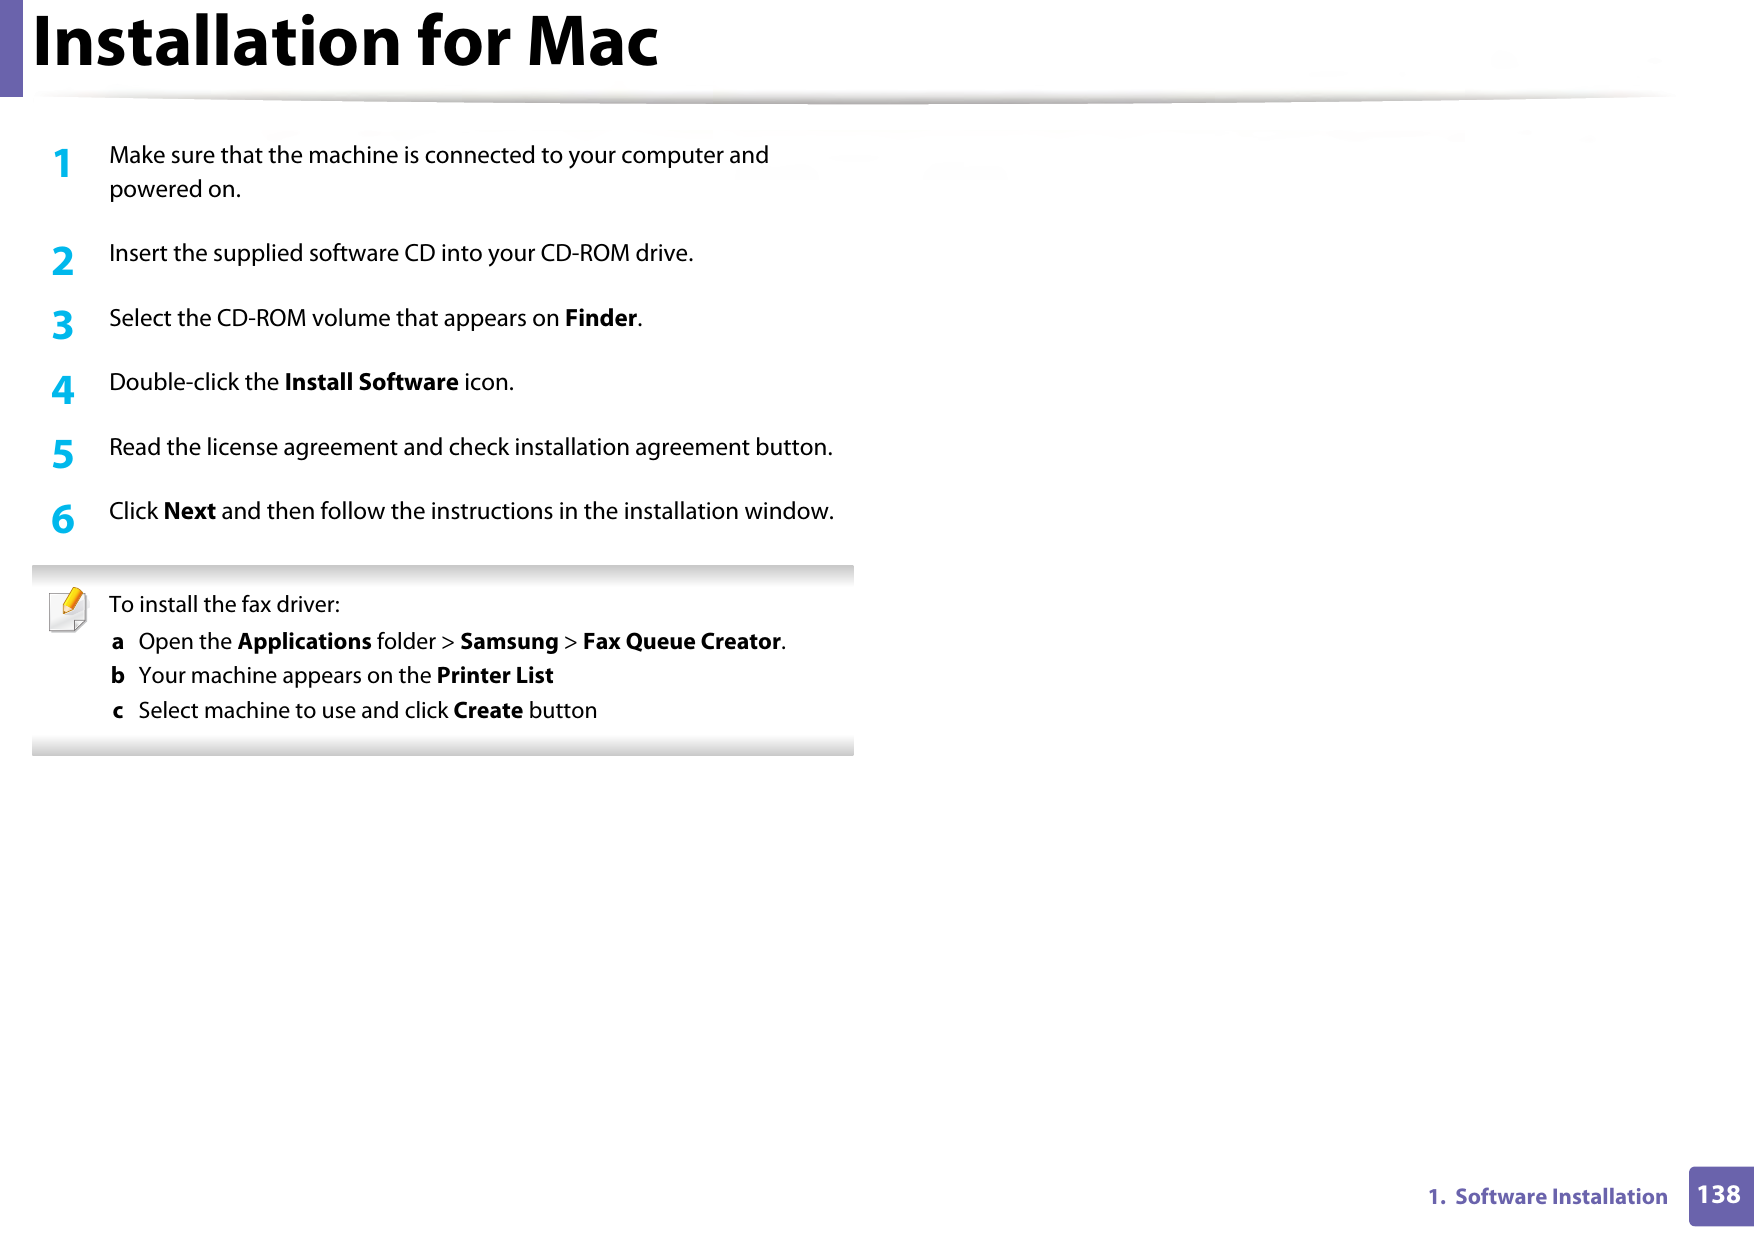
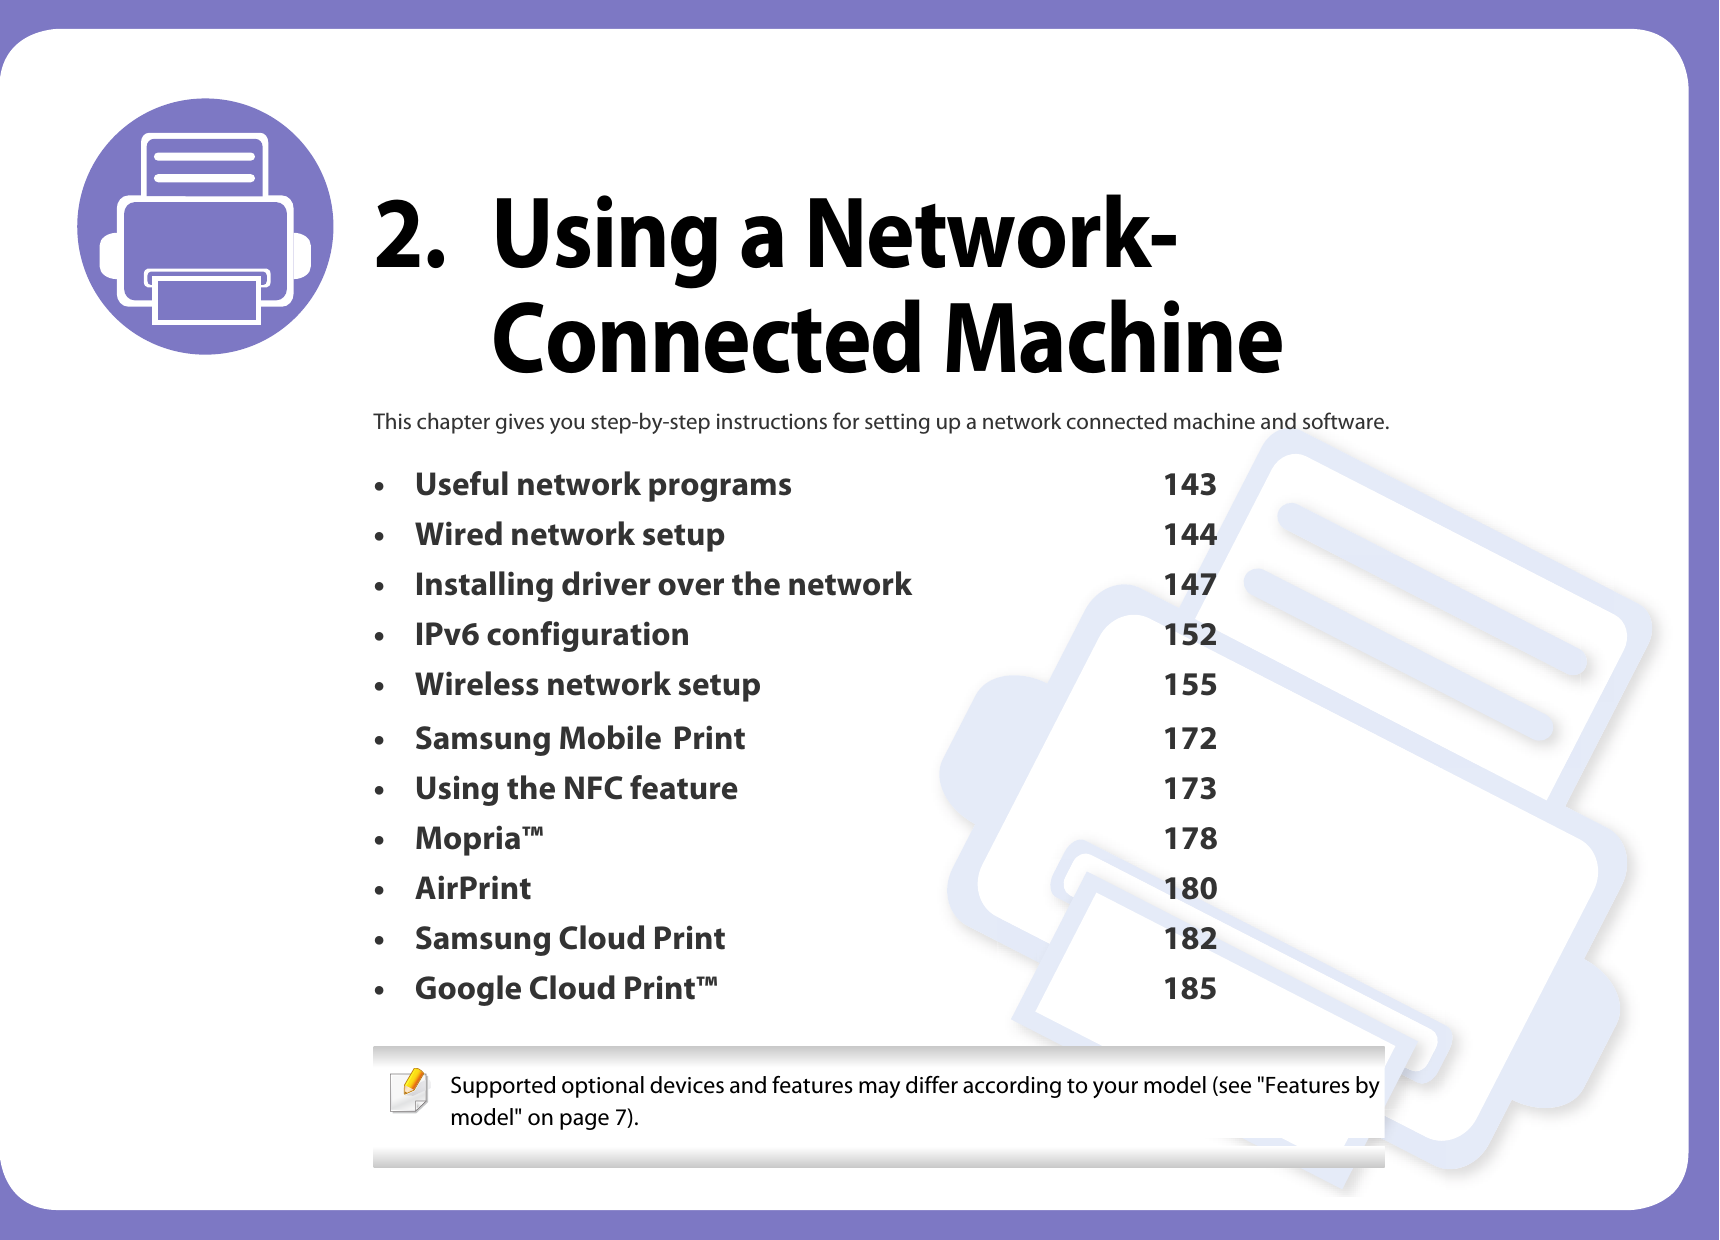
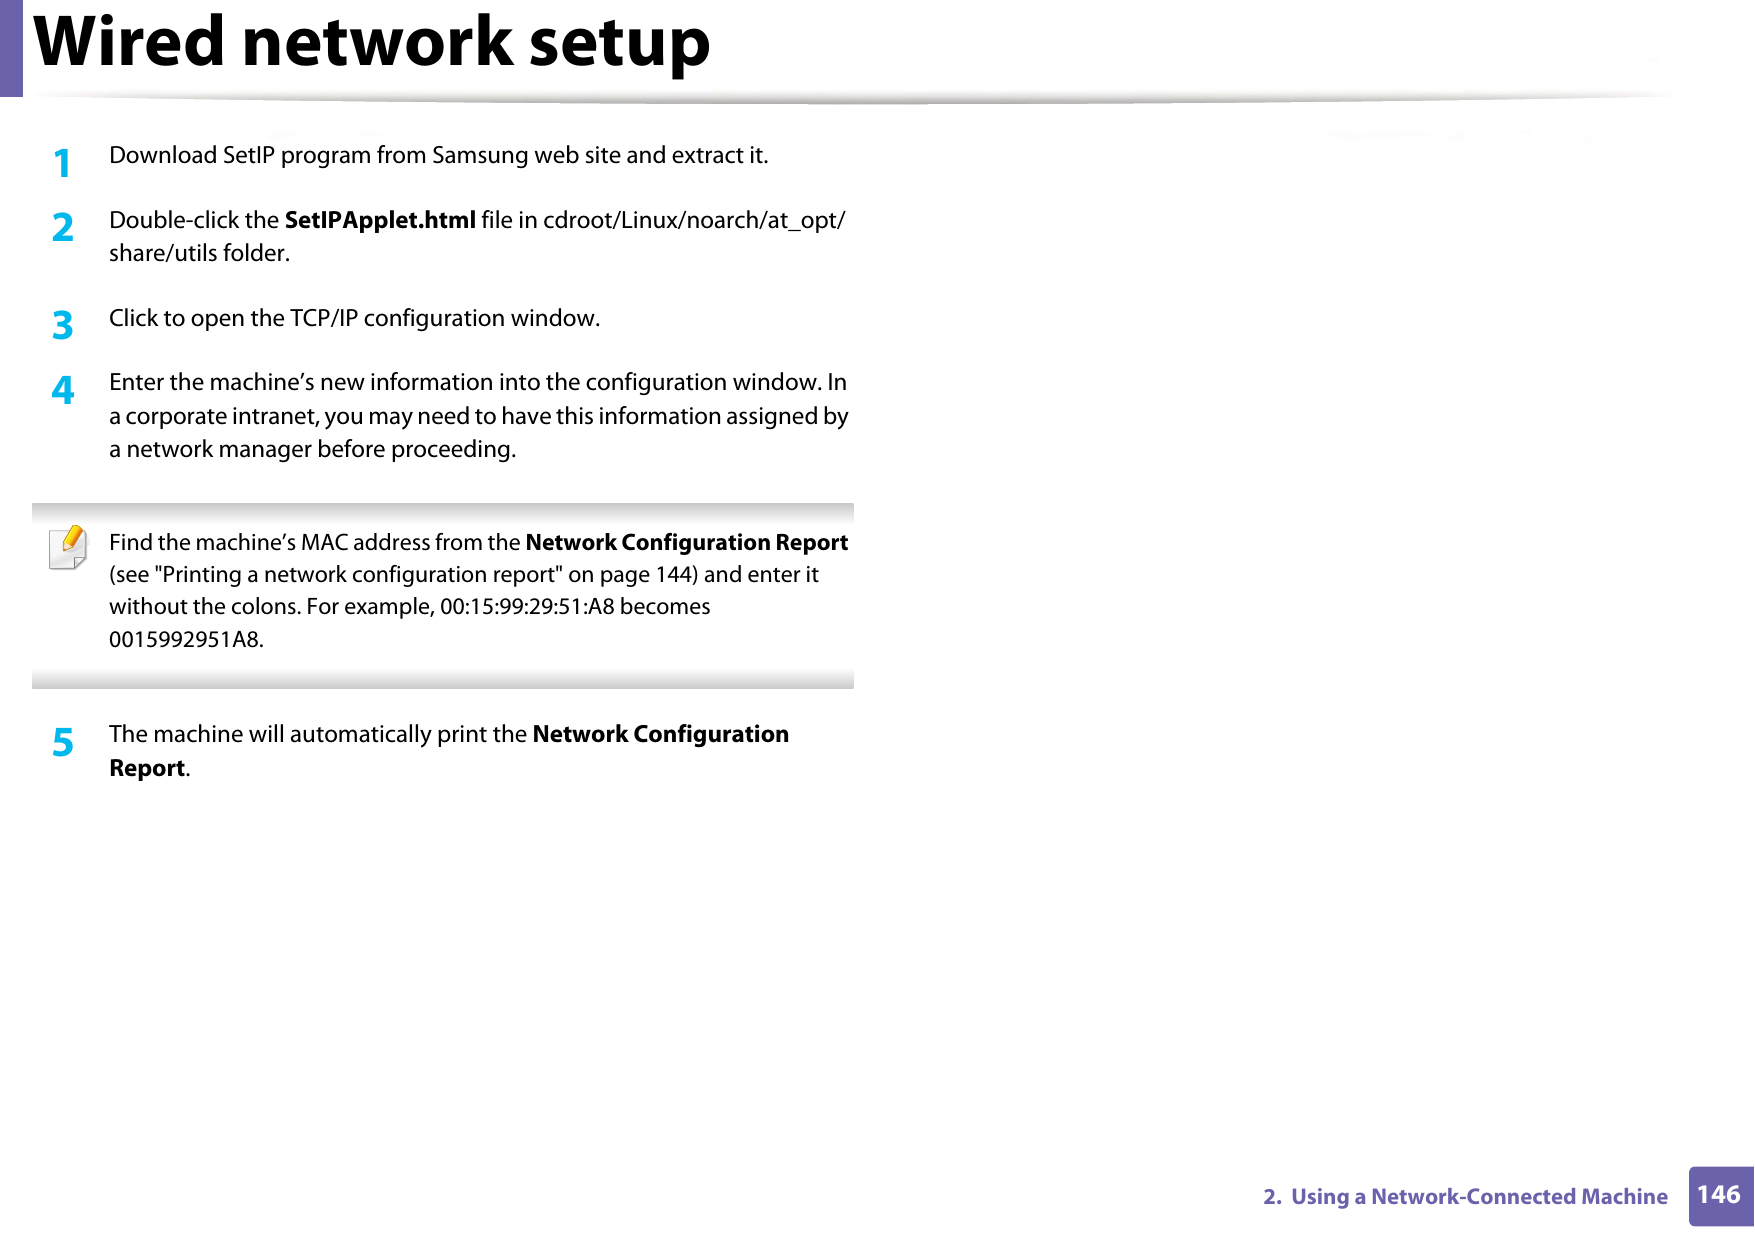
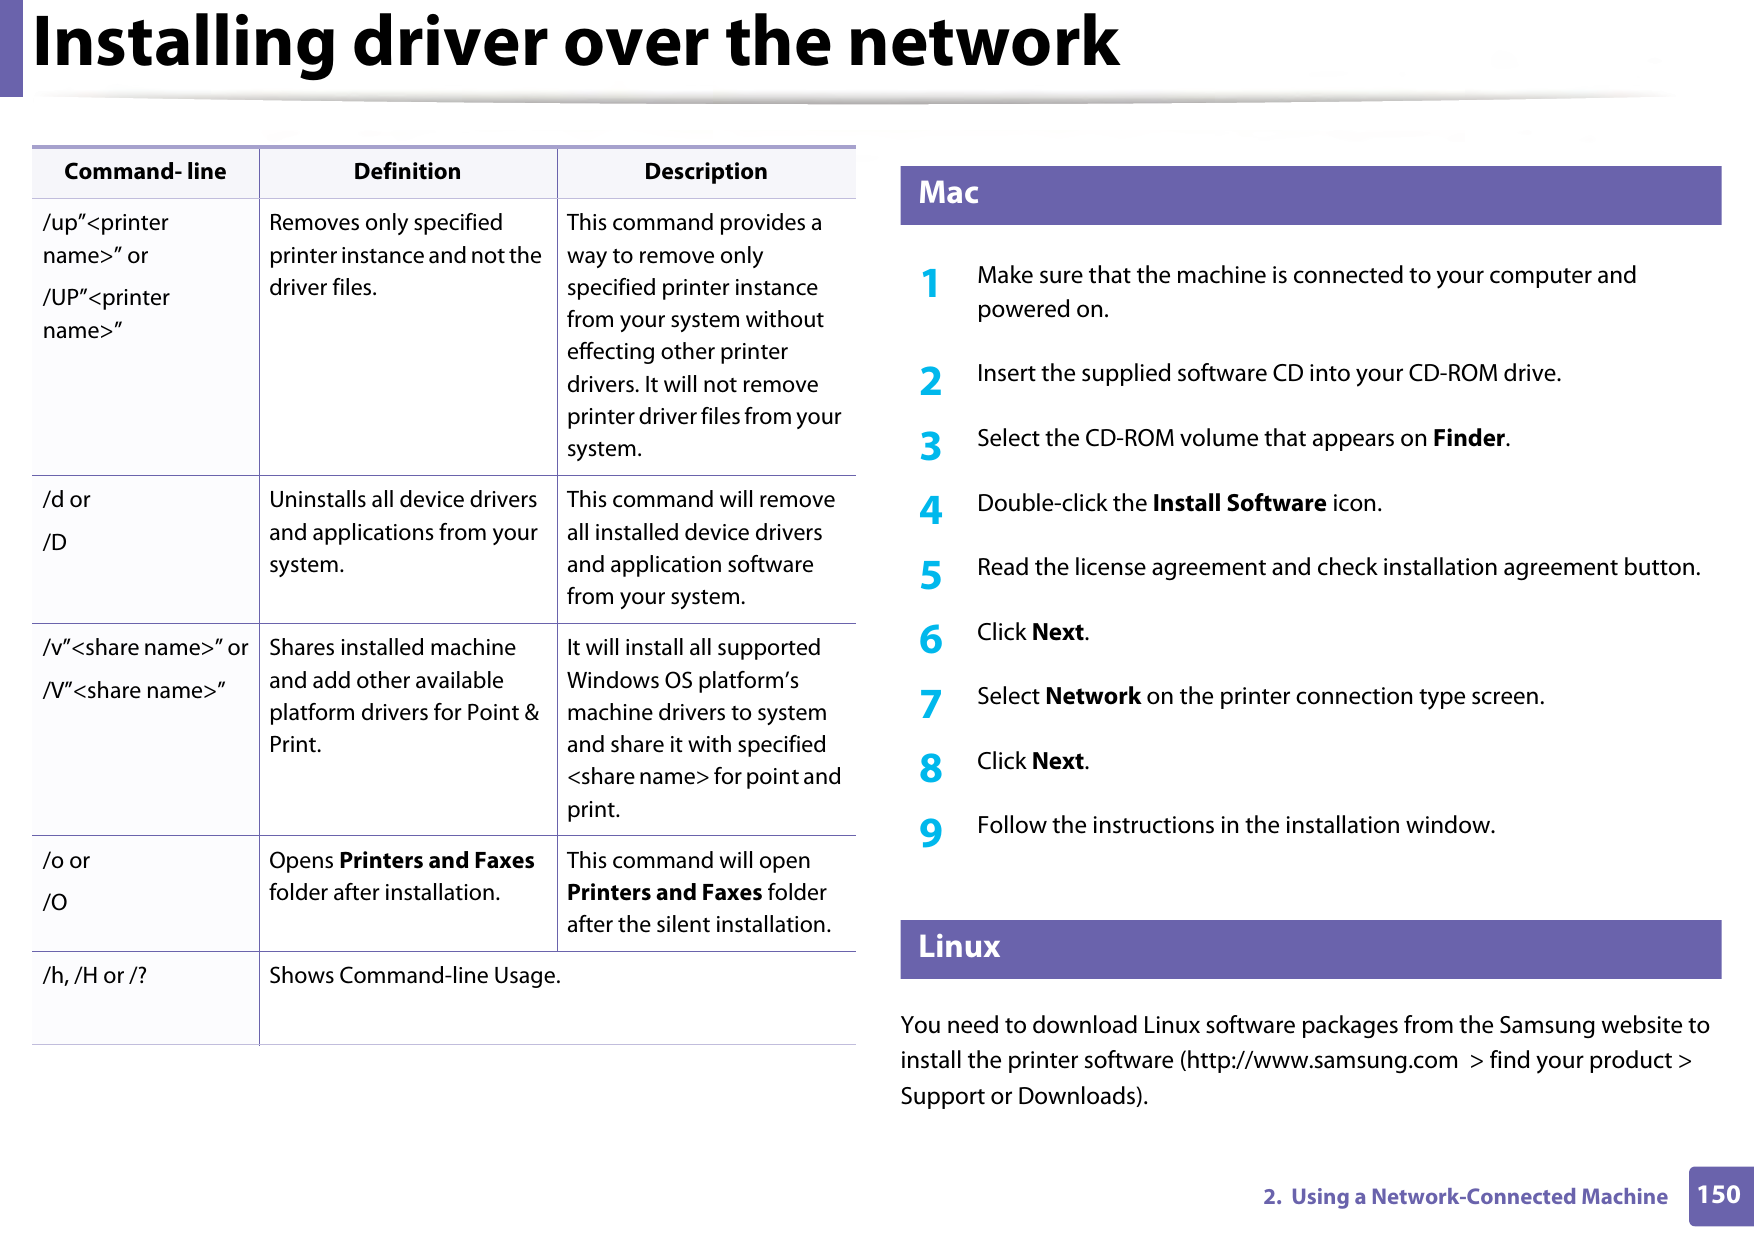
![1044. TroubleshootingUnderstanding display messagesMessages appear on the control panel display to indicate the machine’s status or errors. Refer to the tables below to understand the messages’ and their meaning, and correct the problem, if necessary. • This function is not supported for the devices which has a control panel display. You can resolve the error with the guideline from the computer’s Printing Status window (see "Using Samsung Printer Status" on page 255).• If a message is not in the table, reboot the power and try the printing job again. If the problem persists, call a service representative.• When you call for service, provide the service representative with the contents of display message.• Some messages may not appear on the display depending on the options or models.• [error number] indicates the error number. • [tray type] indicates the tray number. • [media type] indicates the media type.• [media size] indicates the media size.• [color] indicates the color of toner. 5 Paper Jam-related messagesMessage Meaning Suggested solutionsDocument jam.Remove jamThe loaded original document has jammed in the document feeder.Clear the jam (see "Original paper jam" on page 99).Jam or emptyDoor open&close • Paper has jammed in the paper feed area.• There is no paper in tray.• Clear the jam (see "In tray" on page 96).• Load paper in tray (see "Loading paper in the tray" on page 40).Paper Jaminside machinePaper has jammed inside the machine.Clear the jam (see "Inside the machine" on page 97).Paper Jam in tray Paper has jammed in the paper tray.Clear the jam (see "Clearing paper jams" on page 95).Paper Jamin exit areaPaper has jammed in the exit area.Clear the jam (see "Original paper jam in exit area of scanner" on page 101).Paper Empty in [tray type]There is no paper in tray. Load paper in tray (see "Loading paper in the tray" on page 40).](https://usermanual.wiki/Samsung-Electronics-Co/SLC480FW.User-Manual-3/User-Guide-2579315-Page-4.png)
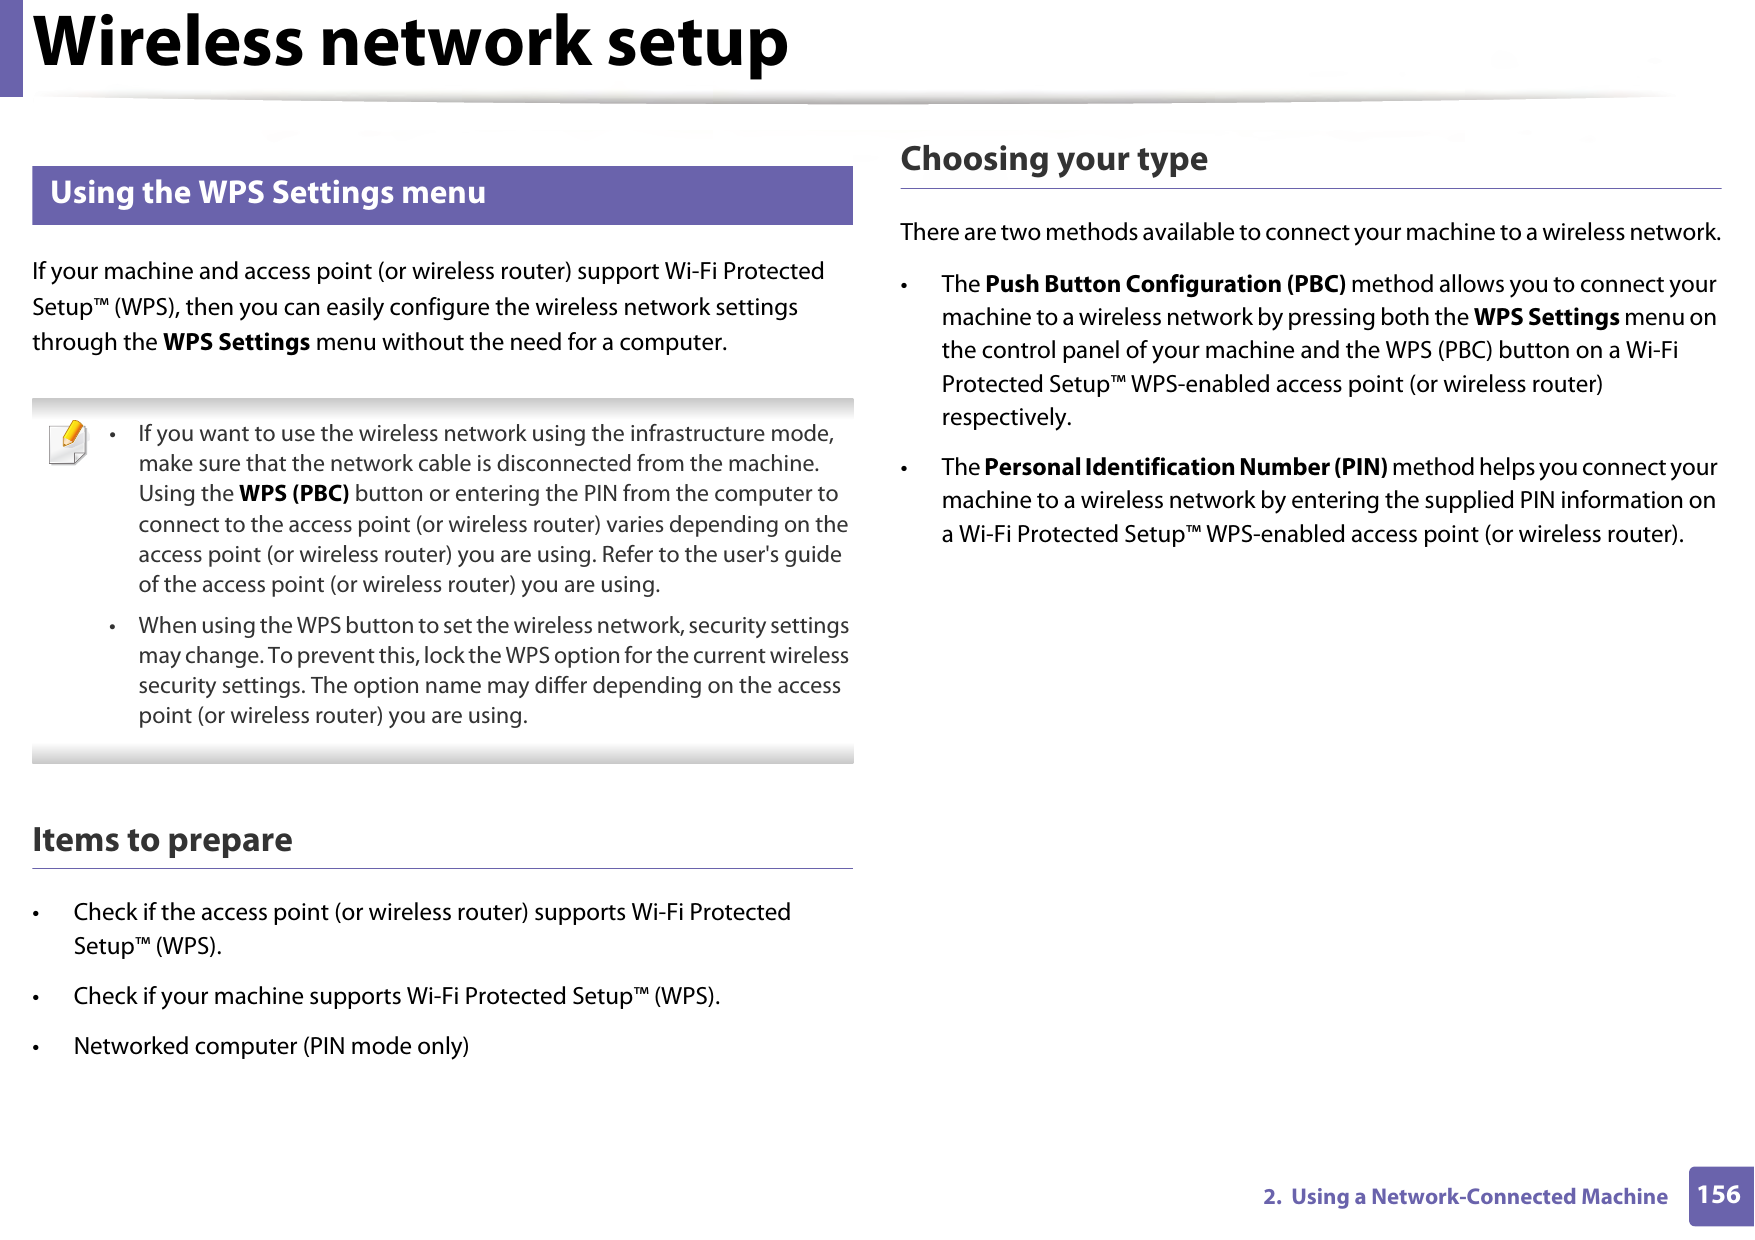
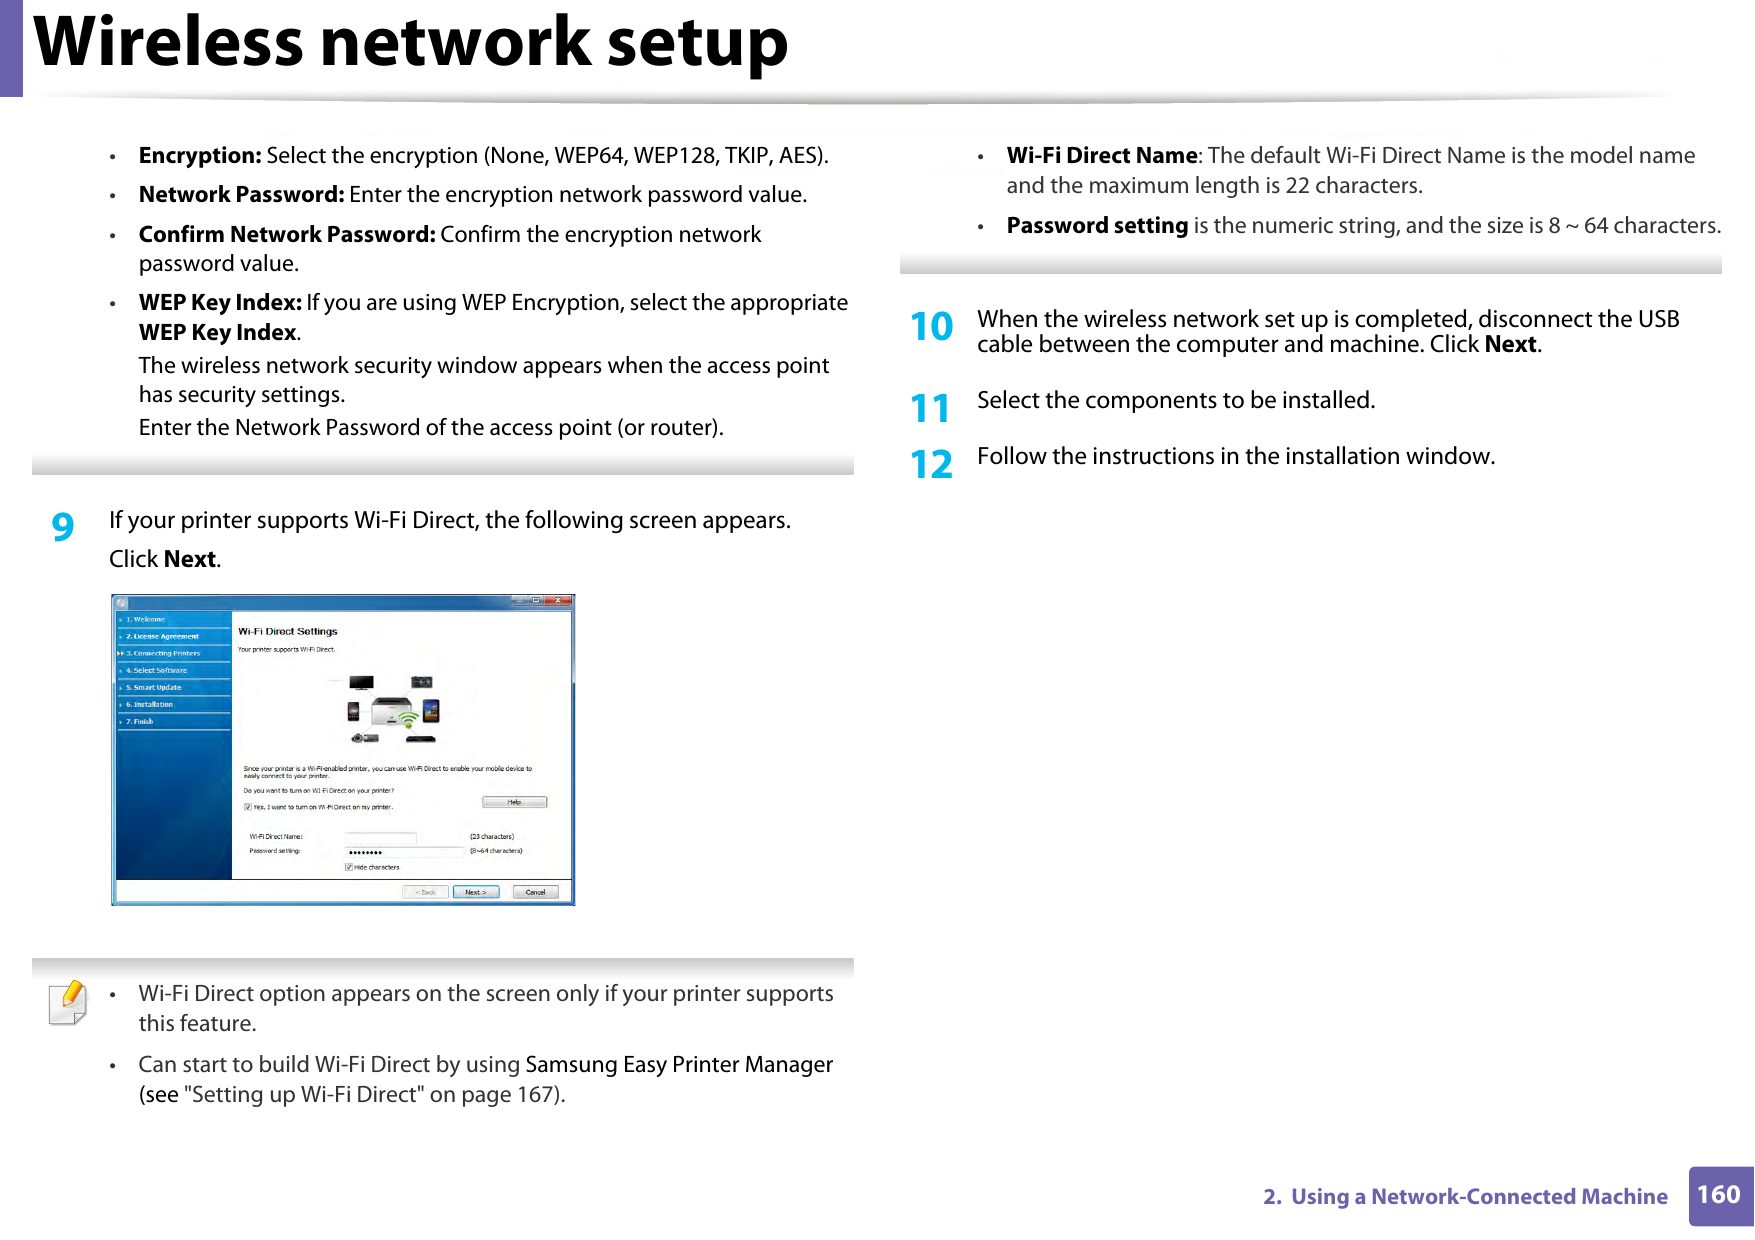
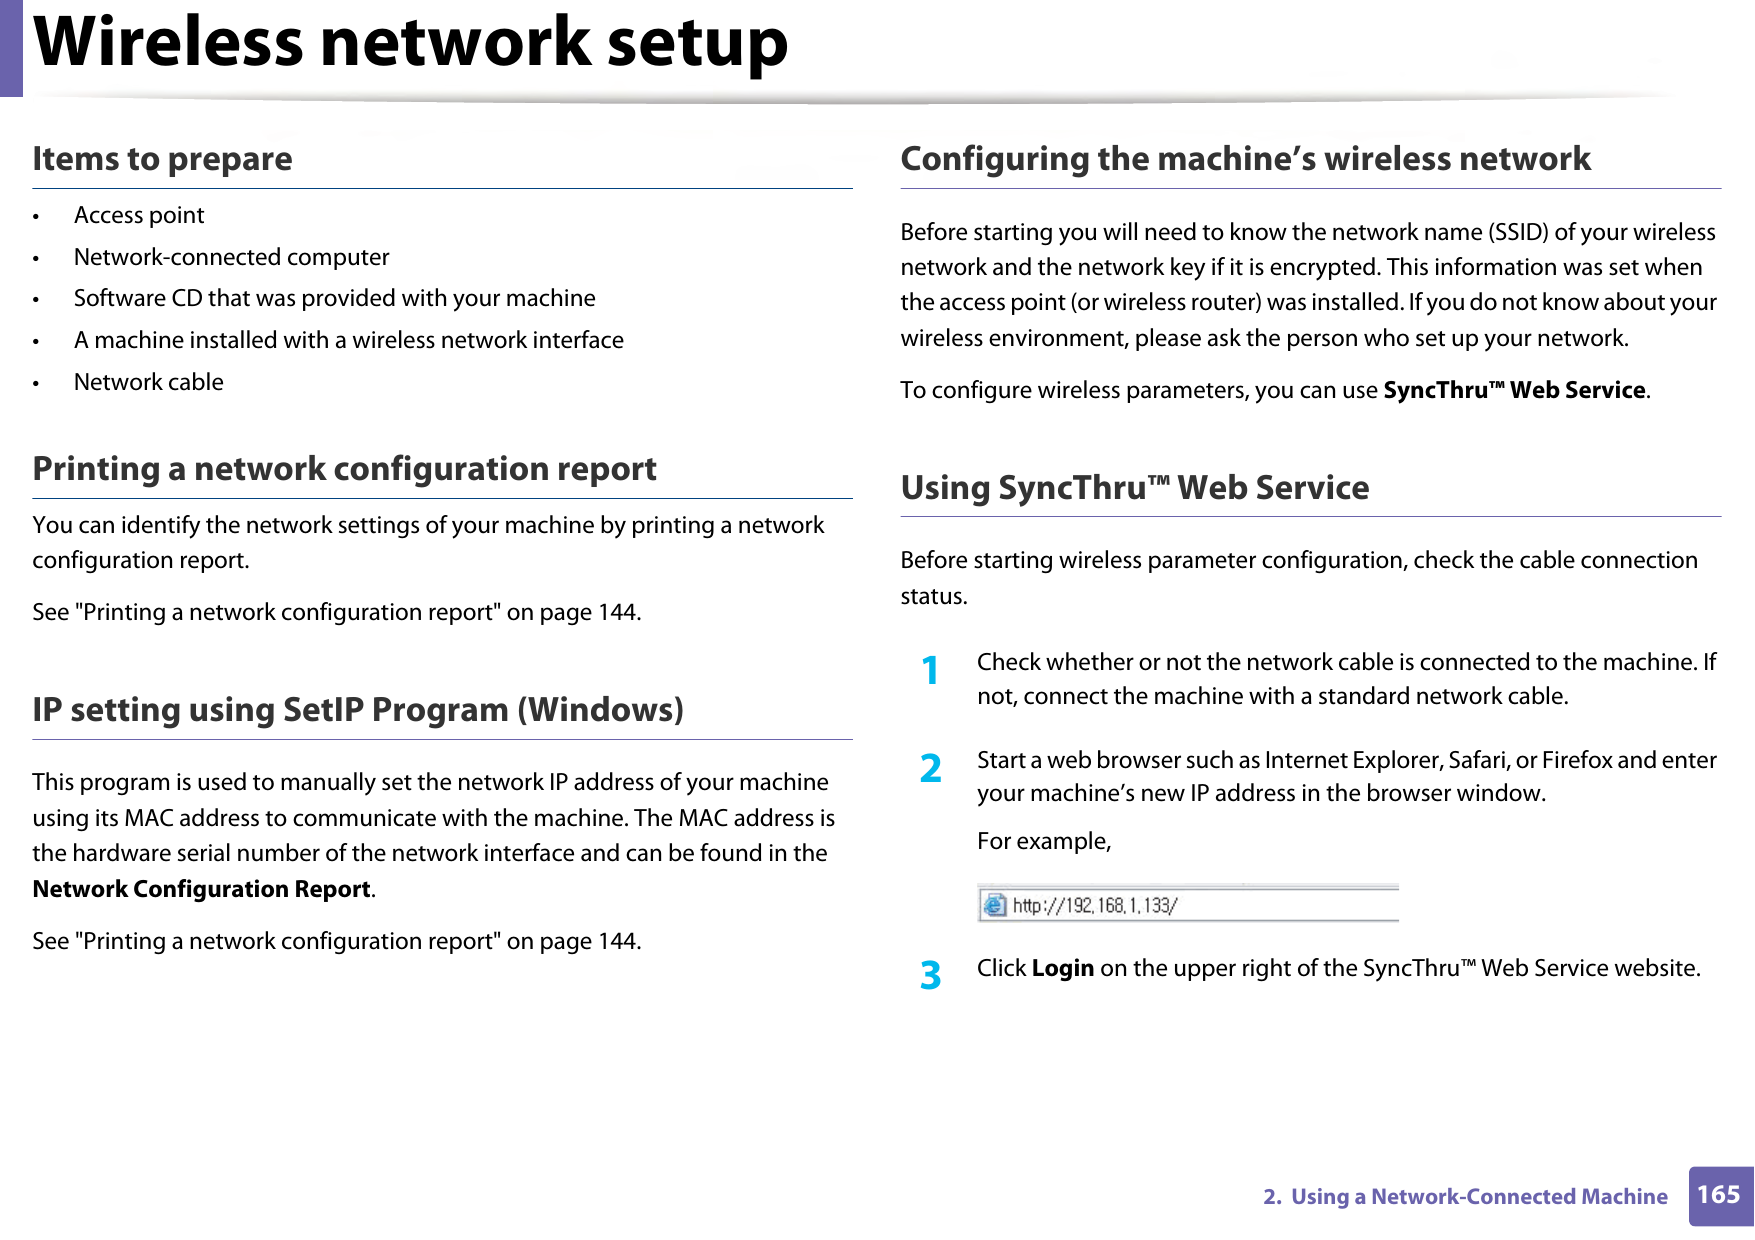
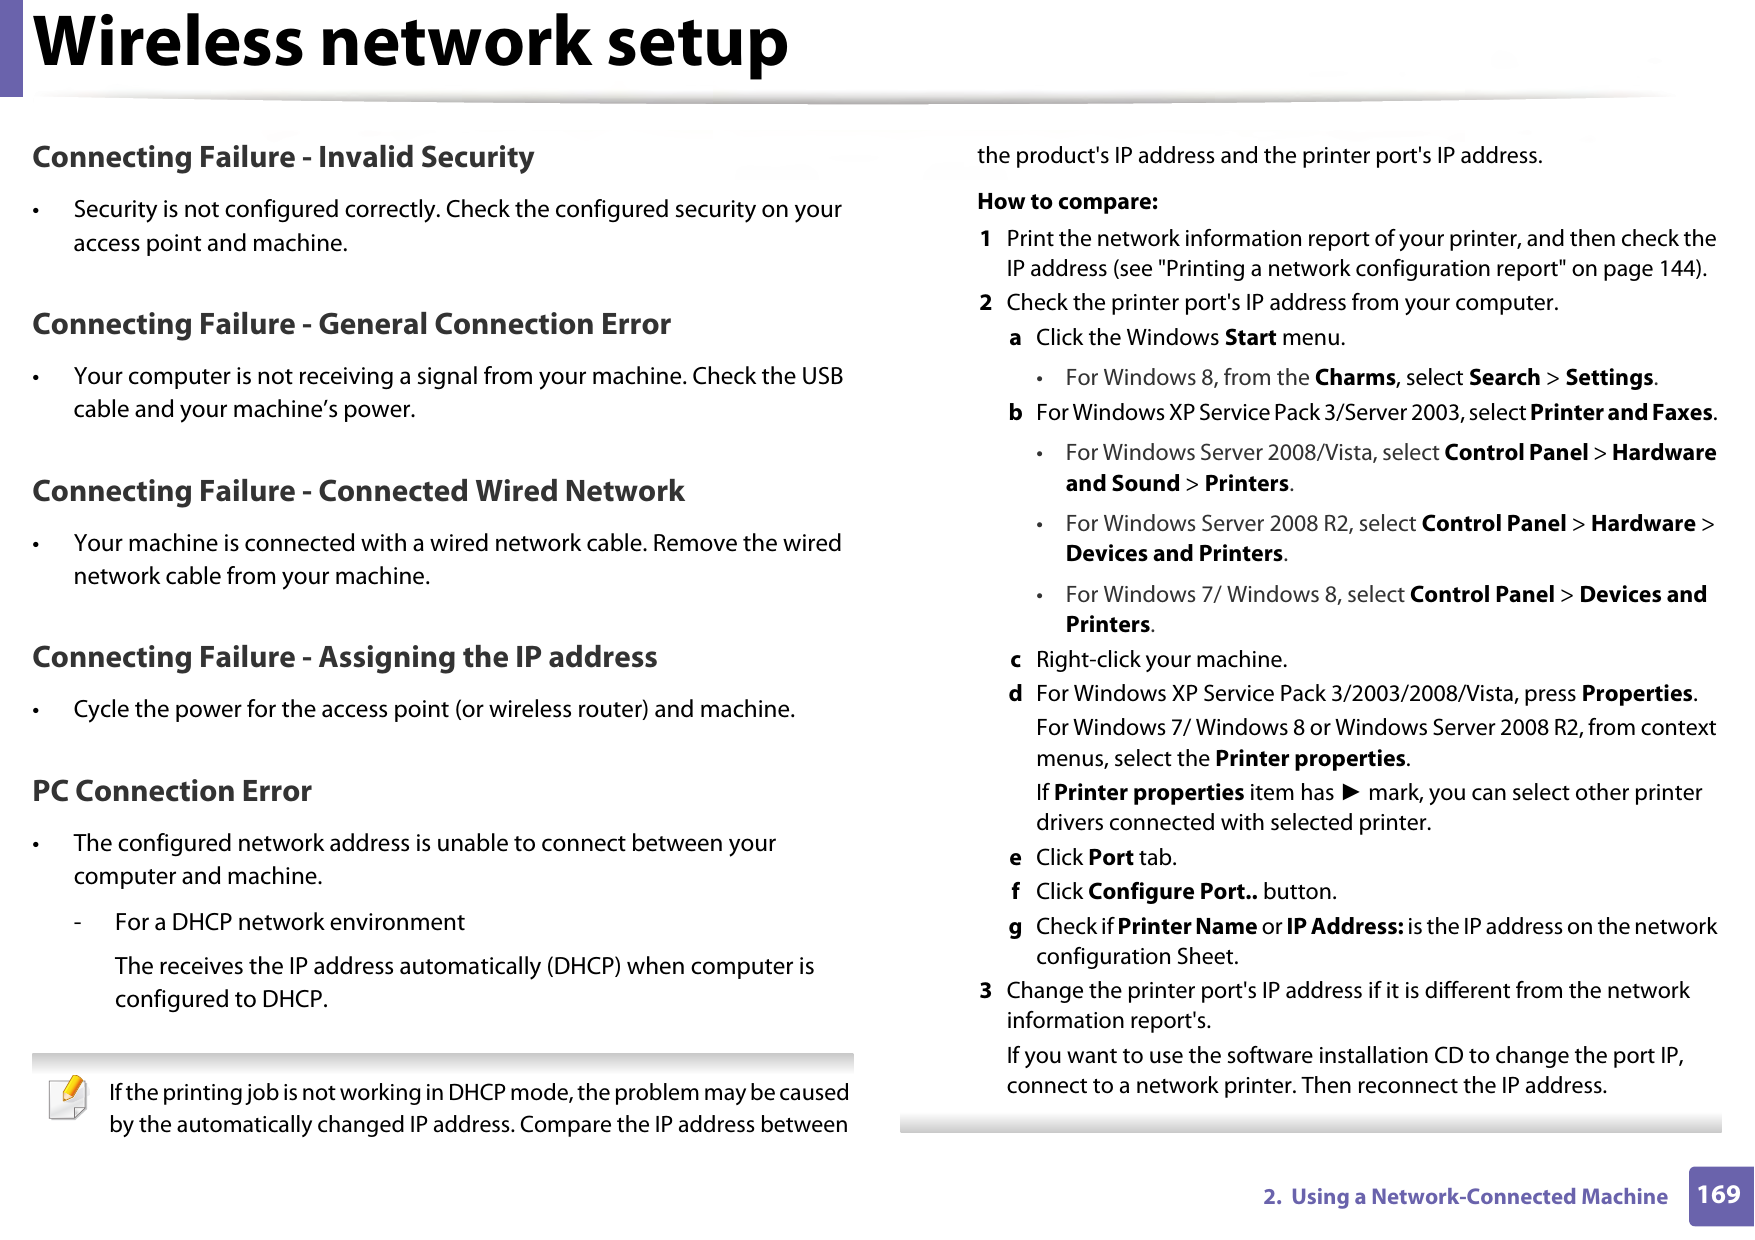
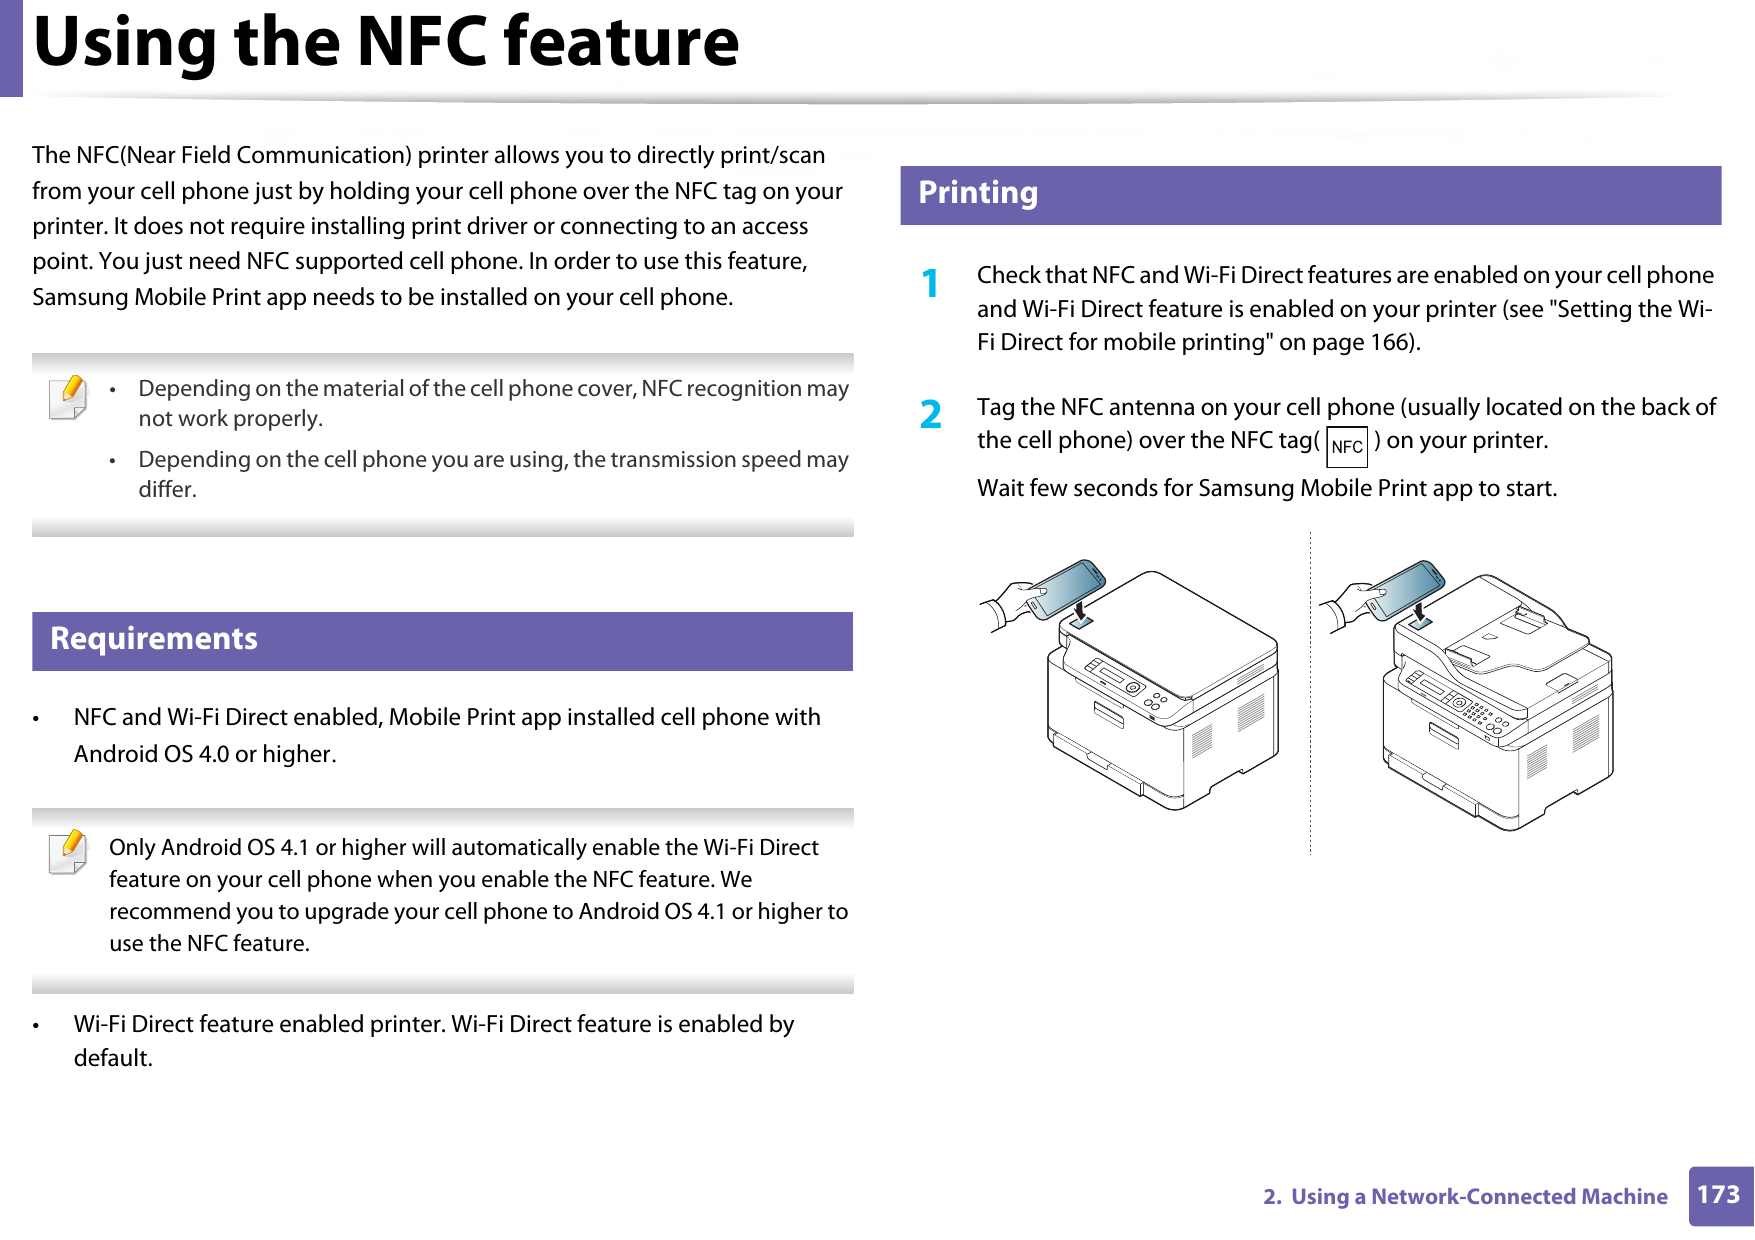
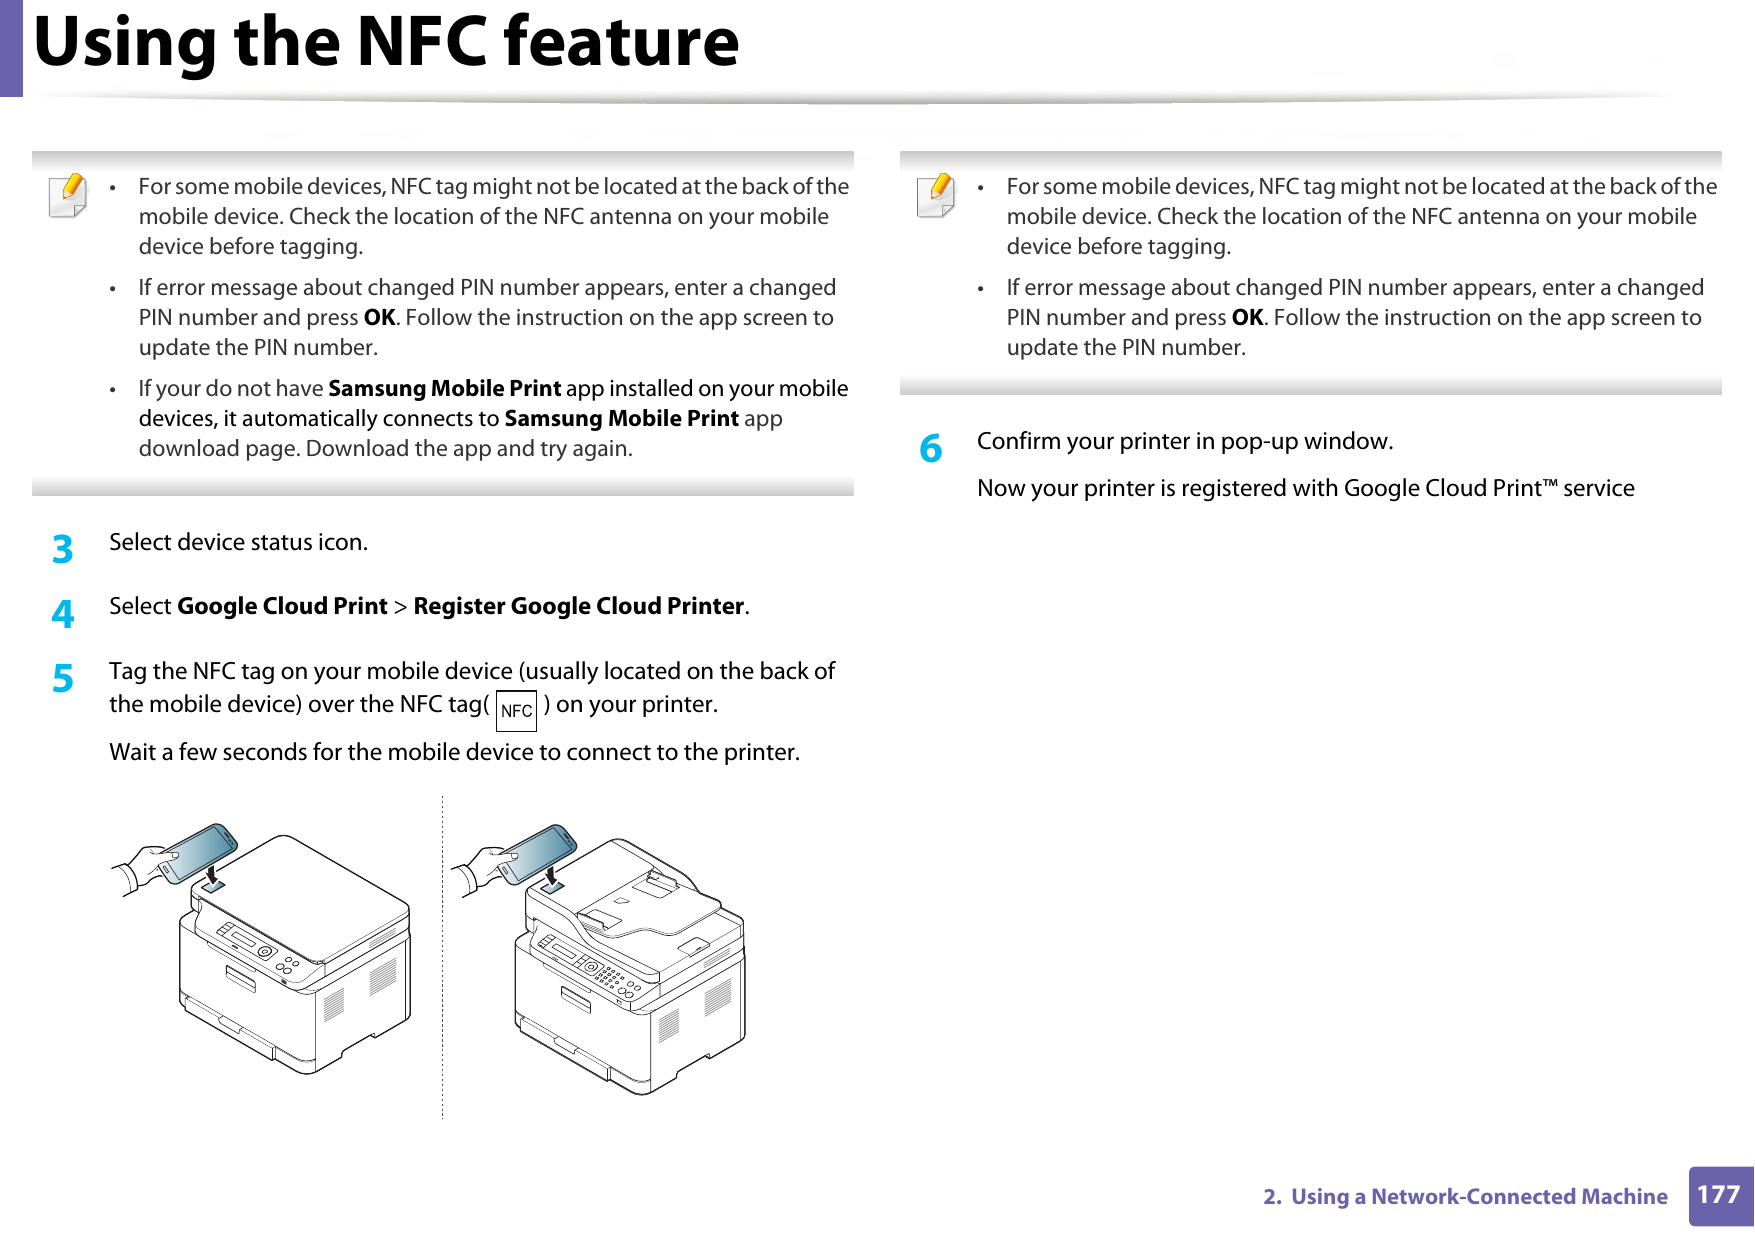
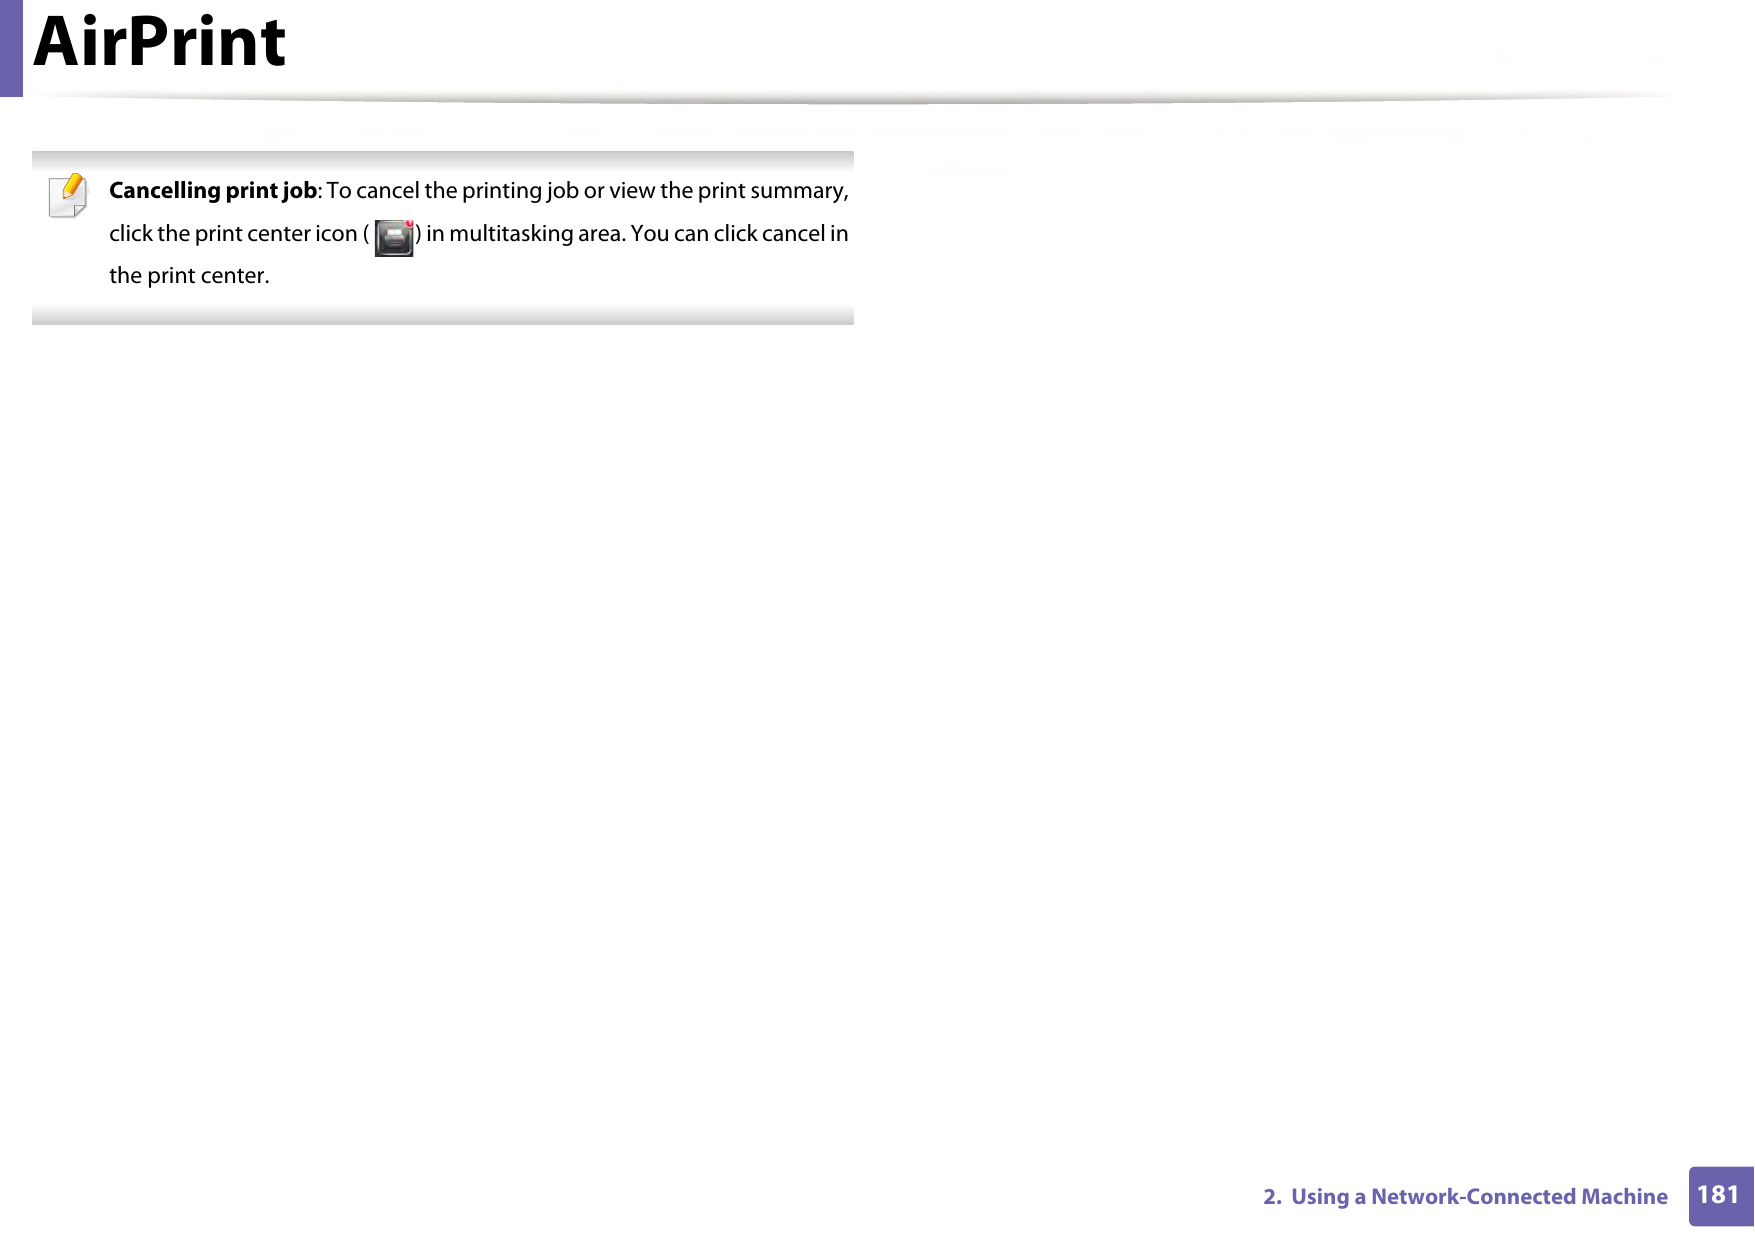
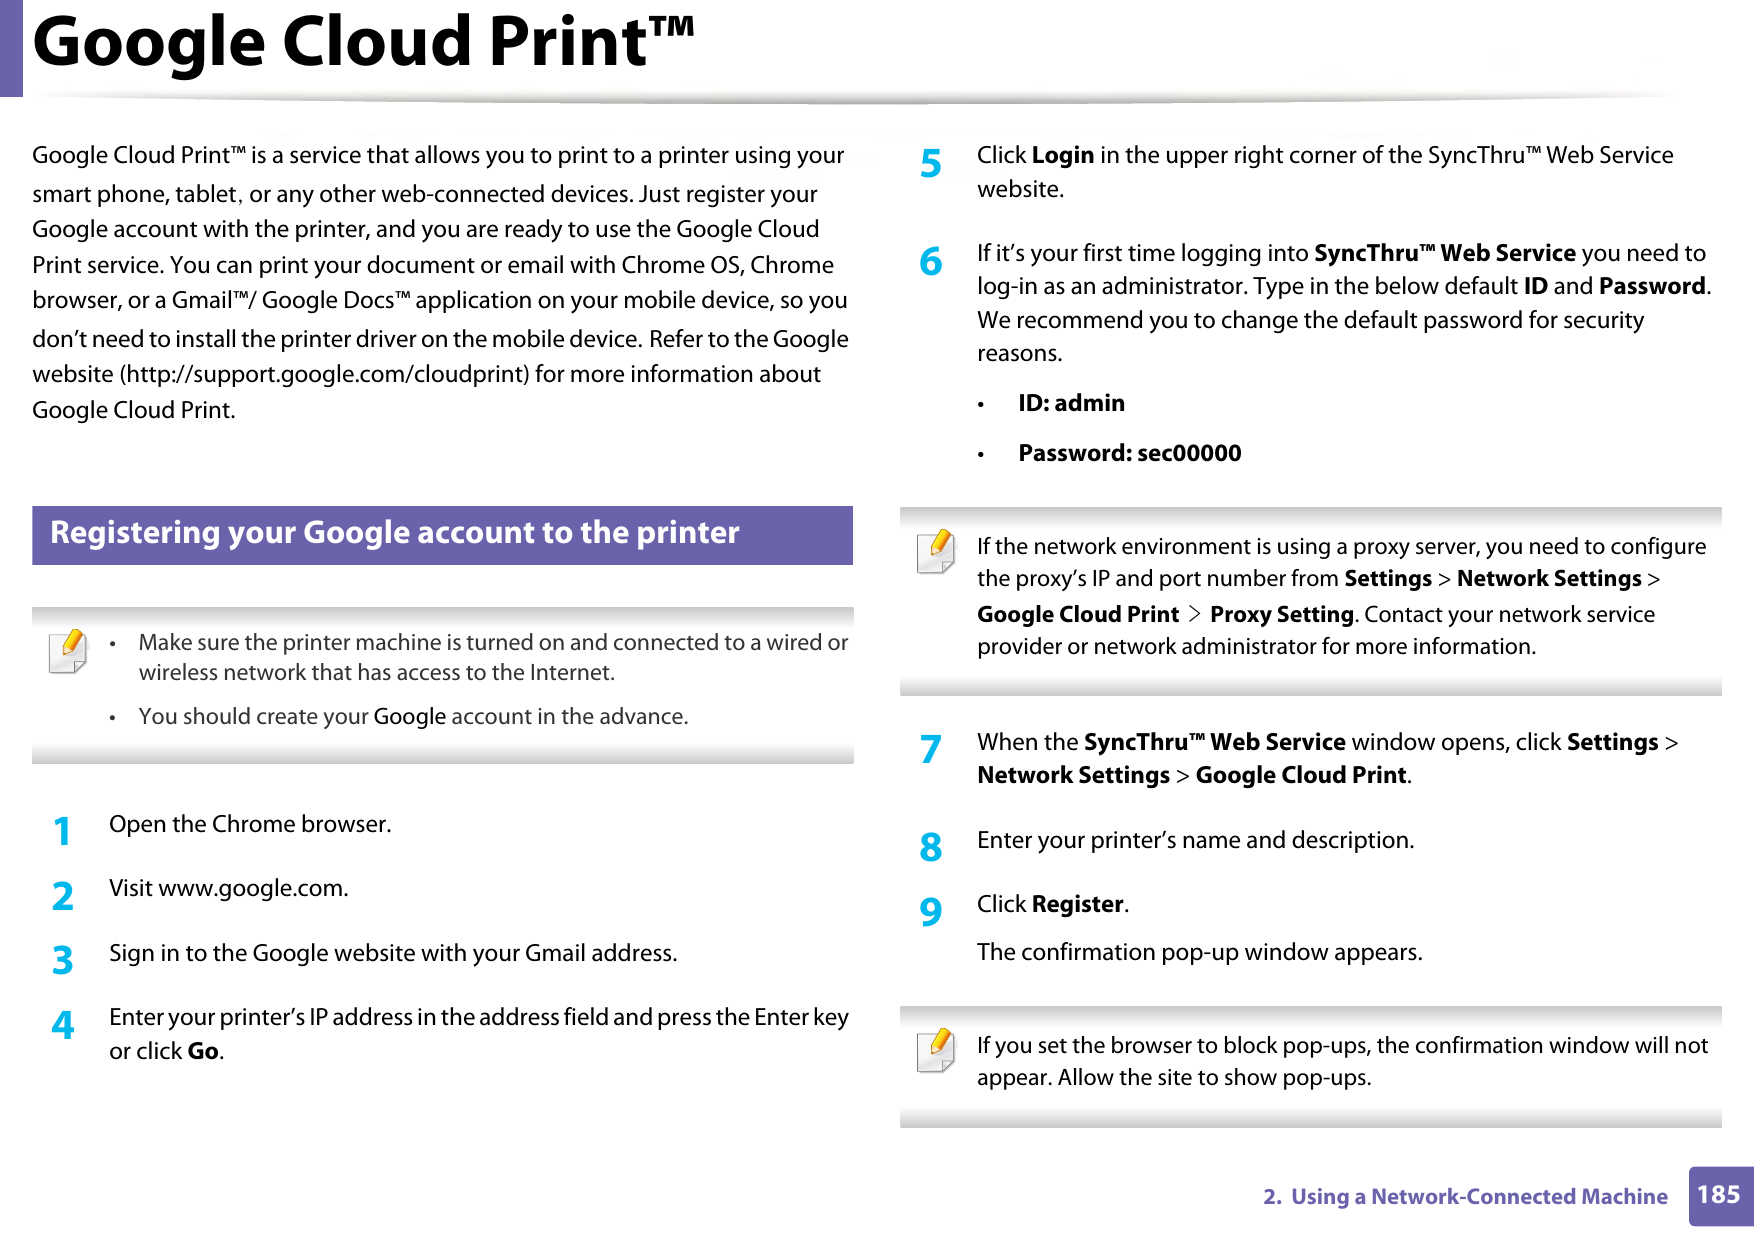
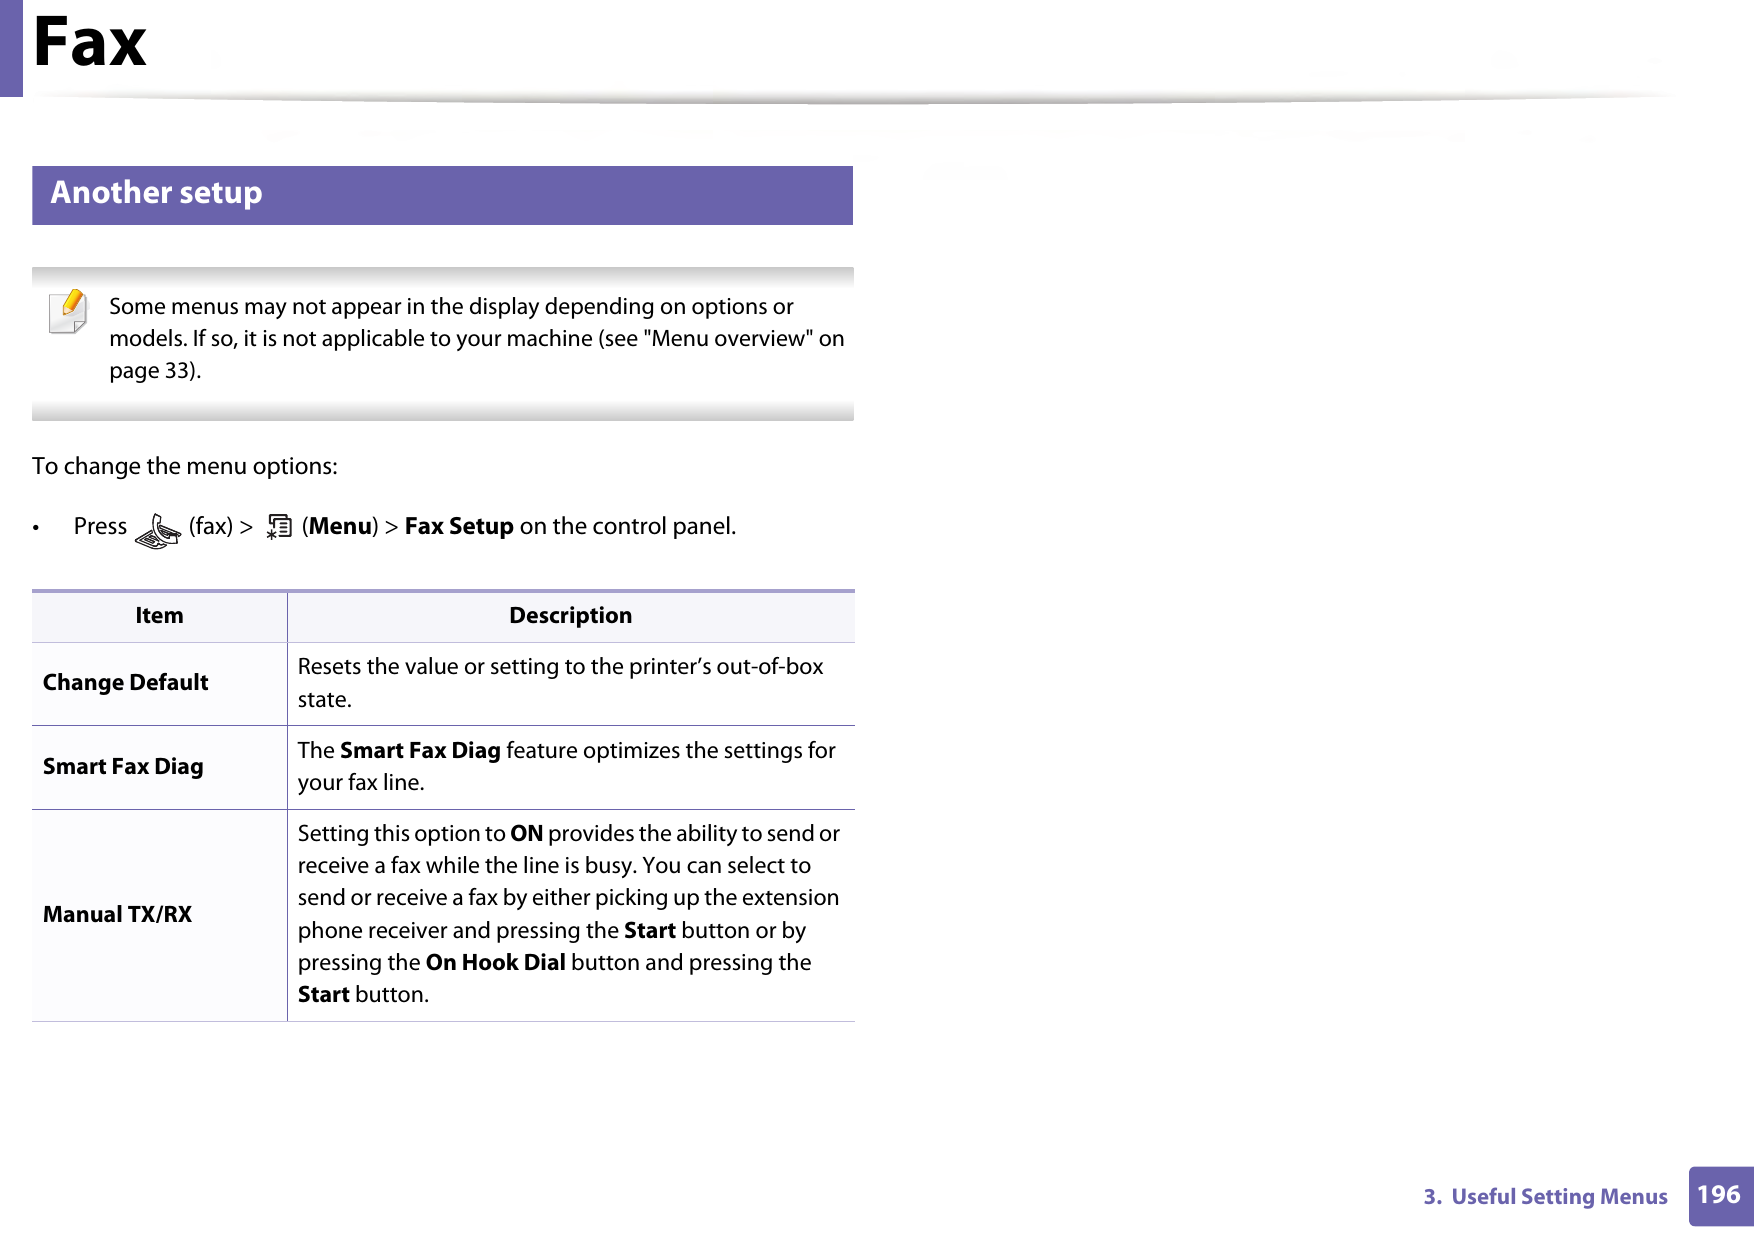
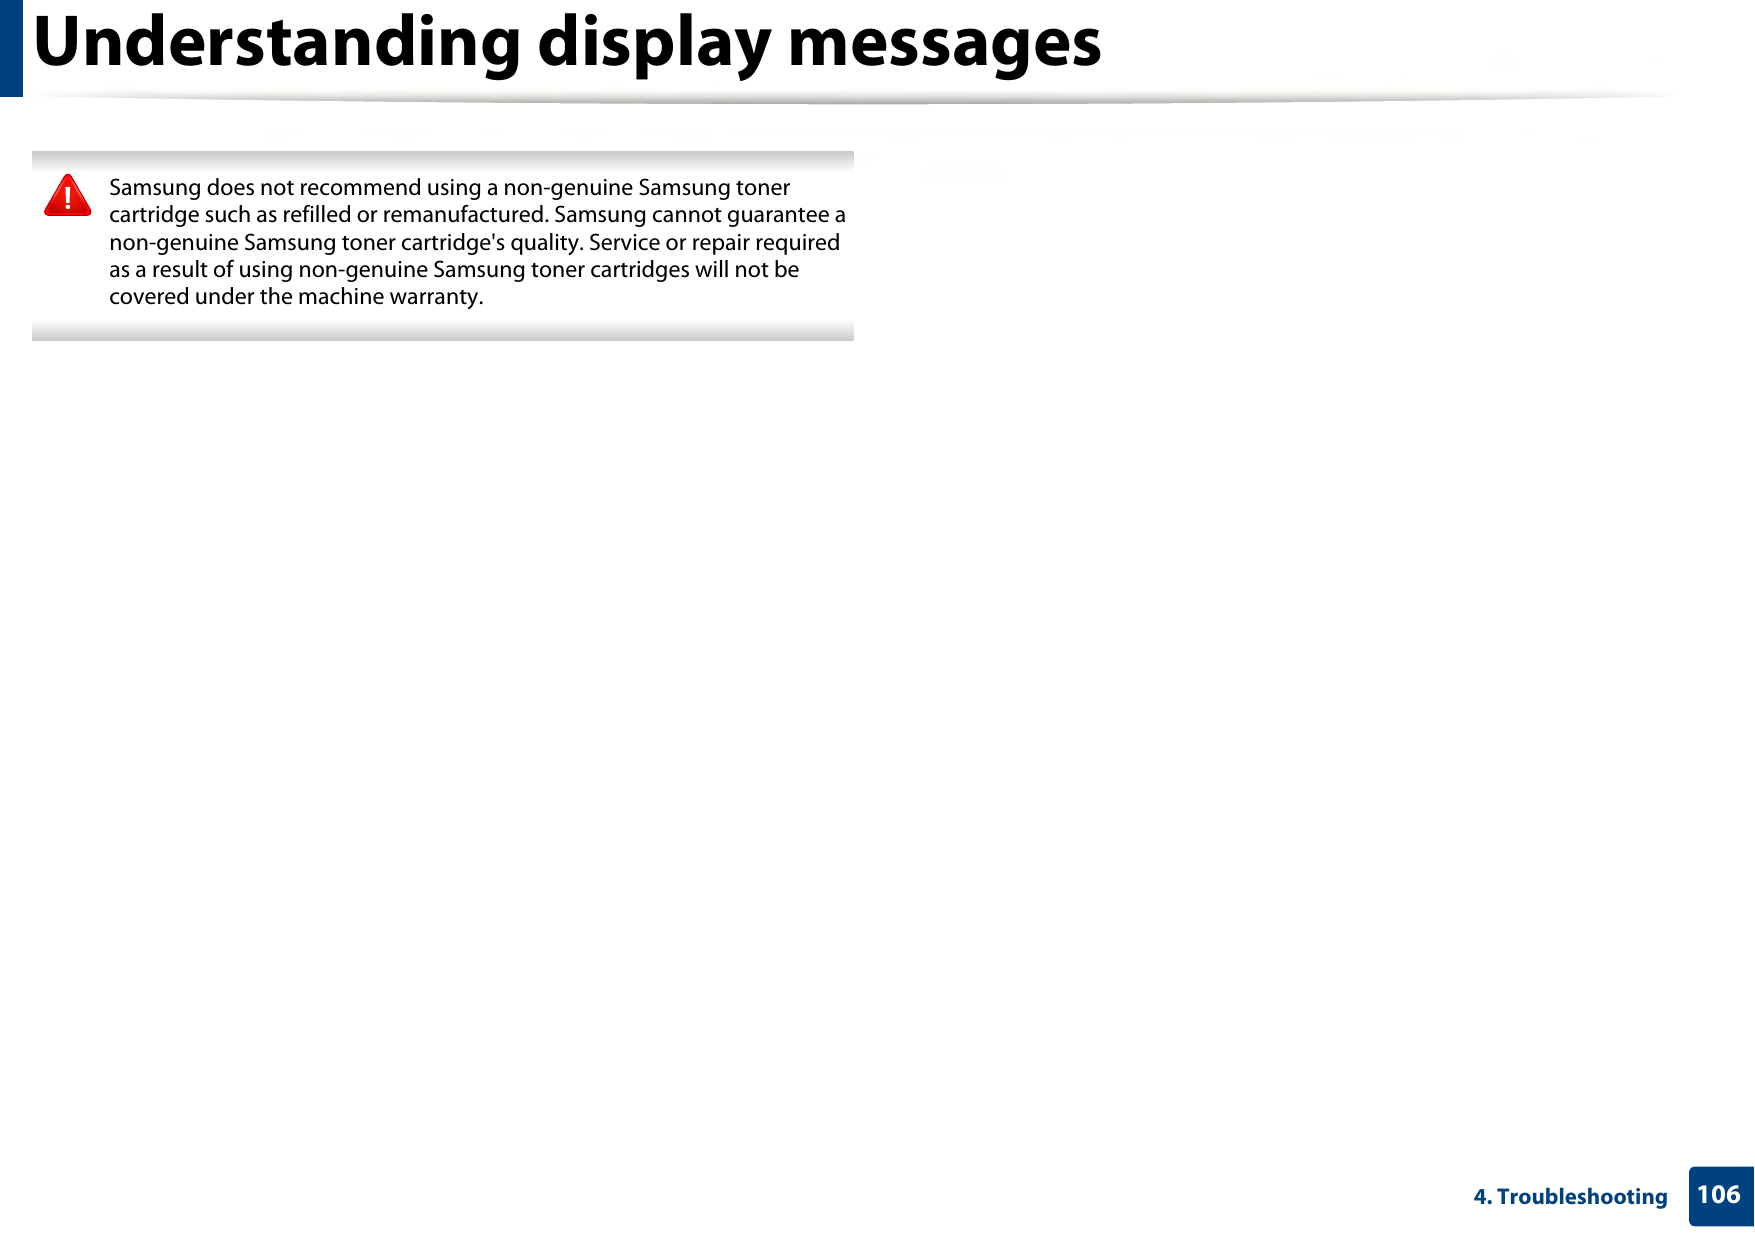
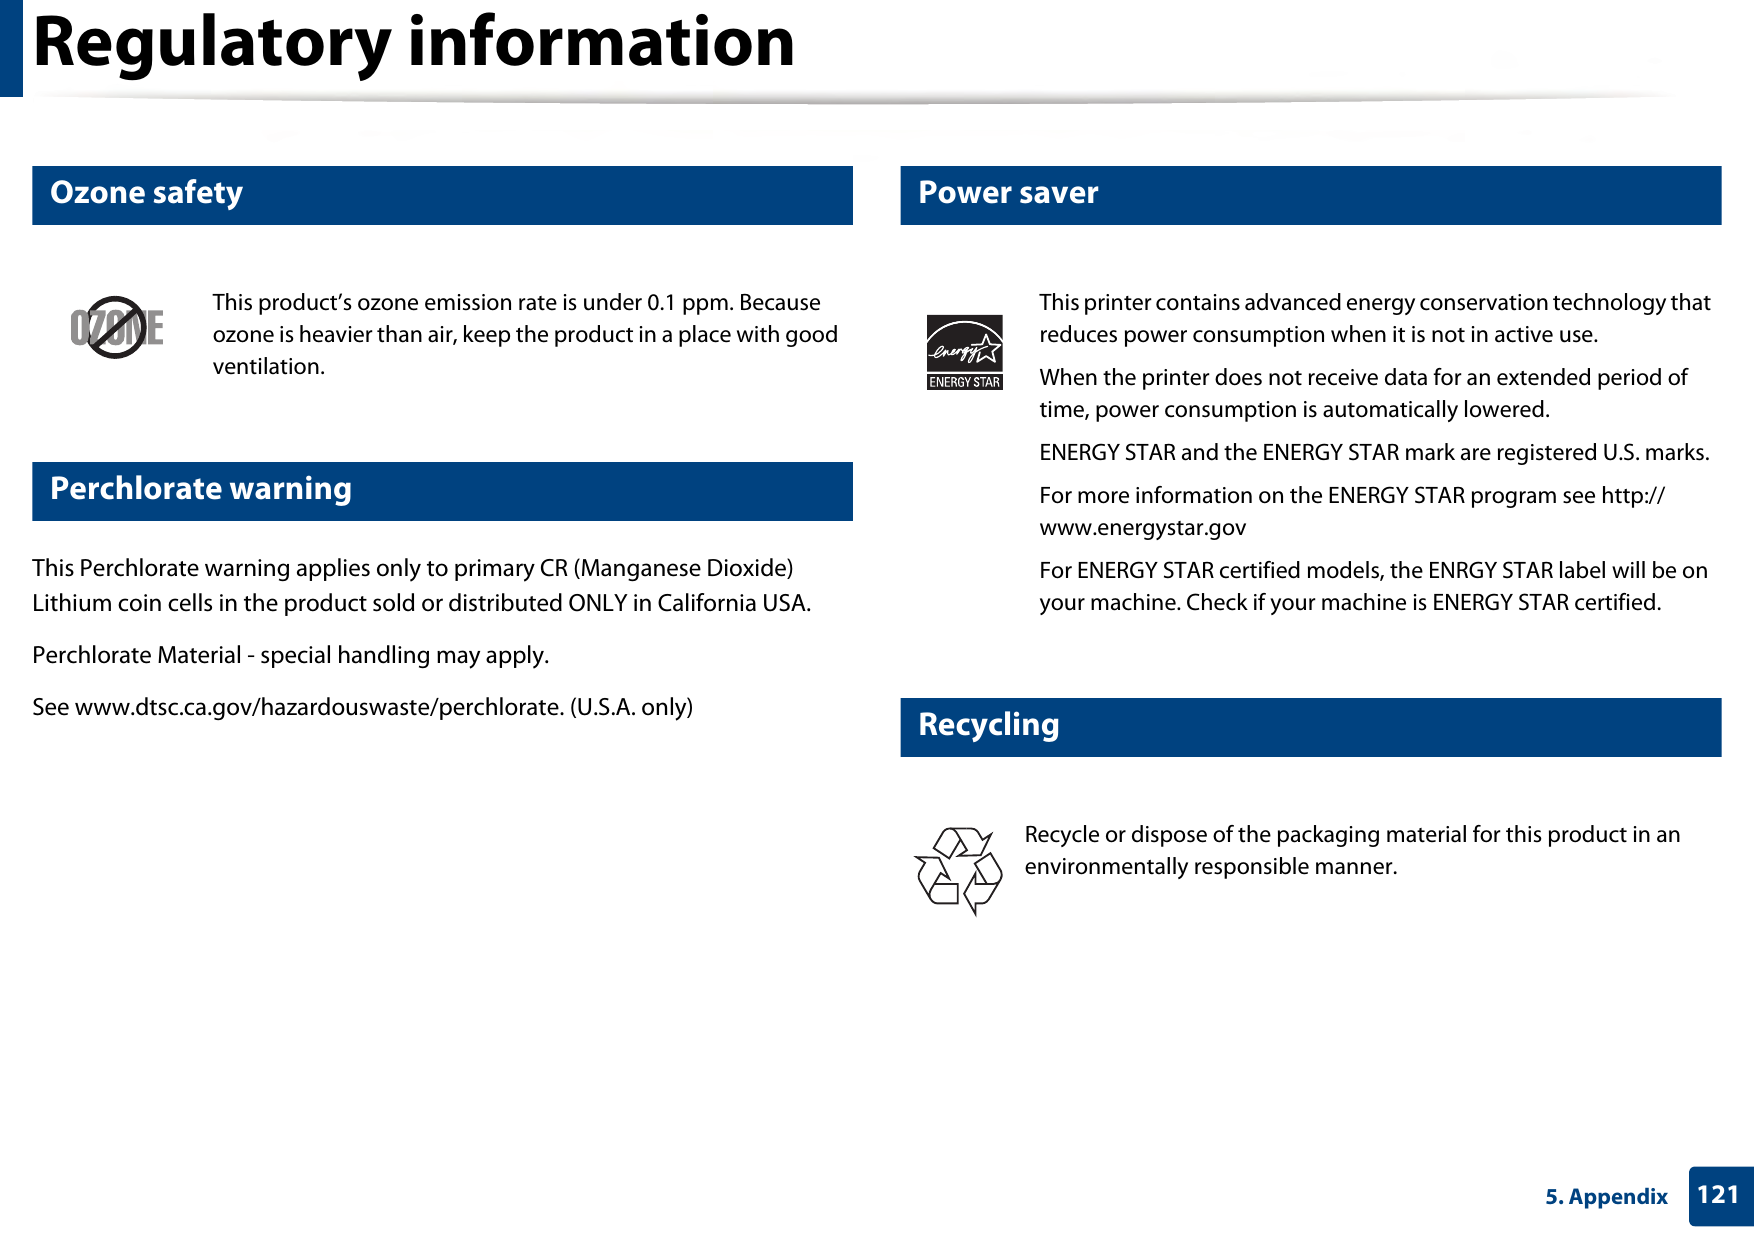
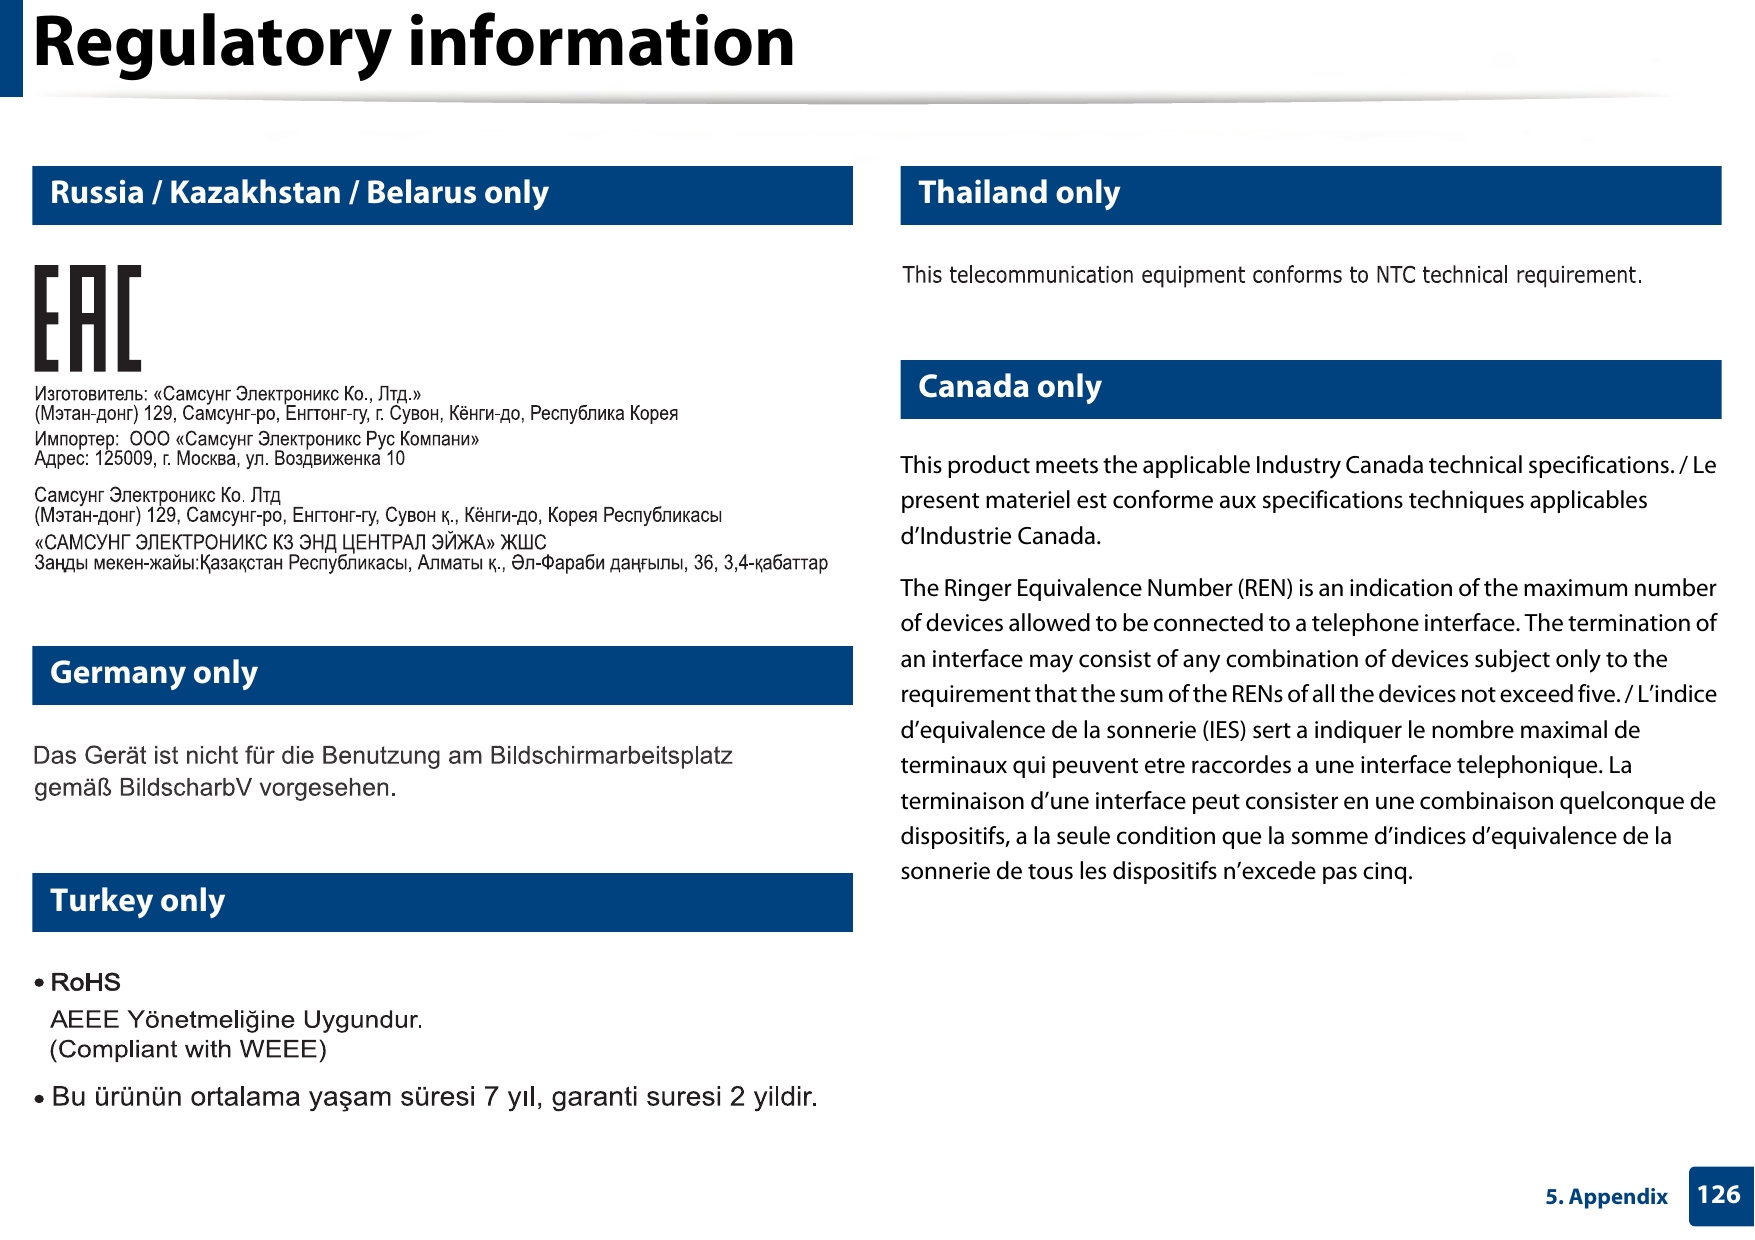
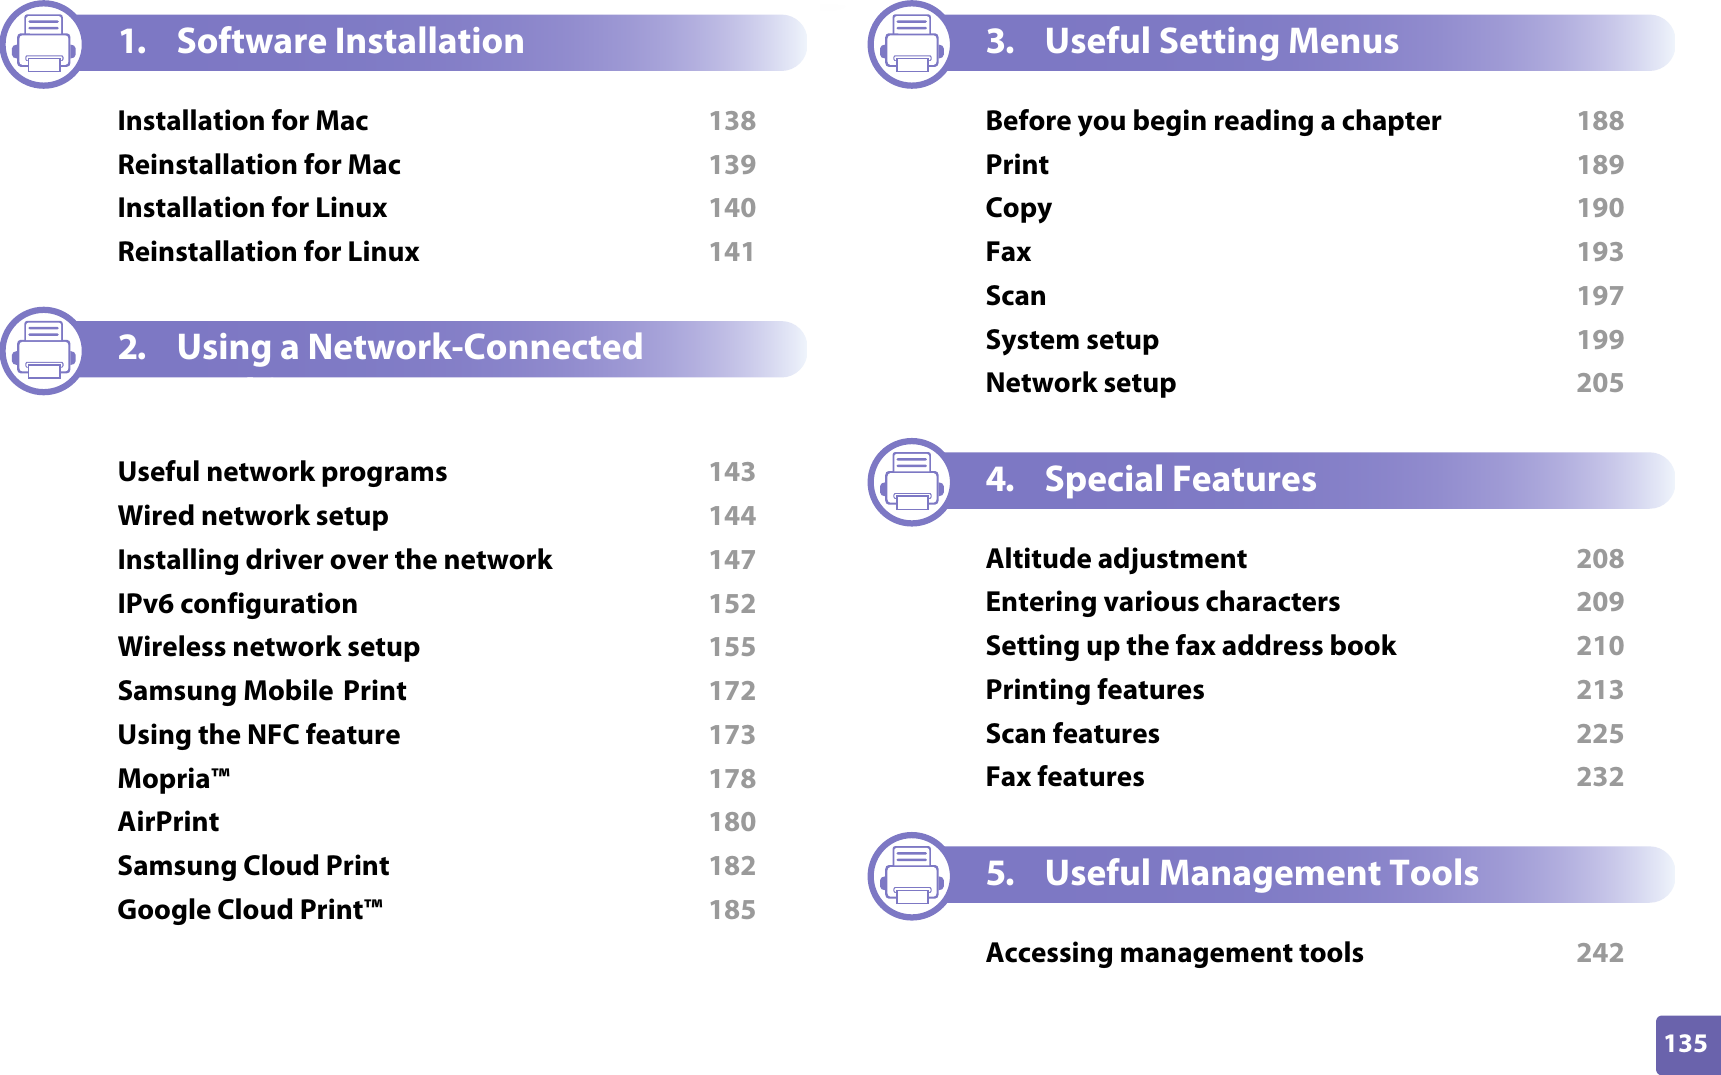
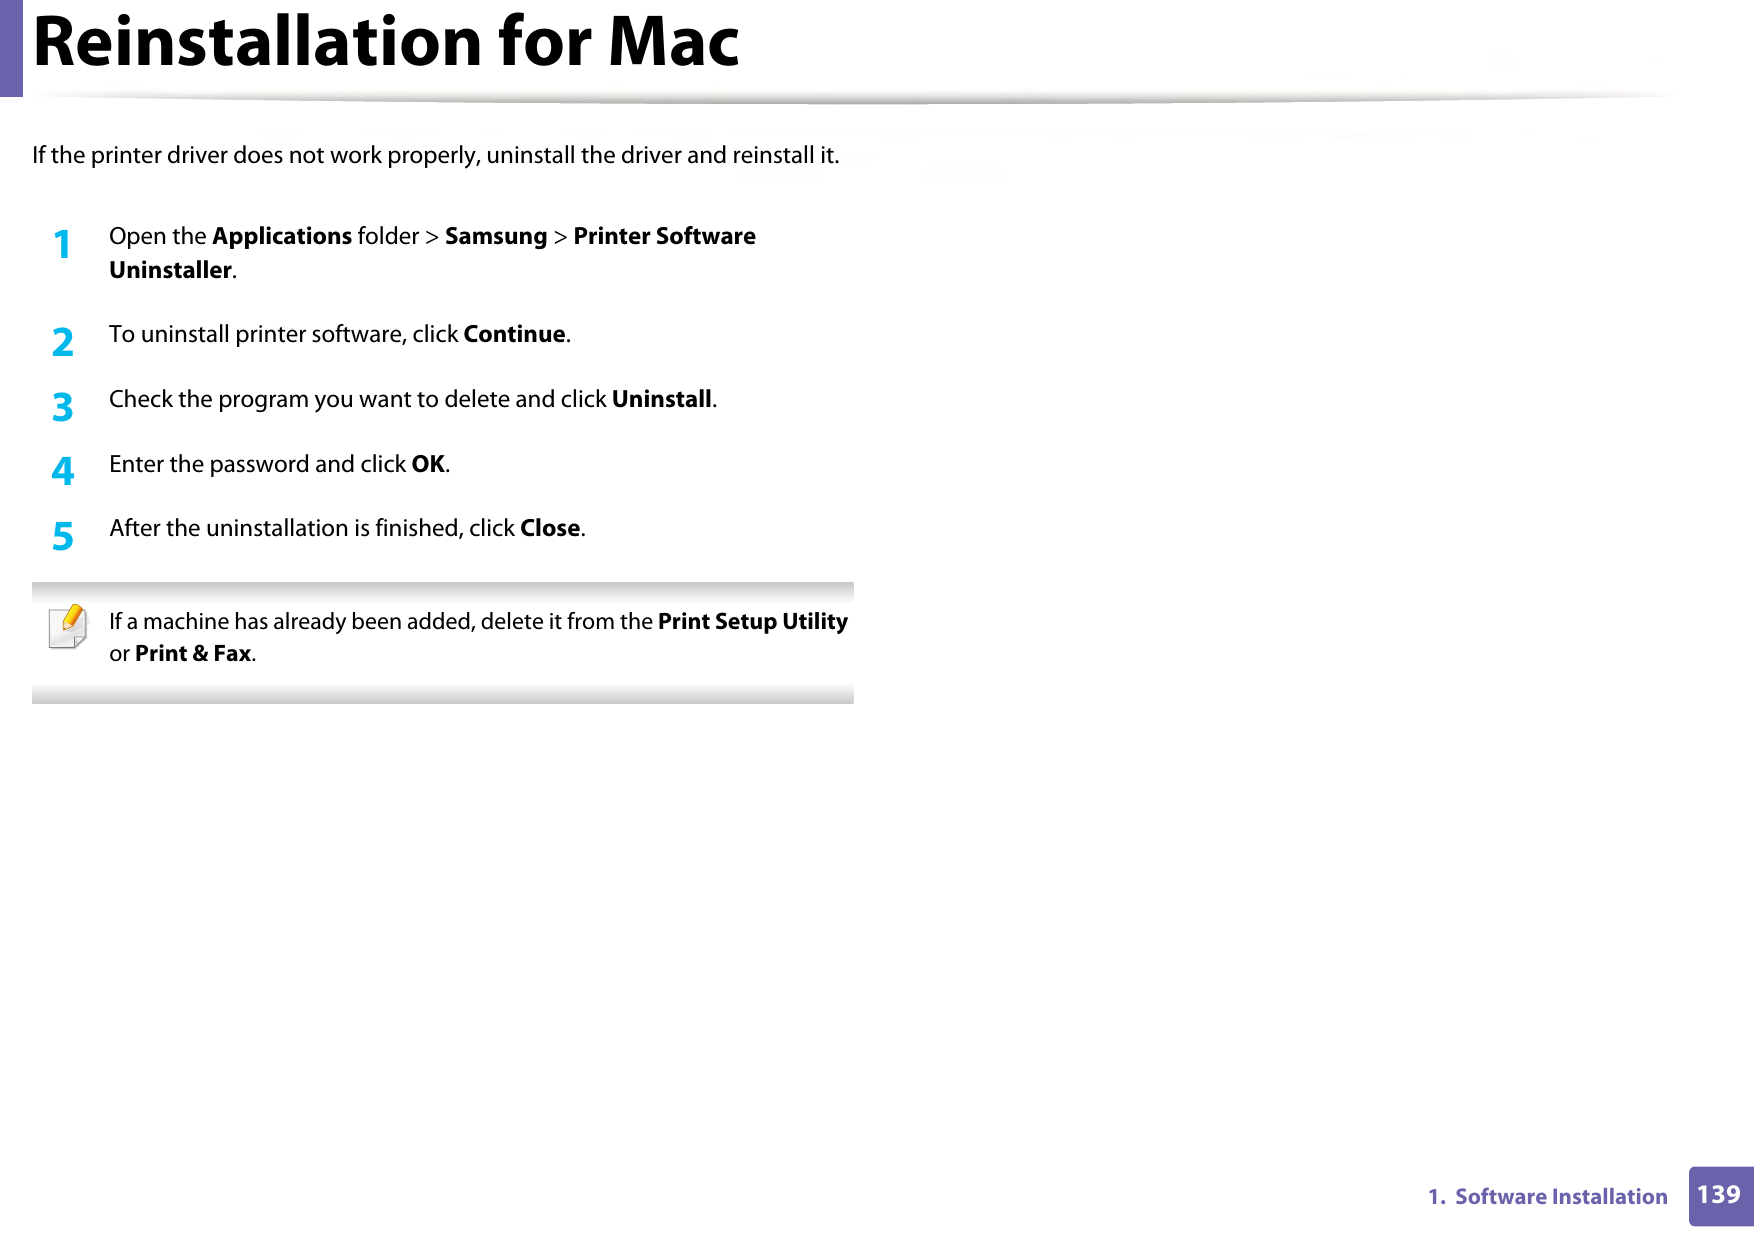
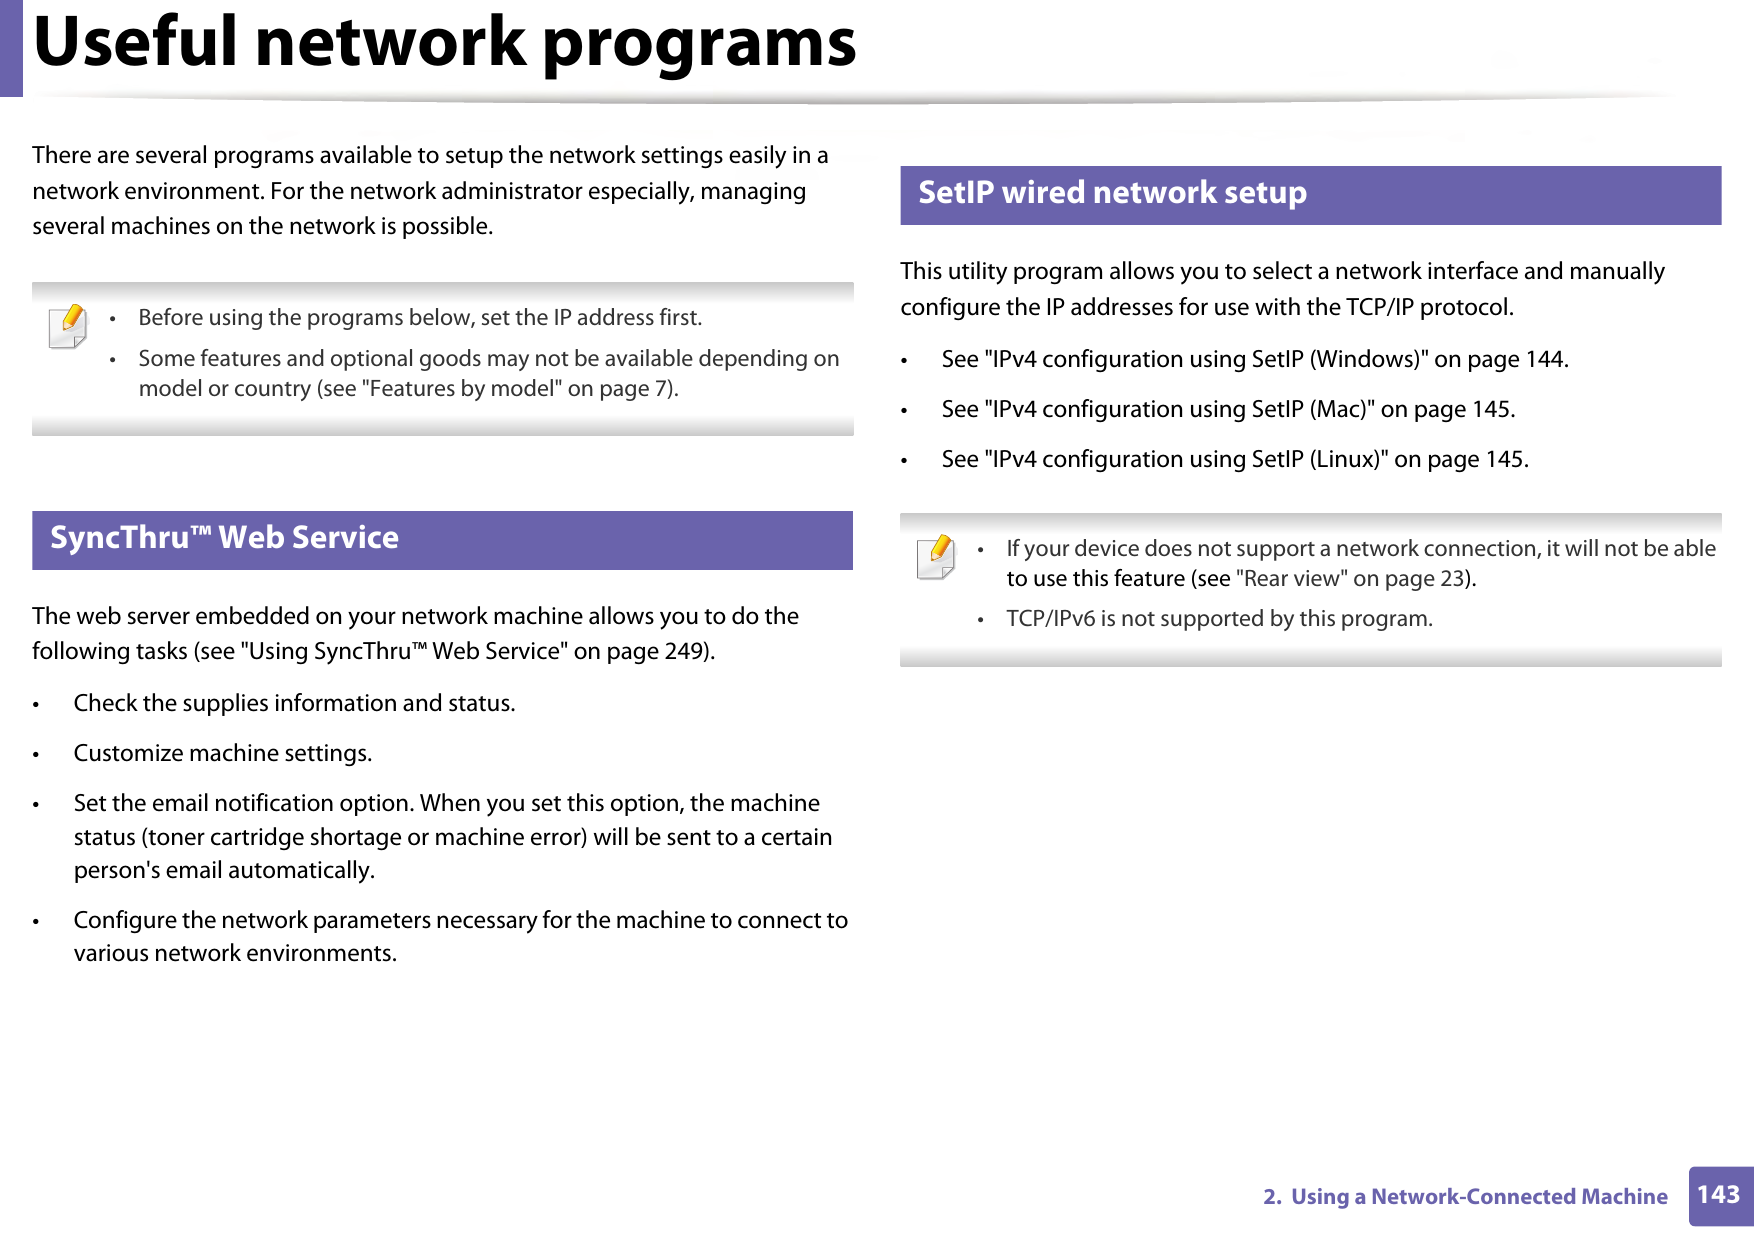
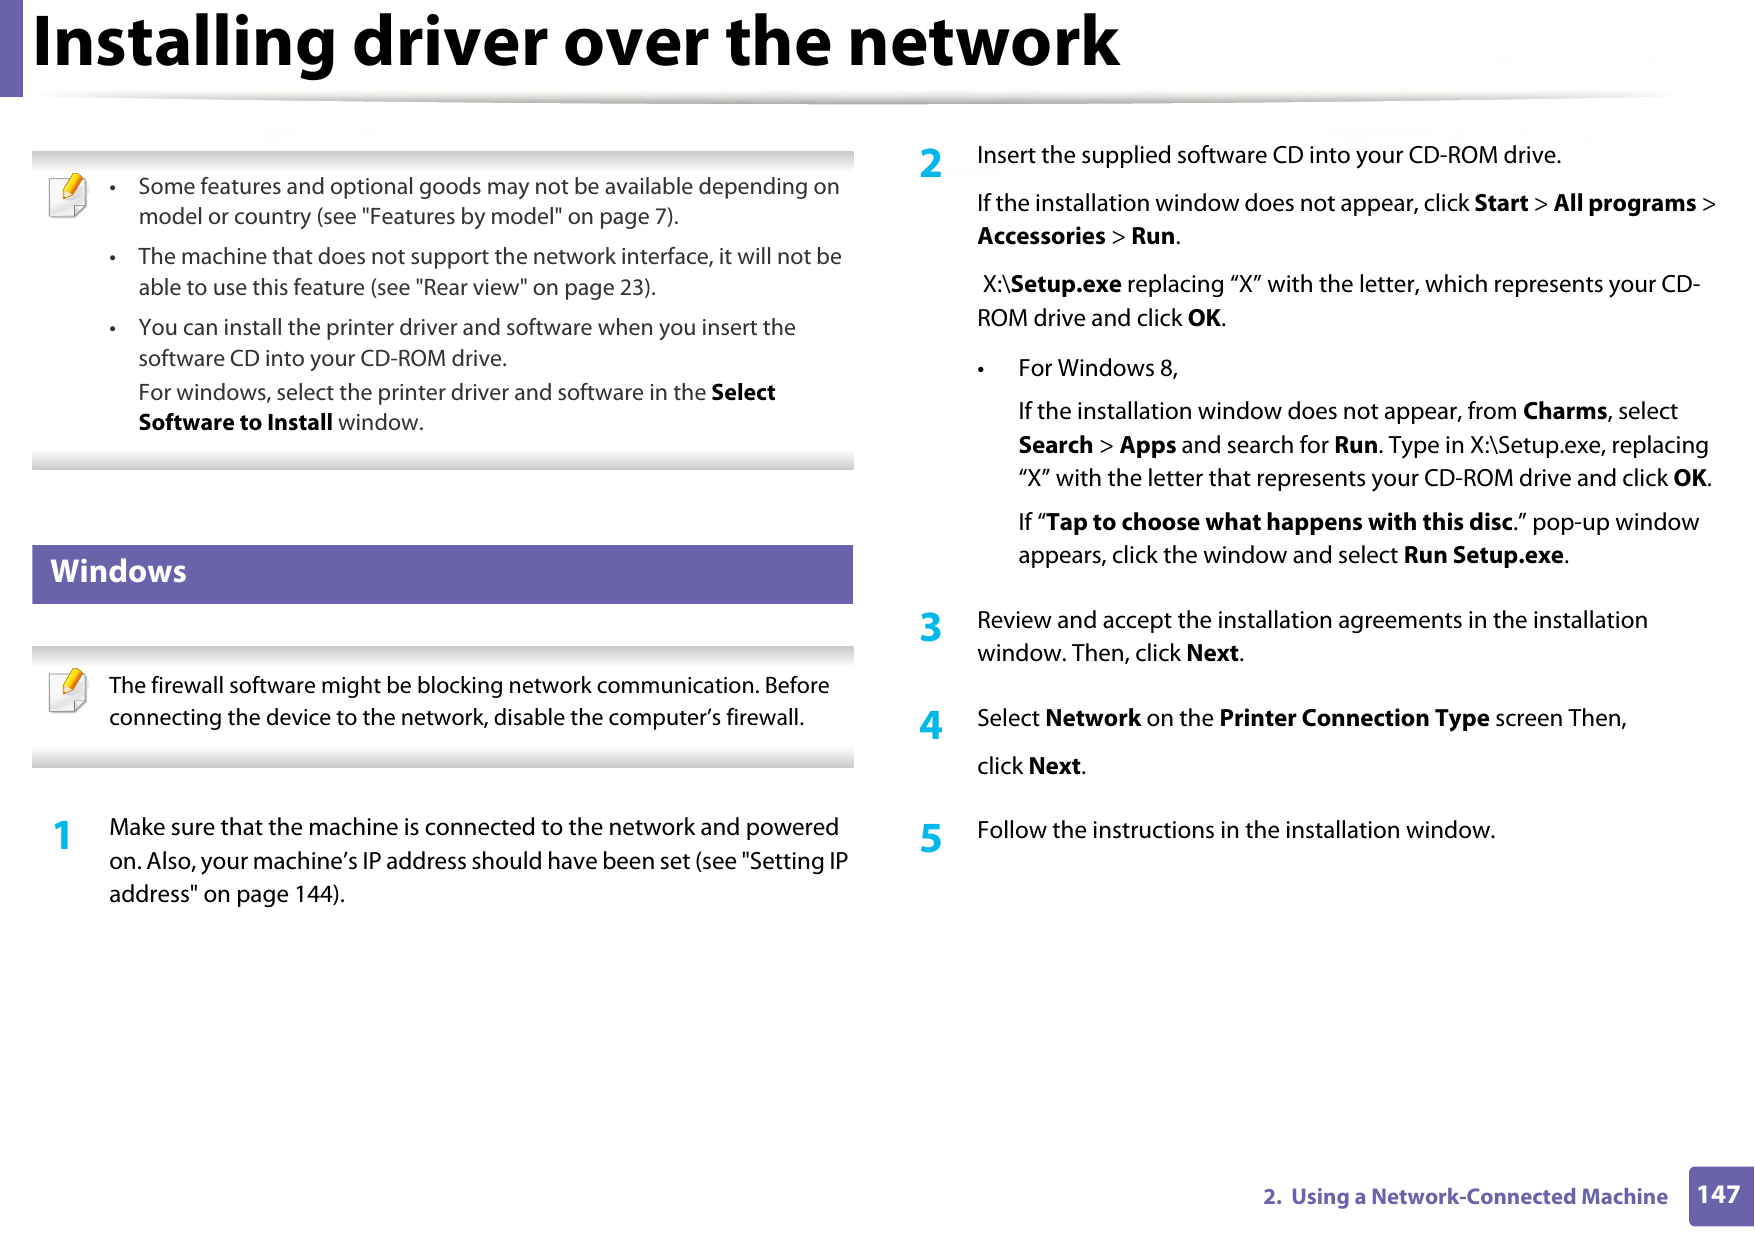
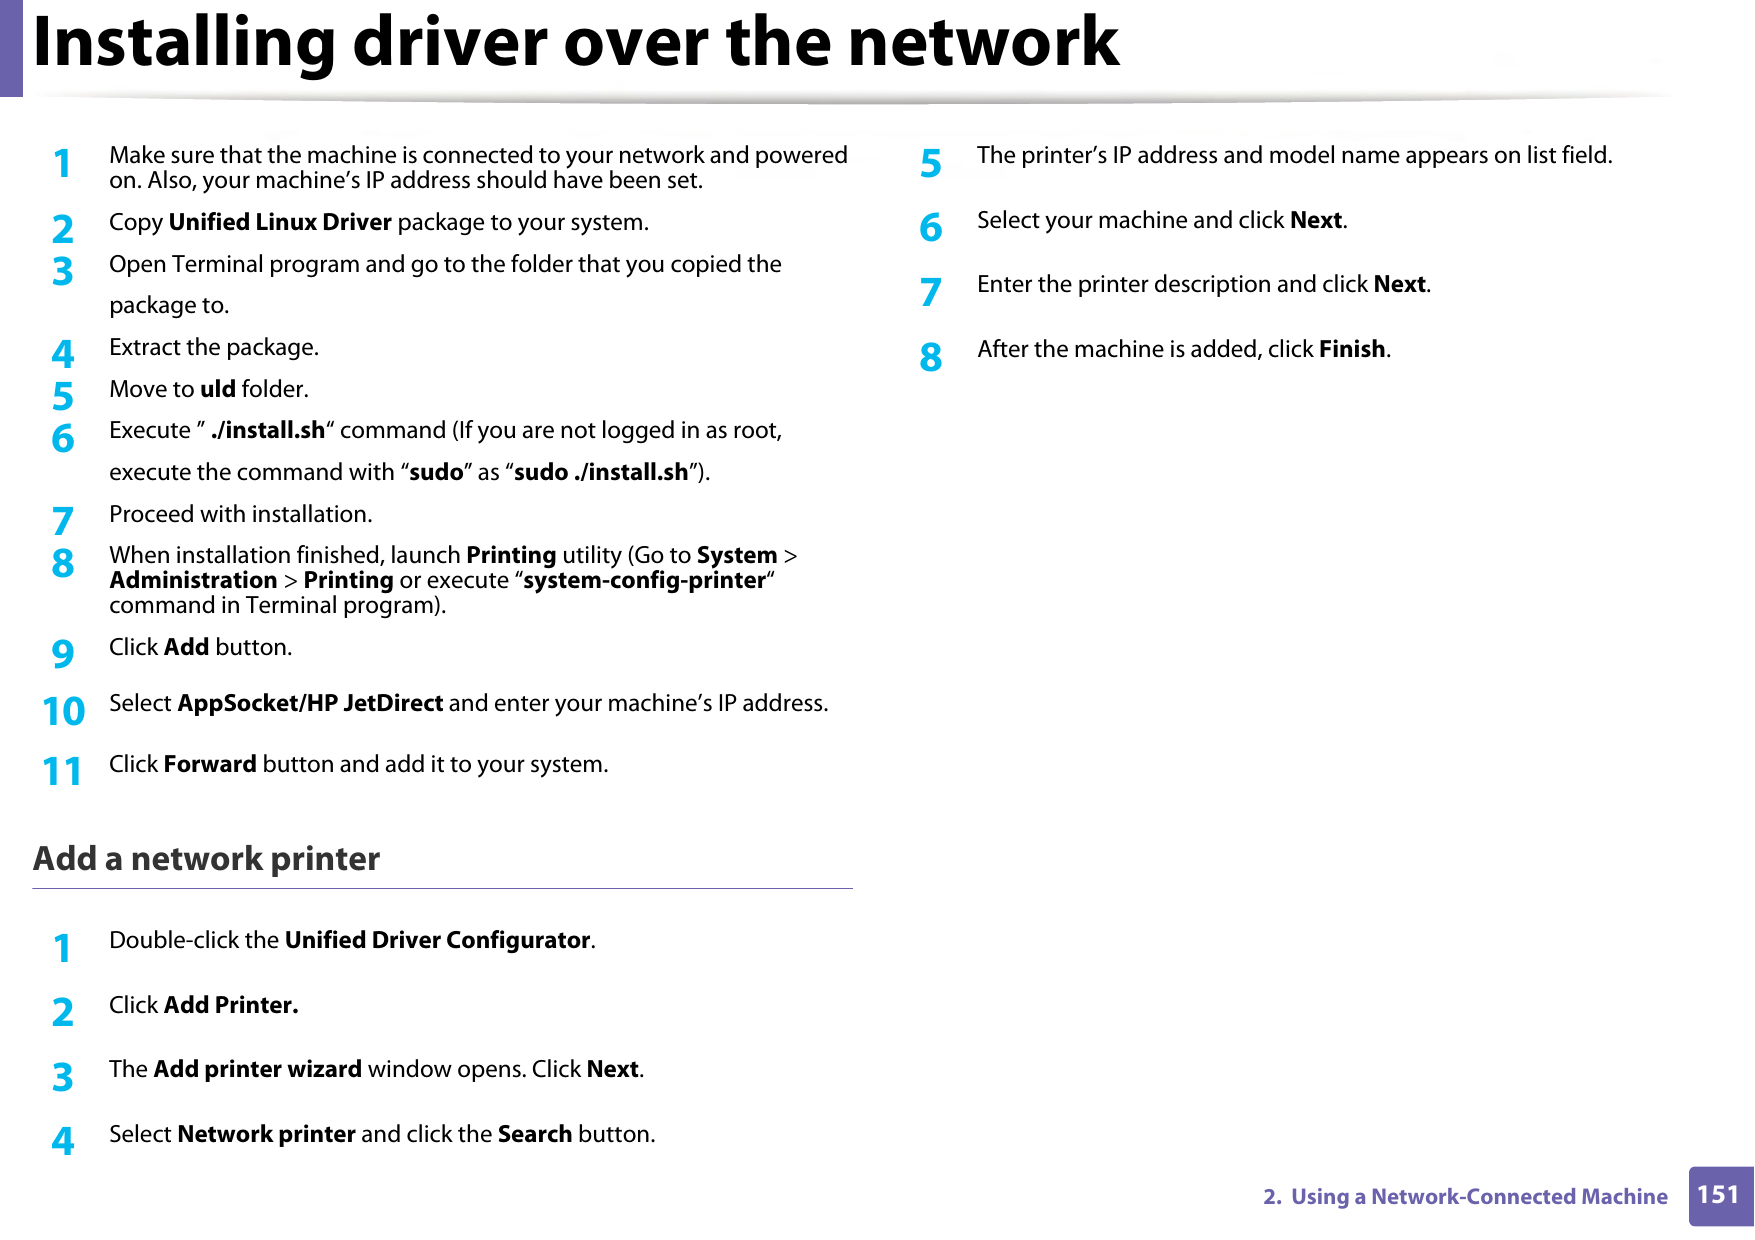
![Understanding display messages1054. Troubleshooting6 Toner-related messagesMessage Meaning Suggested solutions•Install Toner•Install toner cartridgeA toner cartridge is not installed.Install a toner cartridge.• Not Compatible [color] toner• Not Compatible toner cartridgeThe toner cartridge is not suitable for your machine. Install the corresponding toner cartridge with a Samsung-genuine cartridge.Not original [color] tonerThe toner cartridge is not a Samsung-genuine toner cartridge.Install the corresponding toner cartridge with a Samsung-genuine cartridge.•Prepare toner•Prepare new cartridgeSmall amount of toner is left in the indicated cartridge. The estimated cartridge life of toner is close.Prepare a new cartridge for a replacement. You may temporarily increase the printing quality by redistributing the toner (see "Redistributing toner" on page 78).•Replace toner•Replace new cartridgeThe indicated toner cartridge has almost reached its estimated cartridge life. a• You can choose Stop or Continue as shown on the control panel. If you select Stop, the printer stops printing and you cannot print any more without changing the cartridge. If you select Continue, the printer keeps printing but the printing quality cannot be guaranteed. Besides, it can cause serious damage to your machine.• Replace the toner cartridge for the best print quality when this message appears. Using a cartridge beyond this stage can result in printing quality issues (see "Replacing the toner cartridge" on page 80).The indicated toner cartridge has reached its estimated cartridge life.a The machine might stop printing.Replace the toner cartridge (see "Replacing the toner cartridge" on page 80).a. Estimated cartridge life means the expected or estimated toner cartridge life, which indicates the average capacity of print-outs and is designed pursuant to ISO/IEC 19798 (see "Available supplies" on page 75). The number of pages may be affected by operating environment, percentage of image area, printing interval, media, percentage of image area, and media size. Some amount of toner may remain in the cartridge even when replace new cartridge appears and the machine stops printing.Message Meaning Suggested solutions](https://usermanual.wiki/Samsung-Electronics-Co/SLC480FW.User-Manual-3/User-Guide-2579315-Page-5.png)

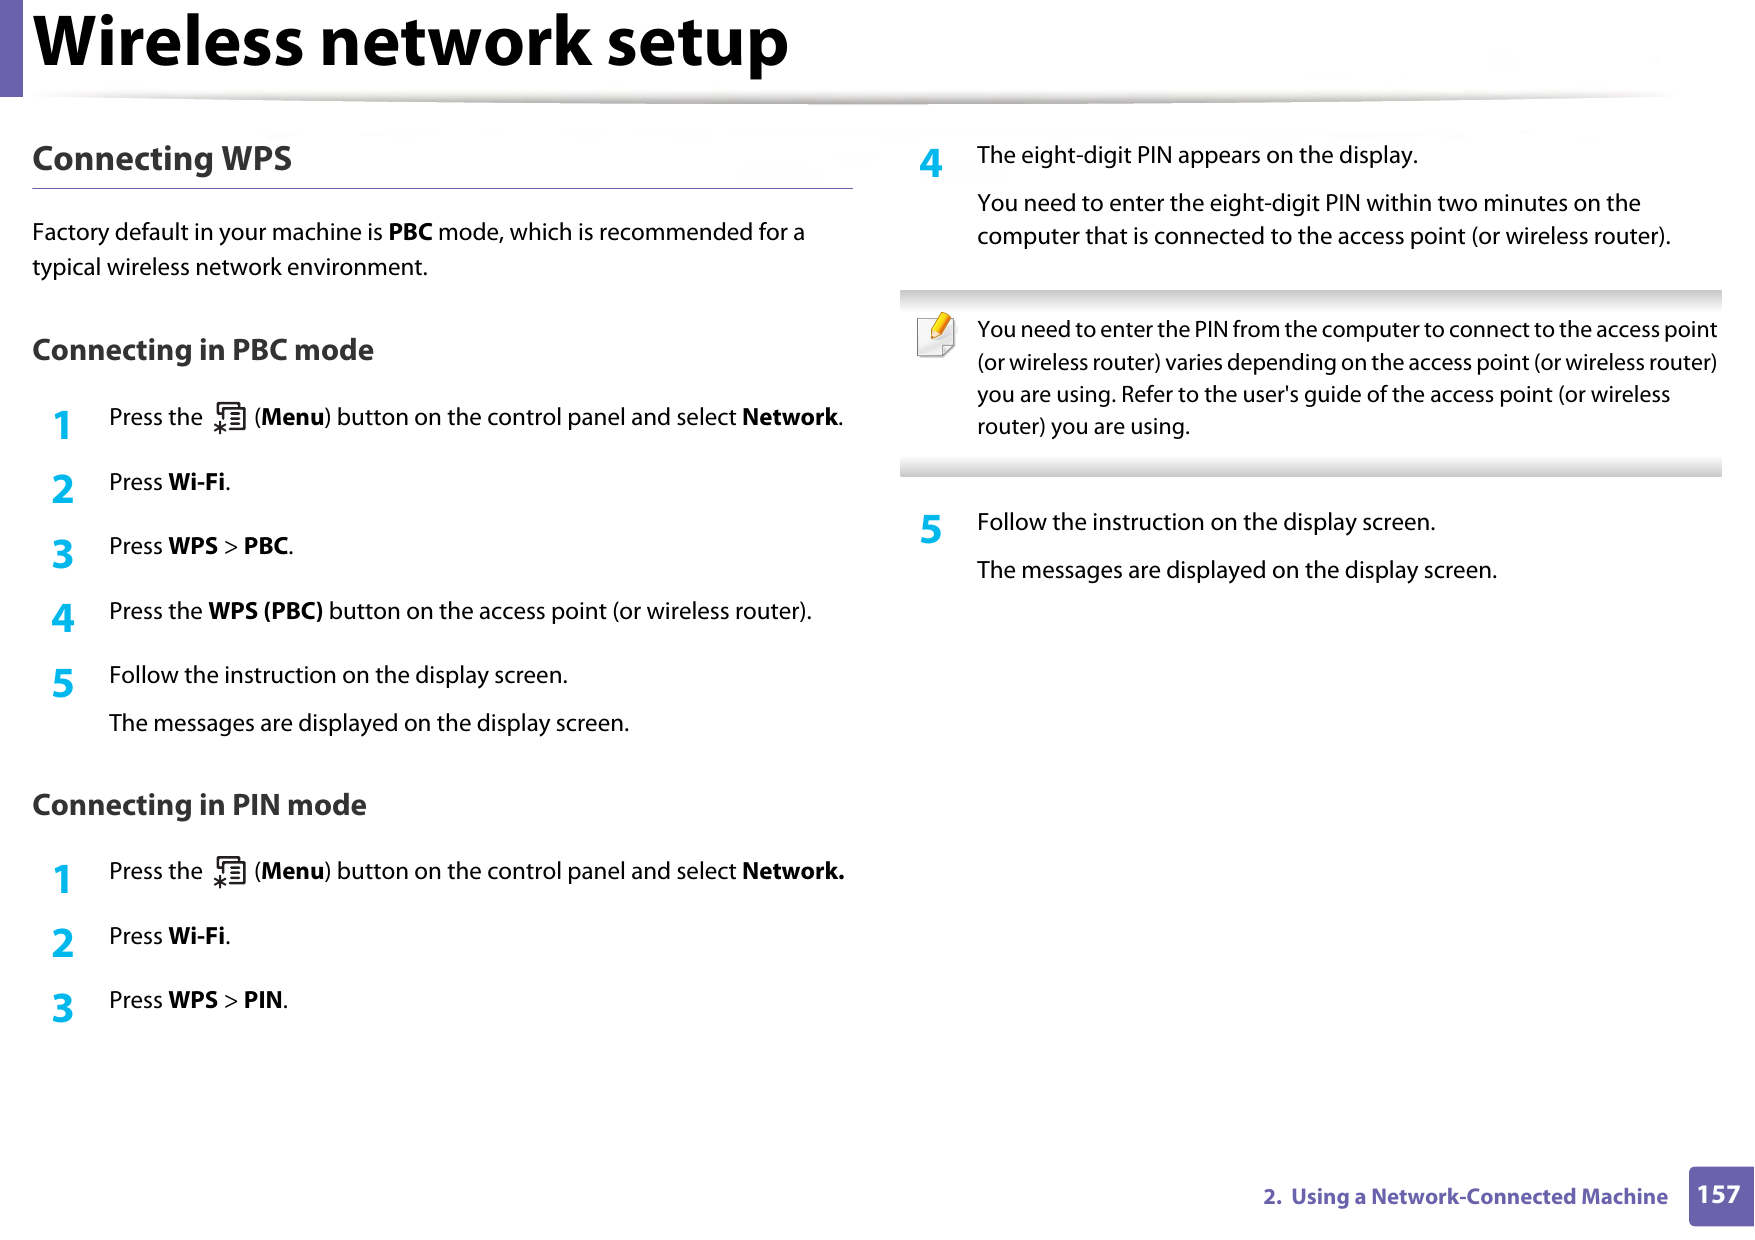
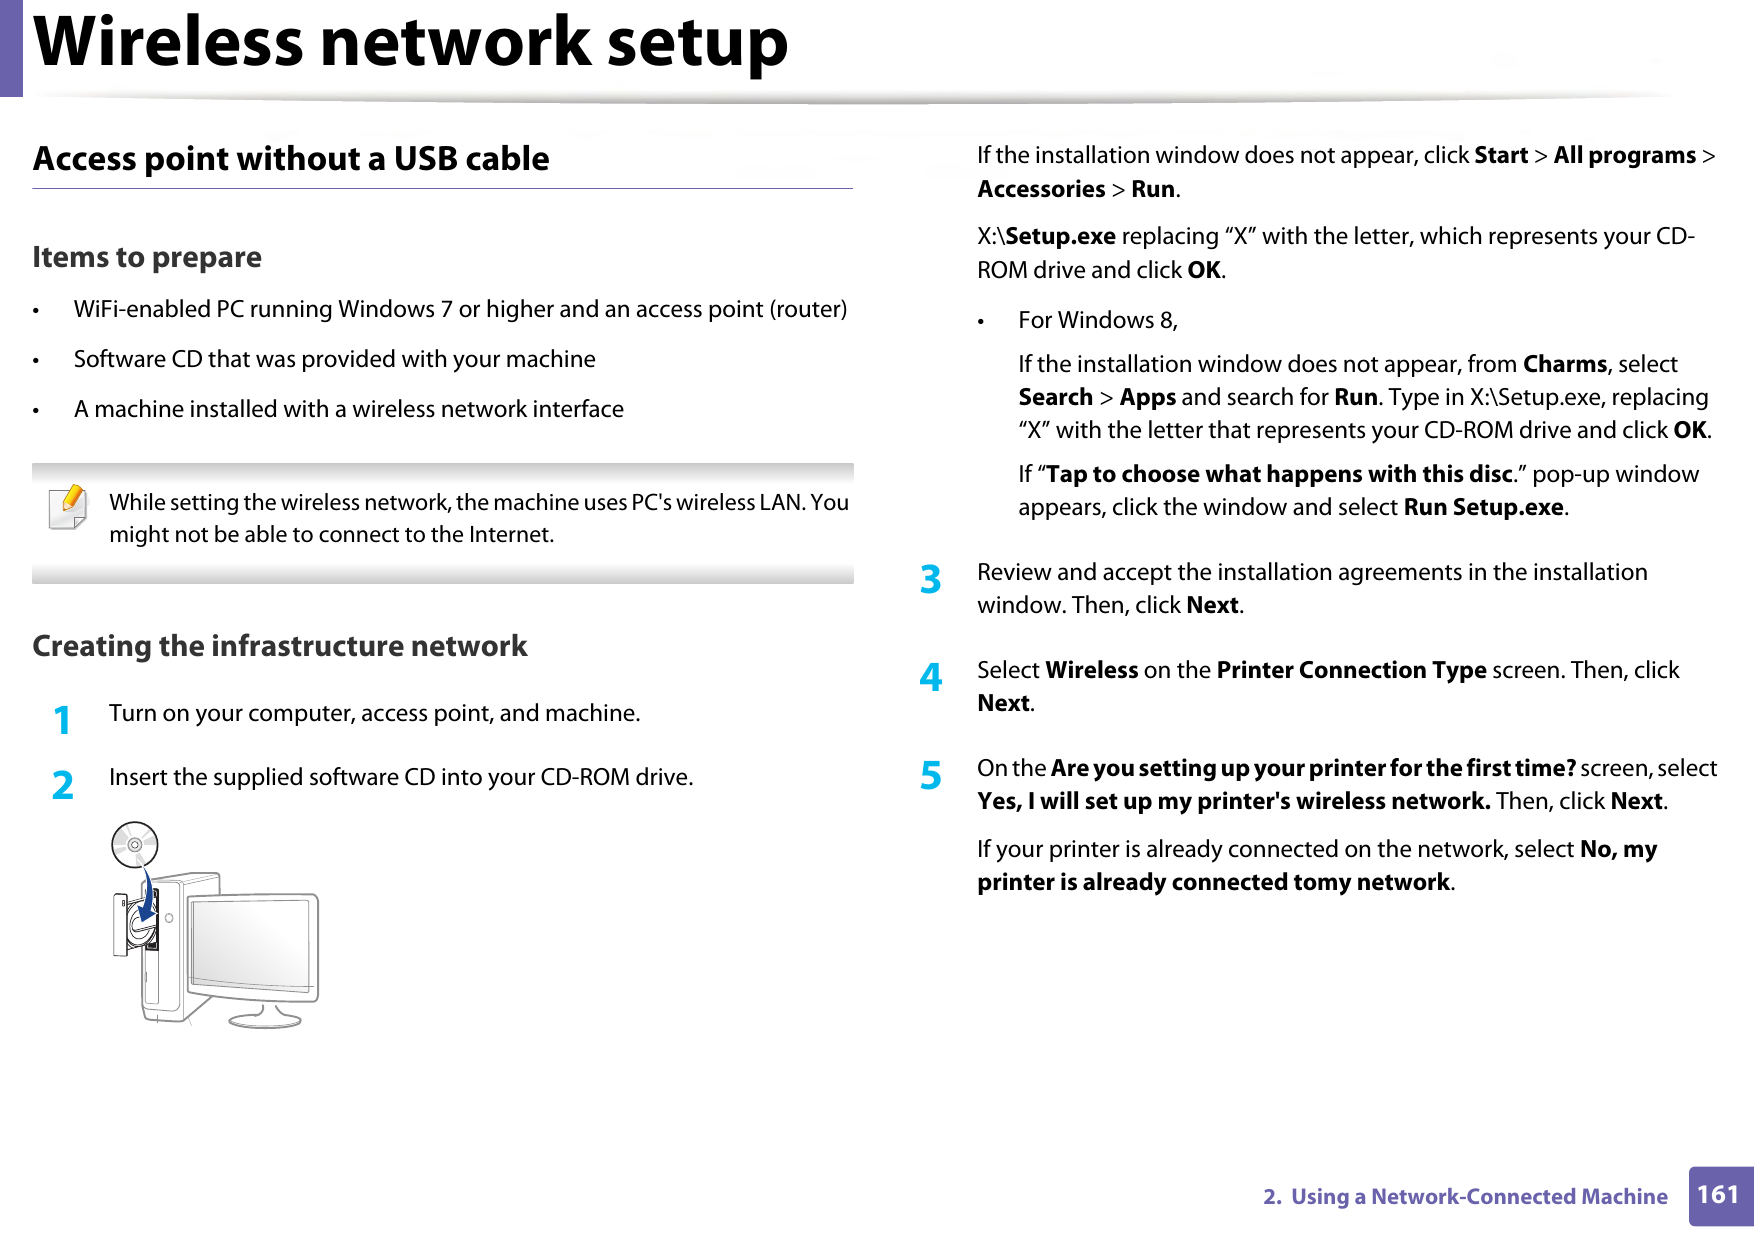
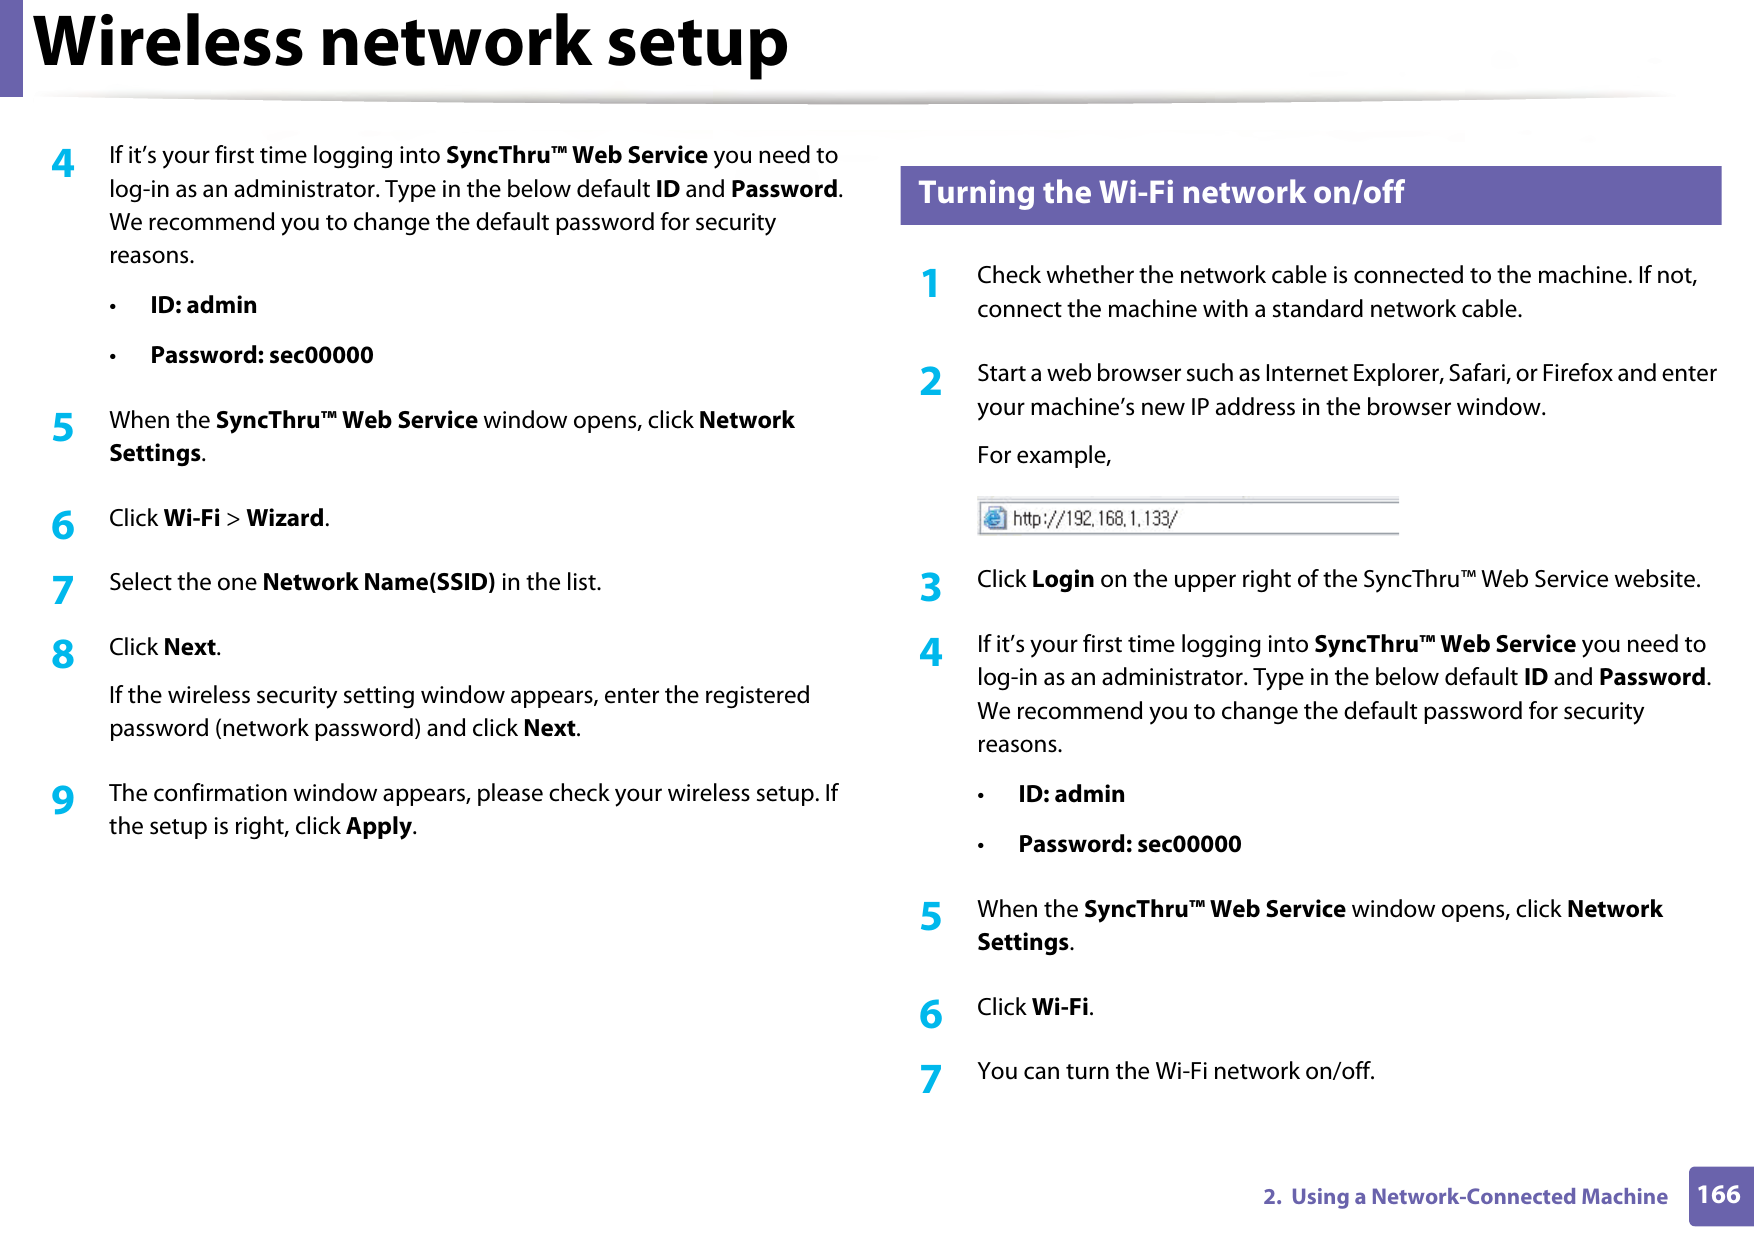
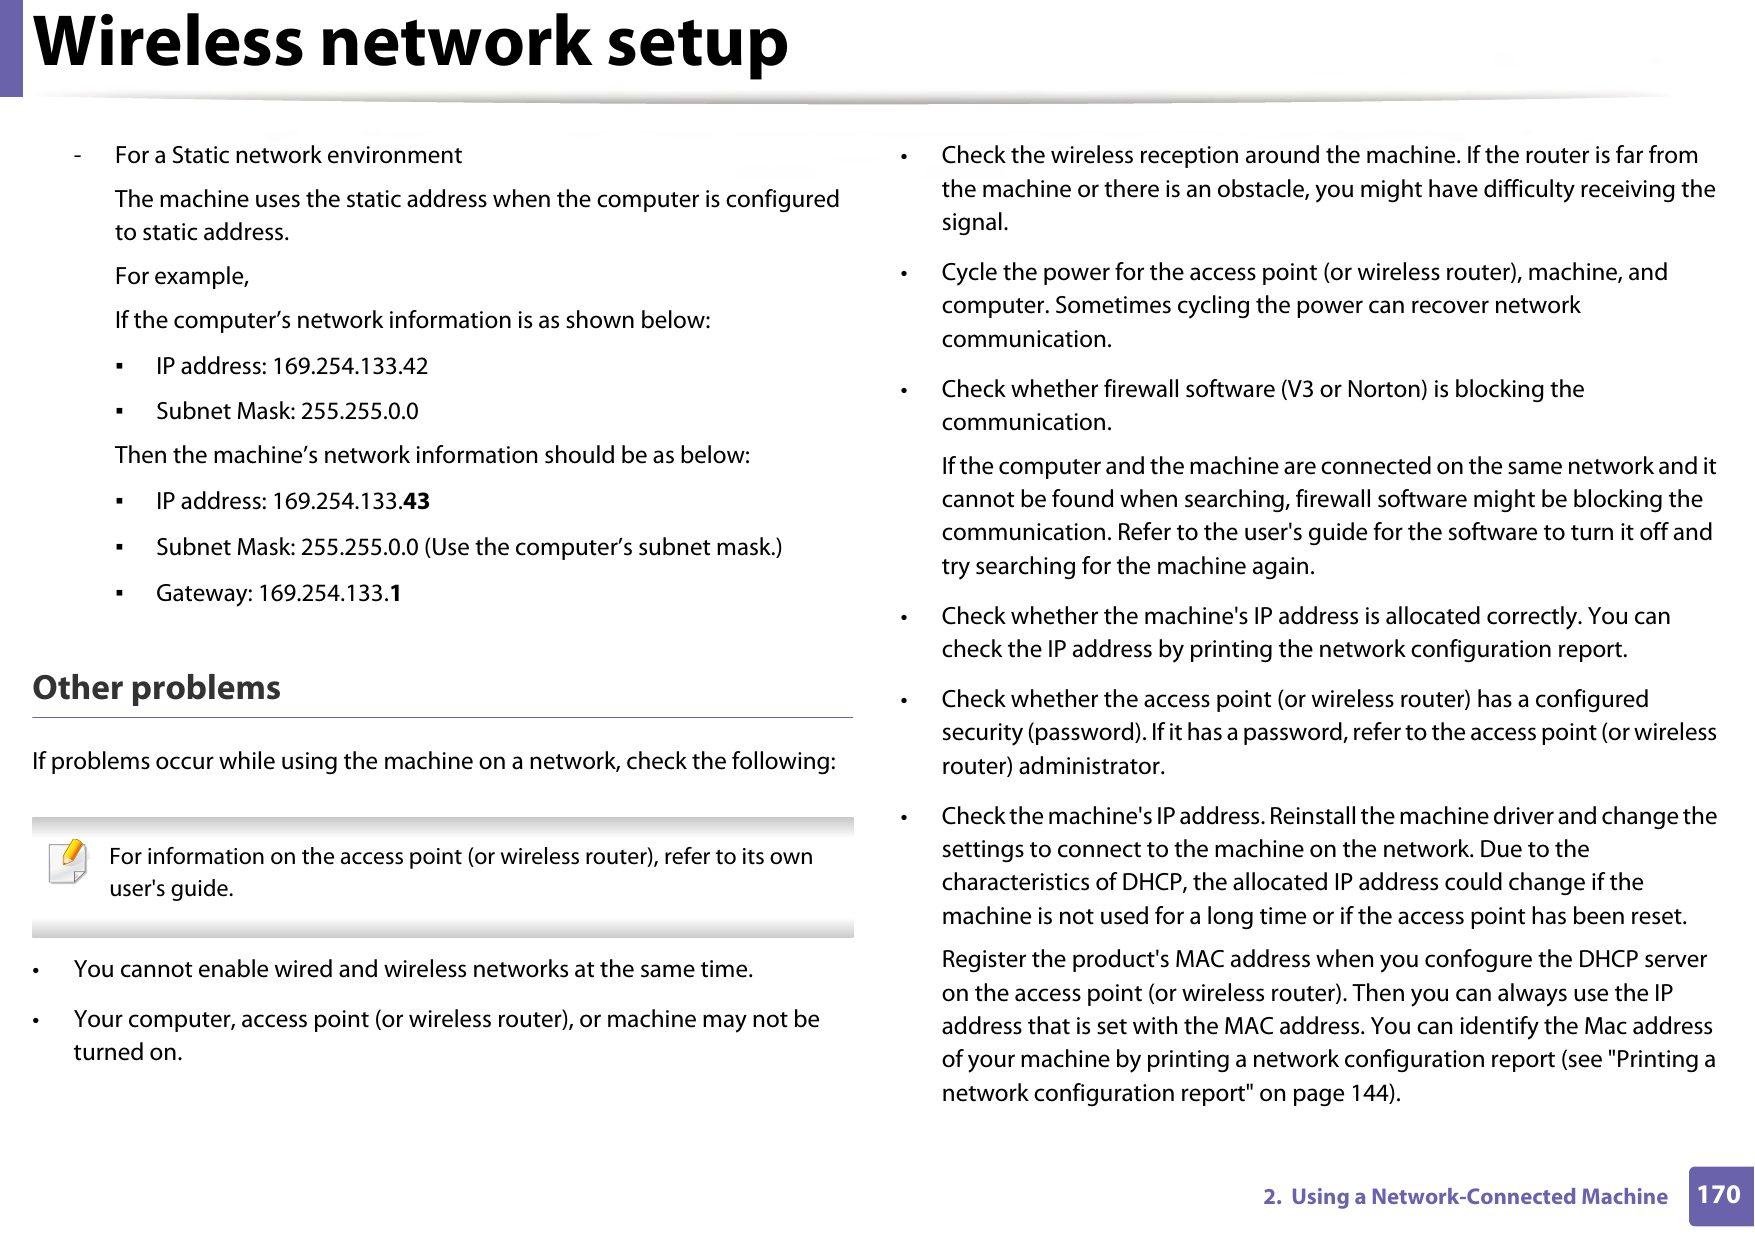
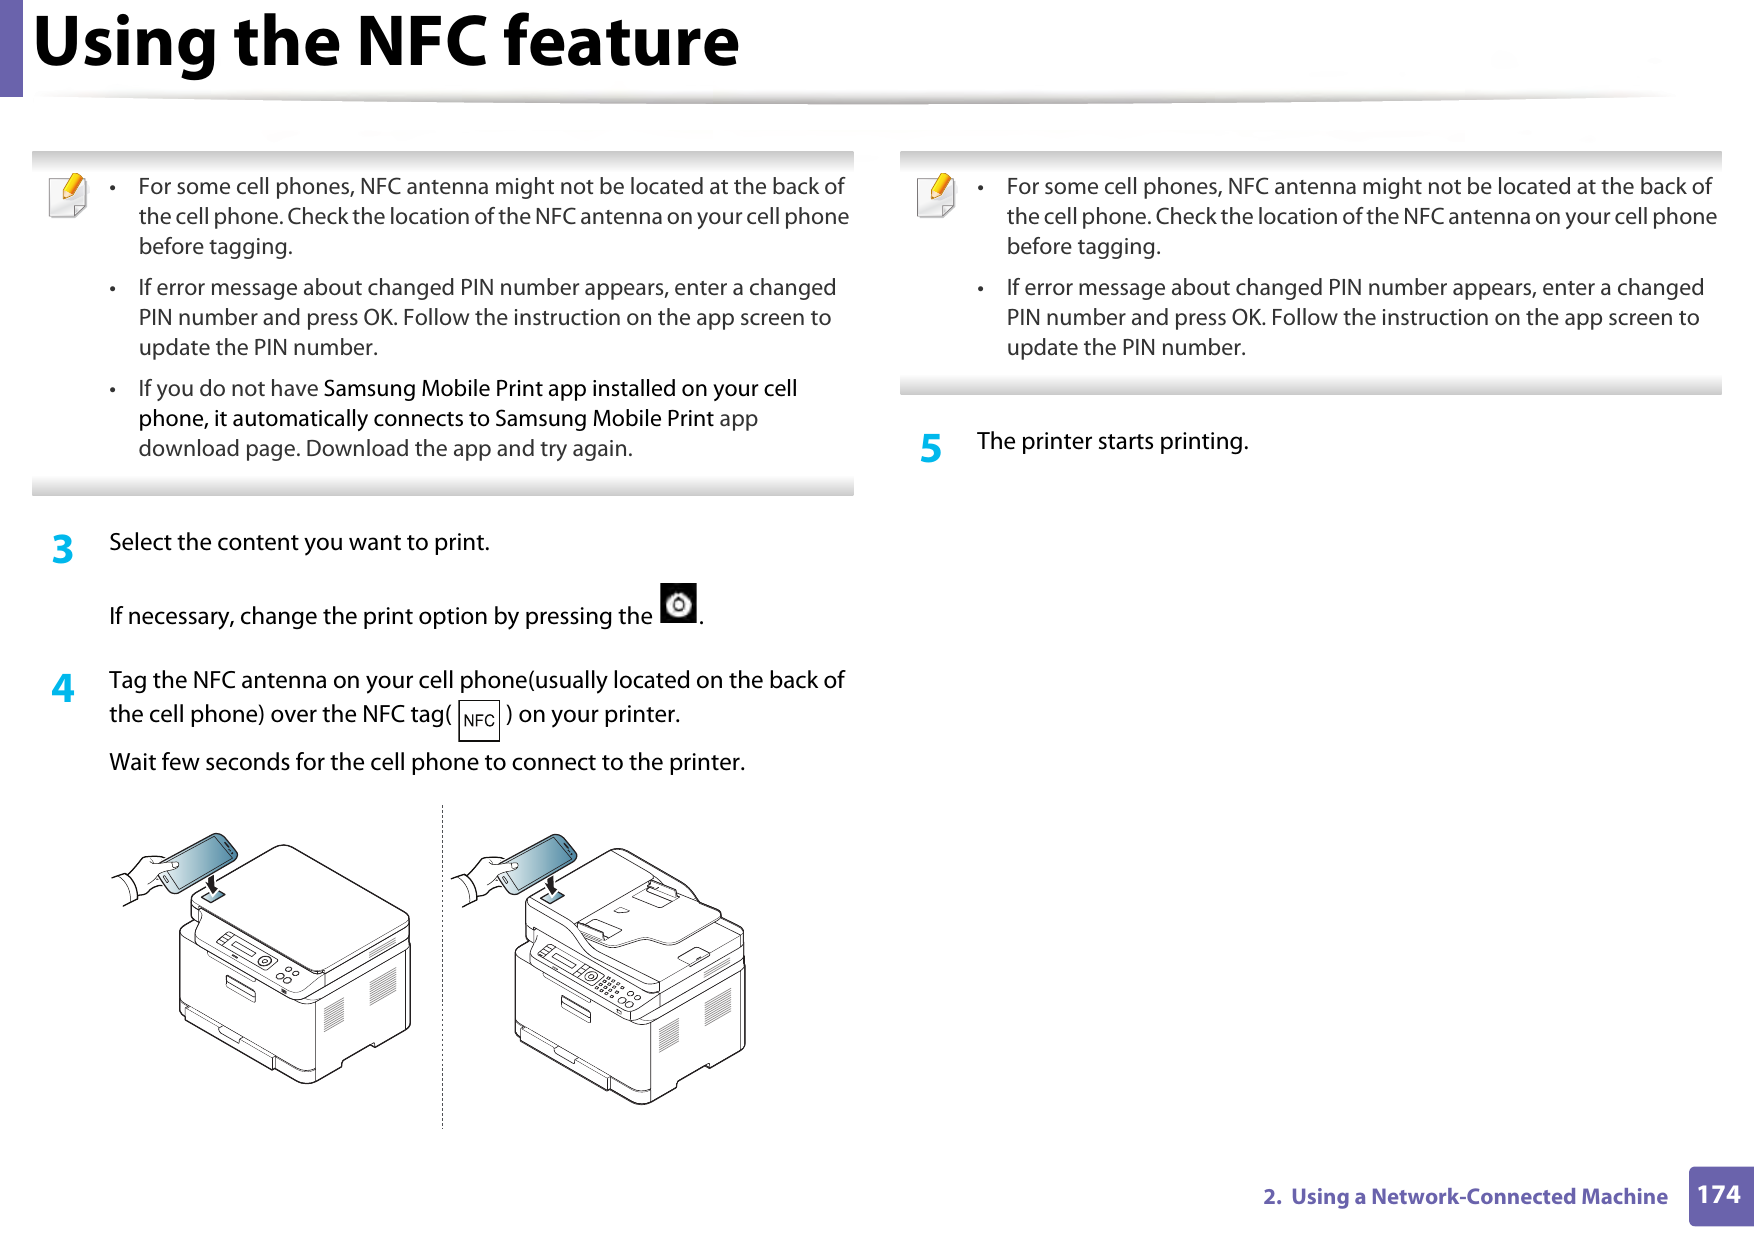
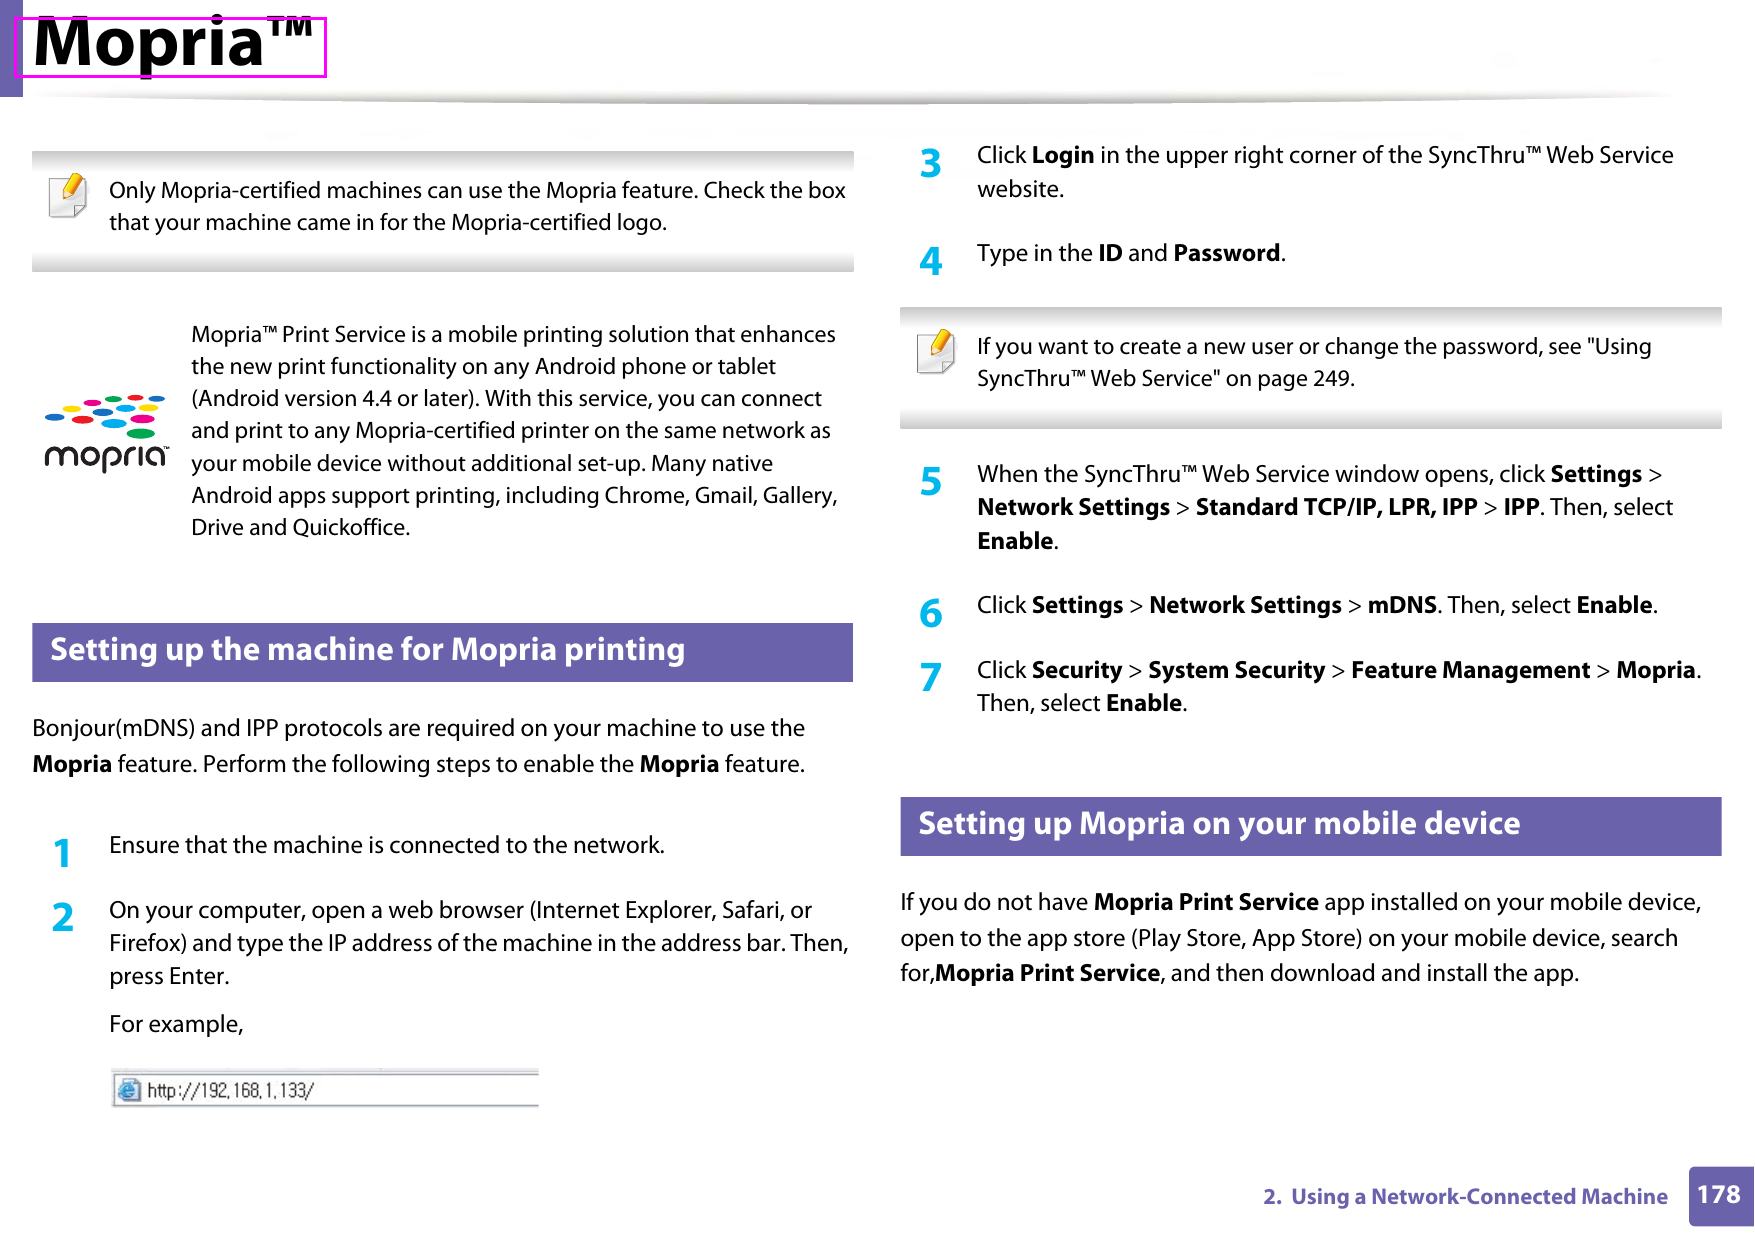
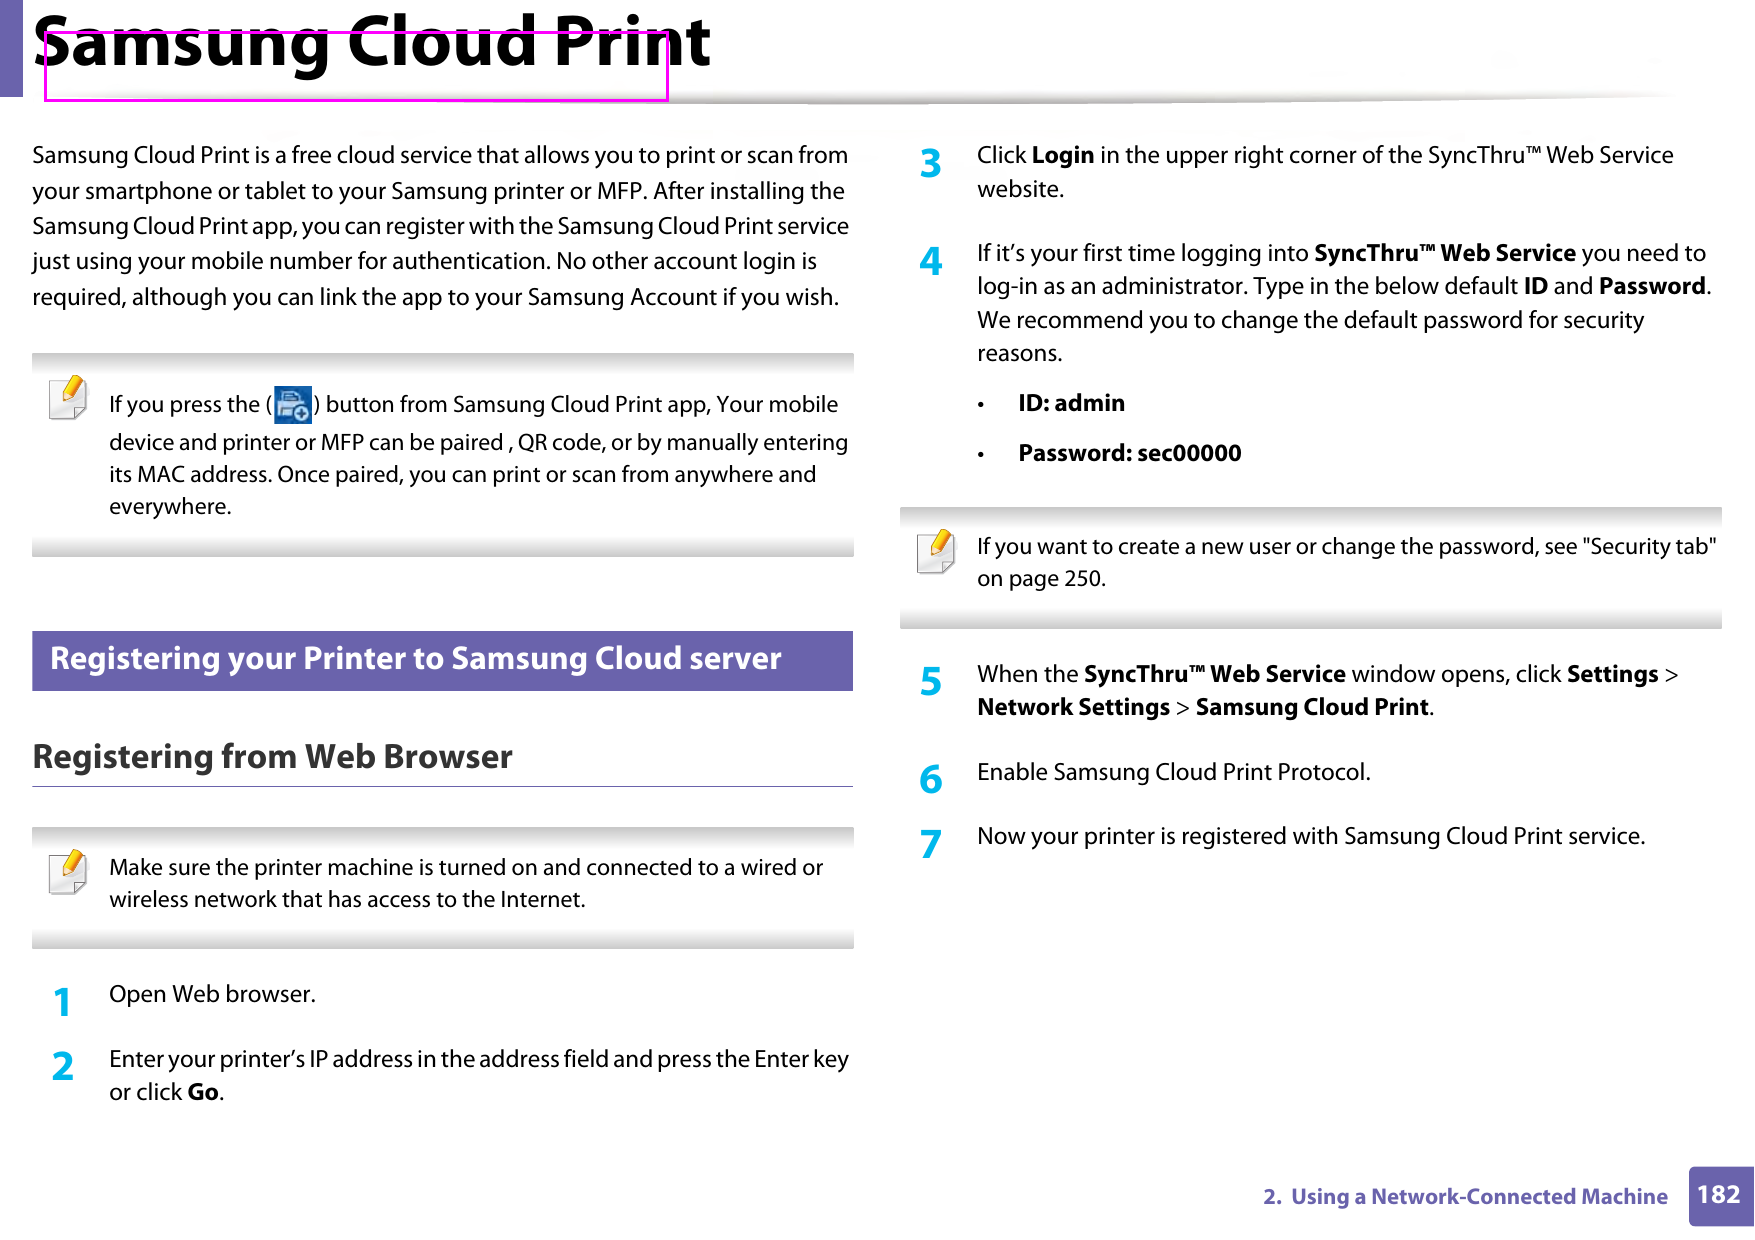
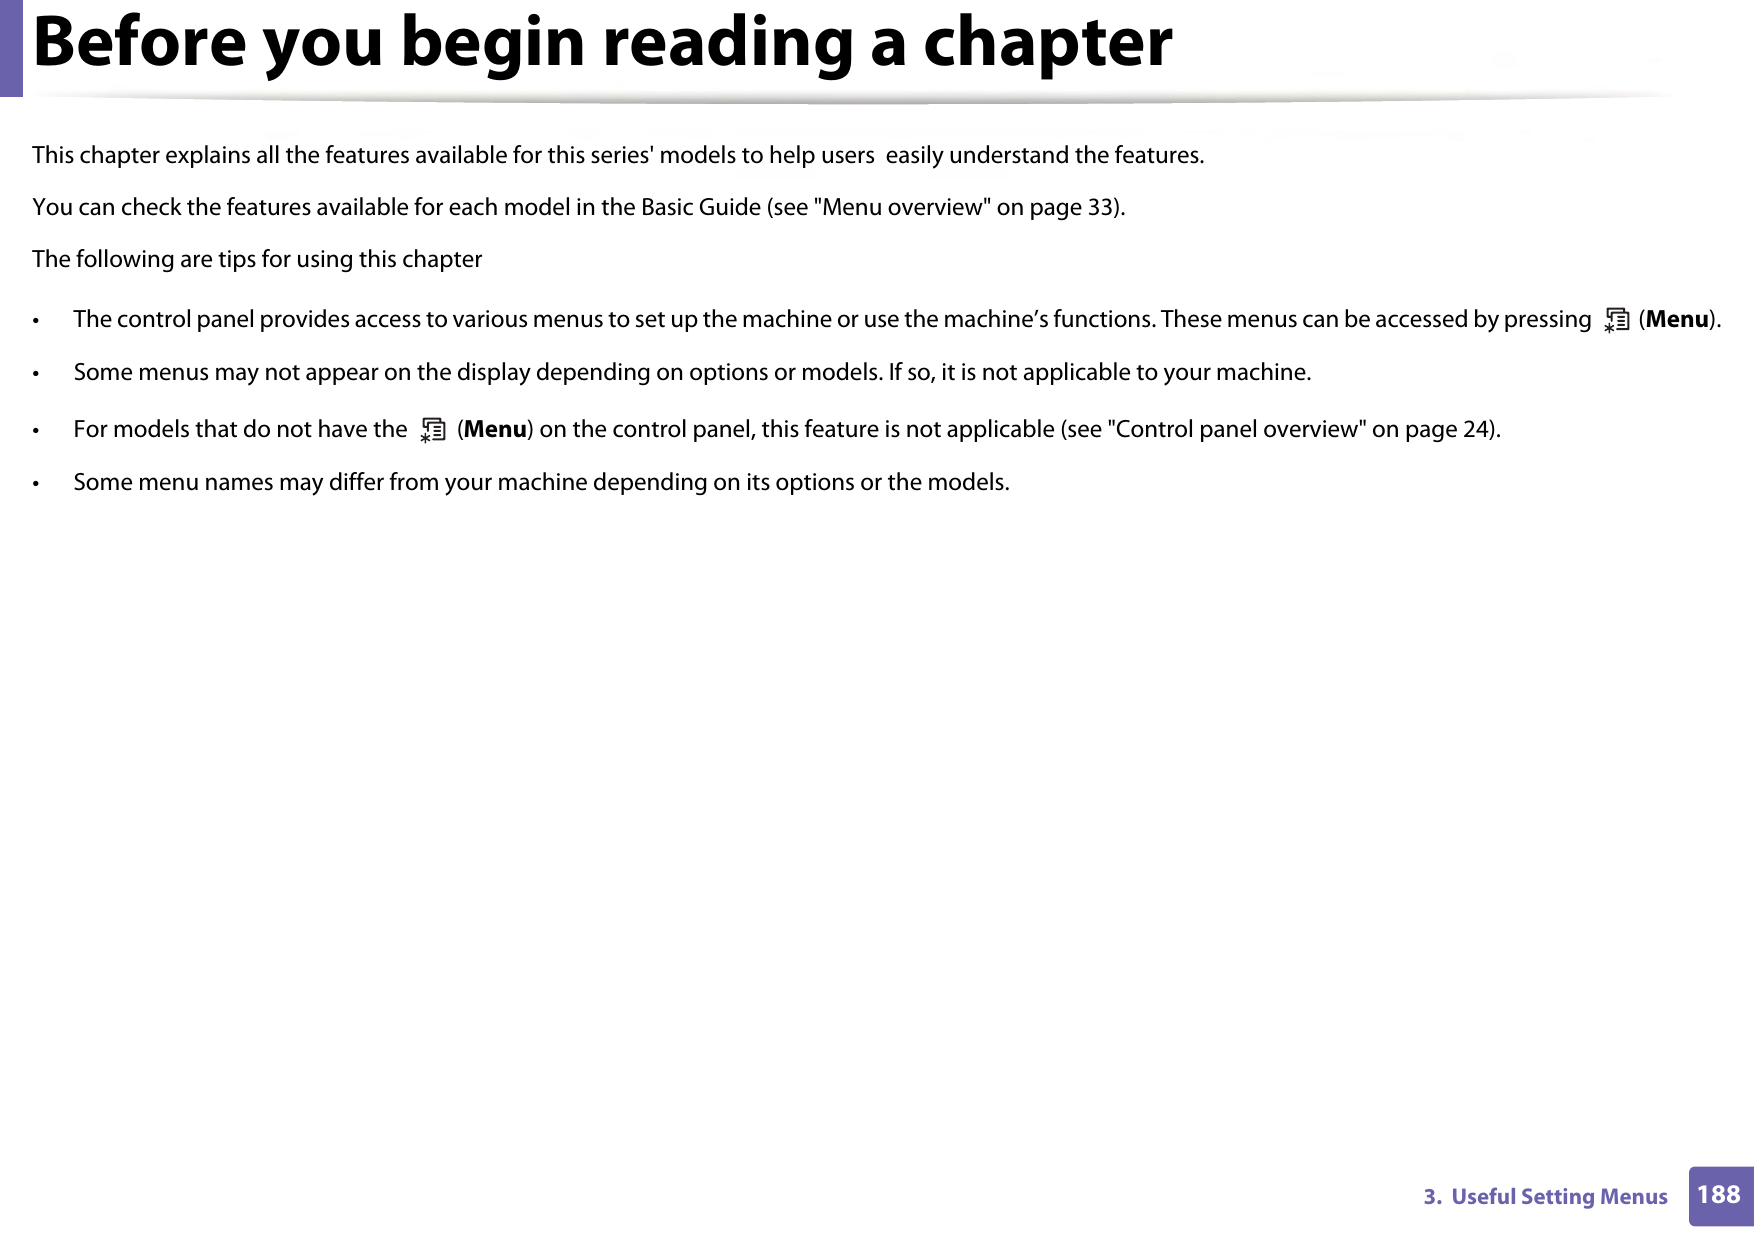
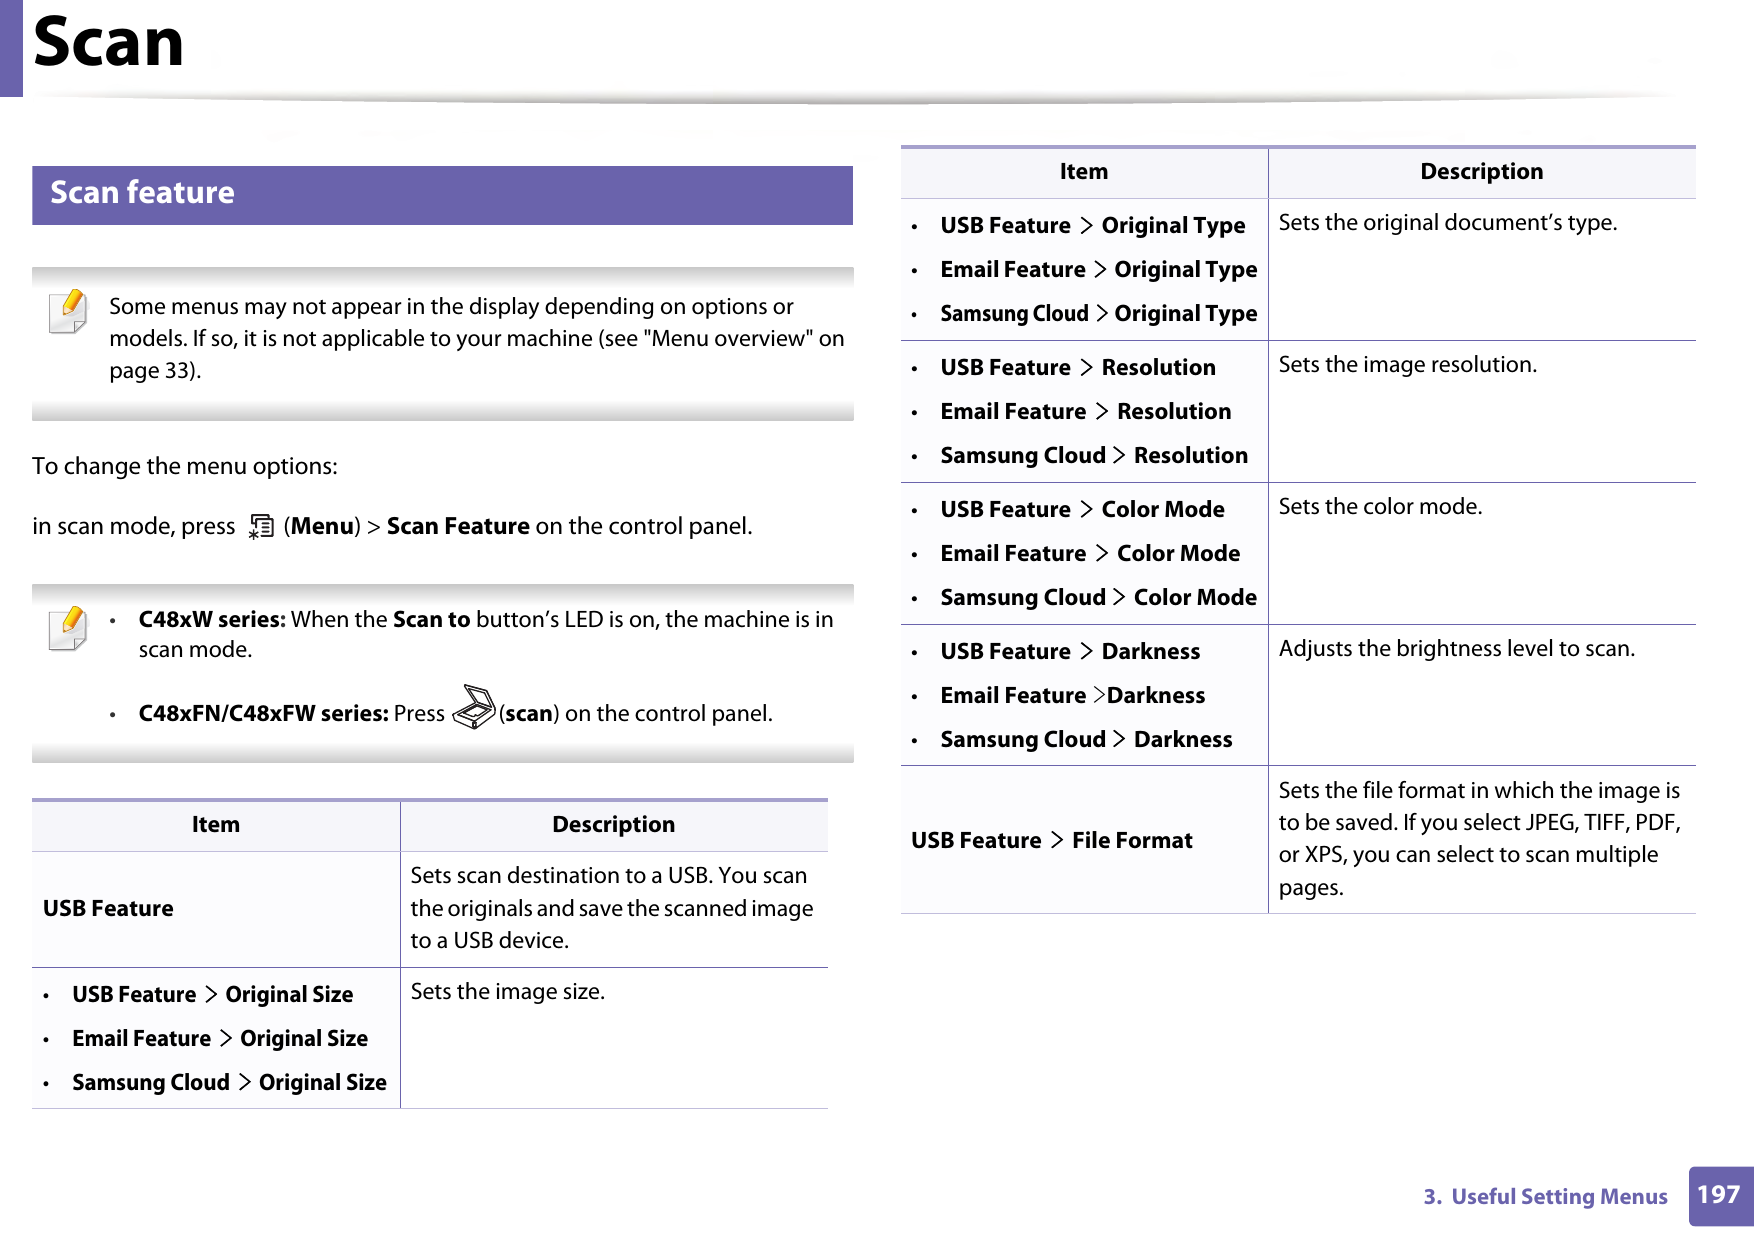
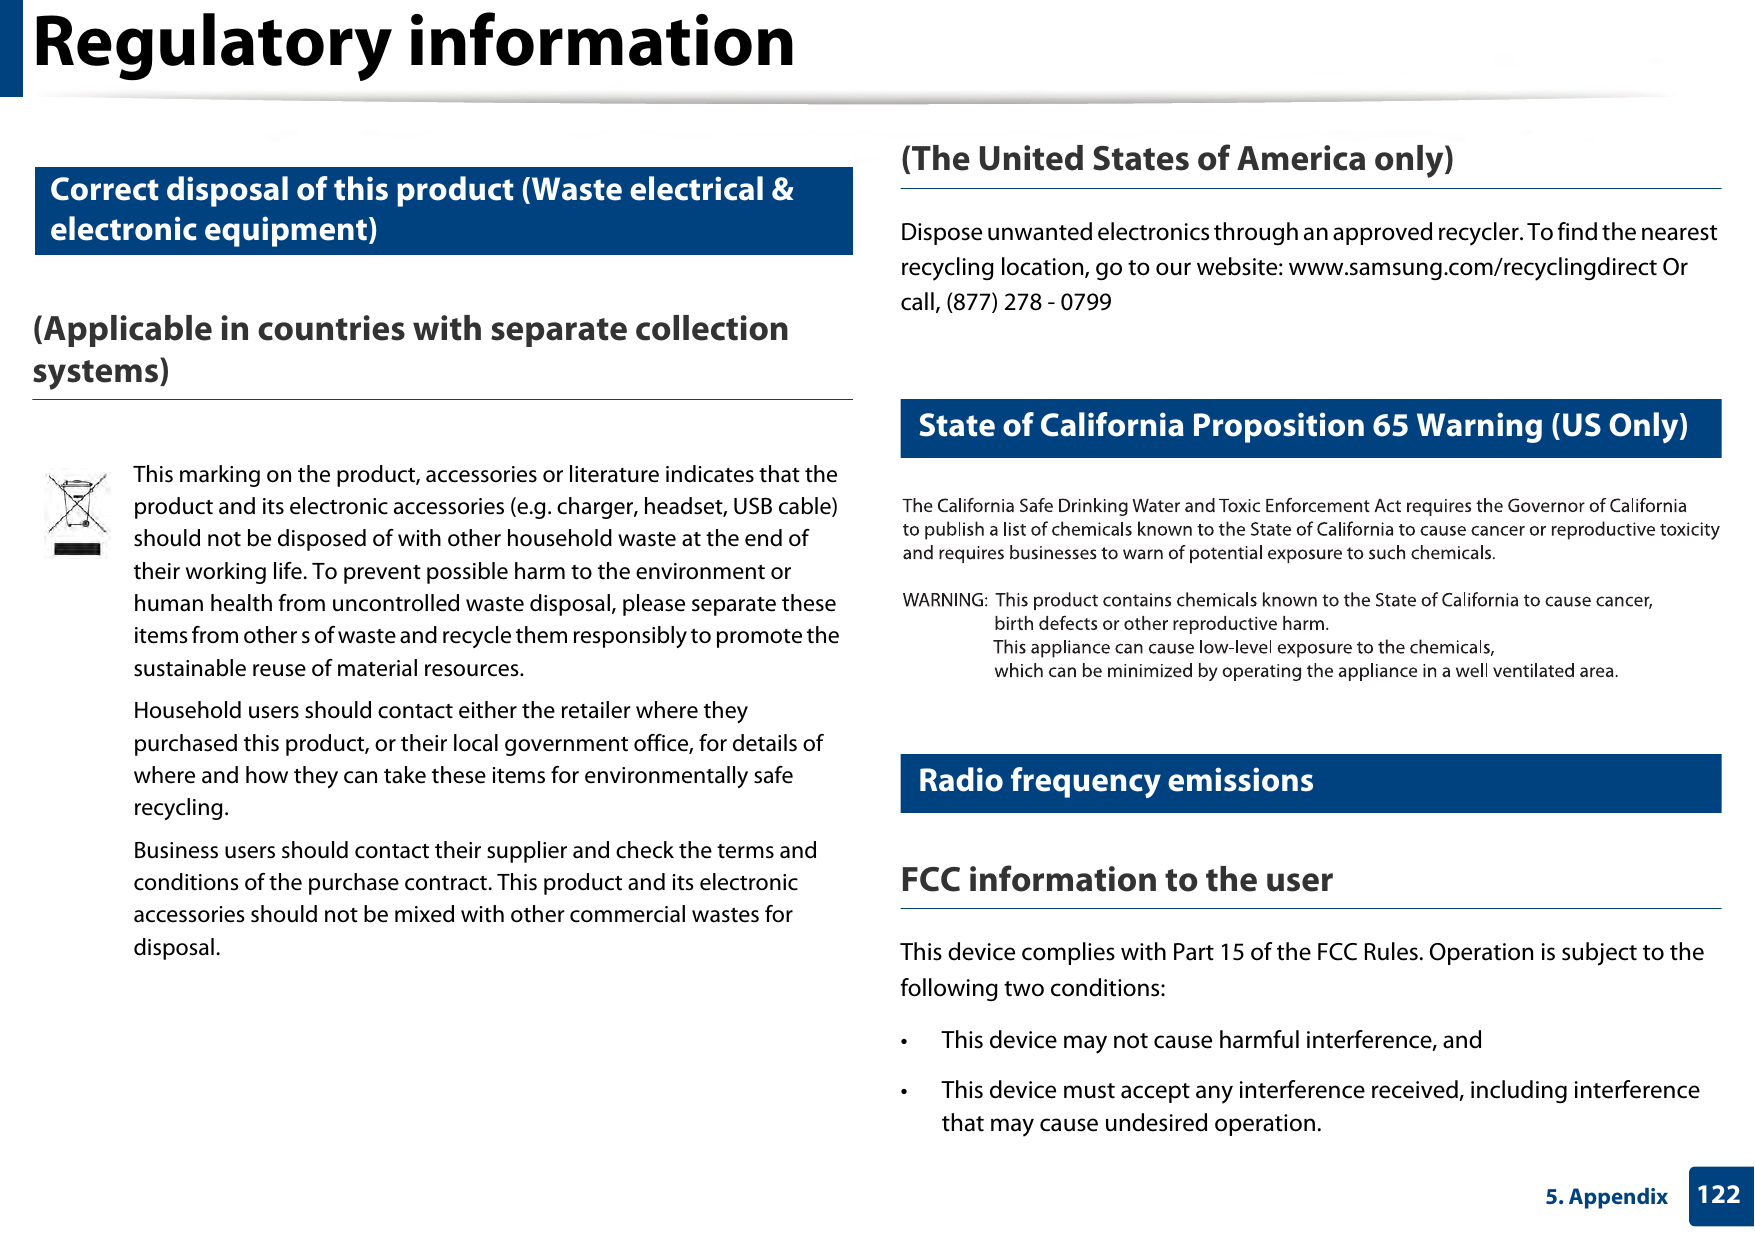
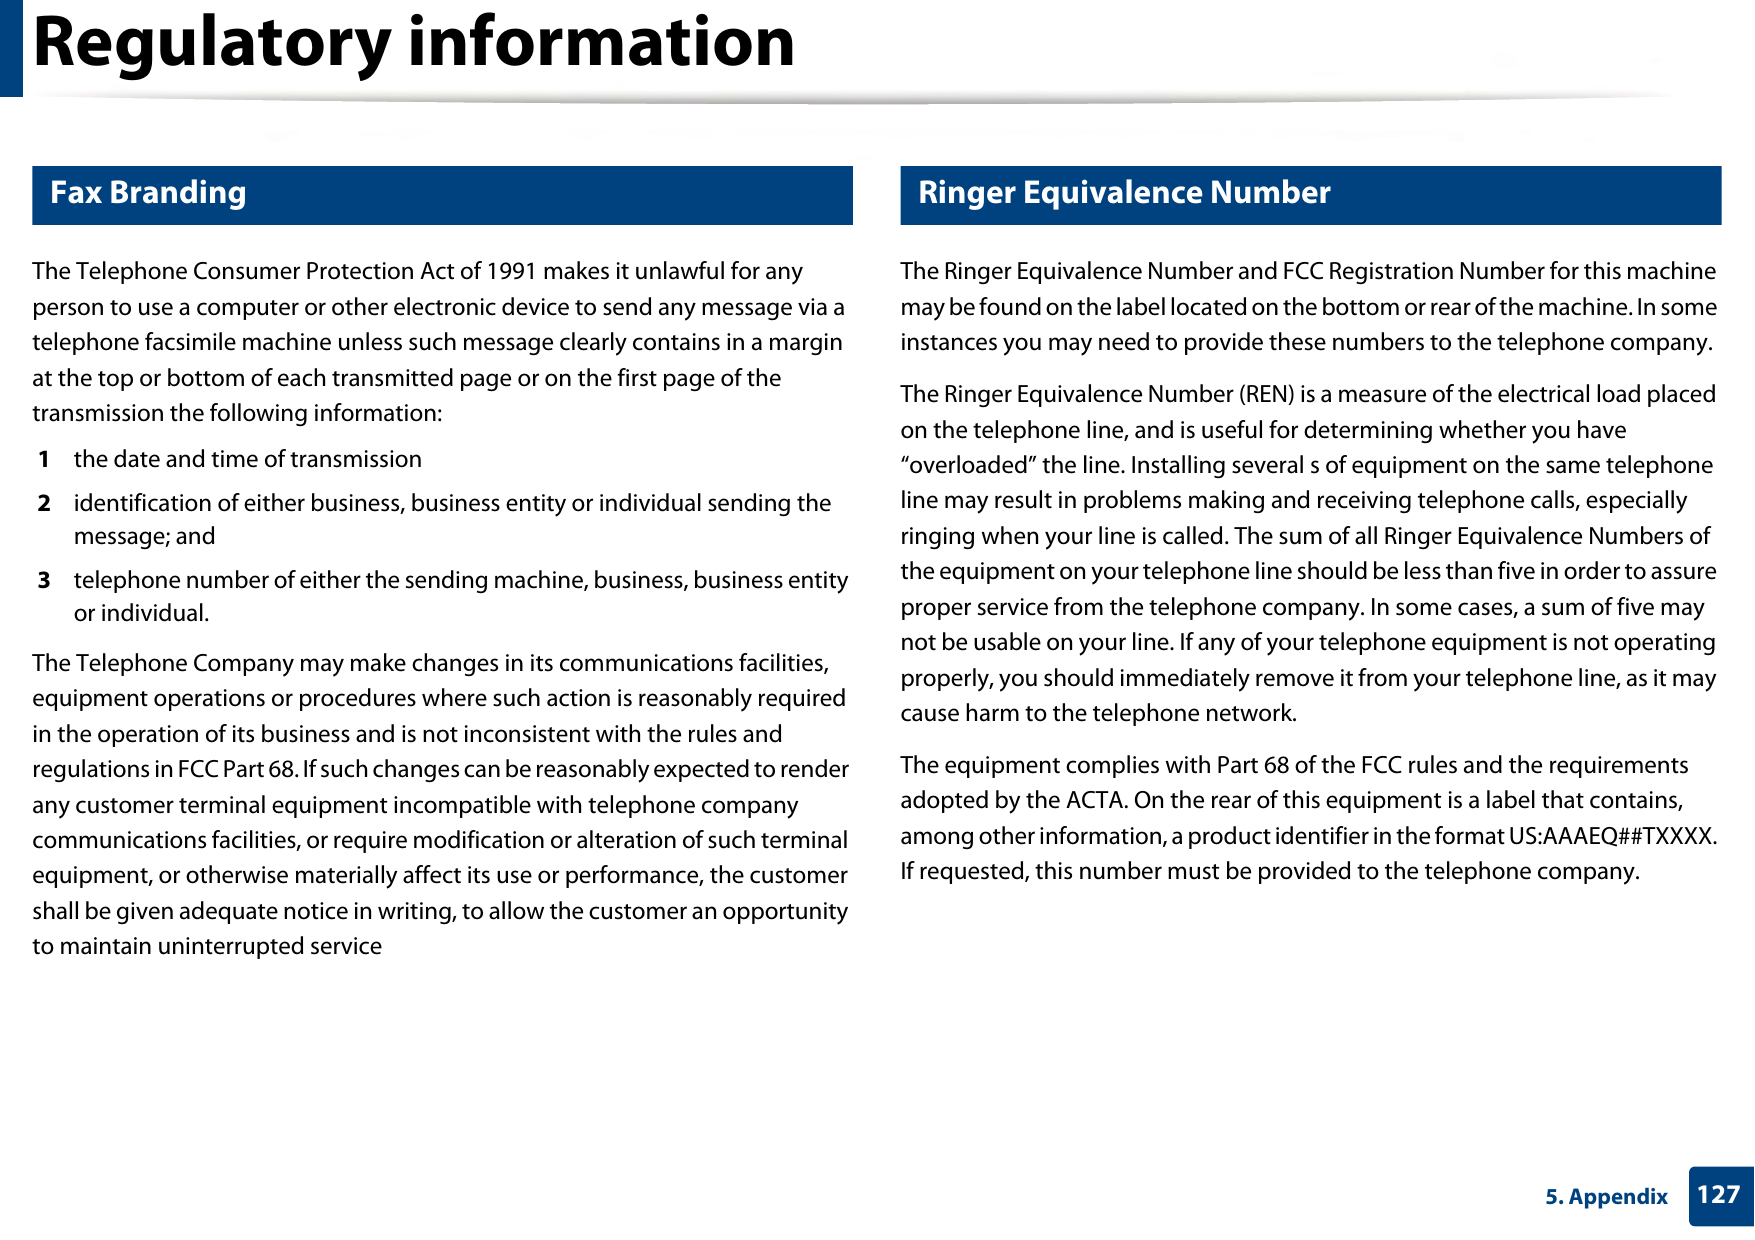
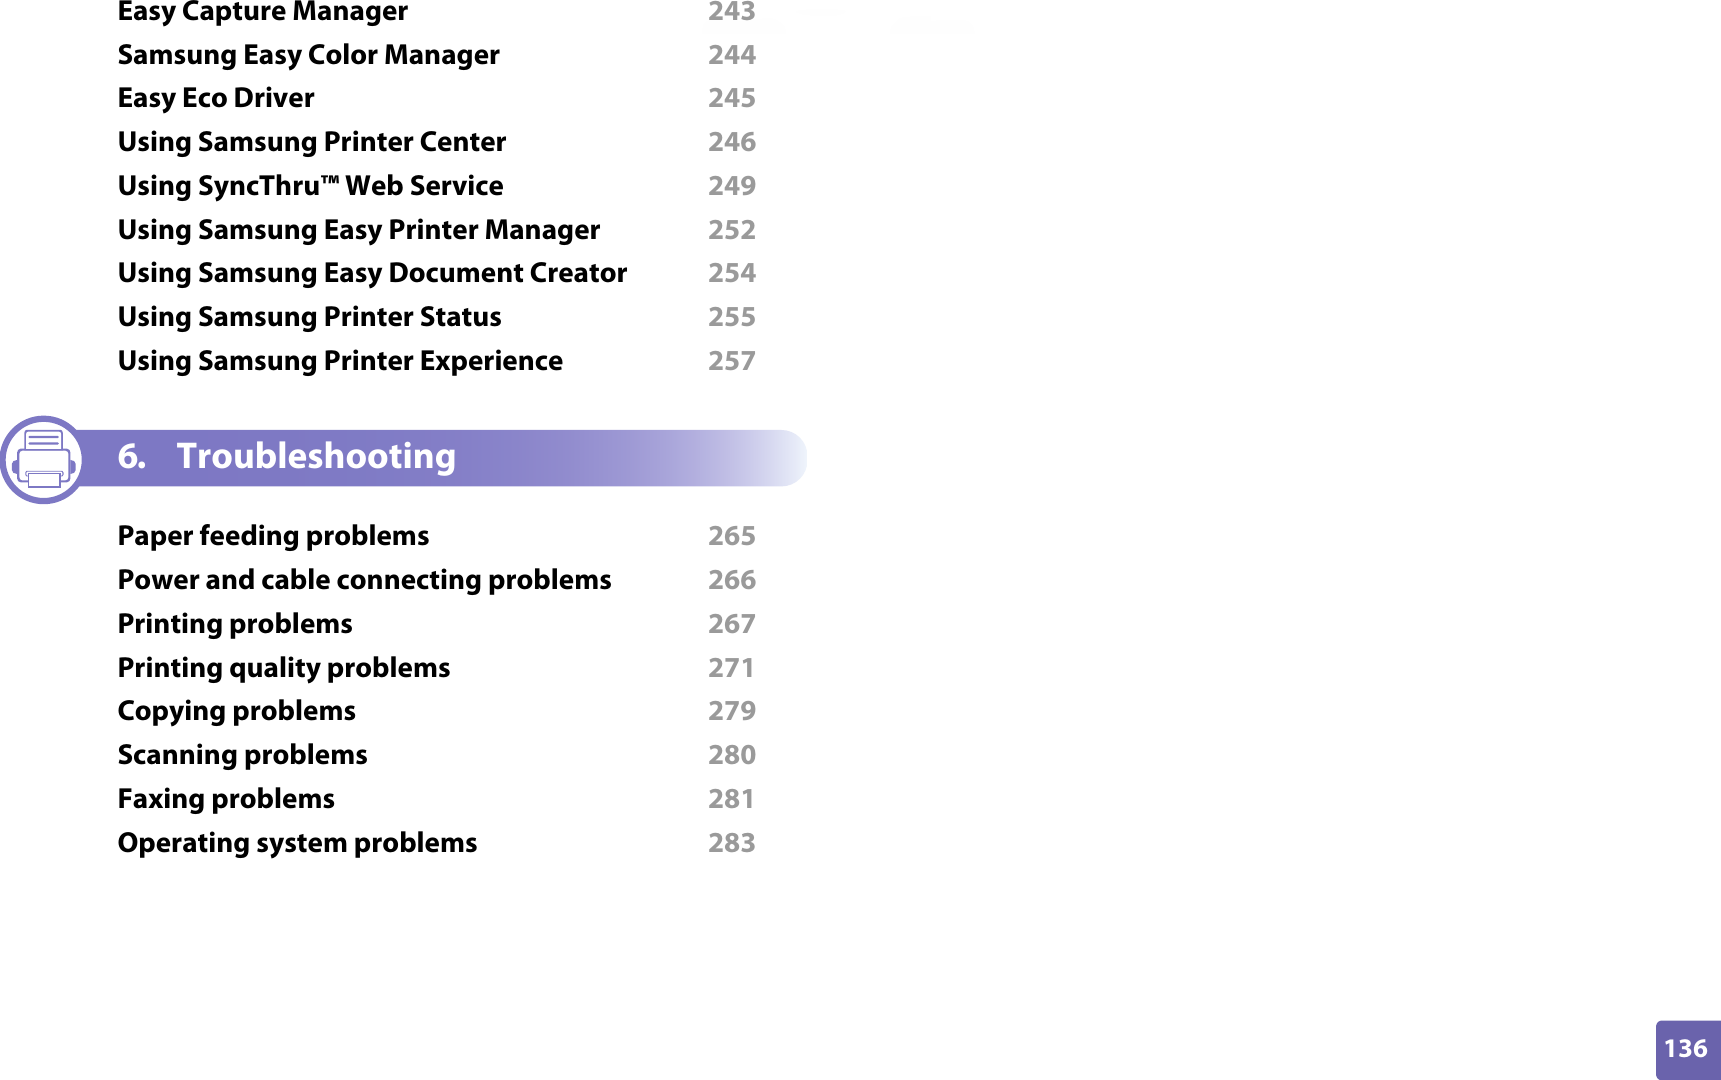
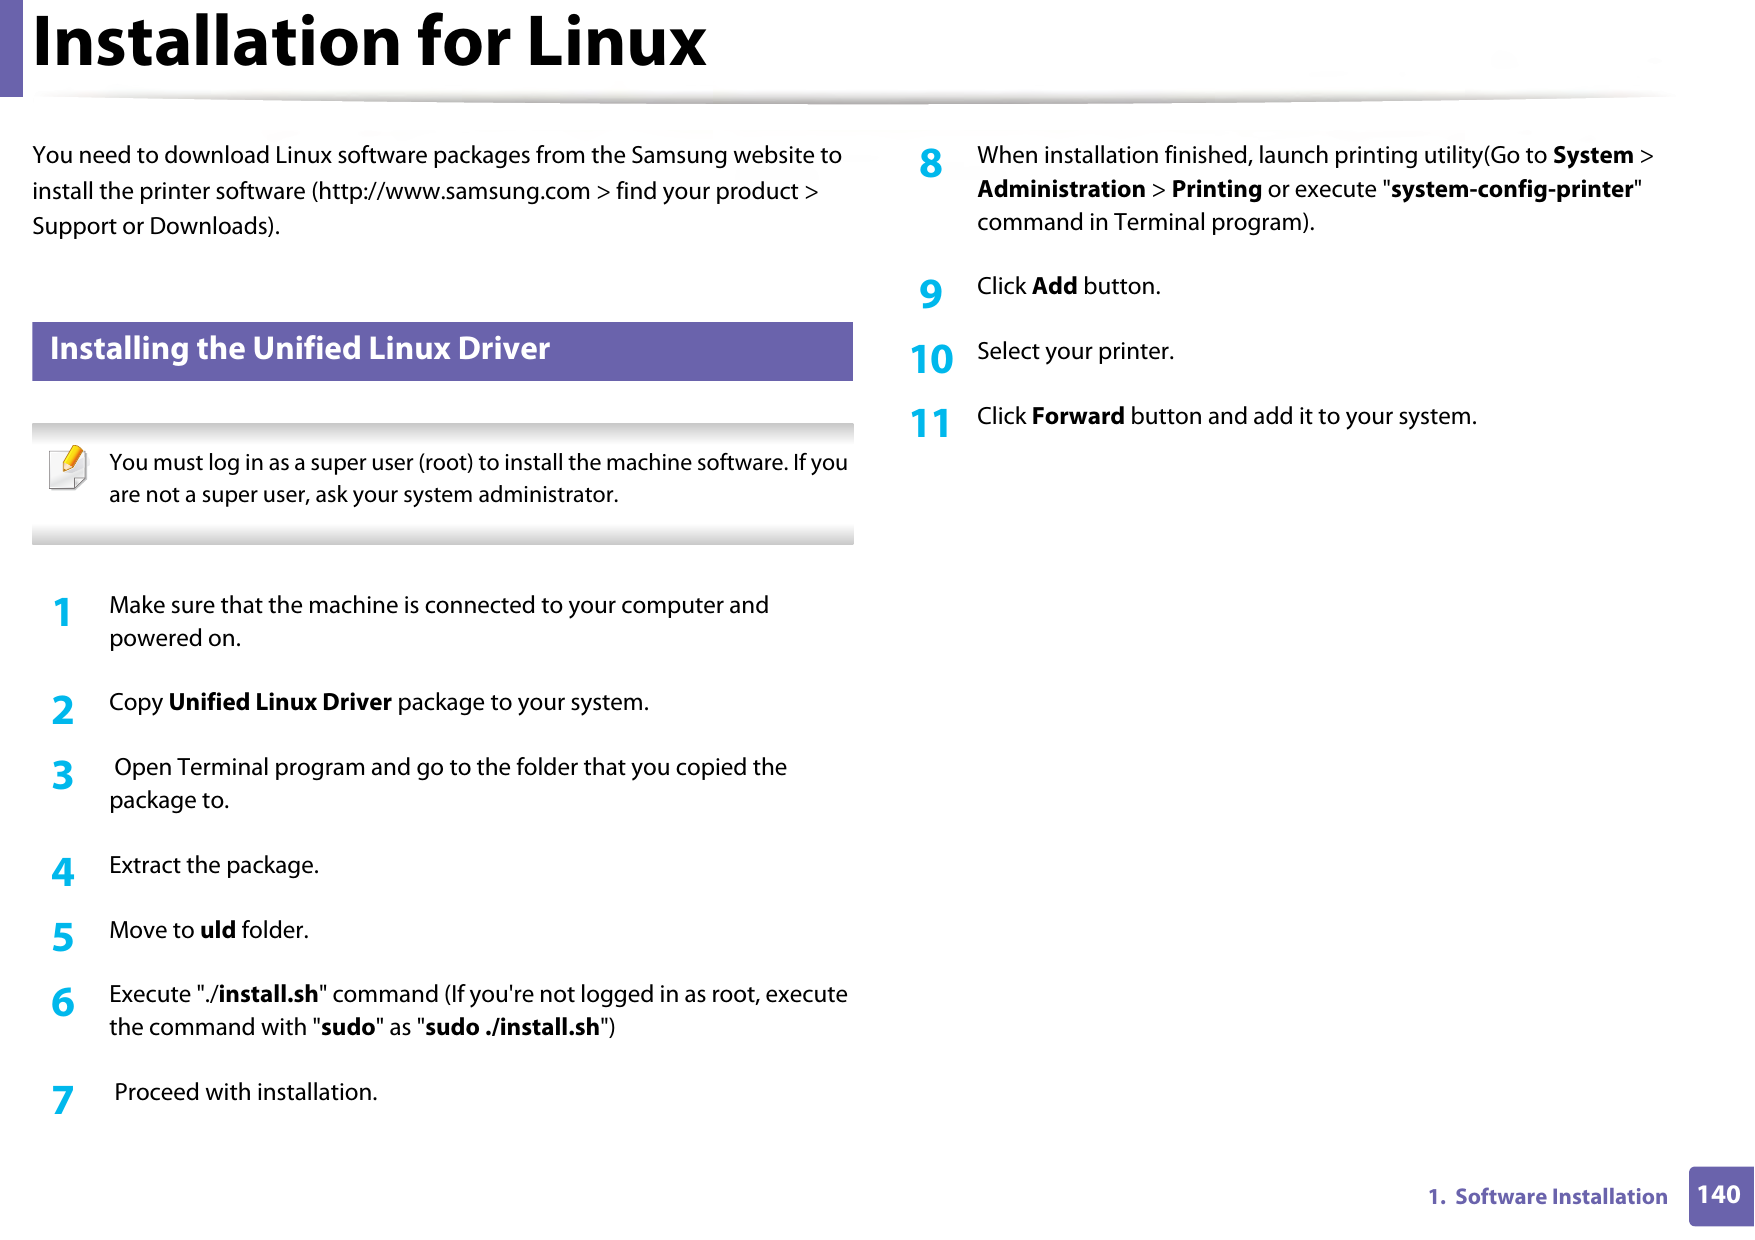
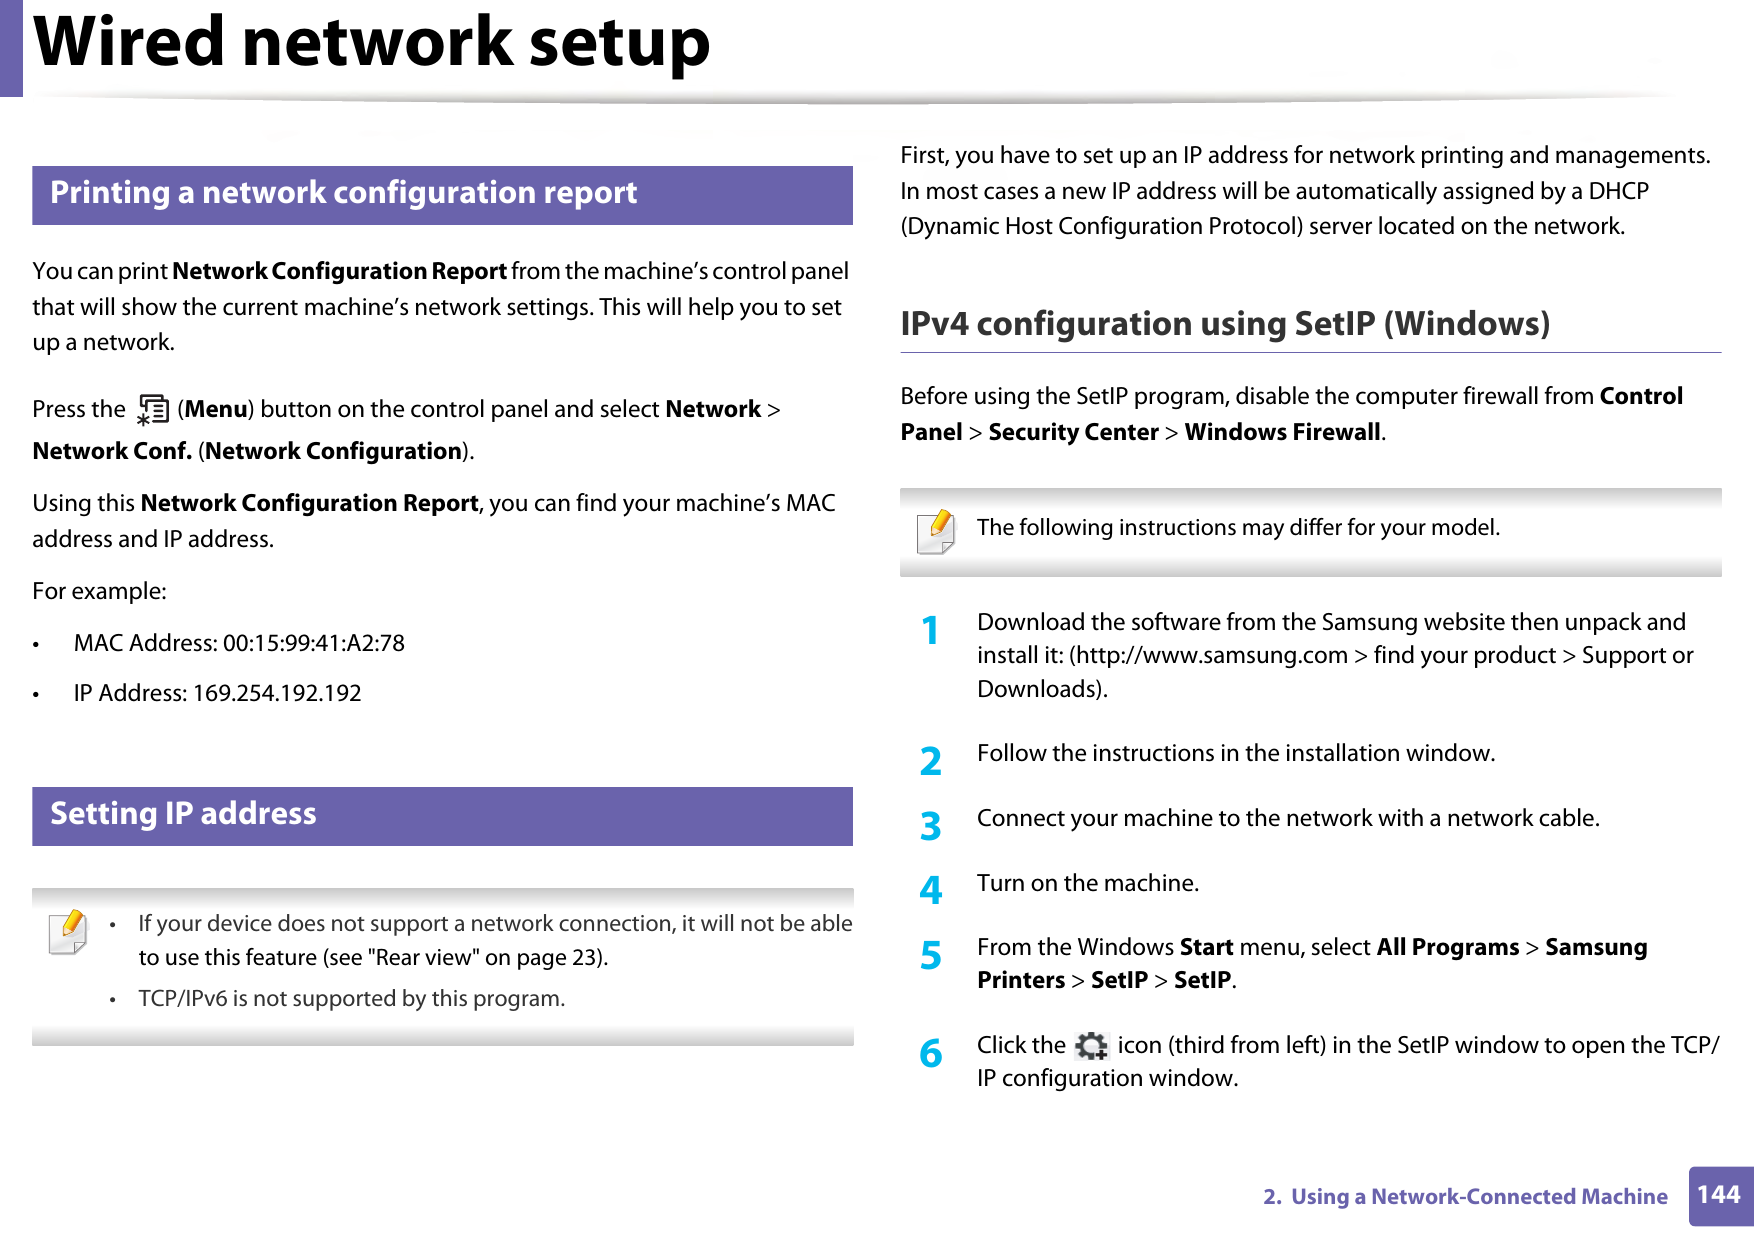
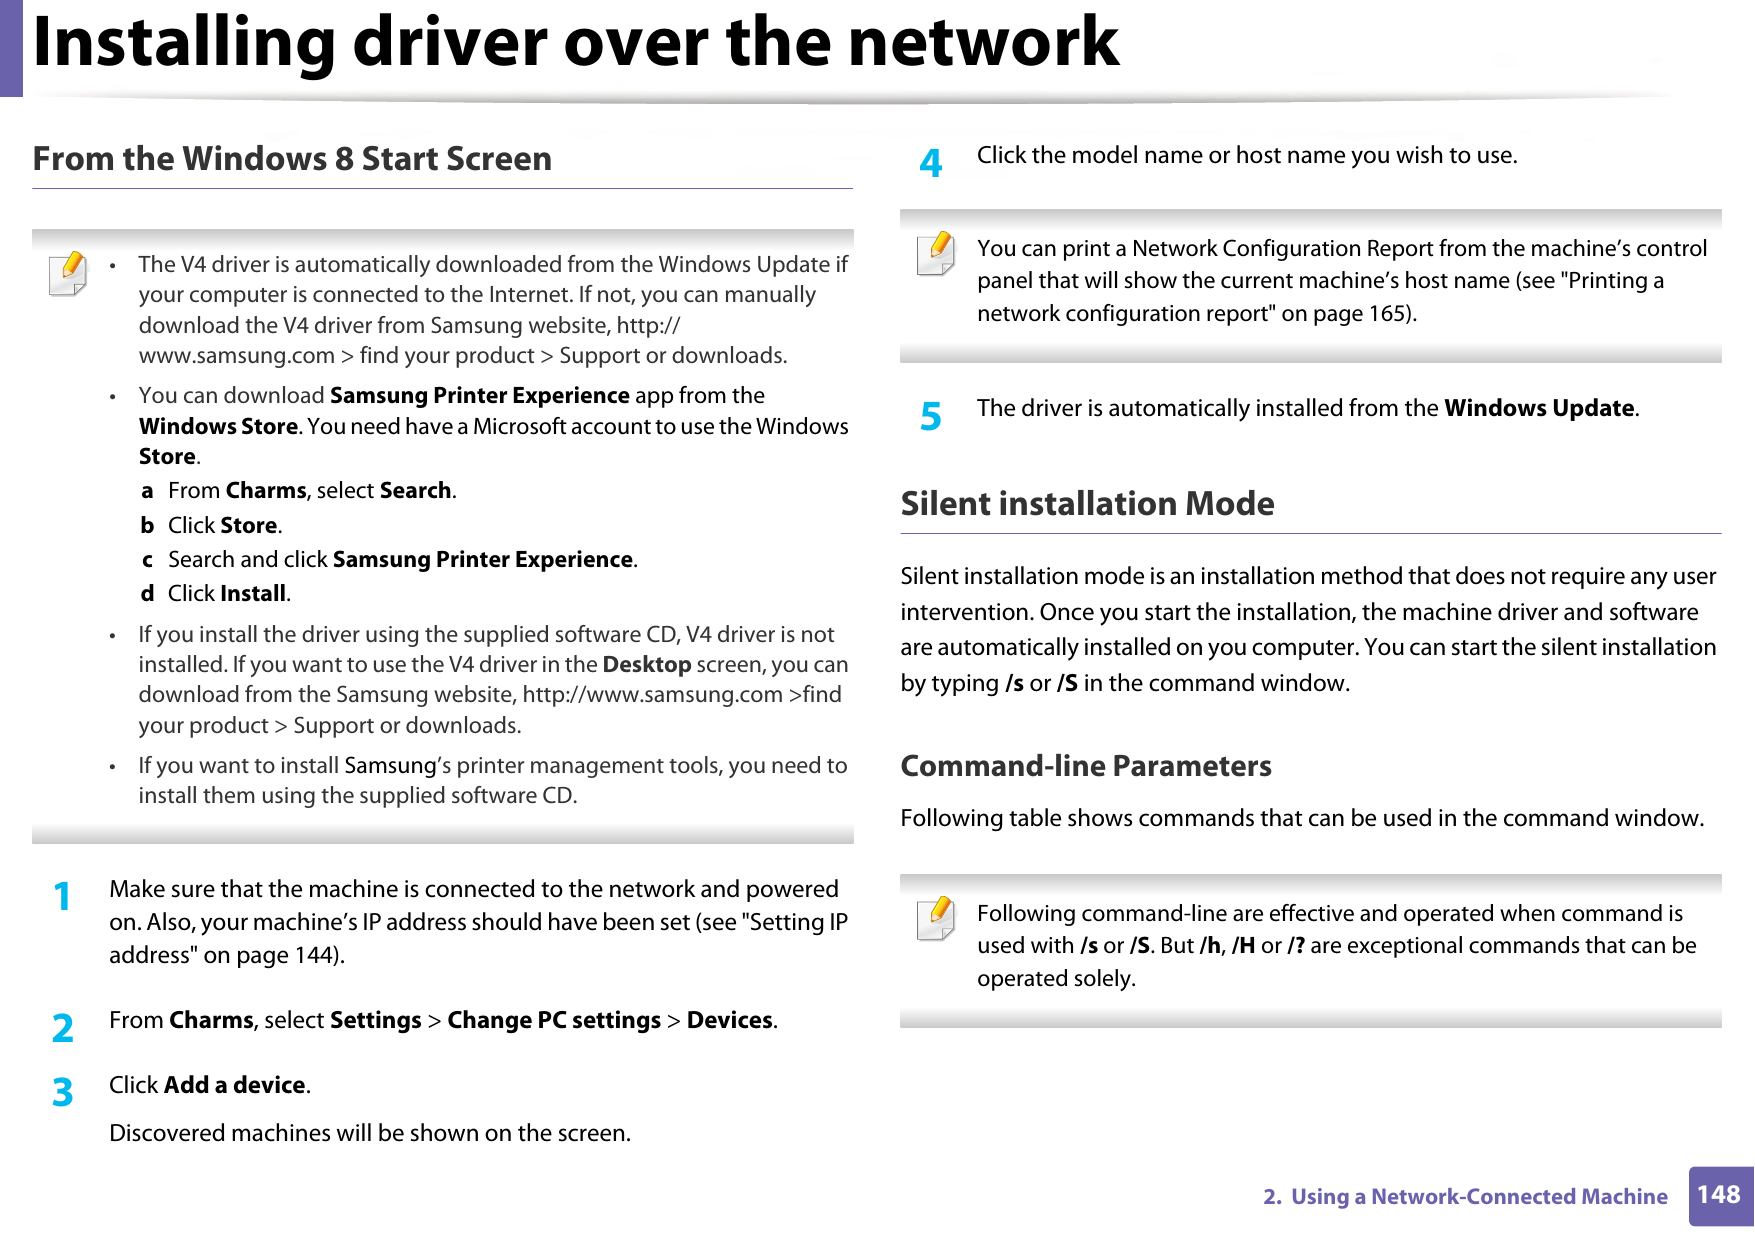
![Understanding display messages1084. TroubleshootingCalibratingimage density…The machine is calibrating the image density. Wait a few minutes.Door OpenClose itThe cover is not securely latched.Close the cover until it locks into place. Scan Unit Openor Exit JAMThe scan unit is not securely latched or paper has jammed in the scanner area.• Clear the jam (see "Original paper jam" on page 99).• Close the cover until it locks into place. Door of scanner is open.The cover of scanner is not securely latched.Close the cover until it locks into place. Error [error number]Install [color] tonerThe indicated toner cartridge is installed improperly, or the connector is polluted.Reinstall the Samsung-genuine toner cartridge two or three times to confirm it is seated properly. Or clean the connector. If the problem persists, contact the service representatives.Error [error number]Turn off then onThe machine unit cannot be controlled.Reboot the power and try the printing job again. If the problem persists, please call for service. Error [error number]Call for serviceMessage Meaning Suggested solutionsScanner Locked The scanner is locked. Reboot the power. If the problem persists, please call for service.Install TR.belt unit.The transfer belt is not installed.Install a Samsung-genuine transfer belt.Not compatibletransfer beltThe transfer belt of the machine is not for your machine.Install the a Samsung-genuine part designed for your machine.Not installedWaste tankThe waste toner container is not installed.Install a Samsung-genuine waste toner container.Check Fax Line The fax line is not properly connected to the LINE port.Connect the fax line to the LINE port not to the EXT port (see "Rear view" on page 23).Not proper roomtemp. Move setThe machine is in a room with improper room temperature. Move the machine to a room with proper room temperature.Output bin FullRemove paperThe output tray is full. Or the sensor is not facing down.Remove papers from the output tray, the machine resumes printing. Or make sure the sensor is facing down. If the problem persists, call for service.Message Meaning Suggested solutions](https://usermanual.wiki/Samsung-Electronics-Co/SLC480FW.User-Manual-3/User-Guide-2579315-Page-8.png)
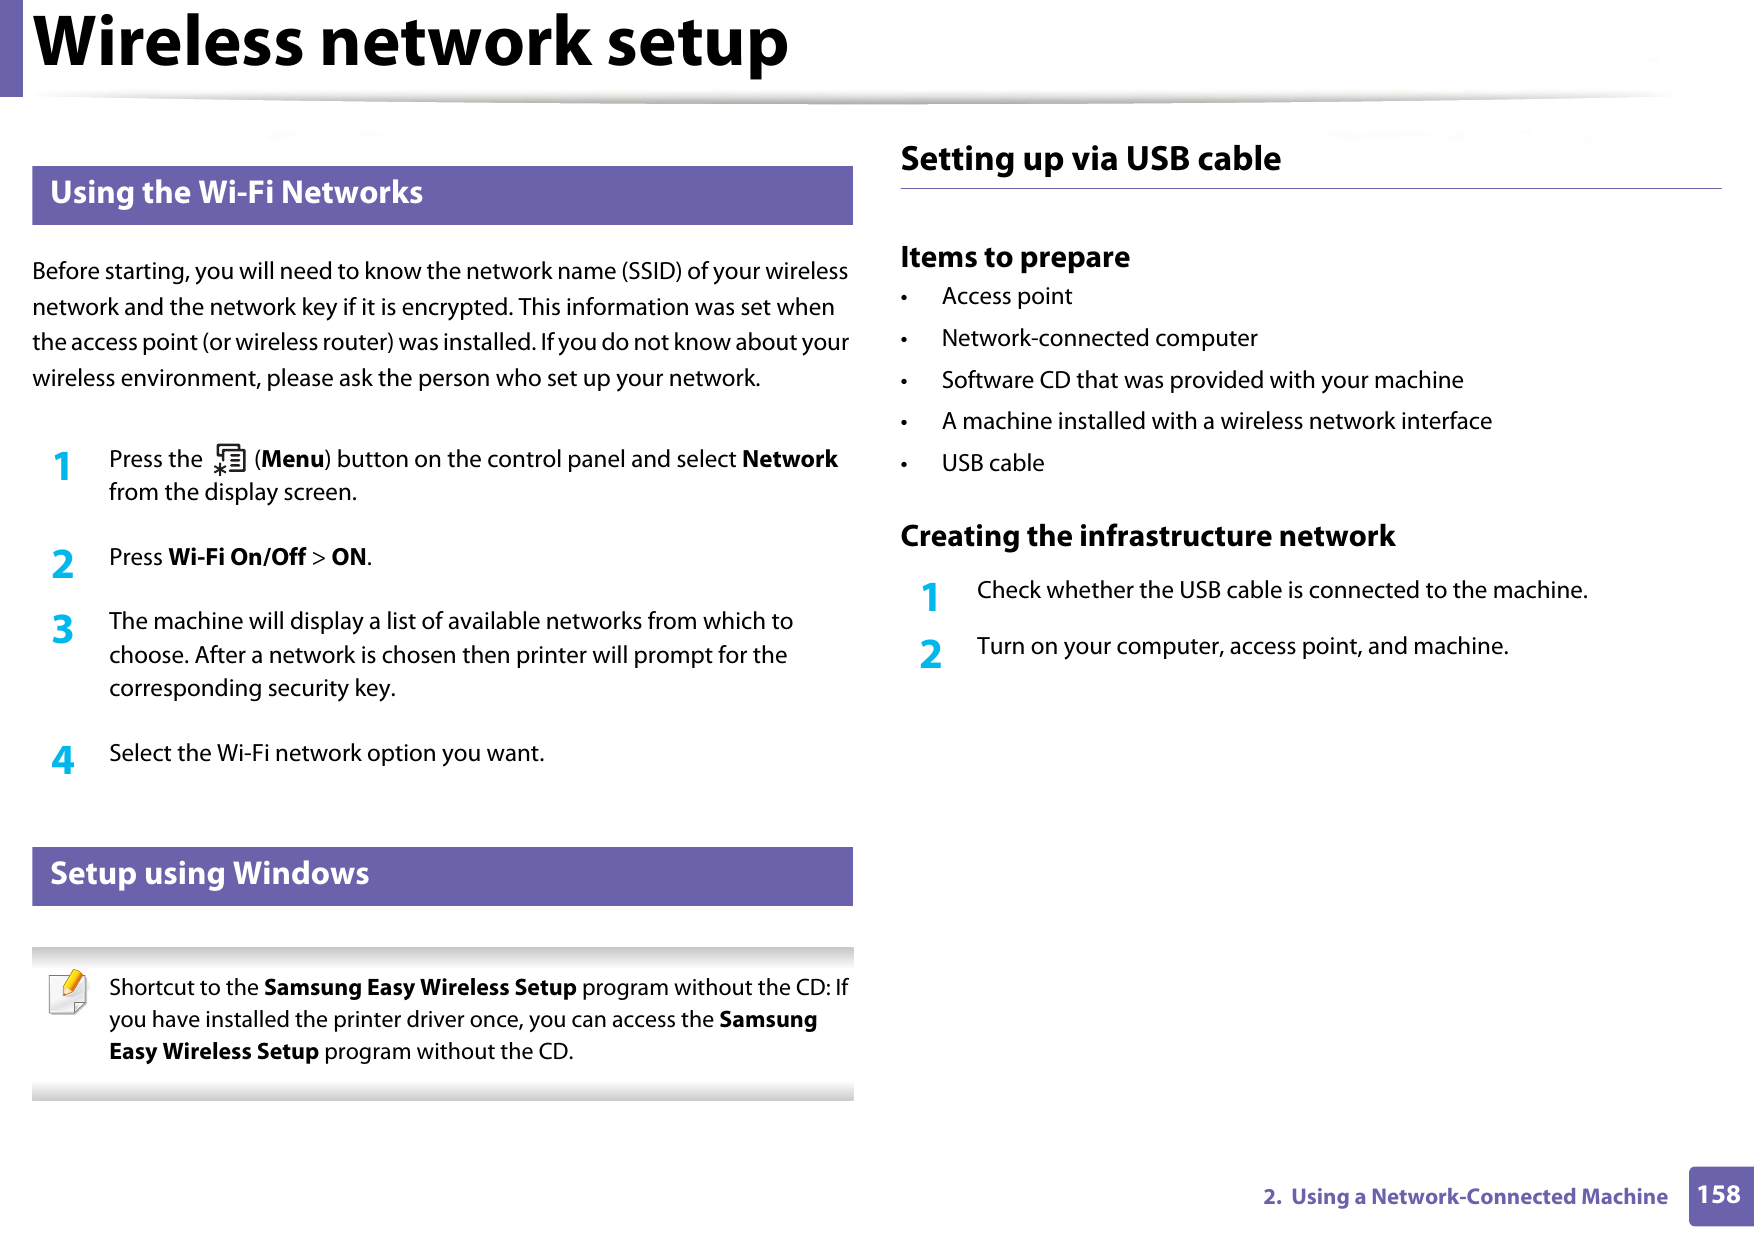
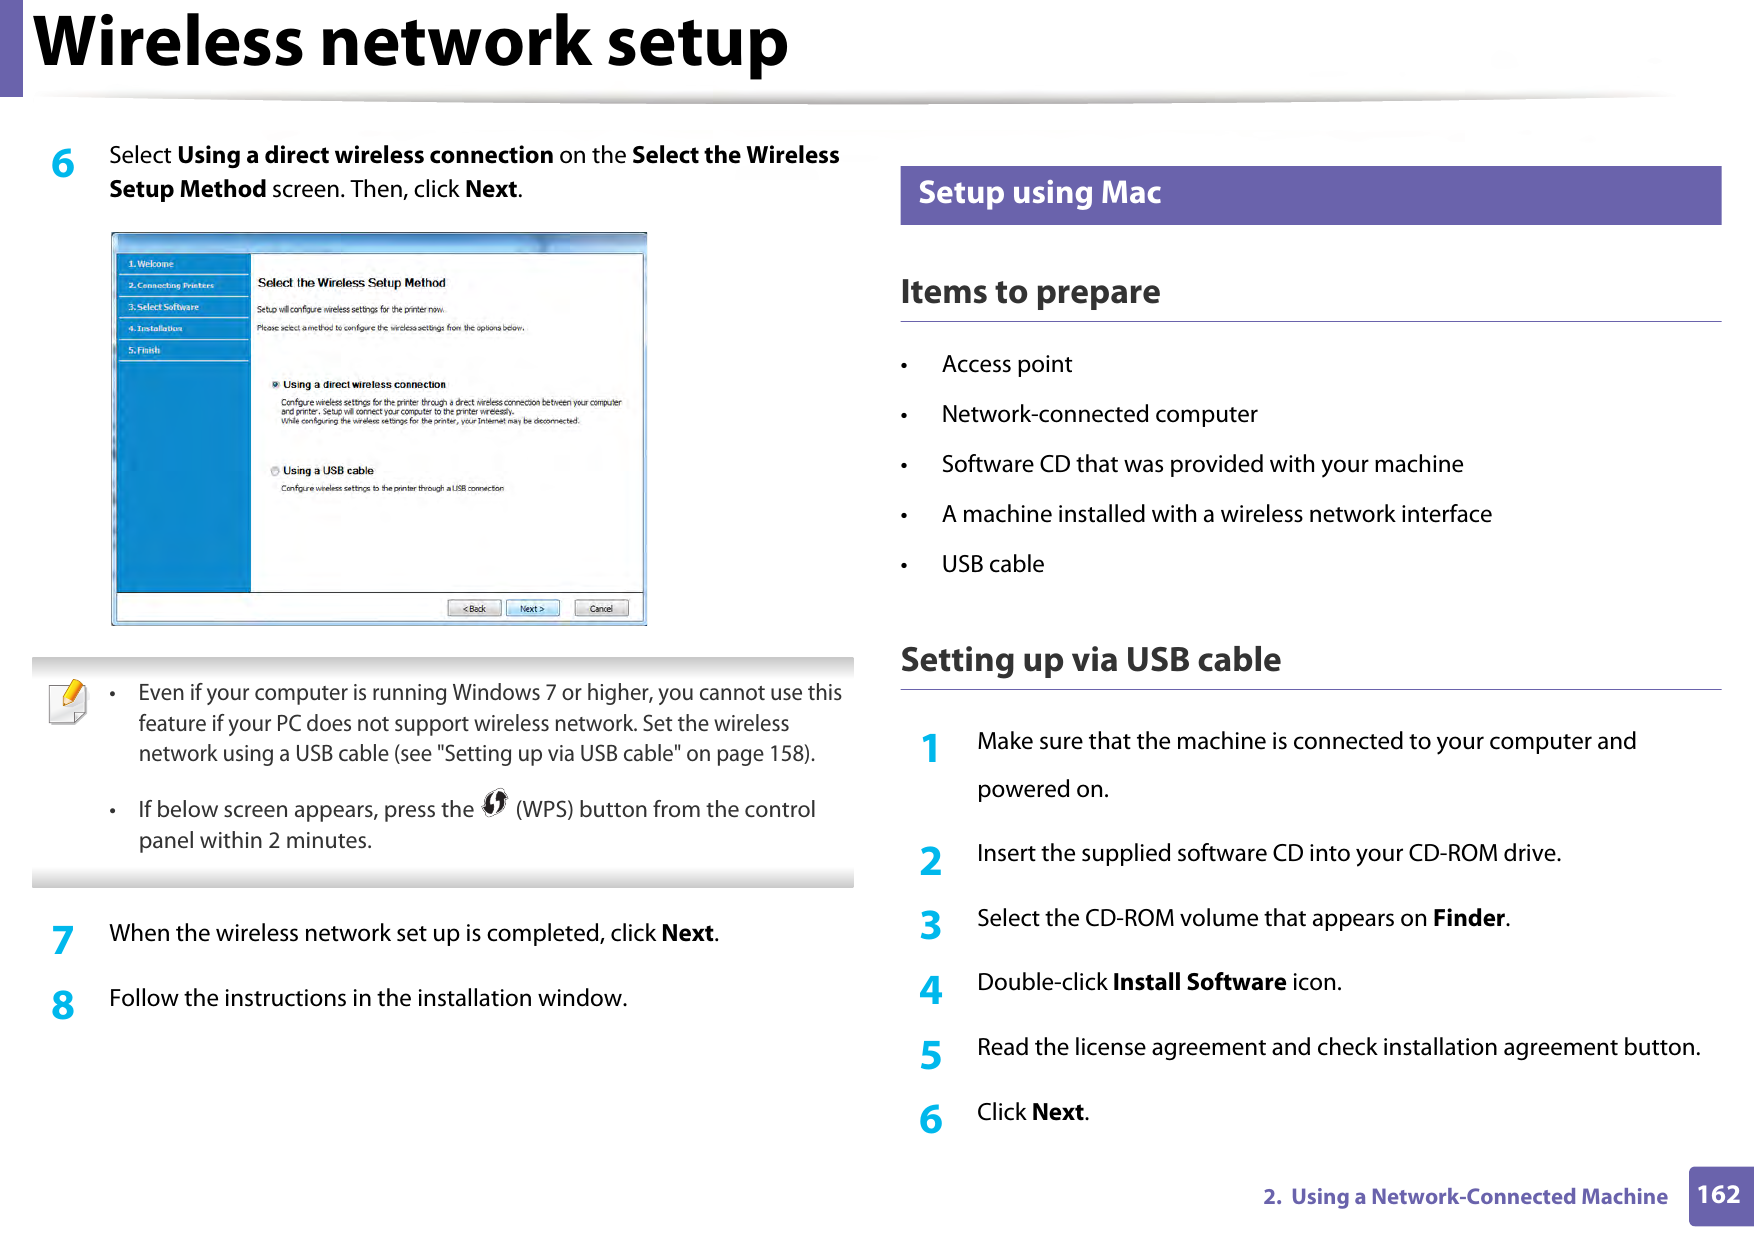
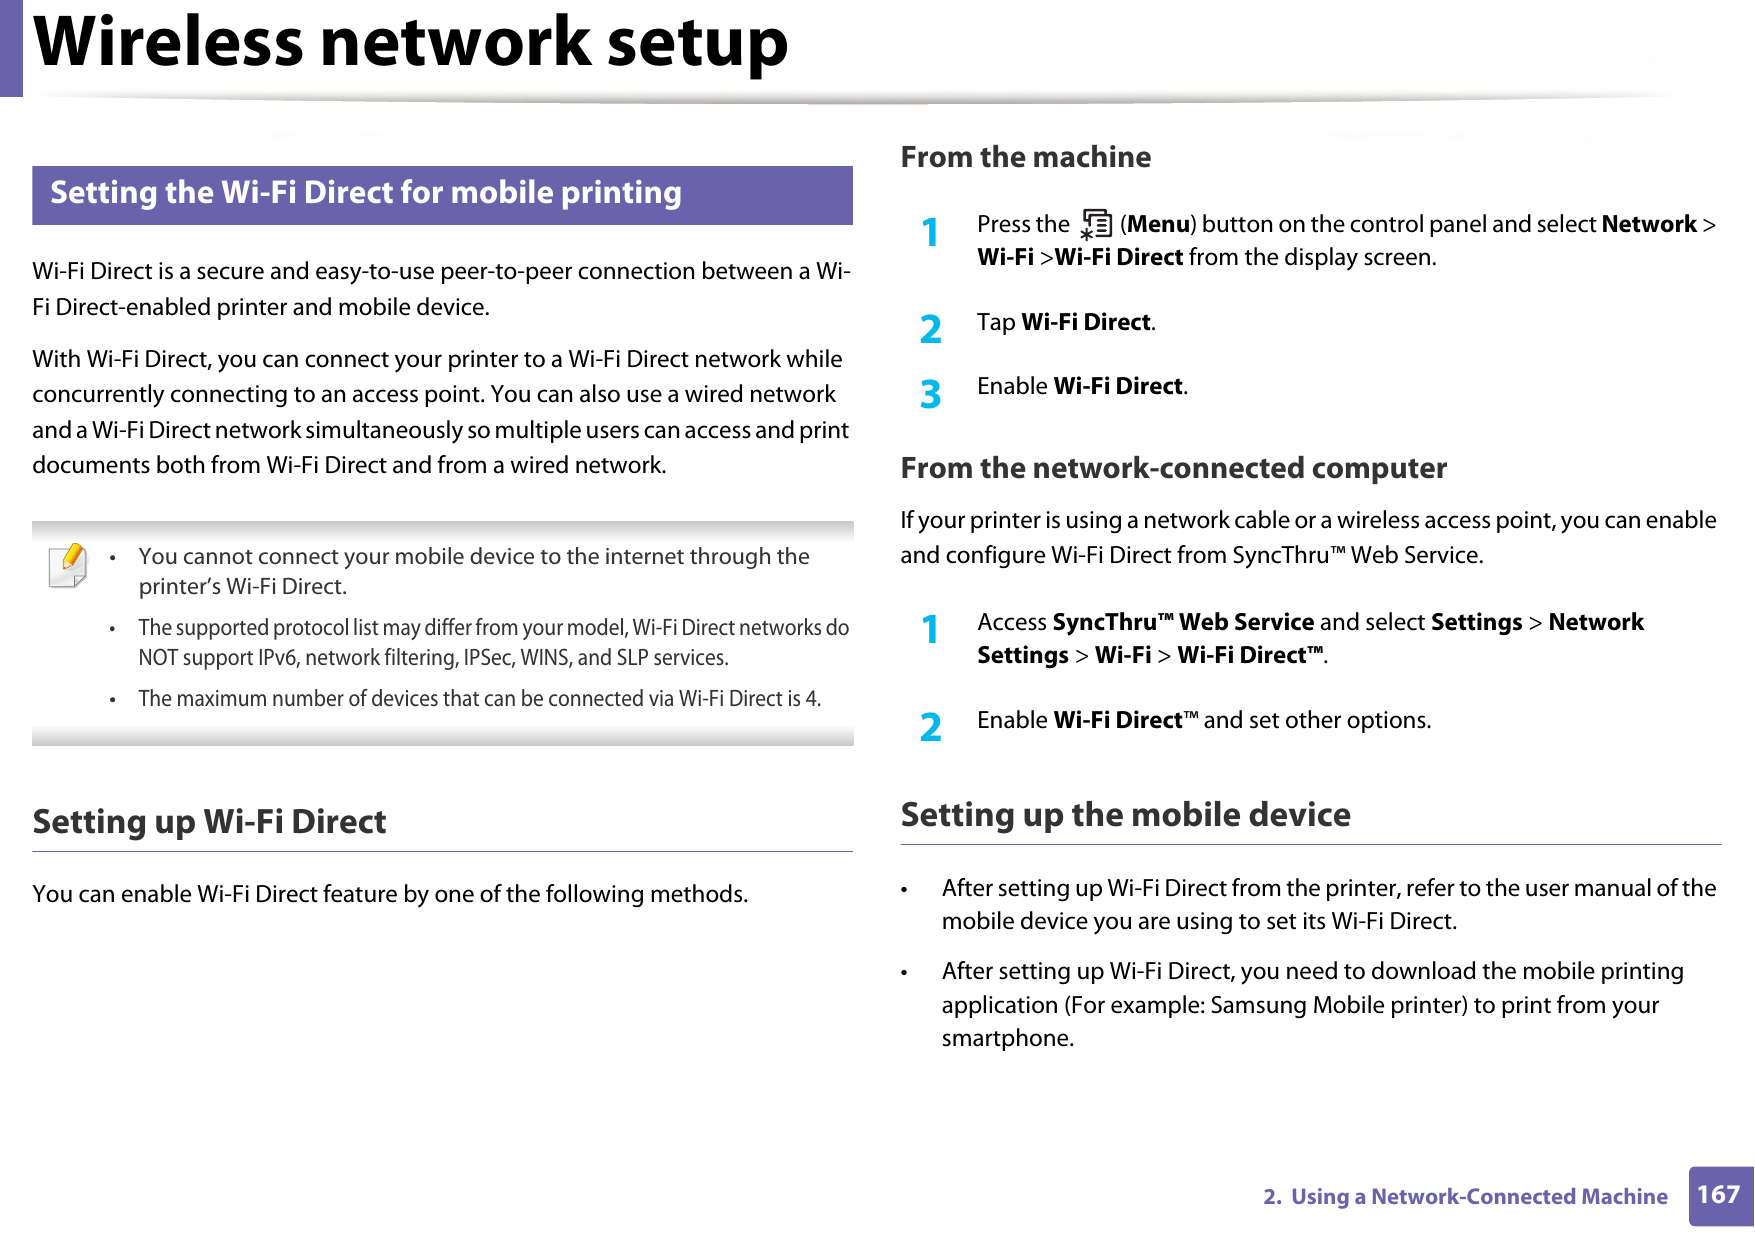
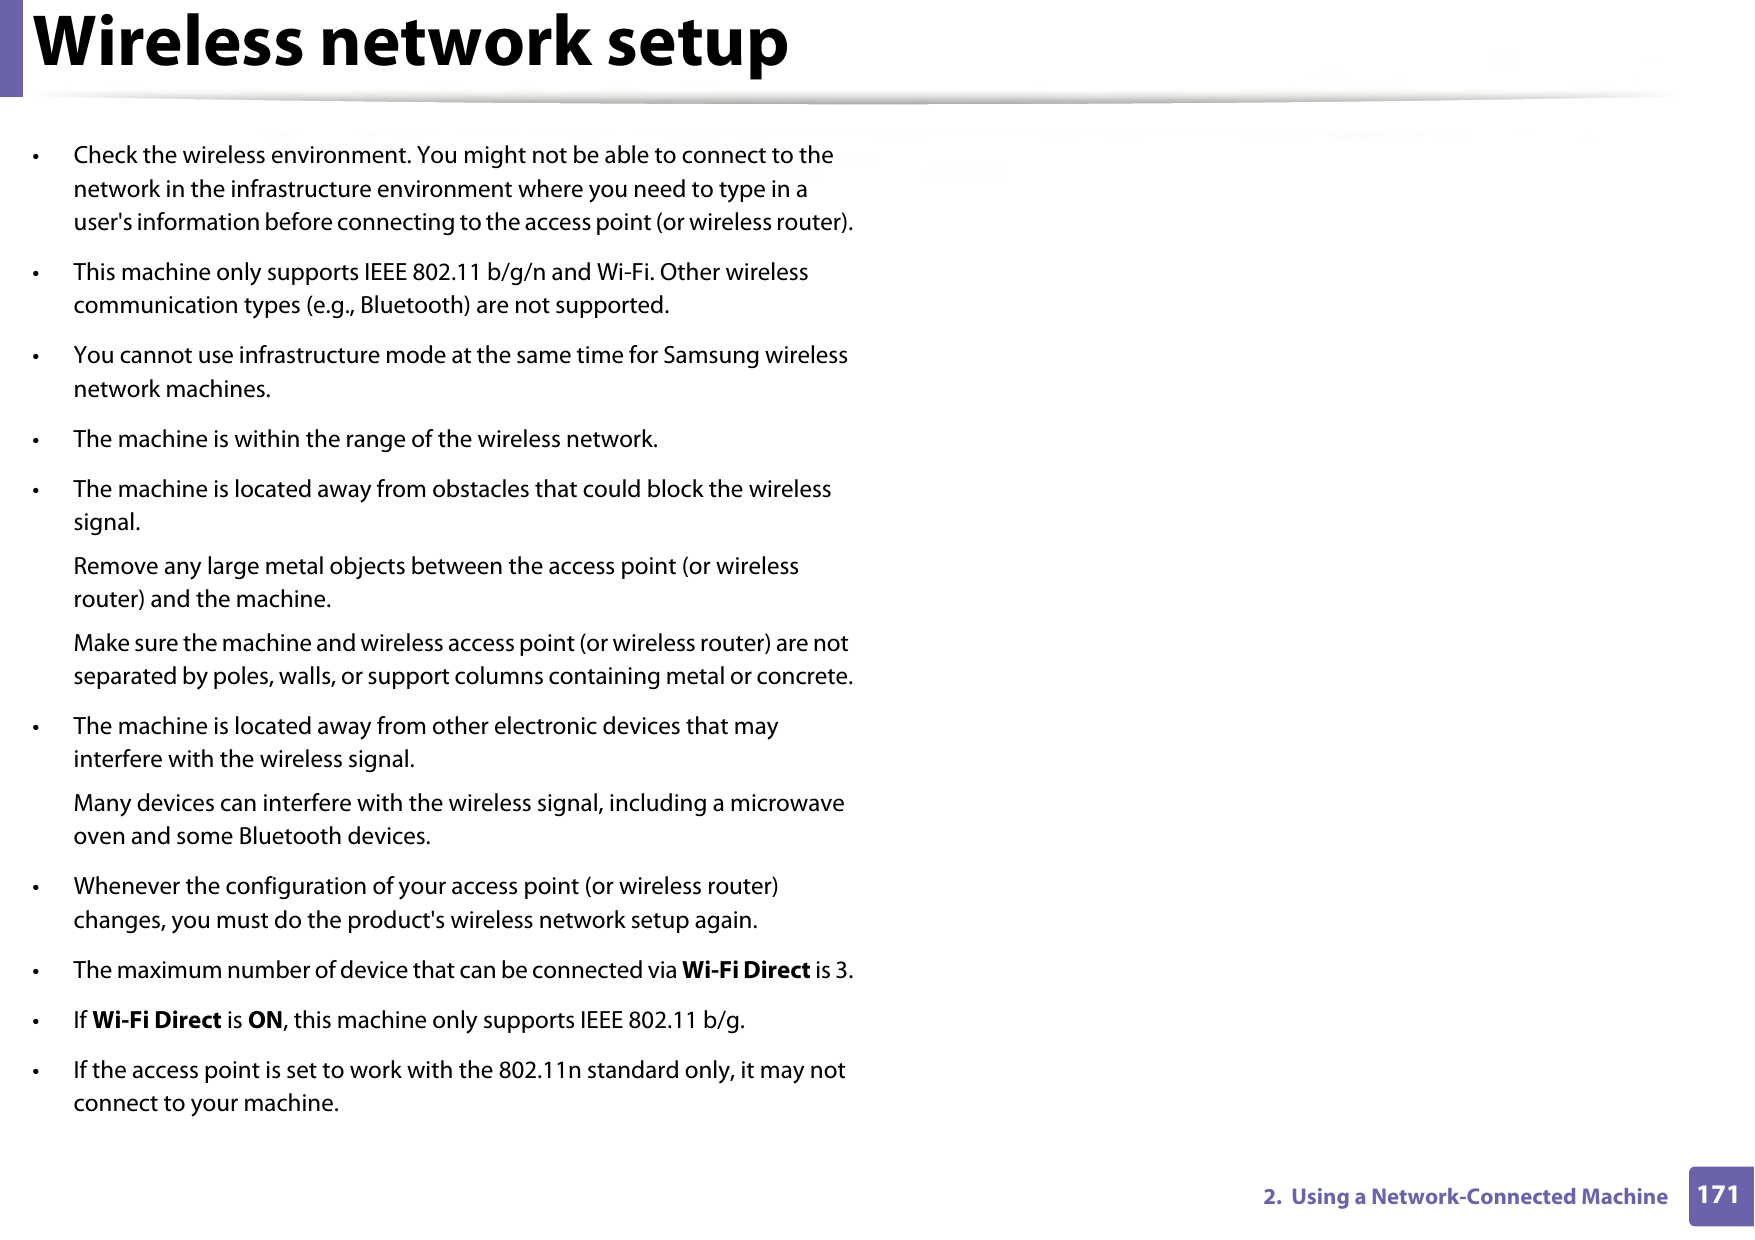
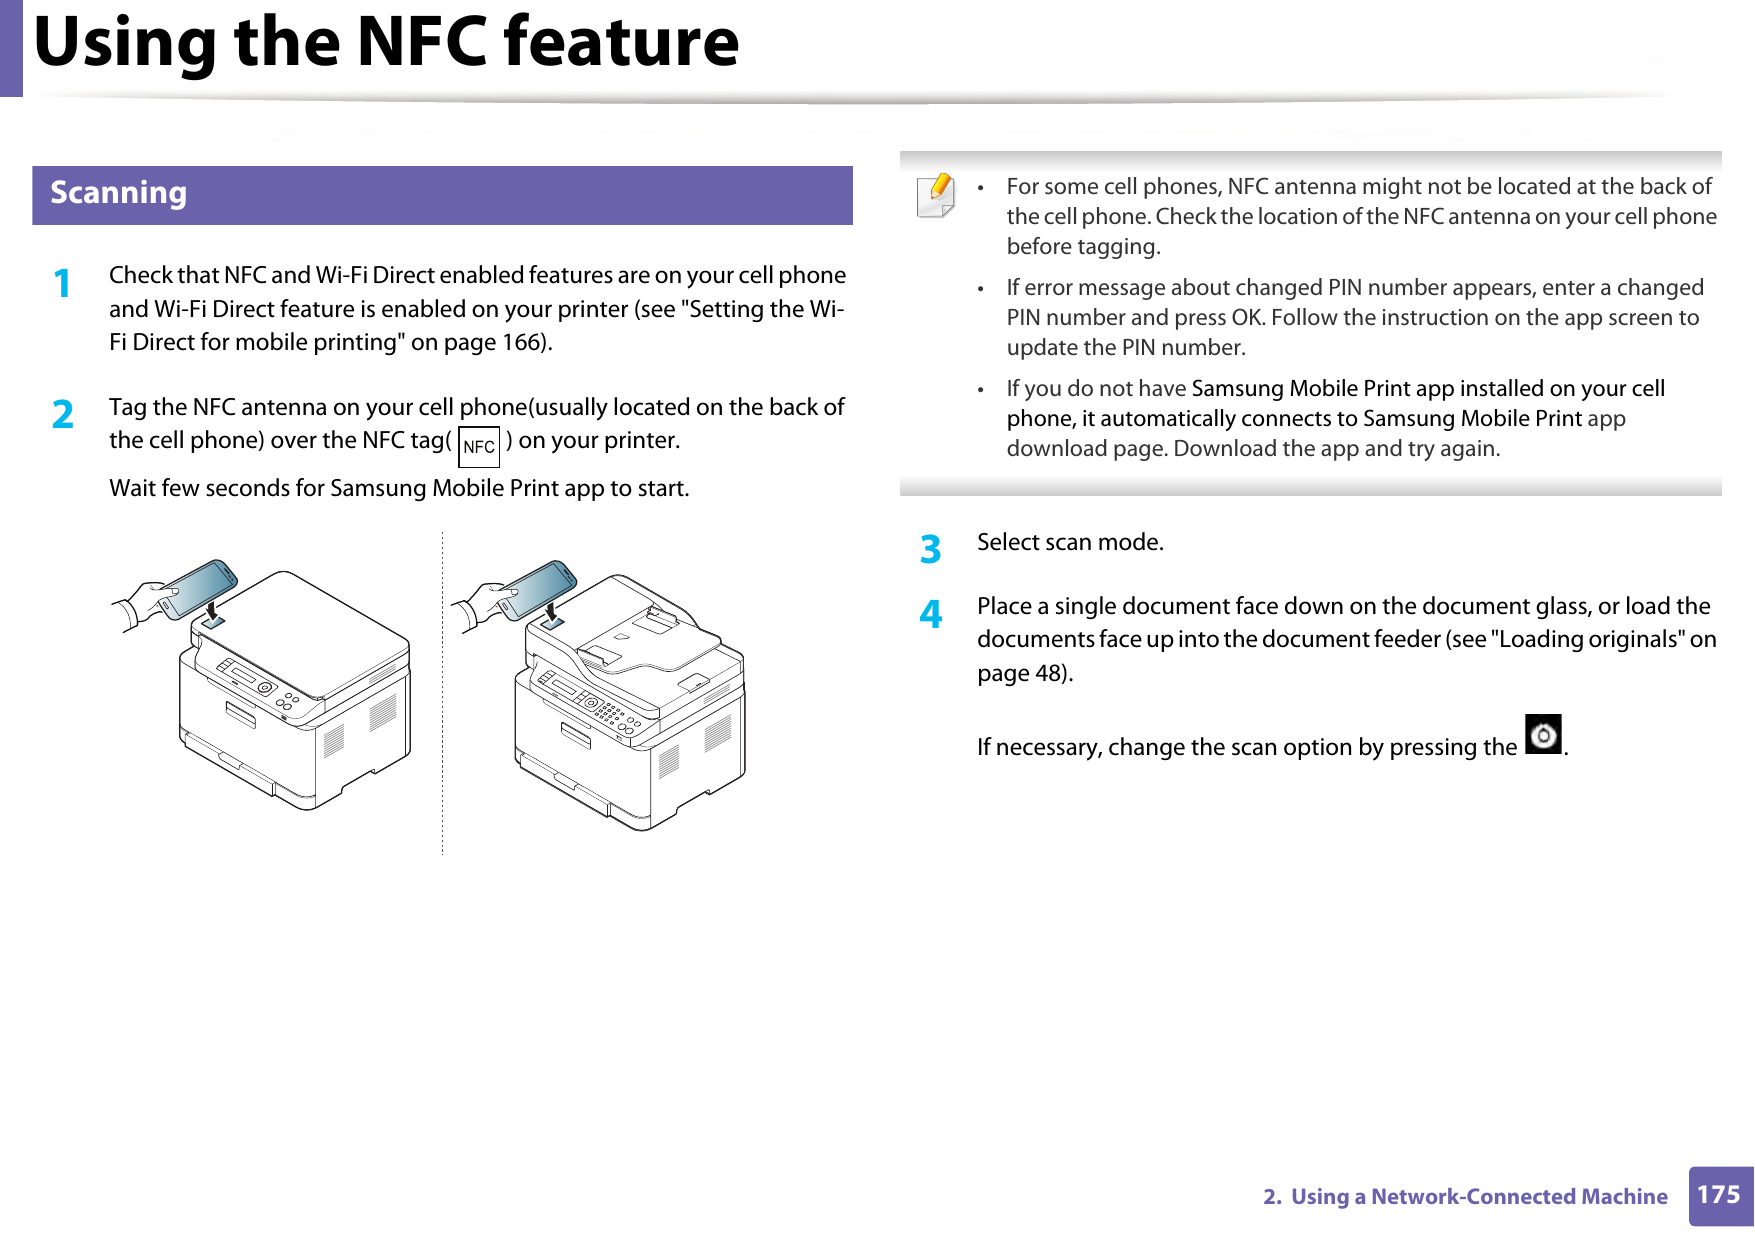
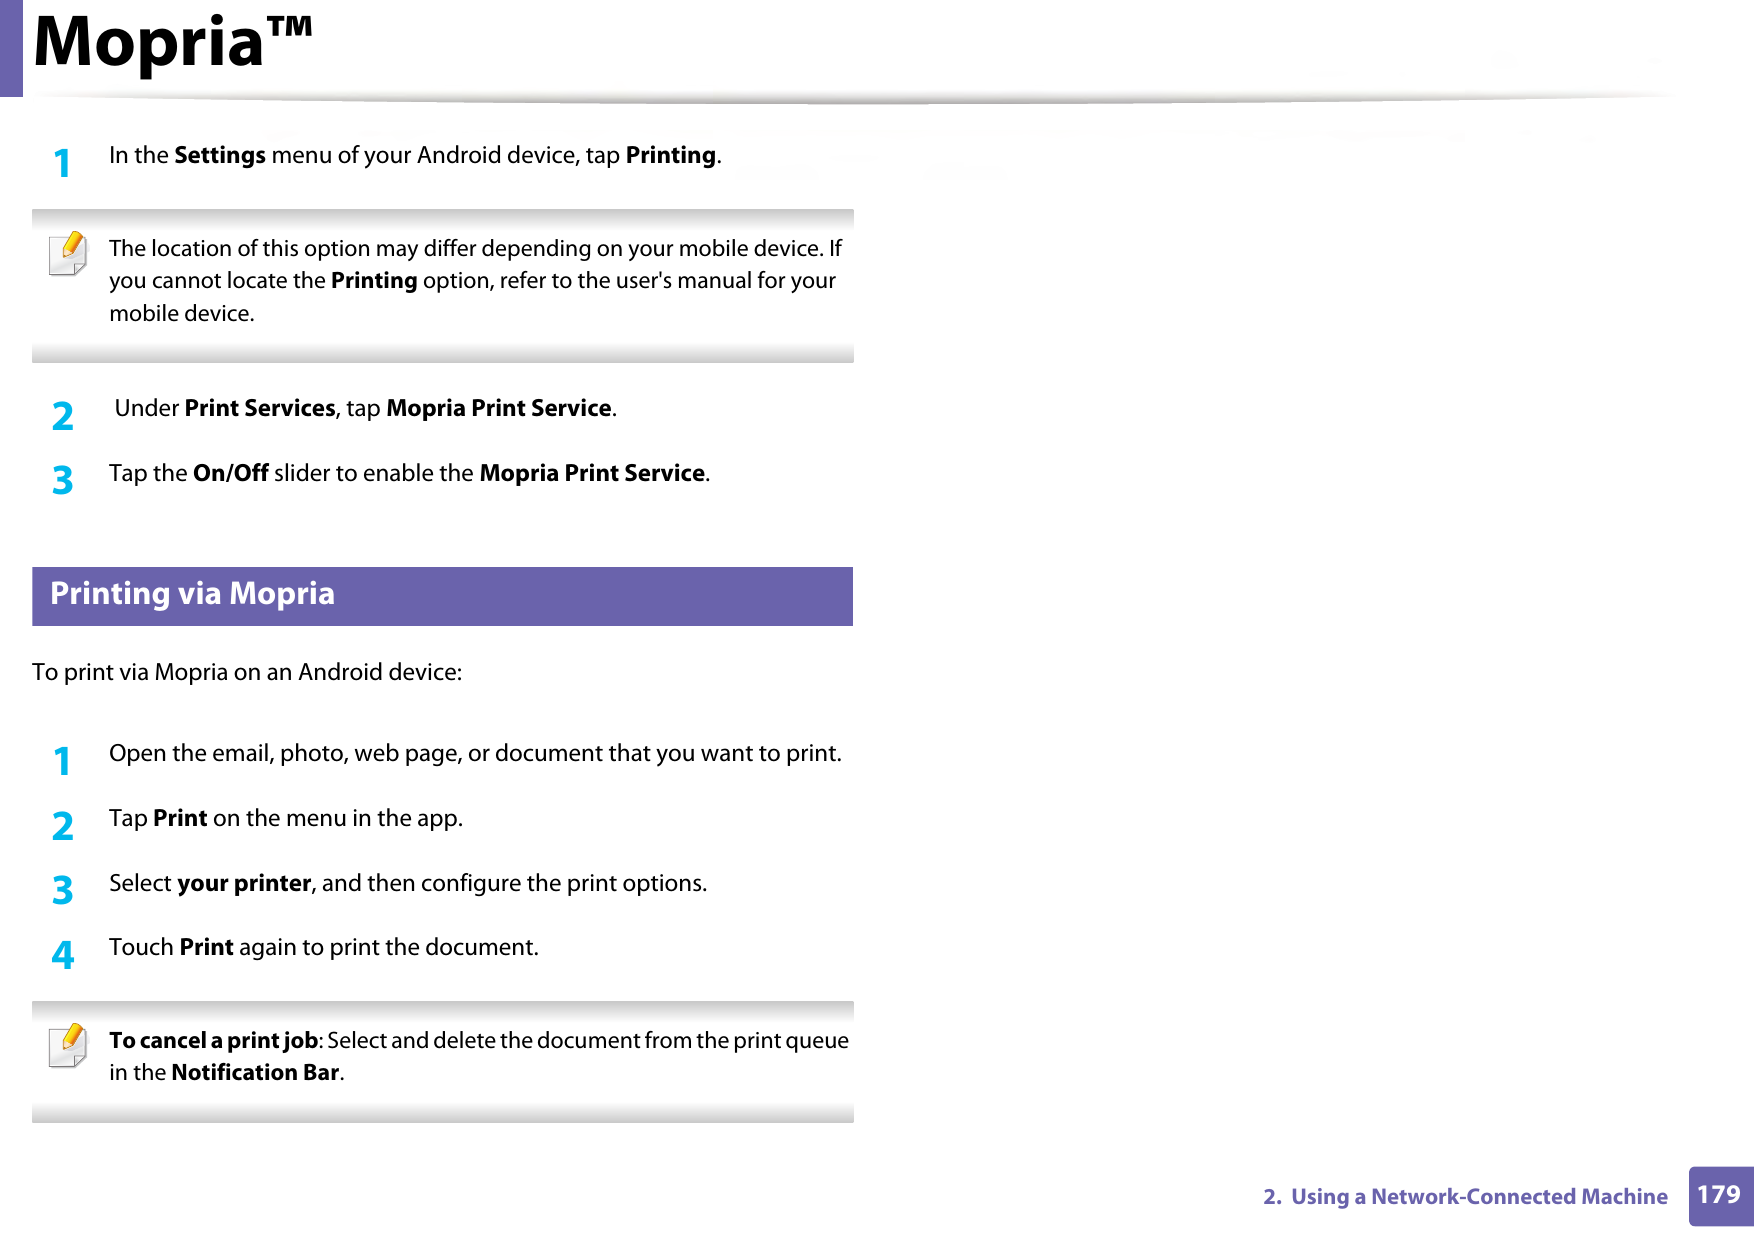
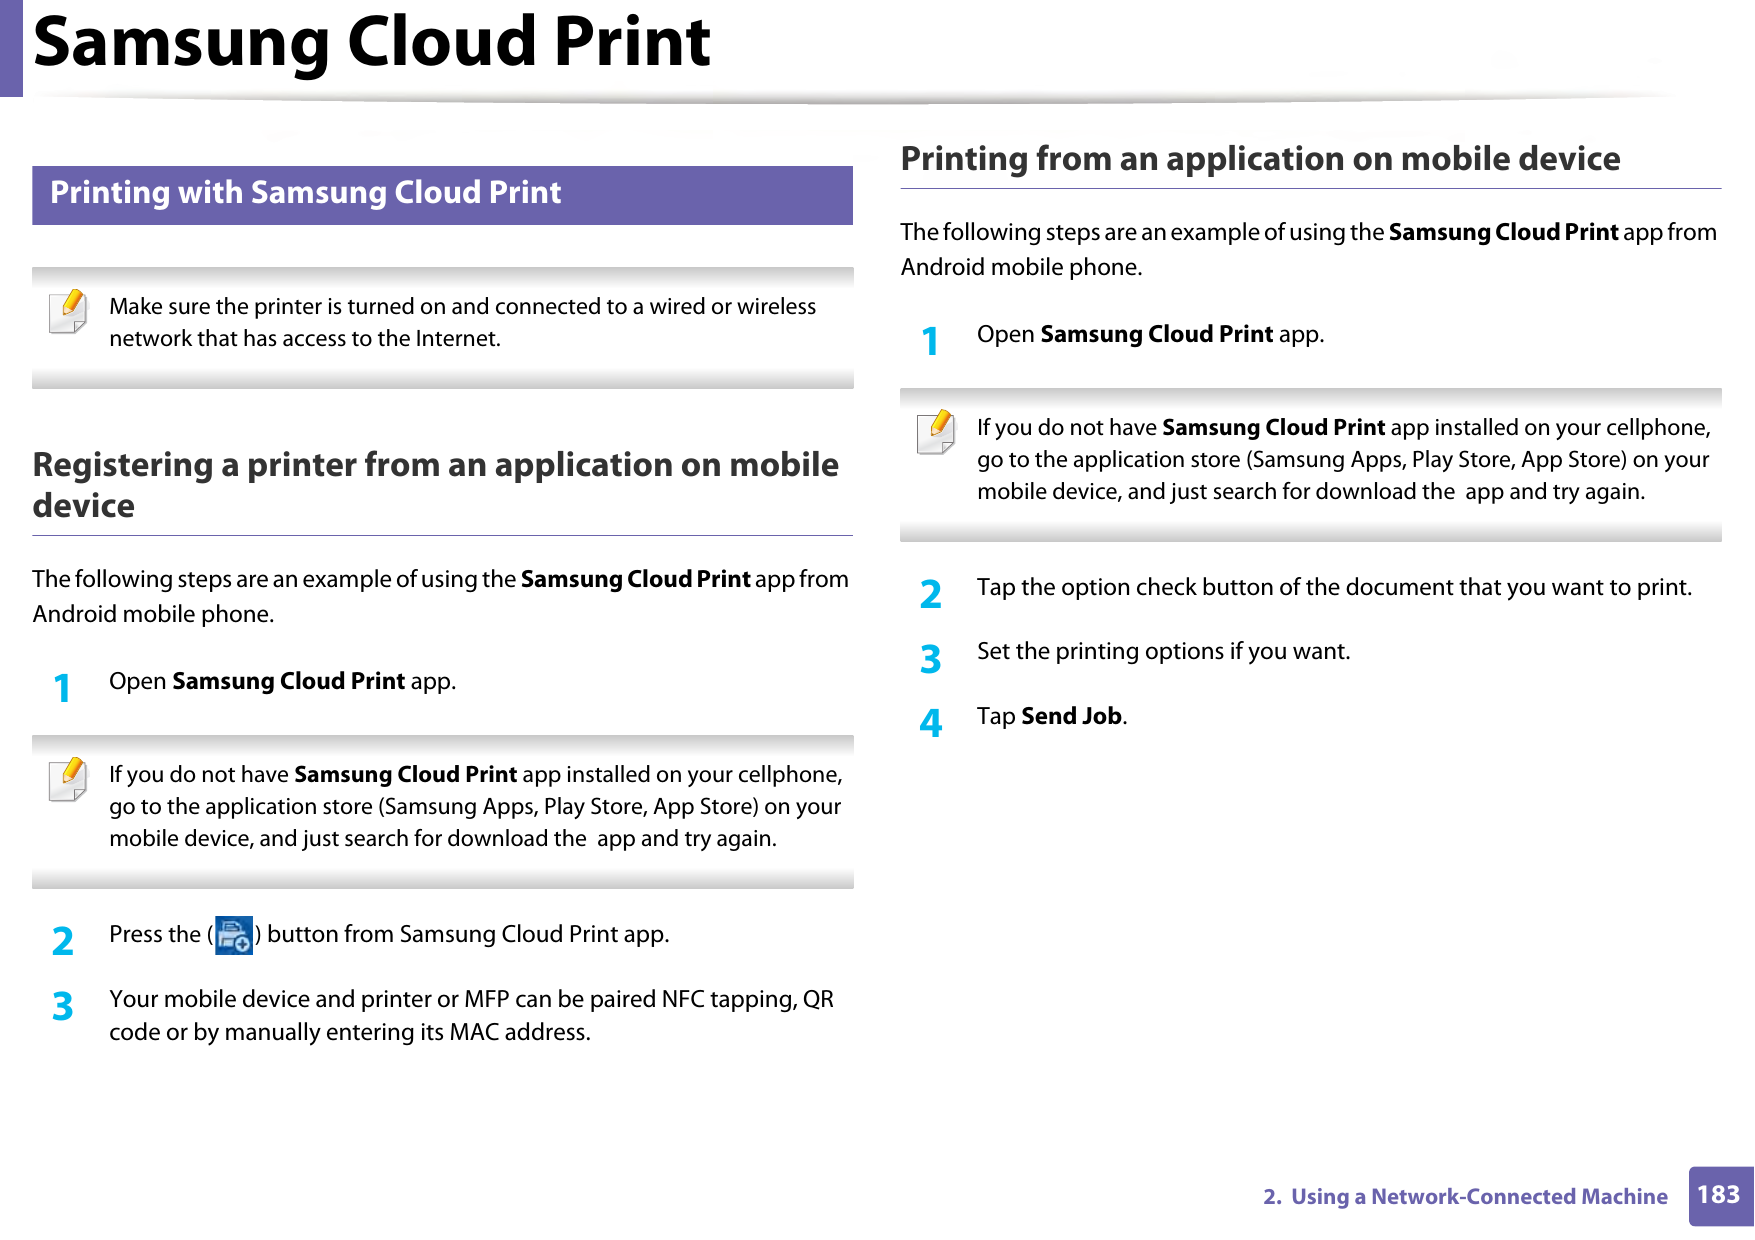
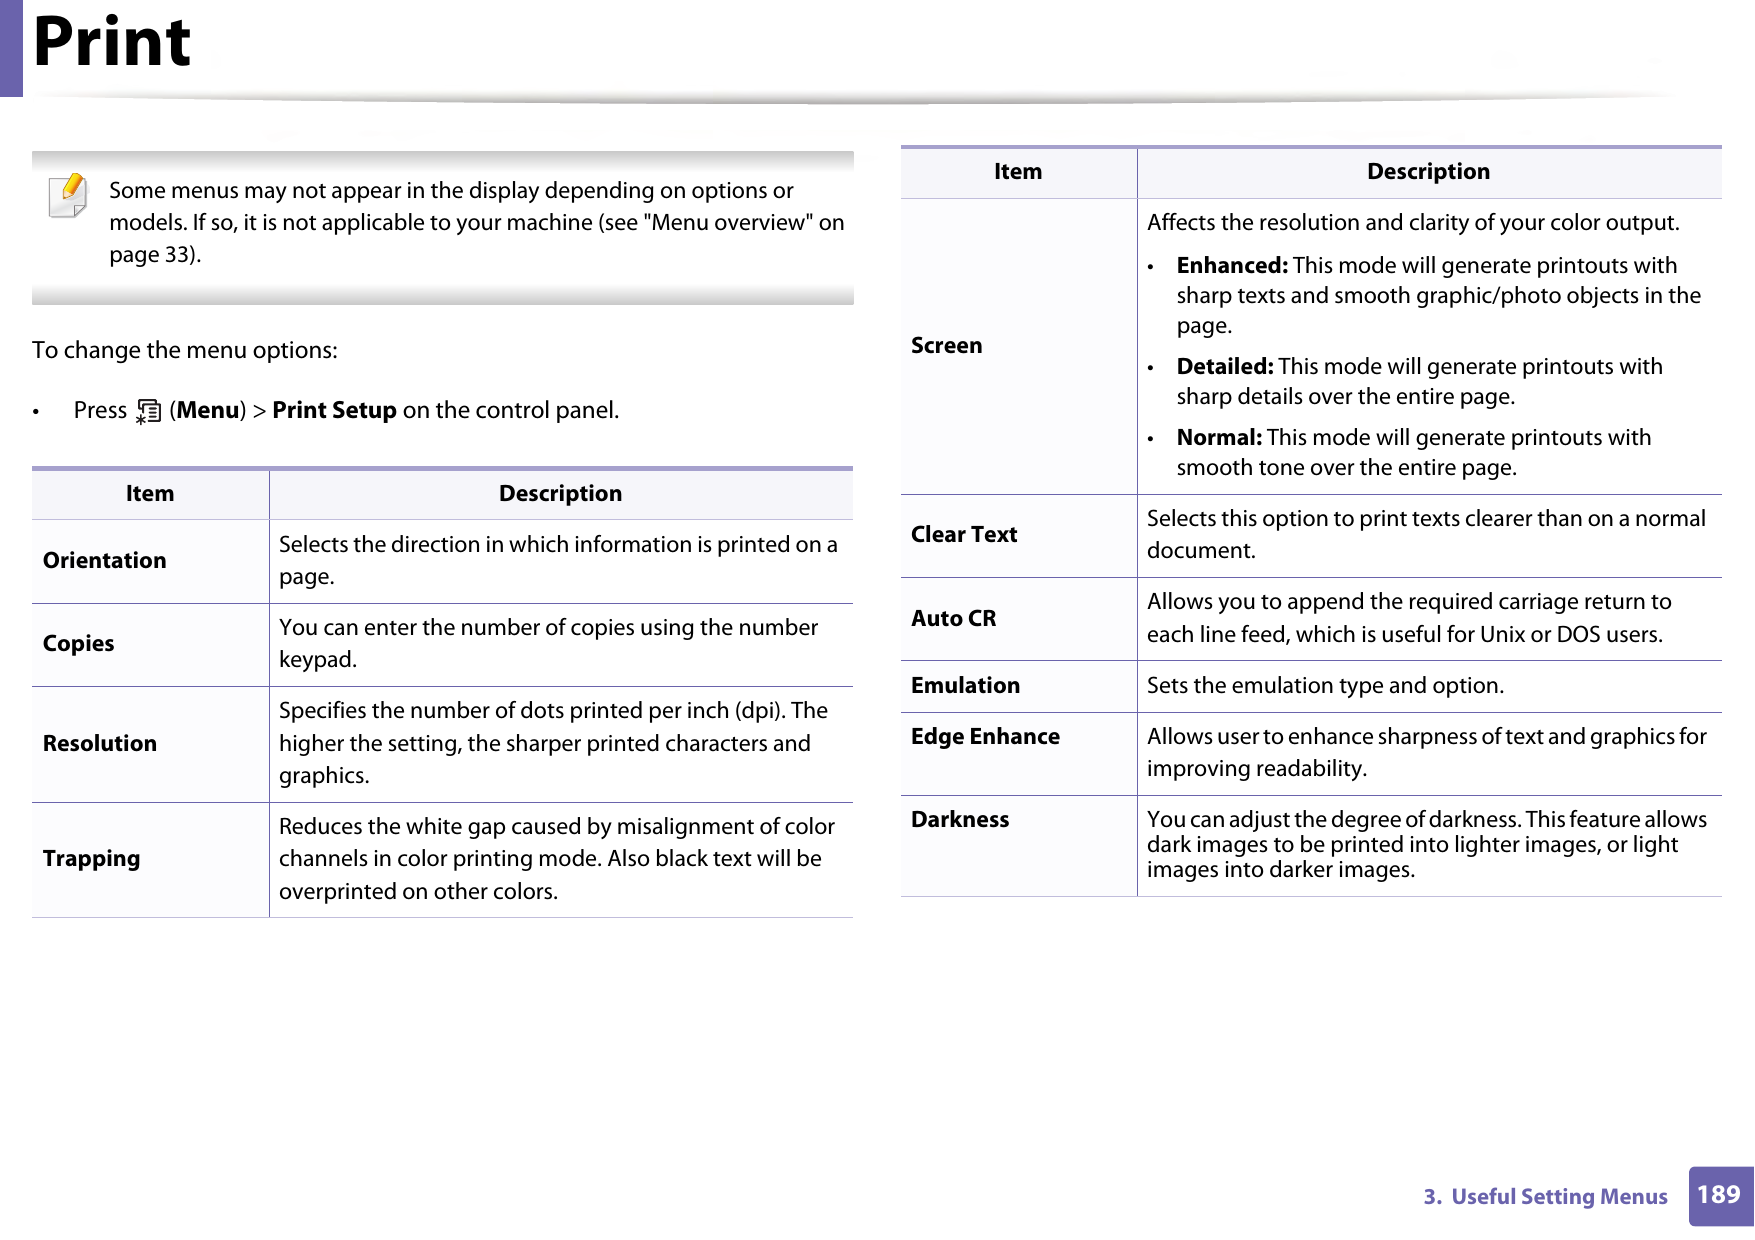
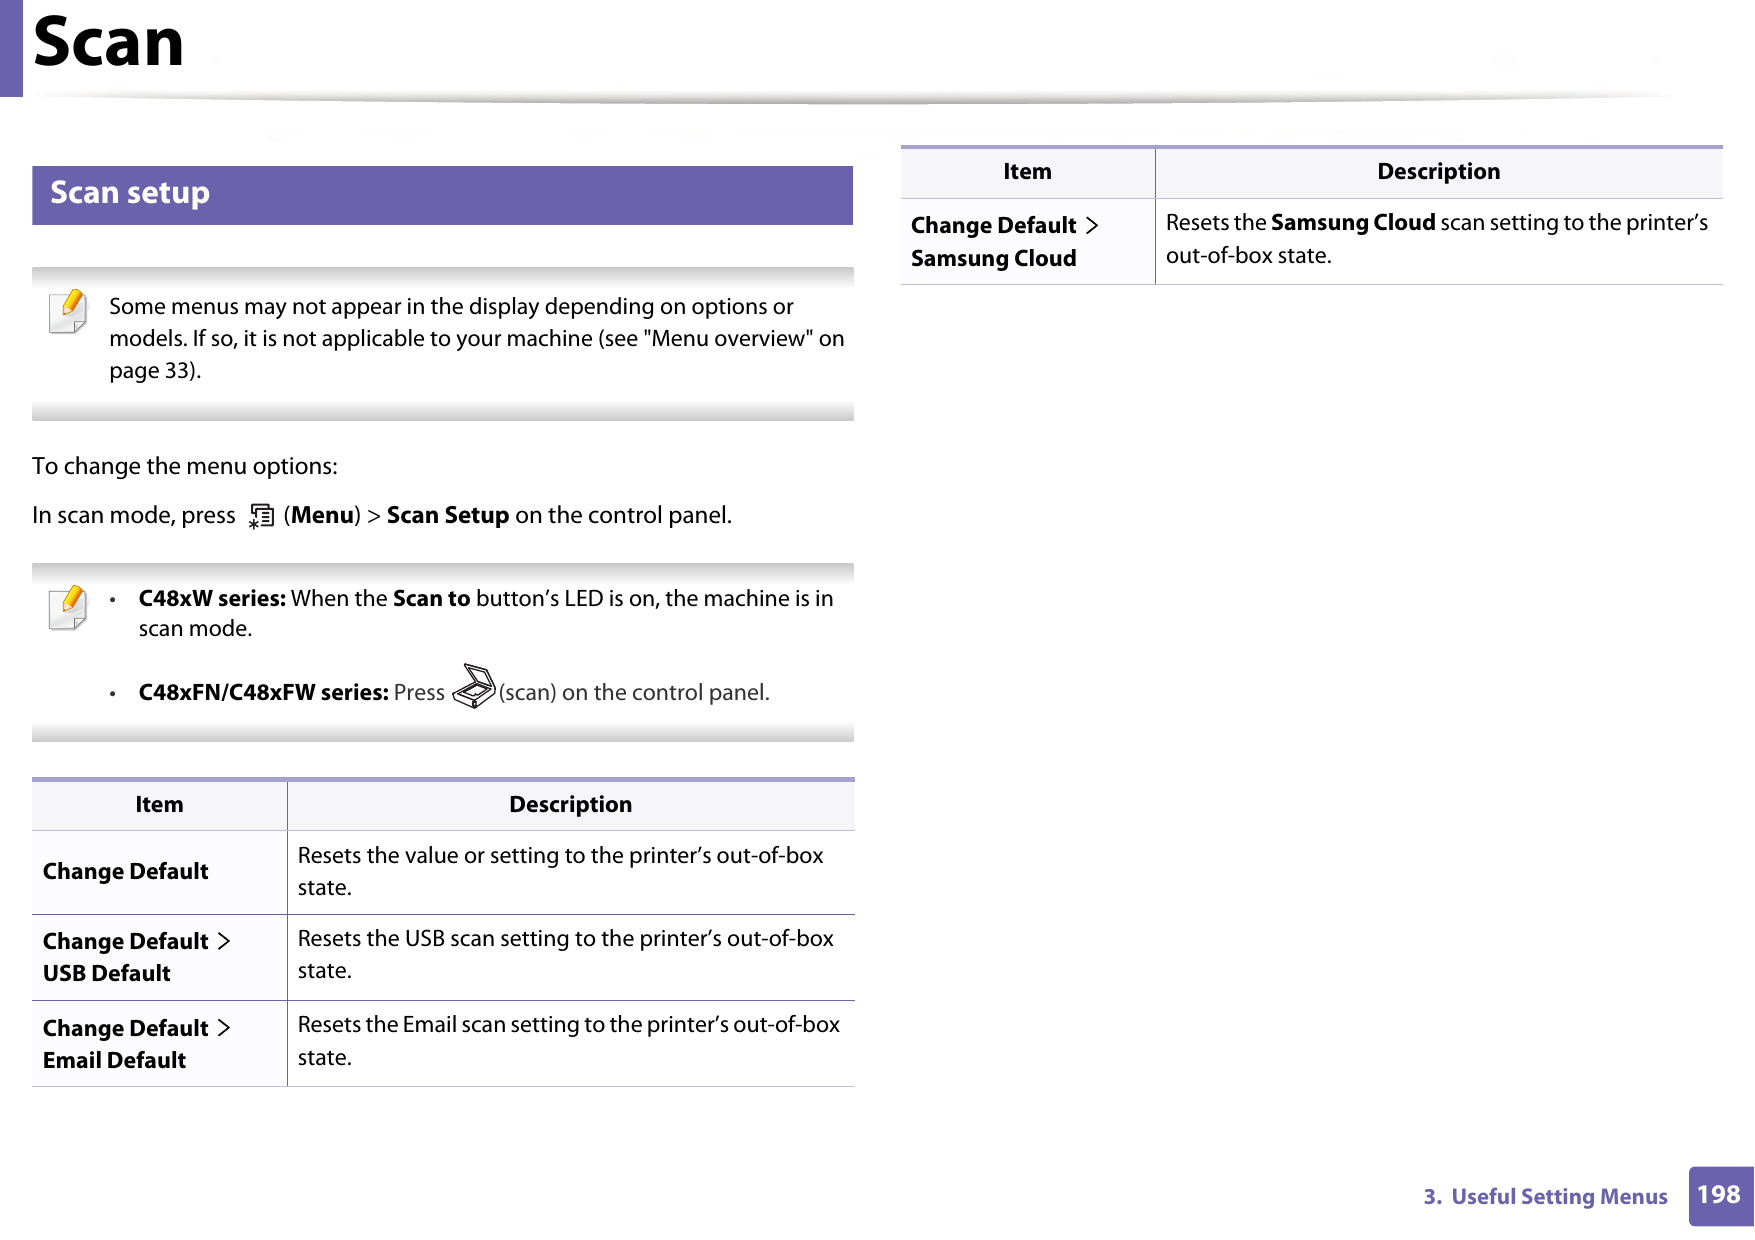
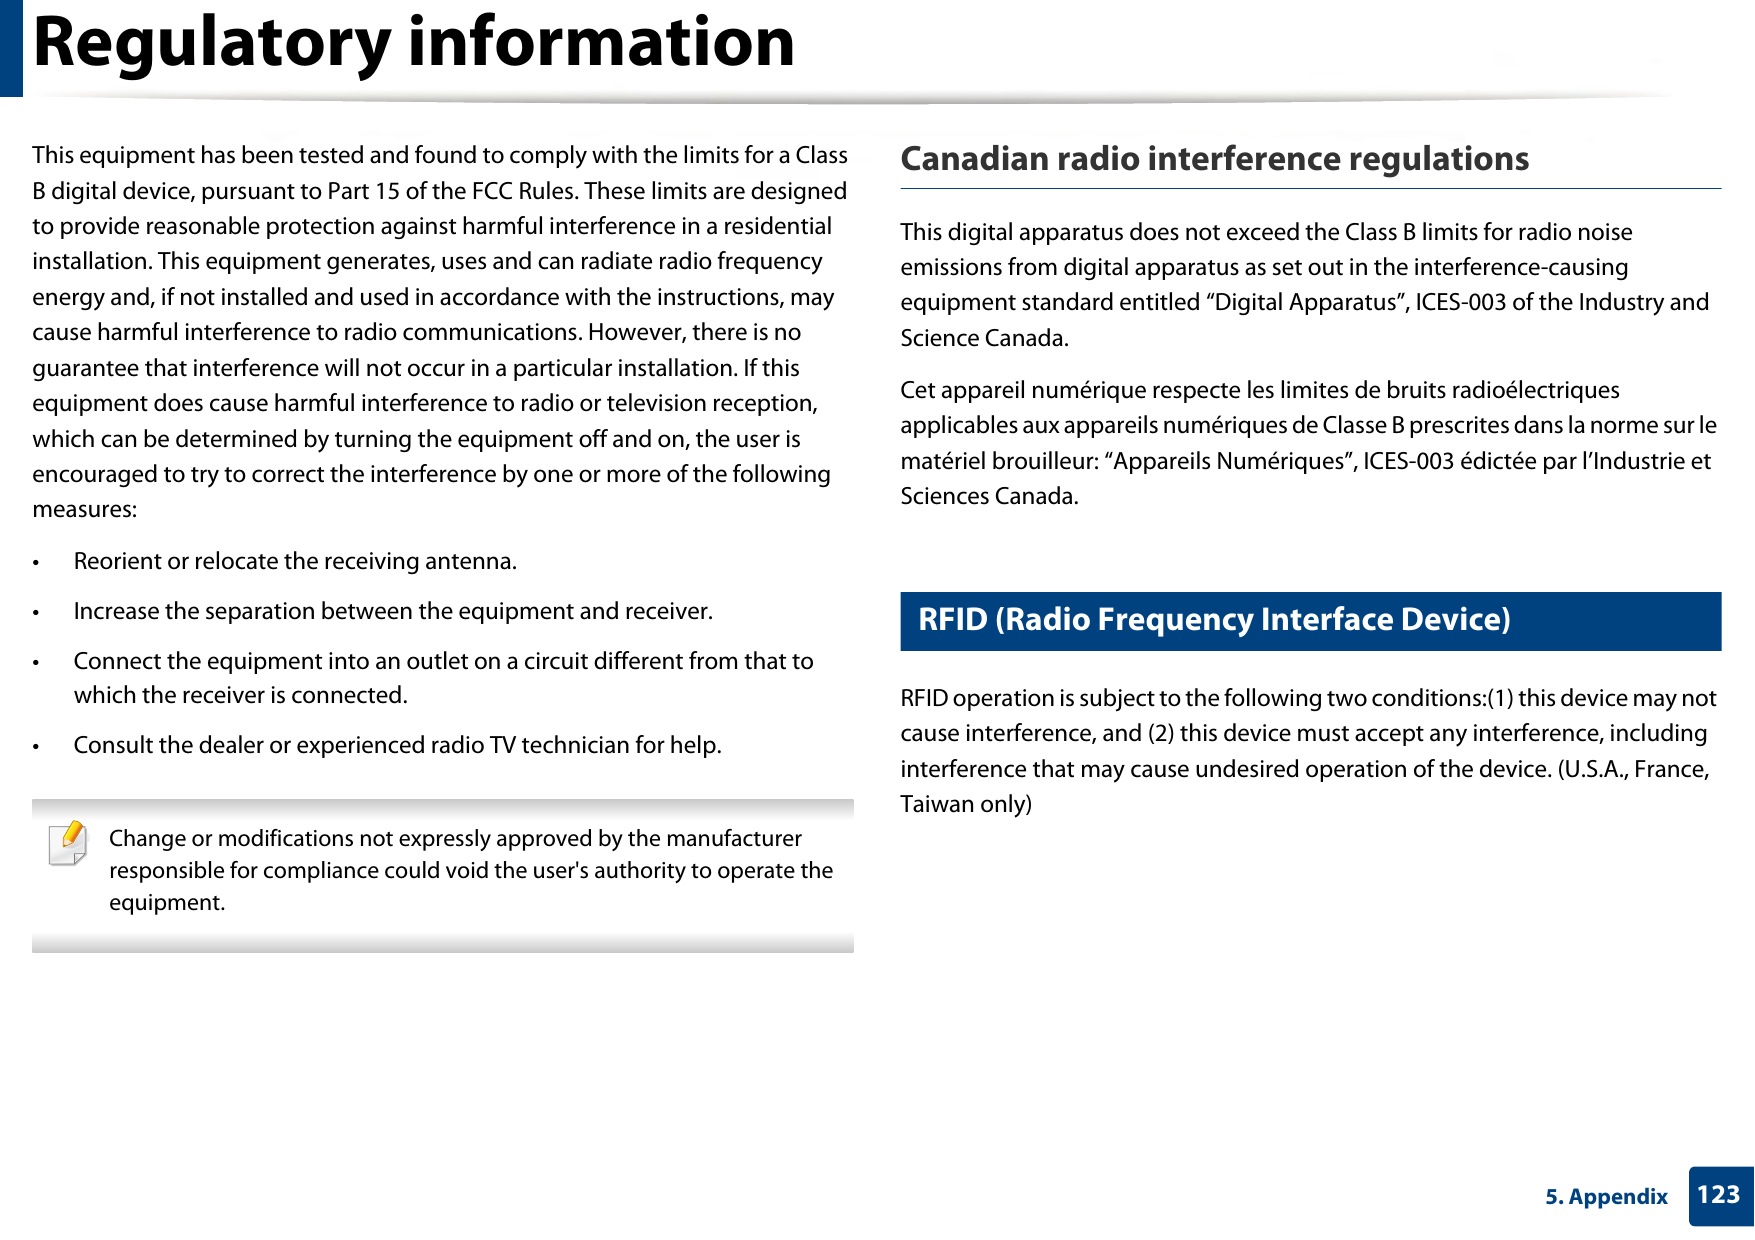
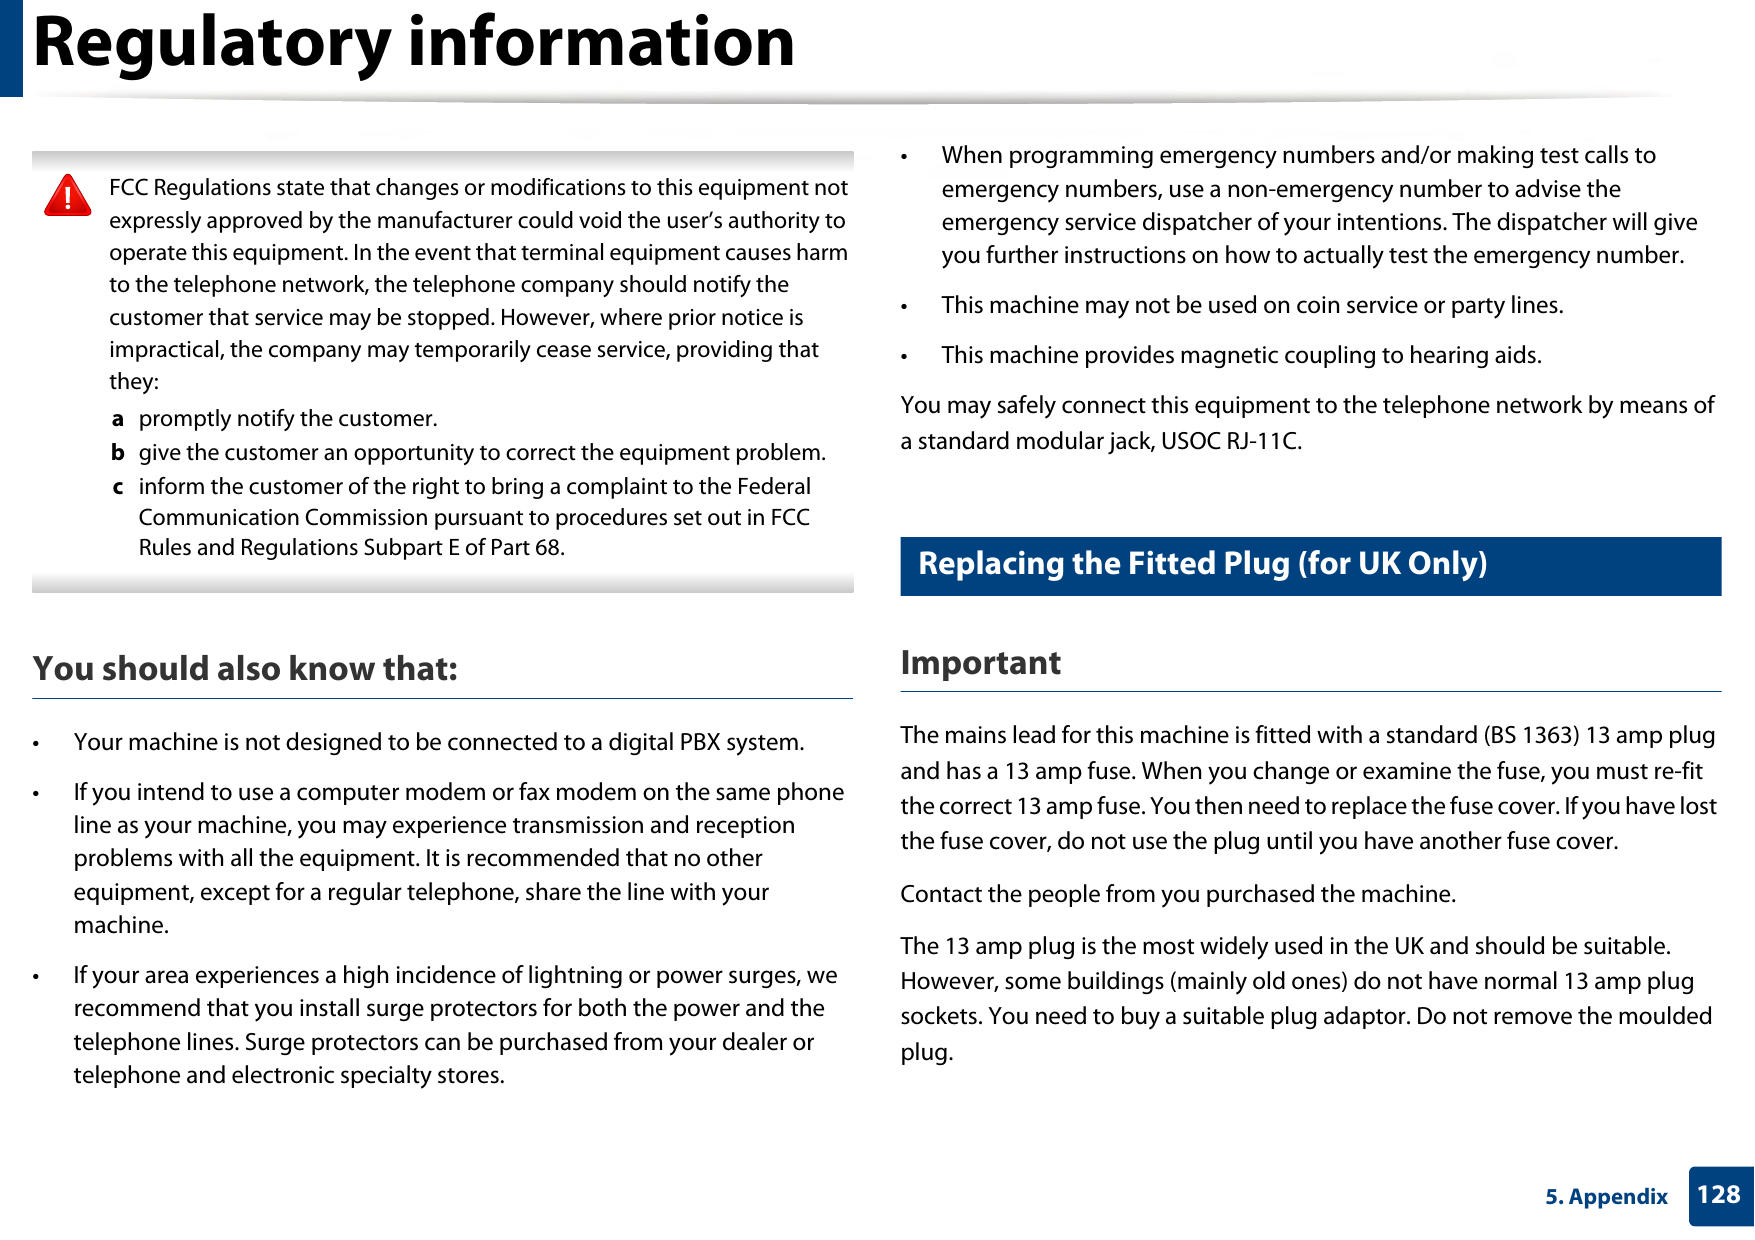
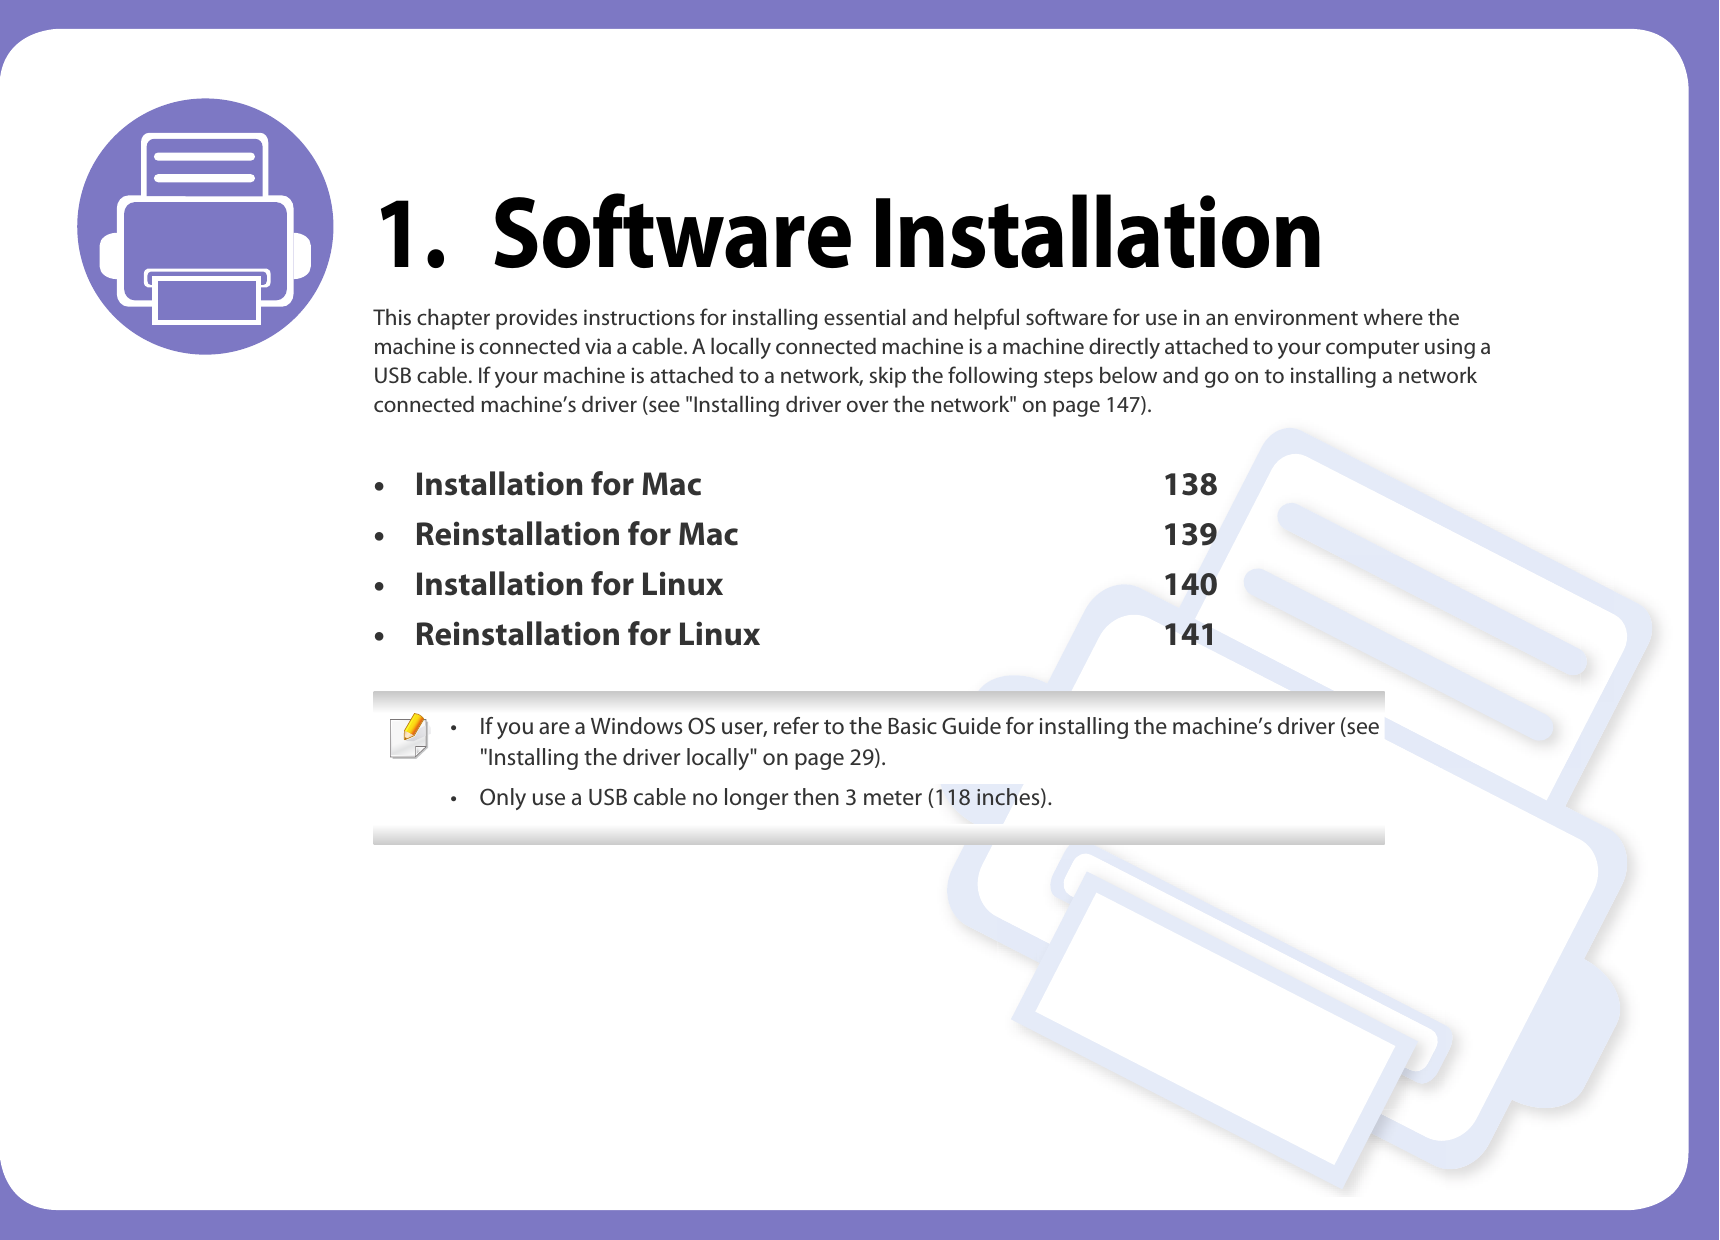
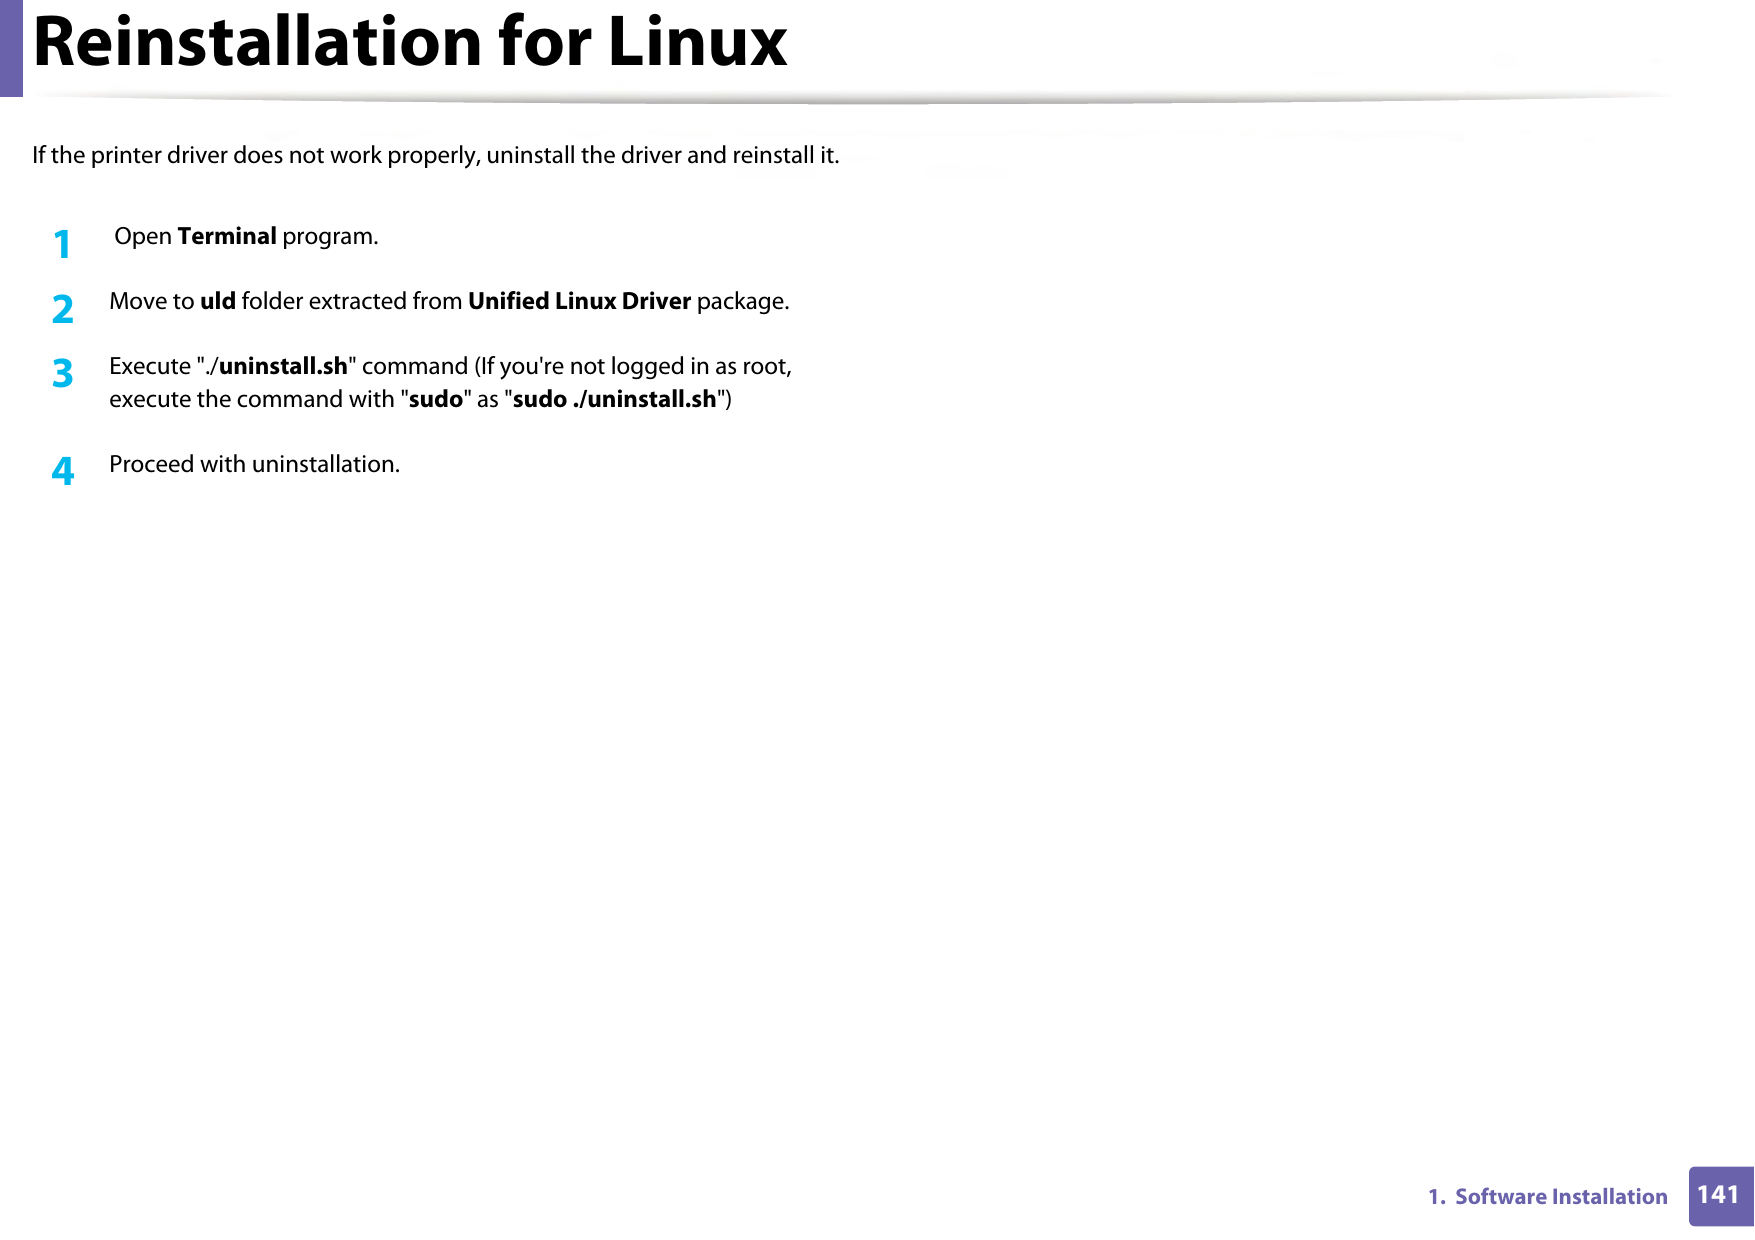
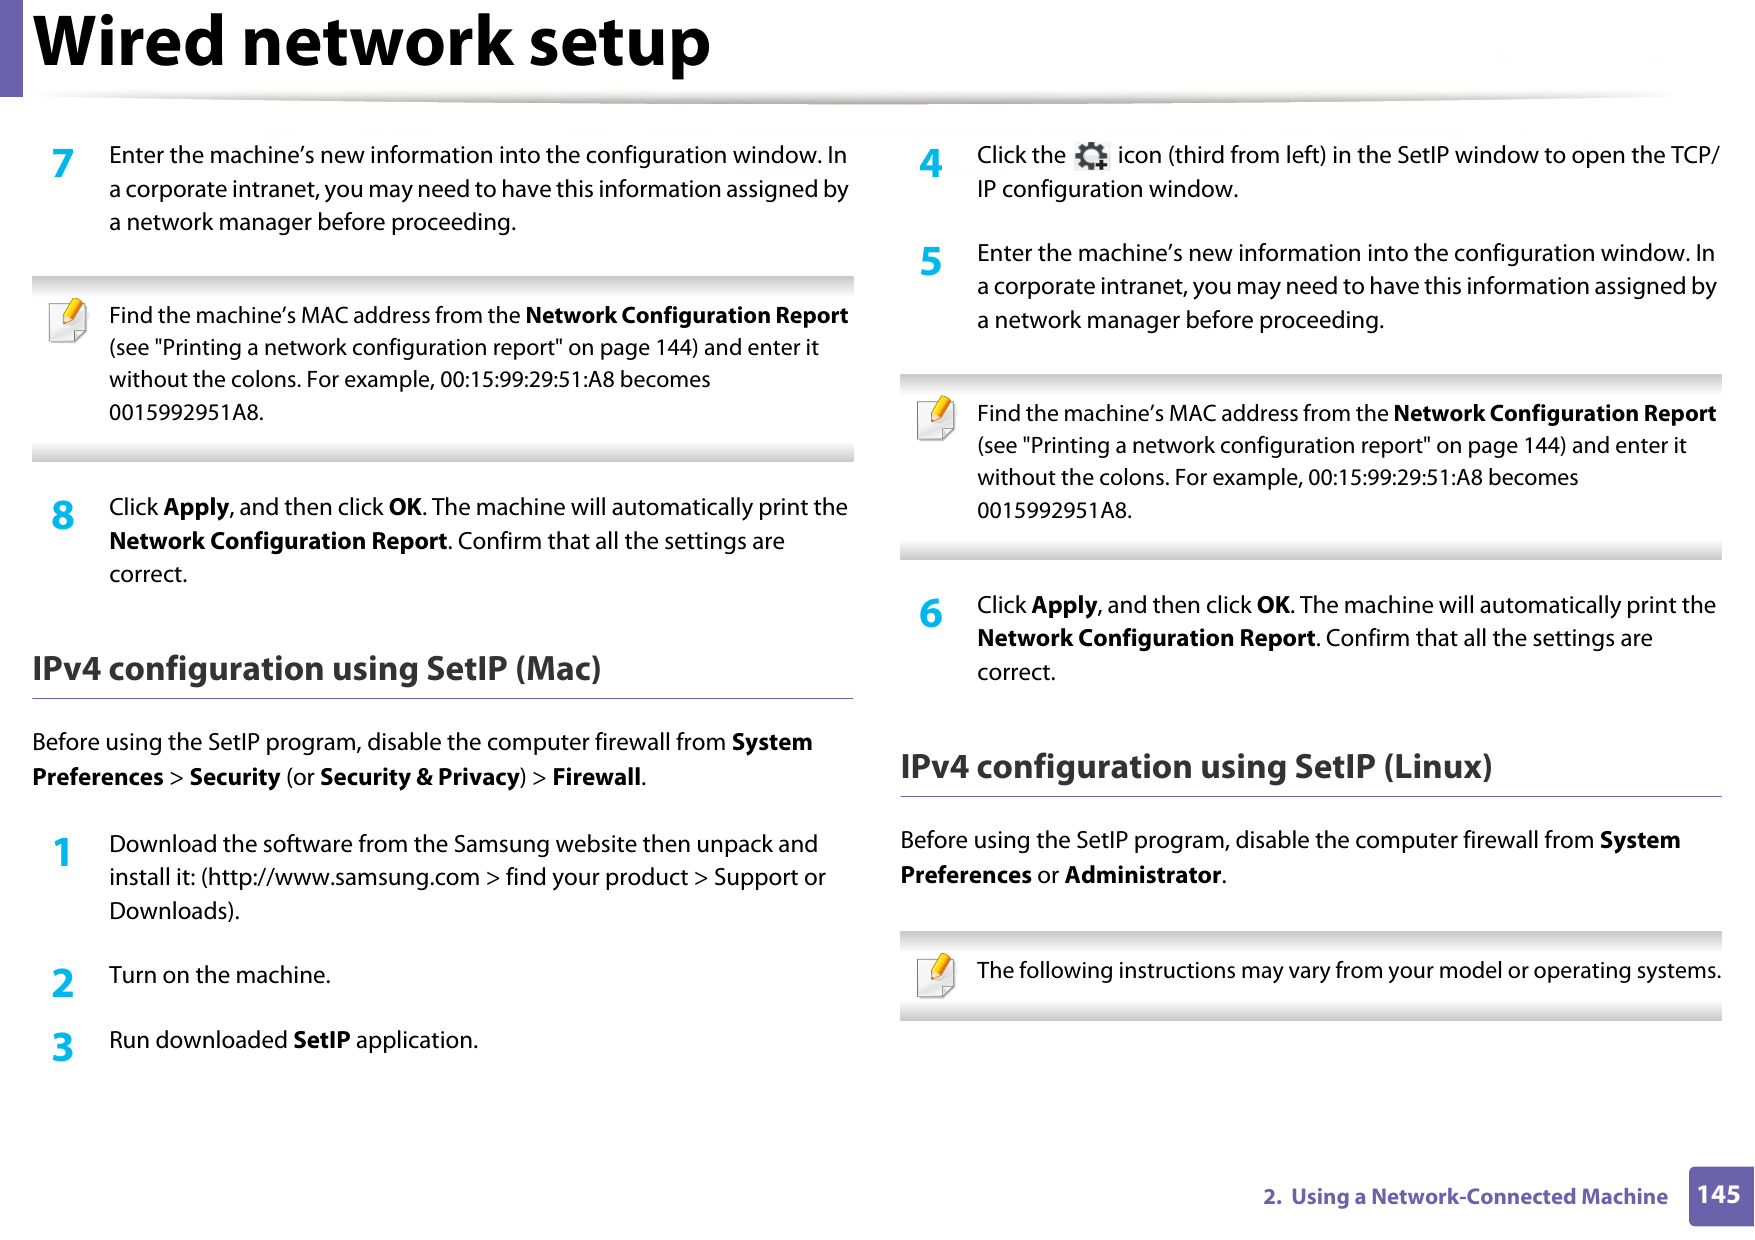
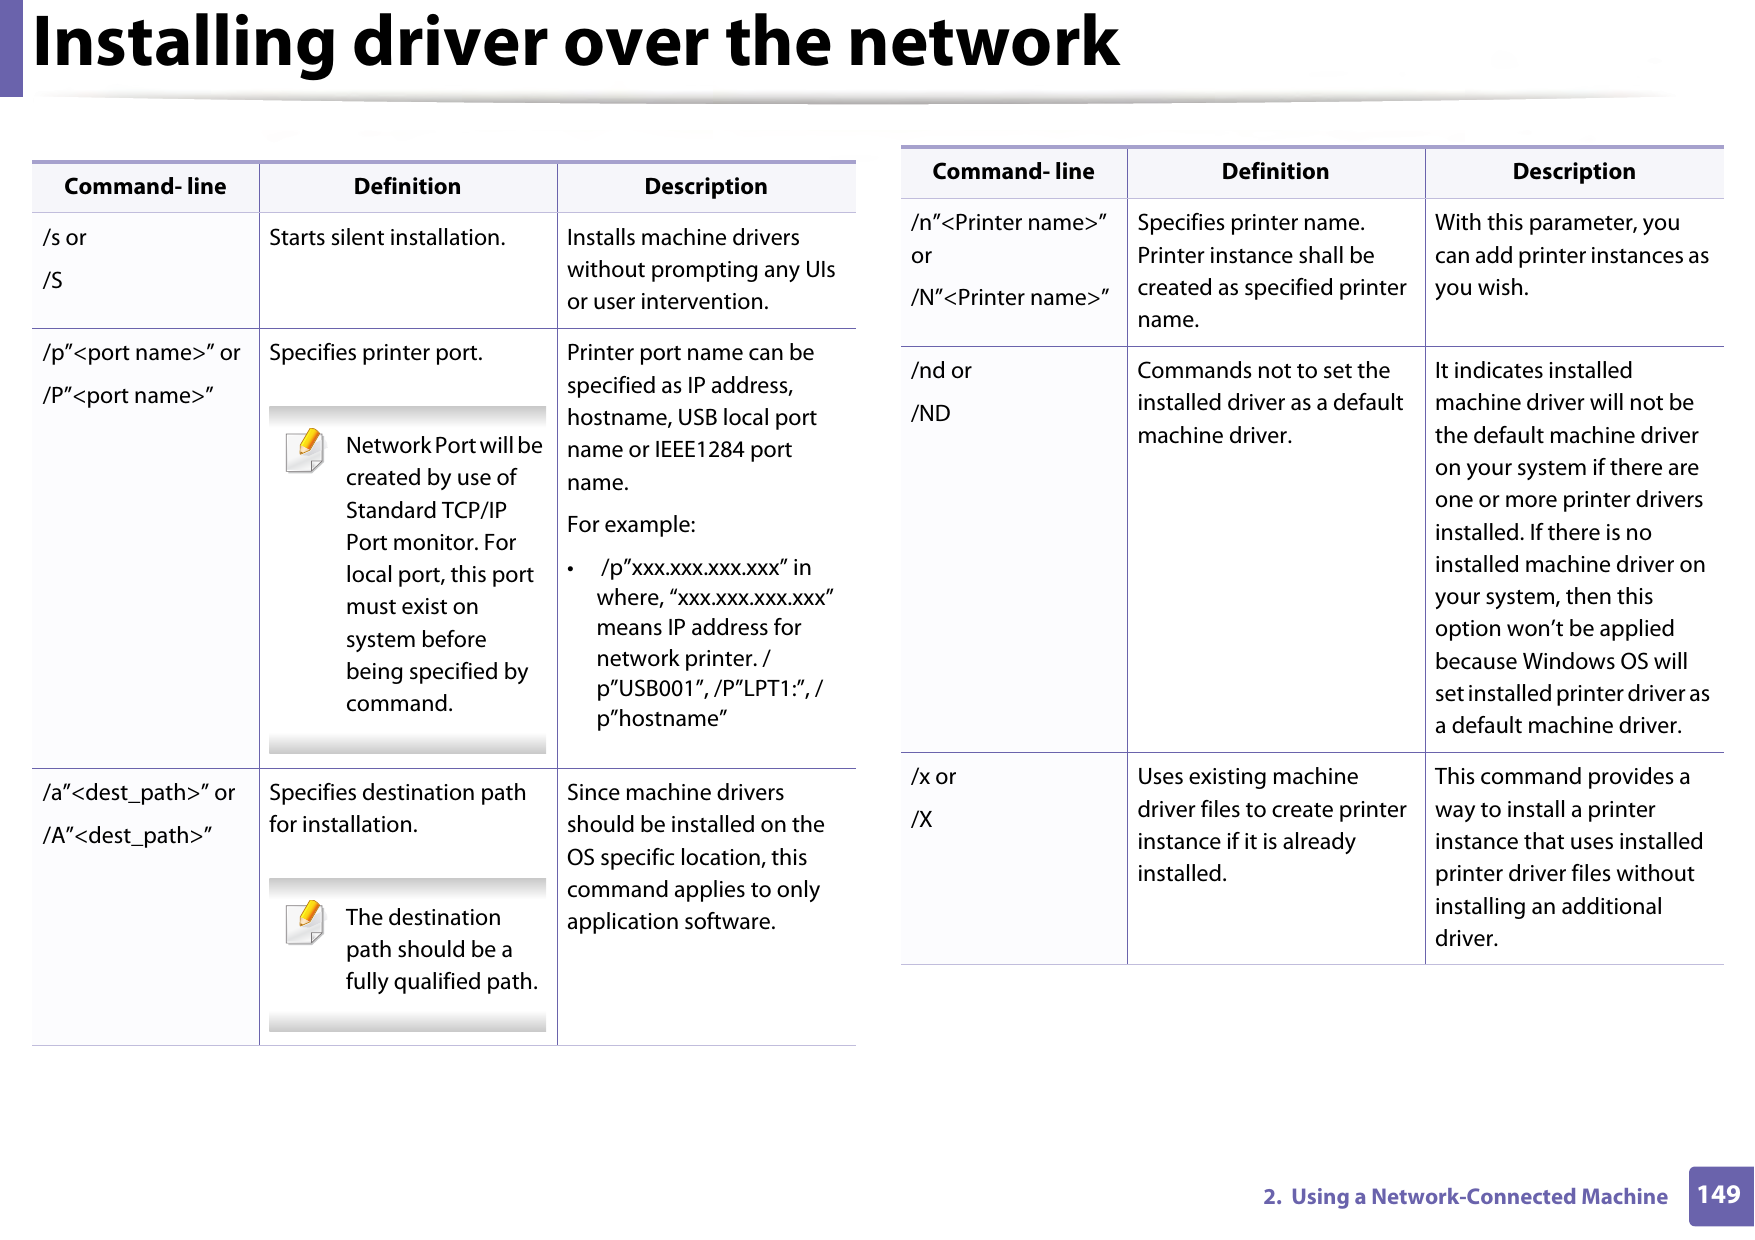
![Understanding display messages1094. TroubleshootingPrepare newTransfer beltThe life of the transfer belt will expired soon.Replace the transfer belt with a new one. Contact the service representatives.Replace newTransfer beltThe life of the transfer belt has expired.Replace the transfer belt with a new one. Contact the service representatives.Transfer Belt Error The transfer belt cannot be controlled.Reboot the power and try the printing job again. If the problem persists, please call for service.Prepare newTransfer rollerThe life of the transfer belt will expired soon.Replace the transfer belt with a new one. Contact the service representatives.Replace newTransfer rollerThe life of the transfer belt has expired.Replace the transfer belt with a new one. Contact the service representatives.Replace Fuser SoonThe life of the fuser unit will be expired soon.Replace the fuser unit with a new one. Contact the service representatives.Replace newFuser unitThe life of the fuser unit will be expired.Message Meaning Suggested solutionsReplace/Install Waste Toner TankThe life span of the waste toner container has expired and the printer will stop printing until a new waste toner container is placed into the printer.Replace a waste toner container with a Samsung-genuine waste toner container.Prepare newImaging unitThe life of the imaging unit will be expired soon.Replace the imaging unit with a new one. Contact the service representatives.Replace withnew imaging unitThe life of the imaging unit will be expired.Installimaging unitThe imaging unit is not installedError [error number]Door open/closeThe imaging unit is installed improperly, or the cover is not securely latched.Reinstall the imaging unit to confirm it is seated properly. Close the cover until it locks into place.Message Meaning Suggested solutions](https://usermanual.wiki/Samsung-Electronics-Co/SLC480FW.User-Manual-3/User-Guide-2579315-Page-9.png)

![Regulatory information1295. Appendix If you cut off the moulded plug, get rid of it straight away.You cannot rewire the plug and you may receive an electric shock if you plug it into a socket. Important warning: If the wires in the mains lead do not match the colors marked in your plug, do the following:You must connect the green and yellow wire to the pin marked by the letter “E” or by the safety ‘Earth symbol’ or colored green and yellow or green.You must connect the blue wire to the pin which is marked with the letter “N” or colored black.You must connect the brown wire to the pin which is marked with the letter “L” or colored red.You must have a 13 amp fuse in the plug, adaptor, or at the distribution board.26 Declaration of conformity (European countries)Approvals and CertificationsJanuary 1, 1995: Council Directive 2006/95/EC Approximation of the laws of the member states related to low voltage equipment.January 1, 1996: Council Directive 2004/108/EC, approximation of the laws of the Member States related to electromagnetic compatibility.March 9, 1999: Council Directive 1999/5/EC on radio equipment and telecommunications terminal equipment and the mutual recognition of their conformity. A full declaration, defining the relevant Directives and referenced standards can be obtained from your Samsung Electronics Co., Ltd. representative.You must earth this machine.The wires in the mains lead have the following color code:•Green and Yellow: Earth•Blue: Neutral•Brown: LiveHereby, Samsung Electronics, declares that this [Xpress C48x series] is in compliance with the essential requirements and other relevant provisions of Low Voltage Directive (2006/95/EC), EMC Directive (2004/108/EC).Hereby, Samsung Electronics, declares that this [Xpress C48xW series, Xpress C48xFN series, Xpress C48xFW series] is in compliance with the essential requirements and other relevant provisions of R&TTE Directive 1999/5/EC.The declaration of conformity may be consulted at www.samsung.com, go to Support > Download center and enter your printer (MFP) name to browse the EuDoC.](https://usermanual.wiki/Samsung-Electronics-Co/SLC480FW.User-Manual-3/User-Guide-2579315-Page-29.png)
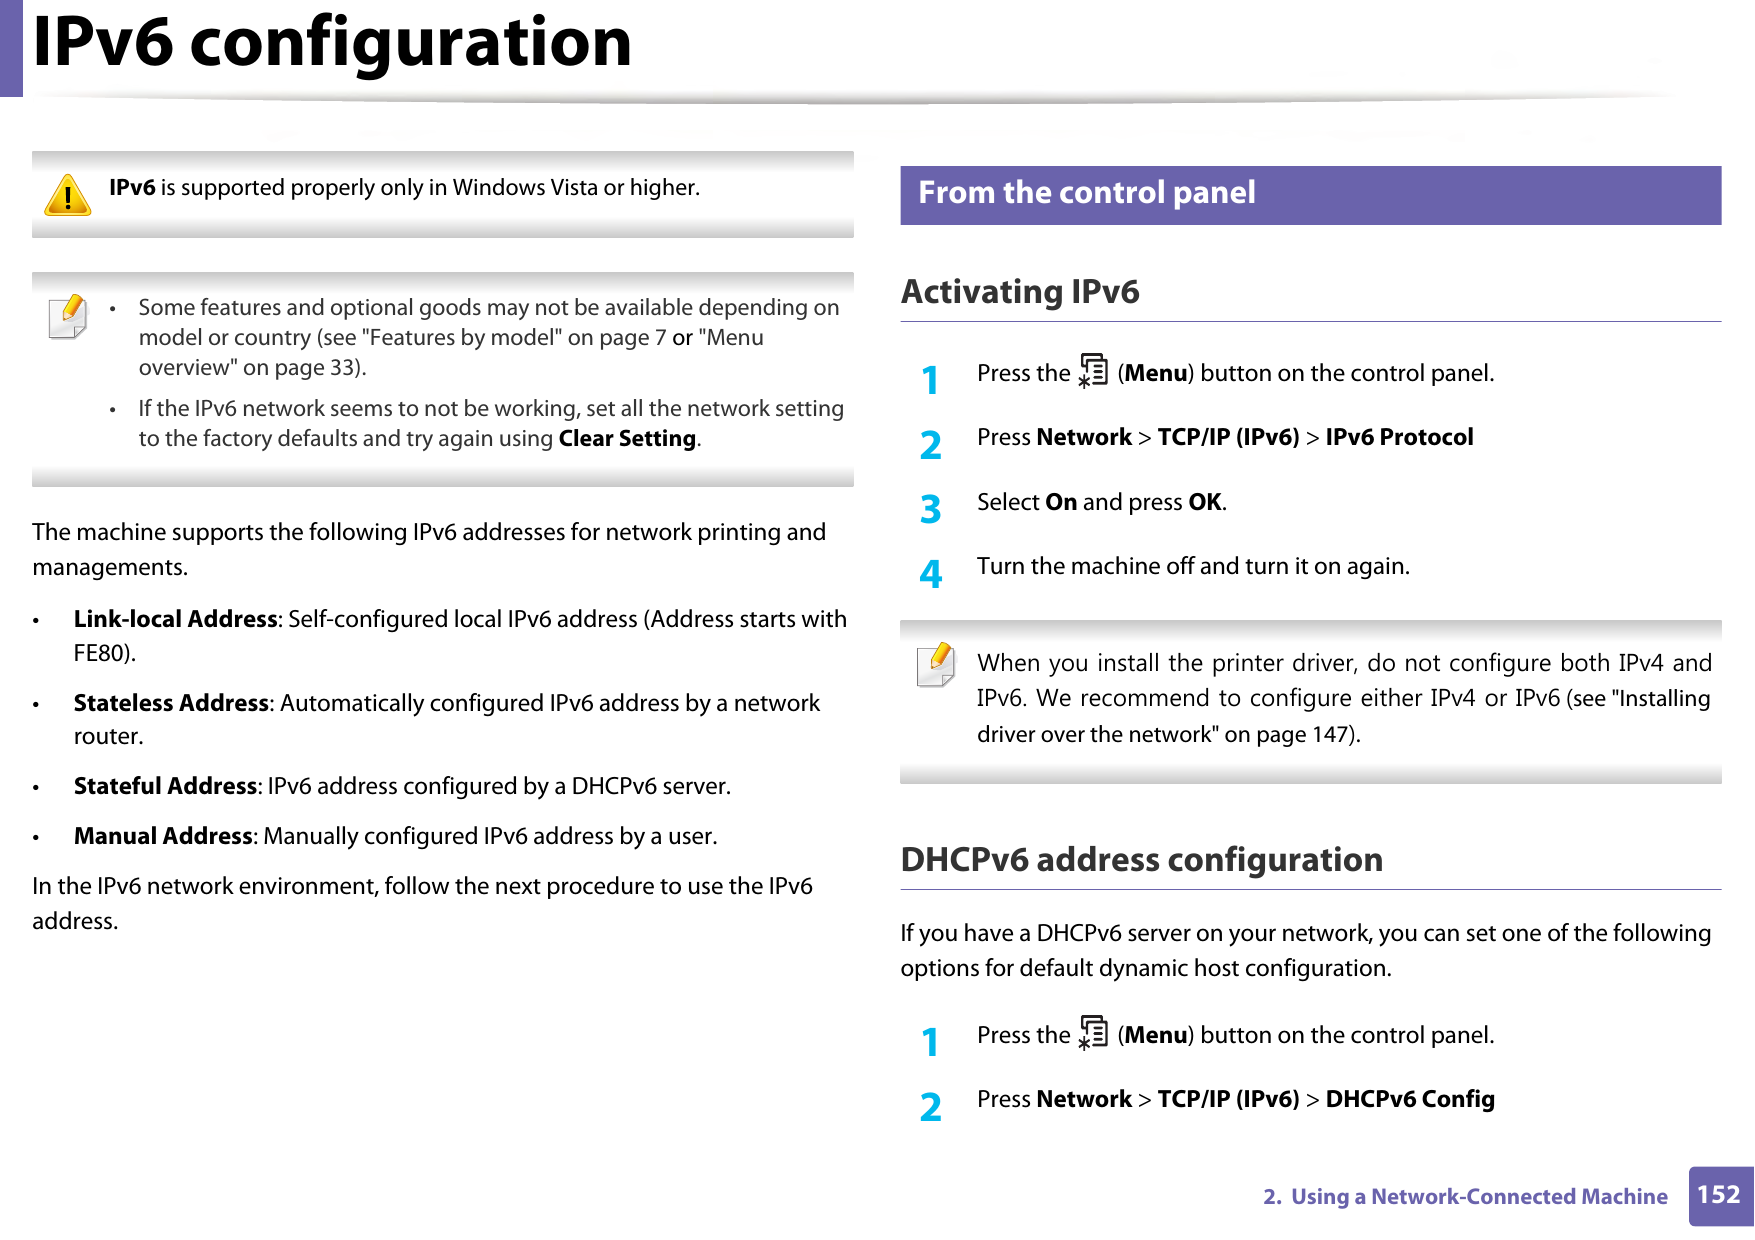

![IPv6 configuration1542. Using a Network-Connected Machine•Stateful Address: IPv6 address configured by a DHCPv6 server.•Manual Address: Manually configured IPv6 address by a user.3 Enter the IPv6 addresses (e.g.,: http://[FE80::215:99FF:FE66:7701]). Address must be enclosed in '[ ]' brackets.](https://usermanual.wiki/Samsung-Electronics-Co/SLC480FW.User-Manual-3/User-Guide-2579315-Page-54.png)