Samsung Electronics Co U32E850R LCD Monitor User Manual
Samsung Electronics Co Ltd LCD Monitor
UserManual.wiki
>
Samsung Electronics Co
>
U32E850R User Manual
>
user manual
Contents
1.
user manual-2
2.
user manual
user manual
Navigation menu
Upload a User Manual
Namespaces
Wiki Guide
HTML
PDF
Info
Views
User Manual
Discussion / Help
Navigation
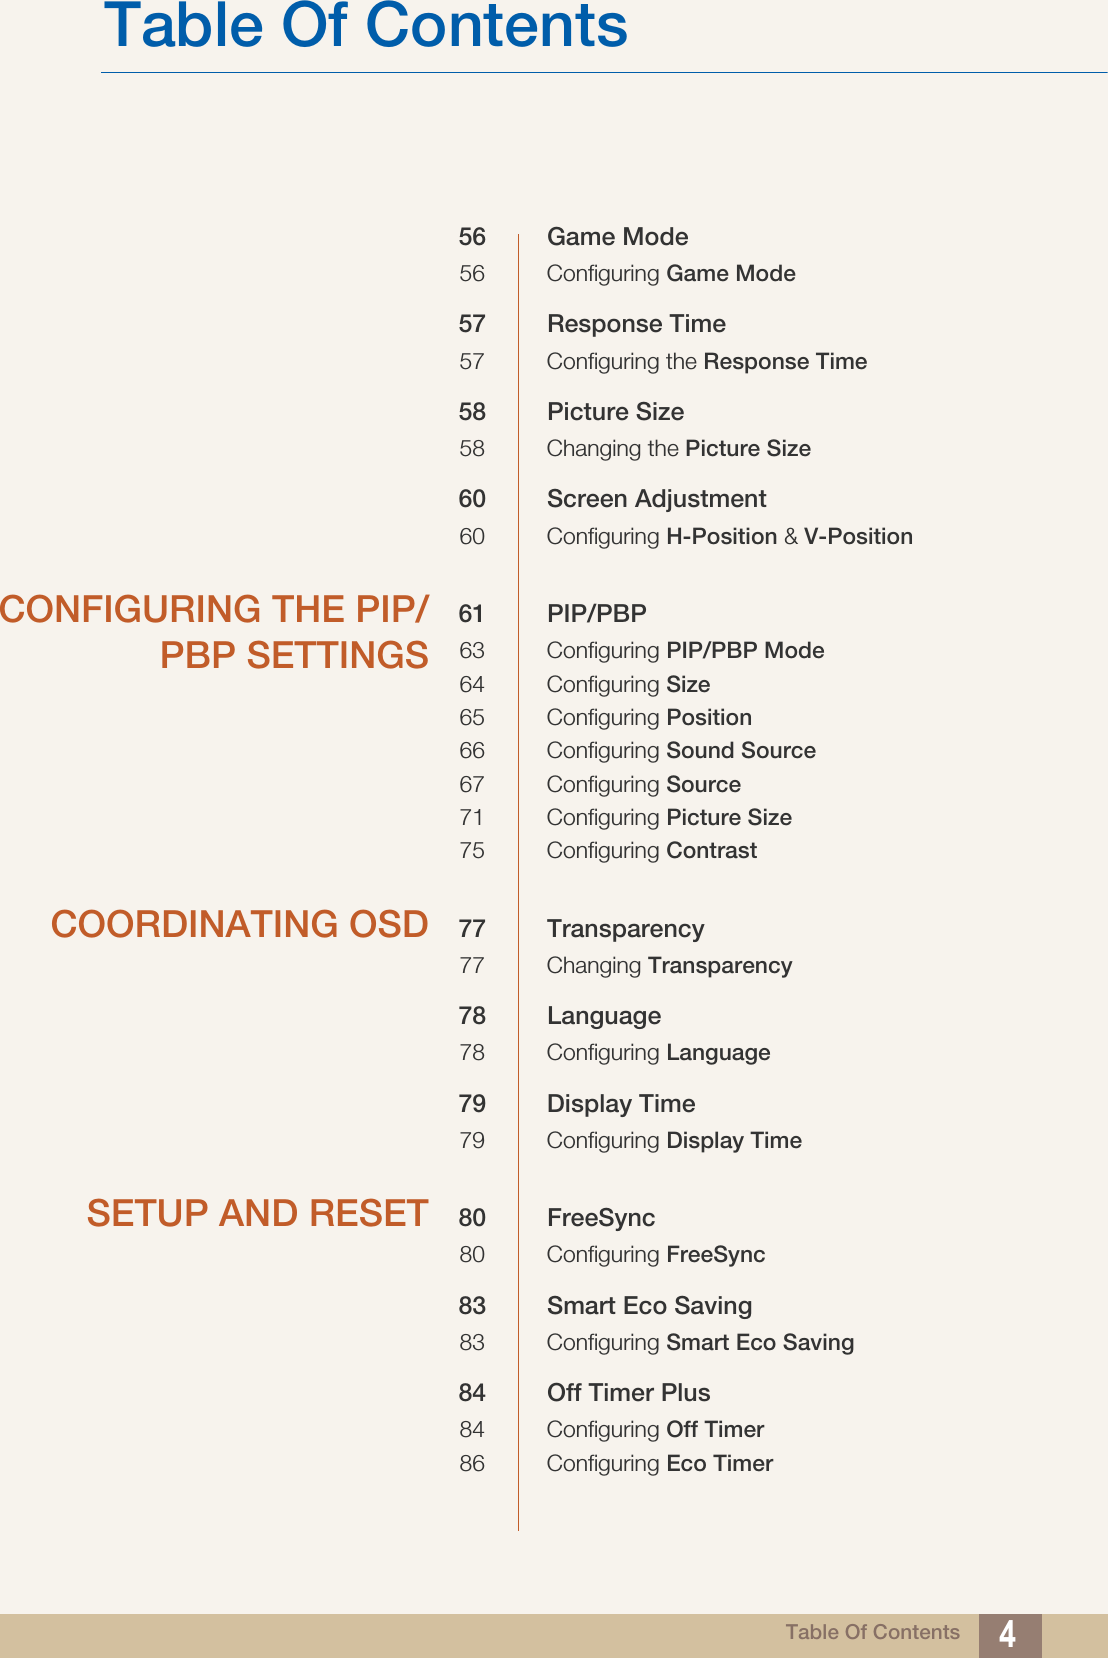
![19Preparations11 Preparations1.2 Parts1.2.1 Frontal Button The color and shape of parts may differ from what is shown.Specifications are subject to change without notice to improve quality. Icons DescriptionOpen or close the onscreen display (OSD) menu, or return to the parent menu.OSD control lock: Maintain the current settings, or lock the OSD control to prevent unintended changes to settings.Enable: To lock the OSD control, press and hold the [ ] button for 10 seconds. Disable: To unlock the OSD control, press and hold the [ ] button for 10 seconds. If the OSD control is locked, Brightness, Contrast and Volume can be adjusted. PIP/PBP and Eye Saver Mode are available. Information can be viewed. Select [ ] to display and access the following menu items.Press to enable or disable Eye Saver Mode.The items below are not available if the Eye Saver Mode function is enable.PICTURE Game Mode, Bright, Angle, BrightnessCOLOR System Smart Eco SavingMENU EYESAVER SOURCE PIP/PBPFunction Key GuideMENU EYESAVER SOURCE PIP/PBPSAMSUNGMAGICSAMSUNGMAGIC](https://usermanual.wiki/Samsung-Electronics-Co/U32E850R.user-manual/User-Guide-2575611-Page-19.png)
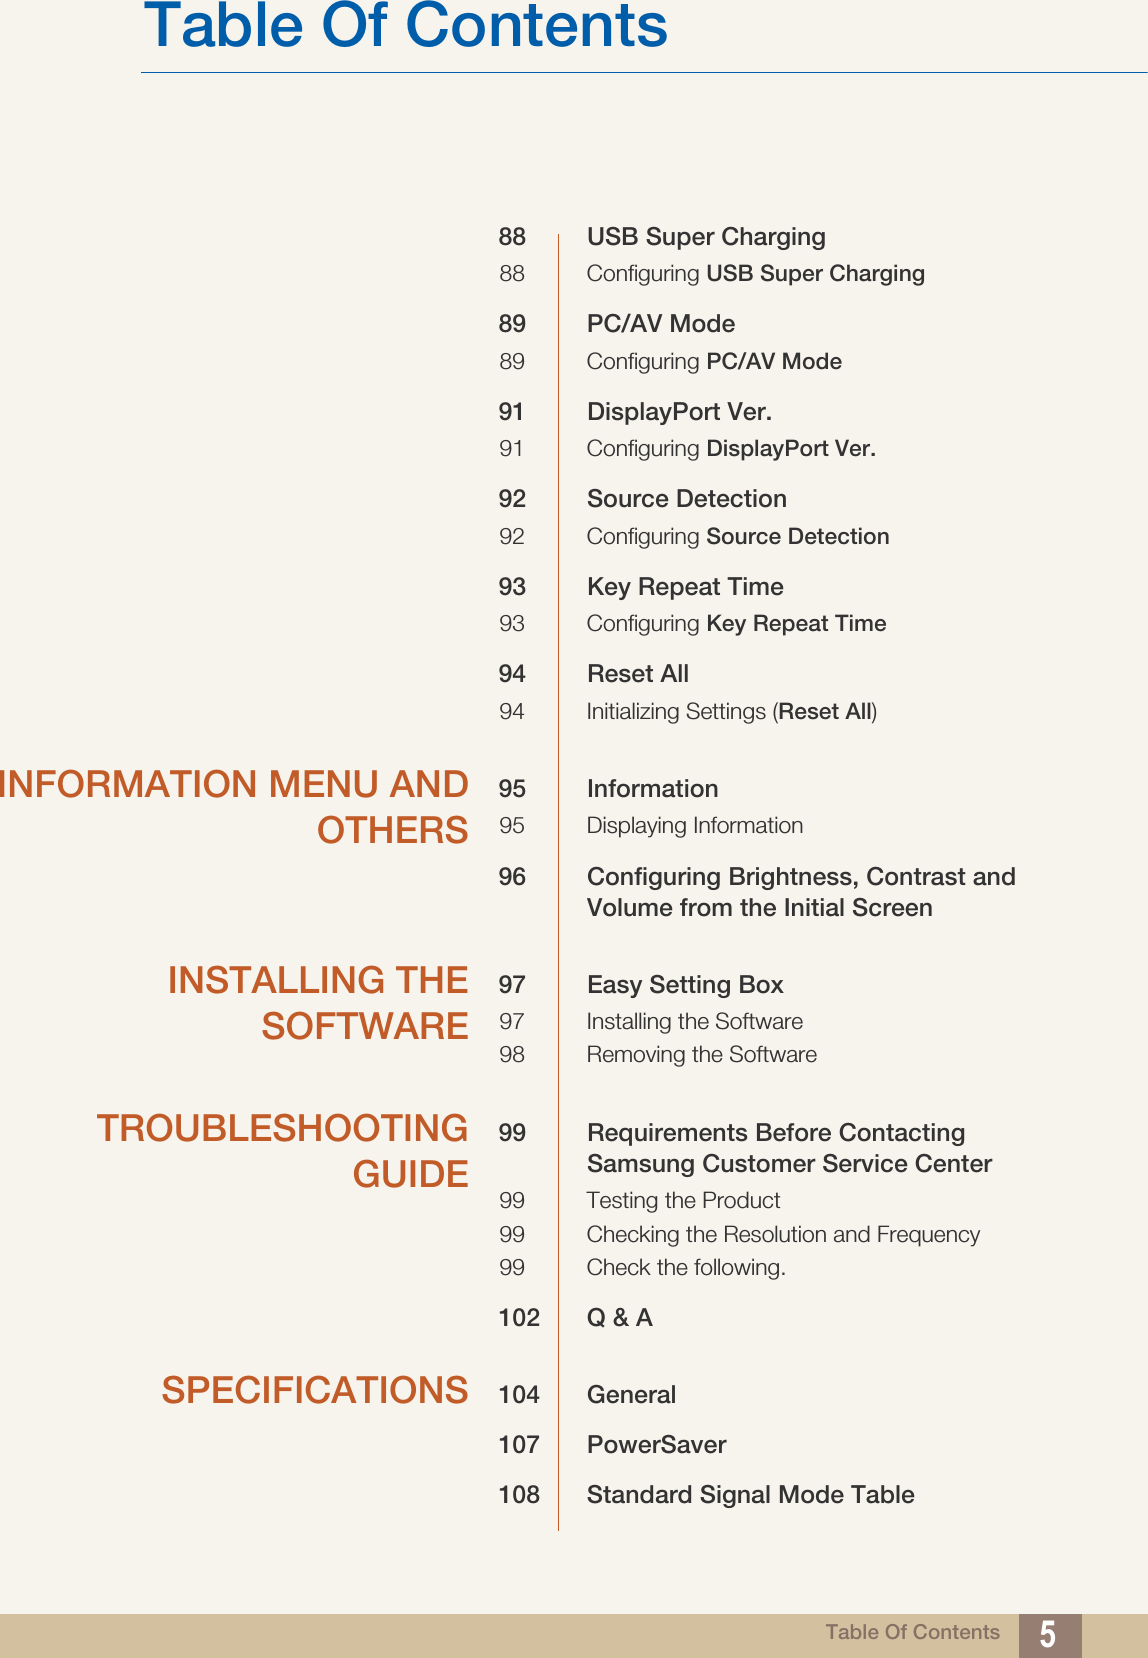
![20Preparations11 PreparationsMove to the upper or lower menu or adjust the value for an option on the OSD menu.Adjust the screen brightness, contrast and volume.Confirm a menu selection.Pressing the [ ] button when the OSD menu is not displayed will change the input source U24E850R (DisplayPort/MINI DP/HDMI), U28E850R / U32E850R (DisplayPort/MINI DP/HDMI 1/HDMI 2). If you power on the product or change the input source by pressing the [ ] button, a message that shows the changed input source will appear at the top left corner of the screen. Press the button when configuring settings for the PIP/PBP function is required.Turn the screen on or off. Function Key GuideWhen a control button on the product is pressed, the Function Key Guide will be displayed before the onscreen menu opens. (The guide shows the function of the button pressed.) To access the onscreen menu when the guide is displayed, press the corresponding button again.The Function Key Guide may vary depending on the function or product model.Refer to the actual product.Icons Description](https://usermanual.wiki/Samsung-Electronics-Co/U32E850R.user-manual/User-Guide-2575611-Page-20.png)
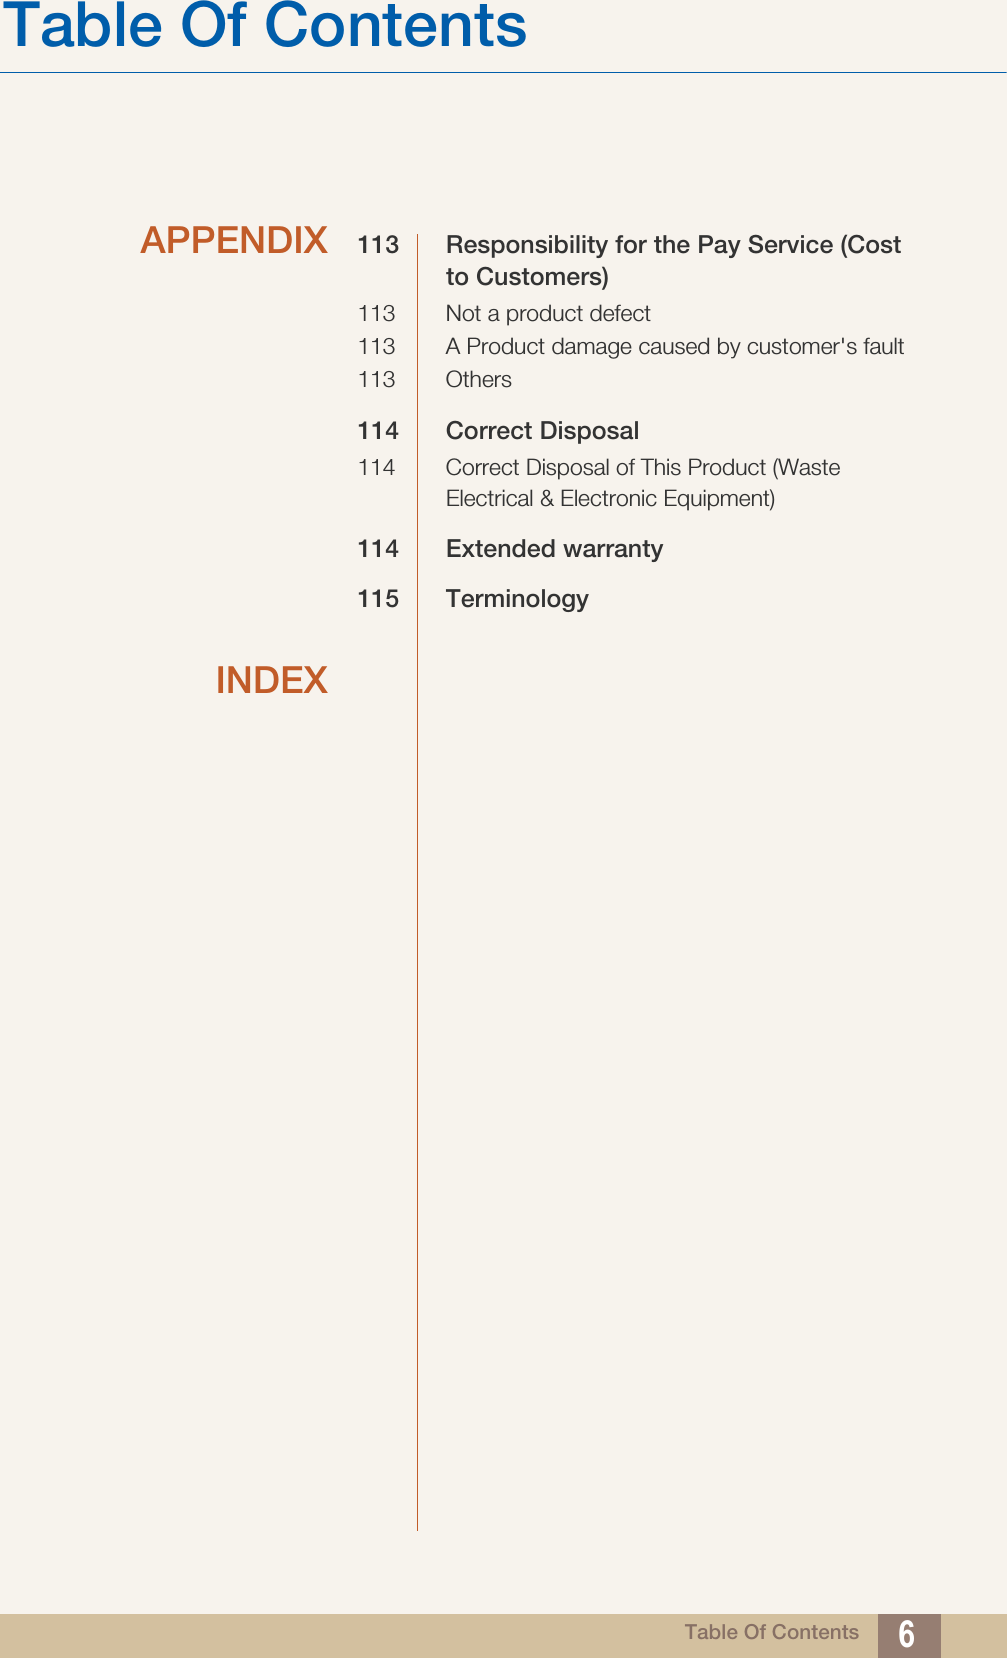
![21Preparations11 Preparations1.2.2 Reverse Side The color and shape of parts may differ from what is shown.Specifications are subject to change without notice to improve quality. U24E850RPort DescriptionConnect the power cord for your monitor to the [POWER IN] port on the back of the product.Connect to a source device using an HDMI cable. Connects to a PC using a DP cable.Connects to a PC using a MINI DP cable.](https://usermanual.wiki/Samsung-Electronics-Co/U32E850R.user-manual/User-Guide-2575611-Page-21.png)
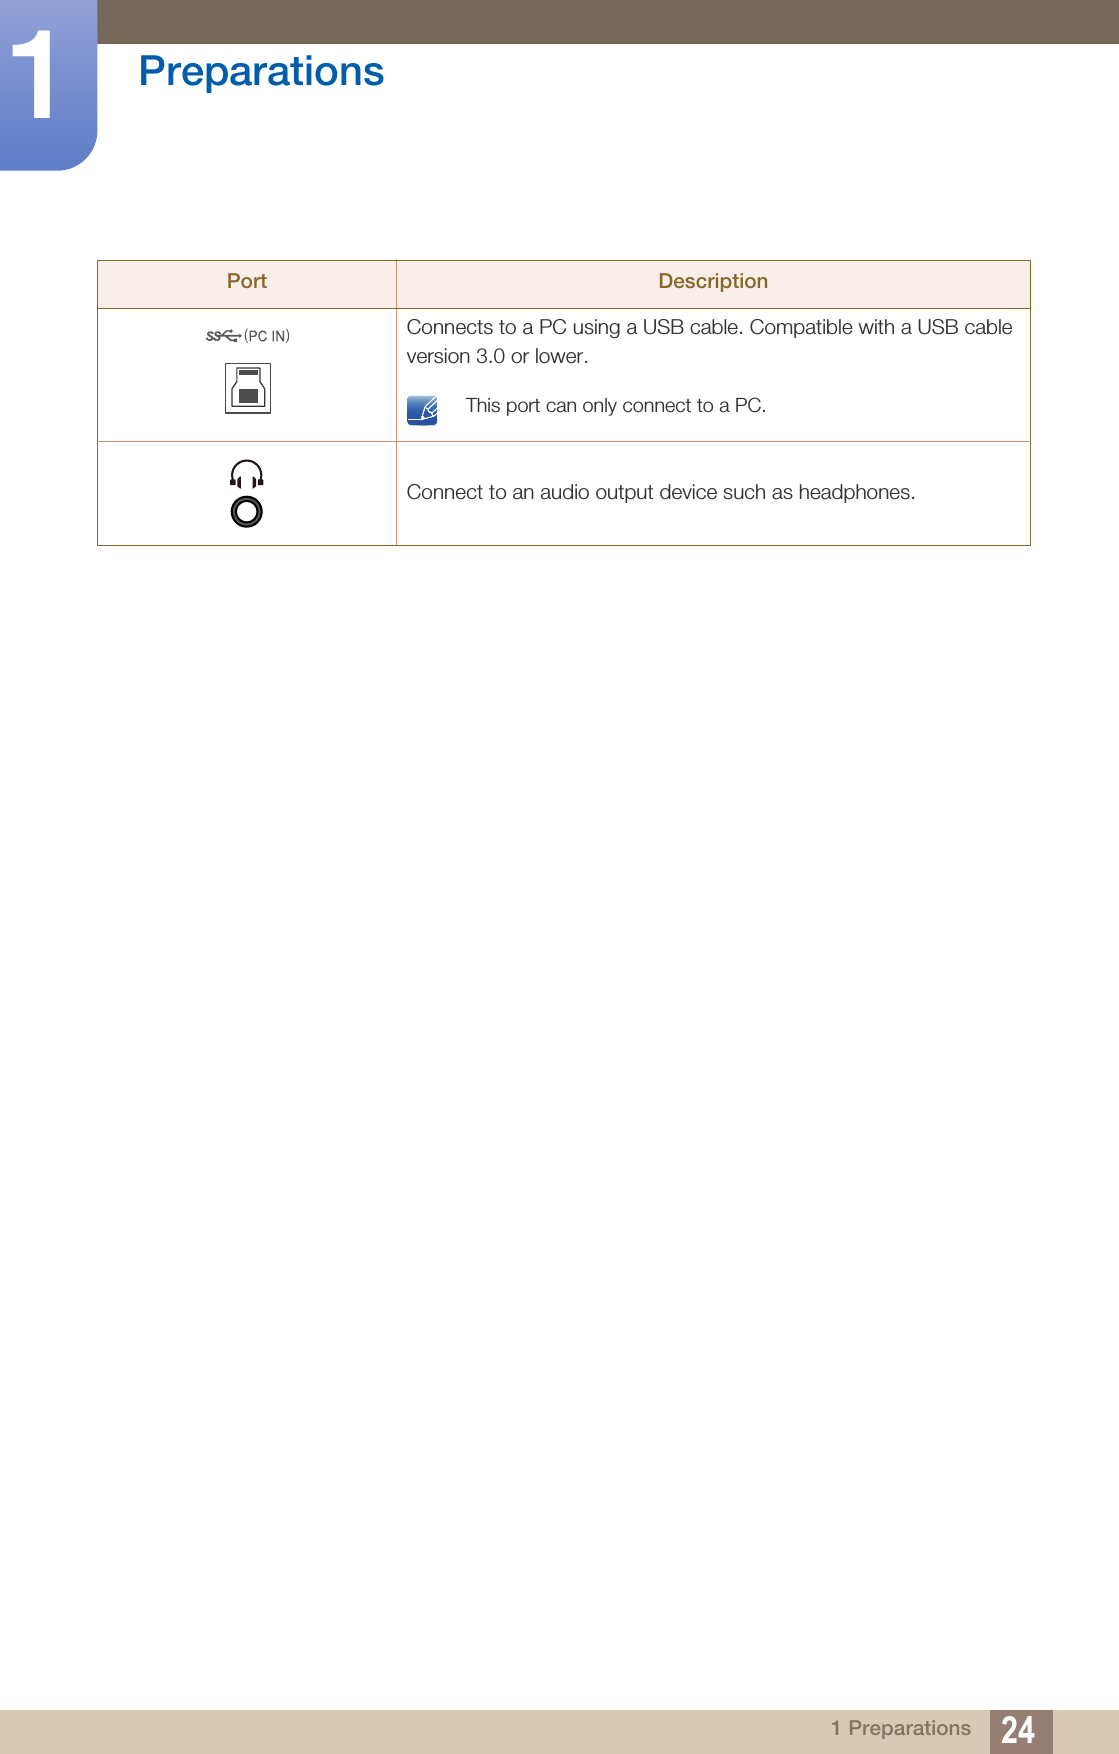
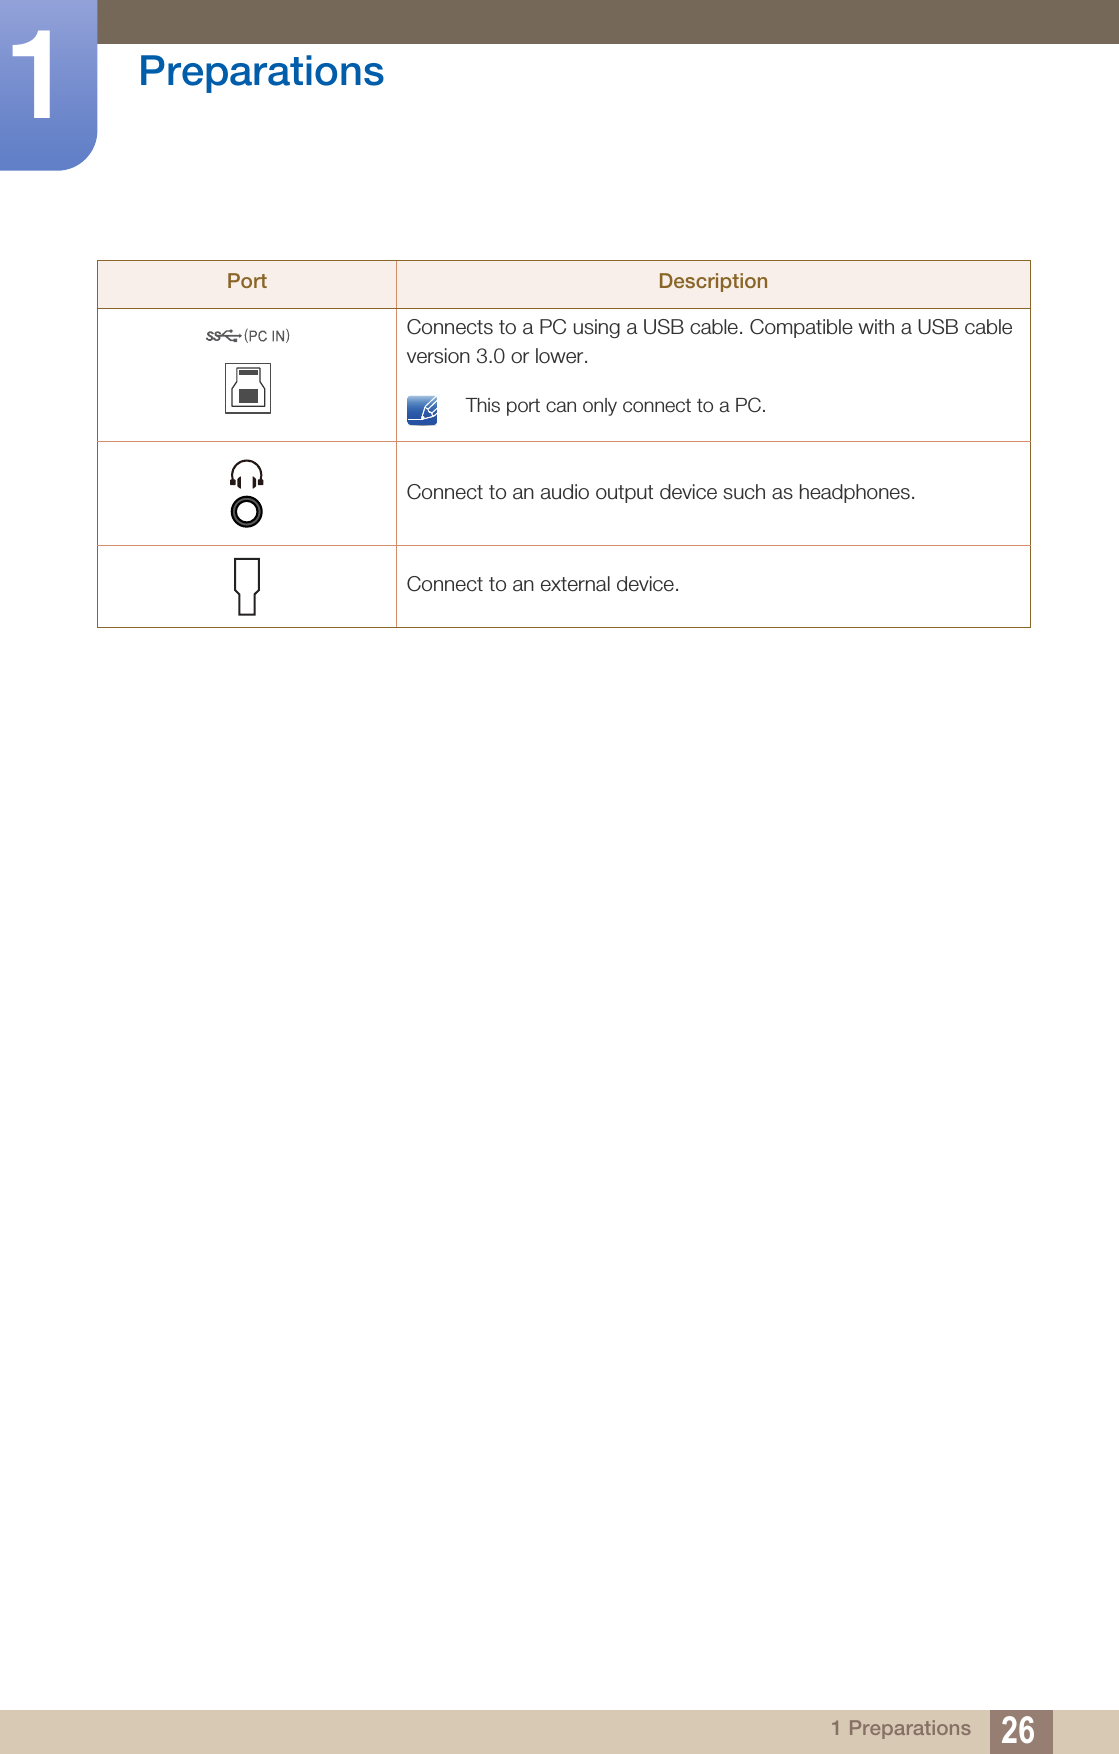
![22Preparations11 PreparationsConnect to a USB device. High-speed charging is possible using the [ ] and [ ] ports only. These ports charge devices faster than typical USB ports. The speed depends on the connected devices. Connects to a PC using a USB cable. Compatible with a USB cable version 3.0 or lower. This port can only connect to a PC. Connect to an audio output device such as headphones.Port Description1 2](https://usermanual.wiki/Samsung-Electronics-Co/U32E850R.user-manual/User-Guide-2575611-Page-22.png)
![23Preparations11 PreparationsU28E850RPort DescriptionConnect the power cord for your monitor to the [POWER IN] port on the back of the product.Connect to a source device using an HDMI cable. HDMI 1 support 3840 x 2160 @ 30 HzHDMI 2 support 3840 x 2160 @ 60 Hz Connects to a PC using a DP cable.Connects to a PC using a MINI DP cable.Connect to a USB device. High-speed charging is possible using the [ ] and [ ] ports only. These ports charge devices faster than typical USB ports. The speed depends on the connected devices. 12121 2](https://usermanual.wiki/Samsung-Electronics-Co/U32E850R.user-manual/User-Guide-2575611-Page-23.png)
![25Preparations11 PreparationsU32E850RPort DescriptionConnect the power cord for your monitor to the [POWER IN] port on the back of the product.Connect to a source device using an HDMI cable. HDMI 1 support 3840 x 2160 @ 30 HzHDMI 2 support 3840 x 2160 @ 60 Hz Connects to a PC using a DP cable.Connects to a PC using a MINI DP cable.Connect to a USB device. High-speed charging is possible using the [ ] and [ ] ports only. These ports charge devices faster than typical USB ports. The speed depends on the connected devices. 12121 2](https://usermanual.wiki/Samsung-Electronics-Co/U32E850R.user-manual/User-Guide-2575611-Page-25.png)
![33Preparations11 Preparations1.4 "MagicRotation Auto"The "MagicRotation Auto" function detects the rotation of monitors that are fitted with a rotation sensor and rotates the Windows screen accordingly.[Software Installation]1Insert the user manual CD provided with the product into the CD-ROM drive.2Follow the instructions given on the screen to proceed with installation. After installation, the application menu language will be displayed in the language of the operating system. (This complies with the basic policies of Windows.) [Caution]1Compatible only with Windows 7 (32 bit or 64 bit) and Windows 8 (32 bit or 64 bit).2Compatible with a graphics card that complies with the DDC/CI and MS API standardsWith a graphics card that does not comply with the aforementioned standards, the "MagicRotation Auto" function may not be available.3To maximize the performance of the function, update the graphics card driver to the latest version.4Fourteen languages are available as installation languages.5If the orientation is set to a mode other than "Landscape" in the screen resolution menu on Windows 7, the "MagicRotation Auto" function may not work properly. 6The OSD menu will be displayed if the monitor is rotated. When the monitor is rotated, the screen reconfiguration process may be displayed or screen burn-in may appear, depending on the graphics card. This is performed by the Windows operating system and has nothing to do with the product.7If you do not want the screen to rotate automatically when the monitor is rotated, press the Windows and L keys at the same time to lock the Windows operating system. If the operating system cannot be locked, it is due to the constraints of Windows API and has nothing to do with the product.(QJOLVK)UDQoDLV'HXWVFK0DJ\DU,WDOLDQR3ROVNL3RUWXJXrVƧNJLjLjǁƿǀ(VSDxRO6YHQVND7UNoHᣣᧄ⺆㩷∝䇁ଞ˲߭](https://usermanual.wiki/Samsung-Electronics-Co/U32E850R.user-manual/User-Guide-2575611-Page-33.png)
![34Preparations11 Preparations1.5 Rotating the monitorWhen rotating the monitor, the rotation angle is displayed on the monitor screen.The on-screen display (OSD) menu items will automatically rotate when the screen rotates.[Caution]1If the "MagicRotation Auto" software is not installed on the monitor, contents on the screen cannot be rotated. The OSD can still rotate by 90° and display properly.2Once rotated, the OSD may appear in a different view mode from the mode before it was rotated. 0° 90°MENU EYESAVER SOURCE PIP/PBPMENUEYESAVERSOURCEPIP/PBP](https://usermanual.wiki/Samsung-Electronics-Co/U32E850R.user-manual/User-Guide-2575611-Page-34.png)
![352 Connecting and Using a Source Device2 Connecting and Using a Source Device2.1 Before Connecting2.1.1 Pre-connection CheckpointsBefore connecting a source device, read the user manual provided with it.The number and locations of ports on source devices may differ from device to device.Do not connect the power cable until all connections are completed.Connecting the power cable during connection may damage the product.Check the types of ports at the back of the product you want to connect.2.2 Connecting and Using a PCSelect a connection method suitable for your PC. Connecting parts may differ in different products.To ensure the screen displays properly, do not use HDMI-to-DP, micro HDMI-to-DP or other nonstandard cables bought from a dealer. It is recommended that you use the cables that came with the product.If you don't use the cable that came with the components of the monitor, the monitor may not support the best resolution. 2.2.1 Connection Using the HDMI Cable Do not connect the power cable before connecting all other cables. Ensure you connect a source device first before connecting the power cable. U24E850R1Connect the HDMI cable to the [HDMI IN] port on the back of the product and the HDMI port on the PC.2Press [ ] to change the input source to HDMI.DVI INHDMI IN](https://usermanual.wiki/Samsung-Electronics-Co/U32E850R.user-manual/User-Guide-2575611-Page-35.png)
![36Connecting and Using a Source Device22 Connecting and Using a Source Device Provided ports may vary depending on the product.To display 3840 x 2160 @ 60 Hz, use an HDMI cable that supports 3840 x 2160 @ 60 Hz to connect HDMI. Make sure that the graphics card of the HDMI source supports 3840 x 2160 @ 60 Hz.When connecting an HDMI cable, use the cable that came with the components of the monitor. If you use an HDMI cable other than provided by Samsung, the image quality may be degraded. U28E850R / U32E850R1Connect the [HDMI IN 1] or [HDMI IN 2] port on the back of the product to the HDMI port on the PC using an HDMI cable. 2Press [ ] to change the input source to HDMI 1 or HDMI 2. Provided ports may vary depending on the product.To display 3840 x 2160 @ 30 Hz, use an HDMI cable that supports 3840 x 2160 @ 30 Hz to connect HDMI 1. Make sure that the graphics card of the HDMI source supports 3840 x 2160 @ 30 Hz.To display 3840 x 2160 @ 60 Hz, use an HDMI cable that supports 3840 x 2160 @ 60 Hz to connect HDMI 2. Make sure that the graphics card of the HDMI source supports 3840 x 2160 @ 60 Hz.When connecting an HDMI cable, use the cable that came with the components of the monitor. If you use an HDMI cable other than provided by Samsung, the image quality may be degraded. DVI INHDMI IN 1 / HDMI IN 2](https://usermanual.wiki/Samsung-Electronics-Co/U32E850R.user-manual/User-Guide-2575611-Page-36.png)
![37Connecting and Using a Source Device22 Connecting and Using a Source Device2.2.2 Connection Using the DP Cable Do not connect the power cable before connecting all other cables. Ensure you connect a source device first before connecting the power cable. 1Connect one end of the DP cable to the [DP IN] port on the side of the product and the other end to the DP port on the PC.2Press [ ] to change the input source to DisplayPort. Provided ports may vary depending on the product.To display 3840 x 2160 @ 60 Hz, use a DP cable that supports 3840 x 2160 @ 60 Hz. Make sure that the graphics card of the DP source supports 3840 x 2160 @ 60 Hz. 2.2.3 Connection Using the MINI DP Cable Do not connect the power cable before connecting all other cables. Ensure you connect a source device first before connecting the power cable. 1Connect one end of the MINI DP cable to the [MINI DP IN] port on the side of the product and the other end to the DP port on the PC.2Press [ ] to change the input source to MINI DP. Provided ports may vary depending on the product.To display 3840 x 2160 @ 60 Hz, use a MINI DP cable that supports 3840 x 2160 @ 60 Hz. Make sure that the graphics card of the MINI DP source supports 3840 x 2160 @ 60 Hz.The DisplayPort and MINI DP can't be identified at the same time, so if the DisplayPort or MINI DP not as a source the PC may not be able to identify. DP INMINI DP IN](https://usermanual.wiki/Samsung-Electronics-Co/U32E850R.user-manual/User-Guide-2575611-Page-37.png)
![38Connecting and Using a Source Device22 Connecting and Using a Source Device2.2.4 Connecting to Headphones Do not connect the power cable before connecting all other cables. Ensure you connect a source device first before connecting the power cable. 1Connect an audio output device such as headphones to [ ] port on the product. The sound could only be heard when you video card's ports support audio out.Provided ports may vary depending on the product. AUDIO OUT](https://usermanual.wiki/Samsung-Electronics-Co/U32E850R.user-manual/User-Guide-2575611-Page-38.png)
![39Connecting and Using a Source Device22 Connecting and Using a Source Device2.2.5 Connecting the Power Connecting parts may differ in different products.The exterior may differ depending on the product. To use the product, connect the power cable to a power outlet and the [POWER IN] port on the product. The input voltage is switched automatically. 2.2.6 Tidying Up the Connected CablesPOWER IN](https://usermanual.wiki/Samsung-Electronics-Co/U32E850R.user-manual/User-Guide-2575611-Page-39.png)
![40Connecting and Using a Source Device22 Connecting and Using a Source Device2.3 Connecting the Product to a PC as a USB HUB2.3.1 Connecting a PC to the Product The product can function as a HUB by connecting to a PC via a USB cable. You can connect a source device directly to the product and control the device from the product, without having to connect the device to the PC. To use the product as a USB hub, connect the product to a PC using a USB cable.Connect the USB cable to [ ] on the back of the product and USB [ ] on the PC. A USB 2.0 cable can be used to connect the product to a PC. However, to take full advantage of the USB 3.0 function, connect a USB 3.0 cable between the PC and the product. Ensure the PC supports USB 3.0. 2.3.2 Utilizing the Product as a USB HUBUsing the product as a hub, connect and use various source devices with the product at the same time.A PC cannot connect to multiple source devices at the same time as it has a limited number of input/output ports available. The HUB feature on the product will improve your work efficiency by allowing you to connect multiple source devices to the USB ports on the product at the same time without connecting them to a PC.If multiple source devices are connected to the PC, the many cables around the PC may look messy. Connecting the devices directly to the product will resolve such inconvenience.Connect a mobile device such as an MP3 player or smartphone to the product when connected to a PC. This allows you to control the device from the PC or charge the device battery. To detect and start a source device faster, connect the device to the USB 3.0 port on the product.An external mass-storage HDD requires an external power supply. Be sure to connect it to a power source.](https://usermanual.wiki/Samsung-Electronics-Co/U32E850R.user-manual/User-Guide-2575611-Page-40.png)
![41Connecting and Using a Source Device22 Connecting and Using a Source DeviceHigh-speed charging is possible using the [ ] and [ ] ports only. These ports charge devices faster than typical USB ports. The speed depends on the connected devices.Battery charging is possible in power-saving mode. However, it is not possible when the product is powered off.Battery charging is not possible if the power cable is disconnected from the power socket.Mobile devices should be purchased separately. 12](https://usermanual.wiki/Samsung-Electronics-Co/U32E850R.user-manual/User-Guide-2575611-Page-41.png)

![43Connecting and Using a Source Device22 Connecting and Using a Source Device2.5 Setting Optimum ResolutionAn information message about setting optimum resolution will appear if you power on the product for the first time after purchase.Select a language on the product and change the resolution on your PC to the optimum setting.1Press [ ] to display the language settings menu.2To hide the information message, press [ ] or [ ]. If the optimum resolution is not selected, the message will appear up to three times for a specified time even when the product is turned off and on again.The optimum resolution can also be selected in Control Panel on your PC. &ORVH7KHRSWLPDOUHVROXWLRQIRUWKLVPRQLWRULVDVIROORZV[+]/DQJXDJH (QJOLVK8VHWKHDERYHVHWWLQJVWRVHWWKHUHVROXWLRQRQ\RXU3&&XUUHQW5HVROXWLRQ[6HWXS*XLGH](https://usermanual.wiki/Samsung-Electronics-Co/U32E850R.user-manual/User-Guide-2575611-Page-43.png)
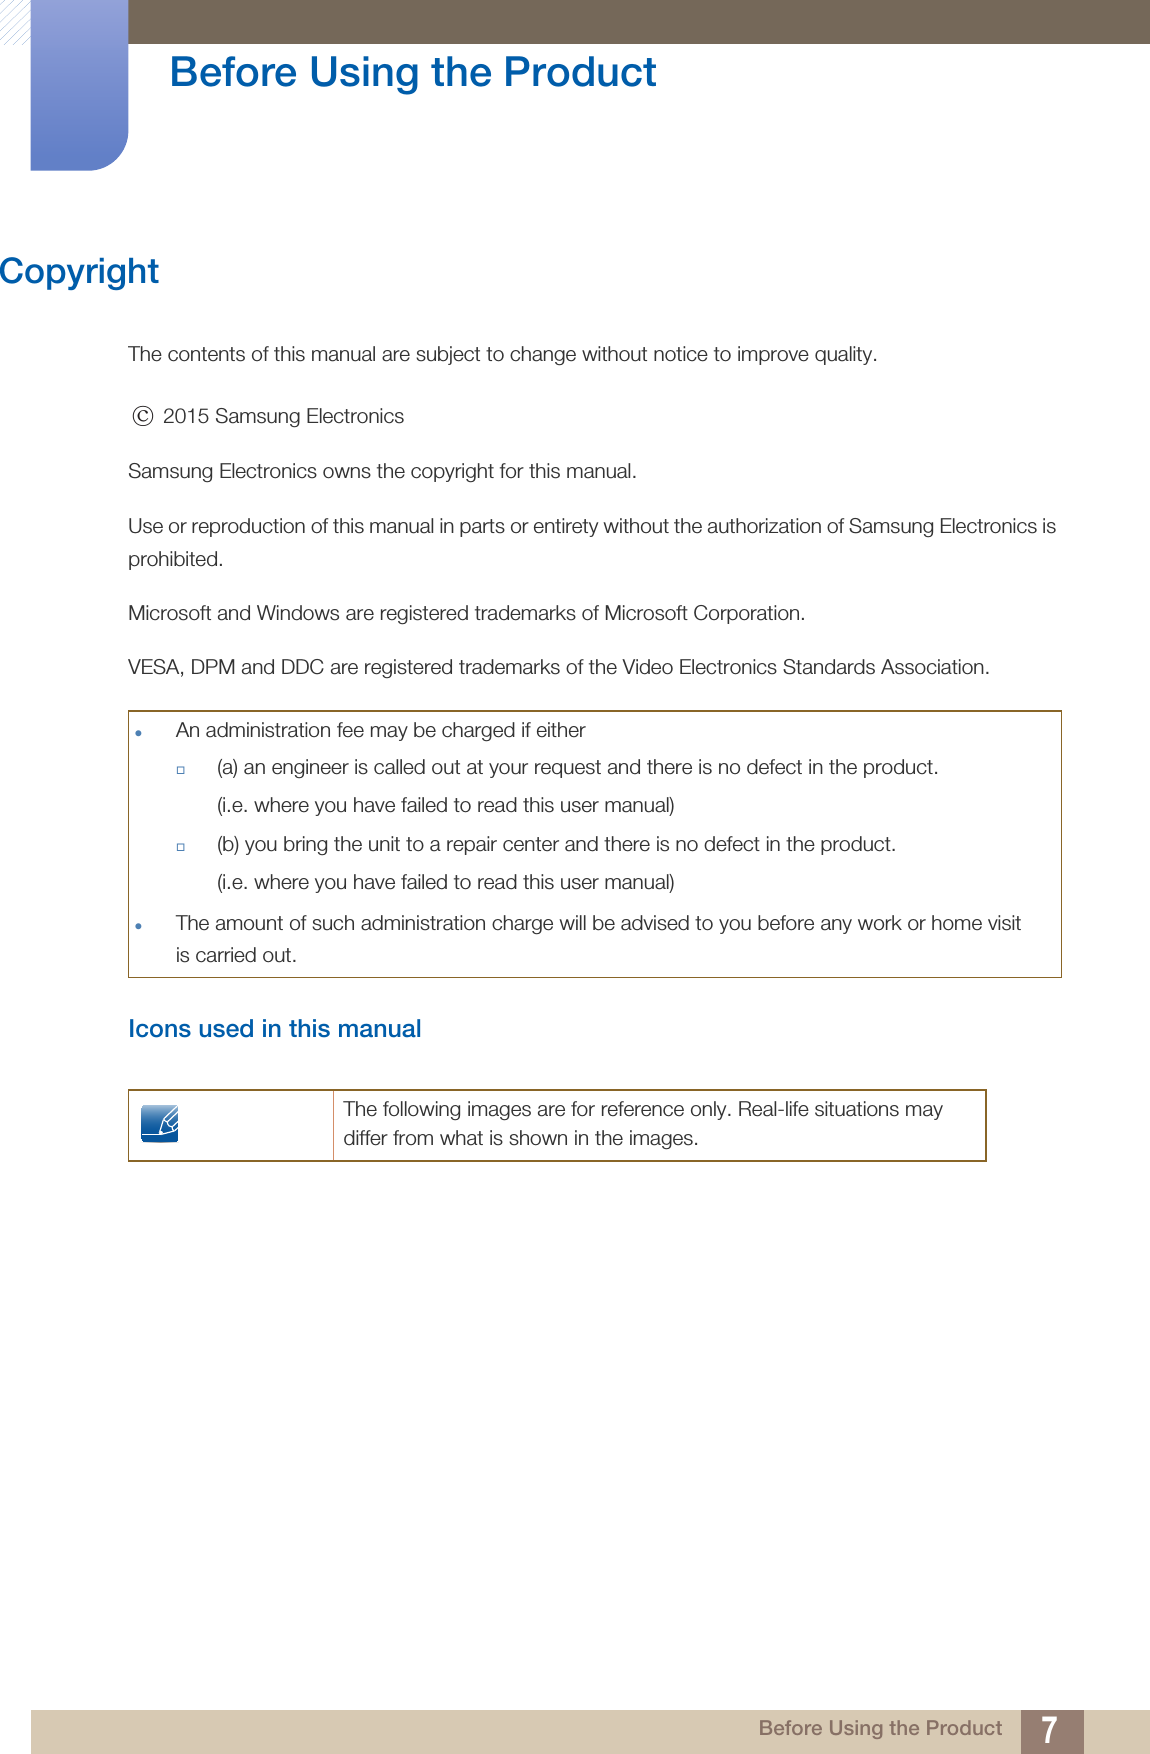
![443 Screen Setup3 Screen SetupConfigure the screen settings such as brightness.A detailed description of each function is provided. Refer to your product for details.3.1 SAMSUNG MAGIC BrightThis menu provides an optimum picture quality suitable for the environment where the product will be used. This menu is not available when Smart Eco Saving is enabled.This menu is not available when Angle is enabled.This menu is not available when Game Mode is enabled.This menu is not available when Eye Saver Mode is enabled.Not available when PIP/PBP Mode is set to On. You can customize the brightness to suit your preferences.3.1.1 Configuring SAMSUNG MAGIC Bright1Press any button on the front of the product to display the Function Key Guide. Next, press [ ] to display the corresponding menu screen. 2Press [ ] to move to Picture and press [ ] on the product.3Press [ ] to move to Bright and press [ ] on the product. The following screen will appear.U24E850R / U32E850RSAMSUNGMAGICSAMSUNGMAGIC SAMSUNGMAGICBrightBrightnessContrastSharpnessColorHDMI Black LevelEye Saver Mode OffPictureCustomStandardCinemaDynamic ContrastSet to an optimum picture quality suitable for the working environment.](https://usermanual.wiki/Samsung-Electronics-Co/U32E850R.user-manual/User-Guide-2575611-Page-44.png)
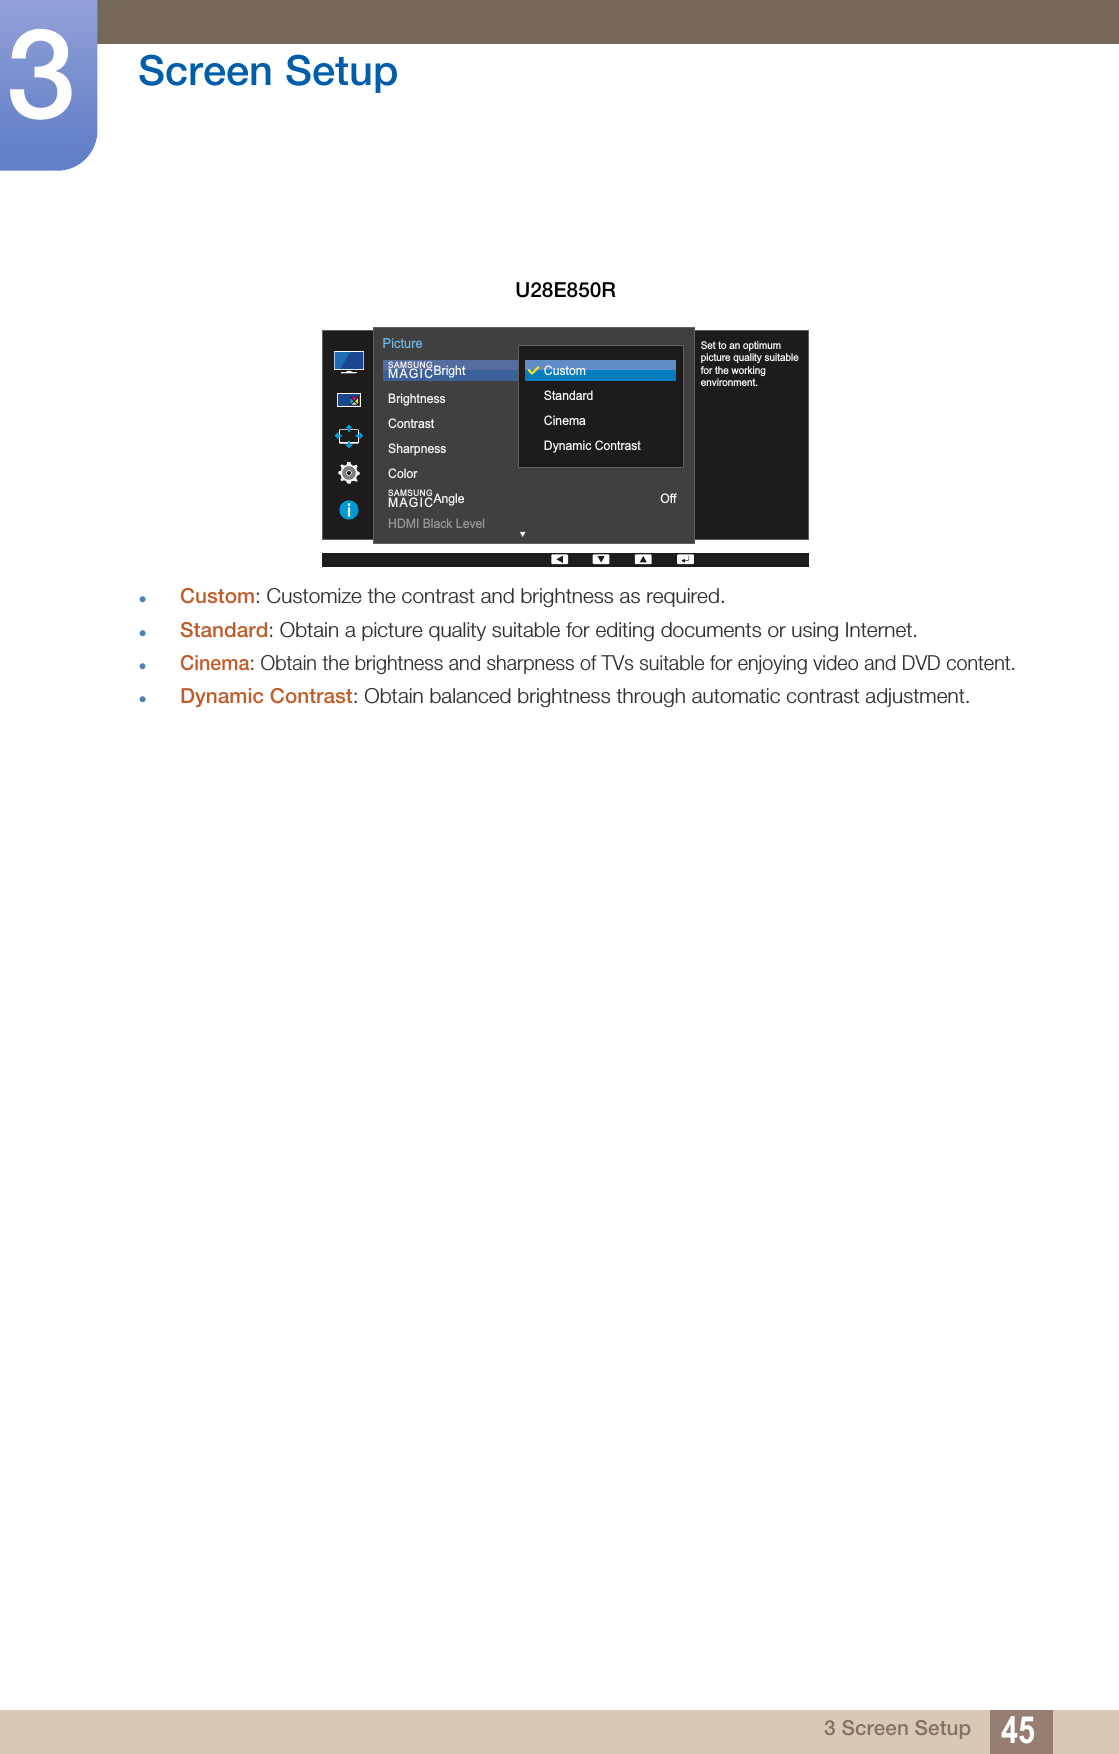
![46Screen Setup33 Screen SetupWhen the external input is connected through HDMI/DP/MINI DP and PC/AV Mode is set to AV, Bright has four automatic picture settings (Dynamic, Standard, Movie and Custom) that are preset at the factory. You can activate either Dynamic, Standard, Movie or Custom. You can select Custom which automatically recalls your personalized picture settings.Dynamic: Select this mode to view a sharper image than in Standard mode.Standard: Select this mode when the surroundings are bright. This also provides a sharp image.Movie: Select this mode when the surroundings are dark. This will save power and reduce eye fatigue.Custom: Select this mode when you want to adjust the image according to your preferences.4Press [ ] to move to the option you want and press [ ].5The selected option will be applied.U24E850R / U32E850RU28E850R SAMSUNGMAGICBrightBrightnessContrastSharpnessColorHDMI Black LevelEye Saver Mode OffPictureDynamicStandardMovieCustomSet to an optimum picture quality suitable for the working environment. SAMSUNGMAGICBrightSAMSUNGMAGICAngleBrightnessContrastSharpnessColorHDMI Black LevelOffPictureDynamicStandardMovieCustomSet to an optimum picture quality suitable for the working environment.SAMSUNGMAGIC](https://usermanual.wiki/Samsung-Electronics-Co/U32E850R.user-manual/User-Guide-2575611-Page-46.png)
![47Screen Setup33 Screen Setup3.2 BrightnessYou can adjust the general brightness of the picture. (Range: 0~100)A higher value will make the picture appear brighter. This menu is not available when Bright is set to Dynamic Contrast mode.This menu is not available when Smart Eco Saving is enabled.This menu is not available when Eye Saver Mode is enabled. 3.2.1 Configuring Brightness1Press any button on the front of the product to display the Function Key Guide. Next, press [ ] to display the corresponding menu screen. 2Press [ ] to move to Picture and press [ ] on the product.3Press [ ] to move to Brightness and press [ ] on the product.The following screen will appear. 4Adjust the Brightness using the [ ] buttons.5The selected option will be applied.U24E850R / U32E850RU28E850RSAMSUNGMAGIC SAMSUNGMAGICBrightBrightnessContrastSharpnessColorHDMI Black LevelEye Saver ModeCustom1007560OffPictureAdjust the brightnesslevel. Values closer to100 mean a brighterscreen. SAMSUNGMAGICBrightSAMSUNGMAGICAngleBrightnessContrastSharpnessColorHDMI Black LevelCustom1007560OffPictureAdjust the brightnesslevel. Values closer to100 mean a brighterscreen.Custom1007560](https://usermanual.wiki/Samsung-Electronics-Co/U32E850R.user-manual/User-Guide-2575611-Page-47.png)
![48Screen Setup33 Screen Setup3.3 ContrastAdjust the contrast between the objects and background. (Range: 0~100)A higher value will increase the contrast to make the object appear clearer. This option is not available when Bright is in Cinema or Dynamic Contrast mode.This menu is not available when Game Mode is enabled.This menu is not available when PIP/PBP Mode is set to On and the Size is set to (PBP Mode). 3.3.1 Configuring Contrast1Press any button on the front of the product to display the Function Key Guide. Next, press [ ] to display the corresponding menu screen. 2Press [ ] to move to Picture and press [ ] on the product.3Press [ ] to move to Contrast and press [ ] on the product. The following screen will appear.4Adjust the Contrast using the [ ] buttons.5The selected option will be applied.U24E850R / U32E850RU28E850RSAMSUNGMAGICAUTOAdjust the contrast level. Values closer to 100 mean a bigger light/dark contrast. SAMSUNGMAGICBrightBrightnessContrastSharpnessColorHDMI Black LevelEye Saver ModeCustom1007560OffPicture SAMSUNGMAGICBrightSAMSUNGMAGICAngleBrightnessContrastSharpnessColorHDMI Black LevelCustom1007560OffPictureAdjust the contrast level. Values closer to 100 mean a bigger light/dark contrast.Custom1007560](https://usermanual.wiki/Samsung-Electronics-Co/U32E850R.user-manual/User-Guide-2575611-Page-48.png)
![49Screen Setup33 Screen Setup3.4 SharpnessMake the outline of objects more clear or blurry. (Range: 0~100)A higher value will make the outline of objects clearer. This option is not available when Bright is in Cinema or Dynamic Contrast mode.This menu is not available when Game Mode is enabled.Not available when PIP/PBP Mode is set to On. 3.4.1 Configuring Sharpness1Press any button on the front of the product to display the Function Key Guide. Next, press [ ] to display the corresponding menu screen. 2Press [ ] to move to Picture and press [ ] on the product.3Press [ ] to move to Sharpness and press [ ] on the product. The following screen will appear.4Adjust the Sharpness using the [ ] buttons.5The selected option will be applied.U24E850R / U32E850RU28E850RSAMSUNGMAGICAdjust the sharpnessof the picture.Values closer to 100mean a sharper image. SAMSUNGMAGICBrightBrightnessContrastSharpnessColorHDMI Black LevelEye Saver ModeCustom1007560OffPictureCustom1007560Off SAMSUNGMAGICBrightSAMSUNGMAGICAngleBrightnessContrastSharpnessColorHDMI Black LevelCustom1007560OffPictureAdjust the sharpnessof the picture.Values closer to 100mean a sharper image.Custom1007560](https://usermanual.wiki/Samsung-Electronics-Co/U32E850R.user-manual/User-Guide-2575611-Page-49.png)
![50Screen Setup33 Screen Setup3.5 ColorA detailed description of each function is provided. Refer to your product for details. Adjust the tint of the screen. This menu is not available when Bright is set to Cinema or Dynamic Contrast mode.This menu is not available when Game Mode is enabled.This menu is not available when Eye Saver Mode is enabled.The Color Tone and Gamma menu is not available when Angle is enabled.Not available when PIP/PBP Mode is set to On. 3.5.1 Configuring Color1Press any button on the front of the product to display the Function Key Guide. Next, press [ ] to display the corresponding menu screen. 2Press [ ] to move to Picture and press [ ] on the product.3Press [ ] to move to Color and press [ ] on the product.The following screen will appear.Red: Adjust the red saturation level. Values closer to 100 mean greater intensity for the color.Green: Adjust the green saturation level. Values closer to 100 mean greater intensity for the color.Blue: Adjust the blue saturation level. Values closer to 100 mean greater intensity for the color.Color Tone: Select a color tone that best suits your viewing needs.U24E850R / U32E850R U28E850RSAMSUNGMAGICSAMSUNGMAGIC SAMSUNGMAGICBrightBrightnessContrastSharpnessColorHDMI Black LevelEye Saver ModeCustom1007560OffPictureConfigure color settings. SAMSUNGMAGICBrightSAMSUNGMAGICAngleBrightnessContrastSharpnessColorHDMI Black LevelCustom1007560OffPictureConfigure color settings.Custom1007560 RedGreenBlueColor ToneGammaColorAdjust the red saturation level. Values closer to 100 mean greater intensity for the color.505050NormalMode1](https://usermanual.wiki/Samsung-Electronics-Co/U32E850R.user-manual/User-Guide-2575611-Page-50.png)
![51Screen Setup33 Screen SetupCool 2: Set the color temperature to be cooler than Cool 1.Cool 1: Set the color temperature to be cooler than Normal mode.Normal: Display the standard color tone.Warm 1: Set the color temperature to be warmer than Normal mode.Warm 2: Set the color temperature to be warmer than Warm 1.Custom: Customize the color tone. When the external input is connected through HDMI/DP/MINI DP and PC/AV Mode is set to AV, Color Tone has four color temperature settings (Cool, Normal, Warm and Custom). Gamma: Adjust the middle level of luminance.Mode1Mode2Mode34Press [ ] to move to the option you want and press [ ].5The selected option will be applied.](https://usermanual.wiki/Samsung-Electronics-Co/U32E850R.user-manual/User-Guide-2575611-Page-51.png)
![52Screen Setup33 Screen Setup3.6 SAMSUNG MAGIC Angle (U28E850R)Angle allows you to configure the settings to obtain the optimum picture quality according to your viewing angle. This option is not available when Bright is in Cinema or Dynamic Contrast mode.This menu is not available when Game Mode is enabled.This menu is not available when Eye Saver Mode is enabled.Not available when PIP/PBP Mode is set to On. This feature provides the viewing angle, brightness, and tint to suit your preferences.3.6.1 Configuring SAMSUNG MAGIC Angle1Press any button on the front of the product to display the Function Key Guide. Next, press [ ] to display the corresponding menu screen. 2Press [ ] to move to Picture and press [ ] on the product.3Press [ ] to move to Angle and press [ ] on the product.The following screen will appear.SAMSUNGMAGICSAMSUNGMAGICSAMSUNGMAGIC SAMSUNGMAGICBrightSAMSUNGMAGICAngleBrightnessContrastSharpnessColorHDMI Black LevelCustom1007560OffPictureSelect an angle that best suits your viewing position.OffLean Back Mode 1Lean Back Mode 2Standing ModeSide Mode](https://usermanual.wiki/Samsung-Electronics-Co/U32E850R.user-manual/User-Guide-2575611-Page-52.png)
![53Screen Setup33 Screen SetupOff : Select this option to view directly in front of the product.Lean Back Mode 1 : Select this option to view from a place slightly lower than the product.Lean Back Mode 2 : Select this option to view from a place lower than Lean Back Mode 1.Standing Mode : Select this option to view from a place higher than the product.Side Mode : Select this option to view from either side of the product.Group View: Select this option for more than one viewer to view from places , and .Custom: Lean Back Mode 1 will be applied by default if Custom is selected.4Press [ ] to move to the option you want and press [ ].5The selected option will be applied. SAMSUNGMAGICBrightSAMSUNGMAGICAngleBrightnessContrastSharpnessColorHDMI Black LevelCustom1007560OffPictureSelect an angle that best suits your viewing position.Group ViewCustom423115 5①② ③④⑤①④⑤](https://usermanual.wiki/Samsung-Electronics-Co/U32E850R.user-manual/User-Guide-2575611-Page-53.png)
![54Screen Setup33 Screen Setup3.7 HDMI Black LevelIf a DVD player or set-top box is connected to the product via HDMI, image quality degradation (contrast/color degradation, black level, etc.) may occur, depending on the connected source device. In such case, HDMI Black Level can be used to adjust the image quality. If this is the case, correct the degraded picture quality using HDMI Black Level. This function is only available in HDMI, HDMI or HDMI 2 mode. Not available when PIP/PBP Mode is set to On. 3.7.1 Configuring the HDMI Black Level Settings1Press any button on the front of the product to display the Function Key Guide. Next, press [ ] to display the corresponding menu screen. 2Press [ ] to move to Picture and press [ ] on the product.3Press [ ] to move to HDMI Black Level and press [ ] on the product. The following screen will appear.Normal: Select this mode when there is no contrast ratio degradation.Low: Select this mode to reduce the black level and increase the white level when there is a contrast ratio degradation.4Press [ ] to move to the option you want and press [ ].5The selected option will be applied. HDMI Black Level may not be compatible with some source devices. U24E850R / U32E850RU28E850R SAMSUNGMAGICBrightBrightnessContrastSharpnessColorHDMI Black LevelEye Saver ModeDynamic1007560OffPictureOptimize HDMI picturebrightness and contrastby adjusting the blacklevel of the video signal.NormalLow SAMSUNGMAGICBrightSAMSUNGMAGICAngleBrightnessContrastSharpnessColorHDMI Black LevelDynamic1007560OffPictureOptimize HDMI picturebrightness and contrastby adjusting the blacklevel of the video signal.NormalLow](https://usermanual.wiki/Samsung-Electronics-Co/U32E850R.user-manual/User-Guide-2575611-Page-54.png)
![55Screen Setup33 Screen Setup3.8 Eye Saver Mode Not available when PIP/PBP Mode is set to On. Set to an optimum picture quality suitable for eye relaxation.TÜV Rheinland “Low Blue Light Content” is a certification for products which meet requirements for lower blue light levels. When Eye Saver Mode is 'On', the blue light that wavelength is around 400nm will become lower and lower, and one hour later it will approach the optimum picture quality suitable for eye relaxation. At the same time, the blue light level is lower than in the default settings, and it was tested by TÜV Rheinland and certified as it met the requirements of TÜV Rheinland “Low Blue Light Content” standards.3.8.1 Configuring Eye Saver Mode1Press any button on the front of the product to display the Function Key Guide. Next, press [ ] to display the corresponding menu screen. 2Press [ ] to move to Picture and press [ ] on the product.3Press [ ] to move to Eye Saver Mode and press [ ] on the product. The following screen will appear.4Press [ ] to move to the option you want and press [ ].5The selected option will be applied.U24E850R / U32E850RU28E850R SAMSUNGMAGICBright Dynamic100756060OffPictureOptimize HDMI picturebrightness and contrastby adjusting the blacklevel of the video signal.OffOnBrightnessContrastSharpnessColorHDMI Black LevelEye Saver Mode Eye Saver ModeGame ModeResponse TimePicture SizeScreen AdjustmentWidePictureSet to an optimumpicture quality suitablefor eye relaxation.OffOn](https://usermanual.wiki/Samsung-Electronics-Co/U32E850R.user-manual/User-Guide-2575611-Page-55.png)
![56Screen Setup33 Screen Setup3.9 Game ModeConfigure the product screen settings for game mode.Use this feature when playing games on a PC or when a game console such as PlayStation™ or Xbox™ is connected. This menu is not available when Eye Saver Mode is enabled.This Menu is not available when Smart Eco Saving is enabled.Not available when PIP/PBP Mode is set to On. 3.9.1 Configuring Game Mode1Press any button on the front of the product to display the Function Key Guide. Next, press [ ] to display the corresponding menu screen. 2Press [ ] to move to Picture and press [ ] on the product.3Press [ ] to move to Game Mode and press [ ] on the product. The following screen will appear.4Press [ ] to move to the option you want and press [ ].5The selected option will be applied. Game Mode turns Off when the monitor turns on, power-saving mode activates, or the input source changes. If you want to keep Game Mode enabled all the time, select Always On. U24E850R / U32E850RU28E850R Game ModeResponse TimePicture SizeScreen Adjustment 16:9PictureOptimizes imagesettings for playinggames.OffOnAlways On Eye Saver ModeGame ModeResponse TimePicture SizeScreen Adjustment16:9PictureOptimizes imagesettings for playinggames.OffOnAlways On](https://usermanual.wiki/Samsung-Electronics-Co/U32E850R.user-manual/User-Guide-2575611-Page-56.png)
![57Screen Setup33 Screen Setup3.10 Response TimeAccelerate the panel response rate to make video appear more vivid and natural. It is best to set Response Time to Standard or Faster when you are not viewing a movie.This menu is not available when PIP/PBP Mode is set to On and the Size is set to / / (PIP Mode). 3.10.1 Configuring the Response Time1Press any button on the front of the product to display the Function Key Guide. Next, press [ ] to display the corresponding menu screen. 2Press [ ] to move to Picture and press [ ] on the product.3Press [ ] to move to Response Time and press [ ] on the product. The following screen will appear.4Press [ ] to move to the option you want and press [ ].5The selected option will be applied.U24E850R / U32E850RU28E850R Game ModeResponse TimePicture SizeScreen Adjustment 16:9PictureAccelerate the panelresponse rate to makevideo appear morevivid and natural.StandardFasterFastest Eye Saver ModeGame ModeResponse TimePicture SizeScreen AdjustmentOff16:9PictureAccelerate the panelresponse rate to makevideo appear morevivid and natural.StandardFasterFastest](https://usermanual.wiki/Samsung-Electronics-Co/U32E850R.user-manual/User-Guide-2575611-Page-57.png)
![58Screen Setup33 Screen Setup3.11 Picture SizeChange the picture size. This menu is not available when PIP/PBP Mode is set to On and the Size is set to (PBP Mode).This menu is not available when FreeSync is enabled. 3.11.1 Changing the Picture Size1Press any button on the front of the product to display the Function Key Guide. Next, press [ ] to display the corresponding menu screen. 2Press [ ] to move to Picture and press [ ] on the product.3Press [ ] to move to Picture Size and press [ ] on the product. The following screen will appear.Auto: Display the picture according to the aspect ratio of the input source.Wide: Display the picture in full screen regardless of the aspect ratio of the input source.In PC modeU24E850R / U32E850RU28E850R Game ModeResponse TimePicture SizeScreen AdjustmentOff16:9PictureChoose the size andaspect ratio of thepicture displayed onscreen.AutoWide Eye Saver ModeGame ModeResponse TimePicture SizeScreen AdjustmentOffOff16:9PictureChoose the size andaspect ratio of thepicture displayed onscreen.AutoWide](https://usermanual.wiki/Samsung-Electronics-Co/U32E850R.user-manual/User-Guide-2575611-Page-58.png)
![59Screen Setup33 Screen Setup4:3: Display the picture with an aspect ratio of 4:3. Suitable for videos and standard broadcasts.16:9: Display the picture with an aspect ratio of 16:9.Screen Fit: Display the picture of the sub-screen with the original aspect ratio without cutting off. The function may not be supported depending on the ports provided with the product.Changing the screen size is available when the following conditions are satisfied.A digital output device is connected using the HDMI/DP/MINI DP cable.The input signal is 480p, 576p, 720p, or 1080p and monitor can display normally (Not every model can support all of these signals.).This can only be set when the external input is connected through HDMI/DP/MINI DP and PC/AV Mode is set to AV. 4Press [ ] to move to the option you want and press [ ].5The selected option will be applied.In AV modeU24E850R / U32E850RU28E850R Game ModeResponse TimePicture SizeScreen AdjustmentOff16:9PictureChoose the size andaspect ratio of thepicture displayed onscreen.4:316:9Screen Fit Eye Saver ModeGame ModeResponse TimePicture SizeScreen AdjustmentOffOff16:9PictureChoose the size andaspect ratio of thepicture displayed onscreen.4:316:9Screen Fit](https://usermanual.wiki/Samsung-Electronics-Co/U32E850R.user-manual/User-Guide-2575611-Page-59.png)
![60Screen Setup33 Screen Setup3.12 Screen Adjustment3.12.1 Configuring H-Position & V-PositionH-Position: Move the screen to the left or right.V-Position: Move the screen up or down. This menu is only available when Picture Size is set to Screen Fit in AV Mode. When a 480P or 576P or 720P or 1080P signal is input in AV mode and the monitor can display normally, select Screen Fit to adjust horizontal position in 0-6 levels. 1Press any button on the front of the product to display the Function Key Guide. Next, press [ ] to display the corresponding menu screen. 2Press [ ] to move to Picture and press [ ] on the product.3Press [ ] to move to Screen Adjustment and press [ ] on the product.4Press [ ] to move to H-Position or V-Position and press [ ].The following screen will appear.5Press [ ] to configure H-Position or V-Position.6The selected option will be applied.U24E850R / U32E850R U28E850R Game ModeResponse TimePicture SizeScreen AdjustmentOffFasterScreen FitPicture Eye Saver ModeGame ModeResponse TimePicture SizeScreen AdjustmentOffOffFasterScreen FitPicture H-PositionV-Position33Screen AdjustmentMove the imagedisplayed on thescreen to the left orright. H-PositionV-Position33Screen AdjustmentMove the imagedisplayed on thescreen up or down.](https://usermanual.wiki/Samsung-Electronics-Co/U32E850R.user-manual/User-Guide-2575611-Page-60.png)
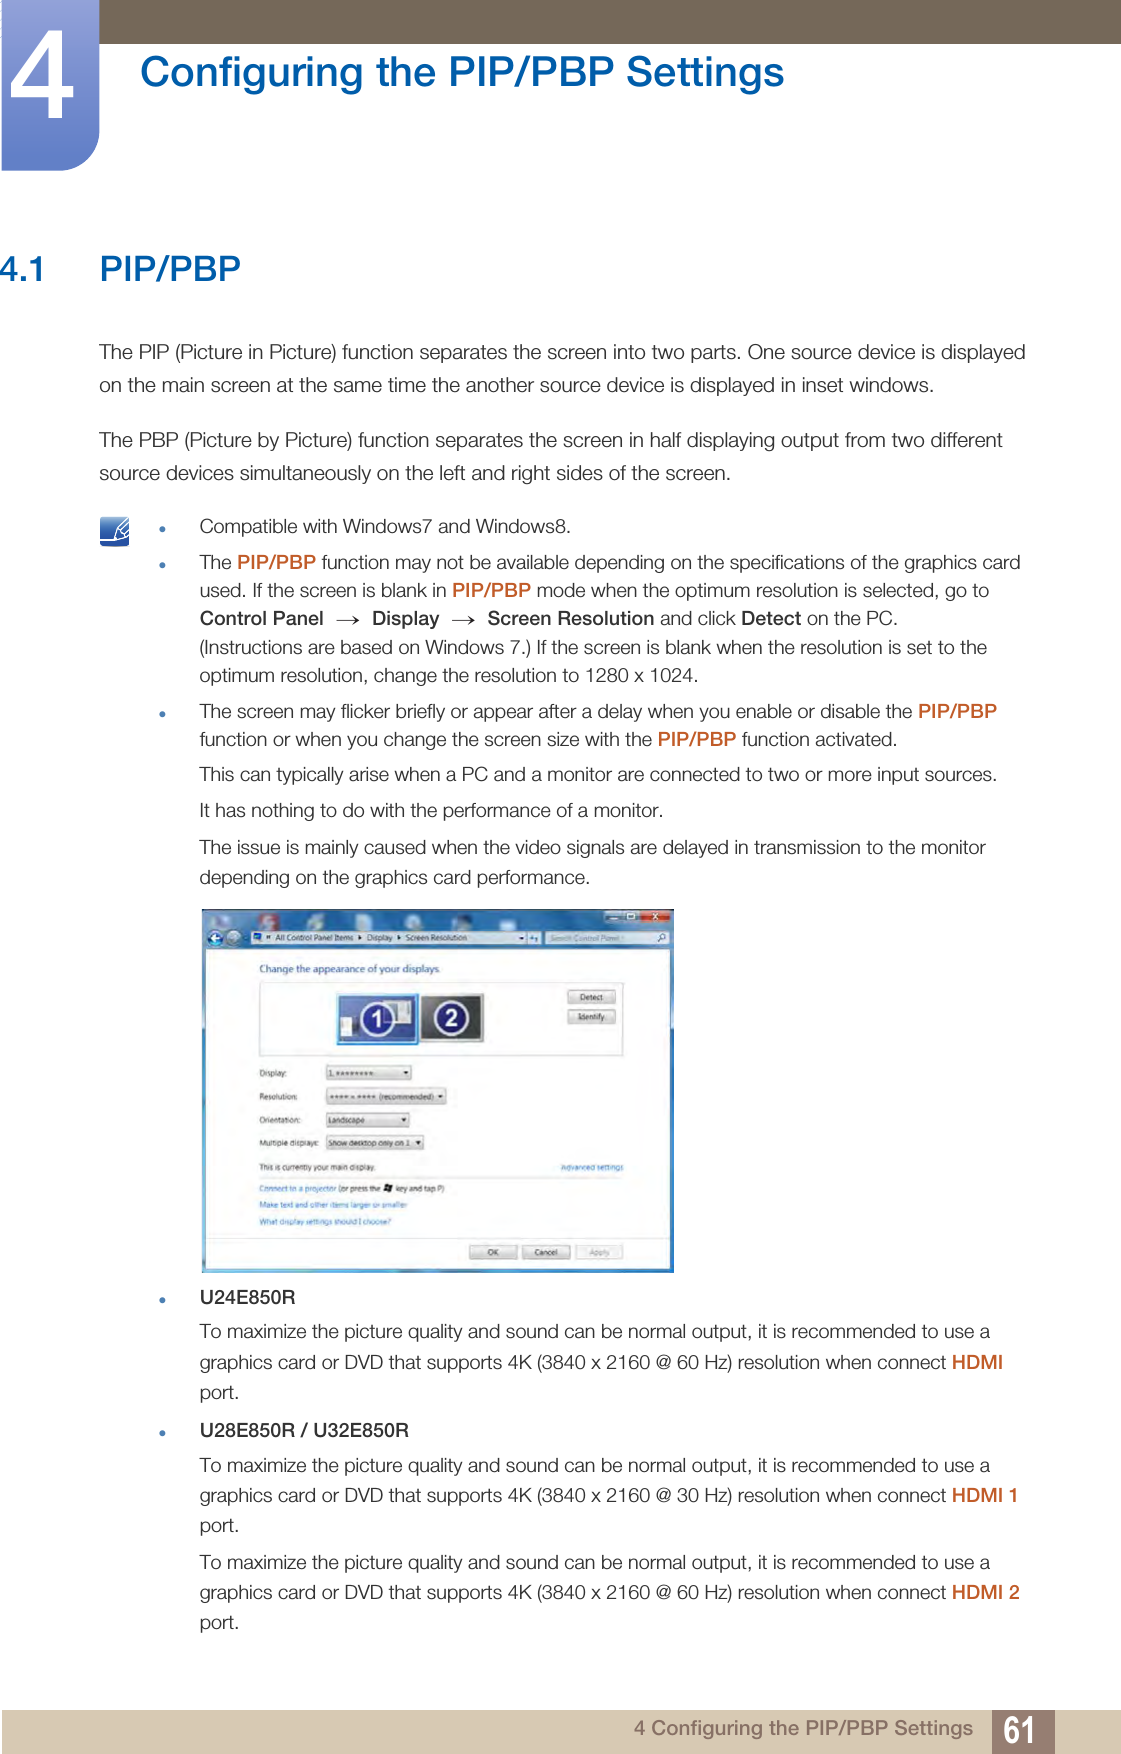
![63Configuring the PIP/PBP Settings44 Configuring the PIP/PBP Settings4.1.1 Configuring PIP/PBP ModeEnable or disable the PIP/PBP function.1Press any button on the front of the product to display the Function Key Guide. Next, press [ ] to display the corresponding menu screen. 2Press [ ] to move to PIP/PBP and press [ ] on the product.3Press [ ] to move to PIP/PBP Mode and press [ ] on the product.The following screen will appear.Off / On4Press [ ] to move to the option you want and press [ ].5The selected option will be applied.OffTurn PIP/PBP Modeon or off. PIP/PBPOffOnPIP/PBP ModeSizePositionSound SourceSourcePicture SizeContrast](https://usermanual.wiki/Samsung-Electronics-Co/U32E850R.user-manual/User-Guide-2575611-Page-63.png)
![64Configuring the PIP/PBP Settings44 Configuring the PIP/PBP Settings4.1.2 Configuring SizeSelect the size and aspect ratio of the sub-screen.1Press any button on the front of the product to display the Function Key Guide. Next, press [ ] to display the corresponding menu screen. 2Press [ ] to move to PIP/PBP and press [ ] on the product.3Press [ ] to move to Size and press [ ] on the product.The following screen will appear.: Select the icon image if you want to use PBP mode where the optimum resolution for the left and right sides of the screen is 1920 x 2160 (width x height).: Select the icon image if you want to use PIP mode where the optimum resolution for the sub-screen is 720 x 480 (width x height).: Select the icon image if you want to use PIP mode where the optimum resolution of the sub-screen is 1280 x 720 (width x height).: Select the icon image if you want to use PIP mode where the optimum resolution of the sub-screen is 1920 x 1080 (width x height).4Press [ ] to move to the option you want and press [ ].5The selected option will be applied.U24E850R U28E850R / U32E850R Select the size andaspect ratio of thesub-screen.Left:HDMIRight:DisplayPort PIP/PBPPIP/PBP ModeSizePositionSound SourceSourcePicture SizeContrast 75/100 Select the size andaspect ratio of thesub-screen.Left:HDMI 2Right:HDMI 1 PIP/PBPPIP/PBP ModeSizePositionSound SourceSourcePicture SizeContrast 75/100](https://usermanual.wiki/Samsung-Electronics-Co/U32E850R.user-manual/User-Guide-2575611-Page-64.png)
![65Configuring the PIP/PBP Settings44 Configuring the PIP/PBP Settings4.1.3 Configuring PositionSelect the position of the sub-screen from the available options.1Press any button on the front of the product to display the Function Key Guide. Next, press [ ] to display the corresponding menu screen. 2Press [ ] to move to PIP/PBP and press [ ] on the product.3Press [ ] to move to Position and press [ ] on the product.The following screen will appear. / / / 4Press [ ] to move to the option you want and press [ ].5The selected option will be applied. Not available when PBP is selected.The screen may flicker if the input signal is unstable. U24E850R U28E850R / U32E850R Select the position ofthe sub-screen fromthe available options. PIP/PBPPIP/PBP ModeSizePositionSound SourceSourcePicture SizeContrastOnMain:HDMISub:DisplayPort Select the position ofthe sub-screen fromthe available options. PIP/PBPPIP/PBP ModeSizePositionSound SourceSourcePicture SizeContrastOnMain:HDMI 2Sub:HDMI 1](https://usermanual.wiki/Samsung-Electronics-Co/U32E850R.user-manual/User-Guide-2575611-Page-65.png)
![66Configuring the PIP/PBP Settings44 Configuring the PIP/PBP Settings4.1.4 Configuring Sound SourceSet which screen you want to hear the sound for.1Press any button on the front of the product to display the Function Key Guide. Next, press [ ] to display the corresponding menu screen. 2Press [ ] to move to PIP/PBP and press [ ] on the product.3Press [ ] to move to Sound Source and press [ ] on the product.The following screen will appear. The white area of the icon means that the Sound Source comes from the main screen/sub-screen or the left/right screen. / / 4Press [ ] to move to the option you want and press [ ].5The selected option will be applied.PIPU24E850R U28E850R / U32E850RPBPU24E850R U28E850R / U32E850R Set which screen youwant to hear thesound for. PIP/PBPPIP/PBP ModeSizePositionSound SourceSourcePicture SizeContrastOn75Main:HDMI Sub:DisplayPort Set which screen youwant to hear thesound for. PIP/PBPPIP/PBP ModeSizePositionSound SourceSourcePicture SizeContrastOn75Main:HDMI 2Sub:HDMI 1 Set which screen youwant to hear thesound for. PIP/PBPPIP/PBP ModeSizePositionSound SourceSourcePicture SizeContrastOn75/100Left:HDMIRight:DisplayPort Set which screen youwant to hear thesound for. PIP/PBPPIP/PBP ModeSizePositionSound SourceSourcePicture SizeContrastOn75/100Left:HDMI 2Right:HDMI 1](https://usermanual.wiki/Samsung-Electronics-Co/U32E850R.user-manual/User-Guide-2575611-Page-66.png)
![67Configuring the PIP/PBP Settings44 Configuring the PIP/PBP Settings4.1.5 Configuring SourceSelect the source for each screen.Due to DisplayPort and MINI DP can't be identified at the same time, if DisplayPort and MINI DP as the source at the same time ,the 'Apply' is not available. PIP1Press any button on the front of the product to display the Function Key Guide. Next, press [ ] to display the corresponding menu screen. 2Press [ ] to move to PIP/PBP and press [ ] on the product.3Press [ ] to move to Source and press [ ] (available in PIP mode (Size / / )).The following screen will appear.U24E850R If the function button description page appears, press []. The main screen will switch in the order DisplayPort MINI DP HDMI. DisplayPortMINI DPHDMI → → Select the source foreach screen. PIP/PBPPIP/PBP ModeSizePositionSound SourceSourcePicture SizeContrastDisplayPortHDMI On](https://usermanual.wiki/Samsung-Electronics-Co/U32E850R.user-manual/User-Guide-2575611-Page-67.png)
![68Configuring the PIP/PBP Settings44 Configuring the PIP/PBP SettingsU28E850R / U32E850R If the function button description page appears, press []. The main screen will switch in the order DisplayPort MINI DP HDMI 1 HDMI 2. DisplayPortMINI DPHDMI 1HDMI 24Press [ ] to move to the option you want and press [ ].5The selected option will be applied. The input source for the main screen changes.With the exception of the current input source, the other two input sources can be selected.The screen may flicker if the input signal is unstable. → → → Select the source foreach screen. PIP/PBPPIP/PBP ModeSizePositionSound SourceSourcePicture SizeContrastDisplayPortHDMI 1HDMI 2 On](https://usermanual.wiki/Samsung-Electronics-Co/U32E850R.user-manual/User-Guide-2575611-Page-68.png)
![69Configuring the PIP/PBP Settings44 Configuring the PIP/PBP SettingsPBP1Press any button on the front of the product to display the Function Key Guide. Next, press [ ] to display the corresponding menu screen. 2Press [ ] to move to PIP/PBP and press [ ] on the product.3Press [ ] to move to Source and press [ ] (available in PBP mode (Size )).The following screen will appear.U24E850R If the function button description page appears, press []. The main screen will switch in the order DisplayPort MINI DP HDMI. DisplayPortMINI DPHDMI → → Select the source foreach screen. PIP/PBPPIP/PBP ModeSizePositionSound SourceSourcePicture SizeContrastOn75/1006RXUFH $SSO\&DQFHODisplayPort HDMI](https://usermanual.wiki/Samsung-Electronics-Co/U32E850R.user-manual/User-Guide-2575611-Page-69.png)
![70Configuring the PIP/PBP Settings44 Configuring the PIP/PBP SettingsU28E850R / U32E850R If the function button description page appears, press []. The main screen will switch in the order DisplayPort MINI DP HDMI 1 HDMI 2. DisplayPortMINI DPHDMI 1HDMI 24Press [ ] to move to the option you want and press [ ].5Press [ ] to move to Apply and press [ ] on the product. Pressing [ ] when Cancel is selected will clear the Source settings and display the PIP/PBP control menu page. The input source for the main screen changes.The screen may flicker if the input signal is unstable.When the input signal of the left and right screens are the same, the operation cannot be performed. → → → Select the source foreach screen. PIP/PBPPIP/PBP ModeSizePositionSound SourceSourcePicture SizeContrastOn75/1006RXUFH $SSO\&DQFHODisplayPort HDMI 1](https://usermanual.wiki/Samsung-Electronics-Co/U32E850R.user-manual/User-Guide-2575611-Page-70.png)
![71Configuring the PIP/PBP Settings44 Configuring the PIP/PBP Settings4.1.6 Configuring Picture SizeSelect the image size for sub-screen.PIP1Press any button on the front of the product to display the Function Key Guide. Next, press [ ] to display the corresponding menu screen. 2Press [ ] to move to PIP/PBP and press [ ] on the product.3Press [ ] to move to Picture Size and press [ ] (available in PIP mode (Size //)).The following screen will appear.Auto: Display the picture according to the aspect ratio of the each screen input source.Wide: Display the picture in full screen regardless of the aspect ratio of the each screen input source.In PC mode Select the image sizefor each screen. PIP/PBPPIP/PBP ModeSizePositionSound SourceSourcePicture SizeContrastOn75/75AutoWide](https://usermanual.wiki/Samsung-Electronics-Co/U32E850R.user-manual/User-Guide-2575611-Page-71.png)
![72Configuring the PIP/PBP Settings44 Configuring the PIP/PBP Settings4:3: Display the picture of the sub-screen with an aspect ratio of 4:3. Suitable for videos and standard broadcasts.16:9: Display the picture of the sub-screen with an aspect ratio of 16:9.Screen Fit: Display the picture of the sub-screen with the original aspect ratio without cutting anything off. The function may not be supported depending on the ports provided with the product.Changing the screen size is available when the following conditions are satisfied.A digital output device is connected using the HDMI/DP/MINI DP cable.The input signal is 480p, 576p, 720p, or 1080p and monitor can display normally (Not every model can support all of these signals.).This can only be set when the external input is connected through HDMI/DP/MINI DP and PC/AV Mode is set to AV. 4Press [ ] to move to the option you want and press [ ].5The selected option will be applied.In AV mode Select the image sizefor each screen. PIP/PBPPIP/PBP ModeSizePositionSound SourceSourcePicture SizeContrastOn75/754:316:9Screen Fit](https://usermanual.wiki/Samsung-Electronics-Co/U32E850R.user-manual/User-Guide-2575611-Page-72.png)
![73Configuring the PIP/PBP Settings44 Configuring the PIP/PBP SettingsPBP1Press any button on the front of the product to display the Function Key Guide. Next, press [ ] to display the corresponding menu screen. 2Press [ ] to move to PIP/PBP and press [ ] on the product.3Press [ ] to move to Picture Size and press [ ] (available in PBP mode (Size )).The following screen will appear.Auto: Display the picture according to the aspect ratio of the each screen input source.Wide: Display the picture in full screen regardless of the aspect ratio of the each screen input source.In PC mode Select the image sizefor each screen. PIP/PBPPIP/PBP ModeSizePositionSound SourceSourcePicture SizeContrastOn75/1003LFWXUH6L]H $SSO\&DQFHOWide Wide](https://usermanual.wiki/Samsung-Electronics-Co/U32E850R.user-manual/User-Guide-2575611-Page-73.png)
![74Configuring the PIP/PBP Settings44 Configuring the PIP/PBP Settings4:3: Display the picture of the sub-screen with an aspect ratio of 4:3. Suitable for videos and standard broadcasts.16:9: Display the picture of the sub-screen with an aspect ratio of 16:9.Screen Fit: Display the picture of the sub-screen with the original aspect ratio without cutting anything off. The function may not be supported depending on the ports provided with the product.Changing the screen size is available when the following conditions are satisfied.A digital output device is connected using the HDMI/DP/MINI DP cable.The input signal is 480p, 576p, 720p, or 1080p and monitor can display normally (Not every model can support all of these signals.).This can only be set when the external input is connected through HDMI/DP/MINI DP and PC/AV Mode is set to AV. 4Press [ ] to move to the option you want and press [ ].5The selected option will be applied.In AV mode3LFWXUH6L]H $SSO\&DQFHO16:9 Wide](https://usermanual.wiki/Samsung-Electronics-Co/U32E850R.user-manual/User-Guide-2575611-Page-74.png)
![75Configuring the PIP/PBP Settings44 Configuring the PIP/PBP Settings4.1.7 Configuring ContrastPIPAdjust the contrast level for sub-screen.1Press any button on the front of the product to display the Function Key Guide. Next, press [ ] to display the corresponding menu screen. 2Press [ ] to move to PIP/PBP and press [ ] on the product.3Press [ ] to move to Contrast and press [ ] (available in PIP mode (Size //)).The following screen will appear.4Adjust the Contrast using the [ ] buttons.5The selected option will be applied. Adjust the contrastlevel for each screen. PIP/PBPPIP/PBP ModeSizePositionSound SourceSourcePicture SizeContrastOn75/7575](https://usermanual.wiki/Samsung-Electronics-Co/U32E850R.user-manual/User-Guide-2575611-Page-75.png)
![76Configuring the PIP/PBP Settings44 Configuring the PIP/PBP SettingsPBPAdjust the contrast level for each screen.1Press any button on the front of the product to display the Function Key Guide. Next, press [ ] to display the corresponding menu screen. 2Press [ ] to move to PIP/PBP and press [ ] on the product.3Press [ ] to move to Contrast and press [ ] (available in PBP mode (Size )).The following screen will appear.4Adjust the Contrast using the [ ] buttons.5The selected option will be applied. Adjust the contrastlevel for each screen. PIP/PBPPIP/PBP ModeSizePositionSound SourceSourcePicture SizeContrastOn75/100&RQWUDVW ](https://usermanual.wiki/Samsung-Electronics-Co/U32E850R.user-manual/User-Guide-2575611-Page-76.png)
![775 Coordinating OSD5 Coordinating OSDA detailed description of each function is provided. Refer to your product for details.5.1 TransparencySet the transparency for the menu windows.5.1.1 Changing Transparency1Press any button on the front of the product to display the Function Key Guide. Next, press [ ] to display the corresponding menu screen. 2Press [ ] to move to OnScreen Display and press [ ] on the product.3Press [ ] to move to Transparency and press [ ] on the product. The following screen will appear.4Press [ ] to move to the language you want and press [ ]. 5The selected option will be applied. Configure the transparency of the menu windows.TransparencyLanguageDisplay Time OffOnOnScreen Display](https://usermanual.wiki/Samsung-Electronics-Co/U32E850R.user-manual/User-Guide-2575611-Page-77.png)
![78Coordinating OSD55 Coordinating OSD5.2 LanguageSet the menu language. A change to the language setting will only be applied to the onscreen menu display.It will not be applied to other functions on your PC. 5.2.1 Configuring Language1Press any button on the front of the product to display the Function Key Guide. Next, press [ ] to display the corresponding menu screen. 2Press [ ] to move to OnScreen Display and press [ ] on the product. 3Press [ ] to move to Language and press [ ] on the product. The following screen will appear.4Press [ ] to move to the language you want and press [ ]. 5The selected option will be applied. Set the menulanguage.TransparencyLanguageDisplay Time DeutschEnglishEspañolFrançaisItalianoOnScreen Display](https://usermanual.wiki/Samsung-Electronics-Co/U32E850R.user-manual/User-Guide-2575611-Page-78.png)
![79Coordinating OSD55 Coordinating OSD5.3 Display TimeSet the on-screen display (OSD) menu to automatically disappear if the menu is not used for a specified period of time.Display Time can be used to specify the time after which you want the OSD menu to disappear.5.3.1 Configuring Display Time1Press any button on the front of the product to display the Function Key Guide. Next, press [ ] to display the corresponding menu screen. 2Press [ ] to move to OnScreen Display and press [ ] on the product. 3Press [ ] to move to Display Time and press [ ] on the product. The following screen will appear.4Press [ ] to move to the option you want and press [ ]. 5The selected option will be applied. Set how long the menuwindow will remain onscreen for when it isnot in use.TransparencyLanguageDisplay Time 5 sec10 sec20 sec200 secOnScreen DisplayOn](https://usermanual.wiki/Samsung-Electronics-Co/U32E850R.user-manual/User-Guide-2575611-Page-79.png)
![806 Setup and Reset6 Setup and Reset A detailed description of each function is provided. Refer to your product for details.6.1 FreeSync The functions available on the monitor may vary depending on the model. Refer to the actual product. FreeSync is a DisplayPort 1.2 function, so the choice of the DisplayPort Ver.1.1 in OSD, or when the access of HDMI signal, the FreeSync function is not available.The sound quality of the monitor may decrease if FreeSync is enabled.Not available when PIP/PBP Mode is set to On. 6.1.1 Configuring FreeSync1Press any button on the front of the product to display the Function Key Guide. Next, press [ ] to display the corresponding menu screen. 2Press [ ] to move to System and press [ ] on the product.3Press [ ] to move to FreeSync and press [ ] on the product. The following screen will appear.OffOnOffStandard Engine: You can experience standard FreeSync technology.Ultimate Engine: You can experience maximized FreeSync technology. If the FreeSync function is enabled, the screen may flicker when you play games. 4Press [ ] to move to the option you want and press [ ]. 5The selected option will be applied.On1.2Auto FreeSync technology is solution that eliminates screen tearing without all the usual lag and latency. FreeSync can be operated when you use AMD's graphic card with supporting Freesync solution.FreeSyncSmart Eco SavingOff Timer PlusUSB Super ChargingPC/AV ModeDisplayPort Ver.Source DetectionSystemOffOnOn1.2Auto FreeSync technology is solution that eliminates screen tearing without all the usual lag and latency. FreeSync can be operated when you use AMD's graphic card with supporting Freesync solution.FreeSyncSmart Eco SavingOff Timer PlusUSB Super ChargingPC/AV ModeDisplayPort Ver.Source DetectionSystemOffStandard Engine Ultimate Engine](https://usermanual.wiki/Samsung-Electronics-Co/U32E850R.user-manual/User-Guide-2575611-Page-80.png)
![83Setup and Reset66 Setup and Reset6.2 Smart Eco SavingThe Smart Eco Saving function reduces power consumption by controlling the electric current used by the monitor panel. This menu is not available when Eye Saver Mode is enabled.Not available when PIP/PBP Mode is set to On. 6.2.1 Configuring Smart Eco Saving1Press any button on the front of the product to display the Function Key Guide. Next, press [ ] to display the corresponding menu screen. 2Press [ ] to move to System and press [ ] on the product.3Press [ ] to move to Smart Eco Saving and press [ ] on the product. The following screen will appear.Off: Deactivate the Smart Eco Saving function.On: The power consumption will automatically be reduced by about 10% over the current setting.(The reduction of power consumption depends on the customer screen brightness condition.)4Press [ ] to move to the option you want and press [ ]. 5The selected option will be applied.1.2Auto Adjust the powerconsumption of theproduct to save energy.FreeSyncSmart Eco SavingOff Timer PlusUSB Super ChargingPC/AV ModeDisplayPort Ver.Source DetectionOffOnSystem](https://usermanual.wiki/Samsung-Electronics-Co/U32E850R.user-manual/User-Guide-2575611-Page-83.png)
![84Setup and Reset66 Setup and Reset6.3 Off Timer PlusYou can set the product to automatically turn off.6.3.1 Configuring Off TimerOff Timer1Press any button on the front of the product to display the Function Key Guide. Next, press [ ] to display the corresponding menu screen. 2Press [ ] to move to System and press [ ] on the product.3Press [ ] to move to Off Timer Plus and press [ ] on the product. 4Press [ ] to move to Off Timer and press [ ] on the product. 5Press [ ] to move to Off Timer and press [ ] on the product. The following screen will appear.Off: Deactivate the off timer so that the product does not power off automatically.On: Activate the off timer so that the product powers off automatically.OffOff1.2Auto Set the monitor to automatically turn off after a certain time period.FreeSyncSmart Eco SavingOff Timer PlusUSB Super ChargingPC/AV ModeDisplayPort Ver.Source DetectionSystem Enable or disablethe Off Timer.Off TimerEco TimerOff Timer Plus Enable or disable theOff Timer.Off TimerTurn Off AfterOffOnOff Timer](https://usermanual.wiki/Samsung-Electronics-Co/U32E850R.user-manual/User-Guide-2575611-Page-84.png)
![85Setup and Reset66 Setup and Reset6Press [ ] to move to the option you want and press [ ]. 7The selected option will be applied.Turn Off After1Press any button on the front of the product to display the Function Key Guide. Next, press [ ] to display the corresponding menu screen. 2Press [ ] to move to System and press [ ] on the product.3Press [ ] to move to Off Timer Plus and press [ ] on the product. 4Press [ ] to move to Off Timer and press [ ] on the product. 5Press [ ] to move to Turn Off After and press [ ] on the product. The following screen will appear. 6Press [ ] to configure Turn Off After.7The selected option will be applied. The off timer can be set within a range of 1 to 23 hours. The product will automatically power off after the specified number of hours.This option is only available when Off Timer is set to On.For products for the market in some regions, the Off Timer is set to automatically activate 4 hours after the product powers on. This is done in accordance with power supply regulations. If you do not want the timer to activate, go to MENU System and set Off Timer Plus to Off. On4 h Set the monitor toautomatically turn offafter a certain timeperiod.Off TimerTurn Off AfterOff Timer4h→](https://usermanual.wiki/Samsung-Electronics-Co/U32E850R.user-manual/User-Guide-2575611-Page-85.png)
![86Setup and Reset66 Setup and Reset6.3.2 Configuring Eco TimerEco Timer1Press any button on the front of the product to display the Function Key Guide. Next, press [ ] to display the corresponding menu screen. 2Press [ ] to move to System and press [ ] on the product.3Press [ ] to move to Off Timer Plus and press [ ] on the product. 4Press [ ] to move to Eco Timer and press [ ] on the product. 5Press [ ] to move to Eco Timer and press [ ] on the product. The following screen will appear.Off: Deactivate the eco timer to disable the automatic power off feature. The product will notpower off while in power-saving mode if this feature is deactivated.On: Activate the eco timer so that the product powers off automatically when it has been inpower-saving mode for a specified period of time.6Press [ ] to move to the option you want and press [ ]. 7The selected option will be applied. Enable or disablethe Eco Timer.Off TimerEco TimerOff Timer Plus Enable or disablethe Eco Timer.Eco TimerEco TimerEco Off AfterOff](https://usermanual.wiki/Samsung-Electronics-Co/U32E850R.user-manual/User-Guide-2575611-Page-86.png)
![87Setup and Reset66 Setup and ResetEco Off Timer1Press any button on the front of the product to display the Function Key Guide. Next, press [ ] to display the corresponding menu screen. 2Press [ ] to move to System and press [ ] on the product.3Press [ ] to move to Off Timer Plus and press [ ] on the product. 4Press [ ] to move to Eco Timer and press [ ] on the product. 5Press [ ] to move to Eco Off After and press [ ] on the product. The following screen will appear. 6Press [ ] to configure Eco Off After.7The selected option will be applied. The Eco timer can be set between 10 and 180 minutes. The product will automatically power off after the specified time has elapsed.This option is only available when Eco Timer is set to On. Enable or disablethe Eco Timer.Eco Timer 10 mEco TimerEco Off After](https://usermanual.wiki/Samsung-Electronics-Co/U32E850R.user-manual/User-Guide-2575611-Page-87.png)
![88Setup and Reset66 Setup and Reset6.4 USB Super ChargingCharge the battery of a connected source device quickly using the USB 3.0 port on the product. Setting USB Super Charging to On during a data transfer will stop the data transfer. If you set USB Super Charging to Off, the standard charging and data transfer feature will be available.High-speed charging is possible using the [ ] and [ ] ports only. These ports charge devices faster than typical USB ports. The speed depends on the connected devices. 6.4.1 Configuring USB Super Charging1Press any button on the front of the product to display the Function Key Guide. Next, press [ ] to display the corresponding menu screen. 2Press [ ] to move to System and press [ ] on the product.3Press [ ] to move to USB Super Charging and press [ ] on the product.4Press [ ] to move to USB1 or USB2 and press [ ] on the product.The following screen will appear.Off: Disable USB Super Charging.On: Enable the function to quickly charge a source device connected to the USB 3.0 port.5Press [ ] to move to the option you want and press [ ].6The selected option will be applied.12OffOff1.2Auto Set the USB Super charging mode.FreeSyncSmart Eco SavingOff Timer PlusUSB Super ChargingPC/AV ModeDisplayPort Ver.Source DetectionSystemSet the USB Port1 charging On/Off.USB Super ChargingOffOnUSB1USB2 Set the USB Port2 charging On/Off.USB Super ChargingOffOnUSB1USB2](https://usermanual.wiki/Samsung-Electronics-Co/U32E850R.user-manual/User-Guide-2575611-Page-88.png)
![89Setup and Reset66 Setup and Reset6.5 PC/AV ModeSet PC/AV Mode to AV. The picture size will be enlarged. This option is useful when you view a movie. Supplied for the wide models only such as 16:9 or 16:10.If the monitor (when set to HDMI, DisplayPort, MINI DP (U24E850R) or HDMI 1, HDMI 2, DisplayPort, MINI DP (U28E850R / U32E850R)) is in power saving mode or is displaying the messageCheck Signal Cable, press the [ ] button to display the On Screen Display(OSD). You can select PC or AV. 6.5.1 Configuring PC/AV Mode1Press any button on the front of the product to display the Function Key Guide. Next, press [ ] to display the corresponding menu screen. 2Press [ ] to move to System and press [ ] on the product.3Press [ ] to move to PC/AV Mode and press [ ] on the product.4Press [ ] to move to HDMI, DisplayPort, MINI DP (U24E850R) or HDMI 1, HDMI 2, DisplayPort, MINI DP (U28E850R / U32E850R) and press [ ] on the product.The following screen will appear.U24E850ROffOff1.2Auto Set to AV to enlarge the picture.FreeSyncSmart Eco SavingOff Timer PlusUSB Super ChargingPC/AV ModeDisplayPort Ver.Source DetectionSystem Select the PC/AV modefor the DisplayPort source.DisplayPortMiniDPHDMI PC/AV ModePCAV Select the PC/AV modefor the MiniDP source.DisplayPortMiniDPHDMI PC/AV ModePCAV Select the PC/AV modefor the HDMI 1 source.DisplayPortMiniDPHDMI PC/AV ModePCAVPC](https://usermanual.wiki/Samsung-Electronics-Co/U32E850R.user-manual/User-Guide-2575611-Page-89.png)
![90Setup and Reset66 Setup and Reset5Press [ ] to move to the option you want and press [ ]. 6The selected option will be applied.U28E850R / U32E850R Select the PC/AV modefor the DisplayPort source.DisplayPortMiniDPHDMI 1HDMI 2PC/AV ModePCAV Select the PC/AV modefor the HDMI 2 source.DisplayPortMiniDPHDMI 1HDMI 2PC/AV ModePCAV Select the PC/AV modefor the HDMI 2 source.DisplayPortMiniDPHDMI 1HDMI 2PC/AV ModePCAVPC Select the PC/AV modefor the HDMI 2 source.DisplayPortMiniDPHDMI 1HDMI 2PC/AV ModePCAVPCPC](https://usermanual.wiki/Samsung-Electronics-Co/U32E850R.user-manual/User-Guide-2575611-Page-90.png)
![91Setup and Reset66 Setup and Reset6.6 DisplayPort Ver.Select your Displayport. Displayport 1.1 supports High Bit Rate 1, while 1.2 supports High Bit Rate 2. Incorrect settings may cause the screen to go blank. If this occurs, check the device specifications.If the monitor (when set to HDMI, DisplayPort, MINI DP (U24E850R) or HDMI 1, HDMI 2, DisplayPort, MINI DP (U28E850R / U32E850R)) is in power saving mode or is displaying the message Check Signal Cable, press the [ ] button to display the On Screen Display (OSD). You can select 1.1 or 1.2.If you select 1.1, the maximum resolution of your screen drops to 2560 x 1440 due to the limitations in HBR1 transmission speeds. 6.6.1 Configuring DisplayPort Ver.1Press any button on the front of the product to display the Function Key Guide. Next, press [ ] to display the corresponding menu screen.2Press [ ] to move to System and press [ ] on the product.3Press [ ] to move to DisplayPort Ver. and press [ ] on the product.The following screen will appear.1.1 / 1.24Press [ ] to move to the option you want and press [ ].5The selected option will be applied.OffOffAuto Select yourDisplayport.Displayport 1.1supports HBR 1,while 1.2 supportsHBR 2.FreeSyncSmart Eco SavingOff Timer PlusUSB Super ChargingPC/AV ModeDisplayPort Ver.Source DetectionSystem1.11.2](https://usermanual.wiki/Samsung-Electronics-Co/U32E850R.user-manual/User-Guide-2575611-Page-91.png)
![92Setup and Reset66 Setup and Reset6.7 Source DetectionYou can activate Source Detection. Not available when PIP/PBP Mode is set to On. 6.7.1 Configuring Source Detection1Press any button on the front of the product to display the Function Key Guide. Next, press [ ] to display the corresponding menu screen. 2Press [ ] to move to System and press [ ] on the product.3Press [ ] to move to Source Detection and press [ ] on the product.The following screen will appear.Auto: The input source is automatically recognized.Manual: Manually select an input source.4Press [ ] to move to the option you want and press [ ].5The selected option will be applied.OffOff1.2Auto Decide how inputsources will bedetected.FreeSyncSmart Eco SavingOff Timer PlusUSB Super ChargingPC/AV ModeDisplayPort Ver.Source DetectionSystemAutoManual](https://usermanual.wiki/Samsung-Electronics-Co/U32E850R.user-manual/User-Guide-2575611-Page-92.png)
![93Setup and Reset66 Setup and Reset6.8 Key Repeat TimeControl the response rate of a button when the button is pressed. 6.8.1 Configuring Key Repeat Time1Press any button on the front of the product to display the Function Key Guide. Next, press [ ] to display the corresponding menu screen. 2Press [ ] to move to System and press [ ] on the product.3Press [ ] to move to Key Repeat Time and press [ ] on the product.The following screen will appear.Acceleration, 1 sec, or 2 sec can be selected. If No Repeat is selected, a command responds only once when a button is pressed.4Press [ ] to move to the option you want and press [ ].5The selected option will be applied. Configure theresponse rate of abutton when the buttonis pressed.Key Repeat TimeReset AllSystemAcceleration1 sec2 secNo Repeat](https://usermanual.wiki/Samsung-Electronics-Co/U32E850R.user-manual/User-Guide-2575611-Page-93.png)
![94Setup and Reset66 Setup and Reset6.9 Reset All Return all the settings for the product to the default factory settings.6.9.1 Initializing Settings (Reset All)1Press any button on the front of the product to display the Function Key Guide. Next, press [ ] to display the corresponding menu screen. 2Press [ ] to move to System and press [ ] on the product.3Press [ ] to move to Reset All and press [ ] on the product.The following screen will appear.4Press [ ] to move to the option you want and press [ ].5The selected option will be applied. Return all the settingsfor the product to thedefault factory settings.Key Repeat TimeReset AllAccelerationSystem $OOWKHPHQXVHWWLQJVZLOOEHUHVHWWRGHIDXOW$UH\RXVXUH\RXZDQWWRUHVHW"<HV 1R](https://usermanual.wiki/Samsung-Electronics-Co/U32E850R.user-manual/User-Guide-2575611-Page-94.png)
![957 Information Menu and Others7 Information Menu and OthersA detailed description of each function is provided. Refer to your product for details.7.1 InformationView the current input source, frequency and resolution.7.1.1 Displaying Information1Press any button on the front of the product to display the Function Key Guide. Next, press [ ] to display the corresponding menu screen. 2Press [ ] to move to Information. The current input source, frequency and resolution will appear.The following screen will appear.U24E850R U28E850R / U32E850RPBPPIP InformationPicturePIP/PBPOnScreen DisplaySystemInformationHDMI**** x ******kHz **Hz InformationPicturePIP/PBPOnScreen DisplaySystemInformationHDMI 1**** x ******kHz **Hz InformationPicturePIP/PBPOnScreen DisplaySystemInformationHDMI**** x ******kHz **HzDisplayPort**** x ******kHz **Hz InformationPicturePIP/PBPOnScreen DisplaySystemInformationHDMI 1**** x ******kHz **HzHDMI 2**** x ******kHz **Hz InformationPicturePIP/PBPOnScreen DisplaySystemInformationHDMI**** x ******kHz **HzDisplayPort**** x ******kHz **Hz InformationPicturePIP/PBPOnScreen DisplaySystemInformationHDMI 1**** x ******kHz **HzHDMI 2**** x ******kHz **Hz](https://usermanual.wiki/Samsung-Electronics-Co/U32E850R.user-manual/User-Guide-2575611-Page-95.png)
![96Information Menu and Others77 Information Menu and Others7.2 Configuring Brightness, Contrast and Volume from the Initial ScreenAdjust the Brightness, Contrast, Volume using the [ ] buttons when the initial screen (that displays no menu screen) is displayed. BrightnessThis menu is not available when Bright is set to Dynamic Contrast mode.This menu is not available when Smart Eco Saving is enabled.This menu is not available when Eye Saver Mode is enabled. ContrastThis option is not available when Bright is in Cinema or Dynamic Contrast mode.This menu is not available when Game Mode is enabled.This menu is not available when PIP/PBP Mode is set to On and the Size is set to (PBP Mode). 1Press any button on the front of the product (when no menu screen is displayed) to display the Function Key Guide. Next, press [ ]. The following screen will appear.2Press the [ ] button to alternate between the Brightness, Contrast and Volume settings.3Adjust the Brightness, Contrast, Volume using the [ ] buttons.SAMSUNGMAGICSAMSUNGMAGICBrightnessContrastVolume100](https://usermanual.wiki/Samsung-Electronics-Co/U32E850R.user-manual/User-Guide-2575611-Page-96.png)