Shinsei BP000002 Mobile Printer User Manual DP 2E Instruction Manual 3rd edition April 20 2010 CS 4 indd
Shinsei Industries Co., Ltd. Mobile Printer DP 2E Instruction Manual 3rd edition April 20 2010 CS 4 indd
Shinsei >
DP-2E Instruction Manual 4th edition. April 20. 2010.CS.4.
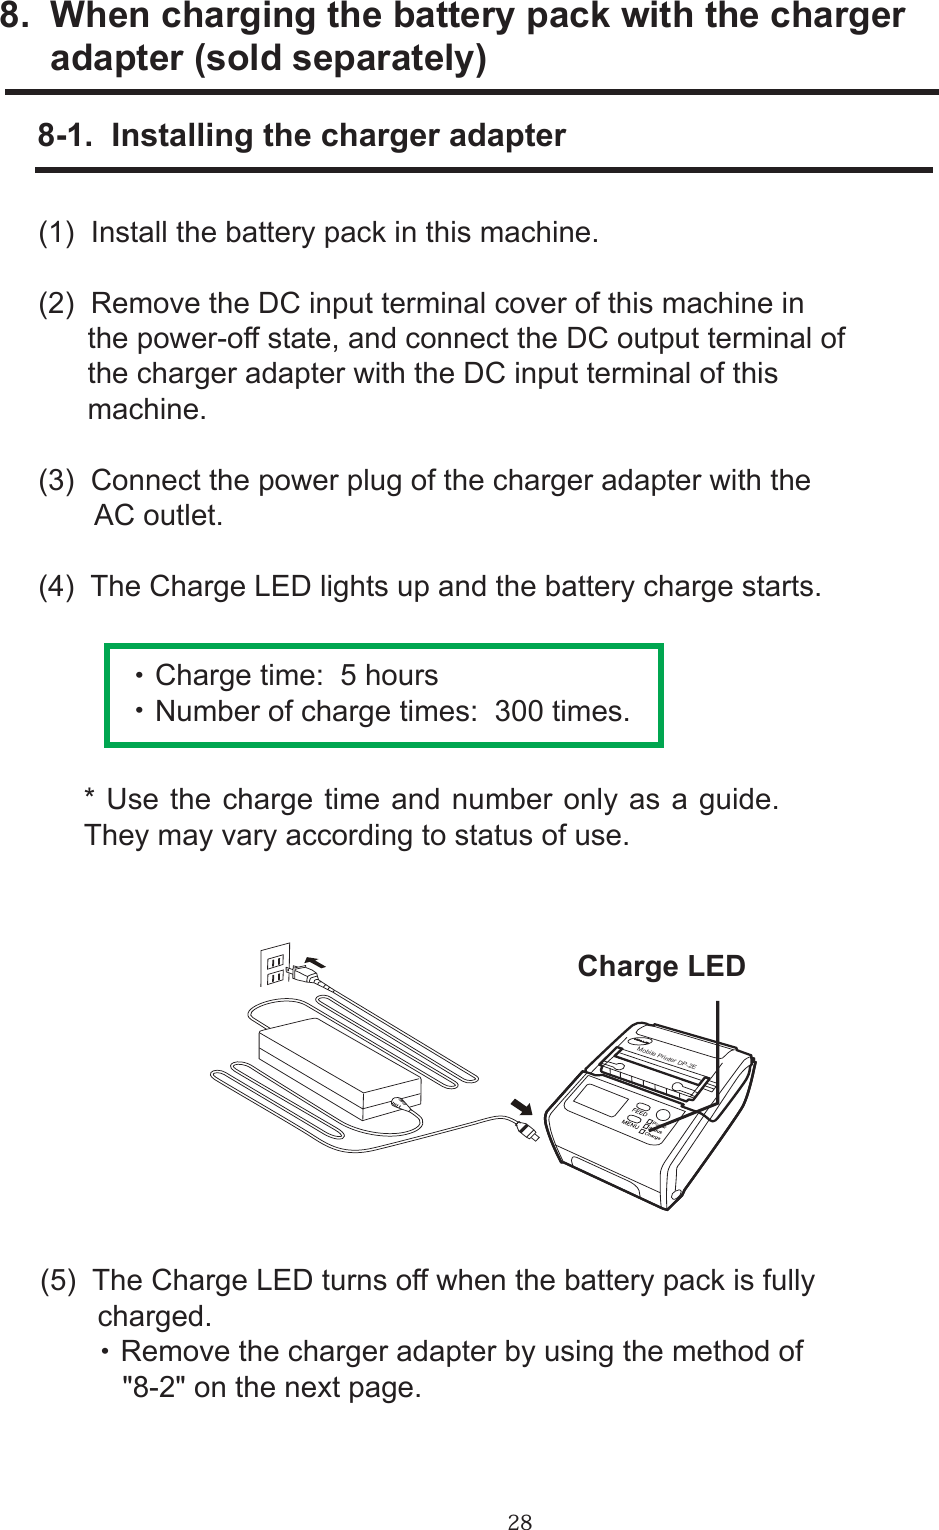
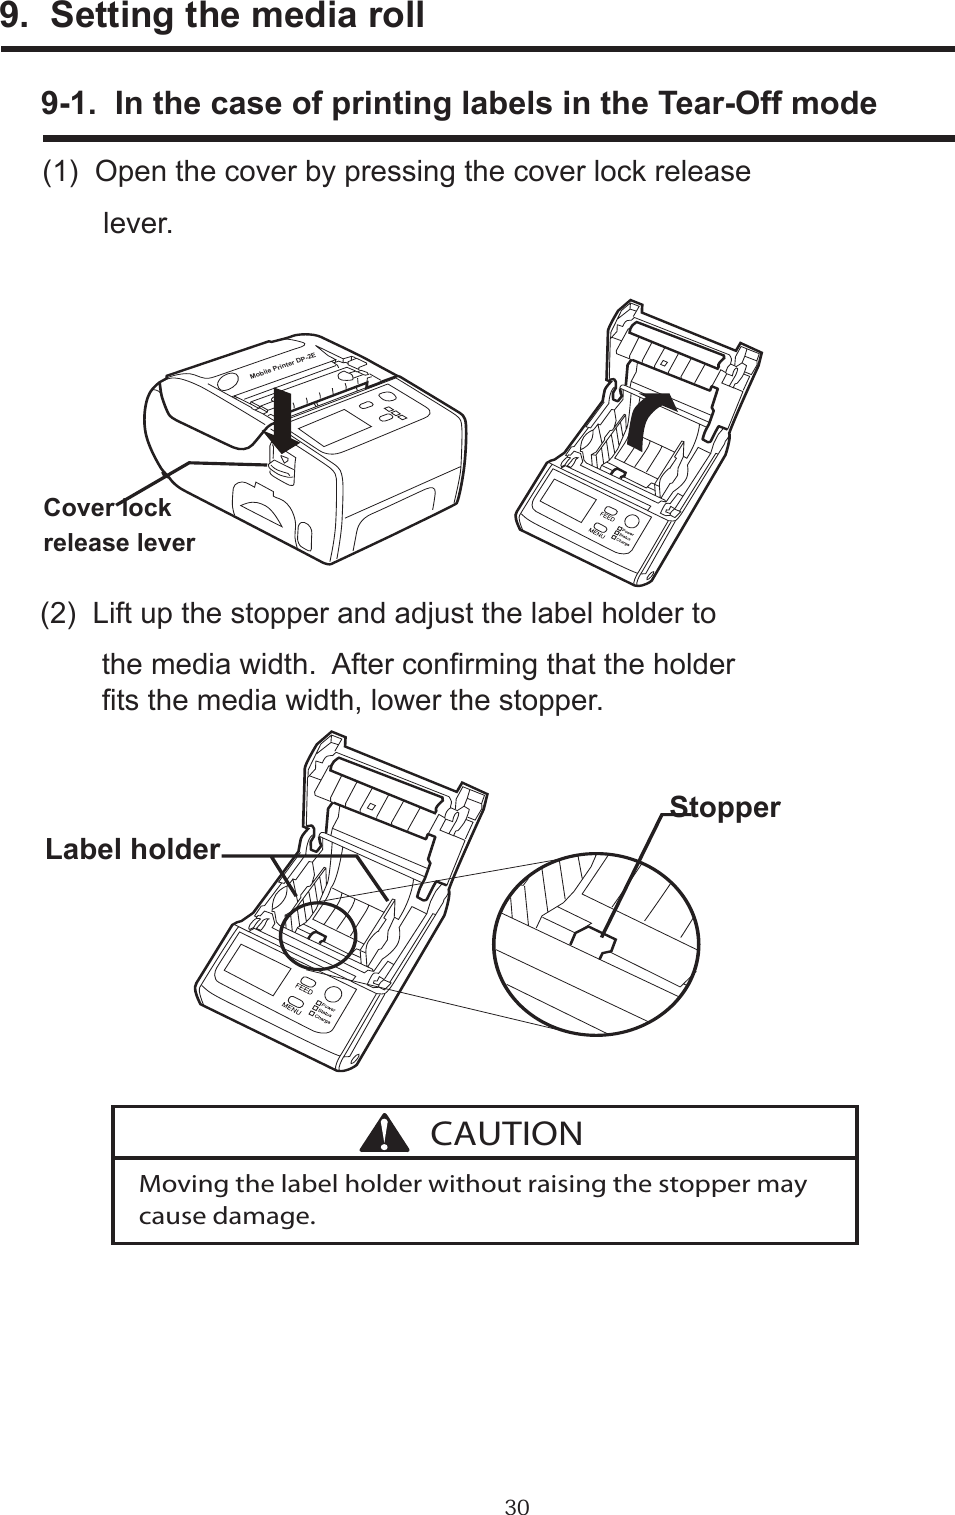
![112. For your longer usePrecautions for use1. Do not print the paper with the paper not installed. 2. Issue labels after conrming the print contents are correct, as set values of a built-in program might be changed or destroyed by an excessive power supply noise.3. Avoid use of this machine under the conditions of extreme temperature or humidity.4. Do not leave or keep the machine in the place where an air conditioner is installed near the machine or direct sunlight is received. [Environment] Operating environmental temperature: +5o ~ +35oC Operating environmental humidity: 25 ~ 80%RH (No condensation) Storage environmental temperature: -10o ~ +60oC Storage environmental humidity: 10 ~ 80%RH (No condensation)5. When glue or dust adheres to the label path, wipe it off with a soft cloth wrung after being soaked in neutral detergent.](https://usermanual.wiki/Shinsei/BP000002/User-Guide-1269665-Page-11.png)

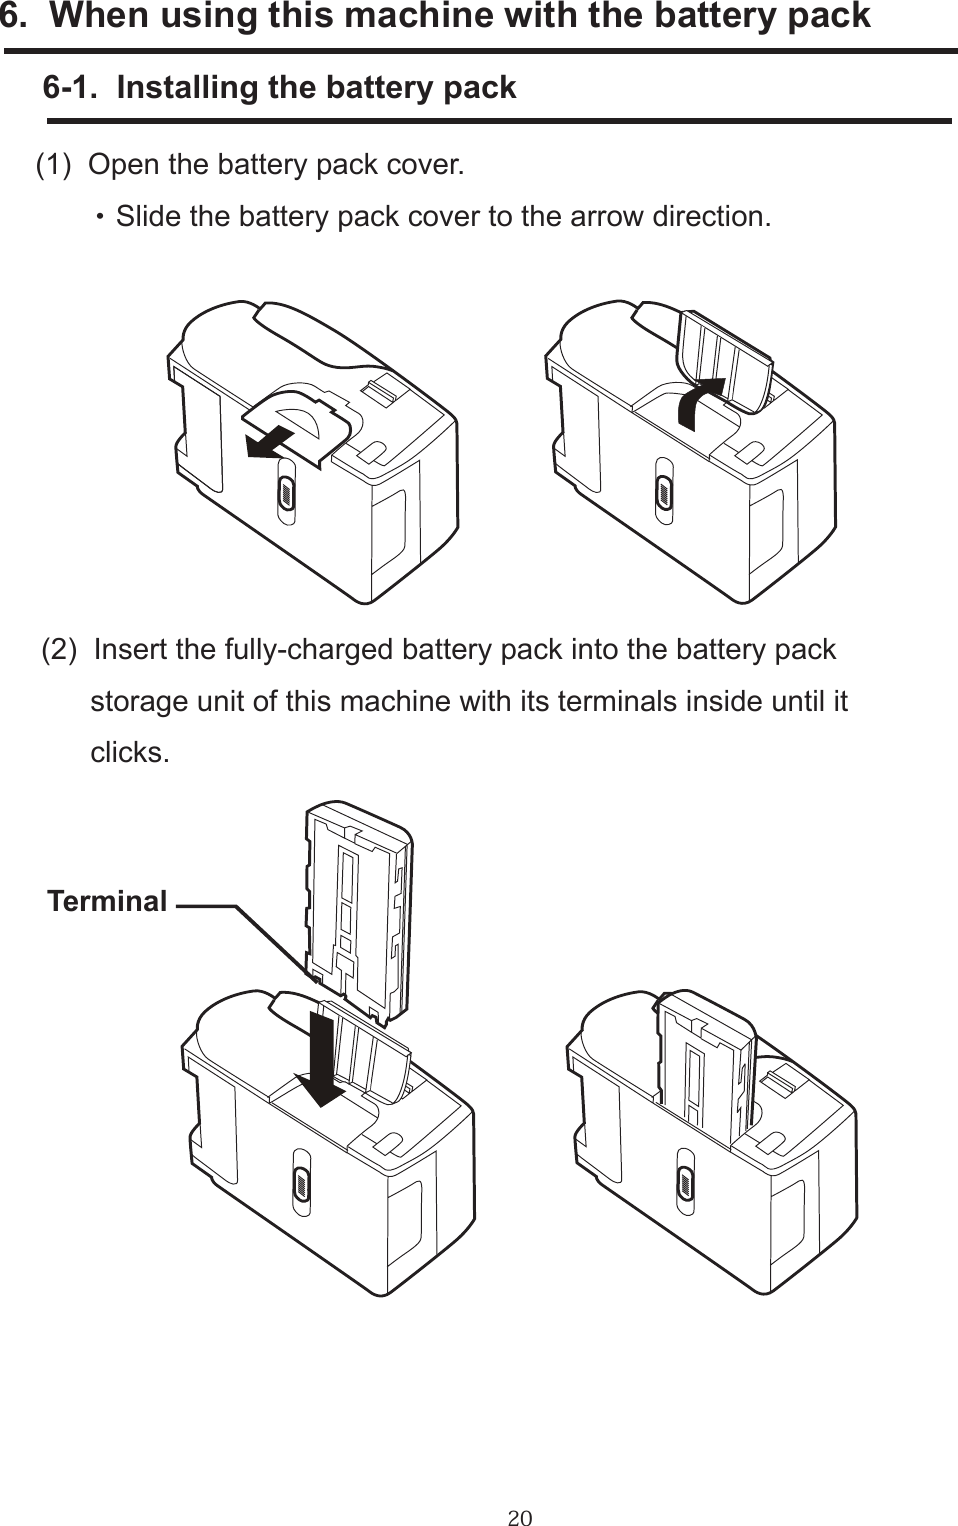
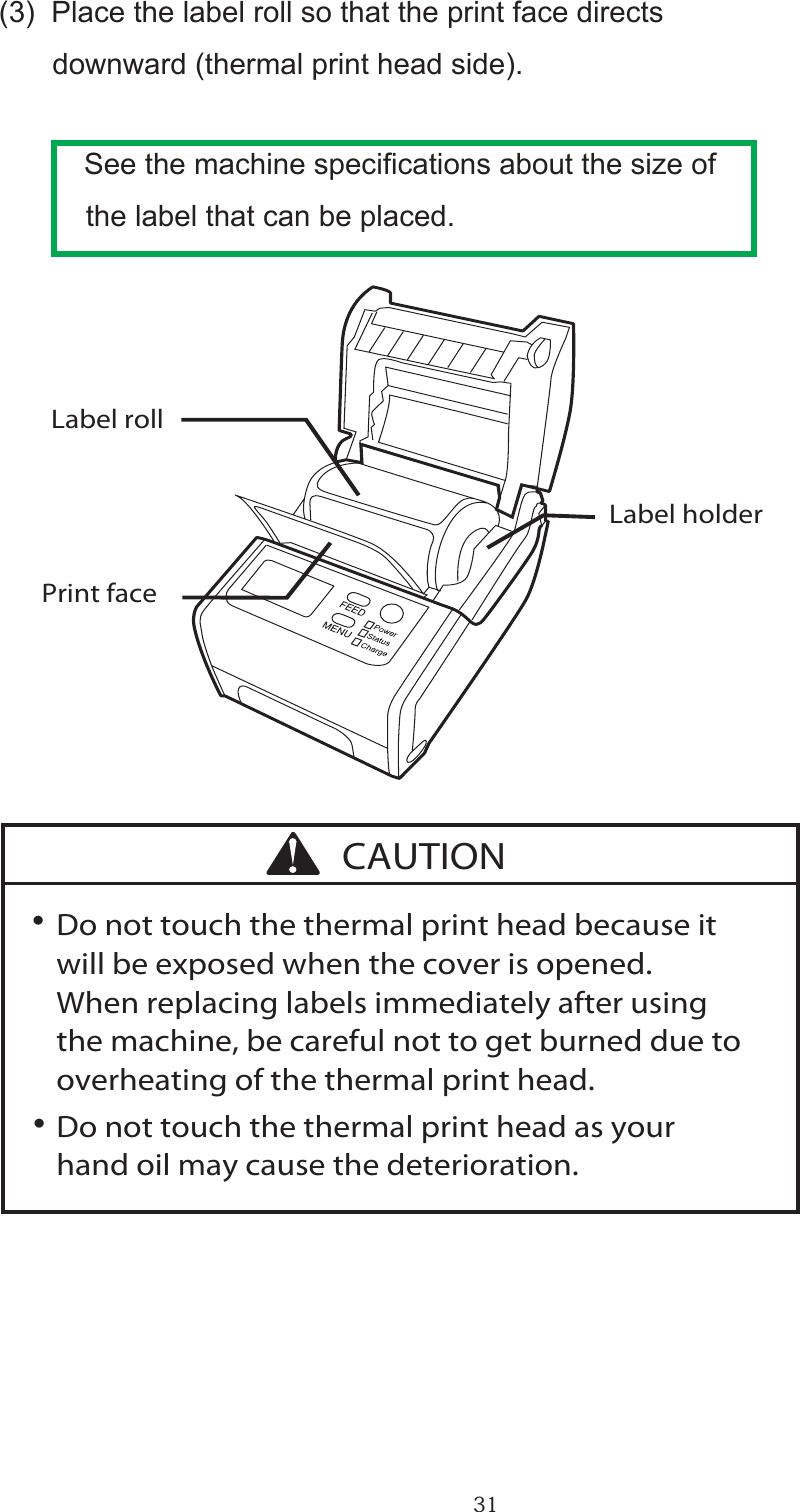
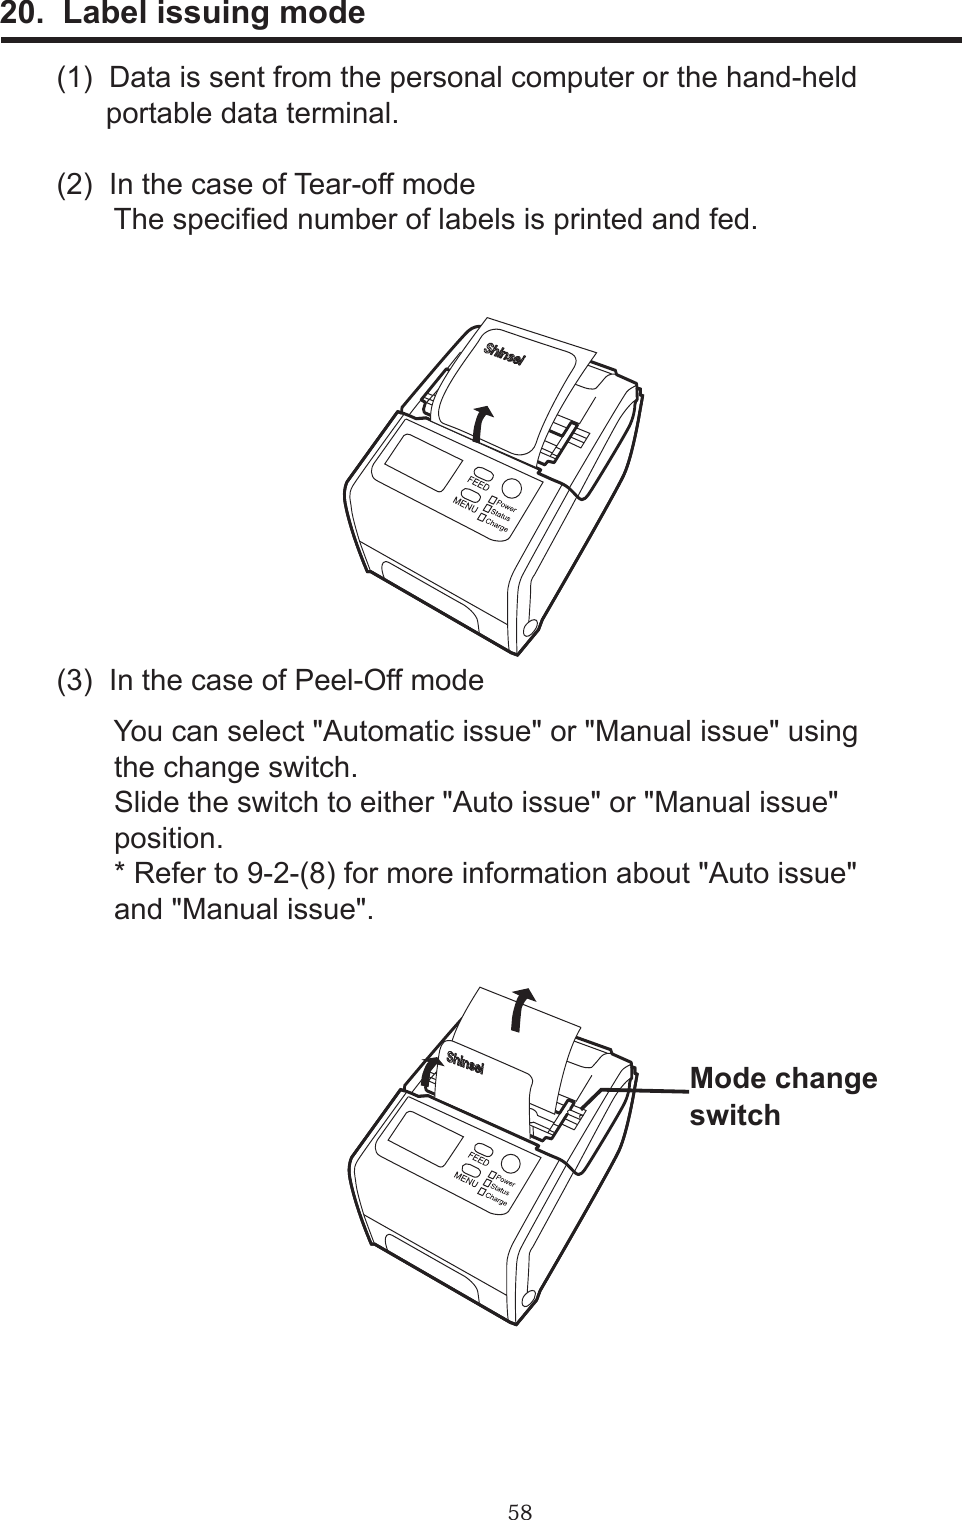
![36(8) Slide the switch to either "Auto issue" or "Manual issue" position. 1. "Auto issue" setting Slide the switch to front to set the automatic label issuing mode. ・In "Auto issue" mode, the label's presence is detected by the peel sensor. Therefore, the next label is automatically peeled off from the backing paper, and fed out of the label outlet every time current label is removed. 2. "Manual issue" setting Slide the switch to rear to set the manual label issuing mode. ・ The next label is peeled off from the backing paper and fed out of the label outlet every time the [FEED] key is pressed.ModechangeswitchModechangeswitch](https://usermanual.wiki/Shinsei/BP000002/User-Guide-1269665-Page-36.png)
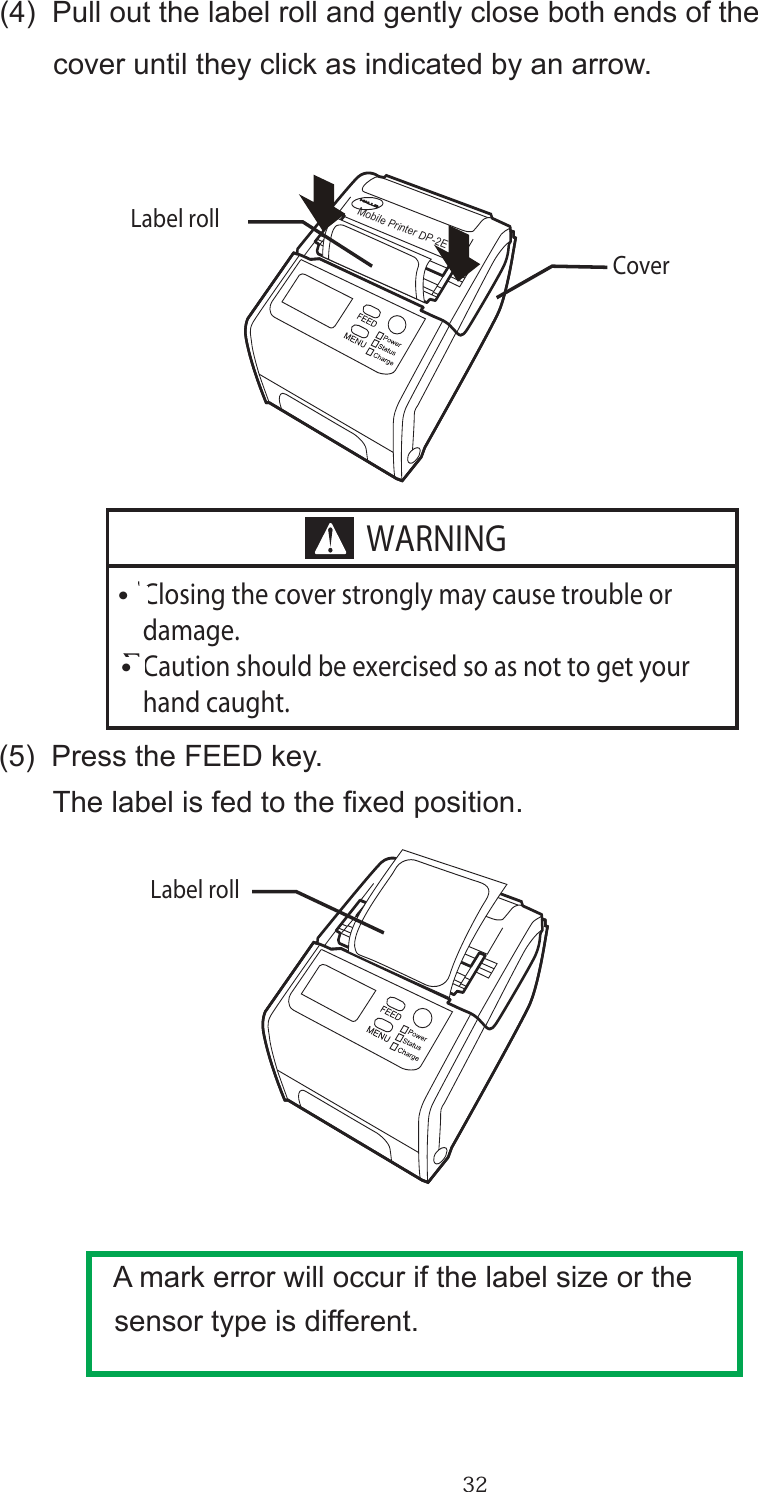
![3811. Contrast adjustment of the liquid crystal display(1) Turn on the power. The standby screen appears.(2) Press the MENU key for about one second to display the Menu 1/4 screen. Conrm the cursor is located on the [next] button, and press the FEED key.(3) Conrm that [1. contrast] is selected and press the MENU key. menu 1/4 exit1. contrast2. backlightnext menu 1/4 next exit 2. backlight 1. contrast](https://usermanual.wiki/Shinsei/BP000002/User-Guide-1269665-Page-38.png)
![39(4) Each time you press the FEED key under this condition, [-], [+], or [exit] is selected in this order. Select [+] to increase the contrast, or [-] to decrease the contrast, and press the MENU key to change the numeric value for changing the contrast. (1 ~16)(5) After completing the setting, select [exit] by using the FEED key and press the MENU key.(6) The display returns to the Menu 1/4 screen. Press the MENU key for about one second to return to the standby screen.](https://usermanual.wiki/Shinsei/BP000002/User-Guide-1269665-Page-39.png)
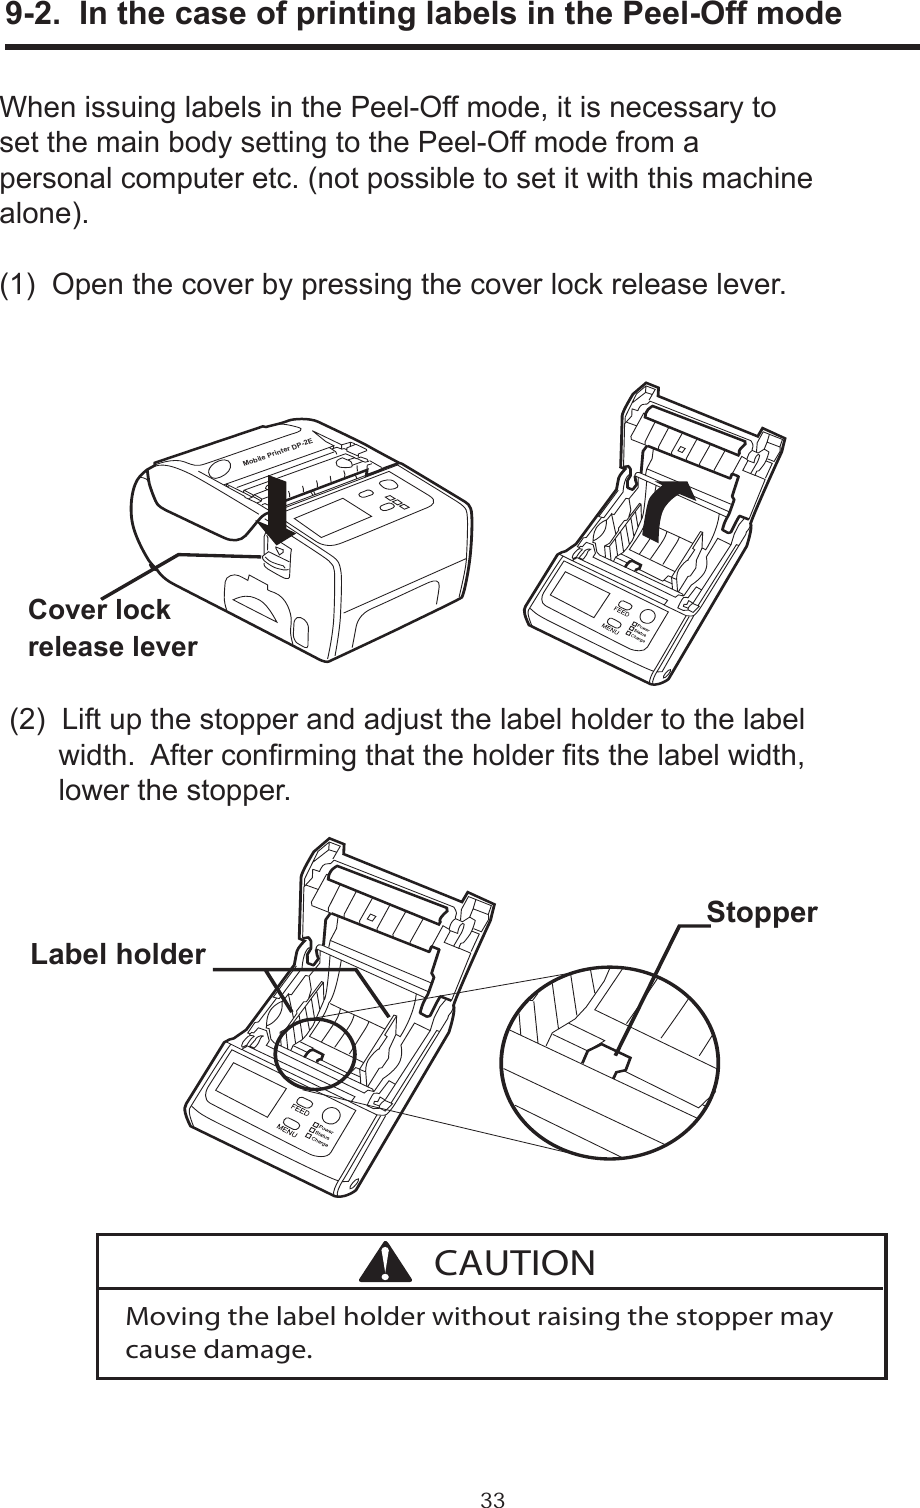
![4012. Adjustment of the backlight lighting time(1) Turn on the power. The standby screen appears.(2) Press the MENU key for about one second to display the Menu 1/4 screen. Conrm the cursor is located on the [next] button, and press the FEED key.(3) Select [2. backlight] by using the FEED key, and press the MENU key. menu 1/4 exit1. contrast2. backlightnext menu 1/4 next exit1. contrast 2. backlight](https://usermanual.wiki/Shinsei/BP000002/User-Guide-1269665-Page-40.png)
![41(4) Each time you press the FEED key under this condition, [-], [+], or [exit] is selected in this order. Select [+] to lengthen the lighting time, or [-] to shorten the time, and press the MENU key to change the numeric value (0 - 90 seconds).(5) After completing the setting, select [exit] by using the FEED key and press the MENU key.(6) The display returns to the Menu 1/4 screen. Press the MENU key for about one second to return to the standby screen.backlightbacklight](https://usermanual.wiki/Shinsei/BP000002/User-Guide-1269665-Page-41.png)
![4213. Test Printing 13-1. Test printing method 1(1) Turn on the power. The standby screen appears.(2) Press the MENU key for about one second to display the Menu 1/4 screen. Conrm the cursor is located on the [next] button, and press the MENU key.(3) The Menu 2/4 screen appears. Select [3. test print] by using the FEED key, and press the MENU key.menu 2/4 next exit4. print setting 3. test printmenu 1/4 exit1. contrast2. backlightnext](https://usermanual.wiki/Shinsei/BP000002/User-Guide-1269665-Page-42.png)
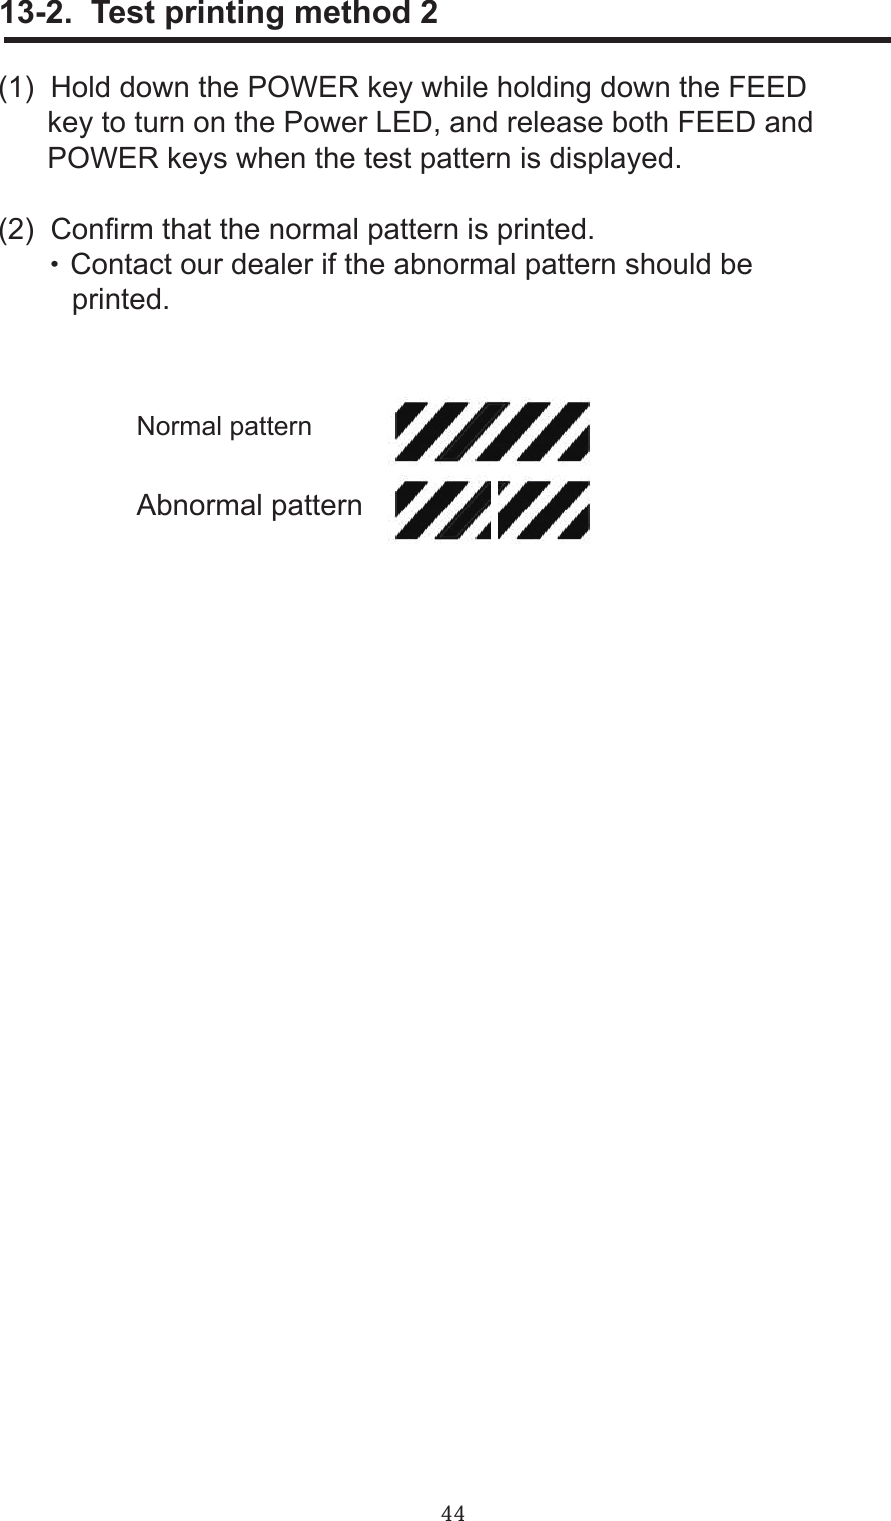
![43(4) Each time you press the FEED key under this condition, [NO], [YES], or [exit] is selected in this order. Select [NO] by using the FEED key for not printing, and press the MENU key. Then, the Menu 2/4 screen appears. Select [YES] by using the FEED key for printing, and press the MENU key. Then, the test pattern is printed. (5) When completing the operation, select [exit] by using the FEED key and press the MENU key.(6) The Menu 2/4 screen appears. Press the MENU key for about one second to return to the standby screen.](https://usermanual.wiki/Shinsei/BP000002/User-Guide-1269665-Page-43.png)
![4514. Printing the Conguration List・ The set value list is printed in 200mm long and 48mm wide. The print might overow depending on labels. Receipt paper of 48mm or more in width is recommended.(1) Turn on the power. The standby screen appears. (2) Press the MENU key for about one second to display the Menu 1/4 screen. Conrm the cursor is located on the [next] button, and press the MENU key.(3) The Menu 2/4 screen appears. Select [4. print settings] by using the FEED key, and press the MENU key. menu 1/4 exit1. contrast2. backlightnext menu 2/4 next exit 3. test print 4. print settings](https://usermanual.wiki/Shinsei/BP000002/User-Guide-1269665-Page-45.png)
![46(4) Each time you press the FEED key under this condition, [NO], [YES], or [exit] is selected in this order. Select [NO] by using the FEED key for not printing, and press the MENU key. Then, the Menu 2/4 screen appears. Select [YES] by using the FEED key for printing, and press the MENU key. Then, the test pattern is printed. (5) When completing the operation, select [exit] by using the FEED key and press the MENU key.(6) The Menu 2/4 screen appears. Press the MENU key for about one second to return to the standby screen. menu 2/4 exit 3. test print 4. print settingsnext](https://usermanual.wiki/Shinsei/BP000002/User-Guide-1269665-Page-46.png)
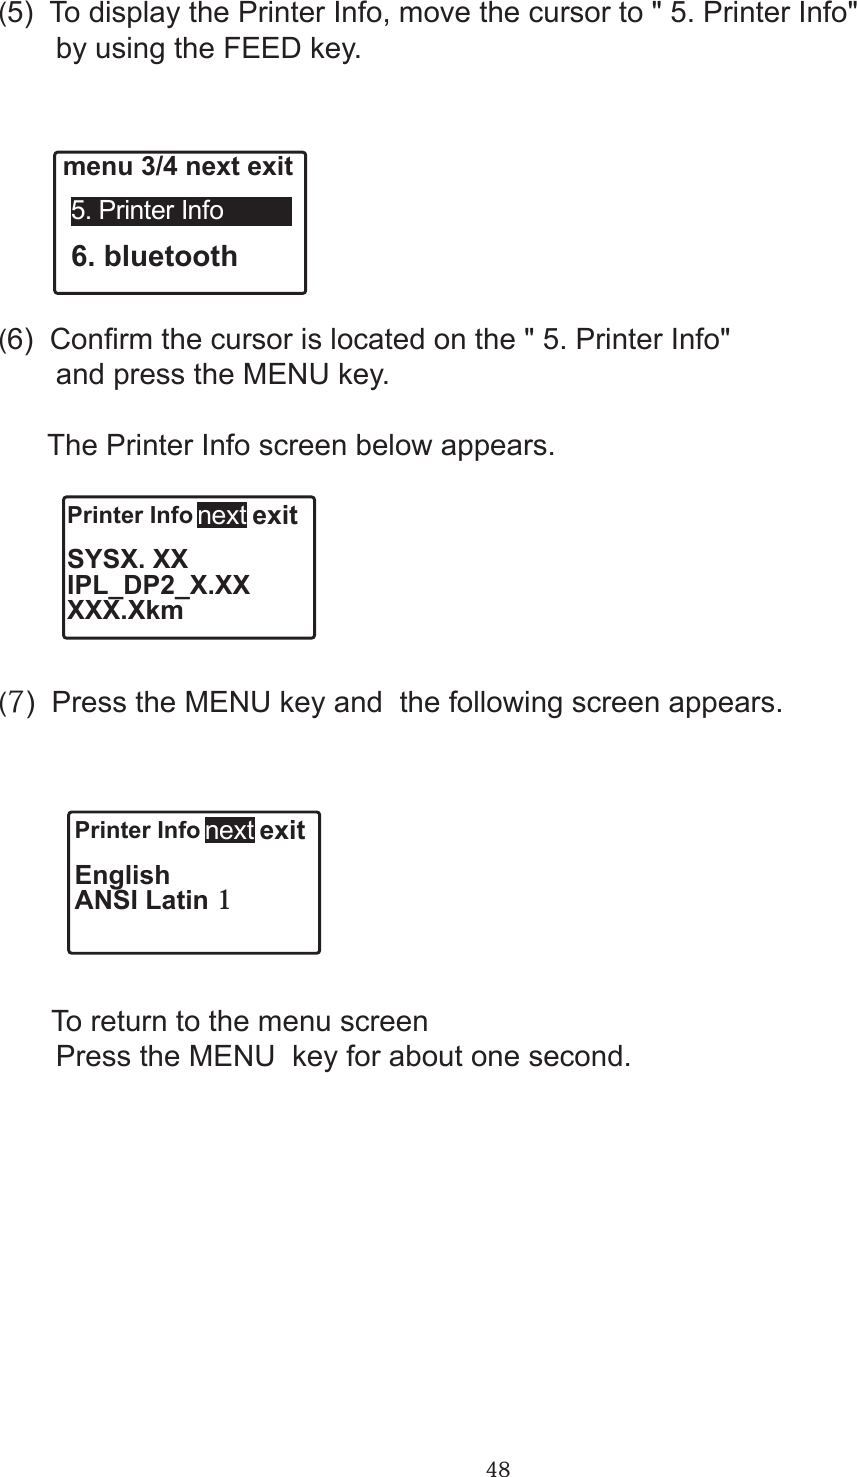
![47menu 3/4 exit 5. Printer Info 6. bluetooth15. Printer Info menu 1/4 exit 1. contrast 2. backlightnext menu 2/4 exit 3. test print 4. print settingsnext(1) Turn on the power. The standby screen appears.(2) Press the MENU key for about one second and the menu 1/4 screen appears.(3) Conrm the cursor is located on the [next] button and press the MENU key, the menu 2/4 screen appears.(4) Conrm the cursor is located on the [next] button and press the MENU key, the menu 3/4 screen appears.next](https://usermanual.wiki/Shinsei/BP000002/User-Guide-1269665-Page-47.png)
![49(1) Turn on the Power. The standby screen appears.(2) Press the MENU key for about one second to display the Menu 1/4 screen. Conrm the cursor is located on the [next] button, and press the MENU key.(3) The Menu 2/4 screen appears. Conrm the cursor is located on the [next] button, and press the MENU key. 16. Conrmation of BluetoothTM communication setting value(4) The Menu 3/4 screen appears. Select [6. bluetooth] by using the FEED key, and press the MENU key.menu 1/4 exit1. contrast2. backlightmenu 2/4 exit3. test print4. print settingsmenu 3/4 next exit5. Printer Infonextnext6. bluetooth](https://usermanual.wiki/Shinsei/BP000002/User-Guide-1269665-Page-49.png)
![50(5) The selection screen for [1. print BDA] and [2. show settings] appears. Conrm the cursor is located on the [1.print BDA] button, and press the MENU key.bluetooth exit2. show settings1. print BDA(6) The [print BDA] screen appears.In case of [NO]bluetooth print BDA YESNO●In case of [NO], conrm the cursor is located on the [NO], and press the MENU key for about one second to return to the standby screen.※If the MENU key is pressed on this screen, the screen returns to the previous selection screen.](https://usermanual.wiki/Shinsei/BP000002/User-Guide-1269665-Page-50.png)
![51●When printing BDA, select [YES] by pressing the FEED key, and the Bluetooth authentication address (BDA) is printed.●After printing BDA, press the MENU key for about one second to return to the standby screen.※If the MENU key is pressed on this screen, the screen returns to the previous selection screen.In case of [YES](7) Select [2.show settings] on this screen by using the FEED key, and press the MENU key.bluetooth exit1. print BDA 2. show settings①The initial set values are displayed.bluetooth exitBDA/Name:000190E130A0SHINSEI PRINTERnext](https://usermanual.wiki/Shinsei/BP000002/User-Guide-1269665-Page-51.png)
![52②Conrm the cursor is located on the [next] button, and press the MENU key to display the next set value.bluetooth exitPIN:0000000000000000Auth:nonenext③Conrm the cursor is located on the [next] button, and press the MENU key to display the last set value.bluetooth exitModuleVersion:0100next●Press the MENU key for about one second on this screen, and the screen returns to the standby screen.※Conrm the cursor is located on the [next] button and press the MENU key to return to the initial set value screen.※Selecting [exit] on this screen by using the FEED key and press the MENU key to return to the Menu 3/4 screen.](https://usermanual.wiki/Shinsei/BP000002/User-Guide-1269665-Page-52.png)
![5317. Automatic adjustment of the sensorPerforms the automatic sensitivity adjustment of the label sensor and the Peel sensor.17-1. Automatic adjustment of the label sensor(1) Conrm the cursor is located on the [next] button on the Menu 3/4 screen and press the MENU key, and the Menu 4/4 screen appears. To perform the automatic adjustment of the label sensor to x the label position, select [7. sensor Adjust] by using the FEED key and press the MENU key.menu 4/4 next exit7. sensor Adjust 8. peel Adjust(2) Selection screen for the label type appears. Select the label type either [1. mark Label] or [2. gap Label] by using the FEED key.In case of mark Label ①Conrm the cursor is located on the [1. mark Label] and press the MENU key.autoSensor exit2. gap Label 1. mark Label](https://usermanual.wiki/Shinsei/BP000002/User-Guide-1269665-Page-53.png)
![54② The mark sensor adustment screen appears. Every time the FEED key is pressed, [NO] ⇒ [YES] ⇒ [exit] appears.mark exitsensor Adjust YESNO ③If the sensor adjustment is not required, conrm the cursor is located on the [NO] and press the MENU key to return to the previous selection screen. ④ If the sensor Adjust is required, select [YES] by using the FEED key and press the MENU key. ● If the sensor is adjusted normally, the following screen appears.autoSensor ENDexit ● Press the MENU key for about one second on this screen to return to the standby screen. ※ Conrm the cursor is located on the [exit] on this screen and press the MENU key to return to the previous selection screen.](https://usermanual.wiki/Shinsei/BP000002/User-Guide-1269665-Page-54.png)
![55In case of gap Label ①Select [2. gap Label] on the label type selection screen by using the FEED key and press the MENU key.autoSensor exit1. mark Label 2. gap Label Hereafter, follow the procedure described in the mark Label ②⇒③⇒④ on the Page 54.](https://usermanual.wiki/Shinsei/BP000002/User-Guide-1269665-Page-55.png)
![56(1) Conrm the cursor is located on the [next] on the Menu 3/4 screen and press the MENU key to display the Menu 4/4 screen. To adjust the sensitivity of the Peel sensor that detects label, select [8. peel Adjust] by using the FEED key and press the MENU key.17-2. Automatic adjustment of the Peel sensormenu 4/4 next exit7. sensor Adjust 8. peel Adjust(2) The threshold setting screen for the Peel sensor appears. +Peel exitthreshold 119 - ● To lower the threshold, select [-] and press the MENU key. The threshold is lowered one by one by pressing the MENU key. The Peel sensor sensitivity becomes lower if the threshold is lowered. ● To increase the threshold, select [+] by using the FEED key and press the MENU key. The threshold is increased one by one by pressing the MENU key. The Peel sensor sensitivity becomes higher if the threshold is increased.(3) After setting the threshold, press the MENU key for about one second to return to the standby screen. ※ Select [exit] by using the FEED key on this setting screen and press the MENU key to return to Menu 4/4 screen.](https://usermanual.wiki/Shinsei/BP000002/User-Guide-1269665-Page-56.png)