Sony PM0816 GSM/WCDMA/LTE Phone + Bluetooth, DTS/UNII a/b/g/n/ac, ANT+ & NFC User Manual UG
Sony Mobile Communications Inc GSM/WCDMA/LTE Phone + Bluetooth, DTS/UNII a/b/g/n/ac, ANT+ & NFC UG
Sony >
Contents
- 1. SAR leaflet_US
- 2. UG
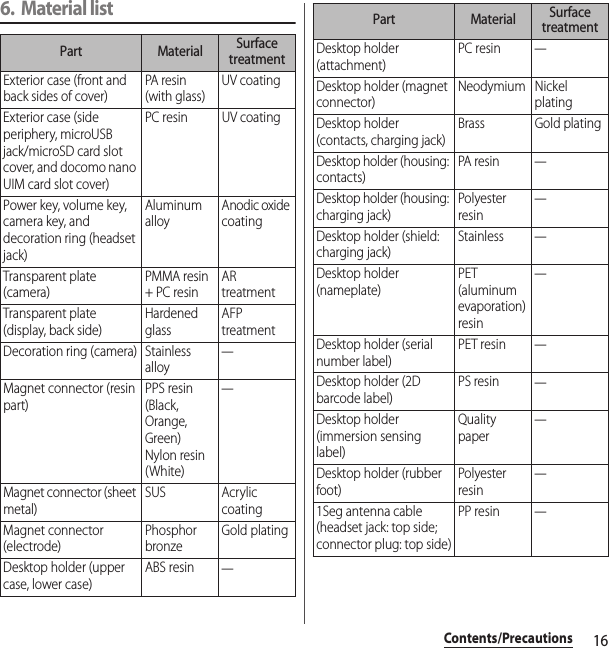
UG
![IntroductionThank you for your purchase of "SO-04G".For proper use of the SO-04G, read this manual carefully before and while you use the SO-04G.About manuals of SO-04GIn addition to this manual, the operations of SO-04G are described in "クイックスタートガイド (Quick Start Guide)" (in Japanese only) and "Instruction Manual" application of the terminal (in Japanese only).●"クイックスタートガイド (Quick Start Guide)" (Supplied accessories)The initial operations and settings after purchasing the terminal, screen view contents and operations of main function are explained.●"Instruction Manual" (Application of the terminal)Operations and settings of each function are explained. To use "Instruction Manual" application, from the Home screen, u[Instruction Manual]. When using for the first time, download and install the application according to the onscreen instructions. If you uninstall "Instruction Manual" application, access to Google Play from Play Store to download it again. From the Home screen, tap [Play Store], search "取扱説明書 (Instruction Manual)" application to select, then install it following the onscreen instructions. You can use the application as an electronic book. You can also shift to actual operations by tapping the description in the contents or view reference contents.●"Instruction Manual" (PDF file)Operations and settings of each function are explained. It can be downloaded from NTT DOCOMO website.https://www.nttdocomo.co.jp/english/support/trouble/manual/download/index.html* You can download the latest information of "クイックスタートガイド (Quick Start Guide)". The URL and contents are subject to change without prior notice.❖Note・Reproduction or reprint of all or part of this manual without prior permission is prohibited.・Important information for SO-04G is posted in the following website. Be sure to check before using.http://www.sonymobile.co.jp/support/use_support/product/so-04g/ (In Japanese only)](https://usermanual.wiki/Sony/PM0816.UG/User-Guide-2593934-Page-2.png)
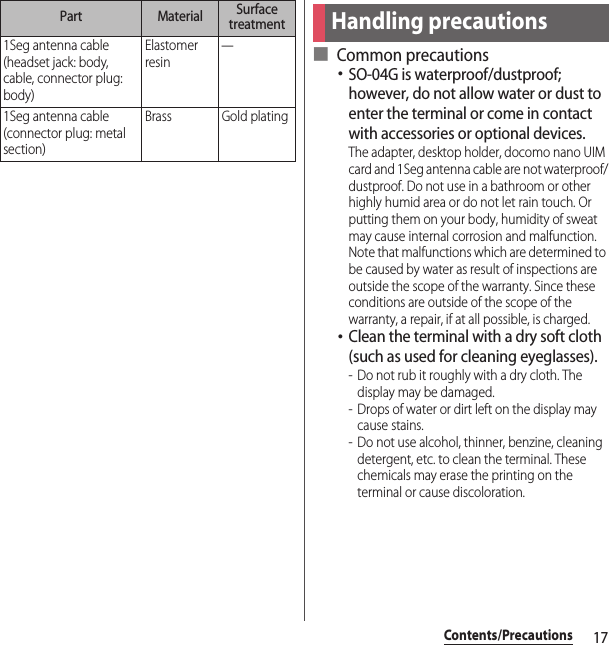
![1Operation descriptionsIn this manual, each key (key icon) operation is described with P, k, x, y, r. And selection operations of the icons or function items on the touch screen are described as follows.❖Information・In this manual, the instructions are described with the default Home screen. If you set the other application to the home screen, the operations may differ from the descriptions.・Display examples and illustrations used in this manual are just images for explanations and may be different from actual ones.・In this manual, the easier procedure is described for the functions and settings which have multiple operating procedures.・Please note that "SO-04G" is called "the terminal" in this manual.・In this manual, explanations for "docomo" as Home application are provided (P.63).Description OperationFrom the Home screen, u[Settings]u[About phone].From the Home screen, tap (Apps button), and then tap "Settings" on the next screen and "About phone" on the following screen in order.Touch and hold an icon.Keep touching an icon longer (1-2 seconds).](https://usermanual.wiki/Sony/PM0816.UG/User-Guide-2593934-Page-3.png)
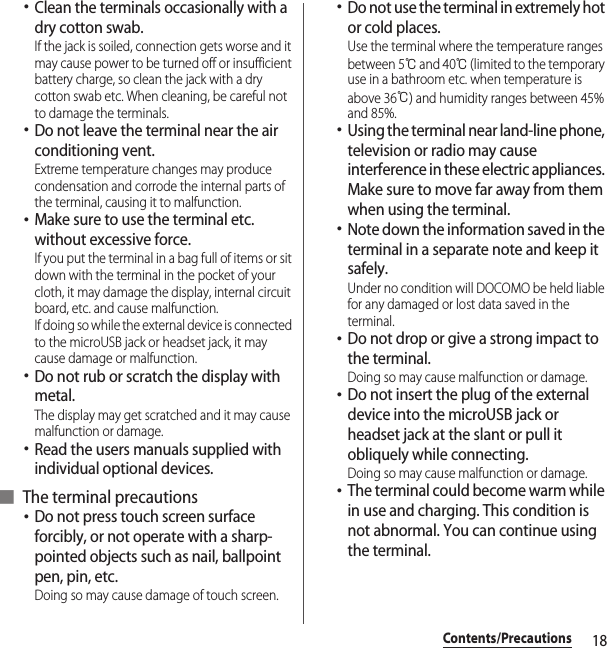
![6Contents/Precautions・The terminal automatically performs communication for synchronizing data, checking the latest software version, and maintaining a connection with the server, and for other purposes. If you transmit a large amount of data, such as when downloading applications or watching video, a packet communication charge becomes high. Subscription to Packet Pack/packet flat-rate service is highly recommended.・Depending on the applications or service you use, packet communication charge may be applied even in Wi-Fi communication.・Public mode (Driving mode) is not supported.・Setting the terminal to silent mode does not mute sounds for shutter, playback of video or music, dialpad operation sound during a call, sound emitted when [End call] is tapped, etc.・The name of the operator is displayed on the lock screen (P.40).・To check your phone number (own number), from the Home screen, u[Settings]u[About phone]u[Status] to see "My phone number".・To check the software version, from the Home screen, u[Settings]u[About phone].・If available memory in the microSD card or the terminal is low, running applications may not operate correctly. In that case, delete the saved data.・You can update software on the terminal to the latest one (P.206, P.212).・By upgrading Android software, the operating system (OS) may be version-upgraded for improving the terminal quality. For this reason, you always need to use the latest OS version. And some applications that used in the previous OS version may not be available or some unintended bugs may occur.・You can use the terminal only with a docomo nano UIM card. If you have a docomo mini UIM card, UIM, or FOMA card, bring it to a docomo Shop to replace it with a docomo nano UIM card.・Set password etc. for screen lock to ensure the security of your terminal for its loss (P.165).・If your terminal is lost, change your each account password to invalidate authentication using a PC to prevent other persons from using Google services such as Gmail or Google Play, or SNS, etc.・For services provided by Google, refer to Google Terms of Service. For other web services, refer to each terms of service.・Applications and service contents are subject to change without prior notice.・The terminal supports only sp-mode, mopera U and Business mopera Internet. Other providers are not supported.](https://usermanual.wiki/Sony/PM0816.UG/User-Guide-2593934-Page-8.png)

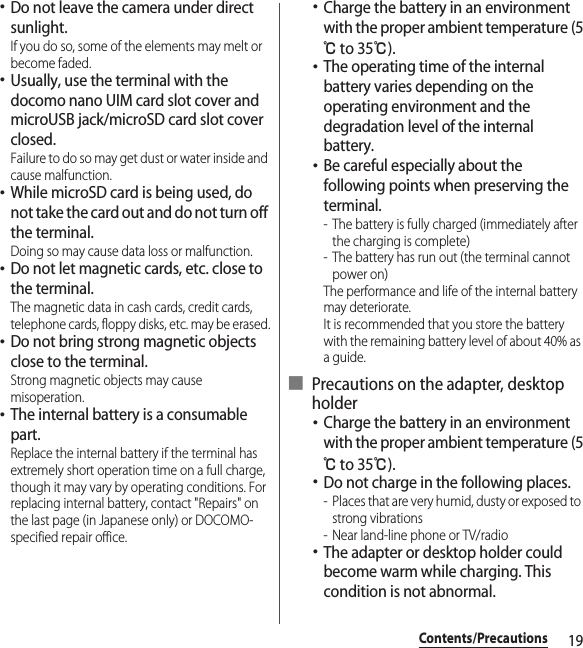

![23Contents/Precautions・5GHz device cautionsThe terminal can use 3 frequency bands of 5.2GHz band (W52), 5.3GHz band (W53), 5.6 GHz band (W56).- 5.2GHz band (W52/36, 40, 44, 48 ch)- 5.3GHz band (W53/52, 56, 60, 64 ch)- 5.6GHz band (W56/100, 104, 108, 112, 116, 120, 124, 128, 132, 136, 140 ch)Using wireless LAN built-into the terminal in 5.2/5.3 GHz outside is prohibited by the Radio Law.■ FeliCa® and NFC reader/writer function precautions・FeliCa and NFC reader/writer, P2P function of the terminal use weak waves requiring no licenses for radio stations.・They use 13.56 MHz frequency band. When using other reader/writer or P2P function in your surroundings, keep the terminal away sufficiently from them. Before using the FeliCa and NFC reader/writer, P2P function, confirm that there are no radio stations using the same frequency band nearby.・For use in an aircraft, contact the airline beforehand. In some countries, usage may be restricted. Confirm regulations etc. for the country/area you stay before using■ Note・Do not use a remodeled terminal. Using a remodeled terminal violates the Radio Law/Telecommunications Business Act.The terminal is compliant with rules on the technical standard conformance of specified wireless equipment based on the Radio Law/Telecommunications Business Act, and as a proof of it, the "Technical Compliance Mark " is depicted on the electronic nameplate of the terminal. To check the certificate, from the Home screen, u[Settings]u[About phone]u[Legal information]u[Certificates].If you remove the screws and alter the inside of the terminal, the technical regulations conformity certification becomes invalid.Do not use the terminal with the certification invalid, as it is a violation of the Radio Law and Telecommunications Business Act.・Be careful when using the terminal while driving.Using a handheld mobile phone while driving will result in a penalty.However, absolutely necessary cases such as rescue of a sick person or maintaining public's safety are exempted.・Use the FeliCa reader/writer function only in Japan.FeliCa reader/writer function of the terminal conforms to Japanese radio standards. If you use this function overseas, you may be punished.・Do not alter the basic software illegally.It is regarded as the software modification and Repairs may be refused.](https://usermanual.wiki/Sony/PM0816.UG/User-Guide-2593934-Page-25.png)
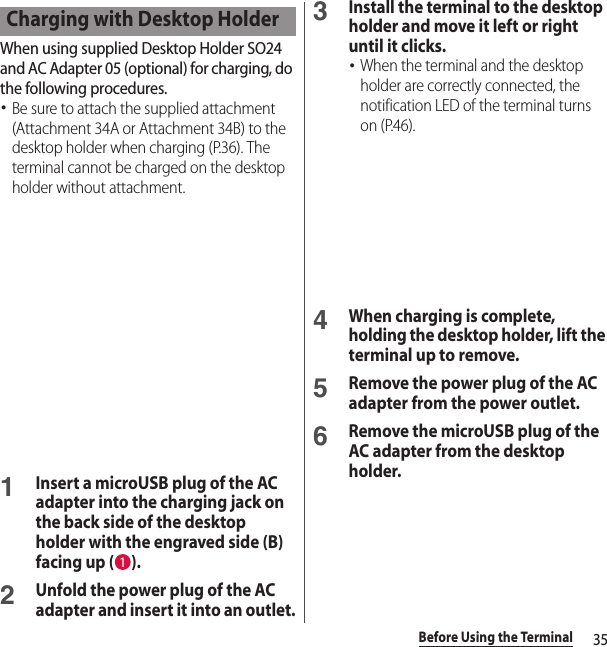
![34Before Using the Terminal・"Continuous standby time", "Continuous call time" (P.215)・The internal battery is a consumable part. Each time the internal battery is recharged, the battery usage time per one charge gradually decreases.・When the battery usage time per one charge becomes about half of that at the time of purchased, replacing the internal battery is recommended because the internal battery is near the end of life.・Watching 1Seg etc. for a long time while charging may shorten the lifetime of the internal battery.・To check the charging performance, from the Home screen, tap u[Settings]u[About phone]u[Status]u[Battery life].・It is recommended to use the AC Adapter 04/05 (optional) for charging. For details on the AC Adapter 04/05, see the AC Adapter 04/05 manual.・The AC Adapter 03/04/05 is compatible with 100V to 240V AC. For using the terminal overseas, a plug adapter that fits the electrical outlets in the country you stay is needed. Do not use an electrical transformer for overseas use to charge the terminal.・Use a compatible AC adapter or microUSB cable for charging. If you use a charger other than compatible ones, charging may not be available or operations may not be performed correctly.・Insert and remove the AC adapter cable or microUSB cable slowly and evenly so that excessive force is not applied.・When charging starts, notification LED of the terminal turns on (P.46).・To check the battery level, see the status bar at the top of the screen or from the Home screen, tap u[Settings]u[About phone]u[Status] to see "Battery level".・If you start charging with the terminal powered off, the power turns on, although you cannot operate the terminal. Therefore, do not charge the battery in a place where the use of the terminal is prohibited.Continuous stand-by timeFOMA/3GStationary (Auto) : Approx. 800 hoursGSMStationary (Auto) : Approx. 620 hoursLTEStationary (Auto) : Approx. 650 hoursContinuous call timeFOMA/3GApprox. 700 min.GSMApprox. 650 min.VoLTE call (voice)Approx. 990 min.Life of the internal batteryBefore charging](https://usermanual.wiki/Sony/PM0816.UG/User-Guide-2593934-Page-36.png)
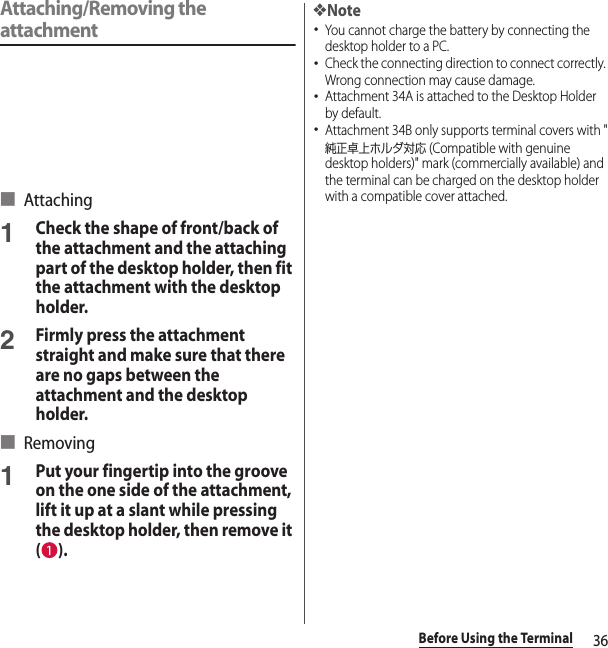
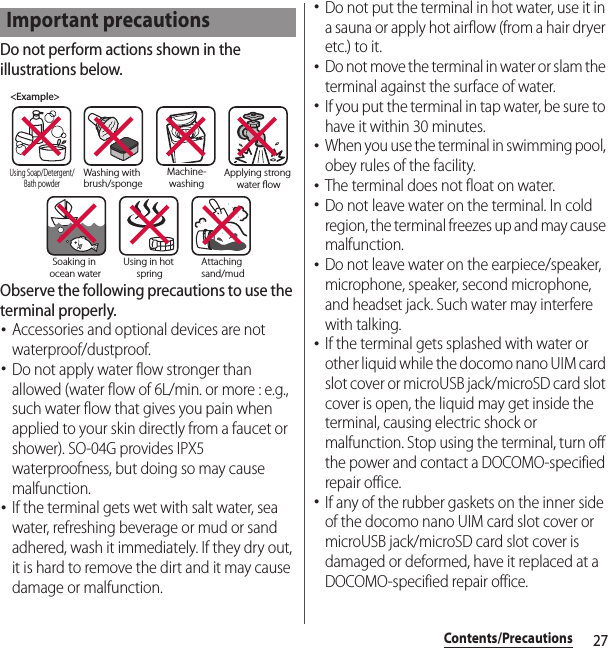
![38Before Using the TerminalWhen using Micro USB Cable 01 (optional) for charging, do the following procedures.・Opening/closing microUSB jack cover (P.25)1Open the microUSB jack cover and insert the microUSB plug of the microUSB cable horizontally into the microUSB jack of the terminal with the engraved side ( ) facing up.2Insert the USB plug of the microUSB cable into a USB port of a PC.・Notification LED of the terminal turns on (P.46).・When "Install software" screen appears on the terminal, tap [Skip] or [Cancel].・When a screen for new hardware detection etc. appears on the PC, select "キャンセル (Cancel)".3When the charging is complete, remove the USB plug of the microUSB cable from the USB port of the PC.4Remove the microUSB plug of the microUSB cable evenly from the terminal.5Close the microUSB jack cover, firmly press it and make sure that there are no gaps between the terminal and cover.❖Note・Check the connecting direction to connect correctly. Wrong connection may cause damage.Charging with a PC](https://usermanual.wiki/Sony/PM0816.UG/User-Guide-2593934-Page-40.png)
![39Before Using the Terminal1Press and hold P for over a second.・The terminal vibrates and lock screen appears after a while.・When you first turn on the terminal after purchasing, follow the onscreen instructions to make initial settings (P.40).2Cancel the screen lock.・Canceling the screen lock (P.40).❖Information・If P is pressed to turn the power on when the battery level is low, the notification LED flashes in red 3 times, or an icon appears indicating that the battery level is low. Charge the terminal (P.33).・When SIM card lock (P.164) is set, enter PIN code on the PIN code entry screen (P.164).1Press and hold P for over a second.2[Power off]u[OK].When the sleep mode is set, the screen backlight turns off so that you can avoid misoperations of the touch screen and keys, and lock the screen.1Press P.・Press P again to cancel sleep mode.❖Information・Also, when the screen backlight goes off after a specified time elapses, the terminal goes into sleep mode. You can change the time-out period for turning off the screen backlight (P.156).Turning power on/offTurning power onTurning power offSetting sleep mode](https://usermanual.wiki/Sony/PM0816.UG/User-Guide-2593934-Page-41.png)
![40Before Using the TerminalThe lock screen appears when turning the power on or the sleep mode is canceled by pressing P.1On the lock screen, .❖Information・On the lock screen, tap to activate "Google" application.・On the lock screen, tap to activate the camera.・You can change screen unlock method (P.165).・When the Home screen is set to "Simple Home" (P.53) or Preferred apps settings is set to "Xperia™" (P.154), flick (or swipe) the screen left, right, up, or down to cancel the screen lock.You can add widgets such as calendar, clock, etc. on the lock screen.・Enable the widget on the lock screen in advance (P.162).1On the lock screen, drag the digital clock widget right.2uTap a widget to add.・Flick the screen to the right in a rowuTap to set up to 5 widgets.❖Information・To delete a widget, on the lock screen, touch and hold a widget to deleteuDrag it to "Delete" displayed at the top of the screen.When you first turn on the terminal after purchasing, follow the onscreen instructions to make initial settings for language, services, etc.1Select [English (United States)]u[Done]u.・After this step, follow the onscreen instructions to make the following settings, and tap or [Finish].- Set your Google account- Join the world of Sony (Connect to Sony Entertainment Network)- Set accounts and auto-sync- Select the home application you want to use2[OK]u[OK].Canceling the screen lockAdding widgets on the lock screenInitial settings](https://usermanual.wiki/Sony/PM0816.UG/User-Guide-2593934-Page-42.png)
![41Before Using the Terminal3When the initial settings screen for docomo services appears, mark [Agree to all]u[Start settings].・After this step, follow the onscreen instructions and tap [Next].- Set docomo ID- Set docomo cloud- Set docomo apps password- Set whether to provide location information- Set Remote Initialization Service*- Select whether to install all applications now or later* It does not appear if docomo apps password is not set.4[Start using].・The operation guide of the Home screen appears. Tap [Do not show again]/[OK] to display the Home screen.❖Information・Some settings can be changed later (P.160, P.166).・Make sure that the data connection is available (LTE/3G/GPRS) or the terminal is connected to a Wi-Fi network before setting up online services (P.46).・You can use the terminal without setting your Google account, however the Google services such as Gmail, Google Play, etc. are not available.Precautions on using touch screen・Touch screen is designed for being touched lightly with fingers. Do not push the touch screen hard with a finger or press sharp objects (nail, ballpoint pen, pin, etc.) against the screen.・Touching the touch screen may not work in the following cases. Note that it may cause malfunction.- Operation with tip of fingernail- Operation with foreign object on the screen- Operation with protective sheet or seal on the screen- Operation on the wet touch screen- Operation with fingers wet with sweat or water- Operation under waterBasic operationsUsing the touch screen](https://usermanual.wiki/Sony/PM0816.UG/User-Guide-2593934-Page-43.png)
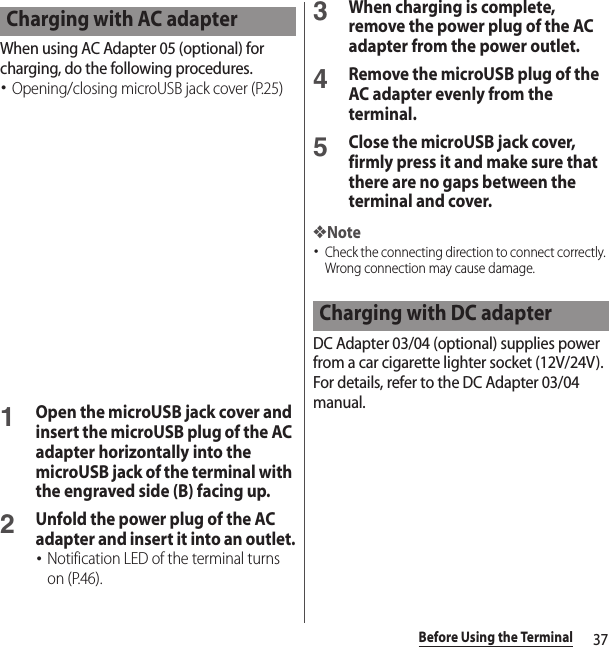
![43Before Using the Terminal* In this manual, each key icon operation is described with x, y, r.You can set the screen orientation to switch between landscape and portrait view automatically according to the terminal orientation.1Drag the status bar downwards.2[Quick settings]u[Auto rotate].・When the setting is ON, it changes to (white).❖Information・Even when you change the orientation of the terminal, the screen may not change to landscape view depending on the screen such as Home screen, etc.・While charging with the desktop holder, the screen view may change regardless of the auto rotate screen setting.・Changing orientation of the terminal in nearly horizontal state against the ground does not switch to portrait view/landscape view automatically.・Set [Auto rotate] to ON. Then, from the Home screen, u[Settings]u[Display]u[Screen rotation]uTap [Smart screen rotation] to turn on or off a feature that automatically determines whether to rotate the screen according to the movement of the terminal.Basic key icon operationxBack Go back to the previous screen. Or close a dialog box, an option menu, the Notification panel, etc.yHome Go to the Home screen.Touch and hold the icon and drag to to activate "Google" application, or drag to to activate "What's New".rRecently used appsDisplay recently used applications in thumbnail list to activate or delete applications from the list (P.62). Also, use or set small apps (P.62).xx y rSwitching portrait or landscape view automatically](https://usermanual.wiki/Sony/PM0816.UG/User-Guide-2593934-Page-45.png)
![44Before Using the Terminal1Press and hold P for over a second.2Tap / / . : Mute (Ringtone 0) : Vibrate : Cancel silent mode❖Information・Press and hold the volume down key to set vibrator and press the volume down key while the vibrator is set to set mute. On the lock screen, during a call, in some applications such as Camera and Walkman, silent mode cannot be set even if the volume down key is pressed.・Setting the terminal to silent mode does not mute sounds for shutter, playback of video or music, dialpad operation sound during a call or sound emitted when [End call] is tapped, etc.・While silent mode is set, adjusting volume for "Ringtone & notifications" from "Volumes" (P.156) in Sound or turning up the volume by pressing the volume up key cancels silent mode.You can capture what is displayed on the screen. (Take screenshot/Record screen)Capturing a still image (Take screenshot)1On the screen you want to capture, press and hold P and volume down key for over a second at the same time.・Screenshot is captured and appears in the status bar.❖Information・Alternatively, press and hold P for over a seconduTap [Take screenshot] to capture screenshot.・Drag the status bar downwardsuTap [Screenshot captured.] to check captured images in the "Album" or "Photos" application. Also, tap [Share] to attach captured images to an application to send or to share them.Setting silent mode Capturing a still image or video displayed on the screen](https://usermanual.wiki/Sony/PM0816.UG/User-Guide-2593934-Page-46.png)
![45Before Using the TerminalCapturing a video (Record screen)1Press and hold P for over a secondu[Record screen].A control panel is displayed.・If terms of use are displayed, read them and then tap [Agree].2Tap to start recording.3Tap the recording time buttonuTap to finish capturing.・Screen recording is recorded and appears in the status bar.・Tap to close the control panel.❖Information・The control panel allows you to:- Tap to display an image from the front camera and capture the video together with that image.- Tap to change the image quality or orientation of the video.・Drag the status bar downwardsuTap [Screen recording saved] to check recorded video. Tap [Share] to send by attaching recorded video to app, or tap [Edit] to edit video.In case of emergency such as disaster, restrict functions to save the battery power.1Press and hold P for over a second.2[Emergency mode]uConfirm "Important information"uMark "I have read the important information"u[Turn on].・All running applications end and the terminal restarts.❖Information・To cancel Emergency mode, press and hold P for over a secondu[Emergency mode]uTap [ Turn off ] or drag the status bar downu[Emergency mode is on]u[Turn off ]. Emergency mode is canceled and the terminal restarts.・For details on available applications in emergency mode, from the Home screen, u[Settings]u[Power management]u[Emergency mode]u[Important information]uTap [Available apps] to see the information.・If you set/cancel emergency mode, you may need to reconfigure widgets or small apps (displayed in a small window) on the Home screen.Setting Emergency mode](https://usermanual.wiki/Sony/PM0816.UG/User-Guide-2593934-Page-47.png)
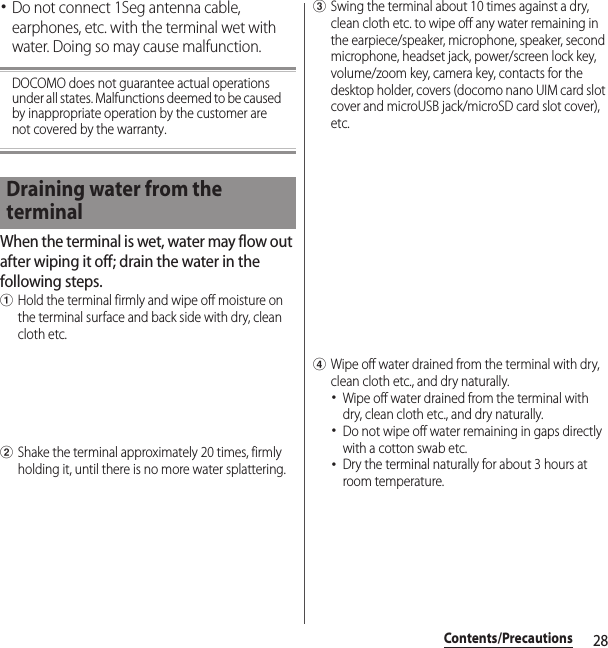
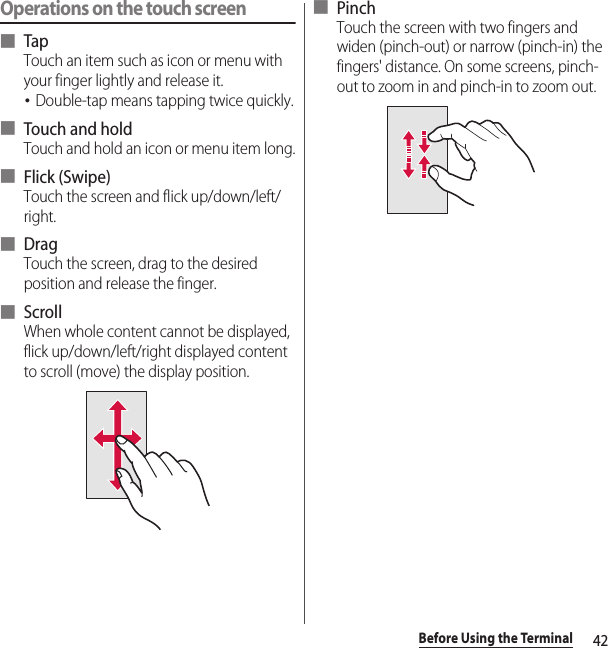
![49Before Using the TerminalWhen notification icons appear on the status bar, you can open the Notification panel to check the notifications, activate corresponding application, etc. Open the Notification panel and then tap [Quick settings] to set Silent mode, enable/disable Wi-Fi function, etc.1Drag the status bar downwards.aQuick settings・Enable/disable functions. Tap [Edit] to change number of tools or sort order.・You can also drag the status bar downwards with two fingers to display the Quick settings.bClear・Clear contents on the Notification panel. Some notifications may not be cleared.❖Information・Tap x to close the Notification panel.・Flick left or right a notification on the Notification panel to delete from the list.・For some notifications, pinch in/out (P.42) the Notification panel to show/hide screen for operation such as "Share" and "Call back".・Touch and hold a notification on the Notification paneluTap [App info] to check the application information.Notification panelWi-FiEnable/disable Wi-Fi function.BluetoothEnable/disable Bluetooth function.NFCEnable/disable NFC Reader/Writer, P2P function.SoundEnable/disable silent mode (Vibrate/Mute).abWi-Fi hotspotEnable/disable Wi-Fi tethering function.LocationEnable/disable location information.Auto rotateSet whether to switch portrait/landscape view automatically according to the terminal orientation.BrightnessAdjust screen brightness.Airplane modeEnable/disable Airplane mode.STAMINAEnable/disable STAMINA mode.Glove modeEnable/disable Glove mode.SettingsDisplay Settings menu (P.144).](https://usermanual.wiki/Sony/PM0816.UG/User-Guide-2593934-Page-51.png)
![51Before Using the TerminalAdding a widget to the Home screenWidget is an application which can be added to the Home screen to use. Use a widget to start an application easily.1Touch and hold an area of the Home screen where no icons are displayed.・Alternatively, pinch-in on the Home screen.2[Widgets]uSelect a widget to add.・When a settings screen appears, follow the onscreen instructions.❖Information・To return to the Home screen, tap y or x, or tap any home screen.・To change displaying widget size, touch and hold a widgetuDrag the blue frame. Display size for some widgets may not be changed.・To delete a widget, on the Home screen, touch and hold a widget to deleteuDrag it to "Remove" displayed at the top of the screen.Adding a shortcut to the Home screenYou can add shortcuts of application, bookmark, etc.1Touch and hold an area of the Home screen where no icons are displayed.・Alternatively, pinch-in on the Home screen.2[Apps].3Select [Shortcuts] or an application you want to add.・If you tapped [Shortcuts], select from the stored shortcuts.・When a data selection screen or setting screen appears, follow the onscreen instructions.❖Information・To return to the Home screen, tap y or x, or tap any home screen.・To delete a shortcut, from the Home screen, touch and hold the shortcut to deleteuDrag it to "Remove", displayed at the top of the screen.](https://usermanual.wiki/Sony/PM0816.UG/User-Guide-2593934-Page-53.png)
![52Before Using the TerminalAdding folders on the Home screenYou can put applications, shortcuts, etc. added to the Home screen into a folder to manage them.1From the Home screen, touch and hold an iconuDrag it over another icon.❖Information・To move an icon to a folder, on the Home screen, touch and hold an icon you want to moveuDrag it over a folder.・To change a folder name, tap a folderuTap the folder nameuEnter a folder nameuTap [Done].・To delete a folder, on the Home screen, touch and hold a folder to deleteuDrag it to "Remove" displayed at the top of the screenuTap [Delete]. Applications, shortcuts, etc. in the folder are also deleted.Changing wallpaperYou can change wallpaper of the Home screen.1Touch and hold an area of the Home screen where no icons are displayed.・Alternatively, pinch-in on the Home screen.2[Wallpapers].3Tap any of [Album]/[Live Wallpapers]/[Photos]/an image.・When you tap [Album], select an imageu[Crop photo]/[Crop picture]u[Always]/[Just once]uAdjust cropping frame by dragging etc.u[Done]/[Crop].・When you tap [Live Wallpapers], select a contentuTap [Set wallpaper].・When you tap [Photos], select a photouTap [SET WALLPAPER].❖Information・To return to the Home screen, tap y or x, or tap any home screen.Changing themeYou can change themes for the Home screen, wallpaper of the lock screen, etc.1Touch and hold an area of the Home screen where no icons are displayed.・Alternatively, pinch-in on the Home screen.2[Themes]uSelect an image.3[Apply theme]u[OK].](https://usermanual.wiki/Sony/PM0816.UG/User-Guide-2593934-Page-54.png)
![53Before Using the TerminalSet Simple Home to use Home screen and setting menu limited to basic functions.1From the Home screen, u[Settings]u[Home]u[Simple Home]u[OK].2[OK].・To set the font size to "Extra large", mark "Set font size to Extra large".■ Applications on the Simple Home screen* Applications such as "Anshin Scan", "docomo backup", etc. appear.❖Information・To change to the standard Home screen, from the Simple Home screen, tap [Settings]u[Exit Simple Home]u[OK]u[docomo LIVE UX]/[Xperia™ Home].Using speed dialsSave frequently used contacts to "Speed dial 1", "Speed dial 2", and "Speed dial 3" to easily make a call or send a message.Simple Home screenMapsP. 1 3 7GoogleP. 6 3SettingsP. 5 4My SelectP. 5 5Tools ContactsP. 5 6CalendarP. 5 7Alarm & clockP. 1 3 9CalculatorP. 5 8Osaifu-KeitaiP. 1 0 7GmailP. 1 0 0Play StoreP. 1 0 5dmenuP. 1 0 5dmarketP. 1 0 5しゃべってコンシェル (Shabette concier)P. 5 9iコンシェル (i-concier)P. 5 9Media WalkmanP. 5 6AlbumP. 1 3 1MoviesP. 5 71SegP. 1 1 1FM radioP. 1 1 7YouTubeP. 1 3 3CameraP. 1 1 8docomo mailP. 9 3MessagingP. 9 3DialP. 5 6Apps*―BrowserP. 1 0 2Speed dial 1/Speed dial 2/Speed dial 3P. 5 3](https://usermanual.wiki/Sony/PM0816.UG/User-Guide-2593934-Page-55.png)
![54Before Using the Terminal■ Saving contactsSave phone numbers and mail addresses to "Contacts" beforehand.1On the Simple Home screen, tap any of [Speed dial 1]/[Speed dial 2]/[Speed dial 3]u[OK].2Select a contact to save.・The name "Speed dial 1", etc. is changed into the name saved in the "Contacts" application.■ Making a call1On the Simple Home screen, select a speed dialu[Call].・Operation during a call (P.82)■ Sending messages (SMS)/mail1On the Simple Home screen, select a speed dialu[Send message]/[Send email].・How to send a message (P.93)・How to send email (P.97)・How to send Gmail (P.100)❖Information・To change/delete/edit contacts saved in the speed dials, select a contact saved in the speed dialu[Menu]uTap any of [Edit entry]/[Delete entry]/[Edit contact].Using Settings1On the Simple Home screen, [Settings].My profileCheck your own phone number and mail address, etc.Display SleepSelect a time duration before the screen back light turns off.BrightnessAdjust screen brightness.Auto-rotate screenSet whether to switch portrait/landscape view automatically according to the terminal orientation.WallpaperSet wallpaper for Simple Home screen.・To set "Custom", unmark "Default" and tap [Custom].Lock screen wallpaperSet wallpaper for lock screen.Font sizeSet font size for the "Contacts" application, etc.Screen lockSet screen unlock method.](https://usermanual.wiki/Sony/PM0816.UG/User-Guide-2593934-Page-56.png)
![55Before Using the TerminalSaving applications in My SelectIf frequently used applications, etc are saved in the "My Select" folder, the applications can easily be activated1On the Simple Home screen, [My Select]u[Edit]u[OK].2Mark applications to saveu[Done].❖Information・To delete applications saved in the "My Select" folder, in Step 2, unmark applications to deleteuTap [Done].Changing applications on the Simple Home screen1On the Simple Home screen, [Settings]u[Customize Home].2[Change apps]/[Reorder apps].3Select applications to changeuSelect applications to display/select a location to move to.・Grayout applications cannot be changed.4[OK].❖Information・In Step 2, tap [Reset]u[OK] to restore the defaults. Note that contacts saved in the speed dials and applications saved in "My Select" folder are not restored.Sound Silent/Vibrate modeSet silent mode.RingtoneSet ringtone.Vibrate on touchSet whether to vibrate the terminal for some operations such as specified software key operation.Touch soundsSet whether to emit sound when selecting menu.Vibrate when ringingSet wether to vibrate the terminal when receiving a call.Customize HomeChange appsP. 5 5Reorder appsResetMore settingsDisplay Settings menu on the standard Home screen (P.144).Exit Simple HomeChange to the standard Home screen.](https://usermanual.wiki/Sony/PM0816.UG/User-Guide-2593934-Page-57.png)
![60Before Using the Terminal Anshin ScanAn application for protecting your terminal from virus attacks. This feature detects potential viruses in installed applications or on microSD cards or other media. Disaster kitAn application for using Disaster Message Board, Disaster Voice Messaging Service and Early Warning "Area Mail".→P. 1 0 1 遠隔サポート (Enkaku support)An application for using "あんしん遠隔サポート (Anshin Enkaku Support)". "あんしん遠隔サポート (Anshin Enkaku Support)" is a service that allows staff of the Call center to support the terminal operations by remote-checking the display of your own terminal.→P.202 My MagazineA search service for displaying articles in the category of your choice.→P. 7 6❖Information・Some pre-installed applications can be uninstalled. Even if uninstalled, some applications can be downloaded from "Play Store" (P.105) etc. again.・Some applications require downloading and installation. If downloading an application is not available, set to allow to download (P.162).・Activating two or more applications may increase battery consumption and the operation time may become short. For this reason, it is recommended to end applications when not used. To end an application, on the screen of application you are using, tap x to display the Home screen, or tap ru[Close all].Add shortcuts of application to the Home screen.1On the application screen, touch and hold an icon you want to add to the Home screen.・For the application icons in a folder, drag out from the folder.2Drag it to "Add to Home screen" displayed at the top of the screen.・When the Home screen is displayed, drag it to a position to locate the shortcut.Adding an application to the Home screen](https://usermanual.wiki/Sony/PM0816.UG/User-Guide-2593934-Page-62.png)
![61Before Using the Terminal・Before uninstalling application, back up contents related to the application that you want to save including data saved in the application.・Some applications may not be uninstalled.1On the application screen, flick right the left edge of the screenu[Uninstall].2Tap an application icon with .3[Uninstall].When the order of application icons is set to "Own order" in the option menu (P.56), you can manage application icons on the application screen by putting them in folders.1On the application screen, touch and hold an iconuDrag it over another icon.❖Information・To move an icon to a folder, on the application screen, touch and hold an icon you want to moveuDrag it over a folder.・To take out an application icon from a folder, tap the folderuTouch and hold the application iconuDrag it to a place you want to locate.・To change a folder name, tap a folderuTap the folder nameuEnter a folder nameuTap [Done].When the order of application icons is set to "Own order" in the option menu (P.56), you can rearrange application icons as you like.1On the application screen, touch and hold an iconuDrag it to any position you like.❖Information・While sorting application icons, drag an icon to the right edge of the application screen to add an application screen.・Set "Alphabetical", "Most used", or "Installed" to automatically rearrange the icons.Uninstalling an applicationAdding a folder to the application screenRearranging application icons](https://usermanual.wiki/Sony/PM0816.UG/User-Guide-2593934-Page-63.png)
![62Before Using the TerminalYou can check the recently-used applications and end them. You can activate a small app (application displayed in a small window) which can be used while using another application.Display recently used applications in thumbnail list and activate.1r.❖Information・Tap a thumbnail of application to activate.・Flick left or right a thumbnail of application to delete it from the list.・To end all applications and delete from thumbnail list, tap [Close all].・To check application information, touch and hold a thumbnail of applicationuTap [App info].You can use a small app (application displayed in a small window) such as Browser while using another application.Applications downloaded from Google Play or widgets can be added to small apps.Using small apps1r.・The set small apps appear in the small apps bar (Favorites) at the bottom of the screen.2Select a small app to use.❖Information・When several small apps are set, flick the small apps bar (Favorites) left or right to display them.・To close a running small app, tap .Adding small apps1ru.・Small apps list appears.2Touch and hold a small app or widget to adduDrag it to the small apps bar (Favorites).❖Information・Alternatively, select an app/widget in the small app list to activate a small app.Task managerOpening recently-used application windowSmall apps](https://usermanual.wiki/Sony/PM0816.UG/User-Guide-2593934-Page-64.png)
![63Before Using the Terminal・In the small app list, tap u[Play Store]/[Widgets] to install a new small app from Google Play or add a widget to small apps.・To delete a small app from the small apps bar (Favorites), touch and hold a small app to deleteuDrag it to displayed out of the frame of the small apps bar (Favorites)u[OK].・To delete a widget or small app, in the small app list, tap u[Delete widget]/[Uninstall small app]uSelect a widget or small app to deleteu[OK].In the terminal, you can switch the Home screen between "docomo" or "Xperia™".1From the Home screen, u[Settings]u[Personalization]u[Preferred apps settings].2[Set all to]/[Home screen].・When "Set all to" is selected, you can set home application, lock screen, phonebook application and application for playing videos or music all at once.3[docomo]/[Xperia™].4[OK].❖Information・When the home application is switched, widgets or shortcuts on the screen may not be displayed correctly depending on home screen layout etc.Enter a word in the search box to browse the information in the terminal or on the Internet.1From the Home screen, tap the Google search widget.2Enter a search word.・Character entry (P.64)・The search candidate list appears.3Tap an item or of software keyboard.❖Information・Alternatively, from the Home screen, uTap [Google] to activate [Google] application.・In Step 1, the explanation screen for Google Now may appear. Follow the onscreen instructions.・When applications appear in Step 2, select an application to activate.Switching Home applicationSearching information in the terminal and web pages](https://usermanual.wiki/Sony/PM0816.UG/User-Guide-2593934-Page-65.png)
![64Before Using the TerminalUsing Google Voice SearchEnter a search word by voice.1From the Home screen, of the Google Search widget.2Speak a search word to the microphone.❖Information・Alternatively, from the Home screen, u[Voice Search] to activate [Voice Search] application.Search settingsYou can set to use for search box or set search objectives in the terminal.1From the Home screen, tap the Google Search widget.2 at the lower left of the screenuu[Settings].3Select an item.❖Information・Alternatively, from the Home screen, uTap [Google] to activate [Google] application.Enter characters using the software keyboard which appears when you tap the character input box in a mail, phonebook, etc.❖Information・When the software keyboard is displayed, appears on the status bar.・To hide software keyboard, tap displayed at the lower left of the screen.・Touch and hold a text on the character entry screen to display the enlarged text.Character input method for the terminal is set to"Xperia™ Japanese keyboard" by default when the language is set to 日本語 (Japanese). Details on using Xperia™ Japanese keyboard are explained in "POBox Plus 使い方ガイド (Tips & Help for Xperia™ Japanese keyboard)". (In Japanese only)Character entryPOBox Plus 使い方ガイド (Help & Tips for Xperia™ Japanese keyboard)](https://usermanual.wiki/Sony/PM0816.UG/User-Guide-2593934-Page-66.png)
![65Before Using the Terminal1On the character entry screen, of the quick tool bar.・If the quick tool bar does not appear, tap (for character mode of "Alphabet" and "Numeric", tap / to switch to "Kana", then appears).2[Help & Tips].1From the Home screen, u[Settings].2[Language & input]u[Default].3Tap any of [Xperia™ Chinese keyboard]/[Xperia™ Japanese keyboard]/[International keyboard].❖Information・When the language is set to English, the default input method is set to "International keyboard". To use the Japanese keyboard, tap [Xperia™ Japanese keyboard] in Step 3. In this manual, explanations are given only for "Xperia™ Japanese keyboard".・Alternatively, while entering characters, drag the status bar downwardsuTap [Choose input method] to select input method.For Xperia™ Japanese keyboard, the following software keyboard can be used.・Character input method (P.66)❖Information・Besides using software keyboard, handwriting input and voice input are available for entering characters.Selecting input methodSoftware keyboardKeypadKeyboard with the same key arrangement as a mobile phone. Input methods available include flick input as well as multi-tap input—selecting a character by repeatedly tapping a key.QWERTYKeyboard with characters allocated in the same arrangement as general PCs. Enter Japanese in Roman character.](https://usermanual.wiki/Sony/PM0816.UG/User-Guide-2593934-Page-67.png)
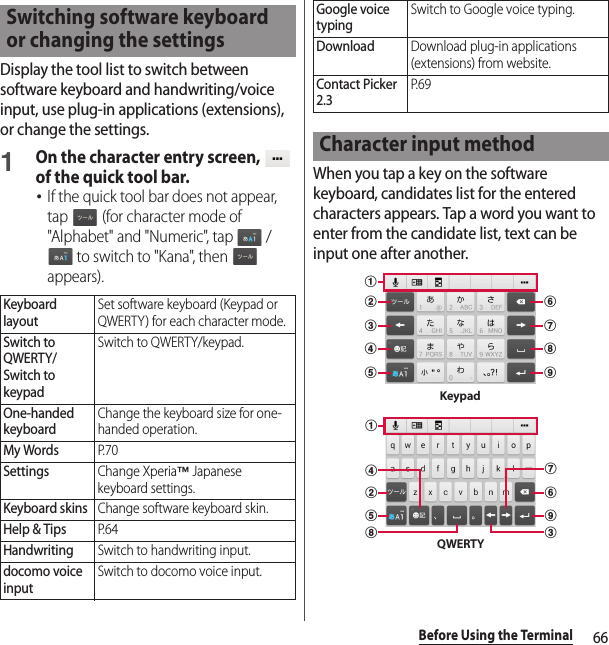
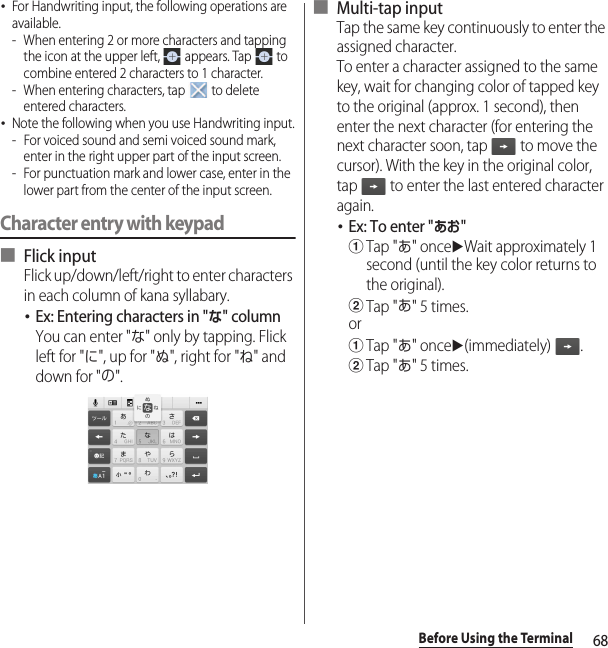
![67Before Using the TerminalaQuick tool barDisplay shortcuts of frequently-used functions. Tap to display the tool list (P.66).bShow/hide the quick tool bar.Characters assigned to a key appear in reverse order. / Appears when entering numbers, tap to switch one-byte/two-byte character. / / Appears in alphanumerics input mode, tap to switch lower case, capitalization and upper case.cMove the cursor to the left.d / Show/hide list of symbols, facemarks, etc. / / Appears before fixing character in Kana mode and switches among 予測 (prediction) candidate list/変換 (conversion) candidate list/英数カナ (alphanumeric/katakana) conversion candidate list.e / / The character mode switches "Kana"→"Alphabet"→"Numeric" in order. / / Touch and holdDisplay the tool list (P.66).fDelete the character before the cursor.gMove the cursor to the right.When there is an unfixed character string with the cursor at the right end, tap to enter the same character as the one at the end (Except for Handwriting input).hEnter spaces.In Kana mode, highlight and select word in the candidate list.iEnter a line feed.*Appears before fixing character and fixes the character.* In some screens, , "次へ (Next)", "完了 (Done)", "実行 (Go)", etc. appear.jReturn to keypad/QWERTY.❖Information・To return to the display before conversion after the conversion is fixed, tap displayed in つながり予測 (associative) candidate (except in handwriting input mode) etc.・To enlarge the display area, tap in the candidate list. To display the software keyboard, tap or [閉じる (Close)].・For Handwriting input, tap an icon at the upper left of entered character to display candidates for the entered character. Recognized character is displayed in light blue and characters are displayed at the bottom of candidate list in different colors by type.chdjgfiHandwriting input](https://usermanual.wiki/Sony/PM0816.UG/User-Guide-2593934-Page-69.png)
![69Before Using the TerminalOn the character entry screen, double-tap character you want to edit so that text edit menu appears at the top of the screen. Drag or to change the character string to select.❖Information・To paste a copied or cut character string, touch and hold a position where you want to insertuTap [PASTE]. When text is already entered, tap a position where you want to insertuuTap [PASTE].・Edit menu icons vary by applications.・In the landscape screen, editing menu may not be displayed.・On some applications, the function may not be available.If contacts are registered to the Contacts, you can use "Contact Picker 2.3" to enter contact information when entering characters.1On the character entry screen, of the quick tool bar.・If the quick tool bar does not appear, tap (for character mode of "Alphabet" and "Numeric", tap / to switch to "Kana", then appears).2[Contact Picker 2.3]uTap "Contacts" tab.3Tap the contact to pick up.4Mark items you want to quoteu[OK].❖Information・"History" tab displays contacts that are picked up when entering characters.Editing text (Select all)Select all text. (Cut)Cut a selected character string. (Copy)Copy a selected character string. (Paste)Paste a copied/cut character string. (Complete)Close the edit menu.Quoting contacts](https://usermanual.wiki/Sony/PM0816.UG/User-Guide-2593934-Page-71.png)
![70Before Using the TerminalRegister words to My Words beforehand to display the words as the preferred candidates when entering characters.1On the character entry screen, of the quick tool bar.・If the quick tool bar does not appear, tap (for character mode of "Alphabet" and "Numeric", tap / to switch to "Kana", then appears).2[My Words].34Tap the character input box for "Reading"uFill it out.5Tap the character input box for "Word"uFill it out.6[OK].❖Information・To delete, in Step 3, mark words in My Words to deleteuuTap [Delete].For each input method, you can make settings related to character entry.1From the Home screen, u[Settings]u[Language & input].2 of "Xperia™ Chinese keyboard"/"Xperia™ keyboard"/"Google voice typing"/"Moji-Henshu"/"Xperia™ Japanese keyboard".・Tap an item displayed on the screen to set.❖Information・The items vary depending on the input method.・Alternatively, while entering characters, drag the status bar downwardsuTap [Choose input method]u[Set up input methods]u for each input method to display.・When entering characters with Xperia™ Japanese keyboard, on the character entry screen, tap of the quick tool baru[Settings] to display the settings screen for Xperia™ Japanese keyboard.My WordsSetting character entry](https://usermanual.wiki/Sony/PM0816.UG/User-Guide-2593934-Page-72.png)
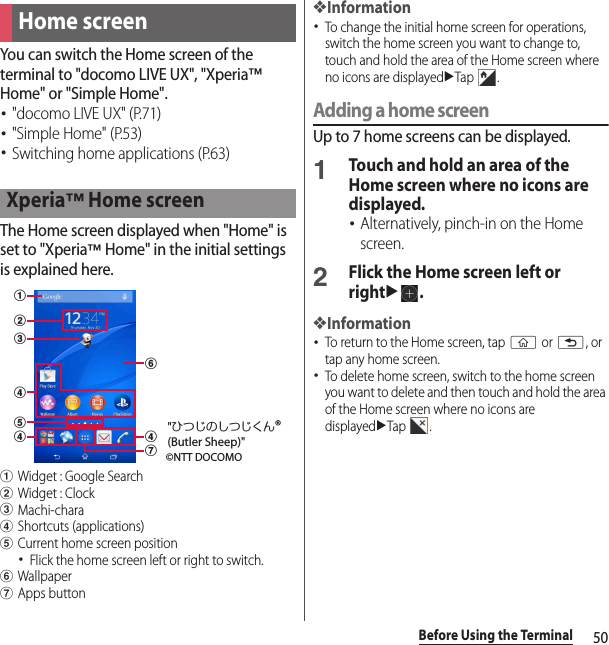
![71docomo LIVE UXdocomo LIVE UXTapping y displays Home screen which consists of up to 7 screens you can use flicking left and right.aWidget : Google SearchbMachi-characApplication icondApps button・View the application screen (P.73).eWallpaperfCurrent home screen position・Flick the Home screen left or right to switch.gMy Magazine button・View My Magazine (P.76).Move application icons or add widgets or folders to the Home screen.1Touch and hold an area of the Home screen where no icons are displayed.2Any of [Show apps]/[Show widgets]/[Create folder]/[Machi-Chara display setting].・To move/add applications or widgets, touch and hold the iconuDrag it to the Home screen display area at the bottom of the screen.・When you tap [Machi-Chara display setting], make basic settings/Machi-chara setting.❖Information・To move applications into a folder, touch and hold an iconuDrag it over a folder.・Tap a folderuTap a folder name to changer the folder name.Home screenabccdefg©NTT DOCOMO"ひつじのしつじくん®(Butler Sheep)"Managing the Home screenAdding/Moving applications etc. to the Home screen](https://usermanual.wiki/Sony/PM0816.UG/User-Guide-2593934-Page-73.png)
![72docomo LIVE UX1From the Home screen, touch and hold an icon you want to move.2Drag it anywhere.・To move to another Home screen, keep touching the icon and drag it to left or right.1From the Home screen, touch and hold an icon you want to delete.2Drag to "Back to apps list"/"Remove from Home".Uninstalling an application or widget from the Home screen・Before uninstalling application, back up contents related to the application or widget that you want to save including data saved in the application or widget.・Some applications or widgets may not be uninstalled.1From the Home screen, touch and hold an icon you want to uninstall.2Drag to "Uninstall"u[OK].❖Information・You can disable some applications or widgets which cannot be uninstalled by dragging to "Disable app" in Step 2 (P.159).1Touch and hold an area of the Home screen where no icons are displayed.2[Change Kisekae].3Tap a Kisekae you want to changeu[Set].❖Information・Alternatively, from the Home screen, uu[Kisekae].・You can add Kisekae contents by tapping [Search on the web] to download from website. To delete added Kisekae contents, select a Kisekae to deleteu[Delete]u[Delete].1Touch and hold an area of the Home screen where no icons are displayed.2[Change wallpaper].Moving an icon on the Home screenDeleting an icon from the Home screenChanging KisekaeChanging wallpaper](https://usermanual.wiki/Sony/PM0816.UG/User-Guide-2593934-Page-74.png)
![73docomo LIVE UX3Tap a wallpaper you want to change.・Tap [See more wallpapers] to select from "Album", "Photos", "Live Wallpapers", or "Xperia™ wallpapers".4[For all screens]/[Just for this screen]u[OK].1Touch and hold an area of the Home screen where no icons are displayed.2[Home screens].3・To delete home screen, tap of the home screen thumbnail you want to delete.・To sort home screens, touch and hold a home screen thumbnail you want to sortuDrag it to any position.❖Information・Alternatively, pinch-in on the Home screen to display the home screen list.・Up to 7 home screen can be set.・To return to the Home screen, tap y or x or pinch-out.1From the Home screen, .・Flick the Home screen downwards to display the application screen.aApps/Widgets/Wallpapers tab・Display application icons/widgets/wallpaper list.bApplication icon list・Applications on the Home screen are not displayed in the list.cHome screen display area・Flick left or right to switch.dOption menu・View optional menu such as Settings.eRecommends button・Install applications recommended by DOCOMO (P.74).fCurrent position in the list screen・Display by application icon/widget list.❖Information・To close the application screen, tap x or y, or flick up the Home screen display area at the bottom of the screen.Adding a home screenApplication screenbdfeac](https://usermanual.wiki/Sony/PM0816.UG/User-Guide-2593934-Page-75.png)
![74docomo LIVE UXMoving/Adding an application or widget to the Home screen1On the application screen, touch and hold an icon you want to add to the Home screen.2Drag it to the Home screen display area at the bottom of the screen.Uninstalling an application or widgetSome application icons and widgets can be deleted from the application screen.・Before uninstalling an application or widget, see "Uninstalling an application or widget from the Home screen" (P.72).1On the application screen, touch and hold an icon of application you want to uninstall.2Drag to "Uninstall"u[OK].❖Information・You can disable some applications or widgets which cannot be uninstalled by dragging to "Disable app" in Step 2 (P.159).Moving application in the application icon list1On the application screen, touch and hold an icon to move.2Drag it anywhere.Install applications recommended by DOCOMO.1On the application screen, [Recommends].2[おすすめアプリを見る (See recommended apps)].3Select an application to use.・Download screen appears. Follow the onscreen instructions.Customizing the application screenInstalling "Recommends" applications](https://usermanual.wiki/Sony/PM0816.UG/User-Guide-2593934-Page-76.png)
![75docomo LIVE UXYou can use docomo LIVE UX data backed up on the docomo cloud to restore the layout of applications, widgets, and other items on the Home screen. Once it is restored, a page for docomo services is added to the bottom of the Home screen.・To use the backup and restore features, you need to set up your "docomo ID" (P.160).1On the Home screen, uu[Layout backup and Restore].・For the first activation, confirm the Application Privacy Policy, Precautions, and Software License Agreement, then tap [Agree].2u[Backup]1On the Home screen, uu[Layout backup and Restore].2[Restore the latest backed up data]/[Restore from backup data list].・If you selected [Restore from backup data list], select the data you want to restoreuTap [Restore].3[Restore].Backing up and restoring the Home screenBacking up the Home screenRestoring the Home screen](https://usermanual.wiki/Sony/PM0816.UG/User-Guide-2593934-Page-77.png)
![76docomo LIVE UX1On the Home screen, uu[Layout backup and Restore].2My Magazine is a search service for displaying articles for categories you selected. It helps to set search words depending on your tendency of read articles or profile information to come close to your preference.1From the Home screen, .・When you activate for the first time, select categories on the selection screen for categories then tap [OK].・Flick the article list screen left or right to switch categories.・Tap [See more info] to show other articles in the category.2Tap an article you want to read.❖Information・Alternatively, flick the Home screen up to display the article list.1From the Home screen, uu[Display category setting].2Mark the category you want to displayu[OK].Backup settingsBackup automaticallySet whether to periodically back up the home screen information for the docomo LIVE UX.Multi-Device SyncSet whether to send a notification to your other devices when an application has been installed.Sync on Wi-Fi onlySet whether to back up or sync data only when the terminal is connected via Wi-Fi.Sync while RoamingSet whether to back up or sync data during international roaming.Delete backup dataDelete your backup information from the server.Open source licensesView open source licenses.Terms of useView the terms of use.HelpView the operation guide.AboutView the application's version and other information.Using My MagazineSetting a category](https://usermanual.wiki/Sony/PM0816.UG/User-Guide-2593934-Page-78.png)
![77docomo LIVE UX1From the Home screen, uu[My Magazine settings]u[My Magazine use setting].2[Use]/[Not use]u[OK].❖Information・You can also set by tapping on the application screenu[My Magazine use setting].1On the application screen, u[About].Changing My Magazine use settingChecking Home application information](https://usermanual.wiki/Sony/PM0816.UG/User-Guide-2593934-Page-79.png)
![78PhonePhone1From the Home screen, u"Dial" tab.2Enter a phone numberu.・To make a video call, enter a phone numberuuTap [Video call].・Tap to delete the number.3When the call is finished, tap [End call].・To end a video call, tap the screenuTap [End call].❖Information・In Step 2, tap without entering a phone number to enter the phone number registered as the latest call in Recent calls.・To activate Xperia™ phone application, from the Home screen, tap u[Dial].・You can display contact, create message (SMS), or make call again from the call end screen.・With VoLTE, you can make high-quality voice and video calls. You can also switch between voice and video calls.To use VoLTE, both parties must meet the following requirements.- Both terminals support VoLTE.- Both parties are in a Xi service area. (VoLTE is not available outside a Xi service area or during international roaming.)- "Network mode" in "Mobile networks" is set to "LTE(preferred)/3G/GSM" or "LTE/3G" (P.188), and "Network mode" is set to "VoLTE/3G" (P.88).・On a video call, both speakers can see each other while talking.- When you make a video call, voice call and packet communication charges will apply. When you receive a video call, packet communication charges will apply.- Video calls are based on best-effort communication (which optimizes transmission speed depending on how busy your network is), so the quality of video images varies depending on your network environment.- If your terminal failed to switch to a video call during a voice call, a massage appears on the screen indicating that the failure occurred, and the voice call is maintained.- Since imaging for video call varies by terminal model, your terminal and the other party's terminal may show different image in scope.Making/Receiving a callMaking a call/video call](https://usermanual.wiki/Sony/PM0816.UG/User-Guide-2593934-Page-80.png)
![79PhoneEmergency call❖Note・This terminal supports "Emergency call location information". If you use the terminal to place a call to emergency numbers such as 110, 119, or 118, the information of a location where you are calling from (location information) is automatically notified to the Emergency call acceptance organization such as the Police Station.The Emergency call acceptance organization may not be able to figure out your exact location depending on the location where you place a call or radio wave condition.If you make a call hiding your caller ID, such as by entering a phone number with "184" for each call, the location information and phone number are not notified. However, the Emergency call acceptance organization may decide to obtain the location information and phone number regardless of your settings when they consider it is necessary for lifesaving, etc. Note that the areas/time for which the "Emergency call location information" is ready to be used vary depending on the preparatory state of each Emergency call acceptance organization.・When calling 110, 119 or 118 for emergency from the terminal, tell that you are calling from a mobile phone, and give your phone number and your current location precisely for checking callback from the police/fire department. Also, make a point to call in a stationary position to prevent the call from being dropped. Do not power off the terminal for at least 10 minutes after the emergency call just in case the Police or Fire/Ambulance may have to get in contact with you.・Note that you may not connect to the local Fire Department or Police Station depending on where you are calling from.❖Information・If docomo nano UIM card is not inserted to the terminal, emergency calls (110, 119, 118) cannot be made in Japan.・You can make an emergency call by tapping [Emergency call] on the lock screen. In Japan, however, on the PIN code entry screen, while PIN code locked or while PUK locked, emergency calls (110, 119, 118) cannot be made.・If you call to emergency numbers with Call Blocking is ON, the setting turns off automatically.・Emergency call may not be available via some networks.・The video call feature does not support emergency calls to 110, 119, and 118.Emergency call Phone numberPolice call110Fire and emergency rescue119Coast guard118](https://usermanual.wiki/Sony/PM0816.UG/User-Guide-2593934-Page-81.png)
![80PhoneEntering pause (,)/(;) to sendFor using services requiring entry of number during a call such as check of the balance of a bank account, reservation of tickets, etc., enter an additional number to a phone number beforehand and make a call.■ Using 2-second pause (,)Added number will automatically be sent approximately 2 seconds after the call is made.1From the Home screen, u"Dial" tab.2Enter a phone numberuu[Add 2–sec pause]uEnter an additional numberu.3When the call is finished, [End call].■ Using a wait (;)Sending is automatically on standby when the call is made and a confirmation screen asking if you send the additional number appears.1From the Home screen, u"Dial" tab.2Enter a phone numberuu[Add wait]uEnter an additional numberu.3On a confirmation screen, [Yes].4When the call is finished, [End call].Making an international call (WORLD CALL)For details on WORLD CALL, refer to DOCOMO International Services website.・Send replacing "+" by an international access code.1From the Home screen, u"Dial" tab.2Dial + (touch and hold [0])uEnter Country code, Area code (City code), recipient number in the orderu.・When "Auto conversion" in International dial assist is marked (P.192), the international dial assist screen appears when sending. Tap [Call original] or [Call].3When the call is finished, [End call].❖Information・If the area code begins with "0", omit "0". However, "0" may be required to dial to some countries or areas such as Italy.](https://usermanual.wiki/Sony/PM0816.UG/User-Guide-2593934-Page-82.png)
![81Phone・Even when the screen is locked, you can still operate the terminal to respond to an incoming call.1While receiving a call, drag (left) to (right).・To accept a video call, drag (left) to (right). To answer a call with voice only, drag (left) for "Voice only" to (right).2When the call is finished, [End call].・To end a video call, tap the screenuTap [End call].Putting a call on holdIf you are not available to answer a call, you can put the call on hold.1Drag upwards when receiving a voice call.2[Put caller on hold]The other party will hear a message saying that the call is on hold.3When you are ready to answer the call, drag (left) to (right).・The call will be put on hold until you drag (right) to (left) or the other party ends the call.Answering an incoming call with Answering MachineEven when Answering Machine is not set, you can activate Answering Machine manually.1Drag upwards when receiving a voice call.2[Reject with Answering Machine].❖Information・If there is a recorded message, is displayed in the status bar. Drag the status bar downwardsuTap [Answering Machine] to display the Messages screen, where you can check the recorded message.Muting the ringtone for an incoming call1While receiving a call, press the volume key or P.❖Information・You can stop vibration by pressing the volume key or P when silent mode (vibration) is set.・On the Home screen etc., press the volume key to adjust the ringtone volume.Declining a call1While receiving a call, drag (right) to (left).Receiving a phone/video call](https://usermanual.wiki/Sony/PM0816.UG/User-Guide-2593934-Page-83.png)
![82PhoneRejecting an incoming call and sending a message (SMS)When you cannot answer a call, you can reject the call and send a message (SMS). Message to send is registered in advance, and you can edit it if necessary.1Drag upwards when receiving a voice call.・If it is a video call, drag upwards and proceed to Step 3.2[Reject with message].3Tap a message to send.・Tap [Write new message] to create and send a message.❖Information・To edit existing message, from the Home screen, tap uu[Call settings]u[Reject call with message]uSelect an existing message and edit itu[OK] in advance.On the Calling screen, you can set speakerphone or mute, or enter a phone number to make a call to another party.■ Screen displayed during a voice callOperations during a callldekcjifhga b](https://usermanual.wiki/Sony/PM0816.UG/User-Guide-2593934-Page-84.png)
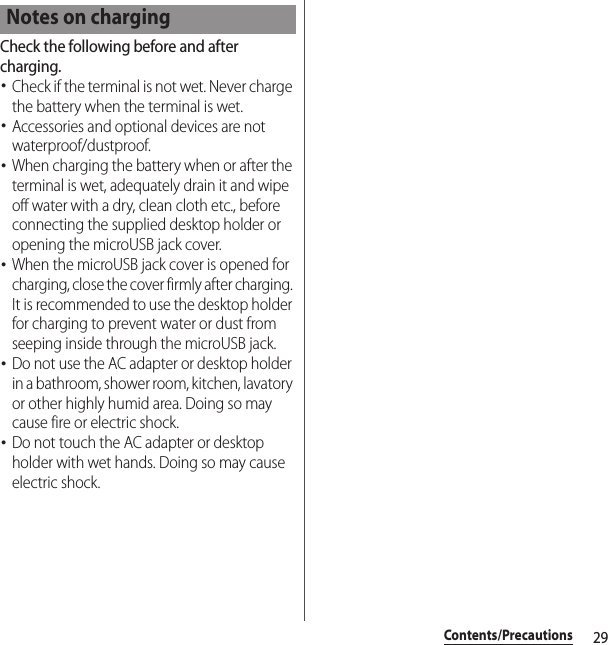
![83Phone■ Screen displayed during a video callWhile on a video call, you will see the other party's image in a parent window, and your image in a child window, with the operation area hidden. Tap the screen to show the operation area.aName of the other partybNumber of the other partycHigh-quality call・Displayed during a VoLTE call.・Displayed during both outgoing and incoming VoLTE calls.dCall duration timeePhoto/image set in the phonebook entryfSpeaker : Set speakerphone on/off.・Other party's voice can be heard from the speaker and handsfree call can be made.・Video calls are made or received with the speakerphone turned on.gDial key : Send a push signal while on a call.hMute : Turn the microphone on/off during a call.iSwitching to video call : Switch from a voice call to a video call.・When you tap this icon, the other party will see a message asking for permission to switch to a video call. If the other party accepts it, you can switch to a video call.・If the other party has declined to switch to a video call, is outside a Xi service area, or is using a terminal that does not support VoLTE, a message appears indicating that the call cannot be switched. Tap [OK] to continue the voice call.jHold : Put a call on hold/cancel hold.kPhonebook : View the dial screen while on a voice call.・You can add a voice call by entering a phone number or selecting a phone number from your call log or phonebook and then making a call.・To add a call, "Call waiting" subscription is required (P.87).lEnd a call・Tap when in landscape view.mOption menu : Switch from a video call to a voice call.・uTap [Change to voice] to switch to a voice call. Tap when in landscape view.nParent window for a video call (other party's image)・When the other party's image is not received, is displayed.oChild window for a video call (your image)pSwitching between cameras for sending your image・Tap this icon to switch between cameras for shooting your image.❖Note・Do not bring the terminal close to your ear with the speakerphone on to avoid from hearing damage.ldgcpnomfha b](https://usermanual.wiki/Sony/PM0816.UG/User-Guide-2593934-Page-85.png)

![85PhonehHistory・The details of an incoming or outgoing call (Outgoing, Incoming, or Missed call) are displayed.Adding a number from the Recent calls to Phonebook1From the Home screen, uTap "Recent calls" tabuTap a phone numberu[Register].・Alternatively, on the Recent calls screen, touch and hold a phone numberu[Edit number before call]u[Register].2[Add new contact]/[Add to the existing contact].・When “Add to the existing contact” is selected, select a contact to save to.3On the profile edit screen, enter necessary information such as name.・To add items, tap [Add other items].4[Save].Deleting a call history1From the Home screen, u"Recent calls" tabuTouch and hold an incoming/outgoing history you want to delete.2[Delete from call log]u[OK].❖Information・To delete all the entries in the call log, on the Recent calls screen, tap the "All" tabuu[Delete log]uMark "Select all"u[Delete]uTap [Delete].・Voice and video calls are not distinguished in the call log.When you have missed calls, appears in the status bar.1Drag the status bar downwards.2[Missed call].❖Information・When there is a missed call, you can make a call or send message (SMS) to the caller of the missed call from "Call back"/"Message" below "Missed call" in the Notification panel.For multiple missed calls, number of calls appears below "Missed call".・When the lock screen application is set to "docomo" and the unlock method is set to "Swipe/Touch", an icon indicating missed calls and the number appears on the lock screen.Displaying missed calls](https://usermanual.wiki/Sony/PM0816.UG/User-Guide-2593934-Page-87.png)
![86PhoneWhen Answering Machine is set, the answering message is played when you cannot answer an incoming call and message from the caller can be recorded even if you are not subscriber of Voice Mail Service. Up to approximately 60 seconds per one can be recorded.・Answering Machine is not available for video calls.1From the Home screen, u.2[Call settings]u[Answering Machine].❖Information・If there is a recorded message, is displayed in the status bar. Drag the status bar downwardsuTap [Answering Machine] to display the Messages screen, where you can check the recorded message.・To delete recorded message, touch and hold a messageuTap [Delete]/[Delete all]u[OK].Answering MachineAnswering MachineSet whether to use Answering Machine.Pick up afterSet a ringing time for answering.Use while roamingSet whether to use Answering Machine when you stay abroad.GreetingsSwitch the answering message language to Japanese or English or record a message.To record message, tap [Record new greeting] and follow the onscreen instructions.MessagesCheck recorded messages.](https://usermanual.wiki/Sony/PM0816.UG/User-Guide-2593934-Page-88.png)
![87PhoneYou can set the network services, register call rejection or edit Reject call with message.1From the Home screen, u.2[Call settings].Call settingsNetwork serviceKoe-no-Takuhaibin*1Record voice messages for you.Voice mail service*1Record caller's message when you cannot answer an incoming call.Call forwarding service*1Forward a call when you cannot answer an incoming call.Call Waiting*1Put the current call on hold and answering an incoming call or making a call to another party.Caller ID notificationNotify the display of the recipient phone of your phone number.Nuisance call blocking serviceRegister phone numbers of nuisance call to reject.Network serviceCaller ID display request serviceRequest number notification for calls without phone number with guidance.Second call settings*1Notify you when a call comes in during another call.Call notificationNotify incoming calls by message (SMS) while the power is off or you are out of service area.English guidanceSwitch the voice guidance to English or Japanese.Remote operation settingsSet to operate Voice Mail Service or Call forwarding Service using land-line phone, public phone or DOCOMO mobile phone, etc.Public mode (power OFF) settingWhile the terminal is OFF or in Airplane mode, a guidance message indicating that the receiver cannot answer the call is heard on the caller's terminal and then the call ends.Roaming settingsSet to reject incoming calls overseas or use roaming guidance (P.192).Phone ringtoneSet ringtone (P.156).](https://usermanual.wiki/Sony/PM0816.UG/User-Guide-2593934-Page-89.png)
![88Phone*1 Not available for video calls.*2 Not displayed if a docomo nano UIM card is not inserted.On the phonebook, you can enter various information for contacts, for example, phone numbers, mail addresses and various service accounts.1From the Home screen, u[docomo phonebook]u"Contacts" tab.・The phonebook list screen appears.Vibrate when ringingSet whether to sound ringtone and vibrate the terminal when there is an incoming call.Dial pad touch tonesSet whether to emit dialpad operation sound.Answering MachineP. 8 6Call BlockingSet whether to reject incoming calls for numbers not in the phonebook, private, pay phone and unknown.Reject call with messageEdit/set a message (SMS) to be sent when rejecting an incoming call (P.82).Sub address settingsSet whether " " in phone number is identified as a sub address separator.Prefix settingsRegister a prefix number added before phone number when making a call.Microphone noise suppressionMake the voice clear to understand for the other party during a call.EqualizerAdjust sound quality during a call.Speaker voice enhancementMake a voice clear to understand during a call.Slow talkSlow the caller’s talking speed to make the call to be heard slowly.Network modeSet the network mode for VoLTE call service.Contact docomo*2Make a call to General Inquiries, inquiries for damage, theft or loss overseas or damage overseas.AccountsSet Internet phone (SIP) account.Use Internet callingSet Internet phone (SIP) call method.PhonebookDisplaying phonebook](https://usermanual.wiki/Sony/PM0816.UG/User-Guide-2593934-Page-90.png)
![89Phone❖Information・To use cloud service for the phonebook, "docomo phonebook" application is needed. When you use the "docomo phonebook" for the first time (including after resetting the application) or log in to cloud from the "docomo phonebook", the "Use of Cloud" screen appears and you can start using cloud.・From the Home screen, uTap [Phonebook] to display the phonebook list.・Phonebook data can be backed up to/restored from a microSD card using "docomo backup" application (P.142).・From the Home screen, uTap [Contacts] to activate Xperia™ phonebook.■ Phonebook list screenOn the phonebook list screen, you can view details of your contacts. You can add a photo or image to a phonebook entry, and display phonebook entries by group.aGroup tab・Display the phonebook group.bTimeline・Display tweet or message on SNS/blog. To display, log in to Cloud and set "My SNS" function.cCloud・Log in to cloud ("Use of Cloud" screen is displayed) or log out of cloud ("Suspend sync" screen is displayed).dOption menueContacts tabfPhoto/image set in the phonebook entry・Tap a photo/image to make a call/video call or send a message (SMS) or mail.gName registered in the phonebook entryhSearchiRegisterjMy profile tab・Check your own phone number.kIndex character area・Tap index character to display phonebook entries allocated to the index character.lIndex・Display the index character to search entries in the order of Japanese syllabary, alphabet, etc.Adding a new phonebook entry1From the Home screen, u[docomo phonebook]u"Contacts" tabu[Register].2On the profile edit screen, enter necessary information such as name.・To add items, tap [Add other items].leb cghfaijdkManaging phonebook](https://usermanual.wiki/Sony/PM0816.UG/User-Guide-2593934-Page-91.png)
![90Phone3[Save].❖Information・When the language is set to Japanese, if you saved phonebook entries with the "Phonetic name (last/first)" field filled in, the phonebook list screen shows them in Japanese syllabary order or alphabetical order of the "Phonetic name" entries. If you did not fill in the "Phonetic name" field, the entry is displayed in the "他 (Others)" section on the phonebook list screen only when you entered the last and first names in Kanji using Japanese "Kana" characters.・If docomo account is selected as saving location when registering phonebook entries, SNS/blog accounts can be set.Making a call using the phonebook1From the Home screen, u[docomo phonebook]u"Contacts" tabuSelect a phonebook entry you want to make a call to.2On the Profile screen, tap a phone number.3[Call]/[Video call].Editing a phonebook entry1From the Home screen, u[docomo phonebook]u"Contacts" tabuSelect a phonebook entry to edit.2On the Profile screen, [Edit].3Select a required item and edit.4[Save].❖Information・You cannot edit contacts for the Facebook account.Registering a phonebook entry to Favorites1From the Home screen, u[docomo phonebook]u"Contacts" tabuSelect a phonebook entry to add to Favorites.2On the Profile screen, tap .❖Information・To display phonebook entries added to Favorites, on the phonebook list screen, tap "Group" tabu[Favorites].Using optional menu1From the Home screen, u[docomo phonebook]u"Contacts" tabuPhonebook list screen/Profile screenu.■ Phonebook list screenDeleteSelect and delete several/all phonebook entries.Cloud menuDisplay cloud menu.Import/ExportP. 9 2](https://usermanual.wiki/Sony/PM0816.UG/User-Guide-2593934-Page-92.png)
![91Phone■ Profile screenSetting phonebook entries to Group1From the Home screen, u[docomo phonebook]u"Group" tab.2Tap a group.3[Add member]uMark phonebook entries to addu[OK]u[OK].❖Information・To cancel group setting, in Step 3, [Delete member]uMark phonebook entries to deleteu[OK]u[OK].・When you set Google account etc., display groups by account. You can set/cancel group in the same account.Creating a new group in the phonebook1From the Home screen, u[docomo phonebook]u"Group" tab.2[Add group].3On the group adding screen, enter account, group name, icon, coloru[OK].・The items vary depending on the account type.Settings International use setting for docomo phonebookSet for using docomo phonebook overseas.docomo ID/Wi-Fi settingsSet for using docomo services via Wi-Fi.Contacts display orderSet display order of phonebook entries.Accounts to displaySet a phonebook to be displayed in the phonebook list screen.HelpDisplay Help of docomo phonebook.AboutDisplay version etc. of docomo phonebook.ShareSend a displayed phonebook entry with Bluetooth function, Email, etc.DeleteDelete a displayed phonebook entry.Set ringtoneSet a ringtone for displayed phonebook entry.Join/SeparateJoin/separate displayed phonebook entry.SNS/contacts link settingsWhen My SNS is set, link a displayed phonebook entry with friends on SNS.](https://usermanual.wiki/Sony/PM0816.UG/User-Guide-2593934-Page-93.png)
![92Phone❖Information・Groups in docomo account can be sorted. In Step 2, tap [Sort] and follow the onscreen instructions.・Groups in docomo account can be edited/deleted. To edit/delete a group, touch and hold a groupu[Edit group]/[Delete group].Checking My profile and editing information1From the Home screen, u[docomo phonebook]u"My profile" tabu[Edit].2On the My profile screen, enter necessary information such as name.3[Save].You can export/import phonebook entries from/to a microSD card or docomo nano UIM card. This is useful, for example, when you want to move the contact information to another phone.・You can also use a synchronization service for synchronizing your phonebook (P.169).・Insert a microSD card in advance (P.173).1From the Home screen, u[docomo phonebook]u"Contacts" tabuu[Import/Export].2Select an item.・After this step, follow the onscreen instructions.・When [Share phonebook data] is tapped, select an application to send.❖Information・To export phonebook entries to docomo nano UIM card, use "Contacts" app of Xperia™. Note that only name and the first phone number can be saved because of memory space of docomo nano UIM card. For some phonebook entries, a part of data may not be exported.Importing/Exporting phonebook entries](https://usermanual.wiki/Sony/PM0816.UG/User-Guide-2593934-Page-94.png)
![93Mail/Web browserMail/Web browserSend/receive mails using DOCOMO mail address (@docomo.ne.jp).Pictograms and Deco-mail can be used, and automatic reception also is supported.Sent/received mails are stored to the docomo mail server. Mails can be transferred readily in case the terminal is lost or you change the model. Also, with a docomo ID, you can use mail on your PC, tablet, and other devices.For details of docomo mail, refer to NTT DOCOMO website.1From the Home screen, .・After this step, follow the onscreen instructions.❖Information・docomo mail (local mail) data can be backed up in a microSD card using "docomo backup" application (P.142).You can send/receive text message to/from a mobile phone number as a recipient.For details of available number of characters etc., refer to "Short Message Service (SMS)" on NTT DOCOMO website.1From the Home screen, u[Messaging].2 (Compose).3Enter the recipient's phone number.・Tap u[Edit recipients] to select from registered contacts. Enter in the search box at the top of the screen to display the contact list.4[Write message]uEnter a message.・Tap u[Select message template] to enter by selecting message template (P.95).・When the number of entered characters comes close to a limit, a number of enterable characters appears on the right of the text box.5[Send].docomo mail Message (SMS)Sending message (SMS)](https://usermanual.wiki/Sony/PM0816.UG/User-Guide-2593934-Page-95.png)
![94Mail/Web browser❖Information・You can change default messaging application to Hangouts.From the Home screen, u[Settings]u[More...]u[Default SMS app]u[Hangouts].・You can also send/receive text messages to/from customers of overseas network operators. For details, see "Mobile Phone User's Guide [International Services]" or the DOCOMO International Services website.・To send SMS to users of overseas network operators, enter "+", "Country code" and then "the recipient mobile phone number". Enter the phone number without a leading "0", if any. Alternatively, enter "010", "Country code" then "the recipient mobile phone number" in order.To reply to the received message (SMS) overseas, you need to create a new message (SMS). To send a message, in Step 3, enter "010", "Country code" then "the recipient mobile phone number" in order.Sent/received message (SMS) is displayed in thread by recipient/sender.1From the Home screen, u[Messaging].・Senders with unread messages (SMS) are displayed in bold font.2Select a sender whose messages (SMS) you want to read.❖Information・When you receive a message (SMS), appears on the status bar. Drag the status bar downwards to read the received message (SMS).・Tap at a bottom of message (SMS) field to add star. To check starred messages (SMS) in a list, from the Home screen, tap u[Messaging]uu[Starred messages].1From the Home screen, u[Messaging].2Tap of a phone number to saveu[Save].3[Add new contact]/[Add to the existing contact].・If you selected "Add to the existing contact", select the contact.4On the profile edit screen, enter necessary information such as nameu[Save].❖Information・For a sender registered to the phonebook, tap or photo (image) in Step 2 to make a call or display the phonebook entry.Reading message (SMS)Saving phone number of message (SMS) to phonebook](https://usermanual.wiki/Sony/PM0816.UG/User-Guide-2593934-Page-96.png)
![95Mail/Web browser1From the Home screen, u[Messaging].2Tap a sender/recipient whose messages (SMS) to delete.3Touch and hold a message (SMS) to delete.4[Delete message]u[Delete].❖Information・To delete several messages (SMS), in Step 3, u[Delete messages]uMark messages (SMS) you want to deleteuu[Delete].1From the Home screen, u[Messaging].2Touch and hold a sender/recipient you want to delete.3u[Delete].❖Information・To delete messages (SMS) from several senders and recipients, in Step 3, mark senders/recipients to deleteuu[Delete].1From the Home screen, u[Messaging].2u[Settings].* While the silent mode (mute) is set, the terminal does not vibrate when receiving a message (SMS).Deleting a message (SMS)Deleting messages (SMS) by sender/recipientChanging settings for Messaging (SMS)Notification toneSet notification tone for receiving.NotificationsSet whether to show message (SMS) arrival notification in the status bar.Notification vibration*Set whether to notify with vibration when receiving.Notification lightSet whether to notify with the notification LED for receiving when the backlight is turned off.Delivery reportSet whether to mark a message (SMS) you sent when the recipient receives.Message templatesRegister/edit phrase to be inserted when entering message.SIM messagesManage messages (SMS) saved to a docomo nano UIM card.Push settingsSet a message (SMS) sent from the provider.GeotagSet whether to include a geotag when sending geotagged media.SMS center numberCheck SMS center number.](https://usermanual.wiki/Sony/PM0816.UG/User-Guide-2593934-Page-97.png)
![96Mail/Web browserYou can create a POP3 or IMAP compatible email account provided by general ISP (provider), or an Exchange ActiveSync account to send or receive email.You can set multiple Email accounts.Set an Email account following the onscreen instructions.1From the Home screen, u[Email].・To set a second or subsequent email account, from the Home screen, u[Email]uu[Settings]uTap [Add account].2Enter your email address and password.3[Next].・To set up an email account manually, tap [Manual setup] and follow the onscreen instructions.4Set check frequencyuMark required itemsu[Next].・If a screen for selecting type of account appears, tap an email account type and follow the onscreen instructions to set.5Enter account name and name displayed on emails you sendu[Next].・Inbox for set email account appears.❖Information・If you need to make the settings manually, contact your email service provider or system administrator for the correct email account settings.・If you set an Exchange ActiveSync account as an email account, and if server manager sets Remote wipe, the data saved in the terminal may be deleted.EmailMaking initial setting for Email](https://usermanual.wiki/Sony/PM0816.UG/User-Guide-2593934-Page-98.png)
![97Mail/Web browser1From the Home screen, u[Email].2 (Compose).3Enter the email address of recipient.・Tap to select from the registered contacts. Enter in the search box at the top of the screen to display the contact list.・To enter multiple email addresses directly, separate with a comma (,) and then enter the next email address.・To add Cc or Bcc recipients, tap u[Show Cc/Bcc].4Enter a subject and message.5[Send].❖Information・To attach a file, while creating an email, tap and select a file.・To save an email as draft, when creating an email, tap u[Save as draft] or display other screen.・Email is handled as an email from a PC. Your email cannot be received if rejecting emails from PCs is set on a recipient terminal.1From the Home screen, u[Email].・If you have set up more than one email account, [Inbox]uTap the email account you want to use for incoming emails.2On the Inbox, flick the screen.3Tap an email you want to read.❖Information・The sender name of a received email is the name set on sender's terminal.・If you specified "Notification" in the email account settings (P.99) and set "Check frequency" to an option other than "Manual", appears in the status bar to notify you when you have received a new email. Drag the status bar downwards to read the received email.・Tap an address of received email to register the address to the phonebook. For addresses already registered, displaying phonebook entries, creating mail, etc. are available.・In the Inbox or the email message screen, tap to add star and the email is added to "Starred" folder. To see a list of starred emails, in the Inbox, [Inbox]uTap the desired email accountu[Inbox]uTap [Starred].Creating and sending email Receiving and reading email](https://usermanual.wiki/Sony/PM0816.UG/User-Guide-2593934-Page-99.png)
![98Mail/Web browserSetting preview of Inbox1From the Home screen, u[Email].2u[Settings]u[Sprit view].3Mark a screen to preview.4[OK].❖Information・If you have two or more accounts, change made in any of the accounts applies to all accounts.・To switch to the landscape view, turn Auto rotate screen on beforehand (P.43).Saving attachment file of email1From the Home screen, u[Email].2Tap an email with attached files.・When attached file is not loaded, tap [Load].3Tap [Save] of file you want to save.・The attached file is saved on the internal storage.1From the Home screen, u[Email].2Tap an email to reply or forwarduTap [Reply]/[Reply all]/[Forward].・When you tap [Forward], enter an email address to forward to.3Enter a message.4[Send].❖Information・To quote original message text, tap [Respond inline].・When you forward an email, the attachment file of the original message is attached. To delete attached file, tap .1From the Home screen, u[Email].2Tap an email to delete.3u[Delete].❖Information・To delete more than one email, in Step 2, touch and hold the emails you want to deleteuMark themuuTap [Delete].Replying/Forwarding emailDeleting email](https://usermanual.wiki/Sony/PM0816.UG/User-Guide-2593934-Page-100.png)
![99Mail/Web browser1From the Home screen, u[Email].2u[Settings].3Tap an Email account you want to change the settings for.*1 While the silent mode (mute) is set, the terminal does not vibrate when receiving an email.*2 Displayed if you have set up an email account that supports IMAP, such as a Gmail account.❖Information・The items vary depending on the account type.・If you set "Check frequency" to an option other than "Manual", and you are using a pay-as-you-go data communication plan, packet communication charges may apply every time you check for new emails.Changing Email account settingsNotificationConfigure notification, ringtone, vibration*1, and notification light settings for new emails.SYNC SETTINGSCheck frequencySet how often the Email application checks for new emails.Days to syncSet the interval at which the Email application automatically checks for emails.Auto download attachments*2Set whether to download attached file automatically when connecting via Wi-Fi.Pre-download emailSet whether to download whole email including the message text before the email is opened.GENERAL SETTINGSAccount nameChange account name.Your nameChange your name (sender name).Incoming settingsSpecify a username, password, and other settings for the incoming server.Outgoing settingsSpecify a username, password, and other settings for the outgoing server.SignatureChange your signature or specify how to insert it.Quick replyRegister phrase that can be inserted when creating an email.SecuritySelect certifications, set digital signature or encryption.Delete accountDelete Email account.](https://usermanual.wiki/Sony/PM0816.UG/User-Guide-2593934-Page-101.png)
![100Mail/Web browser・The setting items displayed below the account in Step 3 affect the general settings for the "Email" application.Set a Google account. You can use Gmail to send and receive emails.・If you do not set a Google account, set following the onscreen instructions (P.168).・If you do not synchronize Gmail after Google account is set, "Account not synced" screen appears. Follow the onscreen instructions.❖Information・For details on Gmail, from the Home screen, [Google]u[Gmail]uTap at the upper left of screenuTap [Help] to see Gmail Help.1From the Home screen, [Google]u[Gmail].2 (Compose).3Enter the email address of recipient.・When you enter a name or email address in the email address field, contacts matched to the entered numbers or letters are listed.・To add Cc or Bcc recipients, tap u[Add Cc/Bcc].4Enter a subject and message.5 (Send).❖Information・To attach a file, u[Attach file]uSelect the file to attach.1From the Home screen, [Google]u[Gmail].2u[Refresh].・Synchronizing "Gmail" app in the terminal with your Gmail account starts, and the Inbox is refreshed.GmailSending GmailRefreshing Gmail](https://usermanual.wiki/Sony/PM0816.UG/User-Guide-2593934-Page-102.png)
![101Mail/Web browserIt is a service with which you can receive earthquake early warning, etc. delivered by the Meteorological Agency.・Area Mail is a free service for which subscription is not required.・Area Mail cannot be received in the following case.- During a voice call (except for VoLTE voice calls)- Out of service area- While power is off- During International roaming-During Airplane mode- While updating software - Upgrading Android software- When a SIM other than by DOCOMO is inserted - While sending/receiving a message (SMS)・Area Mail may not be received when tethering is set or during packet communications.・Area Mail that could not be received cannot be received later.A notification content screen appears and you are notified by dedicated buzzer sound or dedicated ringtone and vibration.・Buzzer sound and ringtone sound volume cannot be changed.・The notification LED blinks only when backlight is off.1Receive Area Mails automatically.2A dedicated ring tone sounds and notification LED flashes when an Area Mail is received.3A message body of Area Mail appears automatically.Viewing received Area Mail later1From the Home screen, u[Disaster kit].・When using for the first time, on the agreement screen of "ご利用にあたって (Using this application)", tap [Agree].2[Early Warning "Area Mail"].3Select an Area Mail from the Area Mail list.Early Warning "Area Mail"Receiving Early Warning "Area Mail"](https://usermanual.wiki/Sony/PM0816.UG/User-Guide-2593934-Page-103.png)
![102Mail/Web browser❖Information・If savable amount of Area Mail exceeds the limit of maximum, the oldest one is deleted in order.Deleting Area Mail1From the Home screen, u[Disaster kit].2[Early Warning "Area Mail"].3Mark Area Mail you want to deleteu[Delete]u[OK].1From the Home screen, u[Disaster kit].2[Early Warning "Area Mail"].3u[Settings].❖Information・To set Emergency mode, from the Home screen, u[Disaster kit]uTap (P.45).Use "Browser" application to view web pages like on a PC."Browser" application can be used via packet communication or Wi-Fi network with the terminal.1From the Home screen, .2Tap the web page address entry field on the top of the screen.・When address entry field is not displayed, flick down the screen to display.3Enter a web page address or keyword to search.・Tap for address entry field to enter search words in voice sound.・As you enter an address or characters, retrieved web pages list appears.Setting Early Warning "Area Mail"Receive settingSet whether to receive Area Mail.Beep toneSet sounding time for Area Mail reception and whether to sound a dedicated ringtone even in silent mode.Check screen image and beep toneCheck the ringtone and screen for reception of earthquake early warning, tsunami warning or disaster/evacuation information.BrowserDisplaying web pages](https://usermanual.wiki/Sony/PM0816.UG/User-Guide-2593934-Page-104.png)
![103Mail/Web browser4Select a candidate or [実行 (Go)] on the software keyboard.・To zoom-in/-out web pages, pinch-out/-in or double-tap the screen.・To go back to the previous page, tap x.❖Information・To copy text on web page, touch and hold a text you want to copyuDrag or to select a range of text to copyuTap (Copy).Adding a new tabOpen multiple tabs and view web pages.1From the Home screen, uu.Changing tabs1From the Home screen, uuTap a tab you want to display.Closing a tab1From the Home screen, uuTap of the tab you want to close.・Alternatively, flick a tab left or right to close it.Searching text for web page1From the Home screen, uu[Find on page].2Enter a search word.・Tap / to move to next/previous matched item.❖Information・Tap to close the search bar.Set homepage, privacy and security, etc.1From the Home screen, uu[Settings].2Select an item to change.Touch and hold a link or image in web page to copy URL or save the image.❖Information・In some website, downloading of files etc. may not be available.Changing the Browser settingsOperating links](https://usermanual.wiki/Sony/PM0816.UG/User-Guide-2593934-Page-105.png)
![104Mail/Web browserYou can check history, save bookmarks, etc.Bookmarking a web page1From the Home screen, uDisplay a web page2u[Save to bookmarks].3Set a label etc.u[OK].Opening a bookmark1From the Home screen, uu[Bookmarks].2Tap the bookmark you want to open.❖Information・Touch and hold a bookmark to edit or delete it.Checking history1From the Home screen, uu[Bookmarks]u"History" tab.2Tap the date of viewing, such as [Today] and [Yesterday], or [Most visited].❖Information・Alternatively, on the web page screen, touch and hold x to check history.・To delete history, touch and hold a historyuTap [Remove from history].・To delete all histories, from the Home screen, uu[Settings]u[Privacy & security]u[Clear history]u[OK].Managing bookmarks and history](https://usermanual.wiki/Sony/PM0816.UG/User-Guide-2593934-Page-106.png)
![105AppsAppsIn dmenu, you can easily access sites recommended by DOCOMO or convenient applications.1From the Home screen, [dmenu].・If an application selection screen is displayed, select the application you want to use, then tap [Always]/[Just once].・Browser is activated, "dmenu" appears.❖Information・To use dmenu, Internet connection by packet communication (LTE/3G/GPRS) or Wi-Fi is required.・For connecting dmenu and downloading applications introduced in dmenu, packet communication charge is applied separately. Some applications automatically perform packet communications.・Applications introduced by dmenu may include charged ones.There are various products such as music, e-books, etc.1From the Home screen, [dmarket].・When using for the first time, confirm Application privacy policy and Software License Agreement, mark the agreement checkboxuTap [Start]. Configure settings by following the instructions on the resulting screen asking if you want to receive notifications and other information.❖Information・For details on dmarket, refer to NTT DOCOMO website.With Google Play, you can directly access useful applications or fun games and you can download and install them on the terminal.・To use Google Play, you need to set a Google account (P.168).・For details on how to purchase applications, return your purchases, request a refund, from the Home screen, [Play Store]uFlick right from the left edge of the screenuTap [HELP] to see Google Play Help.dmenu dmarketPlay Store](https://usermanual.wiki/Sony/PM0816.UG/User-Guide-2593934-Page-107.png)
![106Apps1From the Home screen, [Play Store].2Search applicationsuTap an application you want to install.・Check the displayed contents carefully and follow the onscreen instructions.・Once you accept the installation of an application, you will be held responsible for its use. Be careful especially about applications which access many functions or large amount of data.❖Information・Make sure the security of application, then install it at your own risk. The terminal may be infected with a virus and the data may be damaged.・NTT DOCOMO is not liable for malfunctions, if any, caused by the application you installed. In such case, the repair is charged even during the warranty period.・NTT DOCOMO is not liable for any disadvantage brought to you or any third party due to an application you installed.・Some applications automatically perform packet communications. Packet communication is kept active unless you disconnect it or the time-out error occurs. To disconnect packet communication manually, from the Home screen, u[Settings]u[More...]u[Mobile networks]uUnmark "Mobile data traffic"u[OK].・Some applications may be updated automatically.1From the Home screen, [Play Store].2Flick right from the left edge of the screenu[My apps].3Tap the applications you want to deleteu[UNINSTALL]u[OK].・When you uninstall charged applications, a screen for refund may appear. For details, from the Home screen, [Play Store]uFlick right from the left edge of the screenuTap [HELP] to see Google Play Help.Installing applications Deleting application](https://usermanual.wiki/Sony/PM0816.UG/User-Guide-2593934-Page-108.png)
![108Apps1From the Home screen, u[Osaifu-Keitai].・When using for the first time, on the initial setup screen, mark "Agree to the Osaifu-Keitai Usage Regulations"u[OK].2Select a service you want to use from a service list.・Download an application compatible with service site or service.3Hold mark over the IC card reader.❖Information・You can scan and write data to or from an IC card reader without activating Osaifu-Keitai compatible application.・The function is available even if the terminal is off, but it may not be available when the terminal has been turned off for a long time or battery level is low.・You can use Osaifu-Keitai compatible service even when the PIN code for docomo nano UIM card cannot be unlocked or PIN locked.・Note that when you do not subscribe sp-mode, some functions of Osaifu-Keitai compatible service may not be available.1From the Home screen, u[Settings]u[More...].2[NFC/Osaifu-Keitai settings]uMark "Reader/Writer, P2P"u[OK].・NFC Reader/Writer, P2P function is enabled, and appears in the status bar.3Hold the mark over a device with the NFC module or a smart poster.Using "Osaifu-Keitai compatible service" Using " かざしてリンク対応サービス (Kazashite-Link compatible service)"](https://usermanual.wiki/Sony/PM0816.UG/User-Guide-2593934-Page-110.png)
![109AppsPlease note the following when holding the terminal over an IC card reader or NFC module equipped device.・Bring the mark close to the device slowly, do not hit it strongly.・Hold the mark over the device at the center horizontally. If scanning fails even with it held in front of the center of the scanner, slightly lift up the terminal, or move it backwards/forwards or to the left/right.・If there are metal objects between mark and the other device, scanning may fail. Putting the terminal into a case or cover may affect communication. In that case, remove the case or cover.Use "NFC/Osaifu-Keitai lock" settings to restrict the use of Osaifu-Keitai function and related services.・NFC/Osaifu-Keitai lock is different from screen lock for the terminal, SIM card lock.1From the Home screen, u[Settings]u[More...].2[NFC/Osaifu-Keitai settings]u[NFC/Osaifu-Keitai lock].3Enter a passwordu[Next].・When using "NFC/Osaifu-Keitai lock" for the first time, enter a password to set.・Osaifu-Keitai function is locked, and or is displayed in the status bar.❖Information・Note that you cannot cancel "NFC/Osaifu-Keitai lock", if the battery runs out while "NFC/Osaifu-Keitai lock" is set. Be careful about remaining battery level. If you cancel "NFC/Osaifu-Keitai lock", charge the terminal before canceling.・You need to unlock to use Osaifu-Keitai menu while "NFC/Osaifu-Keitai lock" is set.・"NFC/Osaifu-Keitai lock" password is not be deleted even if you reset the terminal.・When unlocking "NFC/Osaifu-Keitai lock", insert the same docomo nano UIM card as the one inserted when "NFC/Osaifu-Keitai lock" was set, then unlock.Notes on holding over the deviceLocking Osaifu-Keitai function](https://usermanual.wiki/Sony/PM0816.UG/User-Guide-2593934-Page-111.png)
![113Apps1From the Home screen, u[1Seg].・When using for the first time, make channel settings according to the onscreen instructions (P.114).■ 1Seg watching screenaCaptionsbImagecChannel, broadcasting station and program informationdReception signal leveleOption menufRecord icongChannel selection key・Touch and hold / to search available channels.hData broadcasting・Appeared only in portrait screen.iData broadcasting remote control・Appeared only in portrait screen.❖Information・To show/hide icon such as option menu, on the 1Seg watching screen, tap an image.・While watching 1Seg, press the volume key to adjust the sound volume.・You can watch 1Seg in the portrait screen or landscape screen (P.43).・To switch channels for watching, operate any of the followings.- Tap the channel selection key.- Flick an image on the 1Seg watching screen left or right.- Touch and hold an image on the 1Seg watching screenuSelect a channel from the displayed channel list・It may take a time to acquire image data or broadcasted data when you activate 1Seg or change channels due to characteristic of digital broadcasting.・According to the airwave condition, image or sound may be interrupted or stopped.・If the terminal receives a call while watching 1Seg, 1Seg is interrupted and resumes after the call ends.・To watch data broadcasting, call charge or packet communication charge is not required. If you use additional services of data broadcasting, etc. via packet communication, packet communication charge is applied.Watching 1Segcdgfbae1Seg watching screen (Full screen)ihba1Seg watching screen(with Data broadcasting)](https://usermanual.wiki/Sony/PM0816.UG/User-Guide-2593934-Page-115.png)
![114AppsExiting 1Seg1On the 1Seg watching screen, x.❖Information・You cannot exit 1Seg even if you tap y to return to the Home screen. If 1Seg remains activated, the battery may be consumed quickly.You can set 1Seg watching screen, data broadcasting and channel settings.Using optional menuYou can set 1Seg watching screen, data broadcasting and channel settings1From the Home screen, u[1Seg].2.* Subtitle position can be set only in landscape screen.Saving channels in the current locationAvailable channels vary depending on the area (broadcasting service area) you are using in.1From the Home screen, u[1Seg].2u[Change area].Setting 1SegProgram Program guideDisplay a program guide (P.116).Program detail infoDisplay detailed information of the program currently watched.Program informationDisplay program information of the channel currently watched.Recorded program listDisplay recorded program list (P.116).Reserve Recording/ViewingReserve recording or watching programs or display failed reservation list (P.116).TV linkDisplay TV link list screen (P.115).Change areaRegister or change broadcasting area (P.114).Subtitle/Sound setting Enable/disable subtitle display and set subtitle position* and main/sub sound.Settings Data Broadcasting settingsSet whether to use the location information or the terminal information, clear the broadcasting station memoryAuto Exit TimerMake a timer setting to end 1Seg watching.NotesDisplay information before use.Software LicenseDisplay the software license.](https://usermanual.wiki/Sony/PM0816.UG/User-Guide-2593934-Page-116.png)
![115Apps3Touch and hold an unregistered item.4[Area info setting]uSelect region, prefecture and locality.5[OK].❖Information・By touching and holding the area registered in Step 3, you can display details, set area information, refresh channels, rename area, and deleting settings.Changing numbers for TV remoteChange TV remote number assigned to each broadcasting station. Each broadcasting station can be called up via the corresponding TV remote number.1From the Home screen, u[1Seg].2Touch and hold an image.3Tap a broadcasting station to change the remote control numberuTouch and hold an image.4Touch and hold a number of remote control you want to set to.5[YES].・If you select a number of remote control which is already assigned to another broadcasting station, [Overwrite registered channel]uTap [YES].❖Information・To delete set broadcasting stations, touch and hold a broadcasting station to delete in Step 3u[Delete channel]uTap [ YES].For some data broadcasting programs, link information to related websites (TV link) is displayed. Save TV links to connect to related websites later.・Method of registering TV link varies by programs.1From the Home screen, u[1Seg].2u[TV link].3Select a TV link.・When selecting a link content or HTML content, tap [Yes].❖Information・Some TV links have period of validity. Out of date TV links are no longer available.・To delete TV link, in Step 3, touch and hold a TV link you want to deleteuTap [Delete]u[YES].Using TV link](https://usermanual.wiki/Sony/PM0816.UG/User-Guide-2593934-Page-117.png)
![116AppsRecord images, sound, captions or data broadcasting while displaying.1From the Home screen, u[1Seg].2.・To quit recording, tap .❖Information・Maximum savable recorded data file size is 2GB, and maximum recordable time is approximately 640 minutes in a row.Items can be saved up to 99.・Recorded data is saved on a microSD card. Recording is not available if a microSD card is not attached.・When you use the microSD card from another application while recording, recording may fail.Playing a recorded program1From the Home screen, u[1Seg].2u[Recorded program list].3Tap a program you want to play.❖Information・To delete a recorded program, touch and hold the program you want to delete in Step 3uuTap [YES].・To change the title of a TV program, touch and hold the program you want to rename in Step 3uuEnter a titleuTap [OK ].・Tap in Step 3 to set the playback mode and see the amount of available memory.Reserve recording/viewing TV program.1From the Home screen, u[1Seg].2u[Reserve Recording/Viewing]u.3[New reservation].4[Viewing reservation]/[Recording reservation].5Set a title, broadcasting station, start time, end time, etc.u[Save]u[YES].❖Information・Alternatively, tap [From Program guide] in Step 4, you can reserve recording/watching.1From the Home screen, u[1Seg].2u[Program]u[Program guide].・After this step, follow the onscreen instructions.Recording 1Seg Reserving recording/viewing 1Seg programUsing program guide](https://usermanual.wiki/Sony/PM0816.UG/User-Guide-2593934-Page-118.png)
![117AppsYou can listen to the FM radio with the terminal. To use FM radio, use a commercially available earphone set or headphone. They work as antenna.1Connect a plug of a commercially available earphone set or headphone to the headset jack of the terminal.2From the Home screen, u[FM radio].3Tap / to select channel.・You can select channel by flicking the screen left and right.❖Information・You can return to the Home screen and perform other operations while listening to the FM radio in the background. To return to the FM radio screen, from the Home screen, u[FM radio], or drag the status bar downwardsu[FM radio].・If you cannot receive Japanese FM radio programs because the docomo nano UIM card is not inserted etc., from the Home screen, tap u[FM radio]uu[Set radio region]u[Japan]. Before using FM radio, check your area.■ FM radio screenaShow FavoritesbOn/Off of FM radiocOption menudHear from a handsfree device/speakereSave/edit FavoritesfChannel point displayed in a good radio wave conditiongSearch channels to the lefthMonaural/stereo effect iBroadcasting station now listeningjSearch channels to the rightkChannel assigned to favoriteExisting FM radio1On the FM radio screen, .FM radioListening to the FM radiofihjkdgebca](https://usermanual.wiki/Sony/PM0816.UG/User-Guide-2593934-Page-119.png)
![119AppsYou can activate the camera with the camera key (k) (Quick launch).・Using Quick launch (P.129)1Press and hold k for over a second.・A shooting screen appears.❖Information・Alternatively, from the Home screen, u[Camera] to activate the camera.■ Shooting screenaZooming indicator・Within the light gray indicator area (lower half), you can shoot keeping the clearness with less degradation of images (Intelligent clear zoom). In the rest of the area (upper half ), it functions as digital zooming.bAuto focus framecDisplay area for status icons・Icons of set items such as Self-timer, Geotagging, etc. are displayed.dThumbnail・Tap to open viewing/playback screen for still pictures/videos taken (P.131).eDisplay area of icons showing selected settingsfSwitching to the front camera icongOption menuhShutter icon (for still pictures)/Pause icon (for videos)iStart/stop recording icon (video)jScene selection icons・When the capturing mode is set to "Superior auto", an icon for scene detected by the camera is displayed.・An icon is displayed when your terminal detects that the camera is moving or staying still, or that your subject is moving.kCapturing mode icon (P.120)■ Key operationVolume key : Zoom/volume/shutter*k : Shutterx : End Camera* It varies by settings in Use Volume key as (P.127). "Zoom" is set by default.❖Information・Alternatively, on the shooting screen, pinch out/in to zoom in/out.・When the capturing mode is set to "AR fun", "Background defocus", "AR effect", "Social live by Bambuser", or "Sweep Panorama", or when the front camera is being used to shoot images, zooming is not available.Activating the cameraShooting screen and key operationfgdha bijkce](https://usermanual.wiki/Sony/PM0816.UG/User-Guide-2593934-Page-121.png)
![129Apps FireworksShoot a crisp and clear images of fireworks. Due to long exposure time, be careful not to shake camera.■ Exposure value (EV)/White balanceTap or drag the bar to adjust the exposure value.White balance is automatically adjusted depending on the light source. AutoAdjust to the light source automatically. IncandescentAdjust for lighting like incandescent bulb. FluorescentAdjust for lighting like fluorescent. DaylightAdjust for a sunny place. CloudyAdjust for a cloudy sky or shaded area.■ Shooting directionSet shooting direction for Sweep Panorama. RightShoot moving the camera from left to right. LeftShoot moving the camera from right to left. DownShoot moving the camera downwards. UpShoot moving the camera upward.Set operation when activating Camera by pressing and holding k for over a second, or touching and holding on the lock screen and then dragging it to (Quick launch).・When the lock screen is set to "docomo", and the unlock method is set to "Swipe/Touch", is displayed, instead of .Tapping works for “Launch only”.1Press and hold k for over a second.・"Launch only" to activate the camera is set by default.2u"" tabu[Quick launch].3Any of [Launch only]/[Launch and capture]/[Launch and record video].・To cancel Quick launch, tap [Off ].❖Information・The capturing mode will be automatically set to "Superior auto" when pressing and holding k for over a second, or touching and holding and then dragging to .Using Quick launch](https://usermanual.wiki/Sony/PM0816.UG/User-Guide-2593934-Page-131.png)
![130AppsFocus on a face located away from the center.When the capturing mode is set to "Superior auto", face detection works automatically.1Press and hold k for over a second.2Tap the capturing mode iconu[Manual].・To shooting videos, tap to display the video shooting screen.3uTap " " tab/" " tabu[Focus mode]u[Face detection]ux.4Point the camera at the object.・Detected faces are framed (up to 5 faces).5Tap the frame you want to focus on or let the camera select which face to focus on without tapping.・A yellow frame shows the face in focus.6Shoot a still picture/video.Shoot smile face.1Press and hold k for over a second.2uTap " " tab/" " tabu[Smile Shutter]/[Smile Shutter (video)].3Select smile level for the smile shutterux.4Point the camera at the object.・Detected faces are framed (up to 5 faces).・The camera selects which face to focus on. Face frame for focusing on turns to yellow (still picture)/blue (video).5The camera automatically takes the photo when a face in focus smiles.・If no smile is detected, operate the steps in "Shooting still pictures" (P.122) to shoot a still picture.❖Information・When "Smile Shutter (video)" is set, the shutter sound is not emitted for detecting smile while recording a video.Shooting with Face detection Shooting with Smile Shutter](https://usermanual.wiki/Sony/PM0816.UG/User-Guide-2593934-Page-132.png)
![131AppsView/play photos or videos.1From the Home screen, [Album].・A list of images are displayed in chronological order.・For the first activation, select the category you want to open from a list of categories.■ Image list screenaCategory list viewbOption menucTimeshift burst filesdVideo fileseSound PhotofTimeshift video・Files saved containing slow-motion videos are marked with .gBurst with longpress filesh4K video❖Information・Depending on the number of saved images, it may take some times to load images.・To zoom in/out images, pinch out/in on the image list screen.1From the Home screen, [Album]uTap a photo/video.・For Burst with longpress files, tap a photo.・With Sound Photo files, audio is played back.・For Timeshift burst files, tap the screenuTap to check all saved photos.・For video files, tap .・Tap the screen to display information such as shooting date, option menu icons, etc.AlbumDisplaying photos/videoscdefghabViewing a photo/video](https://usermanual.wiki/Sony/PM0816.UG/User-Guide-2593934-Page-133.png)
![132Apps■ Photo viewing screen・Video playback screen (P.134)aReturn to the image listbSharing menu (P.132)cOption menu (P.132)dLocation information・Tap to add geotagging. For a geotagged photo, a country name and a region name appear, and tap it to view the photo on the map.eShot datefAdd to/remove from FavoritesgOperate photos : Edit photos : Play the Burst with longpress files in slideshow : Check Timeshift burst fileshDelete❖Information・To zoom in/out image display, pinch out/in on the photo playing screen.・The items vary depending on the selected file.1From the Home screen, [Album]uTap a photo/video.2Tap a screen.❖Information・Different options may be shown or some items cannot be operated in some image files.・To operate several image files, from the Home screen, [Album]uu[Select items]uSelect an image file to operate.・For some DRM protected contents or transfer applications, sharing may be limited.fda b ceghOperating image filesUpload to online service, send via Bluetooth or mail, copy/move to microSD card.Play in slideshow, edit, register or check the detail information.Use "Throw" to play back photos or videos with other device wirelessly.](https://usermanual.wiki/Sony/PM0816.UG/User-Guide-2593934-Page-134.png)
![133AppsYouTube is a free online video streaming service. You can play, search for and upload videos.・A packet communication charge is applied when downloading or uploading video content using mobile networks.1From the Home screen, [Google]u[YouTube].・If you do not set Google account, the Google account setting screen appears. Follow the onscreen instructions.2Tap a video.・Tap to search videos.❖Information・To delete search history, in Step 2, tap u[Settings]u[Search]u[Clear search history]u[OK].Play back music and videos stored on the internal storage or a microSD card using Media Player.・File formats of playable data (P.215)❖Information・For details on Media Player, from the Home screen, u[Media Player]uuTap [Help] to refer to the manual of Media Player.1From the Home screen, u[Media Player].・When using for the first time, confirm Application Privacy Policy and Software License Agreement, mark the agreement checkboxuTap [Start] and follow the onscreen instructions of the introduction screen for Media Player appears.2Tap a tab at the bottom of the screen.3Tap a song/video.You TubePlaying YouTube videoMedia PlayerPlaying music/video](https://usermanual.wiki/Sony/PM0816.UG/User-Guide-2593934-Page-135.png)
![134Apps■ Music playback screenaPlayback pointbBack to song listcOperate a song : Go back to the beginning of the song or to the previous song : Fast rewind : Pause : Play : Fast forward : Skip to the next songdOption menueAlbum artfSong informationgRepeat is off/Repeat all songs/Repeat current songhShuffle is off/Shuffle is oniVolume control・Alternatively, on the playback screen, press the volume key to adjust the volume.❖Information・You can return to the Home screen to perform another operation while listening to music in the background. To return to the music playback screen, from the Home screen, tap u[Media Player], or drag the status bar downwardsuTap the name of song that is being played.■ Video playback screenaPlayback pointbShare a video between screen mirroring compatible device and the terminalcBack to video listdOperate a video : Go back to the beginning of the video or to the previous video : Fast rewind : Pause : Play : Fast forward : Skip to the next videoeOption menufVideo informationbagefdichadbgcefh](https://usermanual.wiki/Sony/PM0816.UG/User-Guide-2593934-Page-136.png)
![135AppsgAuto-rotate screen ON/OFF・Tap to turn red and disable Auto-rotate screen.hVolume control・Alternatively, on the playback screen, press the volume key to adjust the volume.❖Information・Tap the screen to display option menu icons and other items.Ending Media Player1On the Media Player screen/song player screen/movie player screen, / u[Exit].Your current location can be positioned using GPS, Wi-Fi, or mobile network.The terminal has a GPS receiver that uses satellite signals to calculate your location. Some GPS features use the Internet. Data rates and charges may apply.When you use GPS function to find your location, make sure you have a clear view of the sky. If GPS does not find your location after several minutes, move to another location. To help the search, stand still and do not cover the GPS antenna section (P.30). The first time you use the GPS, it may take about 10 minutes to find your location.・Use the GPS system with great care. DOCOMO is not liable for any damage caused by abnormality of the system.・Note that DOCOMO shall have no liabilities for any purely economic loss including those due to missing a chance to check the measurement (communication) results because of external factors (including the running out of the battery), such as a failure, malfunction, or any other problems of the terminal or the power failure.Location servicesGPS function](https://usermanual.wiki/Sony/PM0816.UG/User-Guide-2593934-Page-137.png)
![137AppsActivating GPS/Location servicesYou can position your current location using GPS, Wi-Fi, and information sent from mobile network base stations.1From the Home screen, u[Settings].2[Location]uTap of "Location" or drag it right.3Read the Attention message about location information and tap [Agree]uRead the Location consent message and tap [Agree].❖Information・Your location information is sent to Google without specifying who you are. Your location information may be sent even when the application is not running.The Google Maps application allows you to view your current location, find other locations and search routes.・To use Google Maps, enable data traffic (LTE/3G/GPRS) or connect to Wi-Fi.・Google Maps does not cover the whole world.Finding the current location on the mapYou can detect your current location using location information service.・To detect current location, enable Location (P.137) beforehand.1From the Home screen, [Google]u[Maps].・When a message appears, follow the onscreen instructions.2.・Current location is shown by blue mark.・If you tap , the icon changes to , and then the terminal's geomagnetic compass links the direction displayed on the map.・To zoom in/out the map, pinch out/in on the map screen, or double-tap/tap the screen with two fingers.Viewing Street view1From the Home screen, [Google]u[Maps].2Touch and hold a point you want to show in the street viewuTap information displayed at the bottom of the screen.3[Street View].Using Google Maps](https://usermanual.wiki/Sony/PM0816.UG/User-Guide-2593934-Page-139.png)
![138AppsSearching for a location1From the Home screen, [Google]u[Maps].2Fill out the search bar.3 on the software keyboard.4Tap a destination.Displaying informationDisplay information such as traffic information etc. on the map.1From the Home screen, [Google]u[Maps].2uSelect information to display.NavigatingYou can receive detailed guides for your destination.1From the Home screen, [Google]u[Maps].2uSelect a transporting method.3Enter a start point in the upper entry fielduEnter an end point in the lower entry field.1From the Home screen, u[Schedule].・When using for the first time, tap [同意する (Agree)] on the 「スケジュール&メモアプリ」 ソフトウェア使用許諾規約 ("Schedule & Memo application" license agreement) screen. Configure settings by following the instructions on the resulting screen asking if you want to use cloud services.2[Switch disp]uTap [Monthly]/[Week]/[Daily time-line]/[Daily].・Flick the calendar left or right to display the next or previous month/week/day.❖Information・To move cursor to the current date or date you want to display, in Step 2, [Jump to]u[Today]/drag a number to set dateu[Jump].・In Step 2, [Switch disp]uTap [Memo list] to switch to the "Memo" application screen.ScheduleDisplaying schedule](https://usermanual.wiki/Sony/PM0816.UG/User-Guide-2593934-Page-140.png)
![139Apps1From the Home screen, u[Schedule].2[Add]uEnter an item.3[Save].❖Information・When an alarm of event is set, appears on the status bar at the set time. Drag the status baruTap [It's time] to display details of the event.Displaying events of Schedule1From the Home screen, u[Schedule]uDisplay scheduled date/time.・In Monthly view or Week view, tap a scheduled date.2Tap an event to view description.・To edit an event, tap [Edit].❖Information・To delete an event, touch and hold an event in Step 2uTap [Delete one]u[Delete].・To delete all events, from the Home screen, u[Schedule]uu[Delete all]u[Delete].Setting display conditions in ScheduleWhen a search criteria is set, specified data can be displayed.1From the Home screen, u[Schedule].2[Conditions].3On the selecting screen for search conditions, tap items to display.❖Information・Tap [Free word search] in Step 3uEnter a search wordu[OK] to search and display the input information in "title", "text" and "どこで? (place)".Use alarm, world clock, stop watch and timer.1From the Home screen, u[Alarm & clock].2uSet time etc.3[Done].Creating schedule eventAlarm & clockSetting alarm](https://usermanual.wiki/Sony/PM0816.UG/User-Guide-2593934-Page-141.png)
![140Apps❖Information・To delete alarms, in Step 2, tap u[Delete alarms]uMark alarms you want to deleteu[Delete]*u[Yes].* A number of marked alarm is displayed at the right side of "Delete".Enabling/Disabling alarm1From the Home screen, u[Alarm & clock].2Tap / of alarm you want to switch ON/OFF or drag it right/left.Stopping alarm1While alarm is sounding, drag to the right.❖Information・If you tap [Snooze], the alarm sounds again when the set time has passed.Display the date and time etc. in cities around the world.1From the Home screen, u[Alarm & clock]u"" tab.2uSelect a city.❖Information・Time display during day-light saving time may differ from time difference displayed on the screen when adding a city in Step 2.・To change the order of cities, in Step 2, tap u[Rearrange]uDrag at the side of date and time for the city up or downuTap [Done].・To delete cities, in Step 2, tap u[Delete]uMark cities you want to deleteuTap [Delete]*u[Yes].* A number of marked city is displayed at the right side of "Delete".1From the Home screen, u[Alarm & clock]u"" tab.2[Start].3[Stop].1From the Home screen, u[Alarm & clock]u"" tab.2[Set time].3Drag the number up or down to set timeu[OK].4[Start].5[Stop].Using World clockUsing StopwatchUsing Timer](https://usermanual.wiki/Sony/PM0816.UG/User-Guide-2593934-Page-142.png)
![141AppsWith docomo backup, you can back up or restore data to/from "データ保管BOX (Data Storage BOX)" or "microSD card".・Do not remove microSD card during backup or restoring. Doing so may damage the terminal data.・If the battery is low, backup or restore may not be done. In that case, charge the terminal and retry to back up or restore.・docomo apps password is required to back up or restore (P.160).・To back up/restore to/from Data Storage BOX, log-in to docomo cloud is needed. To log in, download データ保管BOX (Data Storage BOX) application and enable cloud settings (P.141).❖Information・When using for the first time, confirm Application Privacy Policy and Software License Agreement, then mark "Agree"u[Start].・For details on docomo backup, from the Home screen, tap u[docomo backup]u[Backup/restore to docomo cloud]/[Backup/restore to microSD]uu[Help] to refer to Help.You can back up/restore call logs, music, etc. to/from Data Storage BOX.Backing up1From the Home screen, u[docomo backup]u[Backup/restore to docomo cloud].2[Backup].・When you do not log in to docomo cloud, on the confirmation screen, tap [Log in], then follow the onscreen instructions to log in. If you do not download データ保管BOX (Data Storage BOX) application, on the confirmation screen, tap [Download], then follow the onscreen instructions to download.3Mark the data to back up.4[Start backup]u[Backup].5Enter docomo apps passwordu[OK].docomo backupBacking up/Restoring to/from Data Storage BOX](https://usermanual.wiki/Sony/PM0816.UG/User-Guide-2593934-Page-143.png)
![142Apps❖Information・With Periodical backup, you can back up specified item data to Data Storage BOX automatically every month.・Note that use of Periodical backup may cause high packet communication charge.Restoring1From the Home screen, u[docomo backup]u[Backup/restore to docomo cloud].2[Restore].3Tap [Select] on data type to restoreuMark data to restoreu[Select].・Tap [Select latest data] to select the latest data for each data type.4[Add]/[Overwrite]u[Start restore]u[Restore].5Enter docomo apps passwordu[OK].❖Information・When restoring from the Data Storage BOX, data is restored to the location where the data is backed up to. When model change etc., data may be restored to the different saving location from backing up.Back up or restore data such as phonebook entries, docomo mails, images/videos, etc. to an external memory such as microSD card.Backing upIf microSD card is not installed, data such as images and movies are saved to the internal storage. You can back up only data such as images and movies stored in the internal storage. Data stored in microSD card cannot be backed up.1From the Home screen, u[docomo backup]u[Backup/restore to microSD].2[Backup].3Mark the data to back up.4[Start backup]u[Backup].5Enter docomo apps passwordu[OK].❖Information・When backing up phonebook entries to microSD card, data without Name cannot be copied.・If microSD card is low on memory, backup may not be done. In that case, delete unnecessary files to make available space.Backing up/Restoring to/from microSD card](https://usermanual.wiki/Sony/PM0816.UG/User-Guide-2593934-Page-144.png)
![143AppsRestoring1From the Home screen, u[docomo backup]u[Backup/restore to microSD].2[Restore].3Tap [Select] on data type to restoreuMark data to restoreu[Select].・Tap [Select latest data] to select the latest data for each data type.4[Add]/[Overwrite]u[Start restore]u[Restore].5Enter docomo apps passwordu[OK].Copying phonebook entries registered in Google account to docomo accountYou can copy contacts data registered in Google account to docomo account.1From the Home screen, u[docomo backup]u[Backup/restore to microSD].2[Phonebook account copy].3[Select] on Google account contacts you want to copyu[Overwrite]/[Add].・When a message appears, follow the onscreen instructions.❖Information・If phonebook item names (e.g. Phone number, etc.) of the other terminal are different from ones of your terminal, the item names may be changed or deleted. Also, some text may be deleted in copied destination, because savable characters in a phonebook entry vary by terminal.](https://usermanual.wiki/Sony/PM0816.UG/User-Guide-2593934-Page-145.png)
![144SettingsSettings1From the Home screen, u[Settings].Using the Wi-Fi function, you can connect to an access point for your home, company network or public wireless LAN services to use mail and Internet.■ Reception interference caused by Bluetooth devicesBluetooth devices and wireless LAN (IEEE802.11b/g/n) devices use the same frequency band (2.4GHz). If you use Bluetooth devices near a wireless LAN device, reception interference may occur or the communications speed may lower. Also, you may hear noise or have a connection problem. Communication may be interrupted or sound may be lost while streaming data, etc. In these cases, do the following:・Keep the terminal and Bluetooth device to be connected wirelessly approximately 10 meters or more away from a wireless LAN device.・Within approximately 10 meters, turn off the Bluetooth device to be connected.Viewing the setting menuWIRELESS & NETWORKSP. 1 4 4DEVICEP. 1 5 4PERSONALP. 1 6 0ACCOUNTSP. 1 6 8SYSTEMP. 1 7 0WIRELESS & NETWORKSWi-FiP. 1 4 4BluetoothP. 1 7 6Data usageP. 1 4 7Xperia™ ConnectivityP. 1 4 8More... Airplane modeP. 1 4 9Default SMS appP. 9 4Tethering & portable hotspotP. 1 5 1VPNP. 1 5 3Mobile networksP.150, P.188NFC / Osaifu-Keitai settingsP.107, P.178Wi-Fi](https://usermanual.wiki/Sony/PM0816.UG/User-Guide-2593934-Page-146.png)
![145SettingsTurning on Wi-Fi1From the Home screen, u[Settings]uTap or drag right of Wi-Fi.・It may take a few seconds before the Wi-Fi connection is on.❖Information・Even when Wi-Fi is on, packet communication is available. However, while you connect Wi-Fi network, Wi-Fi comes first.・When a Wi-Fi network is disconnected, connection is automatically switched to a LTE/3G/GSM network mode. Note that packet communication charge may be applied if network connection stays switched.・Turn the Wi-Fi function to off when you do not use Wi-Fi to cut battery power consumption.・Make sure to receive signal strong enough for using Wi-Fi function.Connecting to a Wi-Fi network1From the Home screen, u[Settings]u[Wi-Fi].2Select a Wi-Fi network to connect.・To connect to a protected Wi-Fi network, enter the passwordu[Connect].・To connect Wi-Fi network with WPS compatible device, or u[WPS PIN Entry]. Follow the onscreen instructions.・Scanning for Wi-Fi networks manually, u[Scan].❖Information・Depending on your environment, the connection speed may be slow, or Wi-Fi may not be available.・When the terminal is connected to Wi-Fi network successfully, "Connected" appears. When a different message appears, make sure the password (security key).When "Connected" does not appear even if you enter a correct password (security key), the correct IP address may not have been acquired. Check the signal status and reconnect. It may take 5 minutes or more to display the message after [Connect] is tapped.・To use docomo service via Wi-Fi, setting "docomo ID" is required. From the Home screen, u[Settings]u[docomo service/cloud]u[docomo ID設定 (docomo ID setting)] to set.Deleting connecting Wi-Fi network setting1From the Home screen, u[Settings]u[Wi-Fi].2Tap the Wi-Fi network that is currently connected.3[Forget].](https://usermanual.wiki/Sony/PM0816.UG/User-Guide-2593934-Page-147.png)
![146SettingsAdding a Wi-Fi network manually・Turn Wi-Fi on beforehand (P.145).1From the Home screen, u[Settings]u[Wi-Fi].2uEnter a network SSID of the Wi-Fi network you want to add.3Tap "Security" setting itemuTap a security type of the Wi-Fi network you want to add.・4 options, "None", "WEP", "WPA/WPA2 PSK", or "802.1x EAP", appear.4If required, enter security information for the Wi-Fi network you want to add.5[Save].Using optional menu1From the Home screen, u[Settings]u[Wi-Fi]u.ScanP. 1 4 5WPS PIN EntryP. 1 4 5Wi-Fi DirectP. 1 4 7Advanced Network notificationSet whether to notify when Wi-Fi open network is detected.・Turn Wi-Fi on beforehand (P.145).Keep Wi-Fi on during sleepSet to disable the Wi-Fi function when the screen backlight turns off. Also set the terminal to always turn on the Wi-Fi function or to always turn it on when the terminal is charged.Scanning always availableSet whether to allow Google location service and other application to scan network when Wi-Fi is OFF.Avoid poor connectionsSet whether to use LTE/3G/GSM network mode when Wi-Fi radio waves are weak or communication quality is bad.Install certificatesInstall certificates.](https://usermanual.wiki/Sony/PM0816.UG/User-Guide-2593934-Page-148.png)
![147SettingsUsing Wi-Fi Direct compatible deviceYou can connect among the devices compatible with Wi-Fi Direct via Wi-Fi even without configuring access point.・Turn Wi-Fi on beforehand (P.145).1From the Home screen, u[Settings]u[Wi-Fi].2u[Wi-Fi Direct].3Select a Wi-Fi Direct compatible device name to connect.・Tap [Search for devices] to refresh the detection list.・To change the terminal name displayed on the detected Wi-Fi Direct compatible device, tap [Rename device].❖Information・Wi-Fi function becomes available when you install a compatible application.Enable/disable mobile data communication or set data usage limit.Enabling mobile data communication1From the Home screen, u[Settings]u[Data usage].2Tap of Mobile data communication or drag it to the right.3Read the note and tap [OK].Setting data usage limit1From the Home screen, u[Settings]u[Data usage].2[Set mobile data limit]uRead the notes and tap [OK].Advanced Wi-Fi optimizationSet whether to control the battery power consumption when Wi-Fi is on.Auto IP supportEnable/disable Auto IP function.PasspointSet whether to connect to available Passpoint network automatically.Passpoint networksSet Passpoint network.MAC addressCheck MAC address.IP addressCheck IP address.Data usage](https://usermanual.wiki/Sony/PM0816.UG/User-Guide-2593934-Page-149.png)
![148Settings❖Information・Note that mobile data communication will be disabled when data usage volume reaches to the limit.・Change the setting value for data usage limit and the value for alert by dragging the right end of each bar in the graph.Setting Data usage cycle1From the Home screen, u[Settings]u[Data usage].2Tap "Data usage cycle" setting itemuSet period/[Change cycle...].・When you tap [Change cycle...], select reset dateu[Set].Using optional menu1From the Home screen, u[Settings]u[Data usage]u.Data roamingSet whether to permit data roaming.Restrict background dataSet whether to restrict background data.Auto-sync dataP. 1 6 9Show Wi-Fi usageSet whether to display Wi-Fi usage status.Mobile hotspotsSet to restrict use of specified Wi-Fi network.Xperia™ ConnectivityOne-touch setupSet up for using the terminal and Xperia™ tablet (Android 4.4 or later) at the same time with one-touch operation.Smart ConnectSet operation when external device is connected or applications are activating/deactivating.Throw settingsPlay contents in the terminal with other device.Screen mirroring*Connect to a TV or tablet compatible with Screen mirroring to display the screen on the terminal.Cast screenDisplay the terminal's screen on a device that supports Google Cast.Media server settingsP. 1 8 4](https://usermanual.wiki/Sony/PM0816.UG/User-Guide-2593934-Page-150.png)
![149Settings* Compatible with Wi-Fi CERTIFIED Miracast™Depending on usage environment, image or sound may be interrupted or stopped.Covering around the Wi-Fi/Bluetooth antenna with your hand may affect the quality of communications.In this mode, the functions of using radio wave transmissions such as calling, accessing to the Internet (including sending/receiving mails), etc. are disabled.1From the Home screen, u[Settings]u[More...].2Mark [Airplane mode].・When Airplane mode is on, appears on the status bar.❖Information・Alternatively, press and holdPfor over a seconduTap [Airplane mode] to set Airplane mode to on/off.・Even if Airplane mode is on, Wi-Fi, Bluetooth function and NFC Reader/Writer, P2P function can be turned on. Do no use these functions in a place where the use is prohibited.Windows tetheringDisplay the description about Windows tethering.To connect by Windows tethering, set the following beforehand.・Turn on Bluetooth function of the terminal and the PC (P.176).・Set security of Portable Wi-Fi hotspot to "WPA2 PSK" (P.152).・Pair the terminal and a PC whose OS is Windows 8.1 or later via Bluetooth (P.177).DUALSHOCK™3/DUALSHOCK™4Connect a DUALSHOCK® series wireless controller to your terminal.MirrorLink™Set to allow a device certified with MirrorLink™ to operate the terminal using microUSB cable.Copyright protected data cannot be displayed.USB ConnectivityP. 1 8 1Airplane mode](https://usermanual.wiki/Sony/PM0816.UG/User-Guide-2593934-Page-151.png)
![150SettingsAn access point for connecting to the Internet (sp-mode) is already registered. You can add or change it if necessary.For using mopera U, Business mopera Internet add the access point manually.For details on mopera U, refer to mopera U website.Checking the access point in use1From the Home screen, u[Settings]u[More...]u[Mobile networks]u[Access Point Names].・It is recommended that you use the displayed access point without editing.❖Information・Radio button on the right of current access point is marked.Setting an access point additionally1From the Home screen, u[Settings]u[More...]u[Mobile networks]u[Access Point Names].2.3[Name]uEnter a nameu[OK].4[APN]uEnter an access point nameu[OK].5Tap and enter all other information required by your network operator.6u[Save].❖Information・Do not change the MCC/MNC when setting the APN. If you change them to values other than the default values (440/10), the set APN will not be displayed on the APN screen. If the set APN is not displayed, uTap [Reset to default] or , then set the APN again.Initializing an access point1From the Home screen, u[Settings]u[More...]u[Mobile networks]u[Access Point Names].2u[Reset to default].Setting an access point](https://usermanual.wiki/Sony/PM0816.UG/User-Guide-2593934-Page-152.png)
![151Settingssp-mode is ISP for NTT DOCOMO smartphone. In addition to accessing Internet, you can use the mail service using the same address as i-mode mail (@docomo.ne.jp), etc. sp-mode is a service requiring subscription. For details on sp-mode, refer to NTT DOCOMO website.Use tethering function to enable the terminal to use as modem to allow USB compatible devices, wireless LAN devices or Bluetooth devices to access the Internet.❖Information・If you want to use tethering, subscription to Packet Pack/packet flat-rate service is strongly recommended.・For details on usage charge, see the following website.https://www.nttdocomo.co.jp/english/ ・When the docomo nano UIM card is not inserted, mobile data communication is disabled, or the terminal is out of service area, USB tethering or Wi-Fi tethering, and Bluetooth tethering using mobile network are not available.Setting USB tethering1From the Home screen, u[Settings]u[More...]u[Tethering & portable hotspot].2Connect the terminal to the PC with a USB compatible PC with Micro USB Cable 01 (optional) etc. (P.38).・When you connect microUSB cable etc. for the first time, the driver software for the terminal is installed to a PC. Wait for a while until installation is completed.・When "Install software" screen appears on the terminal, tap [Skip] or [Cancel].3[USB tethering].4Confirm "Details"u[OK].❖Information・System requirements (OS) for USB tethering are as follows.- Microsoft Windows 8/8.1- Microsoft Windows 7- Microsoft Windows Vista-Linux・During USB tethering, the terminal storage cannot be mounted with a PC.・USB tethering can be used with Wi-Fi tethering or Bluetooth tethering at the same time.sp-modeUsing tethering function](https://usermanual.wiki/Sony/PM0816.UG/User-Guide-2593934-Page-153.png)
![152SettingsSetting Wi-Fi tethering1From the Home screen, u[Settings]u[More...]u[Tethering & portable hotspot].2[Portable Wi-Fi hotspot].3Confirm "Details"u[OK].❖Information・If Wi-Fi tethering starts while connecting to Wi-Fi network or the terminal and DLNA device are connected via Wi-Fi network, Wi-Fi network is disconnected. Wi-Fi network is automatically connected when Wi-Fi tethering ends.・Wi-Fi tethering can be used with USB tethering or Bluetooth tethering at the same time.Setting up a portable Wi-Fi hotspotYou can use the terminal as a Wi-Fi access point to connect up to 10 wireless LAN devices to the Internet simultaneously.1From the Home screen, u[Settings]u[More...]u[Tethering & portable hotspot].2[Portable Wi-Fi hotspot settings]u[Configure Wi-Fi hotspot].3Enter a network SSID of the Wi-Fi access point to set.・"XXXXXX Compact_XXXX" is set by default.4Tap "Security" setting itemuTap a security type of the Wi-Fi access point you want to set.5Enter a password of the Wi-Fi access point to set as required.6[Save].❖Information・By default, a password is set in a random manner.Setting Bluetooth tetheringUp to 5 Bluetooth devices can be connected to the Internet.1From the Home screen, u[Settings]u[More...]u[Tethering & portable hotspot].2[Bluetooth tethering].3Confirm "Details"u[OK].❖Information・For using Bluetooth tethering from a Bluetooth device, set it paired with the terminal. For details on Bluetooth function, see "Bluetooth function" (P.176).・Bluetooth tethering can be used with USB tethering or Wi-Fi tethering at the same time.](https://usermanual.wiki/Sony/PM0816.UG/User-Guide-2593934-Page-154.png)
![153SettingsUse Virtual Private Network (VPN) to connect to the information in a protected local network such as companies, schools or other facilities from outside.❖Information・To set up a VPN access from the terminal, you need to retrieve the information related to security from your network administrator. For details, see the following website.http://www.sonymobile.co.jp/support/ (In Japanese only) Adding a VPN1From the Home screen, u[Settings]u[More...]u[VPN].・When the note appears, follow the onscreen instructions to set unlocking method of screen lock (P.165).2.3When an editing screen is displayed, follow the instruction of the network administrator to enter/set required items of VPN settings.4[Save].❖Information・To edit/delete VPNs, touch and hold a VPNu[Edit profile]/[Delete profile].Connecting to a VPN1From the Home screen, u[Settings]u[More...]u[VPN].2Tap a VPN to connect to.3Enter required authentication informationu[Connect].・When you are connected to a VPN, appears in the status bar.Disconnecting a VPN1Drag the status bar downwards.2Tap a notification that indicates VPN connected.3[Disconnect].Connecting to a VPN (Virtual Private Network)](https://usermanual.wiki/Sony/PM0816.UG/User-Guide-2593934-Page-155.png)
![156SettingsAdjusting each sound volumeAdjust volumes for playing media, ringtone, notification sounds and alarms.1From the Home screen, u[Settings]u[Sound]u[Volumes].2Drag the slider to the right or left.3[OK].❖Information・Even if alarm volume is set in Volumes, set in "Alarm & clock" app is given priority (P.139).・Press Volume key when the Home screen is displayed to adjust the volume for ringtone. Press Volume key while receiving a call to mute the ringtone.Setting a ringtone/notification sound1From the Home screen, u[Settings]u[Sound]u[Phone ringtone]/[Notification sound].2Select Phone ringtone or Notification soundu[Done].❖Information・To set a ringtone or notification sound other than the ones stored by default, tap .・When volume of "Music, video, games & other media" is muted (Volume 0), ringtone or notification sound cannot be heard.DisplayImage enhancementSet the screen to display photos and videos vividly and at high resolution. Note that the image quality of still images can only be enhanced when viewing in the "Album" application.・Select "X-Reality for mobile" to enhance patterns and outlines so that sharp images with detailed textures are produced.・Select "Super-vivid mode" to enhance colors so that sharp, vivid images are produced.Glove modeIncrease touch sensitivity to enable touch operation with gloved hand・Touching screen with gloved hand with Glove mode ON, a ring appears where you touch on the screen.・Depending on the material of gloves, touch operation may be difficult.BrightnessP. 1 5 7White balanceP. 1 5 7Screen rotationP. 4 3SleepSet a time before the screen back light turns off.](https://usermanual.wiki/Sony/PM0816.UG/User-Guide-2593934-Page-158.png)
![157SettingsAdjusting the screen brightness1From the Home screen, u[Settings]u[Display]u[Brightness].2Drag the slider to the right or left.❖Information・Mark "Adapt to lighting conditions" to adjust brightness automatically according to the ambient brightness with reference to the manually set brightness.Adjusting the white balance1From the Home screen, u[Settings]u[Display]u[White balance].2Tap or drag the slider to the right or left on the position to set.・Touch and hold the area displaying "Press and hold here to see previous setting" to check the setting before adjusting.3[Done].❖Information・In Step 2, u[Default values]u[Done] to reset back to the default setting.Check or format memory volume of device memory (internal storage), microSD card, and USB storage.Smart backlight controlSet the backlight not to turn off when you use the terminal holding with your hand even while touch operation is not performed.DaydreamSet the screensaver.Font sizeSet font size.Tap to wake upSet whether to turn on the backlight by double-tapping the screen when the backlight is turned off.Notification lightSet whether to notify missed call etc. with blinking notification LED.StorageDEVICE MEMORYTotal spaceCheck available memory space of internal storage, etc.SD CARD Total spaceCheck available memory space etc. of microSD card.Unmount SD card*1Cancel connection of microSD card to remove it safely.Mount SD card*1Have microSD card recognized.Erase SD card*1Format microSD card.](https://usermanual.wiki/Sony/PM0816.UG/User-Guide-2593934-Page-159.png)
![159SettingsManage and delete installed applications, display memory usage condition, etc. or change the settings.Managing applications1From the Home screen, u[Settings]u[Apps].2Tap the application you want to manage.・To delete application data, tap [Clear data]uRead the note and tap [OK].・Tap [Clear cache] to delete cache or tap [Clear defaults] to delete settings for activating the application and restore to the default.Force-quitting an application1From the Home screen, u[Settings]u[Apps].2Tap an application to force-quit.3[Force stop]uRead the notes and tap [OK].Deleting applications・Before deleting application data, back up contents that you want to save including data saved in the application.1From the Home screen, u[Settings]u[Apps].2Tap an application to delete.3[Uninstall]u[OK].❖Information・Some applications pre-installed cannot be deleted (uninstalled). For some applications which cannot be uninstalled, disabling is possible (P.159).・Applications downloaded from Play Store are recommended to be deleted from the Google Play screen (P.106).Disabling applicationYou can disable services or applications that cannot be uninstalled.・Disabled applications are not displayed on the Home screen or application screen and you cannot execute them, but they are not uninstalled.1From the Home screen, u[Settings]u[Apps].2Flick the screen to the leftuDisplay "All" tab.3Tap an application to disable.Apps](https://usermanual.wiki/Sony/PM0816.UG/User-Guide-2593934-Page-161.png)
![160Settings4[Disable]uRead the notes and tap [OK].❖Information・When you disabled an application, some other applications linked to the disabled application may not be operated correctly. Enable the disabled application again to operate them correctly.Resetting applicationYou can reset disabling applications on "All" tab (P.159), settings for activating application (P.159), or restricting background data (P.148).1From the Home screen, u[Settings]u[Apps].2u[Reset app preferences].3[Reset apps].By installing an application that supports this feature, you can use the application to manage the billing information for your use of cloud and the terminal.Tap & payPERSONALdocomo service/cloudP. 1 6 0LocationP. 1 6 1SecurityP. 1 6 2Language & inputP. 1 6 6Backup & resetP. 1 6 7Setup guideP. 4 0docomo service/clouddocomo ID設定 (docomo ID setting)Set docomo ID for using docomo applications.docomo cloudMake settings for docomo cloud compatible service.docomo apps managementManage to install applications provided by NTT DOCOMO and set to check updates for applications regularly.docomo apps passwordSet a password for applications provided by docomo. docomo apps password is set "0000" by default.AUTO-GPSSet to use the services supporting AUTO-GPS.docomo location informationSet location information function for imadoco search, imadocokantan search and Keitai-Osagashi Service.](https://usermanual.wiki/Sony/PM0816.UG/User-Guide-2593934-Page-162.png)

![164Settings■ PIN codeYou can set up a security code called a PIN code for your docomo nano UIM card. The code is set to "0000" at the time of subscription; however, you can change the code by yourself.PIN code is a 4- to 8-digit security number (code) that must be entered for user confirmation to prevent unauthorized use of docomo nano UIM card by a third party every time you insert the docomo nano UIM card into the terminal or when the terminal is powered on. Entering the PIN code enables making/receiving calls and terminal operation.・If you use a newly purchased terminal with docomo nano UIM card you have been using, use the PIN code set on the former terminal. If you did not change the setting, the code is "0000".・If you enter a wrong PIN code 3 times consecutively, the PIN code is locked and cannot be used anymore. In this case, unlock with "Personal Unblocking Key (PUK code)" (P.164).■ Personal Unblocking Key (PUK code)The PUK code is an 8-digit number for canceling the locked PIN code. The PUK code cannot be changed by yourself.・If you failed to enter PUK code 10 times consecutively, the docomo nano UIM card is locked. Please contact a docomo Shop.Enabling SIM card lockBy entering PIN code when powered on, you can protect from improper use.1From the Home screen, u[Settings]u[Security]u[Set up SIM card lock]u[Lock SIM card].2Enter PIN codeu[OK].Entering the PIN code when powered on1On the PIN code entry screen, enter the PIN code.2](https://usermanual.wiki/Sony/PM0816.UG/User-Guide-2593934-Page-166.png)
![165SettingsChanging the PIN code・You can change only when you activate the SIM card lock.1From the Home screen, u[Settings]u[Security]u[Set up SIM card lock]u[Change SIM PIN].2Enter the current PIN codeu[OK].3Enter a new PIN codeu[OK].4Enter the new PIN code againu[OK].Unlocking PIN lock1Enter the PUK codeu.2Enter a new PIN codeu.3Enter the new PIN code againu.Setting screen unlock methodYou can enhance security by requiring a screen unlock pattern every time the terminal is turned on or every time it is activated from sleep mode.1From the Home screen, u[Settings]u[Security]u[Screen lock].2Tap a unlock method to set.・When you tap [PIN], follow the onscreen instructions to enter 4 - 16 digit numbers. This "PIN" code is different from one to be set on a docomo nano UIM card (P.164).・If you tapped [Bluetooth unlock], follow the onscreen instructions to set the Bluetooth device you want to use for unlocking. You must pair the Bluetooth device with your terminal beforehand.❖Information・If you press P with the screen unlock method set to "Bluetooth unlock" and with a device connected via Bluetooth placed near your terminal, then the terminal switches from sleep mode directly to the screen before locked, without displaying the lock screen, and becomes ready to use. Be aware that this may result in unintended operation.Locking the screenWhen P is pressed to turn on the sleep mode or the screen backlight automatically goes off after screen unlock method (P.165) is set, the screen is locked.■ To unlock the screen1When the screen is locked, press P to turn the backlight onuEnter the unlock method.](https://usermanual.wiki/Sony/PM0816.UG/User-Guide-2593934-Page-167.png)
![166Settings■ To turn off the screen lock1From the Home screen, u[Settings]u[Security]u[Screen lock]uEnter the current unlock pattern/PIN/passwordu[None].If you forget how to unlock■ If you set "Pattern""You have drawn an incorrect unlock pattern 5 times. Try again in 30 seconds. " appears when you enter incorrect unlock pattern 5 times consecutively.・When you set a Google account, [Forgot pattern]uEnter Google account and passwordu[Sign in] to unlock the screen lock and reset a new unlock pattern.❖Information・If you set multiple Google accounts to the terminal, enter one of those accounts and password to unlock the screen.■ If you set "PIN" or "Password"Please contact a docomo Shop.* Downloading Android keyboard is required.❖Information・If you choose the wrong language and cannot read the menu texts, see the FAQ of the following website.http://www.sonymobile.co.jp/so-04g/faq.html Language & inputLanguageChange phone language.DefaultSelect input method.Xperia™ Chinese keyboardP. 7 0Xperia™ keyboardGoogle voice typingMoji-HenshuXperia™ Japanese keyboardSpell checker*Set whether to run the spell checker.Personal dictionaryRegister words to the personal dictionary.Voice SearchP. 1 6 7Text-to-speech outputP. 1 6 7Pointer speedSet pointer speed when a mouse or trackpad is used.](https://usermanual.wiki/Sony/PM0816.UG/User-Guide-2593934-Page-168.png)
![168Settings1From the Home screen, u[Settings]u[Backup & reset]u[Factory data reset]u[Reset phone].・Mark "Erase internal storage" to delete all contents (music, photos, etc.) on the internal storage. Contents in pre-installed applications such as “Album”, “Movies”, etc. are deleted. However, some contents can be downloaded from Sony Select.2[Erase everything].Manage (add or delete) online service accounts or synchronize contacts, calendar, etc. saved in online services with the terminal.・Auto-sync data (P.169)Setting Google accountYou can set a Google account on your terminal and use Google services such as Gmail, Google Play, etc.You can set multiple Google accounts on the terminal.1From the Home screen, u[Settings]u[Add account]u[Google].2Follow the registration wizard, set a Google account.❖Information・A Google account registered with "Back up data to your Google Account." marked on the "Google services" screen is registered as a backup account.・You can use the terminal without setting your Google account, however the Google services such as Gmail, Google Play, etc. are not available.・Tap set Google account and synchronize each data manually.ACCOUNTSSetting an account](https://usermanual.wiki/Sony/PM0816.UG/User-Guide-2593934-Page-170.png)
![169SettingsSetting other account1From the Home screen, u[Settings]u[Add account].2Tap an account type.・After this step, follow the onscreen instructions.❖Information・Use docomo account when you use "docomo backup" app (P.141) provided by NTT DOCOMO. docomo account is set by default.Removing account1From the Home screen, u[Settings]uSelect an account typeuSelect an account you want to delete.2u[Remove account]u[Remove account].❖Information・docomo account cannot be deleted.Configuring sync settings for your accounts■ To sync automaticallySynchronize information of online service with the terminal. You can display and edit information on the terminal or a PC.・Setting Auto-sync data, communication occurs to synchronize and a packet communication charge may be applied.1From the Home screen, u[Settings]uTap for Auto-sync or drag it to the rightu[OK].■ To sync manuallyWhen the auto-sync function is off, you can sync your registered account(s) manually.1From the Home screen, u[Settings]uSelect the type of your accountuSelect the account you want to syncuMark the items you want to sync.❖Information・Depending on the type of your account, you can select items to sync.](https://usermanual.wiki/Sony/PM0816.UG/User-Guide-2593934-Page-171.png)
![171Settings❖Information・TalkBack Touch explorationEnabling TalkBack activates Touch exploration.Touch exploration is a function that reads or displays an explanation for the item you tapped.・When touch exploration feature is enabled, you can operate the terminal in the different way from the usual one. To select an item, tap it once and then double-tap it. To drag, tap it once and then double-tap it, then trace the screen to desired orientation.・To turn off only touch exploration, from the Home screen, u[Settings]u[Accessibility]u[TalkBack]u[Settings]uUnmark "Explore by touch"uTap [OK].PrintingCloud PrintUse Google Cloud Print to set for printing with a printer at home or office from the terminal.・Set a Google account in advance (P.168).About phoneSoftware UpdateP. 2 0 6Upgrade Android softwareP. 2 1 0Application updateDownload new applications or update applications.StatusCheck own phone number, battery status, remaining battery, battery performance, etc.Legal informationCheck open source license or Google terms of use, etc.Model numberCheck versions and numbers.Processor infoAndroid versionBaseband versionKernel versionBuild number](https://usermanual.wiki/Sony/PM0816.UG/User-Guide-2593934-Page-173.png)
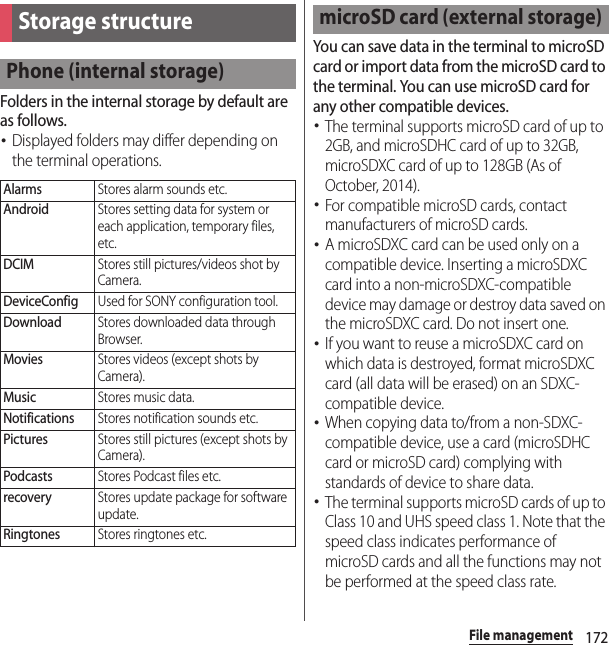
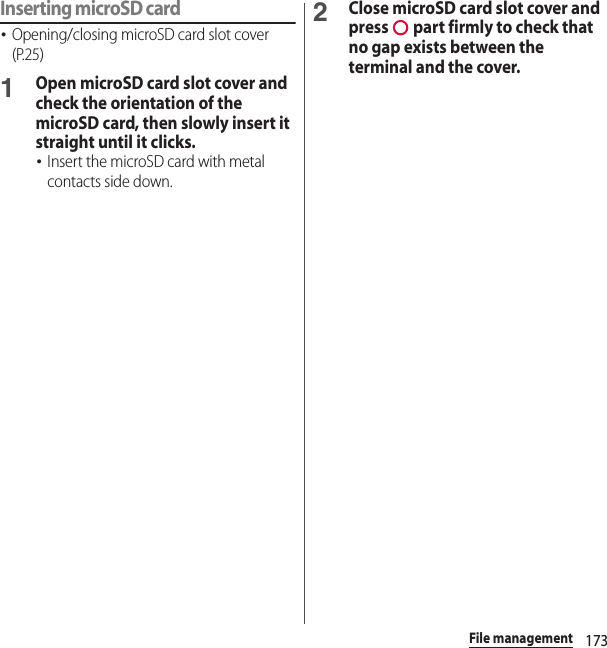
![174File managementRemoving microSD cardMake sure to unmount microSD card (make reading/writing unavailable) before removing.・Opening/closing microSD card slot cover (P.25)1From the Home screen, u[Settings]u[Storage]u[Unmount SD card]u[OK].・When microSD card is unmounted, " SD card safe to remove" appears in the status bar and notify that microSD card is not available for reading or writing.2Open microSD slot cover and push microSD card to the end until it clicks. Then remove microSD card slowly.・" Removed SD card" appears in the status bar.3Close the microSD card slot cover, firmly press it and make sure that there are no gaps between the terminal and cover (P.173).Use "File Commander" application to operate various data saved in the internal storage or the microSD card.1From the Home screen, u[File Commander].・The home screen for File Commander is displayed. Flick right from the left edge of the screen to display the option menu.・When a microSD card is inserted, "SD Card" appears on the home screen and the option menu.2Select an itemuTap a folder as required.3Tap a file.・Data can be displayed with the compatible application.・Tap to add an folder, or select a folder/file and then tap to delete them.File operation](https://usermanual.wiki/Sony/PM0816.UG/User-Guide-2593934-Page-176.png)
![175File managementMoving/Copying folder or fileFolders or files can be copied/moved between the internal storage and the microSD card.1From the Home screen, u[File Commander].2Select an itemuTap a folder as required.3Mark a folder or file you want to move/copy.4 / .5Anywhere, u[Paste].1From the Home screen, u[File Commander].2uEnter a folder name or file name.3From search results appeared according to the entry, tap data you want to check.Searching for data](https://usermanual.wiki/Sony/PM0816.UG/User-Guide-2593934-Page-177.png)
![176Data communicationData communicationBluetooth function is a technology which enables to connect with Bluetooth device such as PC, handsfree headset wirelessly.・The terminal does not communicate wirelessly with all types of Bluetooth devices.・Supported Bluetooth profiles (P.214)❖Information・If you turn off the terminal with Bluetooth turned on, Bluetooth function turns off. When you turn on the terminal again, Bluetooth function turns on automatically.・When you do not use Bluetooth function, turn it off to save the battery.■ Reception interference caused by wireless LAN devicesThe terminal's Bluetooth function and wireless LAN devices use the same frequency band (2.4GHz). If you use the terminal near a wireless LAN device, reception interference may occur or the communications speed may lower. Also, you may hear noise or have a connection problem. In these cases, do the following:・Keep the Bluetooth device approximately 10 meters or more away from a wireless LAN device.・Within approximately 10 meters, turn off either the Bluetooth device or the wireless LAN device.1From the Home screen, u[Settings].2Tap in Bluetooth or drag it right.・ appears on the status bar.3[Bluetooth]u[XXXXXX Compact].Using optional menu1From the Home screen, u[Settings]u[Bluetooth]u.Bluetooth functionMaking the terminal detectableRename phoneRename the terminal which appears on other Bluetooth devices.Visibility timeoutSet time to make the terminal visible to other Bluetooth devices.Show received filesDisplay transfer history with other Bluetooth devices.](https://usermanual.wiki/Sony/PM0816.UG/User-Guide-2593934-Page-178.png)
![177Data communicationTo connect the terminal and Bluetooth device, pair them first.・Once paired, the setting with the Bluetooth device is saved.・For make pair setting, entering passcode (PIN) may be required. Passcode (PIN) of the terminal is "0000". If you cannot make pair setting when you enter "0000", see the documentation of your Bluetooth device.1From the Home screen, u[Settings]u[Bluetooth]u[Search for devices].2Tap the Bluetooth device name to pairuCheck a passkey on the "Bluetooth pairing request" screenu[Pair].■ When pairing request is sent from a Bluetooth deviceCheck a passkey on the "Bluetooth pairing request" screen, then tap [Pair].❖Information・Make sure that the Bluetooth function and Bluetooth detection function of the target device are on.・To unpair, tap for the Bluetooth device to be unpairedu[Unpair].1From the Home screen, u[Settings]u[Bluetooth]u[Search for devices].2Tap the name of Bluetooth device you want to connect.❖Information・Tap for the name of connected Bluetooth device to check the status of the Bluetooth device or change the settings.・Up to 7 devices can be connected at the same time. Depending on profile, operation may not be correct or number of devices that can be connected at the same time may be different.Disconnecting a Bluetooth device1From the Home screen, u[Settings]u[Bluetooth].2Tap the connected Bluetooth device name.3[OK].・To reconnect, tap the Bluetooth device name.Making pair setting for the terminal and Bluetooth deviceConnecting the terminal with Bluetooth device](https://usermanual.wiki/Sony/PM0816.UG/User-Guide-2593934-Page-179.png)
![178Data communicationTurn on Bluetooth function in advance, then pair with Bluetooth devices.Sending data via Bluetooth function1[Bluetooth] from the sharing menu of each application.2Tap the other party's Bluetooth device.Receiving data1Send data from a Bluetooth device.・ appears on the status bar.2Drag the status bar downwardsu[Bluetooth: Incoming file]u[Accept].You can send/receive data to/from a device with NFC such as a mobile phone.・To send/receive data, enable NFC Reader/Writer, P2P function in advance (P.179).・Place 2 mobile phones in parallel position and point marks to each other. Do not move them until sending/receiving is complete.・Operations to send/receive and available data to send/receive depend on the compatible applications. Follow the onscreen instructions.・If the License agreement screen appears when sending/receiving data, read the content and follow the onscreen instructions.Sending/Receiving data via Bluetooth functionNFC communication](https://usermanual.wiki/Sony/PM0816.UG/User-Guide-2593934-Page-180.png)
![179Data communication・When pointing marks to each other, sending/receiving may fail. In such case, operate again to send/receive.・The terminal does not communicate with all NFC devices.・For notes when holding over the other device, (P.109).1From the Home screen, u[Settings]u[More...].2[NFC/Osaifu-Keitai settings]uMark "Reader/Writer, P2P"u[OK].・"Reader/Writer, P2P" and "Android Beam" are marked.・ appears on the status bar.❖Information・While "NFC/Osaifu-Keitai lock" is set, the NFC Reader/Writer, P2P function cannot be turned on.If you use the Android Beam with an Android device with NFC, simple operations allow you to send or receive images, music, photos or videos taken with the terminal.・Turn on Reader/Writer, P2P function in advance (P.179).Sending data1Display data to send on the screen.2Face the marks on the terminal and the receiver’s terminal each other.・"Touch to beam" appears.3Tap the screen that has become small.Enabling NFC Reader/Writer, P2P functionSending/Receiving data by one-touch function](https://usermanual.wiki/Sony/PM0816.UG/User-Guide-2593934-Page-181.png)
![180Data communicationReceiving data1Perform data sending operation on a sender's terminal.2Face the marks on the terminal and the receiver’s terminal each other.・When you receive data, appears on the status bar. Drag the status bar downwardsuTap [Beam complete] to launch the application associated with the received data. Follow the onscreen instructions.Selecting NFC Type1From the Home screen, u[Settings]u[More...].2[NFC/Osaifu-Keitai settings]u[NFC Type].3Tap any of [FeliCa / Type A / Type B (standard)]/[FeliCa / Type A]/[FeliCa / Type B].](https://usermanual.wiki/Sony/PM0816.UG/User-Guide-2593934-Page-182.png)
![181External device connectionExternal device connectionConnect a PC to exchange data between the internal storage or the microSD card and a PC.❖Information・Appeared screen may vary depending on the operating system (OS) of a PC.・You may not be able to operate copyrighted data of images, music, etc.・The following operating systems (OS) are supported.- Microsoft Windows 8/8.1- Microsoft Windows 7- Microsoft Windows Vista・The terminal is connected by "Media transfer mode (MTP)" which is set by default.・For using Mass storage mode (MSC) etc., attach a microSD card to the terminal (P.173).・Charging starts when the terminal is connected to a PC.1Connect the terminal to a PC using a microUSB cable (P.38).・When you connect microUSB cable for the first time, the driver software for the terminal is installed to a PC. Wait for a while until installation is completed.・When "Install software" screen appears on the terminal, tap [Skip] or [Cancel].■Media transfer mode (MTP)The terminal is displayed on the PC screen as a portable device and you can access the internal storage and a microSD card in the terminal.■Mass storage mode (MSC)The terminal is displayed on the PC screen as a removal disk and you can access the microSD card in the terminal.❖Information・From the Home screen, u [Settings]u[Xperia™ Connectivity]u[USB Connectivity] to check connection mode and change the following settings.Connecting to PCConnecting a PC using a microUSB cable](https://usermanual.wiki/Sony/PM0816.UG/User-Guide-2593934-Page-183.png)
![182External device connection・When the terminal is connected to a PC with "Media transfer mode (MTP)" set in "USB connection mode", accessing to the microSD card from the terminal is unavailable. Therefore, functions using the microSD card in the applications such as "Camera", "Album", etc. may not be available.Disconnecting the microUSB cable safely・Do not disconnect the microUSB cable during data transferring. Data may be damaged.■ Media transfer mode (MTP)1Confirm that it is not transferring data, disconnect the microUSB cable.■ Mass storage mode (MSC)1Drag the status bar downwards.2[SD card connected].3Disconnect the microUSB cable.The terminal can be automatically connected to a paired PC on Wi-Fi network. You can access the internal storage and a microSD card in the terminal from the PC.・Use Microsoft Windows Vista, Microsoft Windows 7 or Microsoft Windows 8/8.1 for a PC to be paired. Other OSs are not available.・For Microsoft Windows 8.1, remove the terminal from the PC, click "How to connect" on PC Companion, then follow the onscreen instructions.For PC Companion, see the following website.http://www.sonymobile.co.jp/support/ (In Japanese only)Pairing with a PC within a Wi-Fi network1Connect a PC you want pair to a Wi-Fi network.2Connect the terminal to the Wi-Fi network that the PC is connected (P.145).3Connect the terminal to a PC using a microUSB cable.・When "Install software" screen appears on the terminal, tap [Skip] or [Cancel].Install softwareDisplay the software installation wizard when connected to a PC.USB connection modeSwitch USB connection modes when connecting to a PC.WIRELESS MEDIA TRANSFERConnect the terminal and a host device in a pair via Wi-Fi network (P.182).Connecting the terminal to a PC on a Wi-Fi network](https://usermanual.wiki/Sony/PM0816.UG/User-Guide-2593934-Page-184.png)
![183External device connection4Open "コンピュータ (Computer)" window on the PCuRight-click the terminal icon displayed as a portable deviceu"ネットワーク構成 (Network composition)"u"次へ (Next)".5On the pop-up screen of the terminal, tap [Pair].6On the "ポータブルデバイスのネットワーク構成 (Network composition of the portable device)" window of the PC, click "完了 (Done)".・Remove the microUSB cable from the terminal and the PC.❖Information・If the privacy separator function for Wi-Fi network (access point) is enabled, pair setting cannot be made.Connecting the terminal to a PC within the Wi-Fi network1From the Home screen, u[Settings]u[Xperia™ Connectivity]u[USB Connectivity]u"Host name" (PC name) in the "WIRELESS MEDIA TRANSFER" field.2[Connect].・The terminal and the PC are connected in "Media transfer mode (MTP)" on a Wi-Fi network, and you can exchange data files.・To disconnect, tap [Disconnect].❖Information・The pair setting is retained even if you connect/disconnect repeatedly by coming in and out of a Wi-Fi area. To cancel the pair setting, disconnect the connection, then tap "Host name" (PC name)u[Unpair]uTap [OK].Using Wi-Fi function, you can share media files with other client (DLNA : Digital Living Network Alliance) devices.・Set up a connection (P.145) in advance using the same Wi-Fi network as for the other DLNA devices.Connecting DLNA device](https://usermanual.wiki/Sony/PM0816.UG/User-Guide-2593934-Page-185.png)
![184External device connection1From the Home screen, u[Settings]u[Xperia™ Connectivity]u[Media server settings].2Tap of Share media or drag it to the right.・ appears on the status bar.・Tap [Change server name] to rename the terminal (media server) displayed on a DLNA device.・To upload media files from DLNA device to the terminal, mark "Upload to Xperia™".3Connect the DLNA device to the terminal using an application on the DLNA device.・Access request for media server is notified to the terminal.4On the Media server settings screen of the terminal, tap the pending DLNA deviceuSet the access level.・The DLNA device is registered.・If you tapped [Allow this time], read the message that appearsuTap [OK].5Select a media file on your terminal using the DLNA device to play it back.Play media files in the DLNA device on the terminal.1From the Home screen, tap any of [Album]/[Walkman].・To play a file in "Movies", from the Home screen, u[Movies].2Flick right from the left edge of the screenu[Devices]uSelect a device.3Select a folderuSelect a media file.You can play a media file in the terminal with a DLNA device using Throw function.1From the Home screen, tap any of [Album]/[Walkman].・To play a file in "Movies", from the Home screen, u[Movies].2Tap a file you want to playuu[Throw].Setting Media serverPlaying media files in the DLNA device with the terminalPlaying a media file in the terminal with a DLNA device](https://usermanual.wiki/Sony/PM0816.UG/User-Guide-2593934-Page-186.png)
![185External device connection3Tap a device on the device list.Connect to a TV to activate TV Launcher and display photos and videos on the TV screen.1Connect to TV using commercially available MHL cable.・Activate TV launcher automatically. If TV launcher does not activate automatically, , appears on the status bar. Drag the status bar downwardsuTap [TV launcher] to activate TV launcher.2Switch the TV to MHL input mode.3Flick an icon left or rightuSelect application you want to use.❖Information・To connect to an HDMI compatible TV, a commercially available HDMI connector (MHL adapter) and HDMI cable are required.・When MHL is connected, radio wave condition may be affected according to your environment for the usage.・When you do not use MHL connection, remove the MHL cable or HDMI adapter and cancel MHL connection. If the HDMI cable remains connected, the battery may be consumed quickly.・The terminal does not support resolution 720u576p (50Hz) for MHL output to TV.・You can operate the TV Launcher screen or the Home screen using a TV remote control if connecting the following devices. Some applications can be operated with a TV remote control.- MHL compatible TV supporting Remote Control Protocol (RCP)- HDMI compatible TV supporting Consumer Electronic Control (CEC) (a commercially available HDMI connector (MHL adapter) compatible with RCP is required)・To check operations by TV remote control, drag the status bar downwards uTap [MHL connected]u[Remote control usage].Connecting to other devicesConnecting a TV](https://usermanual.wiki/Sony/PM0816.UG/User-Guide-2593934-Page-187.png)
![186International roamingInternation al roamingWith the international roaming (WORLD WING), you can use the terminal without changing phone number or mail address in the service area of the overseas network operator affiliated with DOCOMO. You do not need to change the settings of call and SMS.■ Supporting networksThe terminal is Class 5. The terminal works in LTE network, 3G network and GSM/GPRS network service area. Services are also available in countries and areas supporting 3G 850MHz/GSM 850MHz. Check available areas.■ Before using the terminal overseas, refer to the following.・"Mobile Phone User's Guide [International Services]"・DOCOMO International Services website❖Information・For Country codes, International call access codes, Universal number international prefix, supported countries/areas and network operators, refer to "Mobile Phone User's Guide [International Services]" or DOCOMO International Services Website.*1 To use data communication during roaming, mark "Data roaming" checkbox in Mobile networks (P.188).*2 Calling is available via 3G.❖Information・Some services are not available depending on the overseas network operator or network.Overview of International roaming (WORLD WING)Available overseas serviceMain communication services3G 3G 850 GSM (GPRS) LTEPhone○○○×*2Message (SMS)○○○○Mail*1○○○○Browser*1○○○○](https://usermanual.wiki/Sony/PM0816.UG/User-Guide-2593934-Page-188.png)
![187International roamingTo use the terminal overseas, check the following in Japan.■ Subscription・Check if you subscribe WORLD WING. For details, contact "General Inquiries" on the last page.■ Charging・For AC adapter for charging overseas travel, use AC Adapter 03/04/05 (optional).■ Usage charge・Overseas usage charges (call and packet communication) differ from those in Japan. For details, refer to "Mobile Phone User's Guide [International Services]" or DOCOMO International Services Website.・Some applications perform communication automatically. Packet communication charge may be higher. For operations for each application, ask the application provider.Network service settingsIf you subscribe to network services, you can use network services such as Voice Mail Service, Call Forwarding Service, Caller ID Display Request Service, etc., even overseas. However, some network services cannot be used.・To use network services overseas, you need to set "Remote operation settings" to activate (P.87). You can set Remote operation settings in the country you stay (P.193).・Even if the setting/canceling operation is available, some network services cannot be used depending on overseas network operators.When you arrive overseas and turn on the terminal, an available network is automatically set.ConnectivityWhen you have set "Search mode" of "Service providers" in "Mobile networks" to "Automatic", optimized network is automatically selected (P.188).Checking before overseas useBefore leaving JapanAdvance preparationAfter arriving overseas](https://usermanual.wiki/Sony/PM0816.UG/User-Guide-2593934-Page-189.png)
![188International roamingBy default, the terminal automatically searches available network and connect to it. To switch network manually, set as follows.Setting data roaming1From the Home screen, u[Settings]u[More...]u[Mobile networks].2Mark "Data roaming"uRead the notes and tap [OK].Setting a network operator1From the Settings screen, u[Settings]u[More...]u[Mobile networks]u[Service providers].・If a note appears, tap [OK].2[Search mode]u[Manual].・To display available networks, tap [Search networks].3From "AVAILABLE NETWORKS", mark a network to use.❖Information・If you cannot search networks, disable mobile data communication (P.147) and then search again.・If you set a network manually, the terminal is not reconnected to another network automatically even if you move out of the network area.・To return to "Automatic", tap [Automatic] in Step 2.Setting network mode1From the Settings screen, u[Settings]u[More...]u[Mobile networks]u[Network Mode].2Tap any of [LTE (preferred)/3G/GSM]/[LTE/3G]/[3G/GSM]/[3G only]/[GSM only].・If you select "LTE (preferred)/3G/GSM" to switch available network automatically.DisplayDuring international roaming, appears on the status bar.・You can confirm the name of the connected network operator on the Notification panel.❖Note・While appears on the status bar, packet communication is available. Note that packet communication charge may become high.Settings for overseas use](https://usermanual.wiki/Sony/PM0816.UG/User-Guide-2593934-Page-190.png)
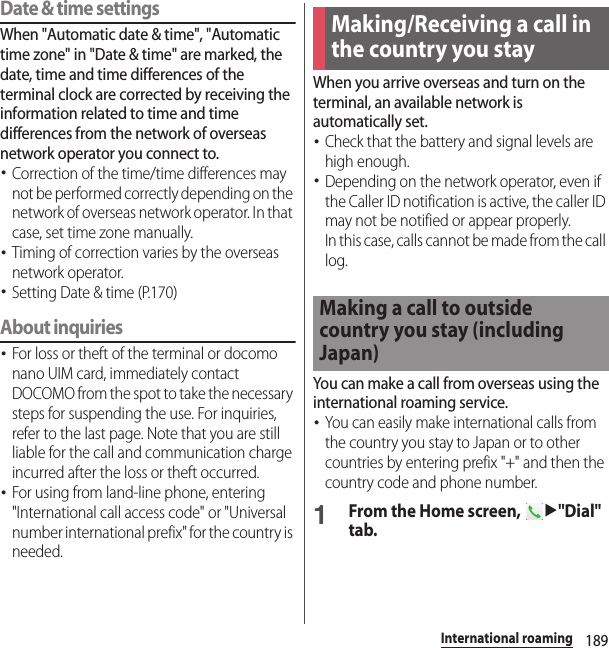
![190International roaming2Dial + (touch and hold [0])uEnter Country code, Area code (City code), a phone number in the order.・If the area code begins with "0", omit "0". However, "0" may be required to dial to some country or area such as Italy.・To call an overseas "WORLD WING" user, enter "81" (Japan) for the country code.3.・When "Auto conversion" in International dial assist is marked (P.192), the international dial assist screen appears when sending. To make a call to Japan, tap [Call].4When the call is finished, tap [End call].You can make a call by entering the phone number of the other party's land-line phone or mobile phone in the same way you do in Japan.1From the Home screen, u"Dial" tab.2Enter a phone number.・To make a call to land-line phone, enter the area code (city code) + other party's phone number.3.・When "International dial assist" screen is displayed, tap [Call original].4When the call is finished, tap [End call].When the other party uses international roaming service, make a call as an international call to Japan even when you stay in the same country as the other party.Making a call within the country you stayMaking a call to WORLD WING user overseas](https://usermanual.wiki/Sony/PM0816.UG/User-Guide-2593934-Page-192.png)
![191International roamingYou can receive a call using the international roaming service.1While receiving a call, drag (left) to (right).2When the call is finished, tap [End call].❖Information・When you received a call during the international roaming, regardless of which country the call is from, it is forwarded internationally from Japan. A caller is charged for a call fee to Japan, and the receiver is charged for a reception fee.Making a call from the other party■ Having someone make a call from Japan to the country you stay.To have the other party make a call from a land-line phone or mobile phone in Japan to the terminal in the country you stay, the other party only needs to dial the phone number as in Japan.■ Having someone make a call from other than Japan to the country you stayYou have to receive a call through Japan no matter where you are; therefore, the other party needs to enter the international call access code and "81" (Country code of Japan).International access code - 81 - 90 (or 80, 70) - XXXX - XXXXReceiving a call in the country you stay](https://usermanual.wiki/Sony/PM0816.UG/User-Guide-2593934-Page-193.png)
![192International roamingMake settings for using international roaming or international calls.・For some overseas network operators, settings may not be made.1From the Home screen, u.2[Call settings]u[Roaming settings].1From the Home screen, u.2[Call settings]u[Roaming settings].3[International dial assist].Set network service such as voice mail from overseas.・You need to set "Remote operation settings" to activate in advance (P.87).・If you make the settings overseas, you are charged a call fee to Japan from the country you stay.・For some overseas network operators, settings may not be made.1From the Home screen, u.International roaming settingsRestricting incoming callsSet whether to restrict incoming calls during international roaming.Incoming notification on roamingSet whether to notify with SMS if you cannot receive calls because of out of service etc. during international roaming.Roaming guidanceSet whether to notify the caller of international roaming.International dial assistP. 1 9 2Network serviceP. 1 9 2Setting International dialing assistAuto conversionInternational prefix or country code is automatically added.Country code[OK]uSelect a country code which will be used for auto conversion.International prefix[OK]uSelect an international prefix which will be used for auto conversion.Setting Network service (overseas)](https://usermanual.wiki/Sony/PM0816.UG/User-Guide-2593934-Page-194.png)
![193International roaming2[Call settings]u[Roaming settings].3[Network service]uSelect a target service.4[OK]uOperate according to the guidance.When you return to Japan, the terminal is connected to DOCOMO network automatically. If connection is failed, perform the following operations.・Set "Network mode" to "LTE (preferred)/3G/GSM" (P.188).・Set "Search mode" to "Automatic" in "Service providers" (P.188).Remote operation (charged)Set whether to start Remote operation.Caller ID request (charged)Set whether to start Caller ID display request service.Incoming call notific. (charged)Set whether to start Incoming notification on roaming.Roaming guidance (charged)Set whether to start Roaming guidance.Voicemail(charged)Set whether to start Voice mail service.Select a target operation.Call forwarding (charged)Set whether to start Call forwarding.Select a target operation.After returning to Japan](https://usermanual.wiki/Sony/PM0816.UG/User-Guide-2593934-Page-195.png)
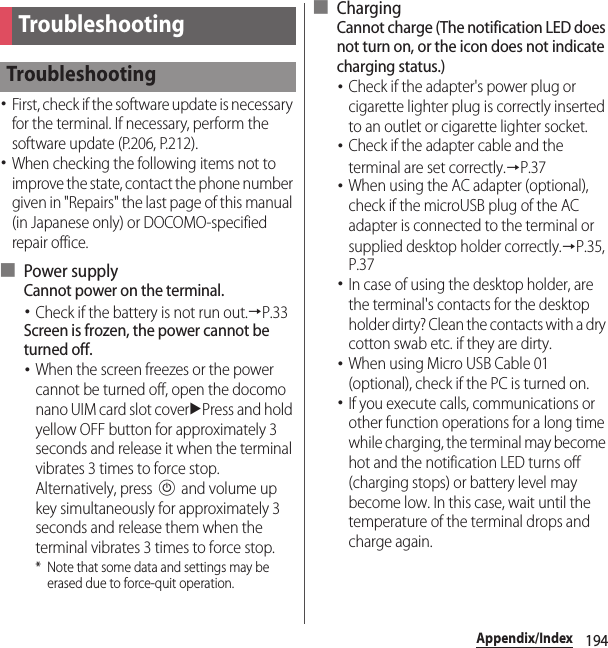
![196Appendix/IndexThe screen reacts slowly when you tap or press keys.・When large amount of data is saved in the terminal or transferring large-size data between the terminal and microSD card, the reactions on the screen may be delayed.The docomo nano UIM card is not recognized.・Check if the docomo nano UIM card is attached in the right direction.→P.31The clock is not on time.・The clock time may become wrong when the power is turned on for a long time. Check if "Automatic date & time" and "Automatic time zone" are marked and turn the power off and on in a place with strong radio wave conditions.→P.170The terminal operation is unstable.・Instability may be caused by applications that you installed after purchasing the terminal. If the symptom is improved when you boot the terminal in safe mode (near default state), uninstalling the installed application may improve the symptom.To boot the terminal in safe mode, press and hold P for over a second with the terminal OFF until XPERIA logo appears, and then touch and hold the volume down key. When safe mode is booted, "Safe mode" is displayed at the lower left of the screen.To exit the safe mode, turn power OFF and then ON.Alternatively, with the power on, press and hold P for over a seconduTouch and hold [Power off]uTap [OK] to restart the terminal in Safe mode.* Back up the necessary data before using safe mode.* Some widgets that you created may be removed.* Safe mode is not a normal booting state. To use ordinarily, exit the safe mode.Applications cannot be operated properly (applications cannot be activated, or errors occur frequently).・Are there any applications being disabled? Enable disabled applications, then retry.→P.159](https://usermanual.wiki/Sony/PM0816.UG/User-Guide-2593934-Page-198.png)
![199Appendix/IndexCannot use the terminal overseas (when is displayed)・Check if you are out of the international roaming service area or in an area with poor signal strength. Check if the service area and network operator are available, referring to "Mobile Phone User's Guide [International Services]" or DOCOMO International Services website.・Change the network settings or overseas network operator settings.- Set "Network mode" to "LTE (preferred)/3G/GSM".→P.188- Set "Search mode" to "Automatic" in "Service providers".→P.188・Turning the power off and on may solve the problem.→P.39Cannot perform data communication overseas.・Mark "Data roaming".→P.188The terminal suddenly became unavailable while using overseas.・Check if usage amount exceeds the limit of maximum charges for use.For use of "International roaming (WORLD WING)", the limit of maximum charges for use is set in advance. If exceeding the limit of maximum charges for use, pay the charges.Cannot receive calls overseas.・Is "Restricting incoming calls" set to "Activate restriction"?→P.192No caller ID is notified/a notified caller ID is different from that of the caller/functions for using contents saved in phonebook or those using Caller ID notification do not operate.・Even if a caller notifies its caller ID, it is not displayed on the terminal unless the network or network operator notifies it. And a different caller ID may be notified depending on the network or network operator you use.■ Data managementData transfer is not performed.・Check if USB hub is used. If you use USB hub, operations may not be performed correctly.Data saved in microSD card is not displayed.・Remove and attach the microSD card.→P.173When trying to display an image, "u" appears instead of it.Or "u" appears for the demo play or the preview function.・"u" may appear instead of destroyed image data.](https://usermanual.wiki/Sony/PM0816.UG/User-Guide-2593934-Page-201.png)
![201Appendix/Index ●No service・The terminal is out of service area, or the received signal is too weak. Move to a location where radio signal can be reached.・The docomo nano UIM card is not working properly.Insert the docomo nano UIM card in another terminal. If this works, it is probably the terminal that is causing the problem. In this case, contact "Repairs" on the last page of this manual (in Japanese only).Removing and inserting docomo nano UIM card may solve the problem. ●Mobile network not availableInstall docomo nano UIM card correctly (P.31), then move to a location where radio signal reaches. ●Normal calls are restricted by access control.Appears when normal voice call service is hard to receive because communication lines are busy. ●Emergency calls are restricted by access control.Appears when emergency voice call service is hard to receive because communication lines are busy. ●Calls are restricted by access controlAppears when normal/emergency voice call service is hard to receive because communication lines are busy. ●Restricted access changedAppears when the voice service or data service is not received. ●SIM card is lockedEnter your PIN code (P.164) correctly. ●SIM card is PUK-lockedEnter your PUK (Personal Unblocking Key) (P.164) correctly. ●PIN lock disable code is locked.PIN lock disable code is locked. Please contact a docomo Shop. ●Memory is getting lowAvailable memory space in the terminal is low. If you continue to use the terminal, some functions or applications may not work. Activate the setting screen and select unnecessary applications, then tap [Uninstall] to delete the applications (P.159). ●Memory full.There is no memory space in the microSD card. Delete unnecessary data (P.174) to save the memory space.Error messages](https://usermanual.wiki/Sony/PM0816.UG/User-Guide-2593934-Page-203.png)
![202Appendix/IndexBy sharing screens of your terminal with NTT DOCOMO, you can receive technical support to make settings (in Japanese only).・This service is not available when your docomo nano UIM card is not inserted, during international roaming, or in Airplane mode.・Anshin Enkaku Support is a service requiring subscription.・Some operations and settings are not supported.・For details on Anshin Enkaku Support, refer to NTT DOCOMO website.1Call あんしん遠隔サポートセンター (Anshin Enkaku support center). 0120-783-360Business hours: 9:00 a.m. to 8:00 p.m., open all year round・To make a call to the Anshin Enkaku support center from the terminal, from the Home screen, u[遠隔サポート (Enkaku support)]u[このスマートフォンから発信する (Make a call from this smartphone)]uTap .2From the Home screen, u[遠隔サポート (Enkaku support)].・When you use for the first time, agree to "ソフトウェア使用許諾書 (License Agreement)".3[遠隔サポートの接続画面に進む (Go to Enkaku support connection screen)]u[同意する (Agree)].4Enter connection number notified by DOCOMO.5Enkaku support starts when you are connected.あんしん遠隔サポート (Anshin Enkaku Support)](https://usermanual.wiki/Sony/PM0816.UG/User-Guide-2593934-Page-204.png)

![207Appendix/Index・If software update is not needed, "No update is needed." appears.・During international roaming or when the terminal is out of service area, "When docomo network is not available, or during roaming, software update is not available even if Wi-Fi is connected." or "When docomo network is not available, or during roaming, install cannot be started even if Wi-Fi is connected." appears. The same messages appear even while connecting via Wi-Fi.・Messages (SMS) sent during software update are stored in the SMS center.・When updating software, your private information concerning SO-04G (model, serial number, etc.) is automatically sent to the server for software update managed by DOCOMO. DOCOMO does not use the sent information for purposes except software update.・If software update fails, the terminal may not activate or message indicating that software update fails appears and all operations may become unavailable. In that case, please bring the terminal to DOCOMO-specified repair office.・While updating software, do not activate other applications.Update file is automatically downloaded and software is updated at the specified time.Setting Software update・The settings of Software Update is set to "Automatic Update" by default.1From the Home screen, u[Settings]u[About phone]u[Software Update].2[Configure the software update].3[Automatic Update]/[Manual Update].When software update is necessaryIf the update file is downloaded automatically, appears on the status bar.・When the rewrite start time is reached with displayed, software is automatically rewritten.1Drag the status bar downwarduTap notification of Software update.・Software update notice screen appears.Updating software automatically](https://usermanual.wiki/Sony/PM0816.UG/User-Guide-2593934-Page-209.png)
![208Appendix/Index2Perform a target operation.・"OK" : Return to the Home screen. Updating starts when the preset time reaches.・"Set Time" : Reserved update→"Reserving software update" (P.209)・"Start update" : Update immediately→"Updating software immediately" (P.208)❖Information・If the software is not updated when the update notification is received, appears on the status bar to notify.・If software update at the preset time could not be performed, the software update will be performed at the same time the following day.・Software cannot be updated automatically when the Auto-update setting is set to "Manual Update" or while updating software by Now update.Software update starts immediately.・There are 2 ways to activate software update: activating from Software update notice screen and activating from the menu.1From the Home screen, u[Settings]u[About phone]u[Software Update].2[Start the software update]u[Yes].・For activating from Software update notice screen, display the Software update notice screenu[Start update].3After a message for rewriting start appears, rewriting starts automatically in approximately 10 seconds.・Tap [OK] to start rewriting automatically.・While updating the software, all key operations become disabled. Also, updating cannot be canceled.・When the software update is complete, the terminal restarts and the Home screen is displayed.❖Information・If software update is not needed, "No update is needed." is displayed.Updating software immediately](https://usermanual.wiki/Sony/PM0816.UG/User-Guide-2593934-Page-210.png)
![209Appendix/Index■ Post-update display appears on the status bar. Drag the status bar downwardsuTap the notification, a message indicating that software update is complete appears.You can preset time to update the software if you want to specify another time for installing the update file.1Display the Software update notice screenu[Set Time].2Set a timeu[Set].■ When the reserved time is reachedWhen the reserved time is reached, a message for rewriting start appears, then rewriting starts automatically in approximately 10 seconds.❖Information・While updating the software, all key operations become disabled. Also, updating cannot be canceled.・If software update could not be started at the preset time, the software update will be performed at the same time the following day.・While upgrading Android software, software update is not executed even when the set time arrives.・When an alarm etc. is set at the same time as the reserved time, priority will be given to the software update.・If SO-04G is turned OFF at the reserved time, the software update starts at the same time as the reserved time after the terminal is turned ON.・If (Software update was suspended Please check the remaining internal storage capacity and retry.) appears on the status bar during software update, make sure that sufficient memory remains on the phone memory and retry to update.・If (Software update was suspended Please check the status of the handset and retry.) appears on the status bar during software update, make sure that the terminal is not in the following states and retry to update.-No signal- Interfered by some functionReserving software update](https://usermanual.wiki/Sony/PM0816.UG/User-Guide-2593934-Page-211.png)
![211Appendix/Index- While updating software・Upgrading software may take time.・During international roaming or when the terminal is out of service area, "Unable to start upgrading in an area where Wi-Fi or FOMA/Xi signal is unreachable" appears.・When Upgrade Android software is performed, some settings are initialized. Make the settings again.・When upgrading Android software, the private information concerning the terminal (model, serial number, etc.) is automatically sent to the server of DOCOMO. DOCOMO does not use the sent information for purposes except Upgrade Android software.・If Upgrade Android software failed and all operations become disabled, please contact a DOCOMO-specified repair office.■ Upgrading by receiving notification1When (Upgrade Android software) is displayed in the status bar, open the status bar, drag the status bar downwardsu[Upgrade is available].・Tap [Install] to install to the terminal.■ Upgrading manually1From the Home screen, u[Settings]u[About phone]u[Upgrade Android software].・If upgrade is available, the selection screen for upgrading method appears.2Select a upgrading method.・"Perform now (only via Wi-Fi)" : Immediately download the update file via Wi-Fi connection.Select "Download and Install" or "Download"*1. When the installation is complete, the terminal restarts.・"Perform at scheduled time (via Wi-Fi/Xi)"*2 : Download the update file via Wi-Fi connection or Xi/FOMA at the time that is set automatically.Select "Download and Install" or "Download"*1. When the installation is complete, the terminal restarts.Upgrading Android software](https://usermanual.wiki/Sony/PM0816.UG/User-Guide-2593934-Page-213.png)
![212Appendix/Index*1 If "Download" is selected, when downloading the update files is complete, installing to the terminal is available.*2 If downloading via Xi/FOMA is not available, "Perform at scheduled time (only via Wi-Fi)" appears.❖Information・When the latest software is already applied to the terminal, "No upgrade is needed" appears.・If downloading stops halfway, data downloaded before interruption is retained for up to 14 days. To resume downloading, resume from (Download stopped) on the Notification panel.・When "Perform at scheduled time (via Wi-Fi/Xi)" is selected, time for downloading is automatically set. Start time cannot be changed. If you do not want to download at the automatically-set time, tap [Upgrade Android software]u[Back] to cancel the reservation of downloading. To download update files, from the Home screen, u[Settings]u[About phone]u[Upgrade Android software]u[Perform now (only via Wi-Fi)].・From the notification iconAfter the upgrading is complete, the terminal restarts and the notification icon (Upgrading has been completed) appears.Drag the status panel downwardsu[Upgrading has been completed]u[OK] and then confirm the updates in the update list.・From Play StoreFrom the Home screen, tap [Play Store]u[Play Store]u[My apps] to check for updates of each application.❖Information・When there are updates for applications, operations may become unstable or functions may not work properly without updating applications.・For OS version support information on each application, contact the application provider.Install a software for "Software update" beforehand.For methods of software installation, refer to the following website.http://www.sonymobile.co.jp/support/ (In Japanese only)Updating applicationsConnecting to a PC to upgrade](https://usermanual.wiki/Sony/PM0816.UG/User-Guide-2593934-Page-214.png)
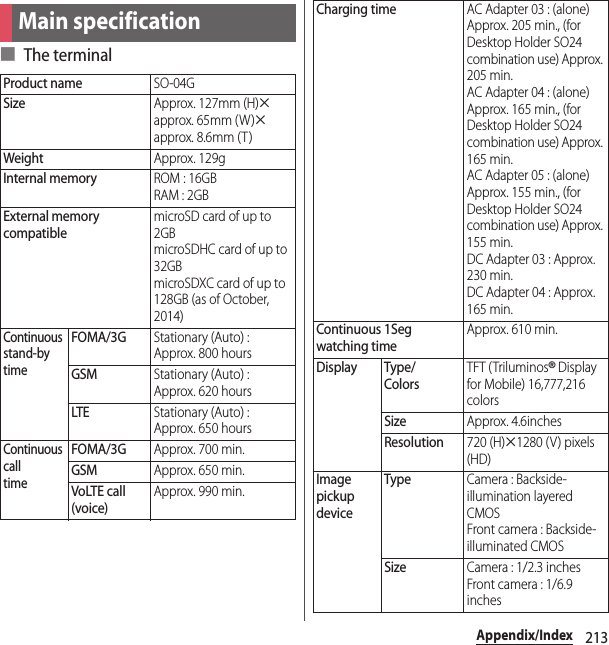
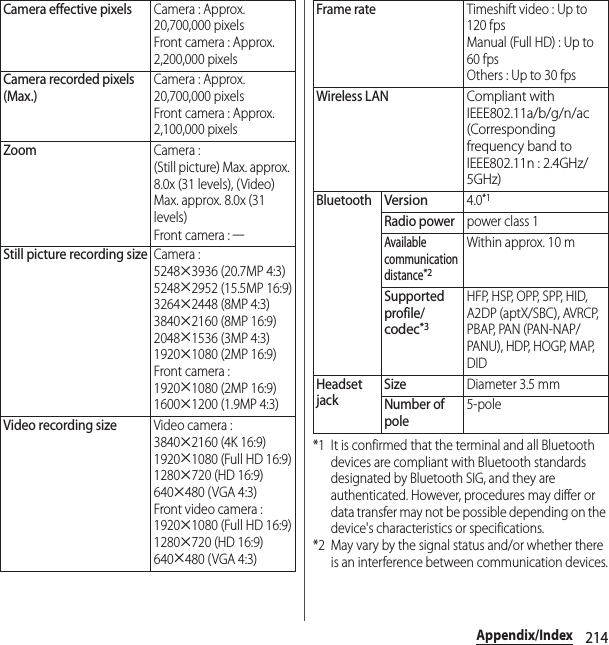
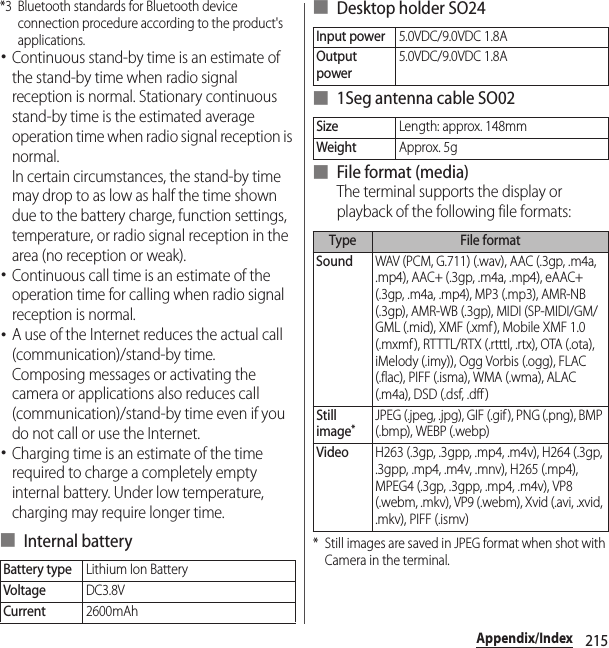
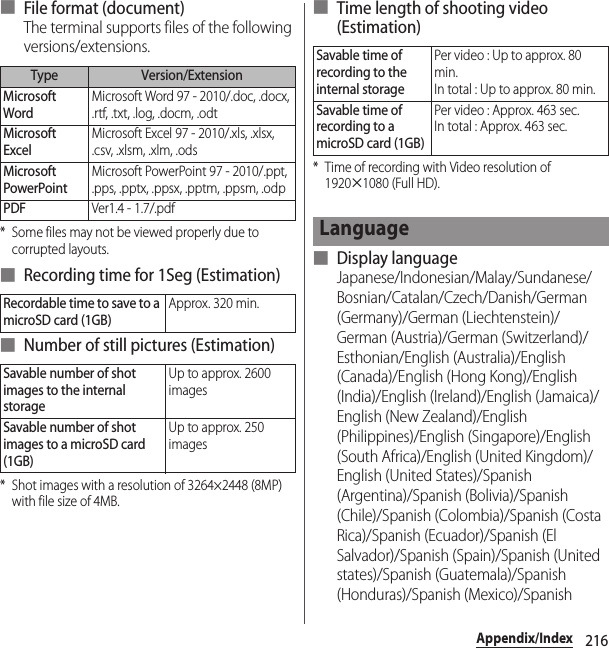
![218Appendix/IndexArabia)/Arabic (Jordan)/Arabic (Lebanon)/Arabic (Bahrain)/Arabic (Oman)/Arabic (Palestine)/Chinese, standard (Taiwan, Traditional)/Chinese, standard (China, Simplified)/Chinese, standard (Hong Kong, Simplified)/Chinese, Cantonese (Hong Kong Traditional)/KoreanYou can check details of certificate and compliance mark specific to the terminal (including certificate number/compliance number).1From the Home screen, u[Settings].2[About phone]u[Legal information]u[Certificates].Software delivered with this device and its media is owned by Sony Mobile Communications Inc., and/or its affiliated companies and its suppliers and licensors.Sony Mobile grants you a non-exclusive limited license to use the Software solely in conjunction with the Device on which it is installed or delivered.Ownership of the Software is not sold, transferred or otherwise conveyed.Do not use any means to discover the source code or any component of the Software, reproduce and distribute the Software, or modify the Software.You are entitled to transfer rights and obligations to the Software to a third party, solely together with the Device with which you received the Software, provided the third party agrees in writing to be bound by the terms of this Licence.This licence exists throughout the useful life of this Device.It can be terminated by transferring your rights to the Device to a third party in writing.Failure to comply with any of these terms and conditions will terminate the licence immediately.Certificate and complianceEnd User Licence Agreement](https://usermanual.wiki/Sony/PM0816.UG/User-Guide-2593934-Page-220.png)