Symbol Technologies RA1202 UHF Narrowband Radio Module User Manual Omnii Hand Held Computer
Symbol Technologies Inc UHF Narrowband Radio Module Omnii Hand Held Computer
Contents
- 1. User Manual
- 2. User Manual 1of2
- 3. User Manual 2of2
- 4. Regulatory Warranty Guide
User Manual 1of2
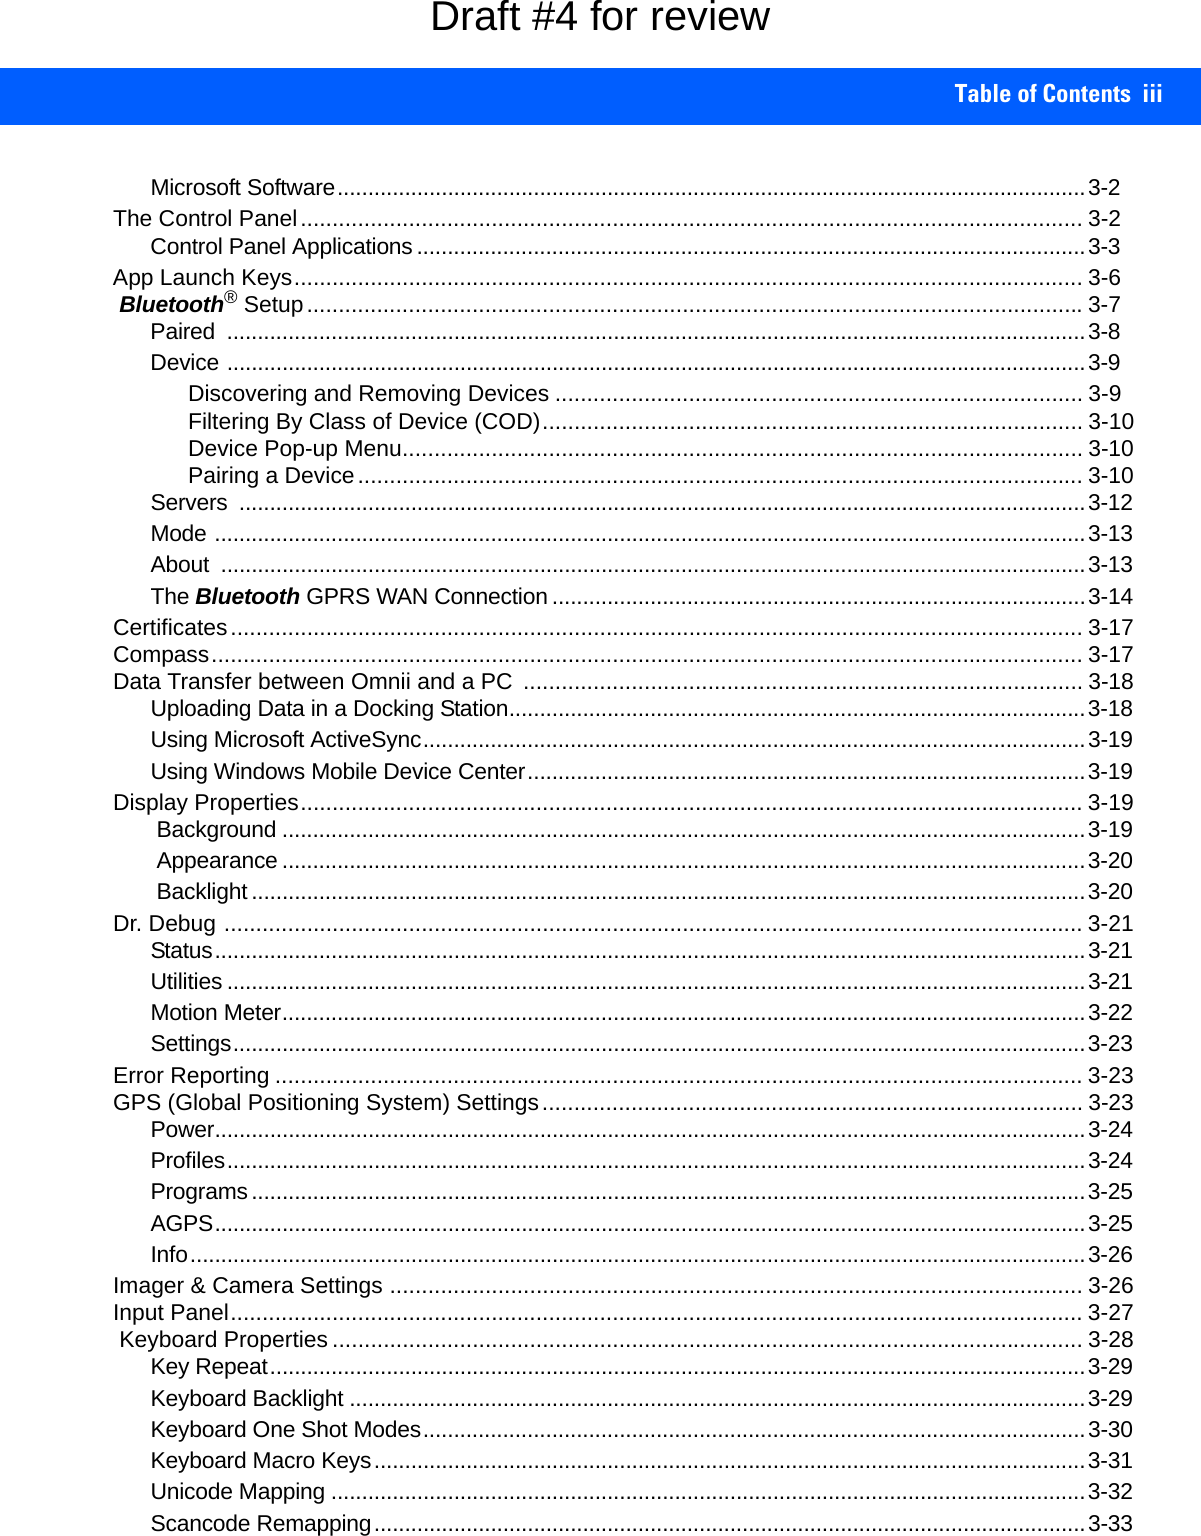
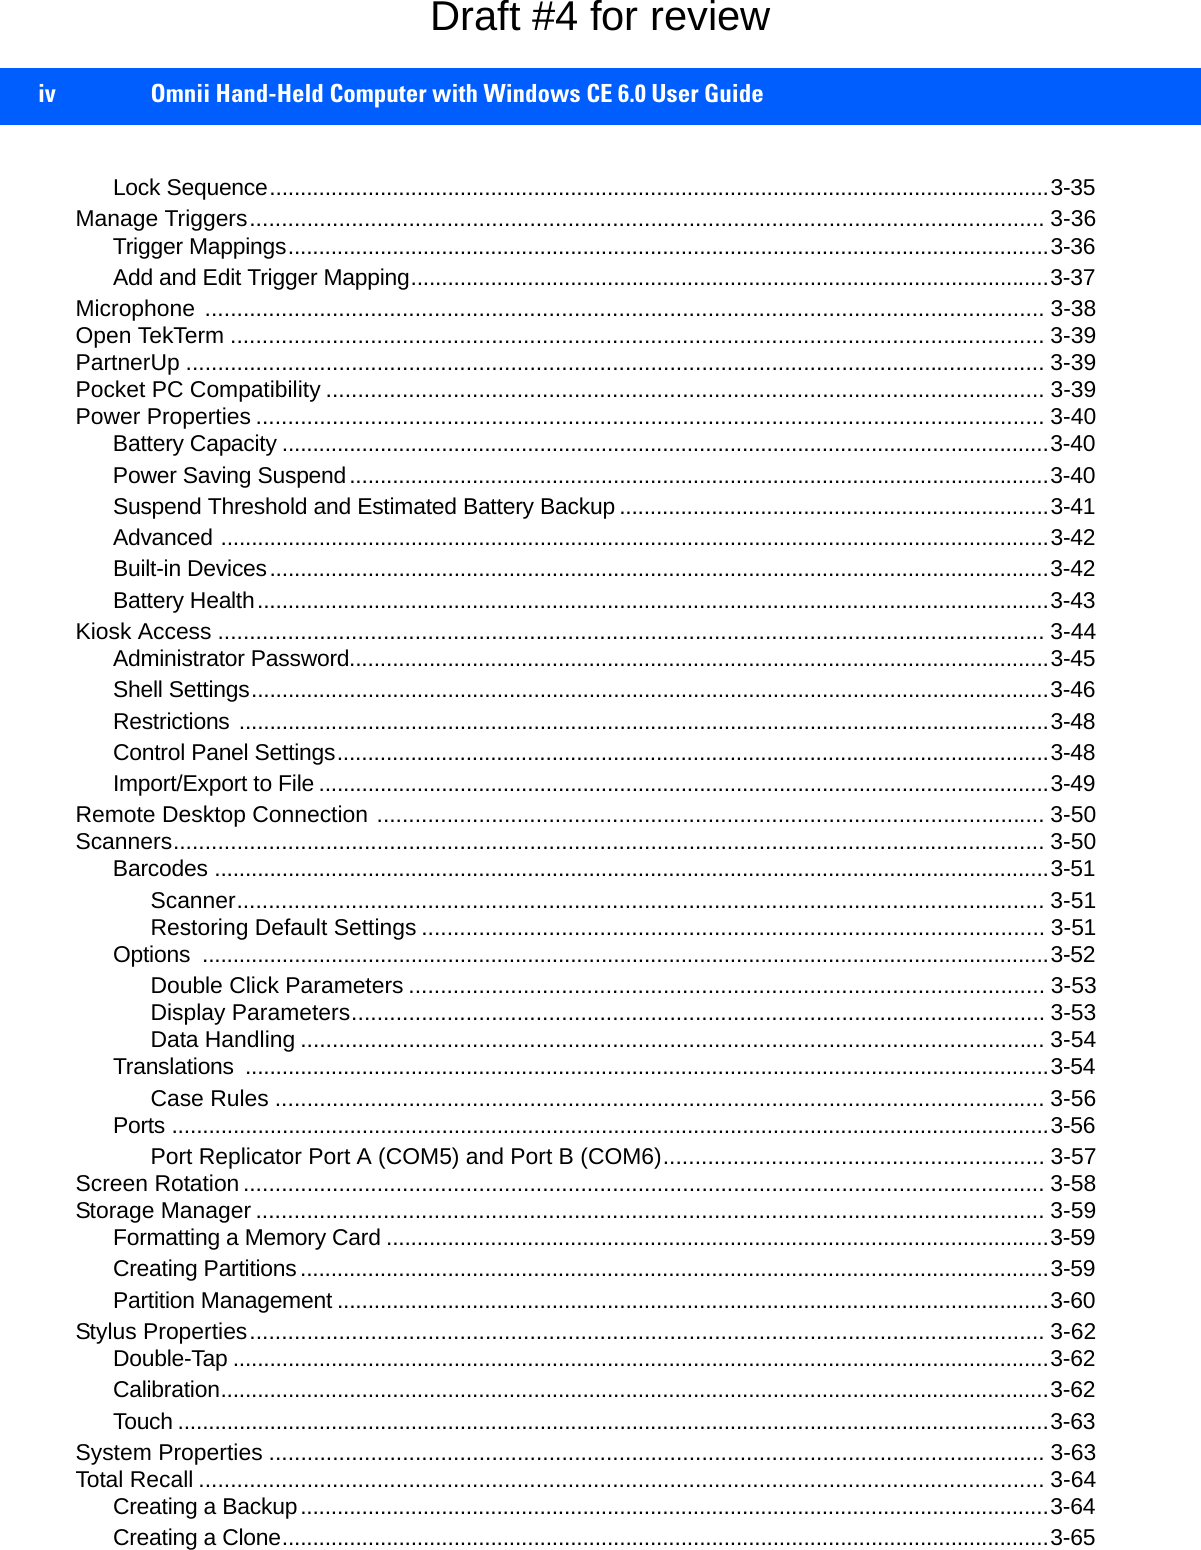
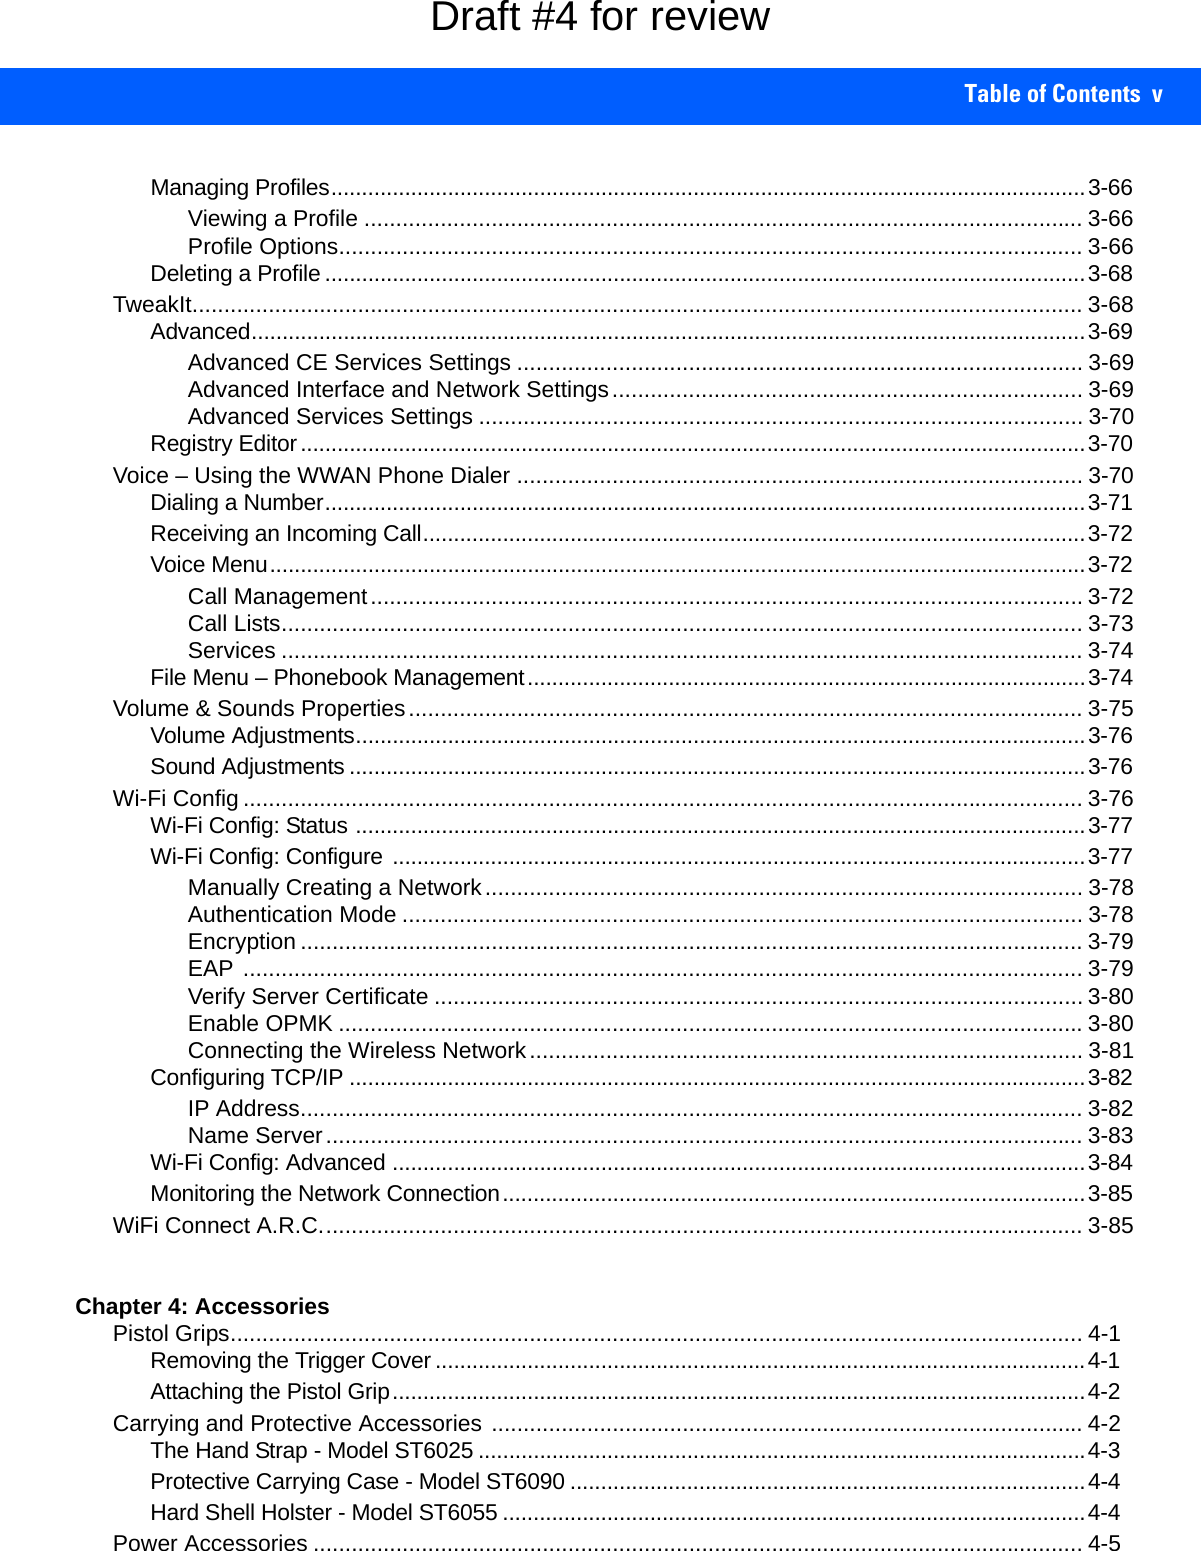
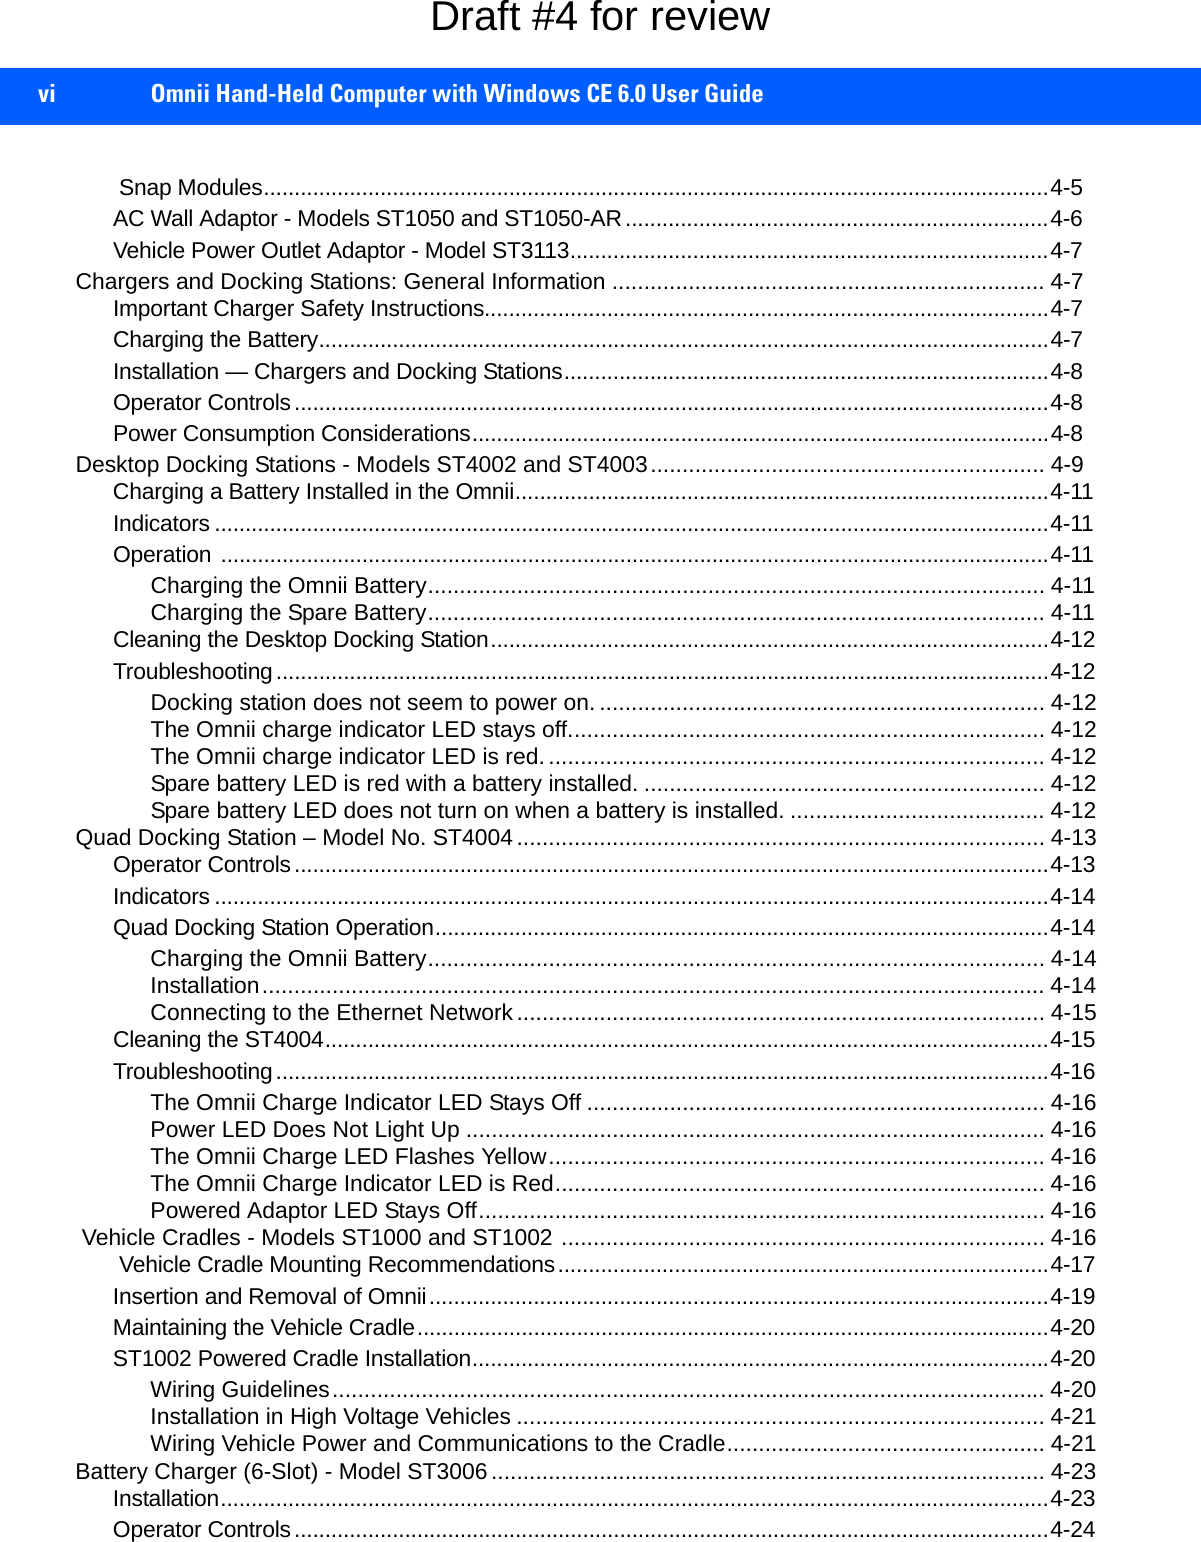
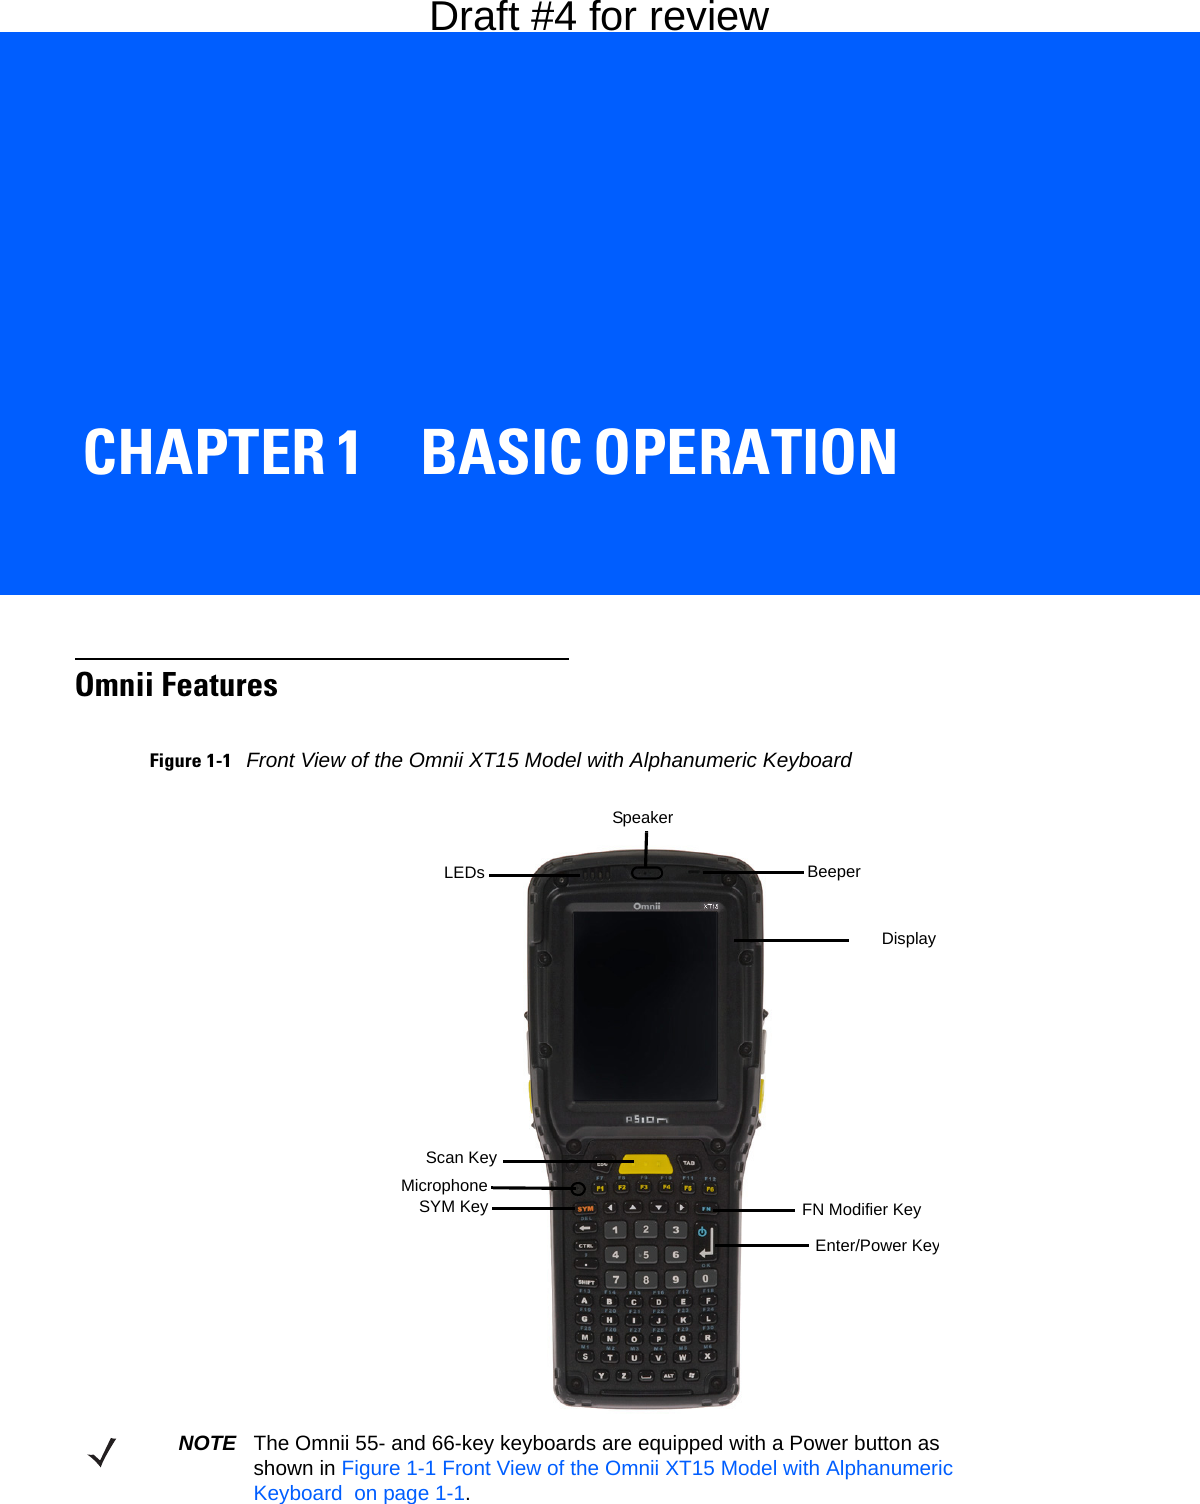
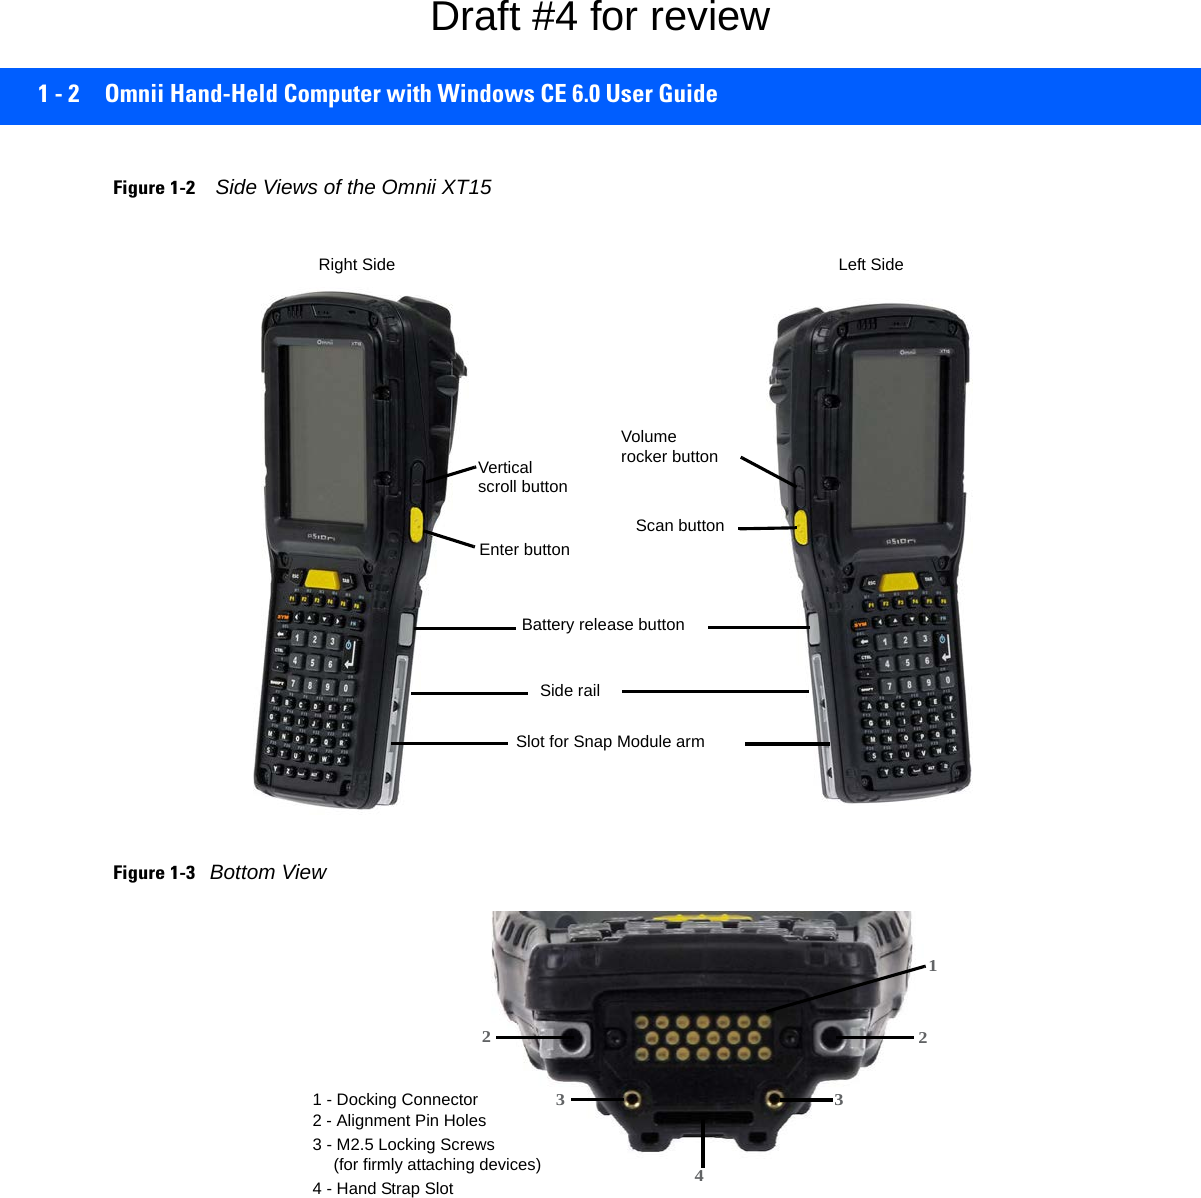
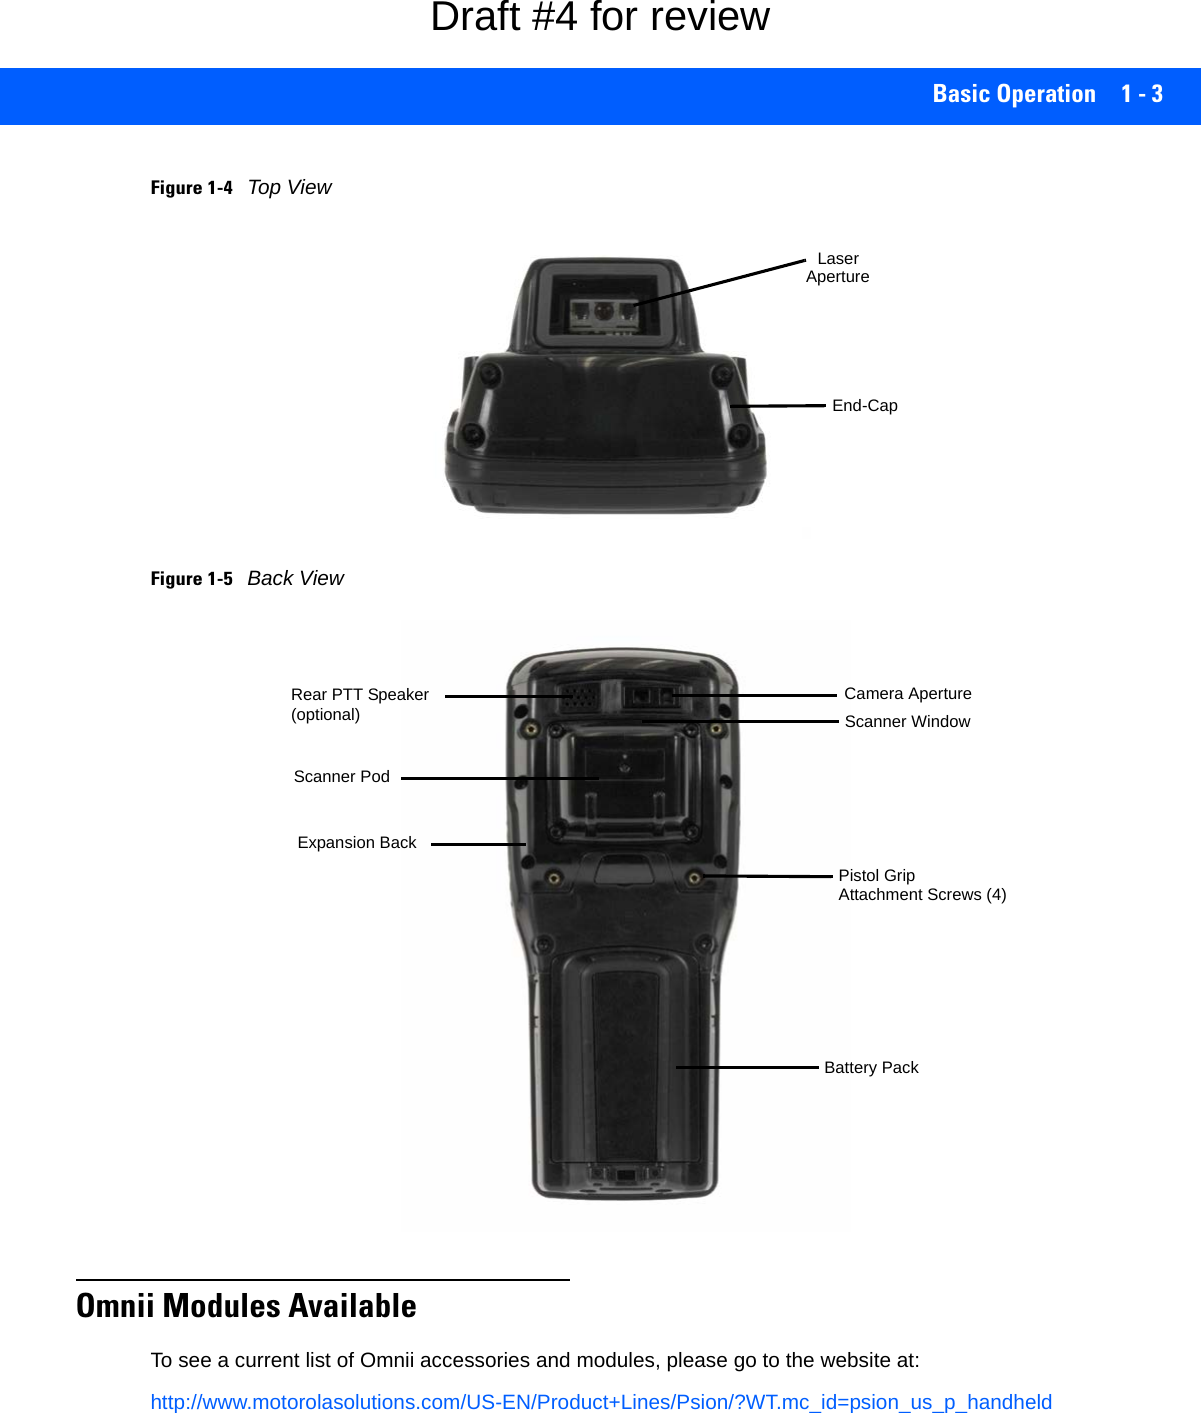
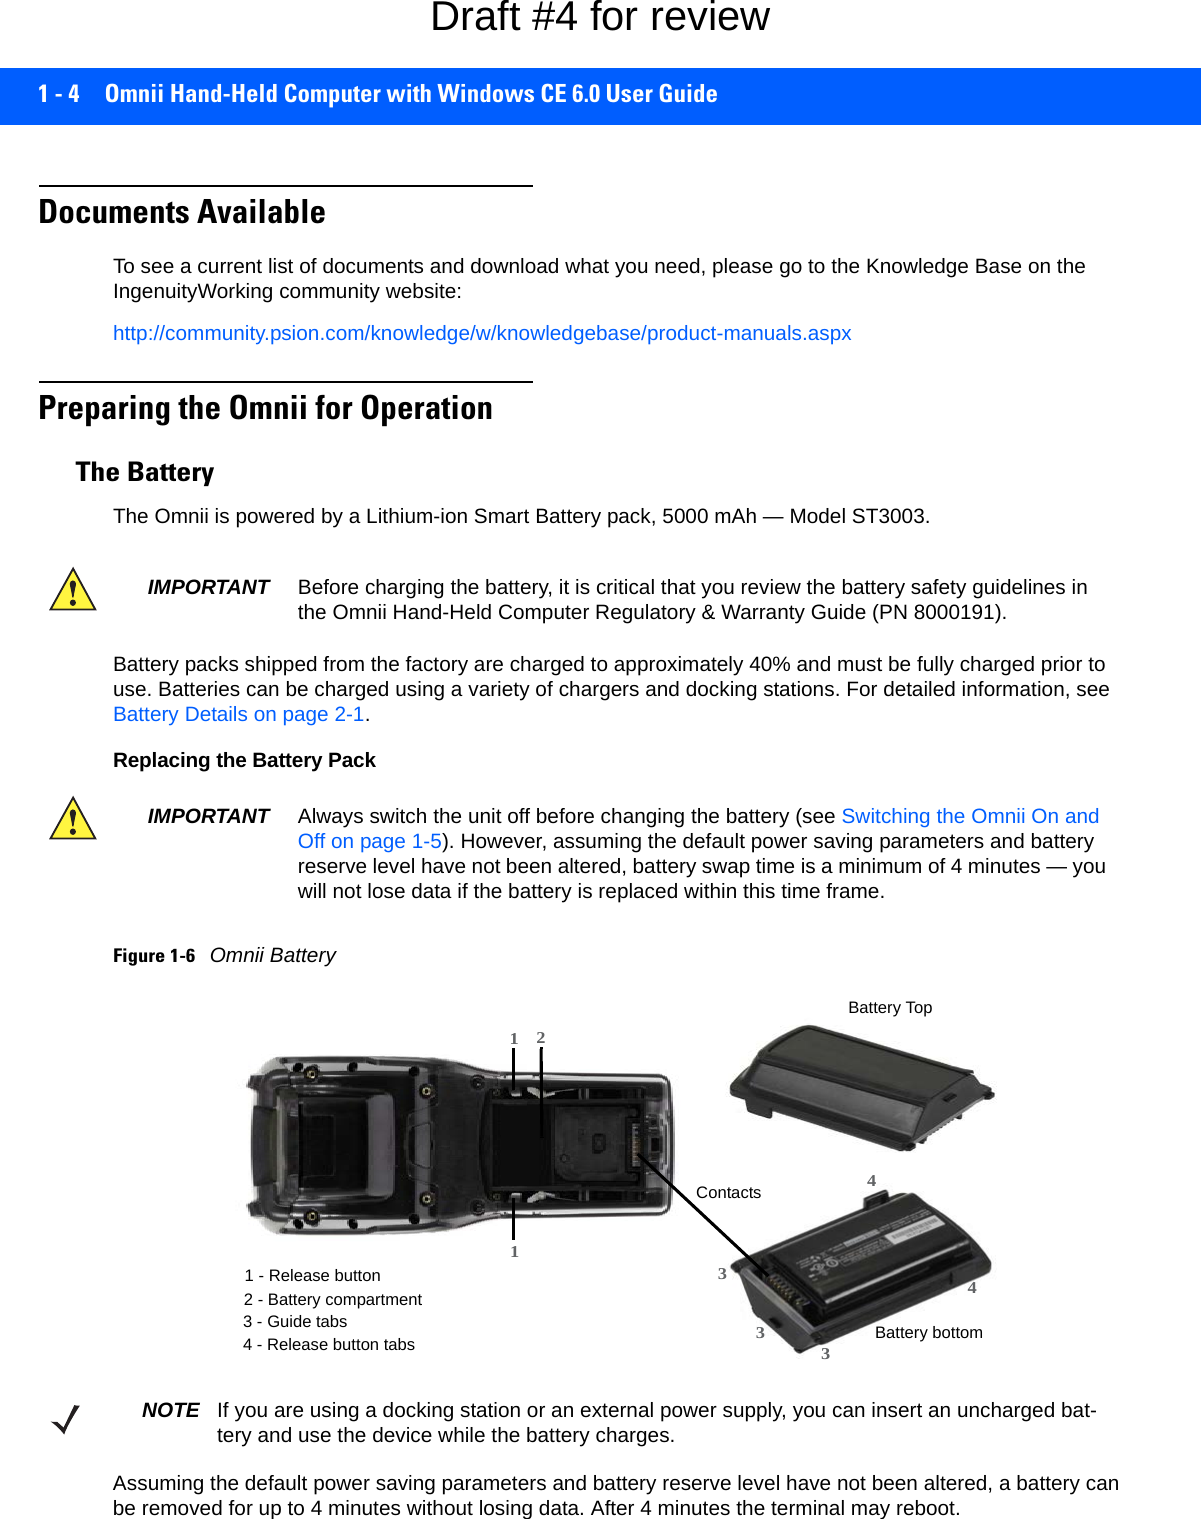
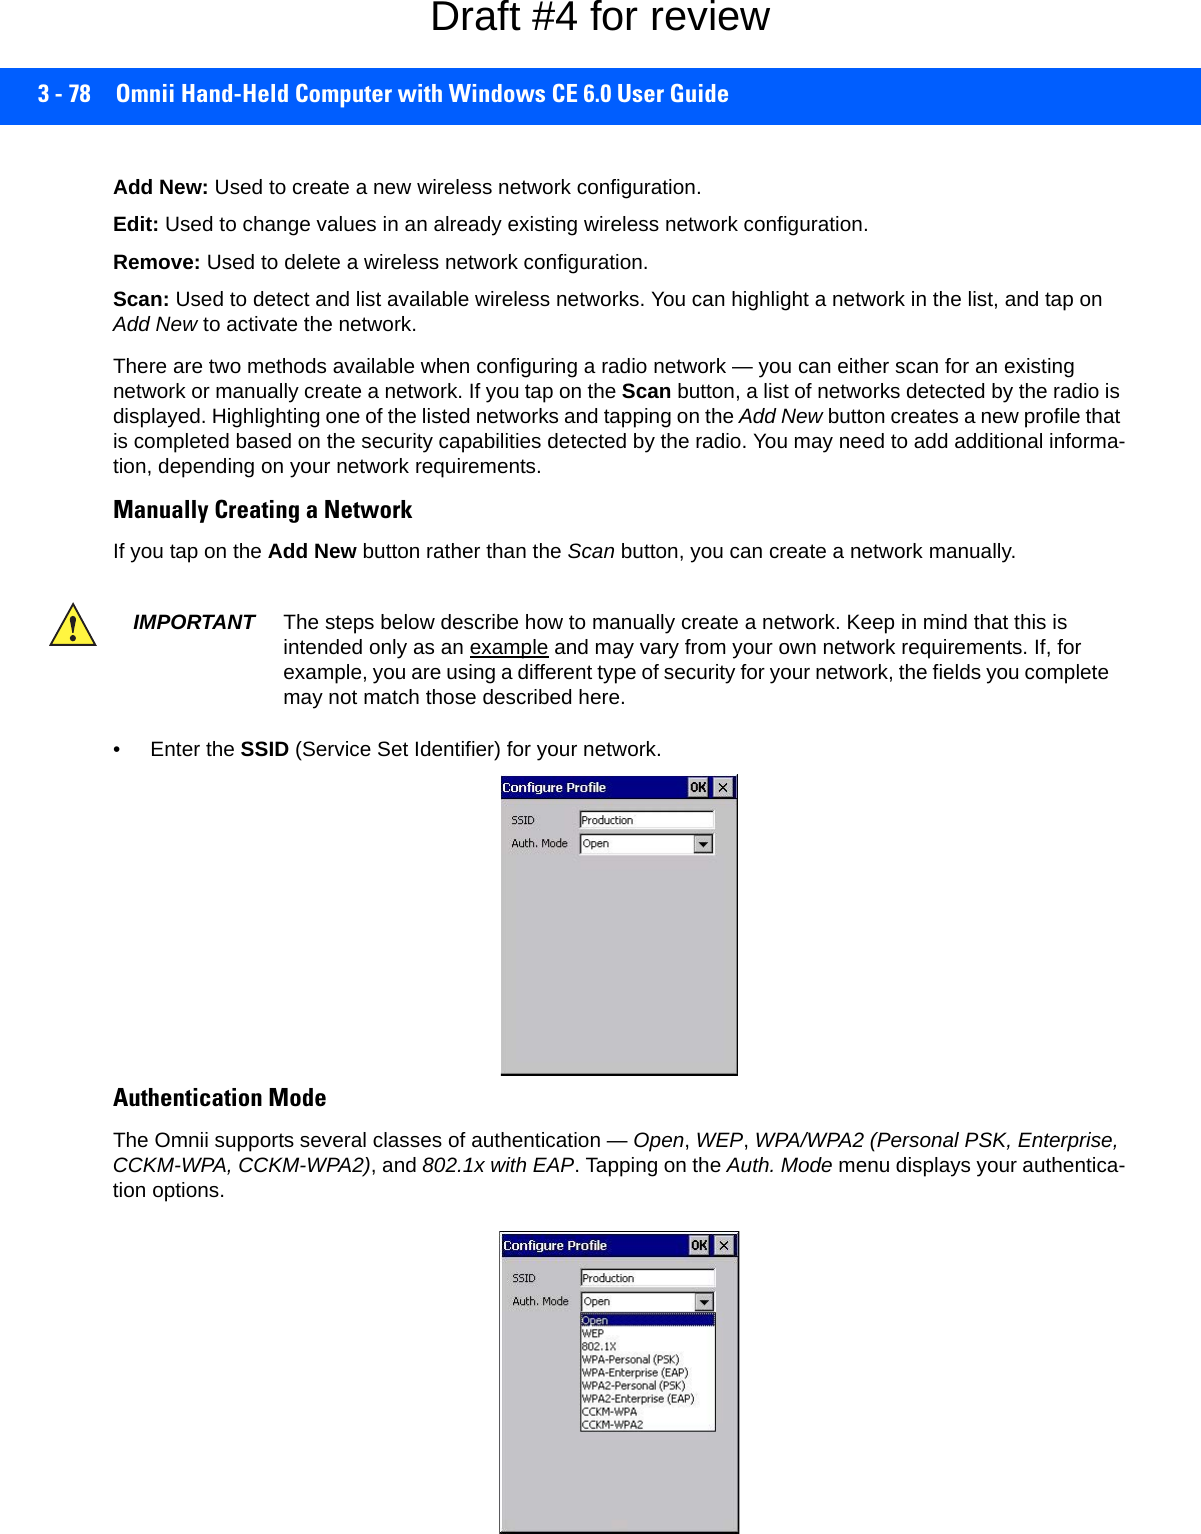
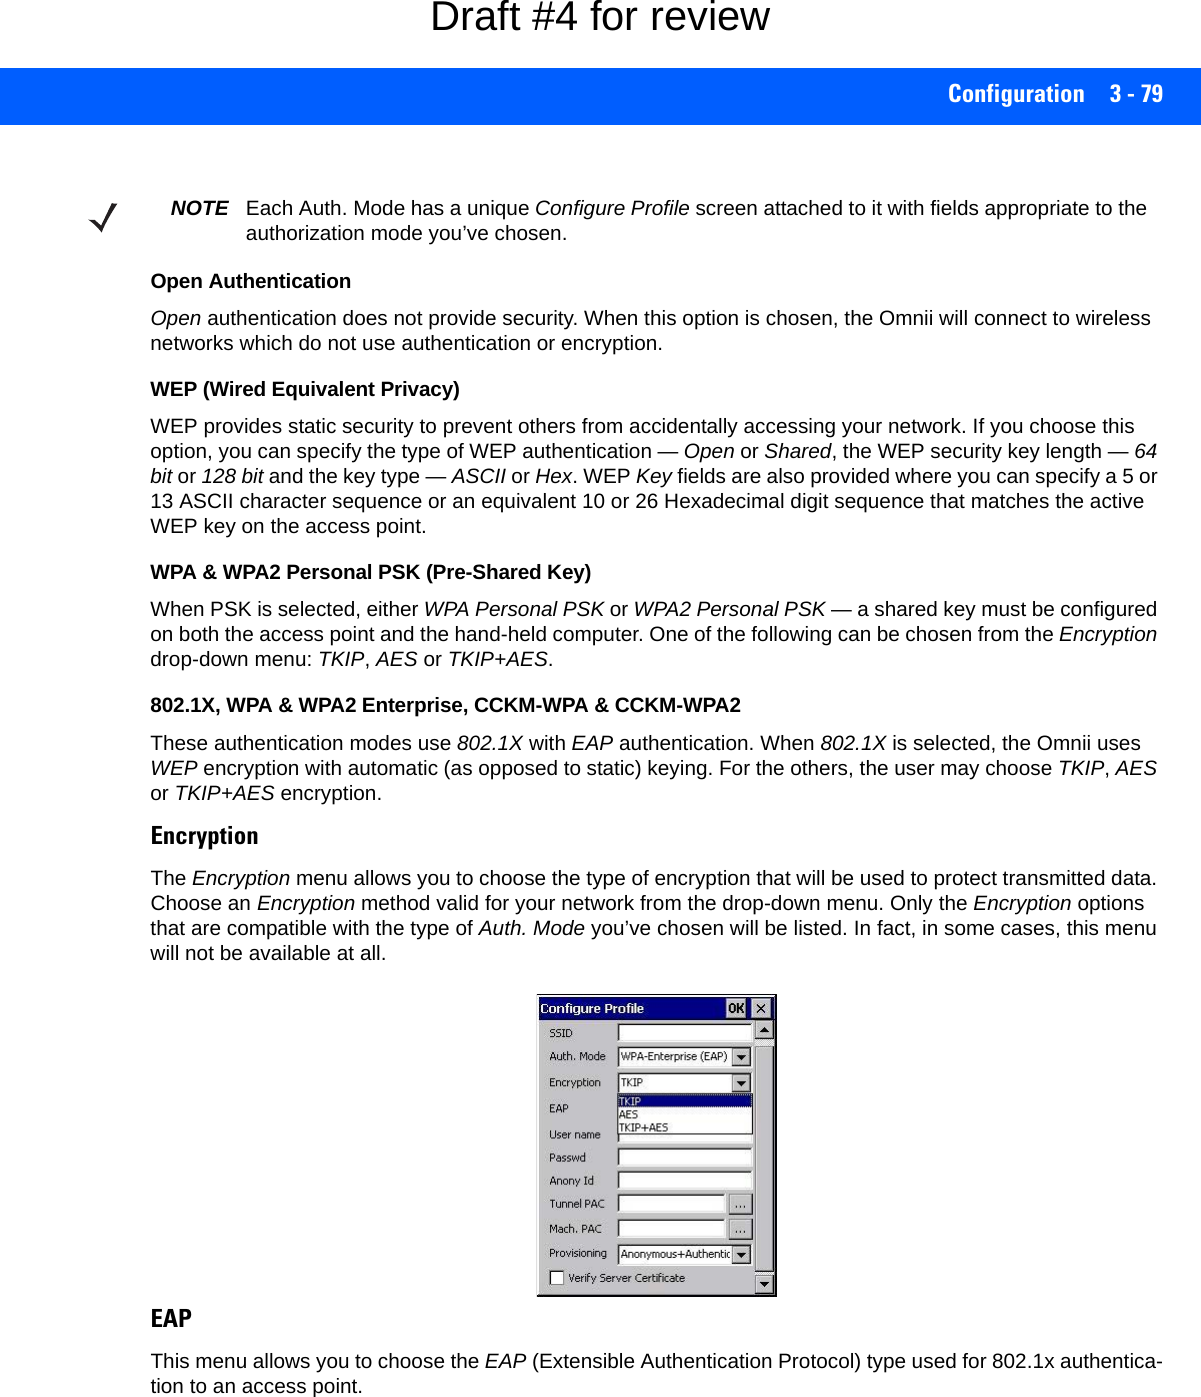
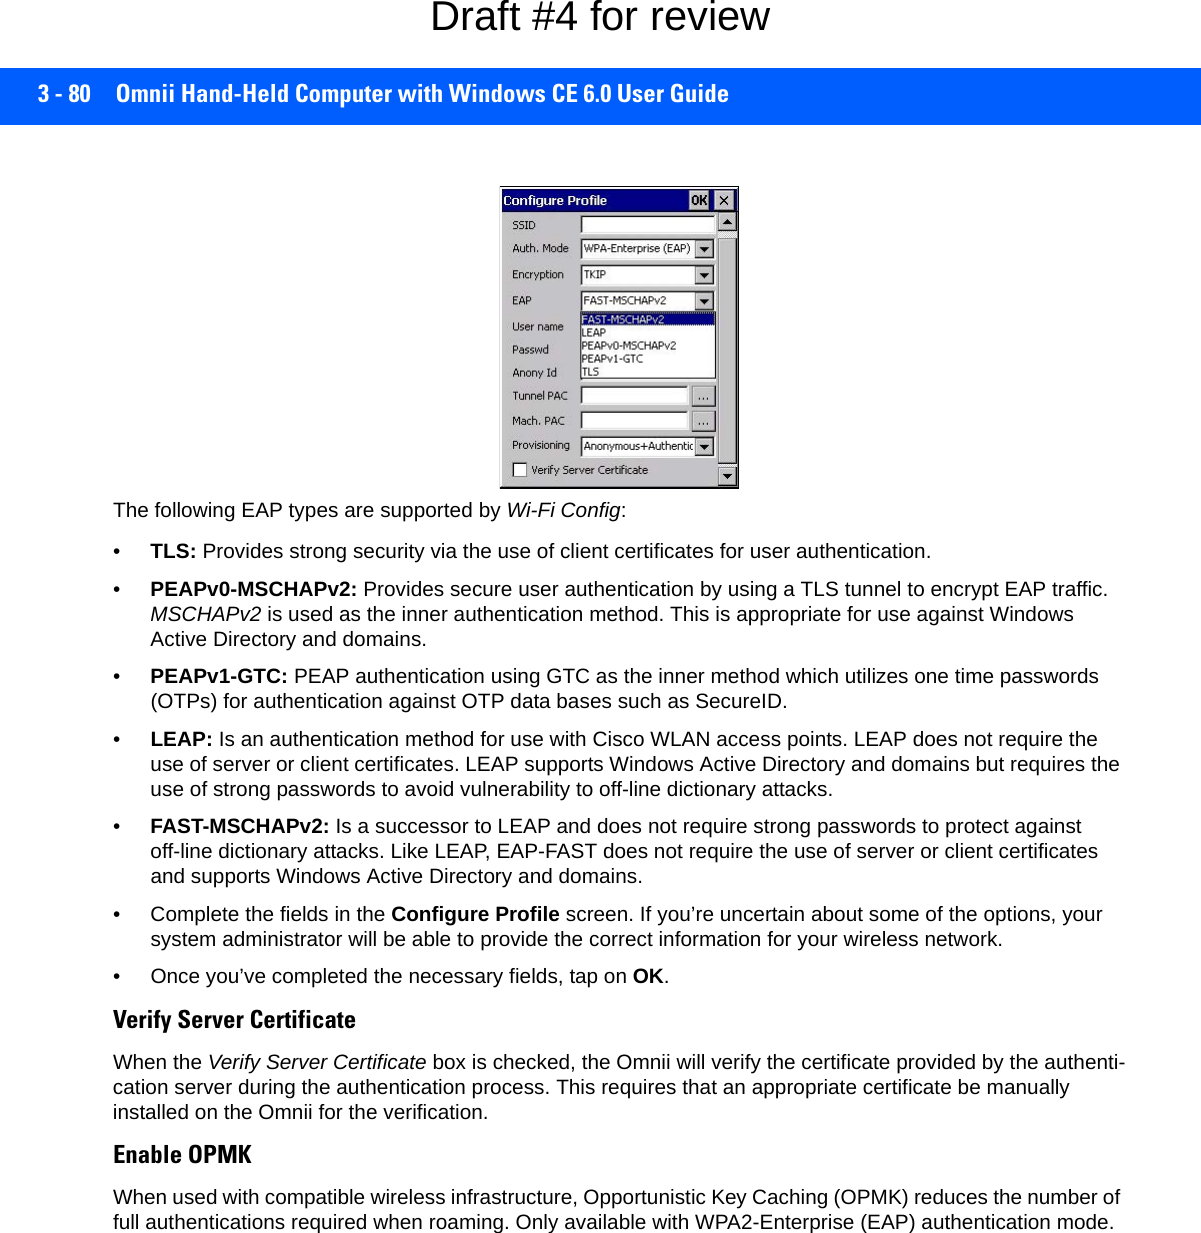
![Basic Operation 1 - 5Removing the Battery Pack• If your unit is equipped with a hand strap, unhook it from the base of the battery.• Press the two buttons at the sides of the compartment simultaneously, and slide the battery out.Installing the Battery Pack• Slide the charged battery with the contoured plastic facing you into the unit with the contacts matching position and the guide tabs moving into the corresponding slots at the base of the compartment. Click both sides of the battery into place.• If your computer is equipped with a hand strap, re-attach the clip to the slot at the base of the battery.• Switch the unit on (see Switching the Omnii On and Off on page 1-5).Switching the Omnii On and OffFollow the instructions below for your Omnii. If your keyboard has a power button (55- and 66-key keyboards only), press that instead of the [FN]+[Enter/Power] key combinations described.Switching the Omnii On• Press and hold down the [Enter/Power] key for at least one second. When the unit is turned off, normally it automatically enters a power-saving, “suspend” state. When the Omnii is switched on from the suspend state, within a few seconds operation resumes in the screen in which you were working prior to turning the computer off.Switching the Omnii Off• To switch off the Omnii, press the [FN] key and then press and release the [Enter/Power] button. The Omnii will automatically enter the Suspend state.IMPORTANT If your Omnii fails to power up, consider the following troubleshooting options:The battery may be overheated (>60C°), a non-Motorola battery may be installed, or the battery may have fallen below the configured Suspend Threshold. See Suspend Threshold and Estimated Battery Backup on page 3-41 for details.To switch on the hand-held, you will need to replace the overheated battery.However, if you supply AC power to the Omnii with a battery that falls below the configured Suspend Threshold, the unit will switch on.IMPORTANT Turning off the hand-held does not result in a complete shutdown; rather, the unit enters a power-saving, “suspend” state. When the Omnii is turned on from suspend state, oper-ation resumes within a few seconds.IMPORTANT If the word ‘FN’ is displayed underlined in the taskbar area at the bottom of the screen, this key is locked “on” and the Omnii will not switch off. Press the [FN] key twice followed by [Enter/Power] to switch the Omnii off.However, if you’ve set the mode to “Lock” (see Keyboard One Shot Modes on page 3-30), the Omnii can be turned off even when the [FN] key is locked ‘on’.Draft #4 for review](https://usermanual.wiki/Symbol-Technologies/RA1202.User-Manual-1of2/User-Guide-2406595-Page-29.png)
![1 - 6 Omnii Hand-Held Computer with Windows CE 6.0 User GuideResetting the OmniiTo perform a warm or cold reset, you can access the menu by going to Start>Shutdown. Alternatively you can use the keyboard shortcuts described below.Performing a Warm ResetDuring a warm reset, running programs are halted. The contents of the file system, RAM Disk, Flash Disk, and the registry are preserved.• Press and hold down the [FN] key and the [Enter/Power] key simultaneously for a minimum of four seconds.Performing a Cold ResetA cold reset reinitializes all hardware. All RAM including the RAM Disk is erased. Non-volatile storage such as the Flash Disk is preserved, as is the file system.To execute a cold reset:• Press and hold down the [SYM] key, the [FN] key, and the [Enter/Power] key, simultaneously for a minimum of four seconds.Performing a Clean StartA clean start returns the Omnii to factory settings, flushes the registry keys, and deletes volatile storage and the file system. The Flash Disk is preserved.• Press and hold down the [FN] key, the [Enter/Power] button and the [SCAN] key simultaneously for a minimum of six seconds.The Omnii displays the Boot to BooSt menu.NOTE If your Desktop is switched to the Kiosk Shell (refer to The Kiosk Desktop Shell on page 2-25), resetting the unit is done solely by use of the keyboard shortcuts.NOTE You need to reset your Omnii after configuring the radio by switching between Windows Zero Config and WiFi Config.NOTE As part of the normal Windows Embedded CE cold boot process, the screen may go blank for a few seconds after the splash screen loading bar reaches the end. The desktop is displayed after a few moments.Draft #4 for review](https://usermanual.wiki/Symbol-Technologies/RA1202.User-Manual-1of2/User-Guide-2406595-Page-30.png)
![Basic Operation 1 - 7• On an alpha keyboard, type .clean.• On a numeric keyboard, type .25326.Boot to BooStIf you choose Boot to BooSt, the BooSt menu is loaded.• Press and hold down the [FN] key, the [Enter/Power] button and the [SCAN] key for a minimum of four seconds.• Press [1] to launch the OS.Performing a Hard ResetTo execute a hard reset:• Remove the battery.• Using a coin, or other conductive item, connect pins 5 and 6 of the battery contacts for at least six seconds.• Replace the battery and power Omnii on. The terminal will boot as if from a cold reset.Attaching Carrying AccessoriesMotorola recommends that a carrying accessory — a hand strap — be installed on the Omnii before use. For detailed information, please see Carrying and Protective Accessories on page 4-2.Calibrating the TouchscreenThe Omnii touchscreen feature is factory-calibrated and ready-to-go; however, over time the touchscreen's operating parameters may change, and it may need to be recalibrated for correct operation. Refer to Cali-brating the Touchscreen on page 2-8 for details.IMPORTANT This procedure is recommended as a last resort, when all other methods fail. Pin 6 Pin 5NOTE The touchscreen function can be turned off (see Touch on page 3-63).Draft #4 for review](https://usermanual.wiki/Symbol-Technologies/RA1202.User-Manual-1of2/User-Guide-2406595-Page-31.png)
![2 - 2 Omnii Hand-Held Computer with Windows CE 6.0 User GuideThe Suspend Threshold adjustment in the Power Properties tab allows you to determine the battery capacity at which the Omnii will be shut down. If left at the default value, Maximum Operating Time, the unit will run until the battery is completely empty; the RAM is only backed up for a short period of time. If you choose Maximum Backup Time, the Omnii shuts off with more energy left in the battery so RAM can be backed up for a longer period of time. Charging the BatteryBatteries shipped from the factory are charged to approximately 40% of capacity. Lithium-ion battery packs must be fully charged before use. These batteries can be charged with a variety of chargers and docking stations. For detailed information on these accessories, please see Chapter 4: Accessories.Normally it takes 3 to 4 hours to charge a battery. The Omnii intelligent charging system protects the battery from over-charging by terminating the charge process when the battery is at maximum capacity.The KeyboardThe Omnii offers a wide variety of Alpha and Numeric keyboard layouts. See http://www.motorolasolutions.com/US-EN/Product+Lines/Psion/?WT.mc_id=psion_us_p_handheld for a list of available configurations. Most of the keys on these keyboards operate much like a desktop computer. Where a key or key function is not consistent with the PC keyboard, those differences are described in the following sections.The Omnii is equipped with either an [Enter/Power] key or Power button (55- and 66-key keyboards only) that allows you to switch the unit on and to shut down the unit to Suspend mode. For details refer to Switching the Omnii On and Off on page 1-5.There are a number of modifier keys that provide access to additional keys and system functions, as described in Modifier Keys on page 2-4.The [Blue/FN] modifier key provides access to additional keys and system functions. These functions are colour coded in blue print above the keyboard keys.IMPORTANT If your Omnii fails to power up, consider the following troubleshooting options:The battery may be overheated (>60C°), a non-Motorola battery may be installed, or the battery may have fallen below the configured Suspend Threshold. See Suspend Threshold and Estimated Battery Backup on page 3-41 for details.To switch on the hand-held, you will need to replace the overheated battery.However, if you supply AC power to the Omnii with a battery that falls below the configured Suspend Threshold, the unit will switch on.% Charge Completed During Sleep Mode While Operating100% 4 hrs. 8 hrs.75% 2 hrs. 6 hrs.IMPORTANT To avoid damaging the battery, chargers will not begin the charge process until the battery temperature is between 0°C to 40°C (32°F to 104°F).Draft #4 for review](https://usermanual.wiki/Symbol-Technologies/RA1202.User-Manual-1of2/User-Guide-2406595-Page-34.png)
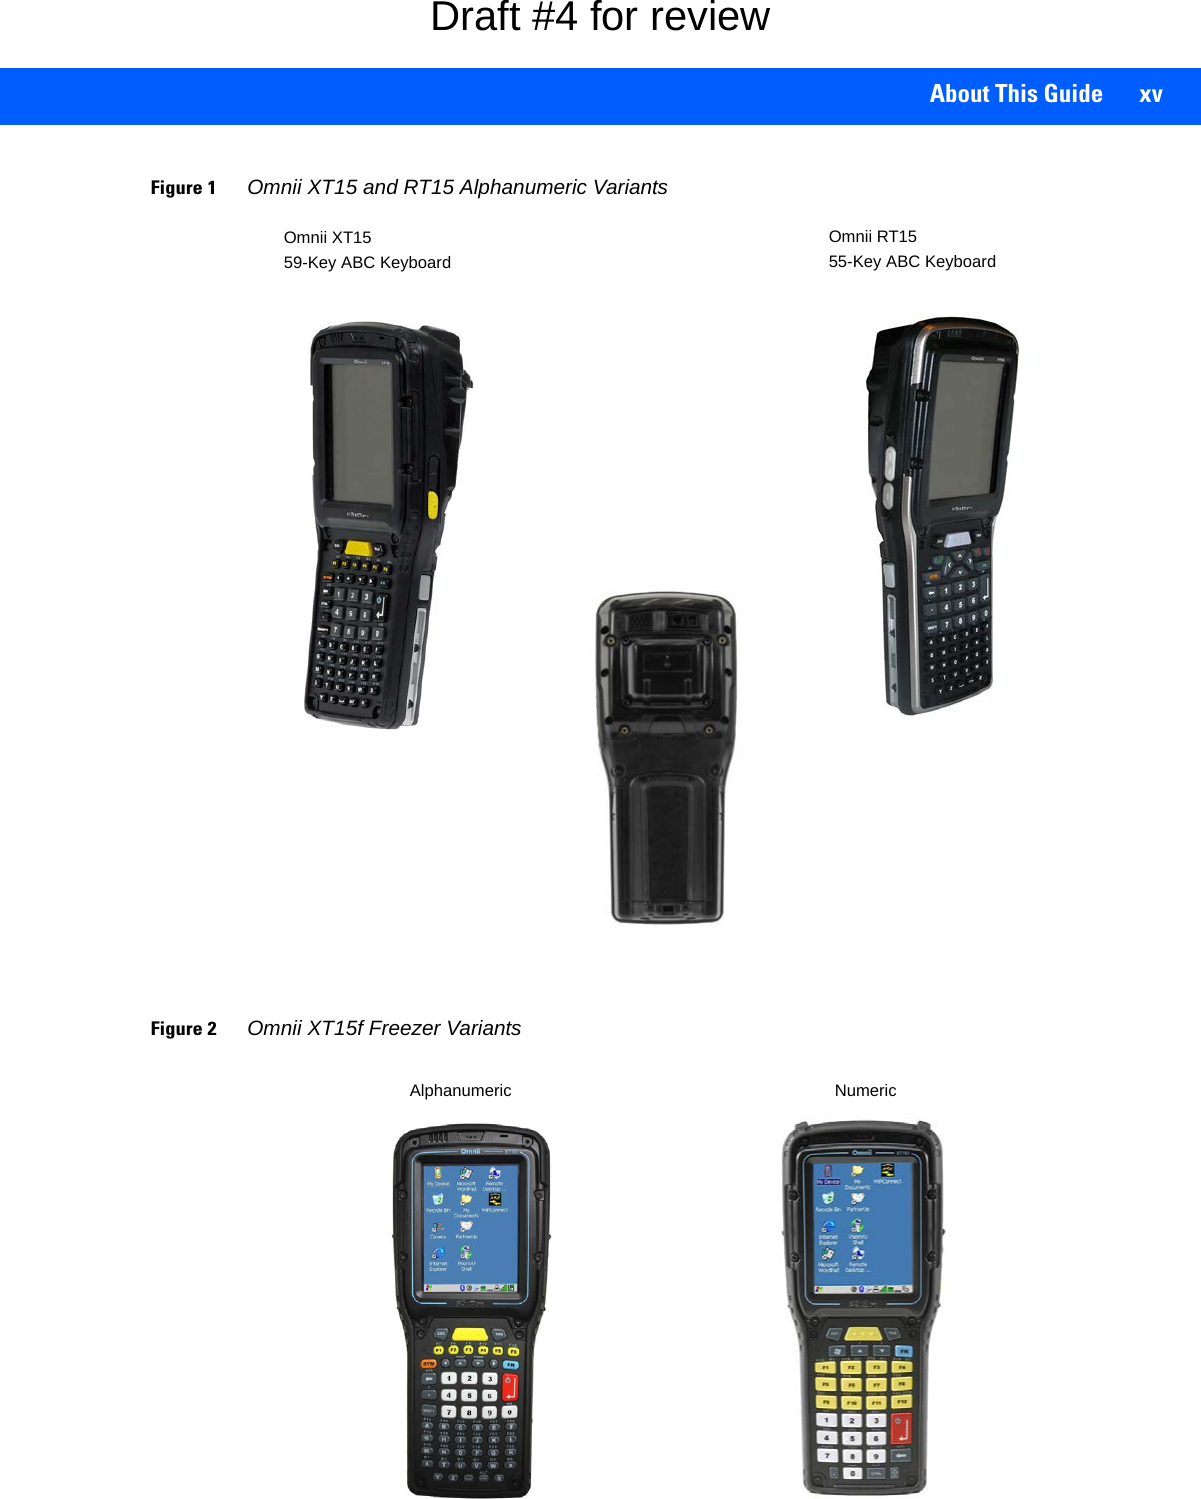
![Getting To Know Your Omnii 2 - 3Figure 2-1Keyboard LayoutsThe Power Button (55-Key and 66-Key Keyboards only)The [Power] button in the upper right corner of the keyboard switches the unit on and off.Regular KeysThe [Enter] KeyThe [Enter] key is used to execute the usual Enter keyboard functions, and on some units to also power the unit on and off (for details refer to Switching the Omnii On and Off on page 1-5).36-Key Numeric 123 Keyboard 59-Key Alpha ABC Keyboard[FN] Modifier Key[SYM] Key[SHIFT] Modifier Key[SCAN] Key[Enter/Power] Key[Windows] Key[End] key[Talk] key55-Key Alpha ABC Keyboard with phonePower buttonNOTE 55-key and 66-key keyboards are equipped with a Power button. For these keyboards, the [Enter] key does not switch the unit on or off.Draft #4 for review](https://usermanual.wiki/Symbol-Technologies/RA1202.User-Manual-1of2/User-Guide-2406595-Page-35.png)
![2 - 4 Omnii Hand-Held Computer with Windows CE 6.0 User GuideThe [SHIFT] KeyThe [SHIFT] key is used to display uppercase alpha characters and to provide access to other symbols and functions on the numeric keyboards. Press the [SHIFT] key to turn the shift state 'on' (it will be represented by an up arrow in the taskbar), then press another key to access the shifted function of that key.Press the [SHIFT] key twice to lock the shift state on (the up arrow in the taskbar will be underlined). Press [SHIFT] again to turn the shift state off.To access CAPS LOCK mode, press [FN] + [SHIFT]. In this state, if you press a numeric key, the number is displayed rather than the normal shifted function of that key. Press [FN] + [SHIFT] again to turn the CAPS LOCK mode off.The Arrow KeysThe [Arrow] keys are located near the top of the keyboard, and are represented on the keyboard as triangles pointing in different directions. The [Arrow] keys move the cursor around the screen in the direction of the arrow: up, down, left and right. The left arrow key should not be confused with the [BACKSPACE] key which is depicted as a left arrow. The cursor is the flashing box or underline character that indicates where the next character you type will appear.The [BACKSPACE/DEL] KeyThe [BACKSPACE] key (represented on the keyboard as an arrow pointing left) moves the cursor one char-acter to the left, erasing the previous key stroke.The [DEL] key ([FN] +[BACKSPACE]) erases the character at the current cursor position.The [CTRL] and [ALT] KeysThe [CTRL] and [ALT] keys modify the function of the next key pressed and are application dependent. Pressing either key twice locks it 'on' (it appears underlined on the Taskbar). Pressing the key once again unlocks it.The [TAB] KeyTypically, the [TAB] key moves the cursor to the next field to the right or downward.The [ESC] KeyGenerally, this key is used as a keyboard shortcut to close the current menu, dialog box, or activity.The [SPACE] KeyThe [SPACE] key is represented on the keyboard by a long, low horizontal line contained by a small vertical line on each side. Pressing this key inserts a blank space between characters. In a Windows dialog box, pressing the [SPACE] key enables or disables a check box.The [SCAN] KeyThe Omnii is equipped with a single [SCAN] key on the keyboard and an extra [SCAN] button located on the left side of the unit. [SCAN] keys activate the scanner beam. For units that do not have internal scanners, these keys can be remapped to serve other functions.Modifier KeysThe [SHIFT], [CTRL], [ALT], [FN] and [SYM] keys are modifier keys that change the function of the next key pressed. The [SHIFT], [CTRL] and [ALT] keys operate much like a desktop keyboard except that they are not chorded (two keys held down simultaneously). The modifier key must be pressed first followed by the key whose func-tion you want modified.Draft #4 for review](https://usermanual.wiki/Symbol-Technologies/RA1202.User-Manual-1of2/User-Guide-2406595-Page-36.png)
![Getting To Know Your Omnii 2 - 5[SHIFT] and [FN]The [SHIFT] and [FN] modifier keys provide access to additional keys and system functions. The functions related to these modifier keys are colour-coded in white and blue print respectively above the keyboard keys, dependant on your keyboard format.[SYM] The Symbol [SYM] modifier key is represented on the keyboard by the characters SYM and provides access to commonly used symbolic characters. Pressing the key brings up the Symbol soft input panel (SIP) onscreen keyboard, with symbols mapped to each key. If you wish to adjust the settings for the pop-up screen (e.g. time of delay before screen appears, etc.), modify the file softinputpanel.xml, located in the Windows folder.The onscreen keyboard corresponds to the specific keyboard on your Omnii — either numeric or alphanumeric. Figure 2-2Symbol Soft Input PanelsActivating Modifier KeysWhen a modifier key is pressed, it is shown in the softkey bar at the bottom of the screen, making it easier to determine whether a modifier key is active. For example, if the [CTRL] key is pressed, Ctrl is displayed at the bottom of the unit screen. Once the next key is pressed, the modifier key becomes inactive and disappears from the taskbar.Locking Modifier KeysWhen a modifier key is pressed twice, it is locked on. A locked modifier key is displayed in underlined letters in the taskbar. For example, pressing the [FN] key twice locks it on — it is displayed as an underlined blue FN in the taskbar at the bottom of the computer screen. The same is true of the [SYM] key, which is shown as an underlined orange SYM in the taskbar.The locked modifier key will remain active until it is pressed a third time to unlock or turn it off. Once a modifier key is unlocked, the underline representation at the bottom of the screen is no longer displayed.NOTE When using the Mobile Devices SDK Developers' Guide (PN 8100016), note that the [SYM] key is interchangeable with the [ORANGE] key.NOTE Modifier keys are remapped in Control Panel, and the Symbol SIP will automatically show and use the new mappings after the next reboot.36-KEY Numeric Keyboard 59-KEY Alpha Keyboard[SPACE] KeyInternet Browser KeysDraft #4 for review](https://usermanual.wiki/Symbol-Technologies/RA1202.User-Manual-1of2/User-Guide-2406595-Page-37.png)
![2 - 6 Omnii Hand-Held Computer with Windows CE 6.0 User GuideFunction Keys and Macro KeysIn addition to the standard keyboard functions (see The Keyboard on page 2-2), the Omnii supports function keys and macro keys.All function keys and macro keys can be custom defined for each application. The Open TekTerm application utilizes these keys (for detailed information, see the Open TekTerm Software User Manual, PN 8000073). Function KeysFunction keys perform special, custom-defined functions within an application. These keys are accessed by pressing one of the dedicated function keys on the keyboard, or through the appropriate [SHIFT] or [FN] key sequence, depending on the keyboard variant being used.Alphanumeric Keyboard Function KeysThe Alphanumeric keyboards are equipped with up to thirty function keys, including those function keys that are colour-coded in blue print above the alpha keys or function keys (depending on your keyboard).To access the blue function keys, press the [FN] key followed by the appropriate alpha or function key.Function keys [F1] through [F24] can be used with the Windows Embedded CE operating system or another application. The additional function keys, [F25] through [F30] along with the macros, are not used as part of the Windows Embedded CE operating system. Numeric Keyboard Function KeysThe Numeric keyboards are equipped with up to 24 function keys, including those function keys that are colour-coded in white print above the function keys. Function keys F25 through F30 can only be accessed by remapping another key to that function. To access the white function keys, press the [SHIFT] key followed by the appropriate function key. Macro KeysSeveral of the Omnii keyboards are equipped with a series of macro keys that can be programmed to replace frequently used keystrokes, along with the function of executable keys like the [Enter/Power] key, the [BACK-SPACE] key, any function key and arrow key, etc. 59-Key Alphanumeric Keyboard Macro KeysThese keyboards have six macro keys: [M1] to [M6], located on the S to X keys (second-last row of keys).To access a macro key, press the [FN] key followed by the macro key.36-Key Numeric Keyboard Macro KeysThese keyboards are equipped with five macro keys: [M1] to [M5]. These keys are colour coded in blue print above function keys [F1] to [F5]. NOTE The locking function of the modifier keys can be changed so that pressing a key once will lock the key on. If you disable the One Shot function of the key, pressing it once will lock the key on. Pressing the same key a second time will unlock or turn it off. Refer to Keyboard One Shot Modes on page 3-30 for details.IMPORTANT Refer to Keyboard Macro Keys on page 3-31 for details about creating macros.Draft #4 for review](https://usermanual.wiki/Symbol-Technologies/RA1202.User-Manual-1of2/User-Guide-2406595-Page-38.png)
![Getting To Know Your Omnii 2 - 7To access a macro key, press the [FN] key followed by the macro key.Numeric Keyboards — Accessing Alpha KeysOn the Numeric Omnii keyboards, all alphabetic characters are printed on the unit plastic in blue typeface above the keys. Alpha characters are accessed by pressing the [FN] modifier key, then pressing another key on the keyboard. The Alpha Modified Numeric 789 keyboard has each blue alphabetic character assigned as a single [FN]-shifted character on individual keys. An indicator in the left corner of the taskbar displays the currently selected character. The Numeric 123 keyboards have telephone-style alphabetic keys, with the blue alphabetic characters located in groups of 3 or 4 above each of the numeric keys. To access characters on these keyboards, a few extra steps are needed, as described below.Choosing a Single Alpha CharacterThe examples below illustrate how to access A, B and C, all of which are printed in blue characters above the numeric key [2]. The letters you choose appear in the softkey bar as you press the numeric key, providing a visual indicator of which letter will be displayed on the screen.To choose the letter a:• Press the [FN] key, and press the numeric key [2].• Press the [FN] key again to unlock or turn it off.To choose the letter b:• Press the [FN] key, and press [2] twice.• Press the [FN] key again to unlock or turn it off.To choose the letter c:• Press the [FN] key, and press [2] three times.• Press the [FN] key again to unlock or turn it off.Selecting Uppercase LettersTo display a single capital letter, press the [SHIFT] key first, then the letter you want. To access CAPS LOCK mode, press [FN] + [SHIFT]. In this state, if you press a numeric key, the number is displayed rather than the normal shifted function of that key. Press [FN] + [SHIFT] again to turn the CAPS LOCK mode off.NOTE The following examples assume that the [FN] key is enabled as Lock mode in the One Shot screen (accessible through the Control Panel Keyboard icon). In Lock mode, pressing the [FN] key once locks it on. Refer to Keyboard One Shot Modes on page 3-30 for details.NOTE Keep in mind that there is a timeout of one second between key presses when sequencing through the alphabetic characters on a key. If you pause longer than one second between key presses, the alphabetic character that is displayed at that time will be entered.Draft #4 for review](https://usermanual.wiki/Symbol-Technologies/RA1202.User-Manual-1of2/User-Guide-2406595-Page-39.png)
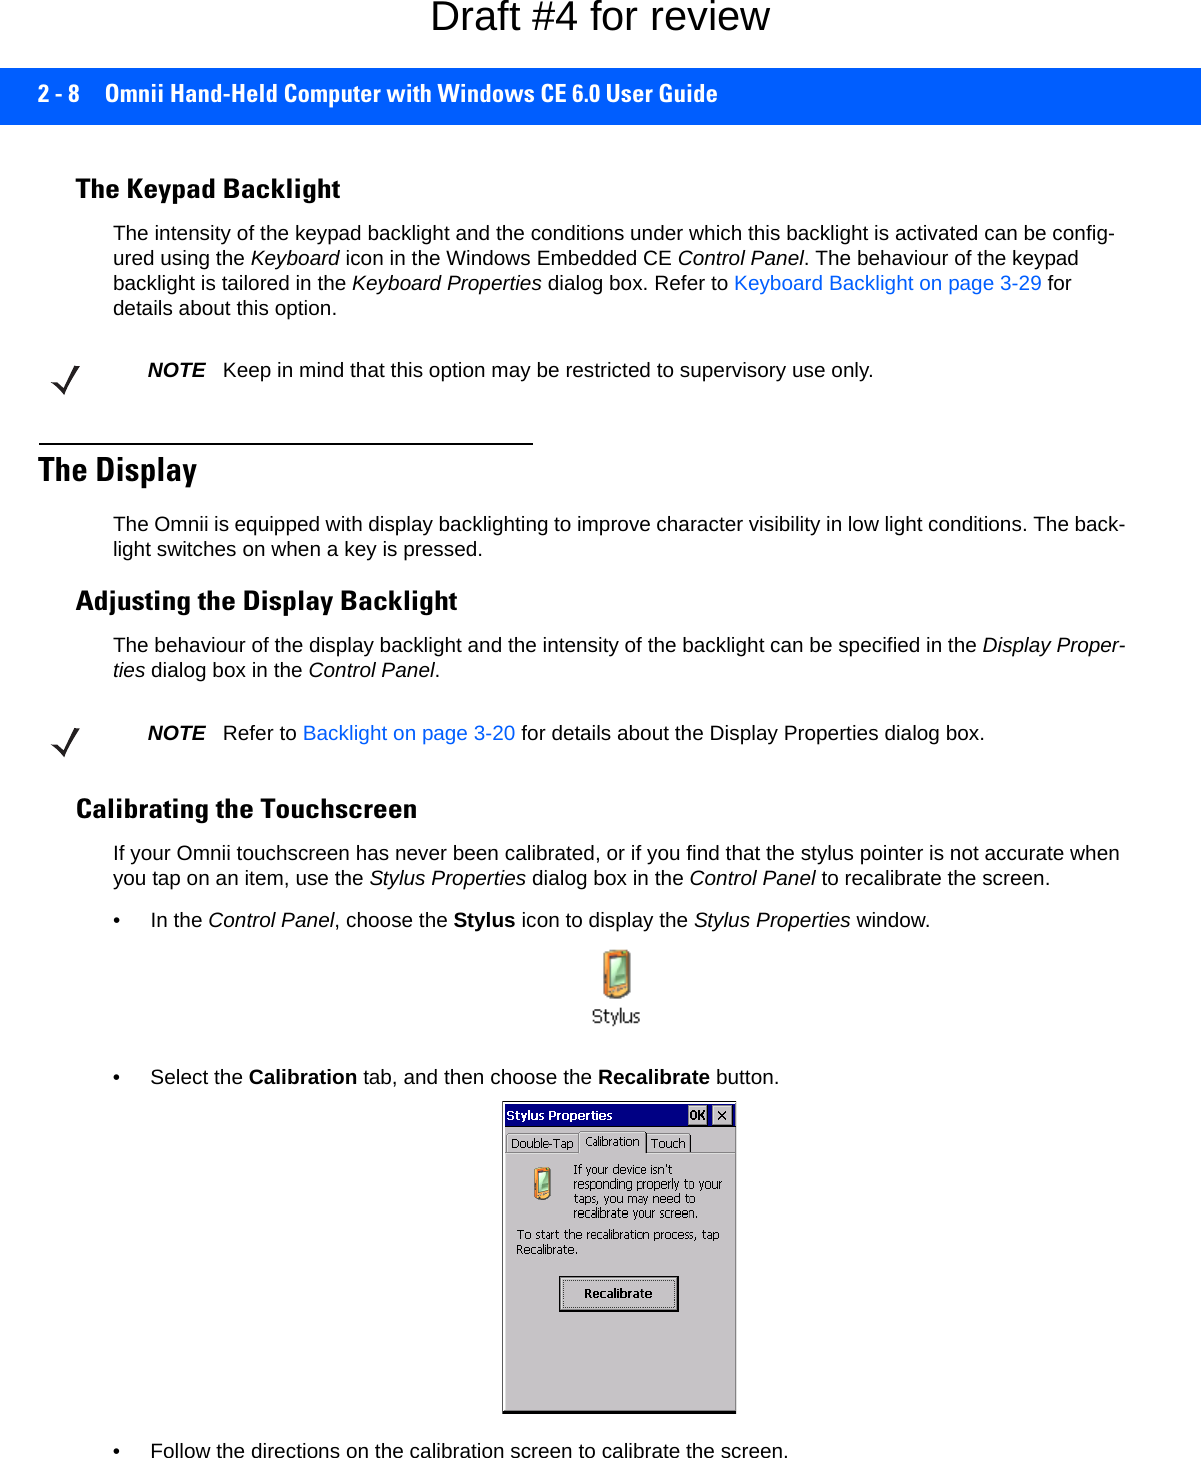
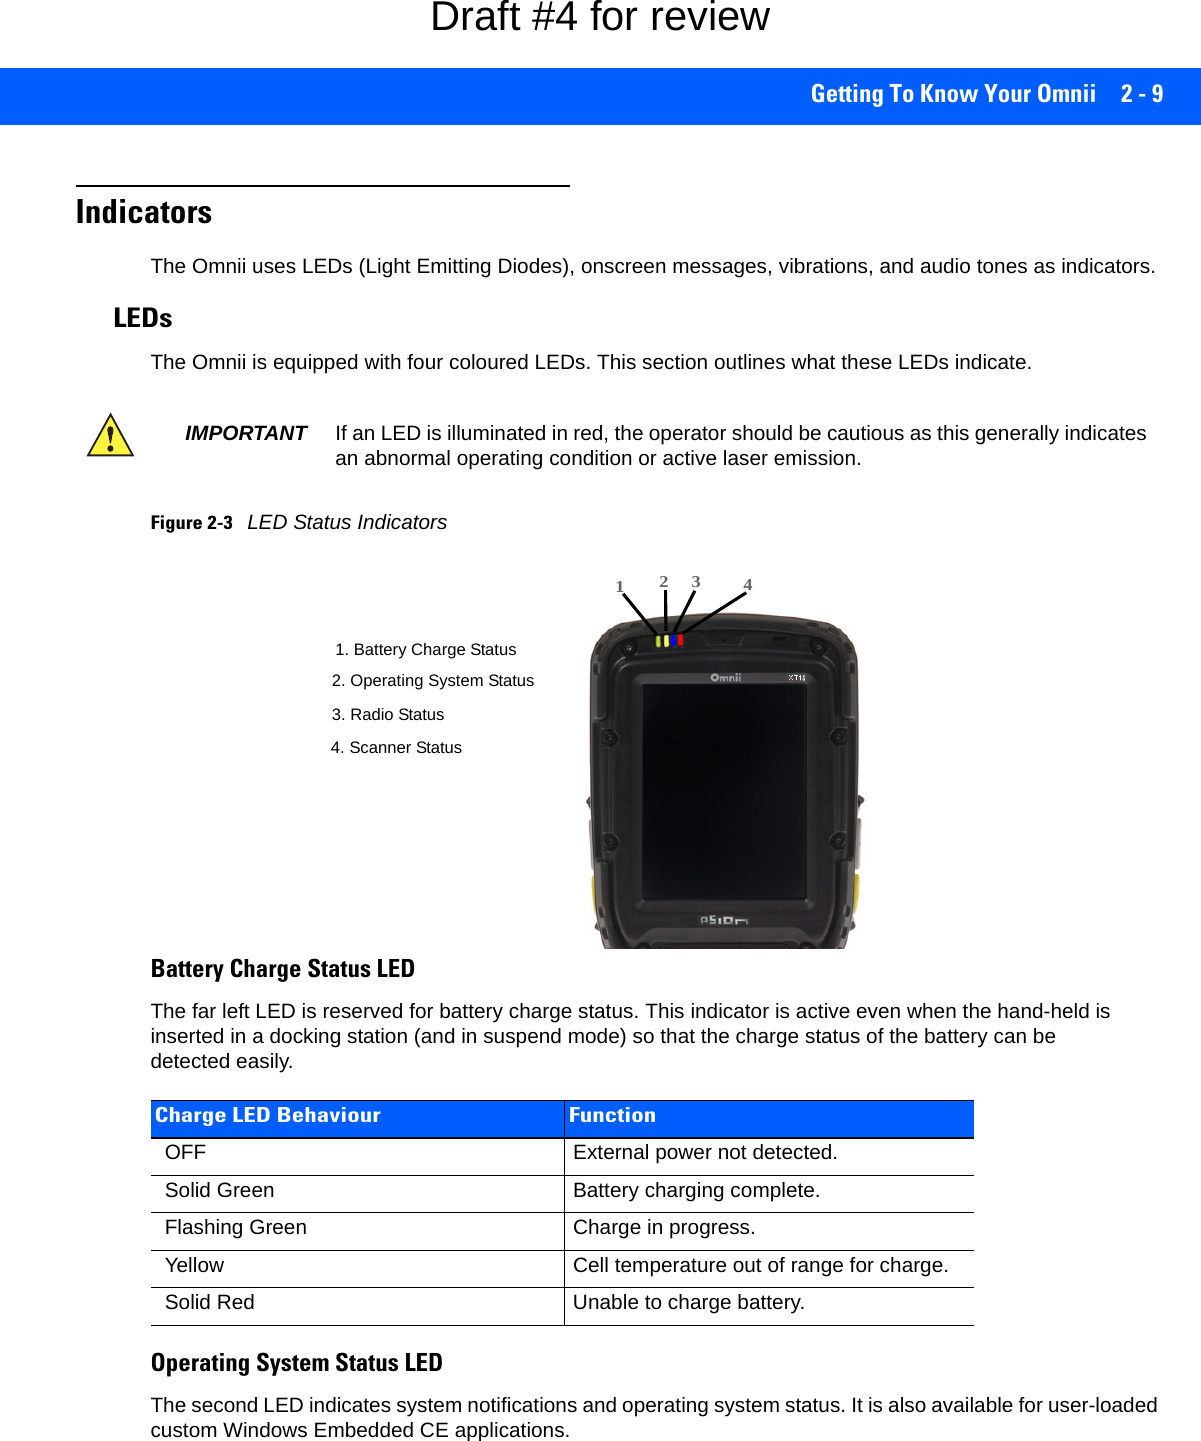
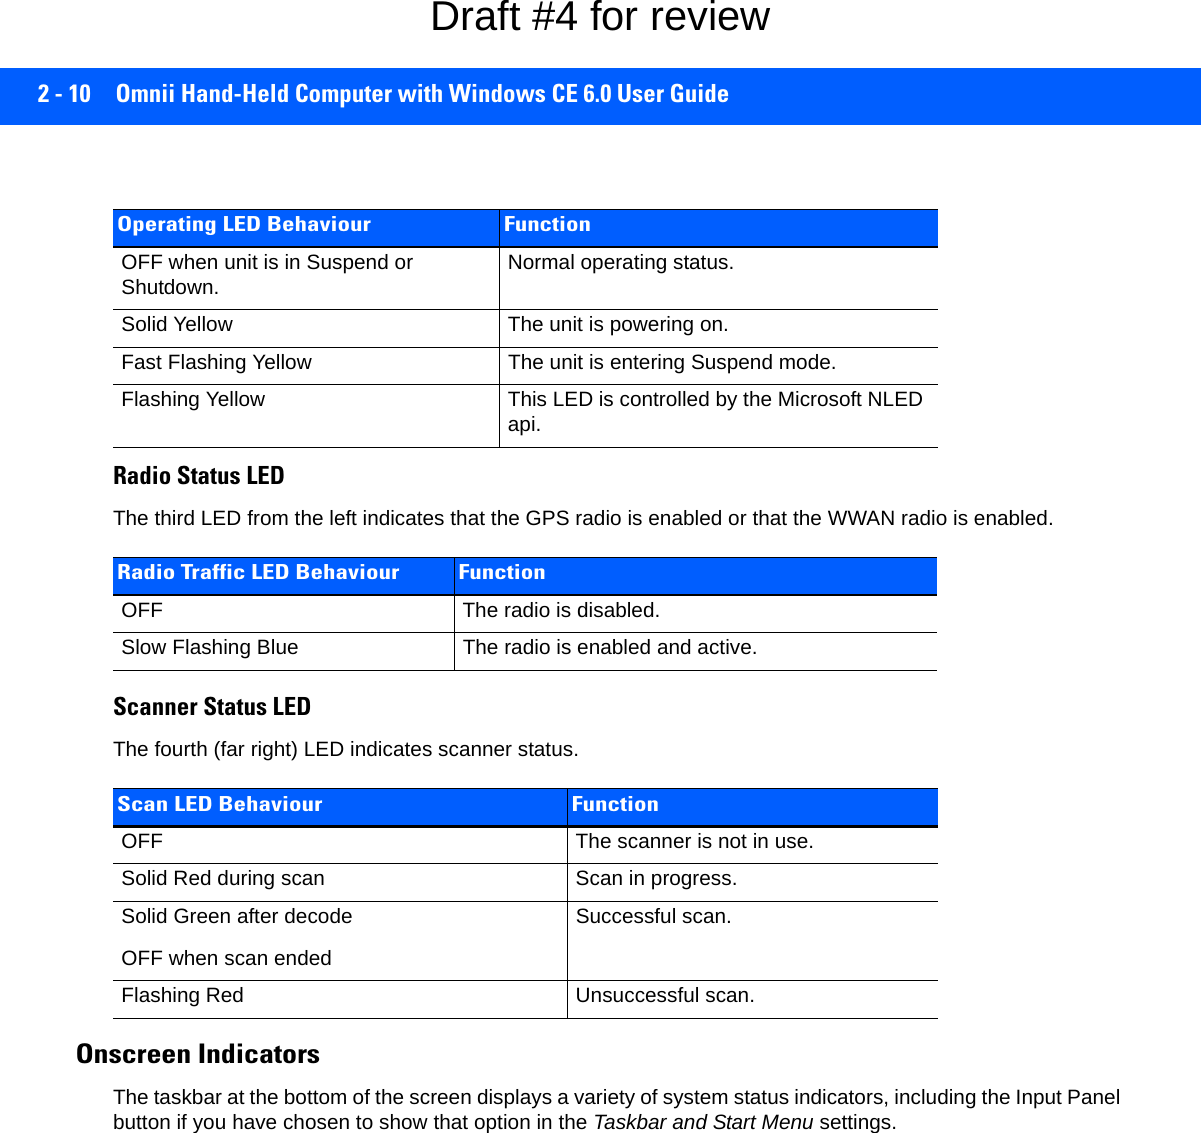
![Getting To Know Your Omnii 2 - 11Figure 2-4TaskbarThe taskbar changes dynamically, and only those icons that are applicable are displayed. For example, if a radio is not installed in your Omnii, the radio signal icon is not displayed in the taskbar.Windows® Start ButtonIf you are using the touchscreen, you can either tap the Windows icon at the bottom left of the screen, or press the [Windows] key to display the Start Menu, and then tap on the desired application.Modifier Key Indicators[SHIFT], [CTRL], [ALT], [FN] and [SYM] are modifier keys that have onscreen indicators to show when a key is active or locked. If a modifier key is pressed once to activate it, the key is displayed in the taskbar, for example, pressing the [FN] key once displays FN in the taskbar. If a modifier key is pressed twice, it is locked on and the onscreen indicator is displayed with underlined letters in the taskbar, for example, pressing [FN] twice displays FN in the taskbar.Power The battery shaped icon displayed in the taskbar provides quick access to the charge state of the battery. Tapping on the icon once will show the percentage charge left in the battery. Tapping on the icon twice opens the Power Properties menus (see Power Properties on page 3-40), where you can set the low battery warnings levels, and time to enter Suspend.If the Omnii is using external AC power, an AC icon is displayed in the taskbar.802.11 Radio Signal QualityIncreasing radio signal quality is represented by longer, filled bars within this icon.WWAN Radio Signal QualityWireless WAN icons in the taskbar indicate the status of your wide area network connection. For details, see Taskbar Icons on page G-1.Good No RadioReceptionWeakReception LinkDraft #4 for review](https://usermanual.wiki/Symbol-Technologies/RA1202.User-Manual-1of2/User-Guide-2406595-Page-43.png)
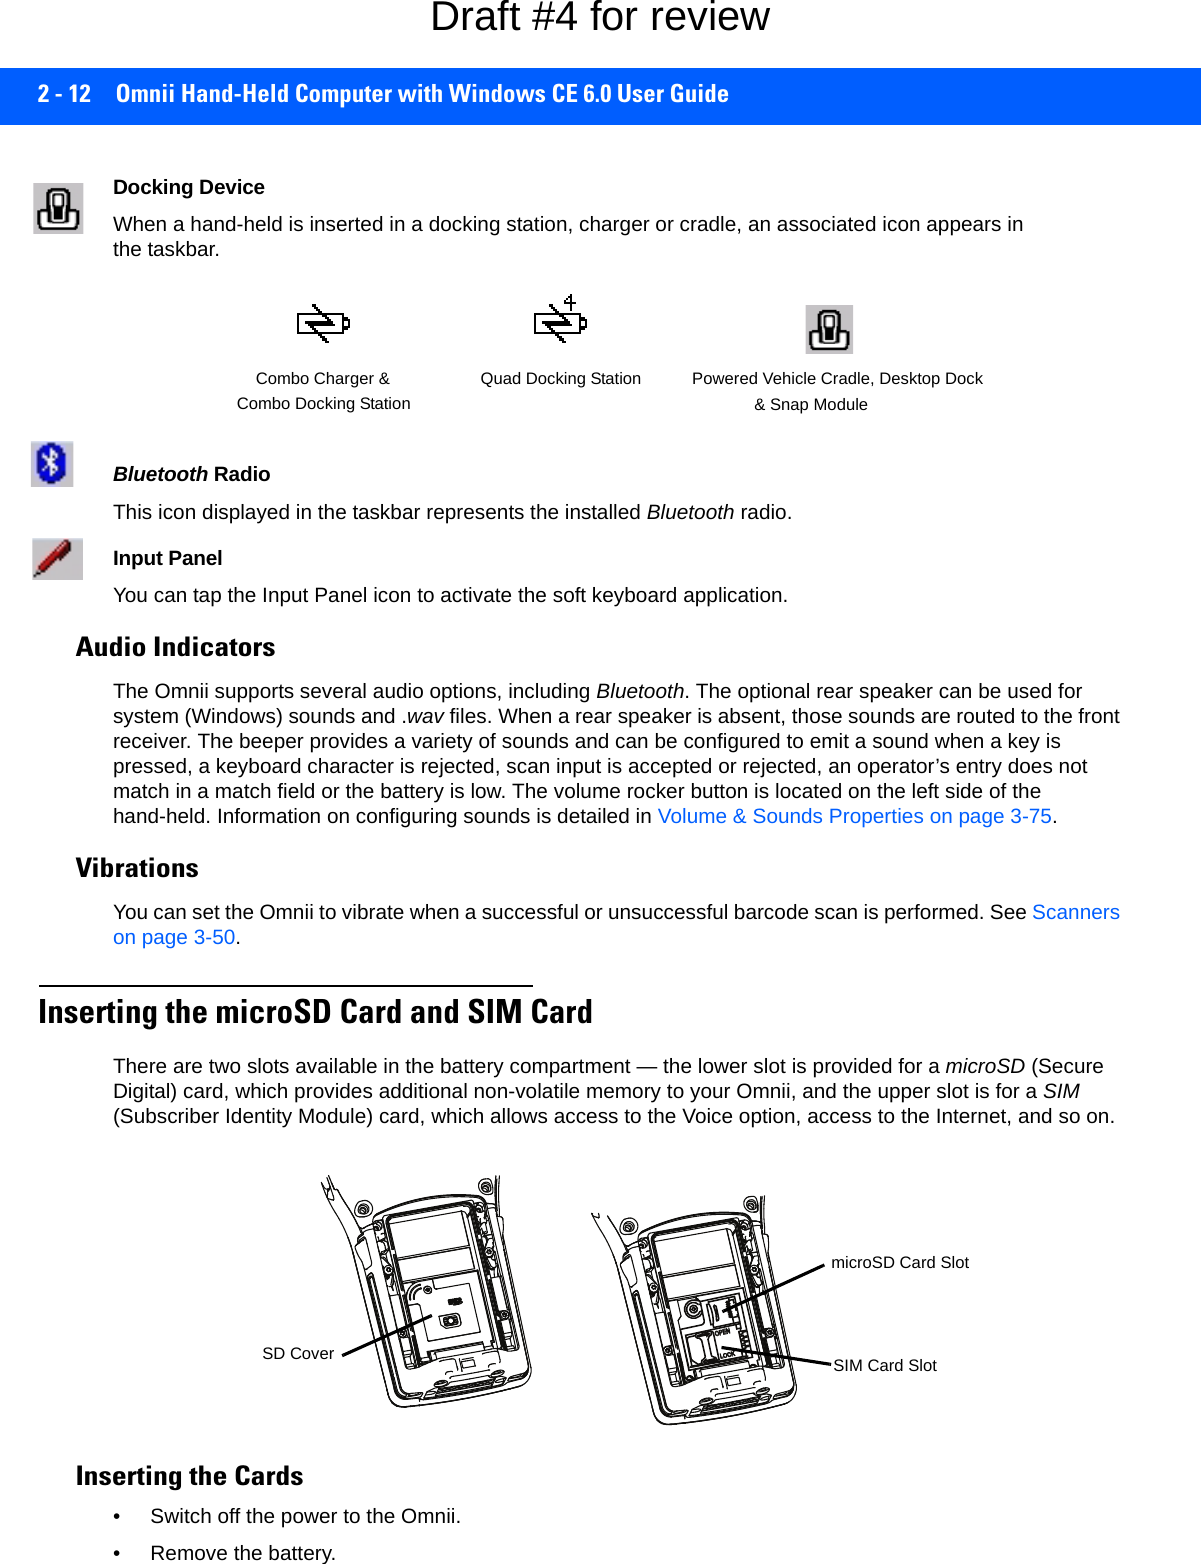
![Getting To Know Your Omnii 2 - 13• Use a Phillips screwdriver to remove the SD cover screw. Flip the cover open or remove it.For a microSD card: • Slide the microSD card door to the left to unlock it. Flip it open.• Slide the microSD card into the guides on the SD card door.• Close the microSD card door, and slide it to the right to lock it.For a SIM card:• Slide the SIM card metal door latch to the right to unlock it, then flip the door open.• Slide the card into the guides on the SIM card door. • Swing the hinged door back down into place, and slide the metal door latch to the left to lock it.Scanners and ImagersThe Omnii supports a wide range of scanner options to address a variety of user application requirements. Refer to the following sections for detailed information:• Scanner list and specifications: Appendix D: Internal Imager & Scanner Specifications.• Configuration: Scanners on page 3-50 and Manage Triggers on page 3-36.•Scanning Techniques on page 2-14 outlines the mechanics of a successful scan.icroMOPENLOCKIMPORTANT It is critical that you review the “Laser Warnings” in the Omnii Hand-Held Computer Regu-latory & Warranty Guide (PN 8000191) before using any of the scanners described in this chapter. For detailed scanner specifications and decode zone tables, refer to Appendix D: Internal Imager & Scanner Specifications.NOTE To enable a newly-installed imager or scanner, press and hold down the [FN] key and the [Enter/Power] key simultaneously for a minimum of three seconds.If your unit has a [Power] button, press and hold down the [FN] key and the [Power] button for a minimum of three seconds. Draft #4 for review](https://usermanual.wiki/Symbol-Technologies/RA1202.User-Manual-1of2/User-Guide-2406595-Page-45.png)
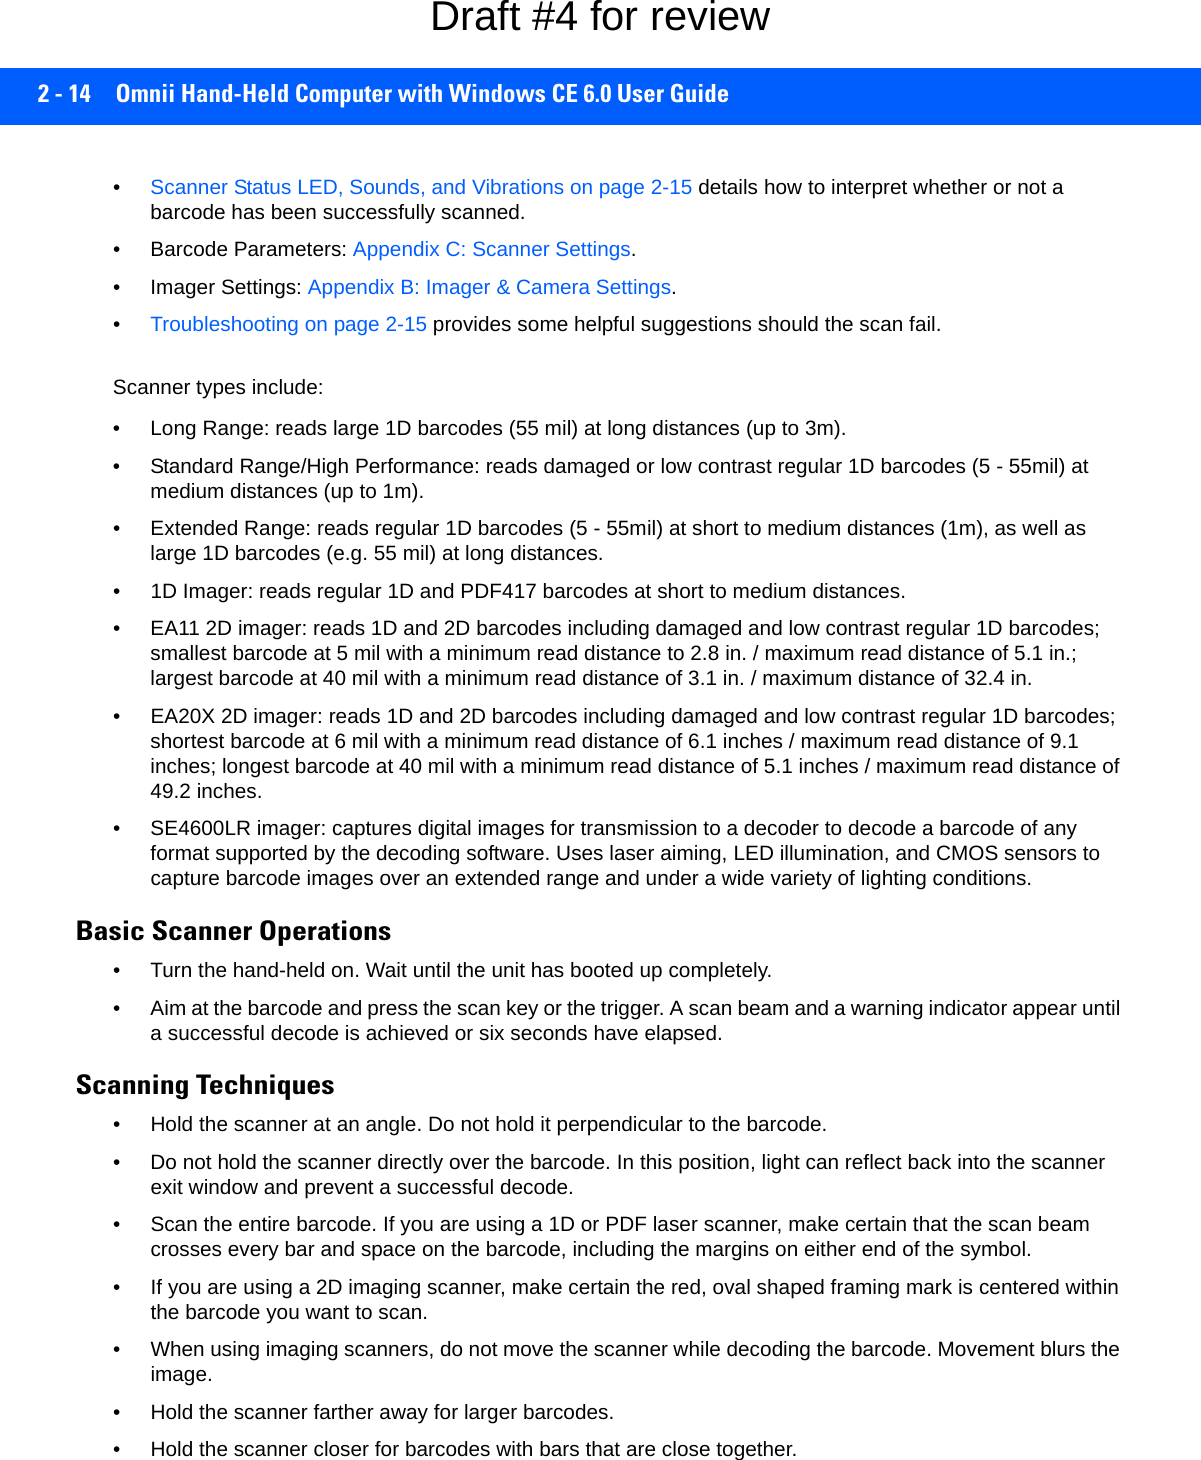
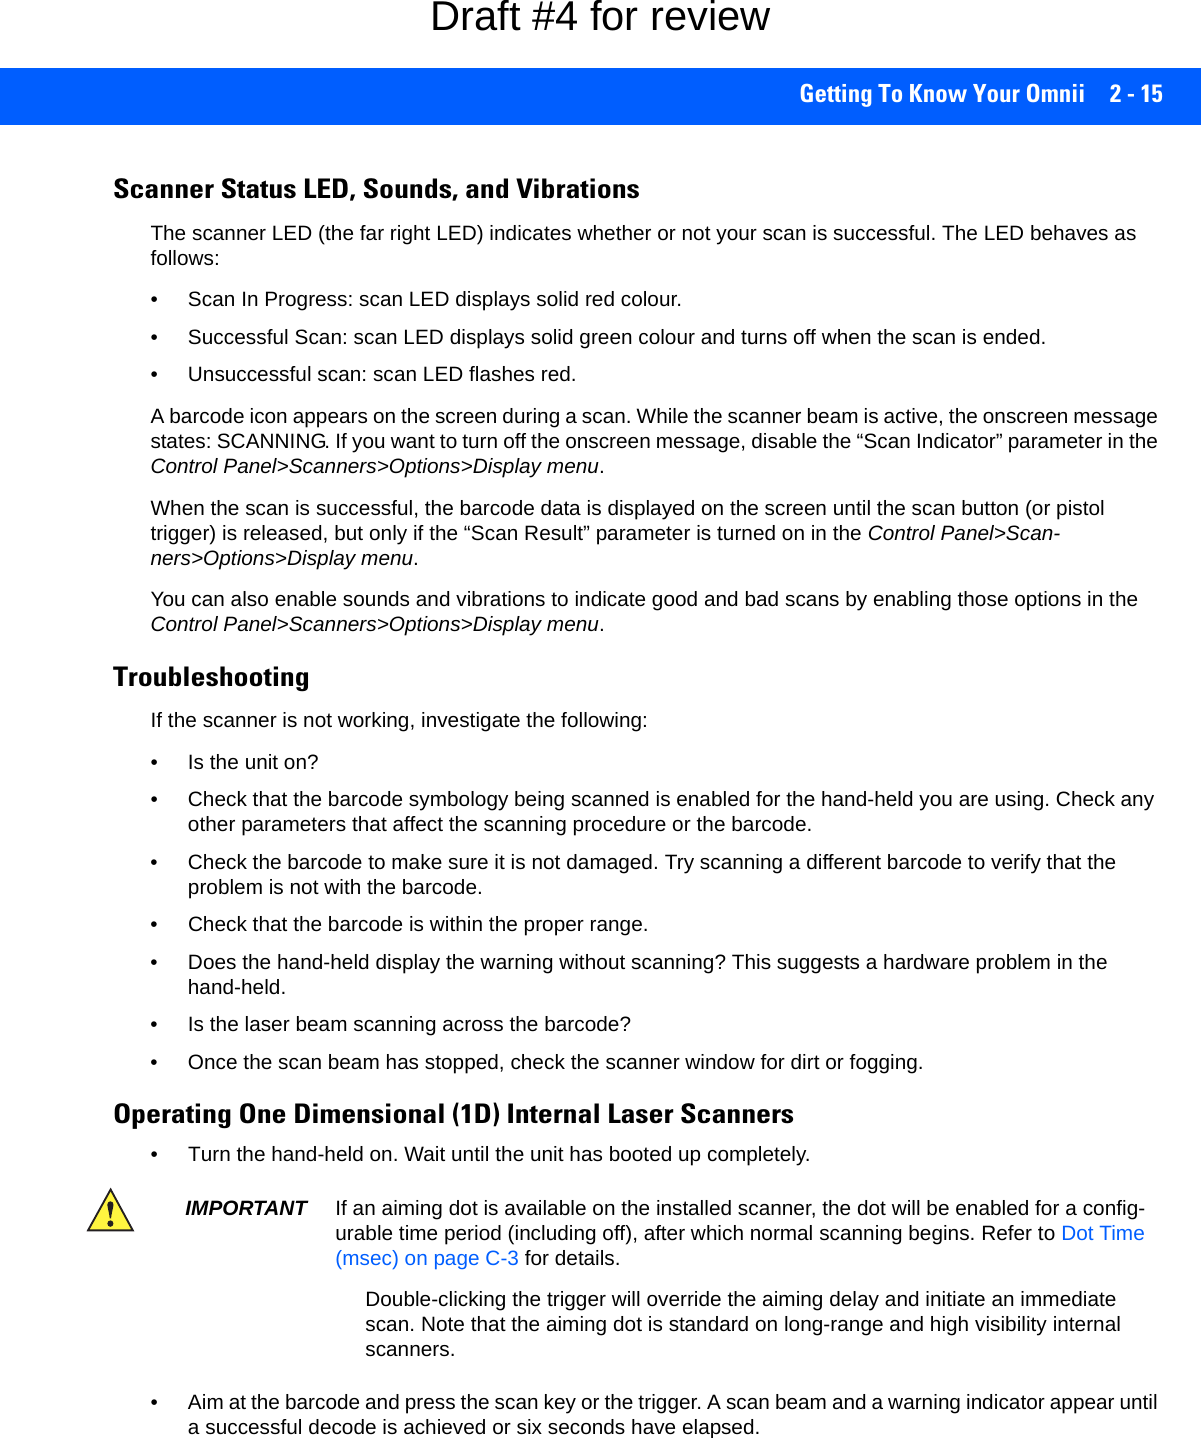
![Getting To Know Your Omnii 2 - 17Windows Embedded CE 6.0Navigating in Windows Embedded CE and ApplicationsGraphic user interfaces such as Windows Embedded CE for portable devices and desktop Windows (Windows Vista™, Windows 7, Windows 8, etc.) utilize point and click navigation. An equivalent keyboard shortcut is also available for every point and click action.Windows Embedded CE supports the same point and click user interface and keyboard shortcuts as desktop Windows with one difference — the point and click action is accomplished using a touchscreen rather than a mouse. Actions can be performed using any combination of keyboard shortcuts or touchscreen tapping. In those applications that support it, you can also flick and pan your finger to scroll through screens.Navigating Using a TouchscreenThe Omnii comes equipped with a stylus — a pointing tool that looks like a pen. The stylus is used to select objects on the touchscreen. You can also use gestures with your fingers. You can use two gestures: pan and flick. Use left or right flicks to quickly move between tabs of a multi-tab control panel, or to scroll long lists of options. Use panning by touching and dragging a page that has scrollbars.To choose an icon, open a file, launch an applet or open a folder:• Double-tap on the appropriate icon.Navigating Using the KeyboardIf you would like to use keyboard input to choose icons and navigate dialog boxes, refer to the table following.NOTE If the touchscreen is not registering your screen taps accurately, the touchscreen may need reca-libration. Refer to Calibrating the Touchscreen on page 2-8.NOTE To prevent damage to the touchscreen, use only a finger touch or the stylus (pen) supplied with your Omnii.Operation Key or Key CombinationSwitch between active applications [ALT] [TAB]Open task manager [ALT] [ESC]Move the cursor Arrow keysOpen file, folder or icon [Enter]Exit & Save [Enter]Close/Exit & Do Not Save [ESC]Navigate Dialog Boxes [TAB]To move cursor up [SHIFT] [TAB]To display the contents of the next tab in a dialog box [CTRL] [TAB]Select Radio Button/Press Button [SPACE]Go to Start Menu [Windows]Draft #4 for review](https://usermanual.wiki/Symbol-Technologies/RA1202.User-Manual-1of2/User-Guide-2406595-Page-49.png)
![2 - 18 Omnii Hand-Held Computer with Windows CE 6.0 User GuideKeep in mind that unlike a desktop computer, the Omnii does not support key chording (pressing two keys at the same time). You must press one key followed by the next in sequence. The Windows Classic Shell Startup DesktopWhen the Omnii boots up, the default startup desktop (Windows Classic Shell) is displayed. Any applications stored in the Startup folder start up immediately. Figure 2-5Omnii Windows Classic Shell Startup DesktopTo access desktop icons:• Double-tap on the icon to open a window or, in the case of an application icon, launch an application.On the keyboard:• Use the arrow keys to highlight the icon, and press [Enter] to launch the highlighted icon.NOTE The startup folder is located in \Windows\StartUp and \Flash Disk\StartUp.NOTE If the arrow keys do not highlight the desktop icons, the desktop may not be selected. Press [Win-dows] to display the Start Menu, and select Desktop. Now the desktop will be “in focus” and the arrow keys will highlight the icons.Draft #4 for review](https://usermanual.wiki/Symbol-Technologies/RA1202.User-Manual-1of2/User-Guide-2406595-Page-50.png)
![Getting To Know Your Omnii 2 - 19The TaskbarThe Omnii is equipped with a taskbar at the bottom of the screen. It displays icons through which you can view the battery capacity and radio signal quality of your unit. If the hand-held is attached to a charger, cradle, docking station, or Snap Module, an associated icon is displayed. In addition, the taskbar displays the applica-tion(s) currently running on your unit.The taskbar also displays active modifier keys: [SHIFT], [ALT], [CTRL], [FN] and [SYM]. Keys that have been locked “on” are displayed with underlined letters. For example, if you have set the [CTRL] key lock to “on” in the Keyboard menu and you press the key, it is displayed as an underlined Ctrl in the taskbar. (For detailed information on modifier keys and keyboard options, see The Keyboard on page 2-2).Using the TaskbarA tooltip is displayed as each taskbar icon is highlighted. The tooltip provides the status of each icon.If you’re using the touchscreen:• Tap and hold on an icon to display the icon's tooltip. Double-tap the icon to open the Control Panel dialog box associated with the icon. For example, double-tap the battery icon to display a dialog box listing the current battery capacity information.On the keyboard:• Press [Windows] to display the Start Menu.• Choose Shortcuts from the Start Menu, and then press the [RIGHT] arrow key to display the sub-menu.• Choose System Tray in the sub-menu. • Use the arrow keys to highlight the icon in the taskbar about which you’d like more information.• Press [Enter] to display the appropriate dialog box.Customizing the TaskbarTo customize the taskbar so that it displays only those icons you require:• In the Start Menu, choose Settings, and then Taskbar.If you’re using the keyboard:• Press [Windows] to display the Start Menu.Draft #4 for review](https://usermanual.wiki/Symbol-Technologies/RA1202.User-Manual-1of2/User-Guide-2406595-Page-51.png)
![2 - 20 Omnii Hand-Held Computer with Windows CE 6.0 User Guide• Highlight the Settings option, highlight Taskbar in the sub-menu, and press [Enter]. The Taskbar and Start Menu dialog box is displayed.• Tap on the items you want to activate or deactivate. The check mark indicates active items.If you’re using the keyboard:• Highlight the options you want to activate, and press the [SPACE] key to select them. A check mark indi-cates active items.The Start MenuThe Start Menu lists the operations you can access and work with. It is available from the startup desktop or from within any application.• To display the menu, tap on the Start Menu.If you’re using the keyboard:• Use the arrow keys to highlight a menu item, and press [Enter], or If the menu item has an underlined character:• Type the underlined alpha character. For example, to display the Run dialog box, type the letter r.NOTE Tap on the item in the menu with which you want to work.Draft #4 for review](https://usermanual.wiki/Symbol-Technologies/RA1202.User-Manual-1of2/User-Guide-2406595-Page-52.png)
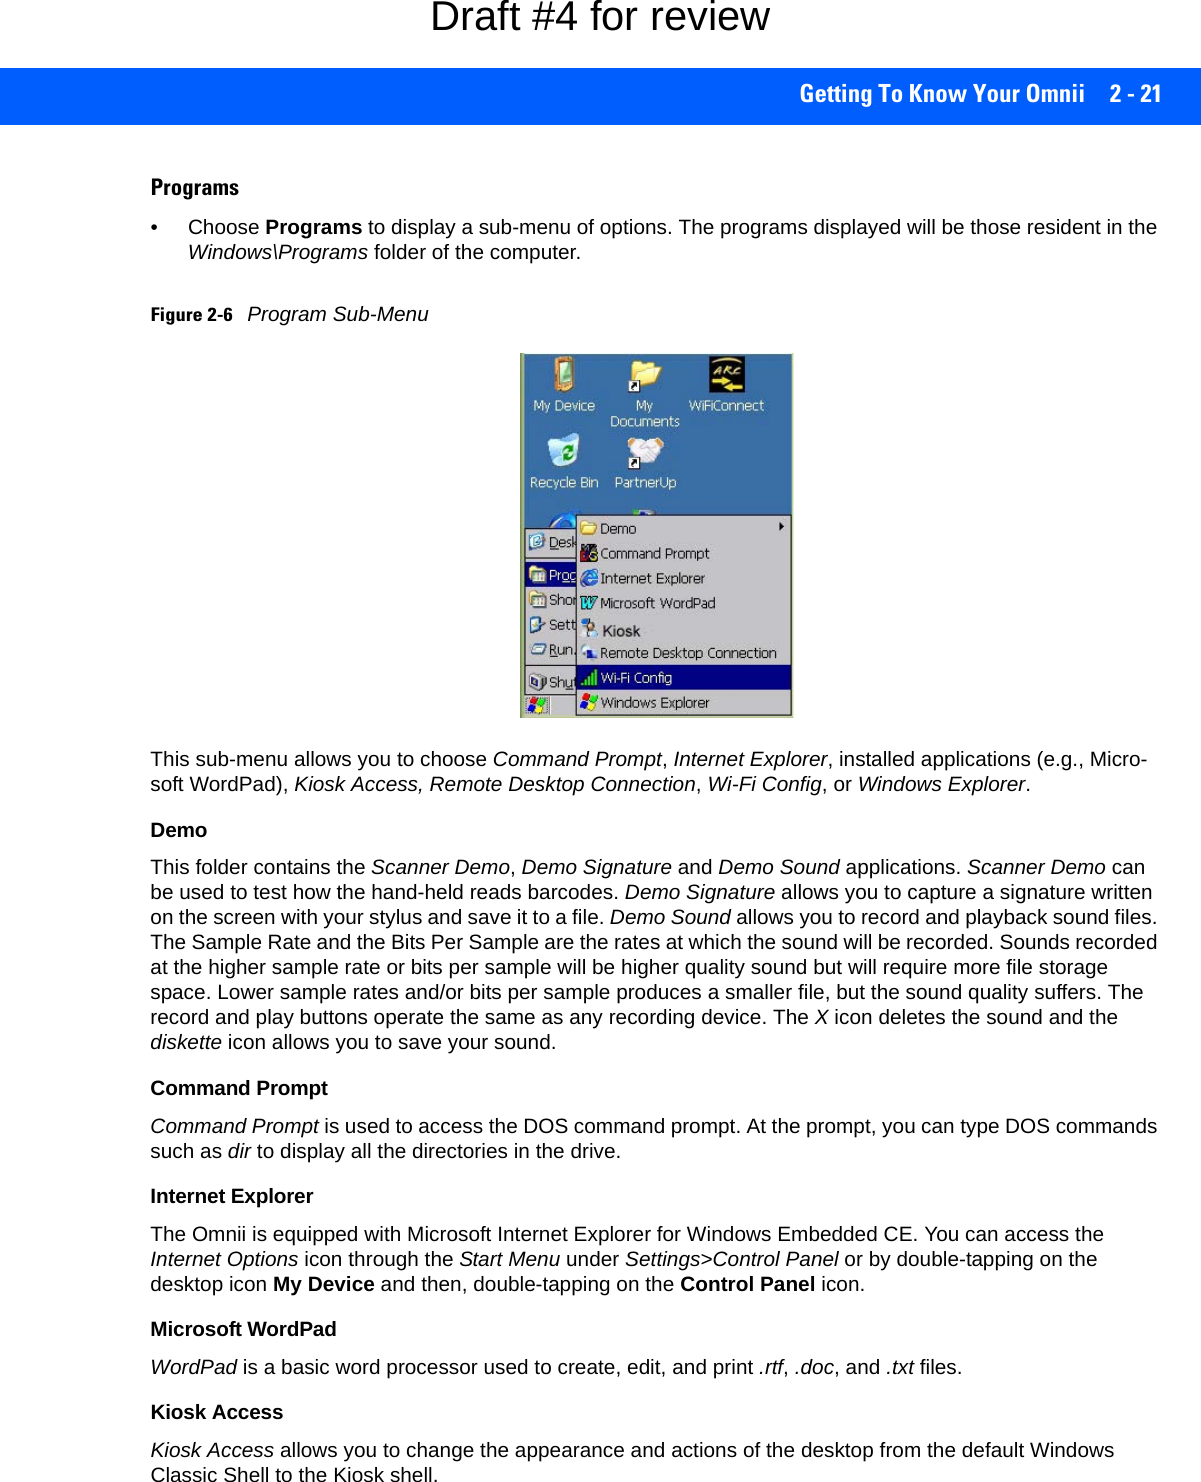
![2 - 22 Omnii Hand-Held Computer with Windows CE 6.0 User GuideRemote Desktop ConnectionRemote Desktop Connection is an Omnii application used to connect to a Windows Terminal Server so that you can run a “session” on the Server machine using the hand-held (Windows Embedded CE device). Remote Desktop Connection on page 3-50 provides a website with details about this option.Wi-Fi ConfigThe Wi-Fi Config application is used to configure the Omnii 802.11a/b/g/n radio for one or more wireless network profiles. Windows ExplorerThe Windows Explorer installed on your Omnii is consistent with all Windows Embedded CE devices. ShortcutsFigure 2-7Shortcuts Sub-MenuSystem TrayIf your touchscreen is not enabled, you can use the System Tray option to access the icons in the taskbar at the bottom of the screen. The taskbar displays indicators such as a radio signal icon. These indicators are attached to dialog boxes that provide additional information. • Choose Shortcuts>System Tray.When System Tray is chosen, the taskbar icons become accessible. To display the dialog box attached to an icon:• Use the arrow keys to highlight an icon, for example, the Bluetooth icon.• Press [Enter] to display the Bluetooth menus.Cycle TasksWhen Cycle Tasks is selected (and the Task Manager is not open), you can cycle through active applications. To cycle through your active applications:• Choose Shortcuts>Cycle Tasks, or • Press [ALT] [TAB].Task ManagerThe Task Manager allows you to switch to another task or to end an active task. To display the task manager window:Draft #4 for review](https://usermanual.wiki/Symbol-Technologies/RA1202.User-Manual-1of2/User-Guide-2406595-Page-54.png)
![Getting To Know Your Omnii 2 - 23•Tap on Shortcuts>Task Manager, or• Press [ALT] [ESC].SettingsThe Settings sub-menu includes the following settings: Control Panel, Network and Dial-up Connections and Taskbar and Start Menu.Figure 2-8Settings Sub-MenuControl PanelThe Control Panel contains applets used to configure hardware, the operating system and the shell. If your Omnii is running with the Motorola TekTerm application or another application, additional configuration applets may appear in the Control Panel.Network and Dial-Up ConnectionsThe Network and Dial-up Connections window allows you to configure the Omnii network interfaces or execute an existing configuration. Refer to Connectivity on page 1-8 for radio setup details.Taskbar and Start MenuThe Taskbar and Start Menu option displays a dialog box in which you can customize the taskbar, choosing which options will be displayed. Refer to Customizing the Taskbar on page 2-19 for additional details about this option.Draft #4 for review](https://usermanual.wiki/Symbol-Technologies/RA1202.User-Manual-1of2/User-Guide-2406595-Page-55.png)

![3 - 2 Omnii Hand-Held Computer with Windows CE 6.0 User GuideMicrosoft SoftwareWindows CE 6.0 R3 is a 32-bit, real-time, multitasking Operating System. The OS features a small footprint, with compatibility to port existing Win32 applications and Touch & Gesture support. Some of the major Windows CE 6.0 R3 components are:• Control Panel, where both our Advantage product and Microsoft applications are listed• Flash Lite• Internet Explorer Embedded• Microsoft WordPad• Remote Desktop Connection• Windows ExplorerThe Control PanelThe Windows Embedded CE Control Panel provides a group of applications through which you can set a variety of system-wide properties, such as power, keyboard sensitivity, network configuration, system backup, desktop appearance, and so on.When the Omnii boots up, the startup desktop (Windows Classic Shell) is displayed, and any applications stored in the Startup folder start up immediately. To access the Control Panel:• Press the [Windows icon] to display the Start Menu.•Tap on Settings>Control Panel.If you’re using the keyboard:• Press the [Windows icon] to display the Start Menu.• Highlight Settings in Start Menu, and press the [RIGHT] arrow key to highlight the Control Panel.• Press the [Enter] key.The Control Panel folder contains icons used in the setup of your Omnii.Figure 3-1Control Panel IconsDraft #4 for review](https://usermanual.wiki/Symbol-Technologies/RA1202.User-Manual-1of2/User-Guide-2406595-Page-62.png)
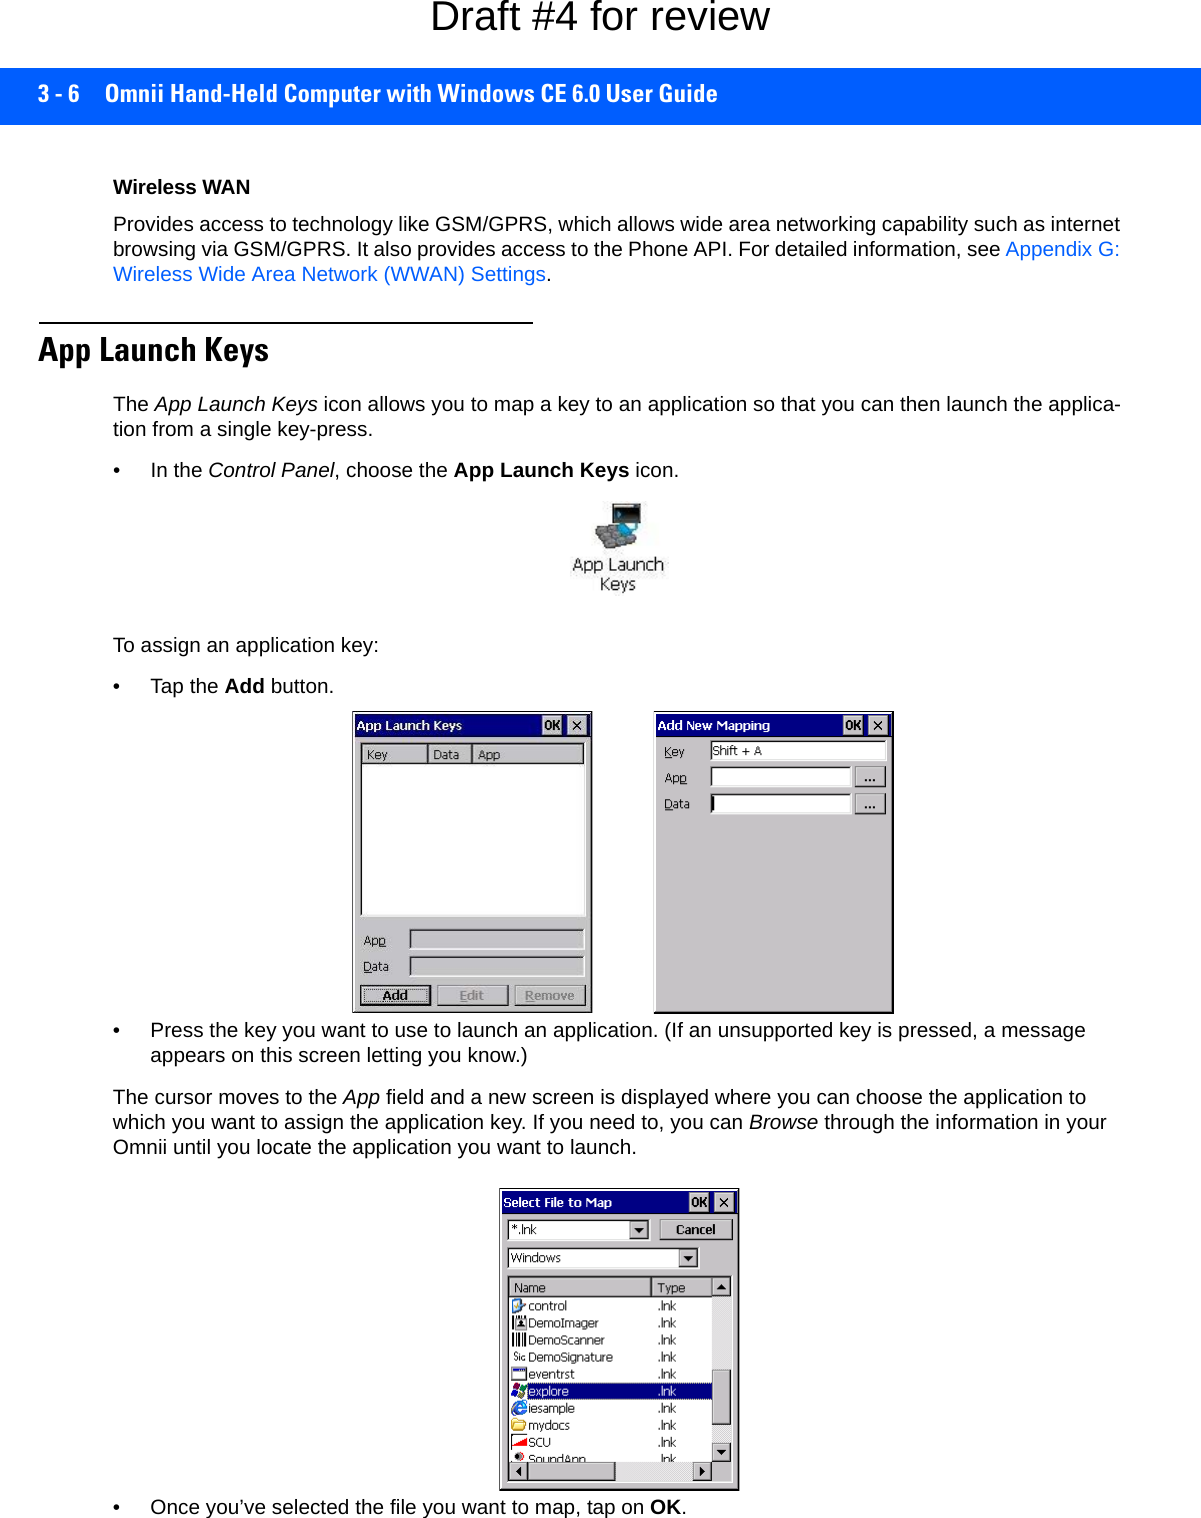
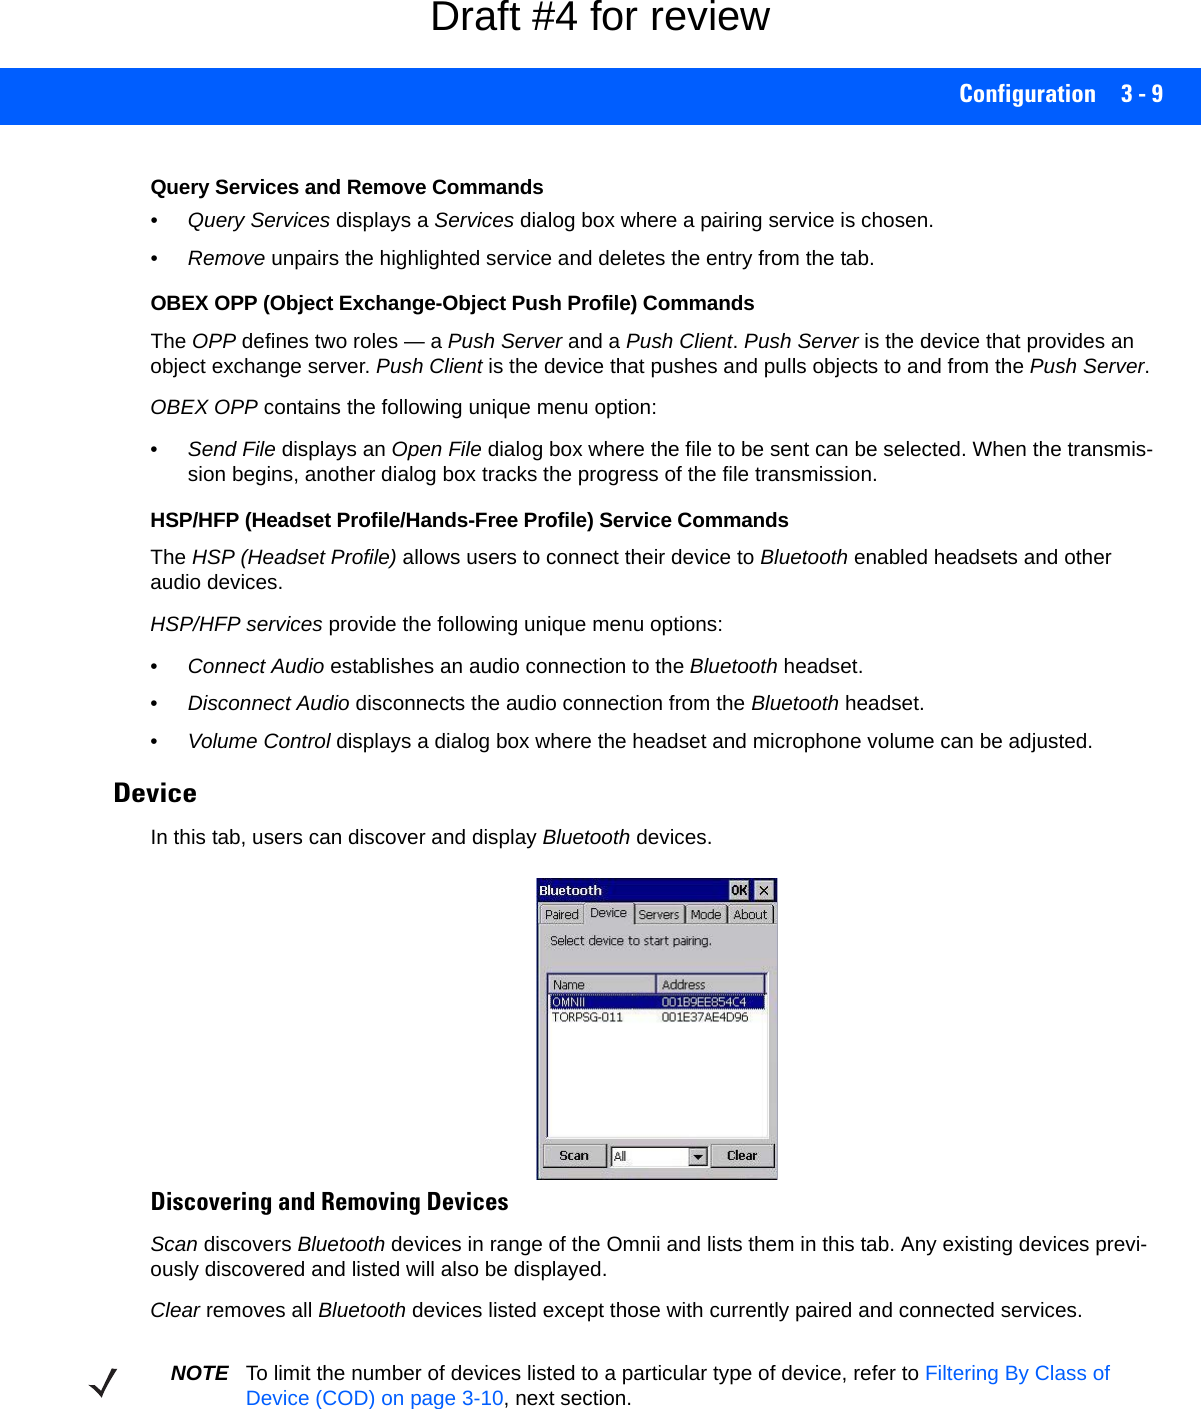
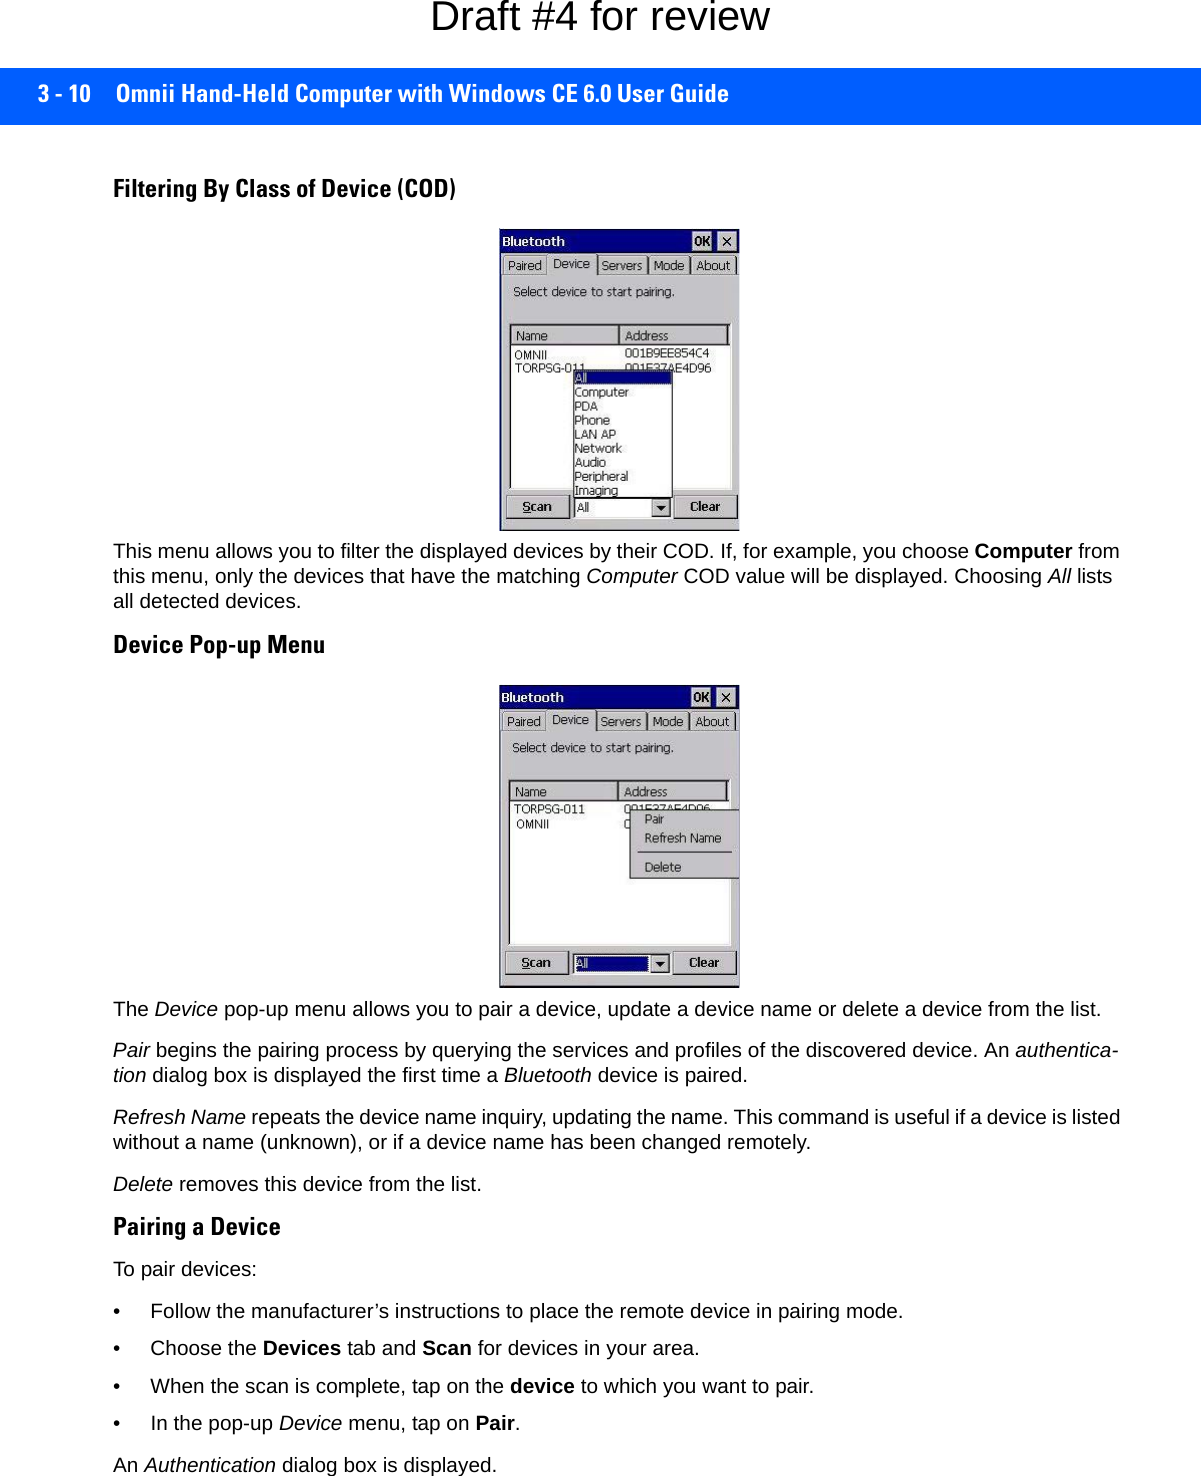
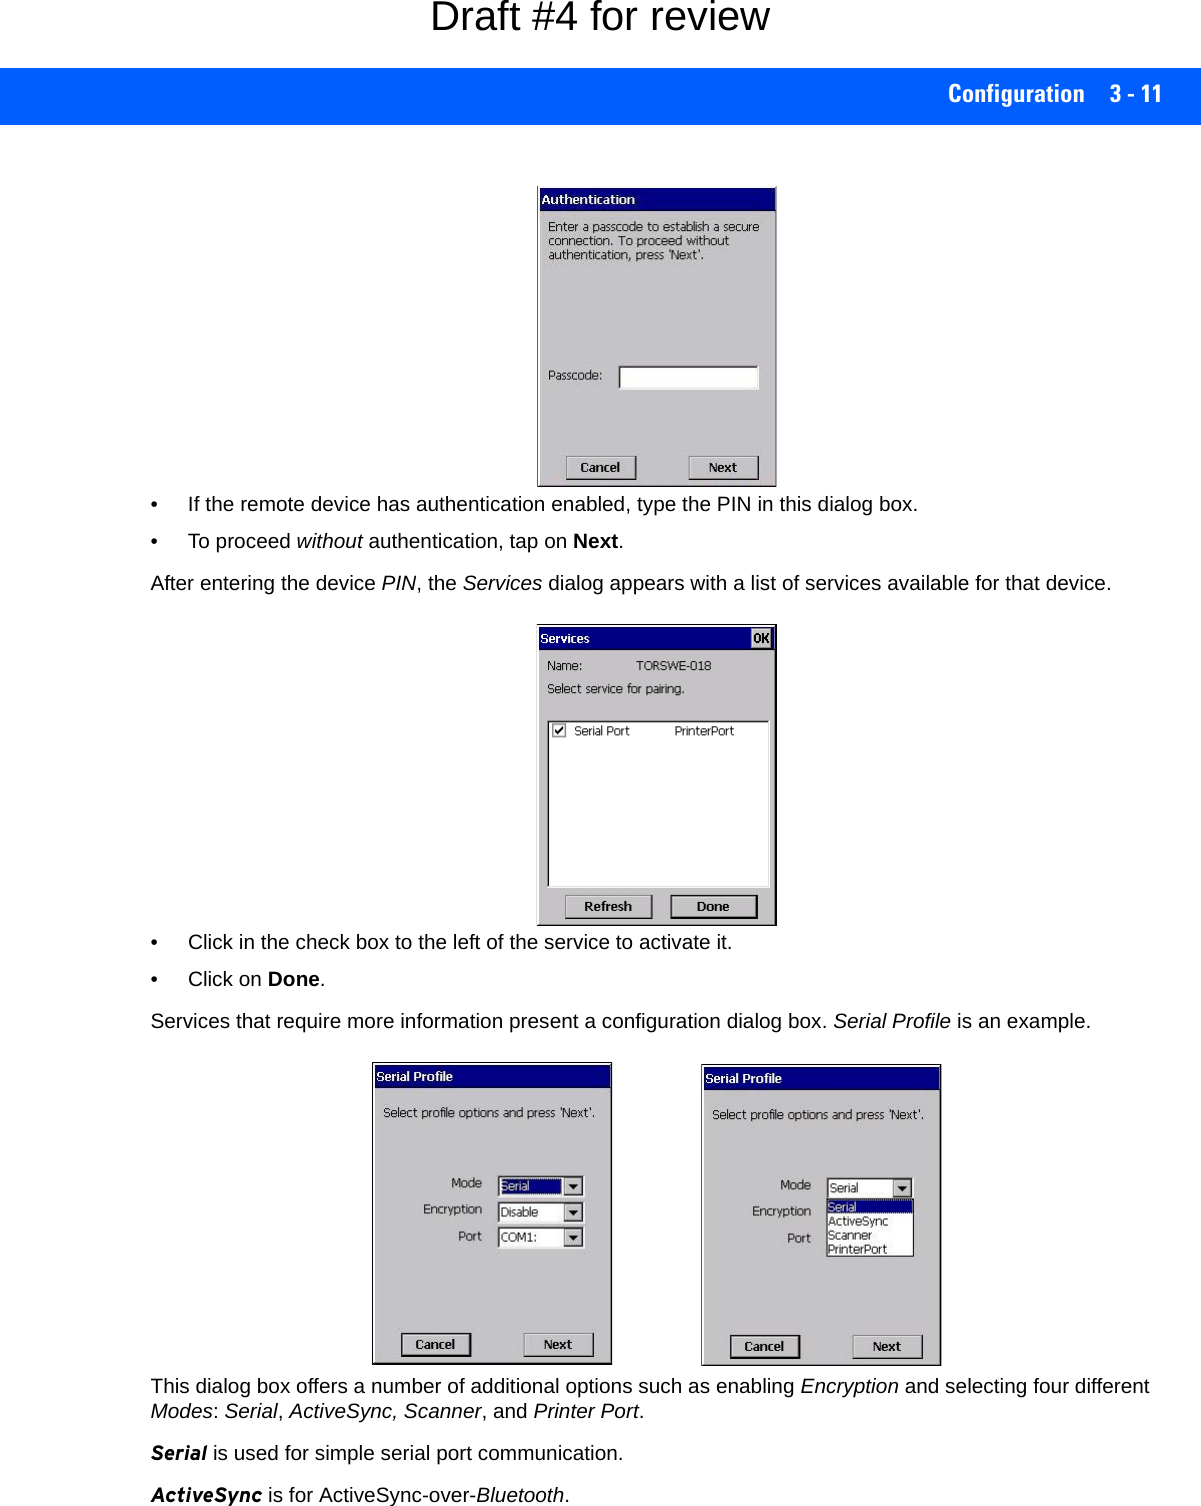
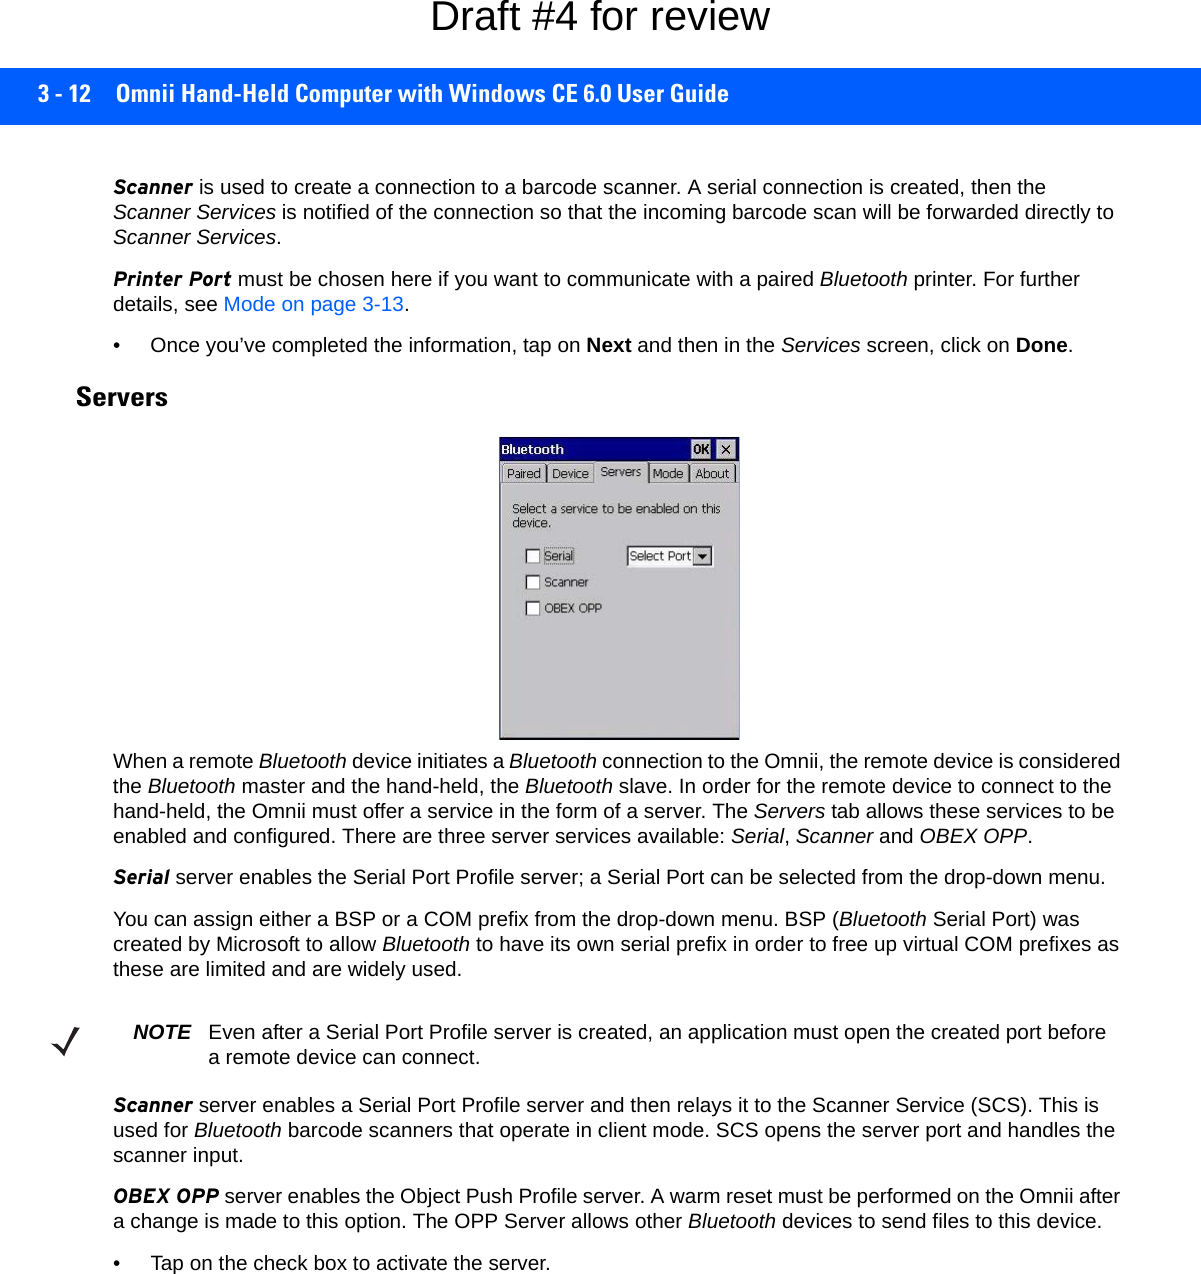
![Configuration 3 - 13Mode Turn on Bluetooth activates the Bluetooth radio.Discoverable determines whether the Omnii is visible or invisible to other devices.Printer Port allows you to assign and enable a virtual outgoing COM port selected from the drop-down menu to communicate with a paired Bluetooth printer. Keep in mind that when a port is chosen, the printer must be on and connected to the chosen port for a remote device to be able to connect.• Select a port within the Printer Port drop-down list, e.g. BSP1: • Check the Printer Port check box.• Open the Device tab and tap on Scan. • Tap-and-hold each Bluetooth Printer device entry and then select Pair, key-in the Passcode (if needed) and then tap Done. DO NOT select any services!• Close the Bluetooth Manager.• Select the Bluetooth device to print to — you will need to key-in (or programmatically raise) the following key sequence [CTRL] [ALT] [F1].• You can now select the Bluetooth device to which you wish to print. Allow Bluetooth to wake system allows remote Bluetooth devices to wake the Omnii by requesting a Blue-tooth service that requires host intervention. This feature can also be used when the Omnii is waking from suspend to significantly to reduce the initialization time of the Bluetooth system.About Device Name displays the broadcasted name of the hand-held. The name can be changed in the System Properties applet: Start>Settings>Control Panel>System icon>Device Name tab.Draft #4 for review](https://usermanual.wiki/Symbol-Technologies/RA1202.User-Manual-1of2/User-Guide-2406595-Page-73.png)
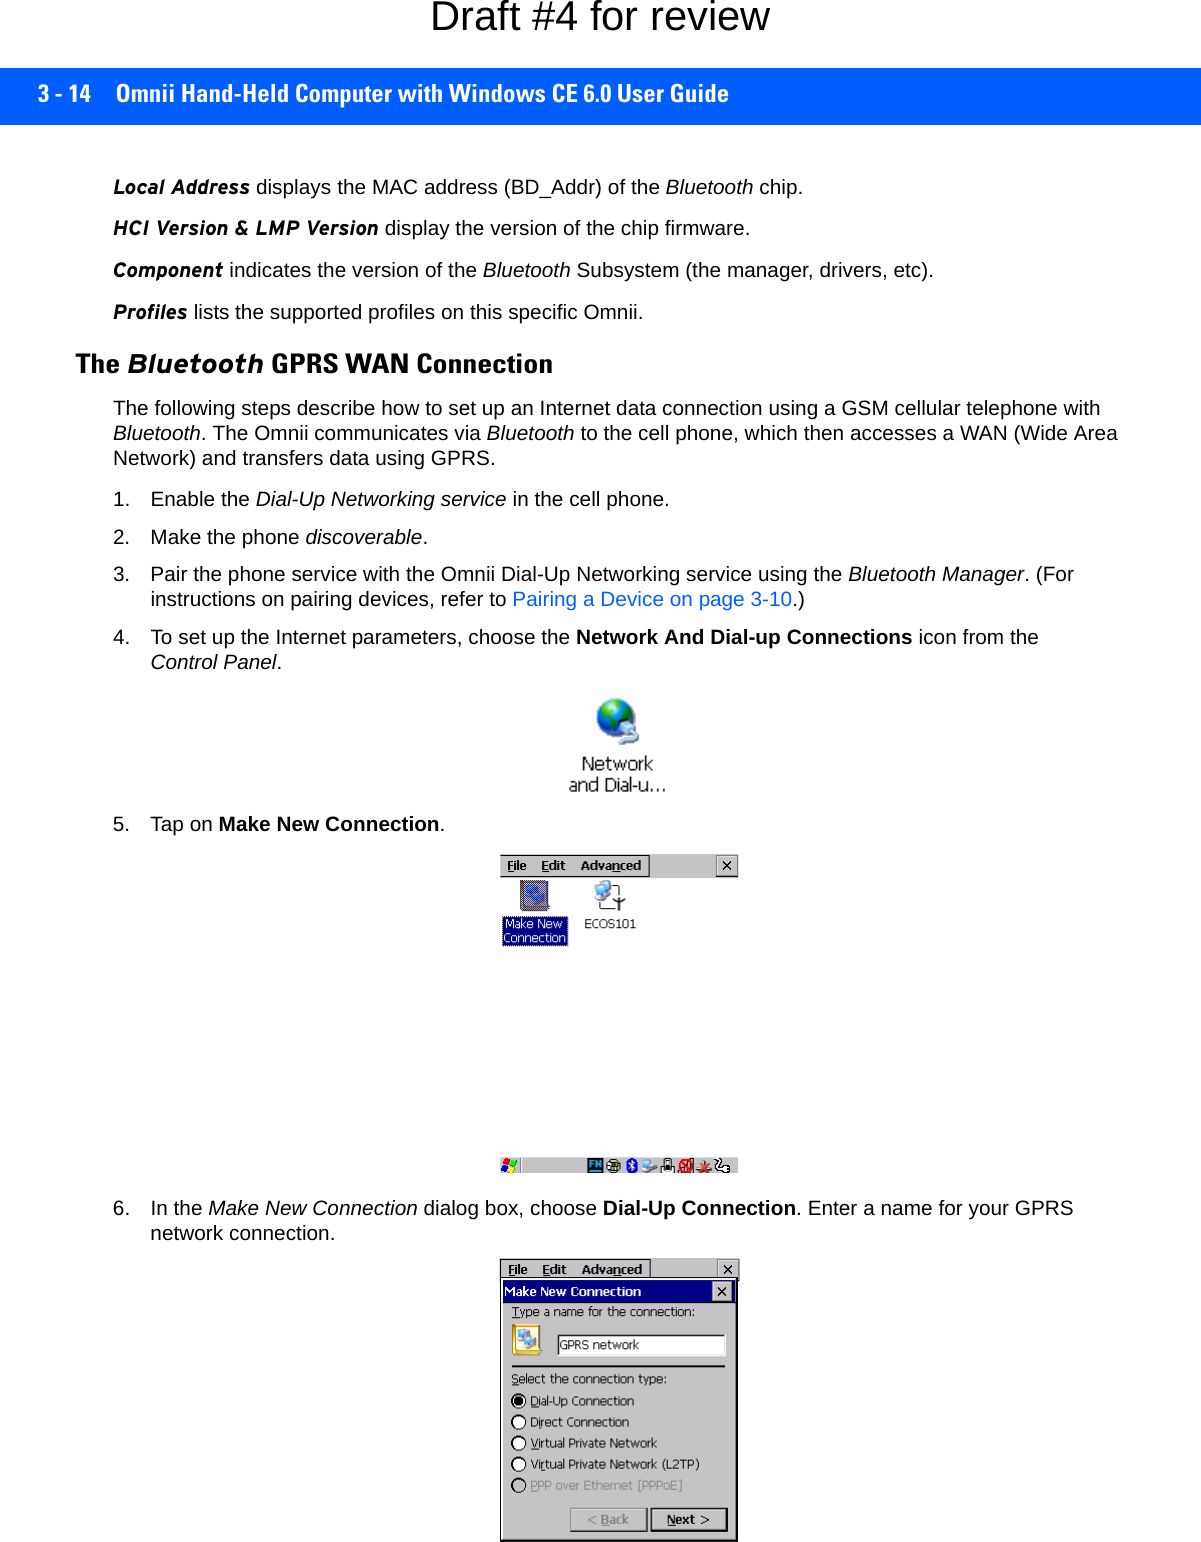
![Configuration 3 - 157. Choose the Next button to display the Modem dialog box.8. In the drop-down menu labelled Select a modem, choose the name of the modem with which you want to connect, and then choose the Configure button to display the Device Properties dialog box.The Omnii communicates via Bluetooth to your Bluetooth equipped cellular telephone and retrieves the parameters for the Device Properties dialog box. Omnii then disconnects.9. Under the Call Options tab, turn off Cancel the call if not connected within, and press [Enter] to save your changes.10. In the Modem dialog box, choose the Next button to display the Phone Number dialog box.Draft #4 for review](https://usermanual.wiki/Symbol-Technologies/RA1202.User-Manual-1of2/User-Guide-2406595-Page-75.png)
![3 - 16 Omnii Hand-Held Computer with Windows CE 6.0 User GuideThe phone number you enter is network carrier dependent. Once you’ve specified all the necessary infor-mation, choose the Finish button.11. In the Control Panel, choose the Dialing icon.12. The values in the Dialing Properties dialog box need to be edited according to your network carrier specifications.Once you’ve edited this dialog box to reflect your network carrier requirements, press [Enter] to save your changes.13. At this point, return to the Control Panel, and choose the Network and Dial-up Connections icon.14. In the network connection window, the new network configuration — in this case, New Connection is displayed. Tap on the new icon.Draft #4 for review](https://usermanual.wiki/Symbol-Technologies/RA1202.User-Manual-1of2/User-Guide-2406595-Page-76.png)
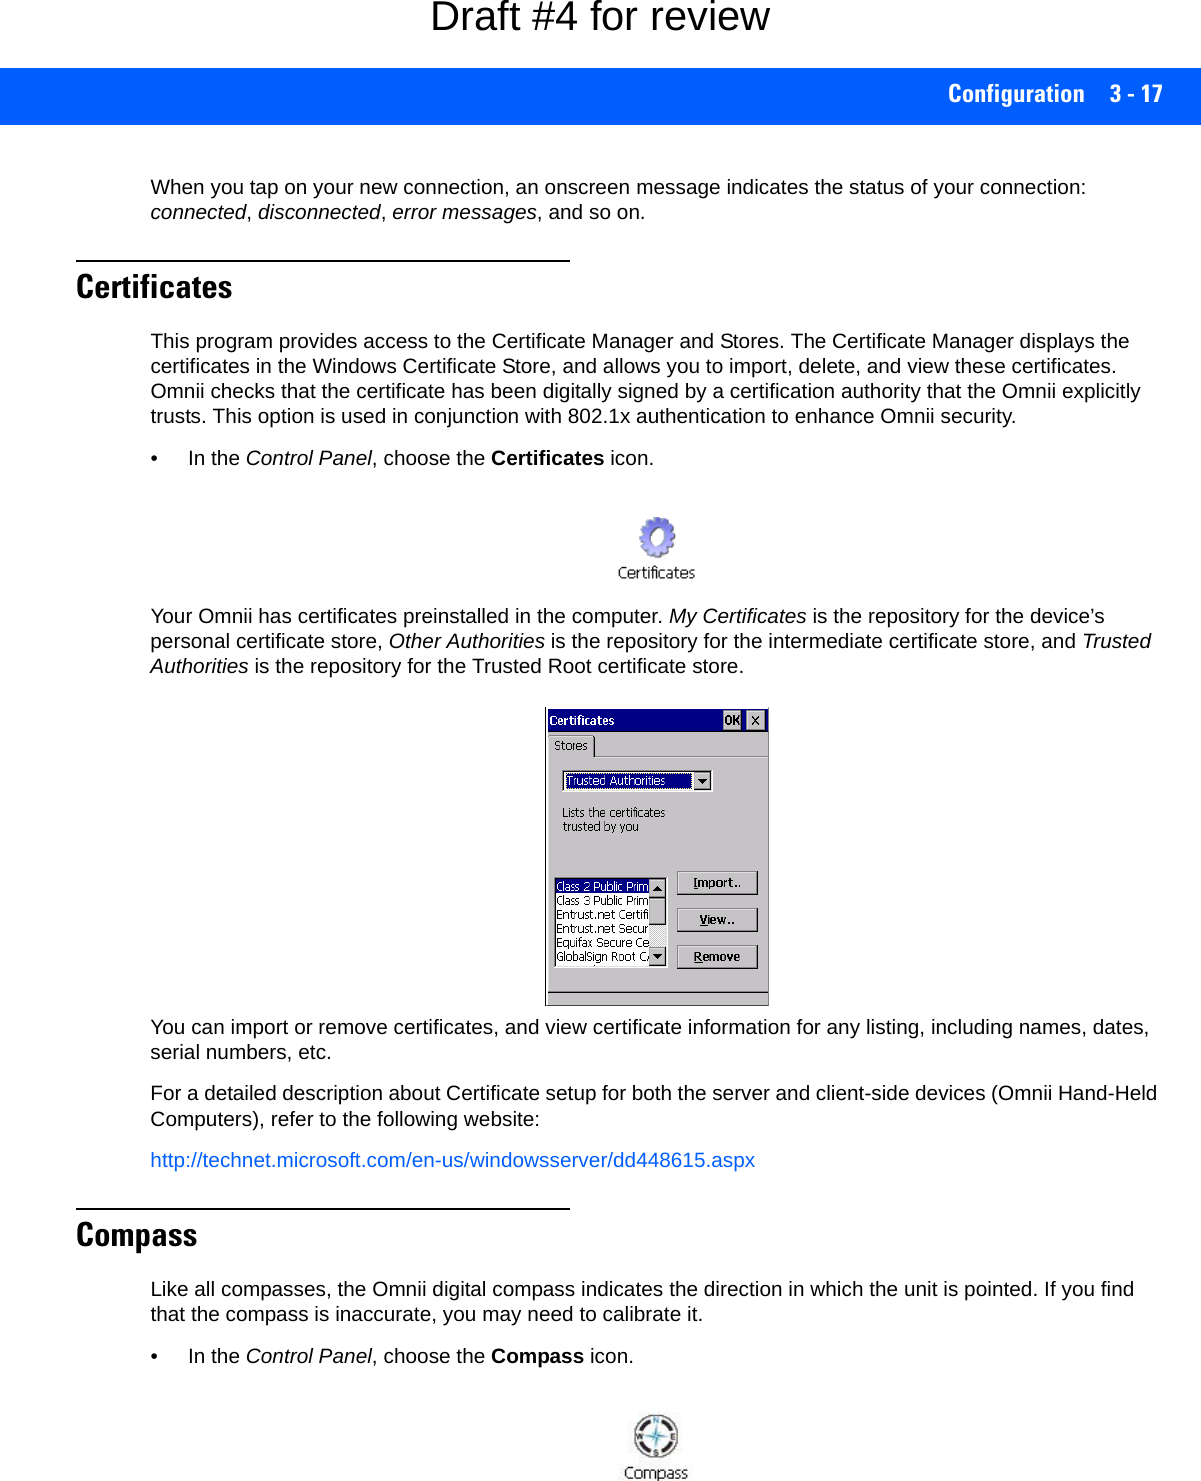
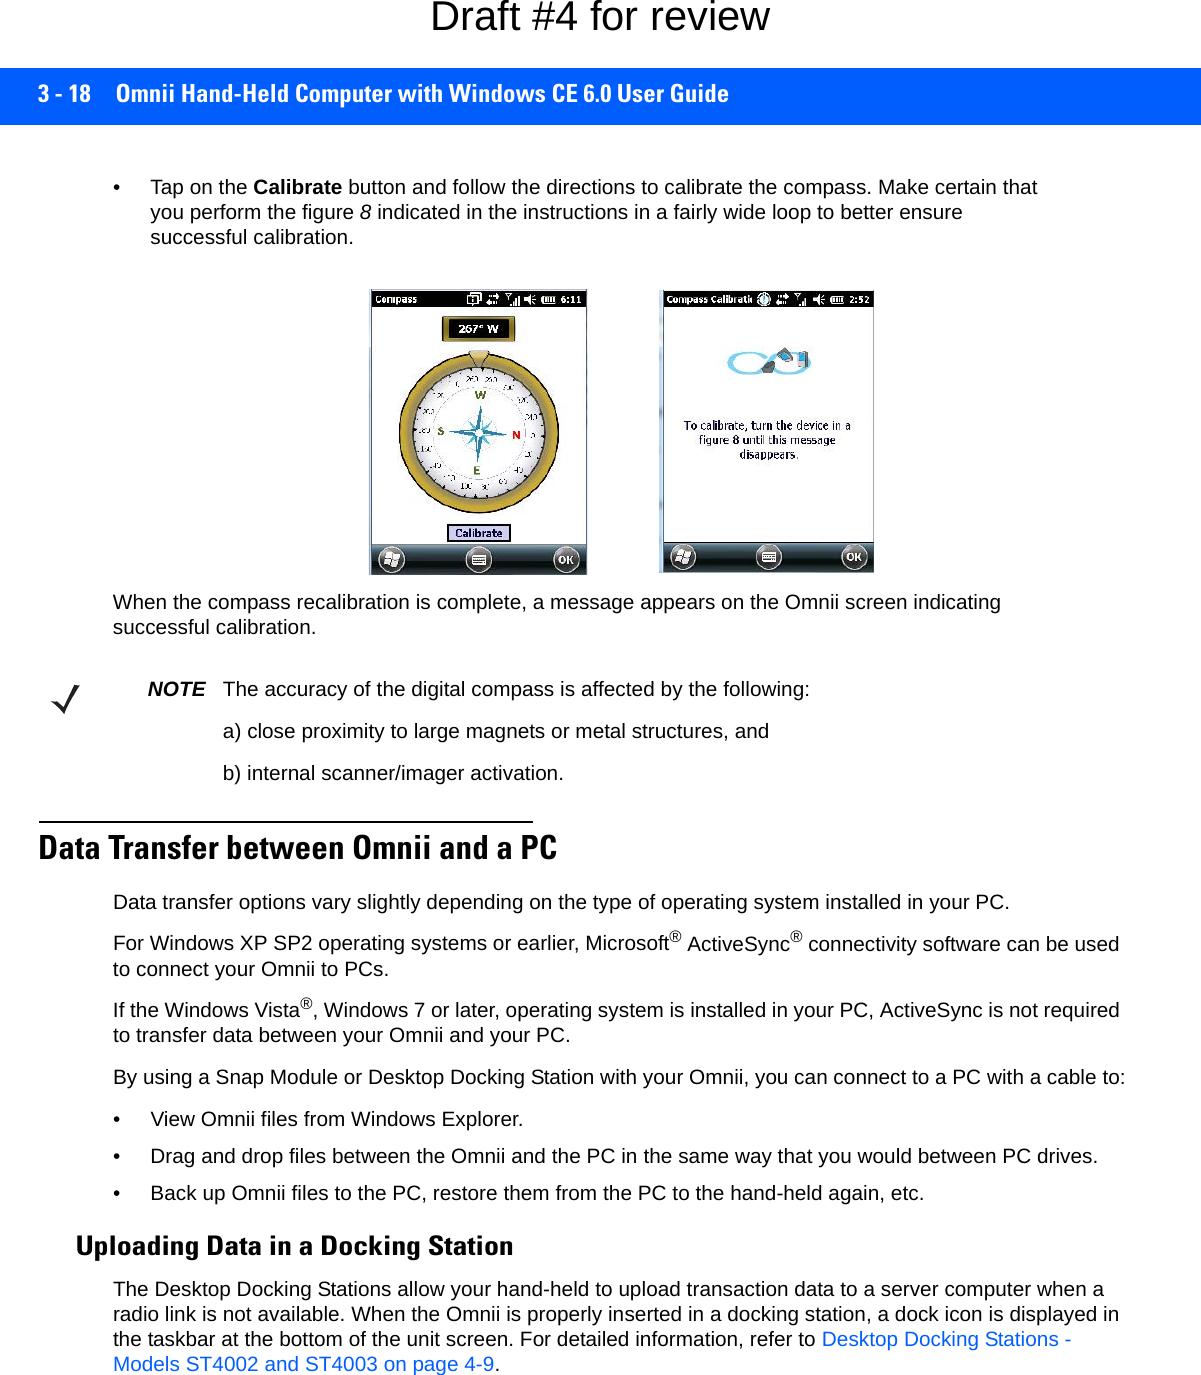
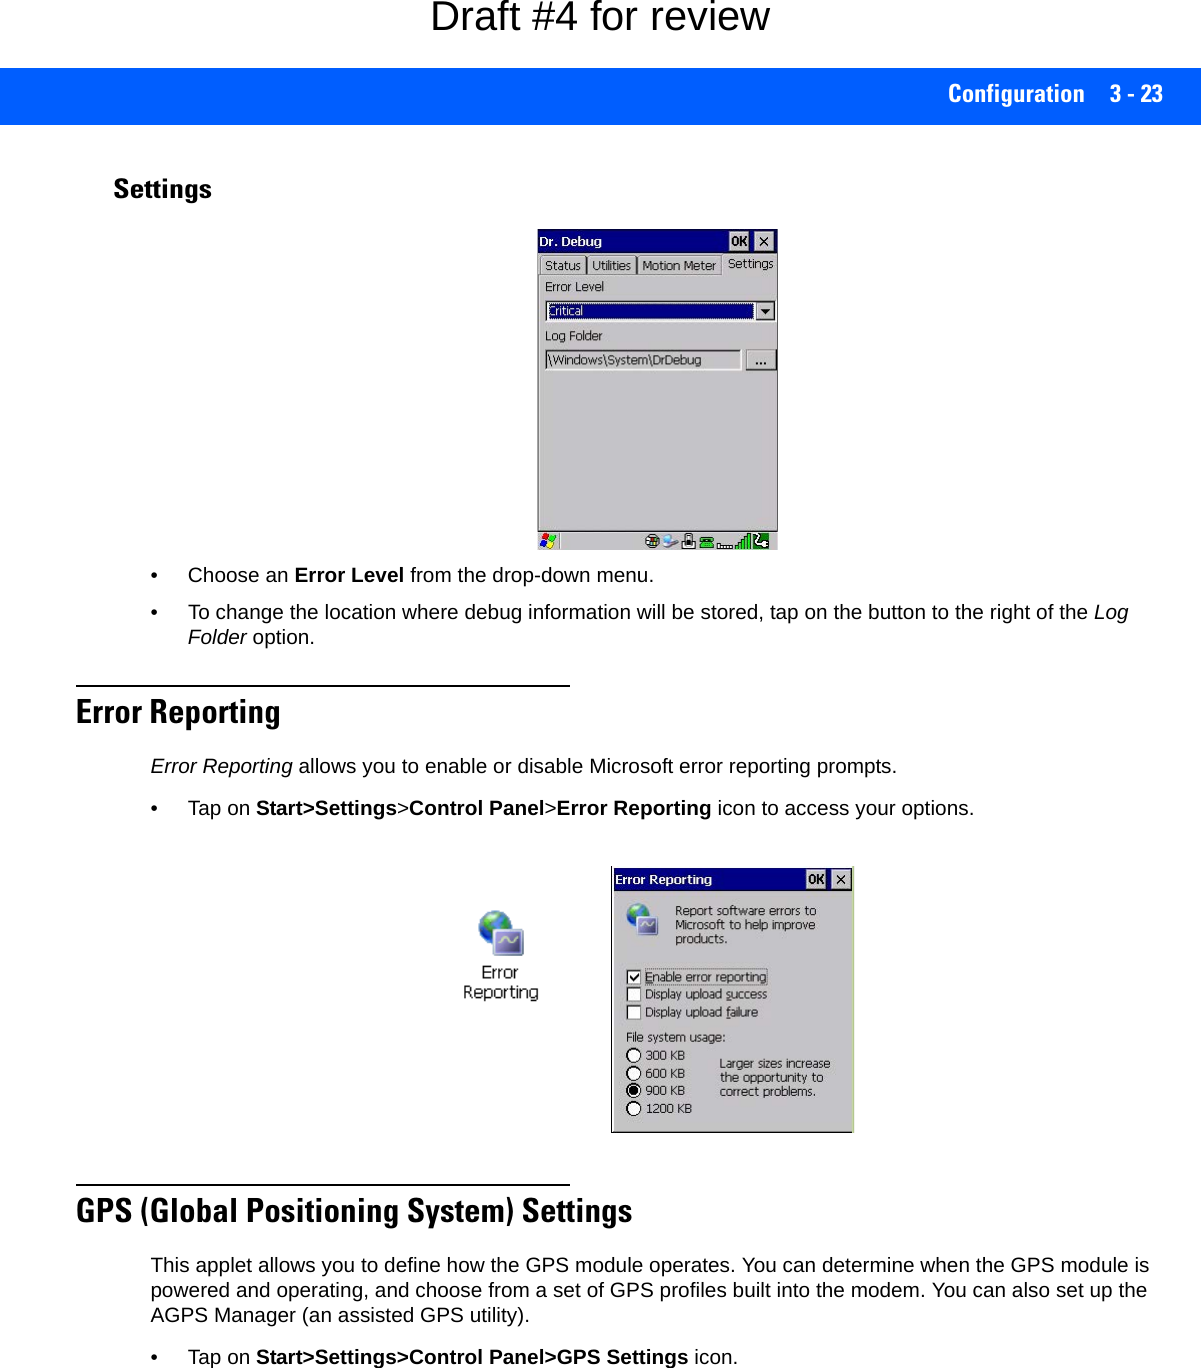
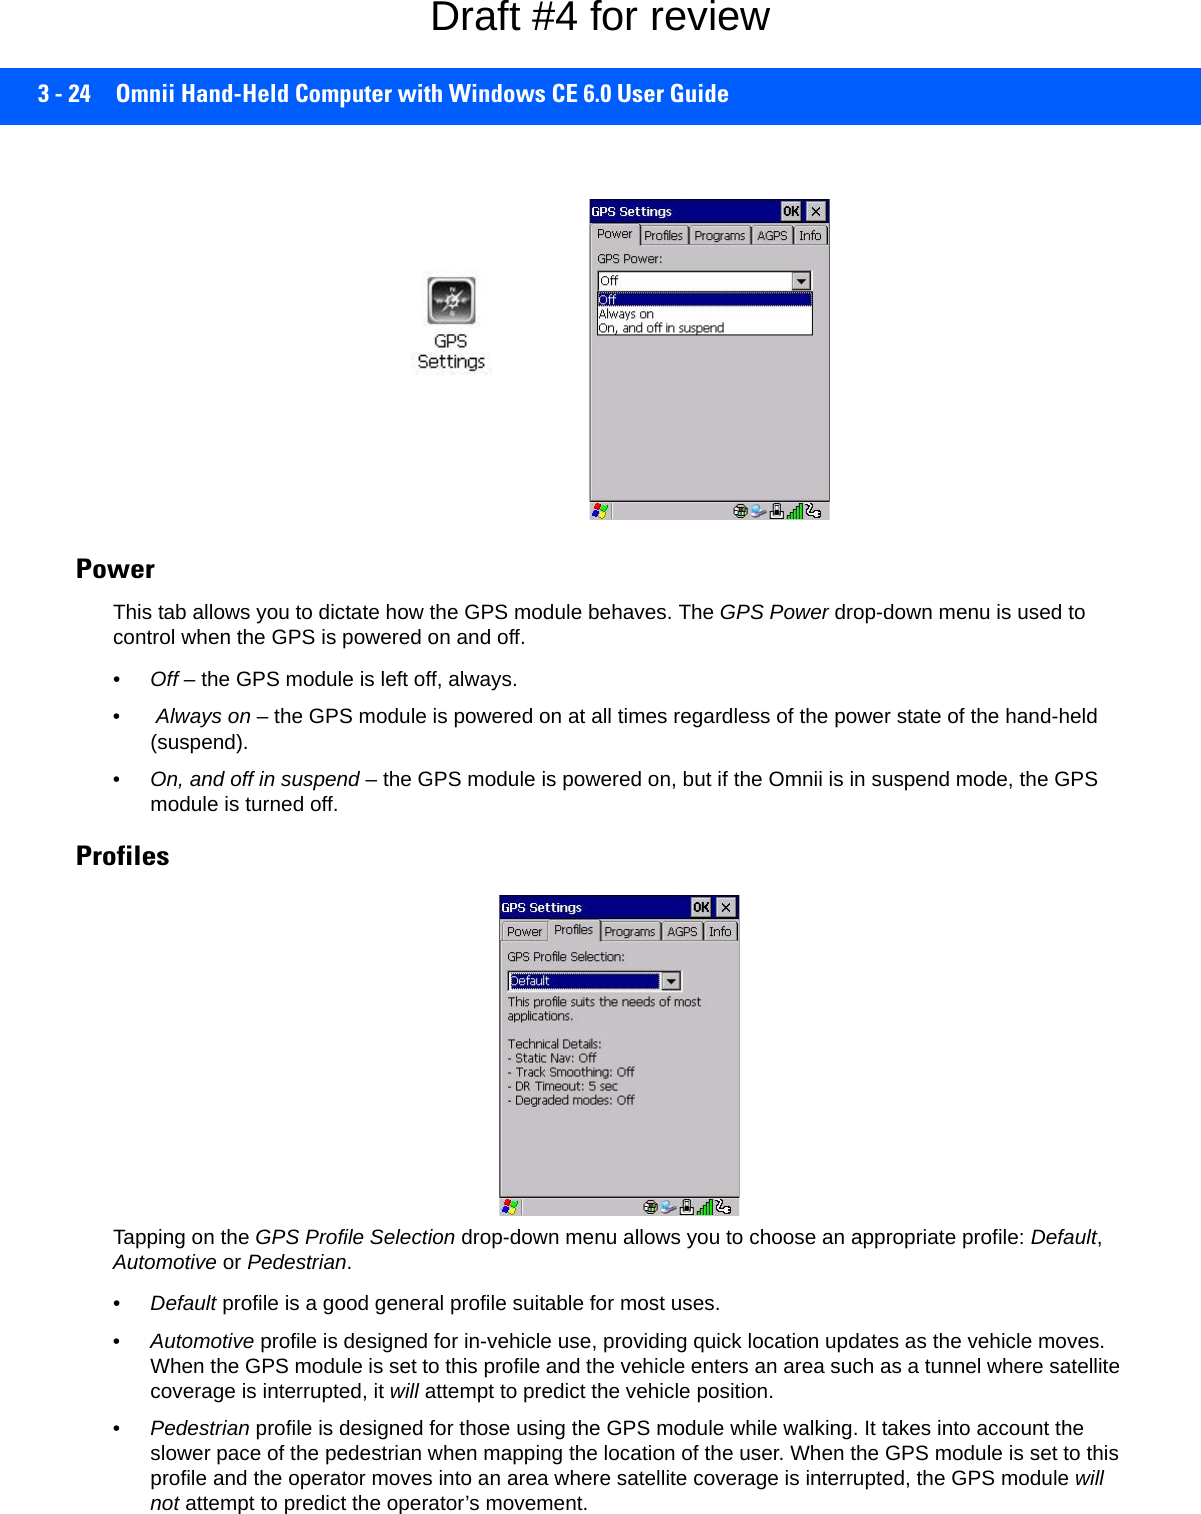
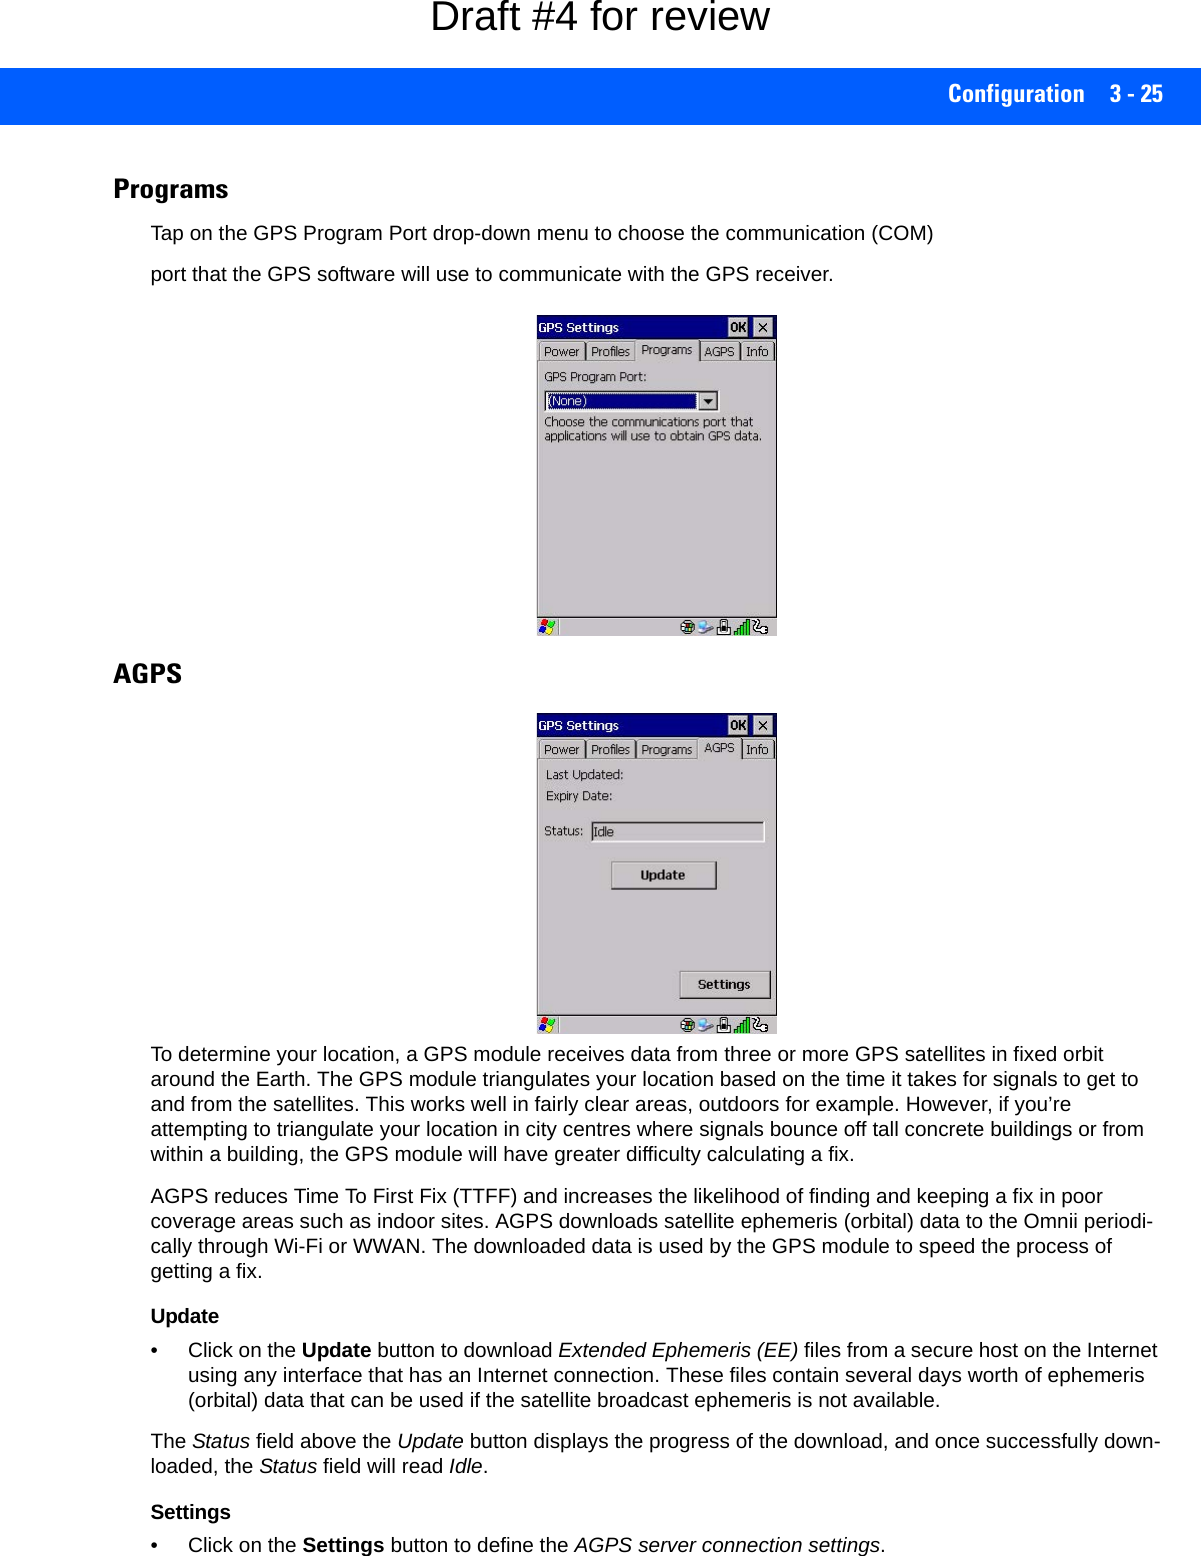
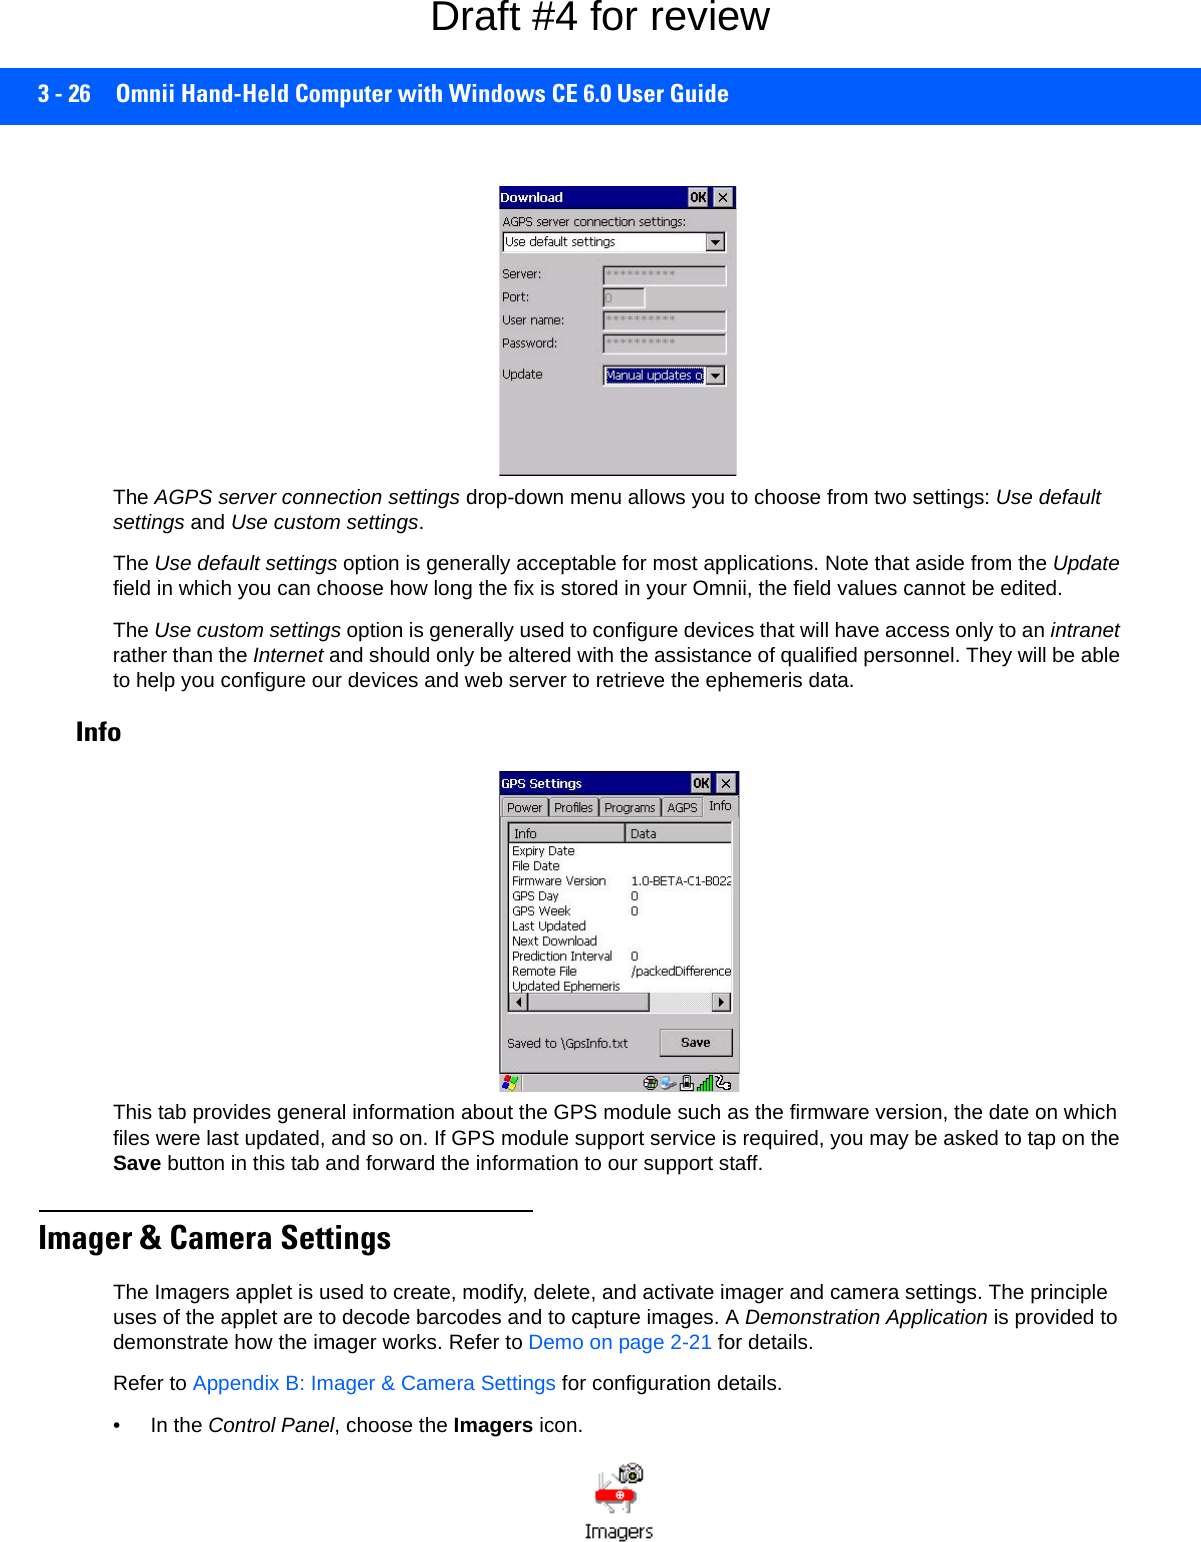
![Configuration 3 - 27Input PanelThe Omnii is equipped with a Soft Input Panel (SIP). Shown below is the standard Microsoft SIP, accessed from the Control Panel. Tapping on the Input Panel button displays a soft input panel (soft keyboard) that can be customized using the Input Panel dialog box.NOTE This icon is only displayed when the appropriate imager is installed in your Omnii. If there is an imager installed but this icon is not present, additional software (ICS) may need to be installed.To enable a newly-installed imager, Press and hold down the [FN] key and the [Enter/Power] key simultaneously for a minimum of three seconds. Soft KeyboardInput PanelButton IconIMPORTANT If the Input Panel button icon is not visible in the taskbar, from the Start menu, tap on Set-tings>Taskbar and Start Menu. Tap the check box next to Show Input Panel Button. To remove this icon from the taskbar, tap in the check box to erase the check mark.Draft #4 for review](https://usermanual.wiki/Symbol-Technologies/RA1202.User-Manual-1of2/User-Guide-2406595-Page-87.png)
![3 - 28 Omnii Hand-Held Computer with Windows CE 6.0 User GuideThe soft keyboard operates just like a standard keyboard except that rather than pressing a key, you tap on letters, numbers, modifier keys, etc. on the Omnii screen.To customize the appearance and behaviour of the soft keyboard:Tap on the Input Panel icon in the Control Panel.Figure 3-2Input Panel Properties• Tap on the Options button to change the appearance of your soft keyboard.Figure 3-3Soft Keyboard Options Keyboard PropertiesThis icon displays the Keyboard Properties dialog box in which you can adjust the repeat rate of the keys, the intensity of the keyboard backlight and the behaviour of the [FN] and [SYM] modifier keys. This dialog box also allows you to define macro keys and Unicode characters.• In the Control Panel, choose the Keyboard icon.NOTE You can also display this dialog box by double-tapping on the Input icon in the far-right corner of the taskbar.Draft #4 for review](https://usermanual.wiki/Symbol-Technologies/RA1202.User-Manual-1of2/User-Guide-2406595-Page-88.png)
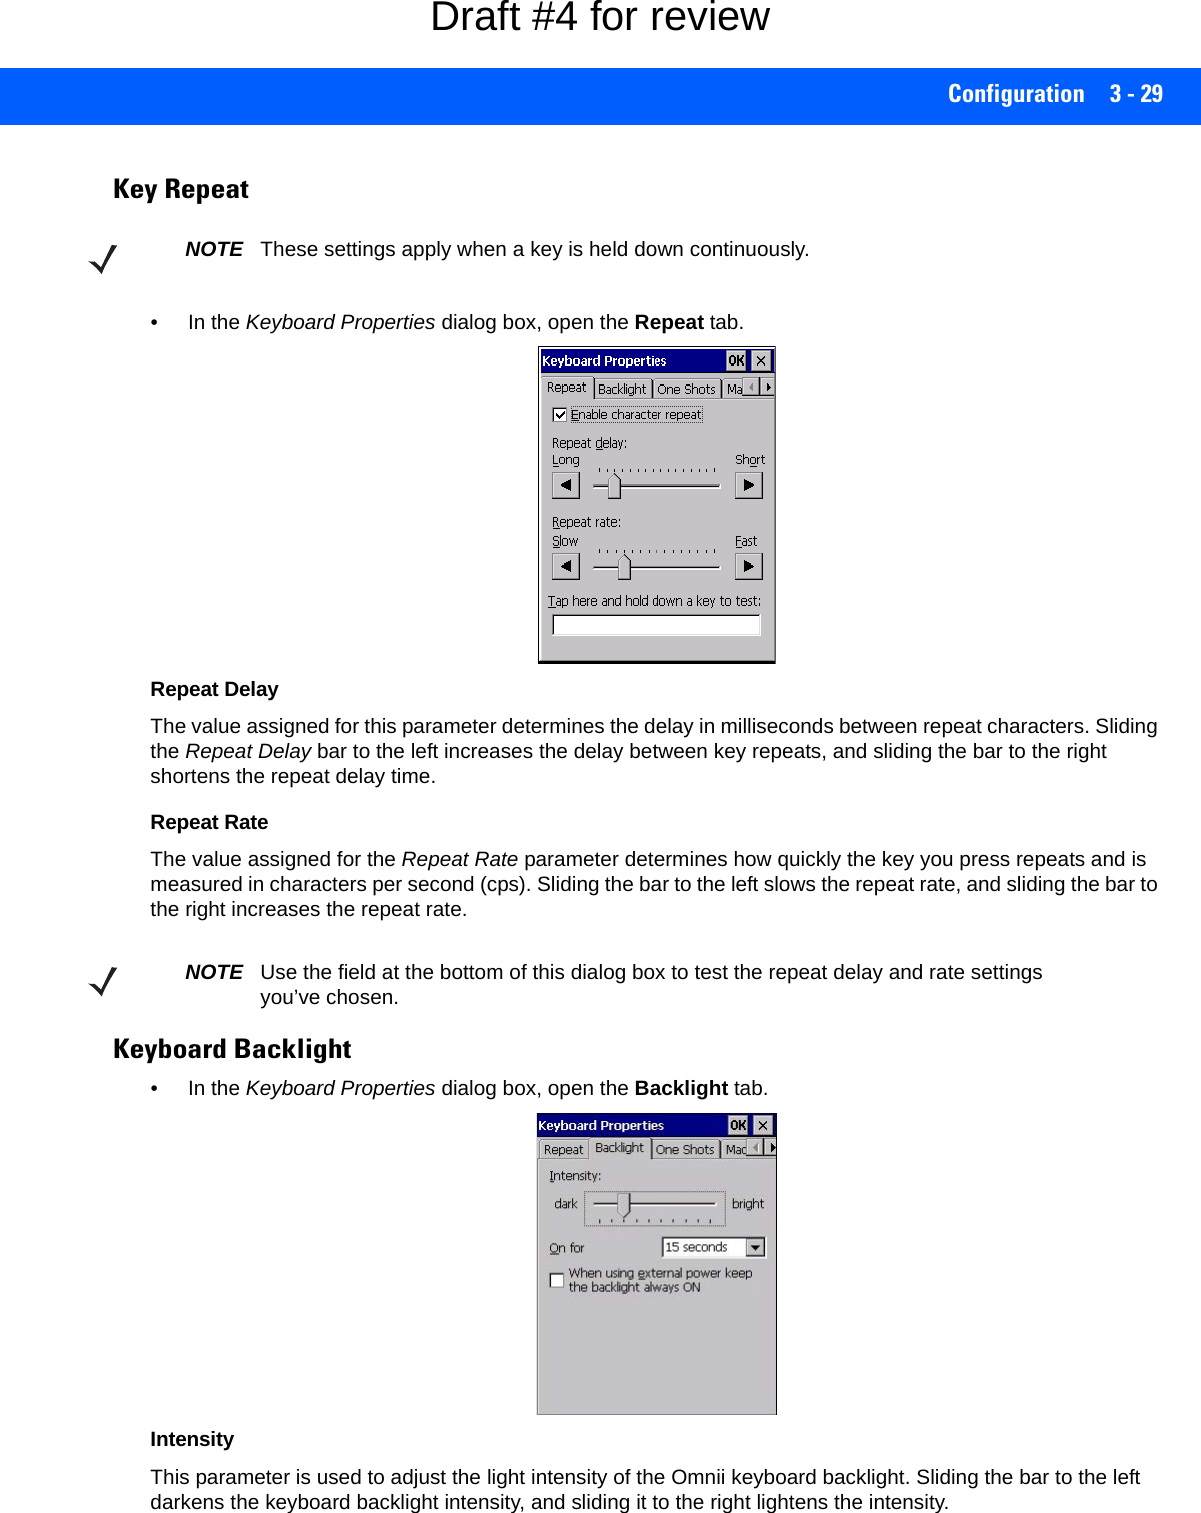
![3 - 30 Omnii Hand-Held Computer with Windows CE 6.0 User GuideON ForThe value chosen from this drop-down menu determines the duration of time that the keyboard backlight stays on after the last user action (keypress or scan trigger).Keyboard One Shot Modes• In the Keyboard Properties dialog box, open the One Shots tab.The options in this tab allow you to determine how modifier keys on your Omnii behave. For each modifier key — [ALT], [SHIFT], [CTRL], [FN], and [SYM] — you have the following options in the drop-down menu: Lock, OneShot, and OneShot/Lock. LockIf you choose Lock from the drop-down menu, pressing a modifier key once locks it on until you press the modifier key a second time to unlock or turn it off. OneShotIf you choose OneShot, the modifier key remains active only until the next key is pressed.OneShot/LockOneShot/Lock allows you to combine these functions. When you choose this option and you press the modifier key once, it remains active only until the next key is pressed. NOTE The keypad backlight maximum brightness will decrease over time as it ages. Use mid-range intensity settings when possible to extend the backlight lifespan. When the backlight starts to dim, use this parameter to make it brighter.NOTE Tapping in the check box next to When using external power, keep the backlight always ON forces the keypad backlight to remain on when the unit is operating with external power.NOTE Keep in mind that checking the taskbar lets you know whether or not these keys are locked on. For example, if the [FN] key is locked on, the taskbar at the bottom of the screen displays it underlined. If this key is displayed without the underline in the taskbar, you’ll know that the key is not locked. It will become inactive following a key press.IMPORTANT Once you’ve assigned a One Shot mode to a modifier key, you need to tap on the OK button at the top of the tab to activate your selection.Draft #4 for review](https://usermanual.wiki/Symbol-Technologies/RA1202.User-Manual-1of2/User-Guide-2406595-Page-90.png)
![Configuration 3 - 31If you press the modifier key twice, it is locked on, remaining active until the modifier key is pressed a third time to turn it off.Keyboard Macro Keys• In the Keyboard Properties dialog box, open the Macros tab.A macro has 200 programmable characters (or “positions”). The macro keys can be programmed to replace frequently used keystrokes, along with the function of executable keys including [Enter], [BACKSPACE] and [DEL] ([FN]-[BACKSPACE]), function keys and arrow keys. Recording and Saving a MacroYou can program up to 6 physical macro keys, depending on your keyboard layout. You can also increase the number of virtual macro keys up to 15 using Scancode Remapping (for details, see Scancode Remapping on page 3-33). • In the Macro menu highlight a macro key number, for example macro 1, to assign a macro to macro key [M1]. Choose the Record button. A message screen is displayed instructing you to Enter Key Strokes to Record.• Type the macro sequence you want to assign to the Macro key. You can type text and numbers, and you can program the function of special keys into a macro.• When you’ve finished recording your macro sequence, press the key sequence: [CTRL] [ALT] [Enter], or choose the Stop Recording button.Draft #4 for review](https://usermanual.wiki/Symbol-Technologies/RA1202.User-Manual-1of2/User-Guide-2406595-Page-91.png)
![3 - 32 Omnii Hand-Held Computer with Windows CE 6.0 User GuideA new screen Verify Macro displays the macro sequence you created. The Save button is highlighted. • Press [Enter] to save your macro, or highlight CANCEL and press [Enter] to discard it.Executing a MacroTo execute a macro:• Press the macro key to which you’ve assigned the macro. Deleting a MacroTo delete a macro:• In the Macros tab, highlight the macro number you want to delete.• Choose the Delete button.Unicode Mapping• In the Keyboard Properties dialog box, open the Unicode Mapping tab.The Unicode Mapping tab is used to map combinations of virtual key values and [CTRL] and [SHIFT] states to Unicode™ values. This tab shows the configured Unicode character along with the Unicode value. For example, the sample screen above shows “a (U+0061)” indicating that the character “a” is represented by the Unicode value “0061”, and so on. Keep in mind that Unicode configurations are represented as hexadecimal rather than decimal values.All user-defined Unicode mappings are listed in the Unicode Mapping tab in order of virtual key value, and then by order of the shift state. If a Unicode mapping is not listed, the Unicode mapping is mapped to the default Unicode value.Adding and Changing Unicode Values• Choose the Add/Change button.IMPORTANT Changes to Unicode mappings are not saved until you exit the Keyboard Properties dialog box.Draft #4 for review](https://usermanual.wiki/Symbol-Technologies/RA1202.User-Manual-1of2/User-Guide-2406595-Page-92.png)
![Configuration 3 - 33• Highlight a value in the Unicode mapping list. In the sample screen above, a value will be assigned to virtual key 0 (VK 0).• Position the cursor in the Unicode Mapping field, and type a Unicode value for the highlighted key.Removing Unicode Values• In the Unicode Mapping tab, highlight the item you want to delete, and choose the Remove button.Scancode RemappingA scancode is a number that is associated with a physical key on a keyboard. Every key has a unique scan-code that is mapped to a virtual key, a function or a macro. Scancode Remapping allows you to change the functionality of any key on the keyboard. A key can be remapped to send a virtual key (e.g. VK_F represents the F key; VK_RETURN represents the [Enter] key, etc.), perform a function (e.g. turn the scanner on, change volume, etc.) or run a macro.There are three different tables of scancode mappings: the Normal table, the FN table and the SYM table.The Normal table defines unmodified key presses; the FN table defines key presses that occur when the [FN] modifier is on; the SYM table defines key presses that occur when the [SYM] modifier is on. The default mappings of these scancodes can be overwritten for each of these three tables using the Scancode Remap-ping tab accessed from the Keyboard Properties dialog box.NOTE To add a shifted state, [SHIFT] and/or [CTRL], press [TAB] to position the cursor in the check box next to SHIFT Pressed and/or CTRL Pressed. Press [SPACE] to select the shift state you want to assign.NOTE When using the Mobile Devices SDK Developers' Guide (PN 8100016), note that the [ORANGE] key is interchangeable with the [SYM] key. Similarly, in the context of the scancode mapping tables, Orange is interchangeable with SYM.Draft #4 for review](https://usermanual.wiki/Symbol-Technologies/RA1202.User-Manual-1of2/User-Guide-2406595-Page-93.png)
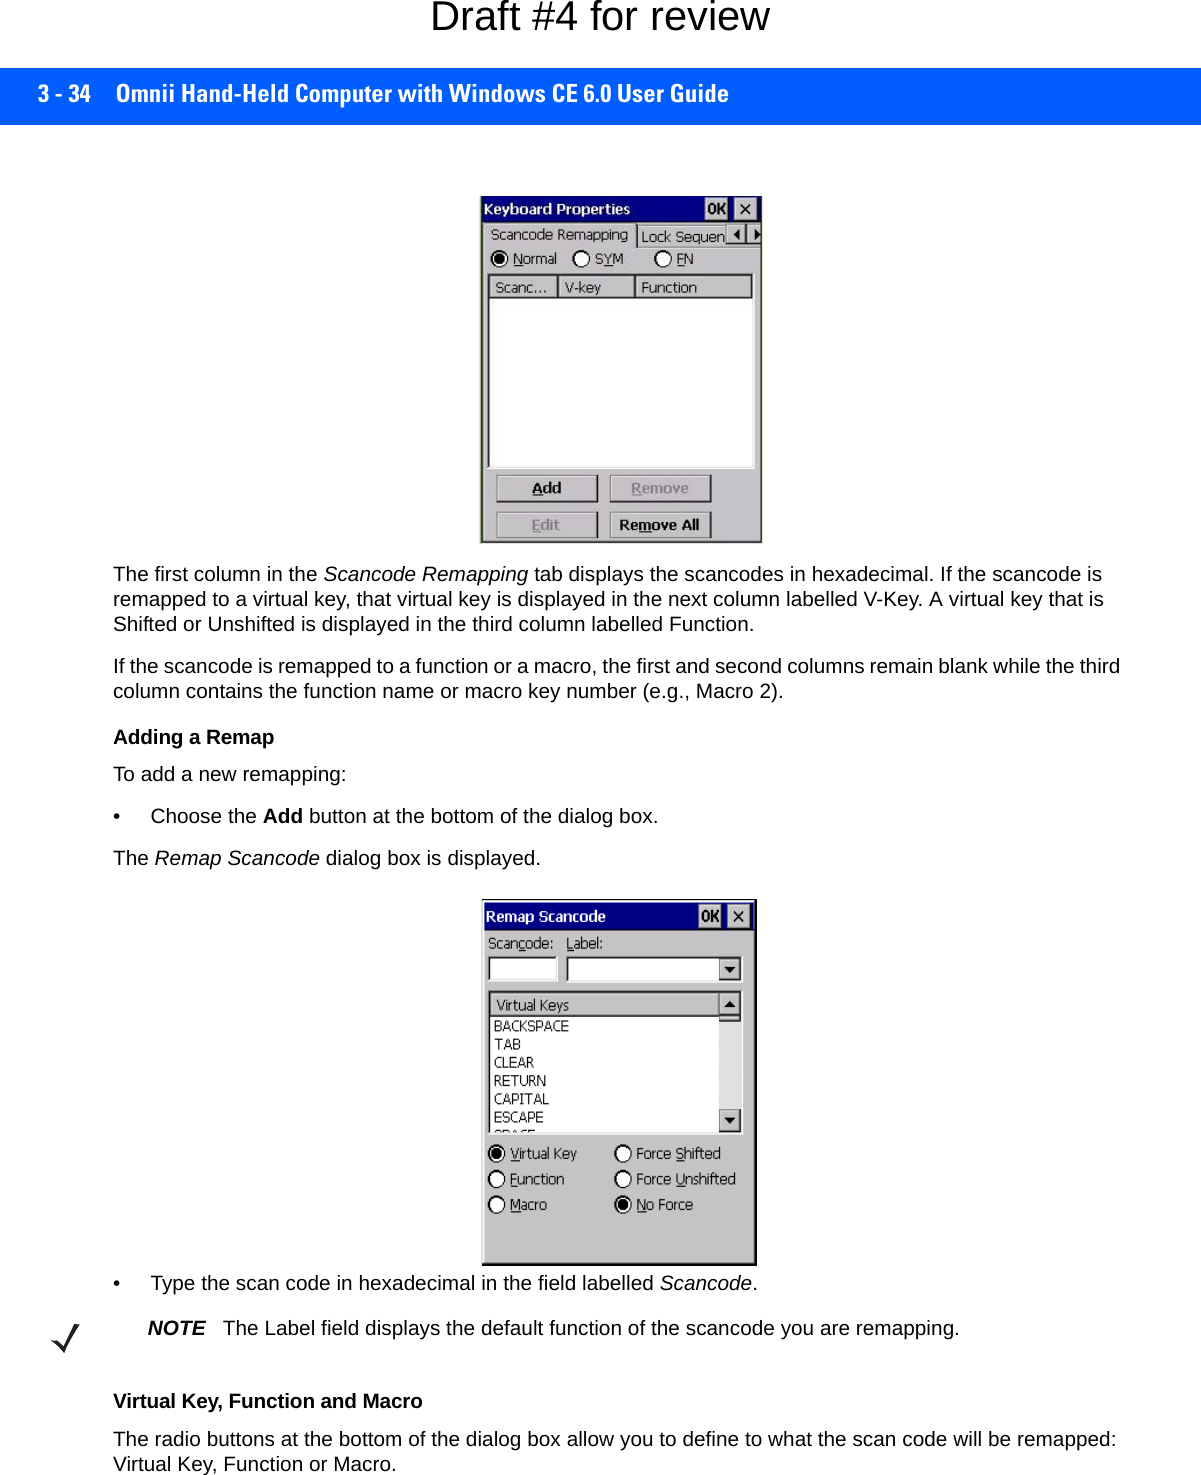
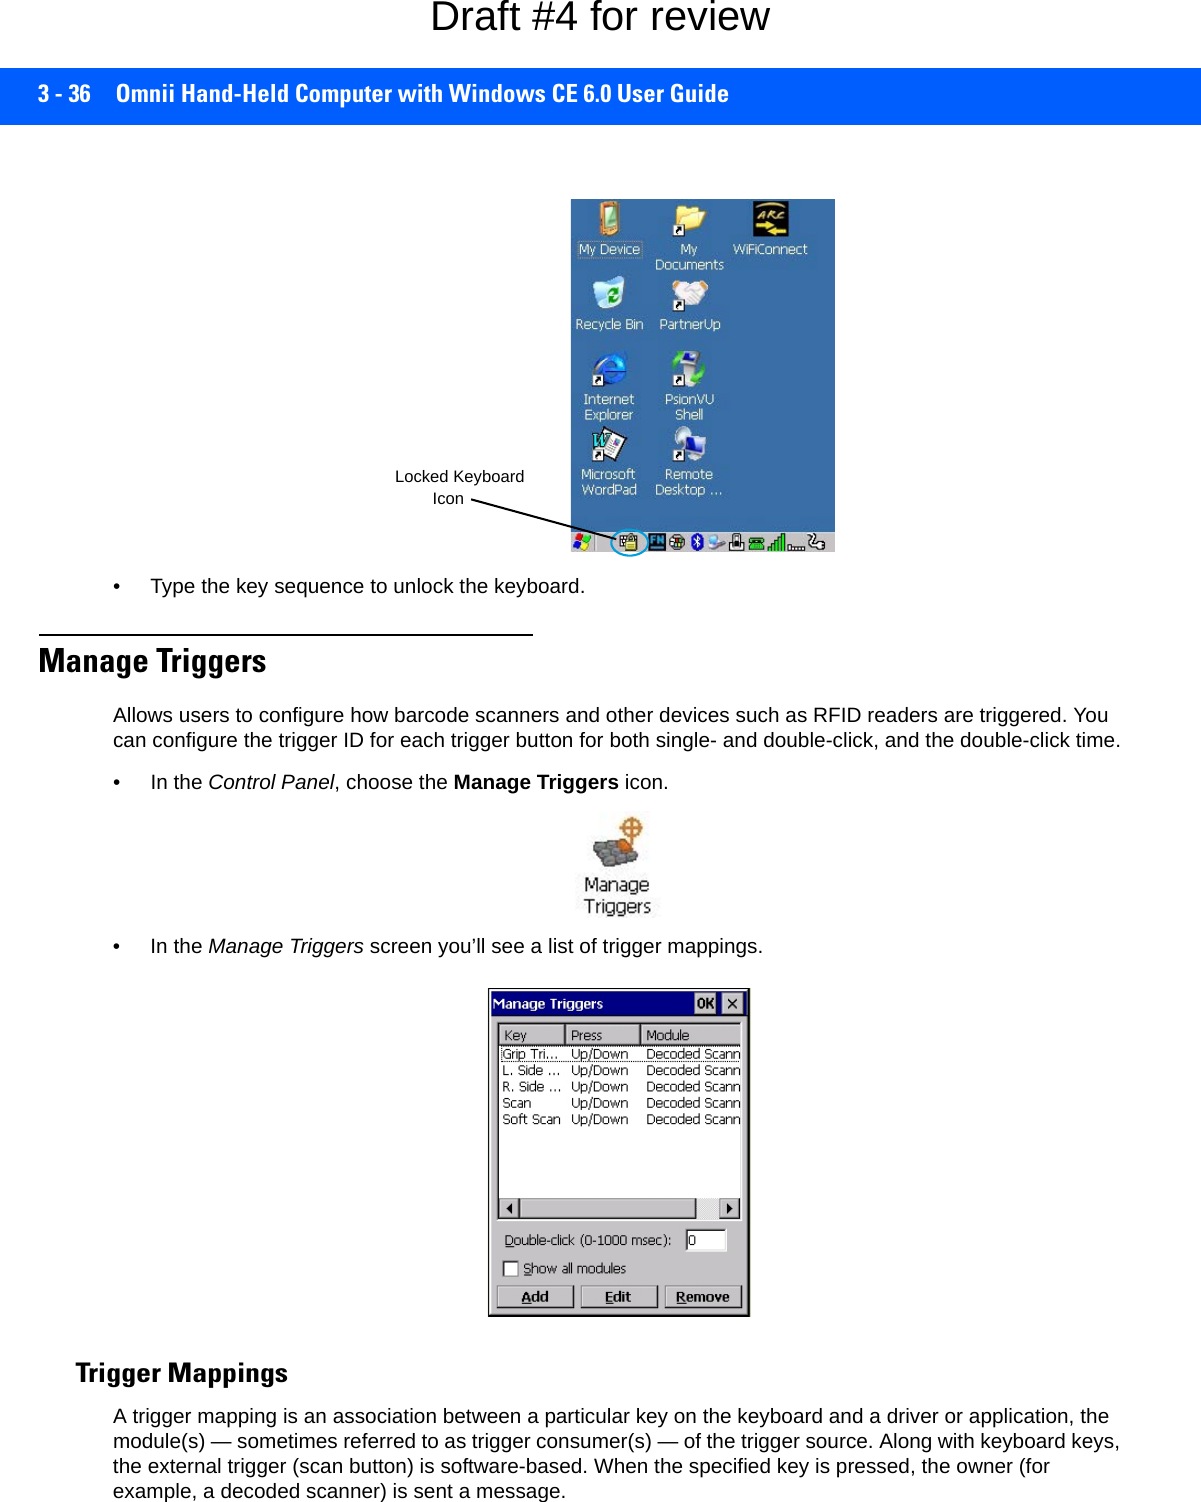
![Configuration 3 - 35When Virtual Key is selected, you can choose to force [SHIFT] to be on or off when the virtual key is sent. If No Force is selected, the shift state is dependent on whether the shift state is on or off at the time the virtual key is sent.When Function is selected, a list of valid functions appears in the dialog box. When Macro is selected, the macro keys available on your unit are listed in the dialog box.• Choose Virtual Key, Function or Macro.• Choose a function from the Function list in the dialog box, and tap on OK.Editing a Scancode RemapTo edit a scancode:• In the Scancode Remapping tab, tap on the remap you want to edit.• Tap on the Edit button, and make the appropriate changes.•Tap on OK to save your changes.Removing a RemapTo delete a remap:• In the Scancode Remapping tab, highlight the scancode you want to delete, and tap on the Remove button.•Tap on OK.Lock SequenceThe Lock Sequence menu allows you to lock the Omnii keyboard to prevent keys from being pressed acciden-tally when, for example, the unit is inserted in a holster.• To lock the keyboard, tap in the check box next to Enable key lock sequence.• Tap in the check box next to Keyboard locked at startup.• In the Key sequence drop-down menu, choose the key sequence you will need to type to unlock the keyboard.A locked keyboard icon is displayed in the softkey bar when the keyboard is locked.NOTE It is useful to leave the Show popup message enabled (default) so that anyone attempting to use the keyboard will see the key sequence they will need to enter to unlock the keyboard displayed on the screen.Draft #4 for review](https://usermanual.wiki/Symbol-Technologies/RA1202.User-Manual-1of2/User-Guide-2406595-Page-95.png)
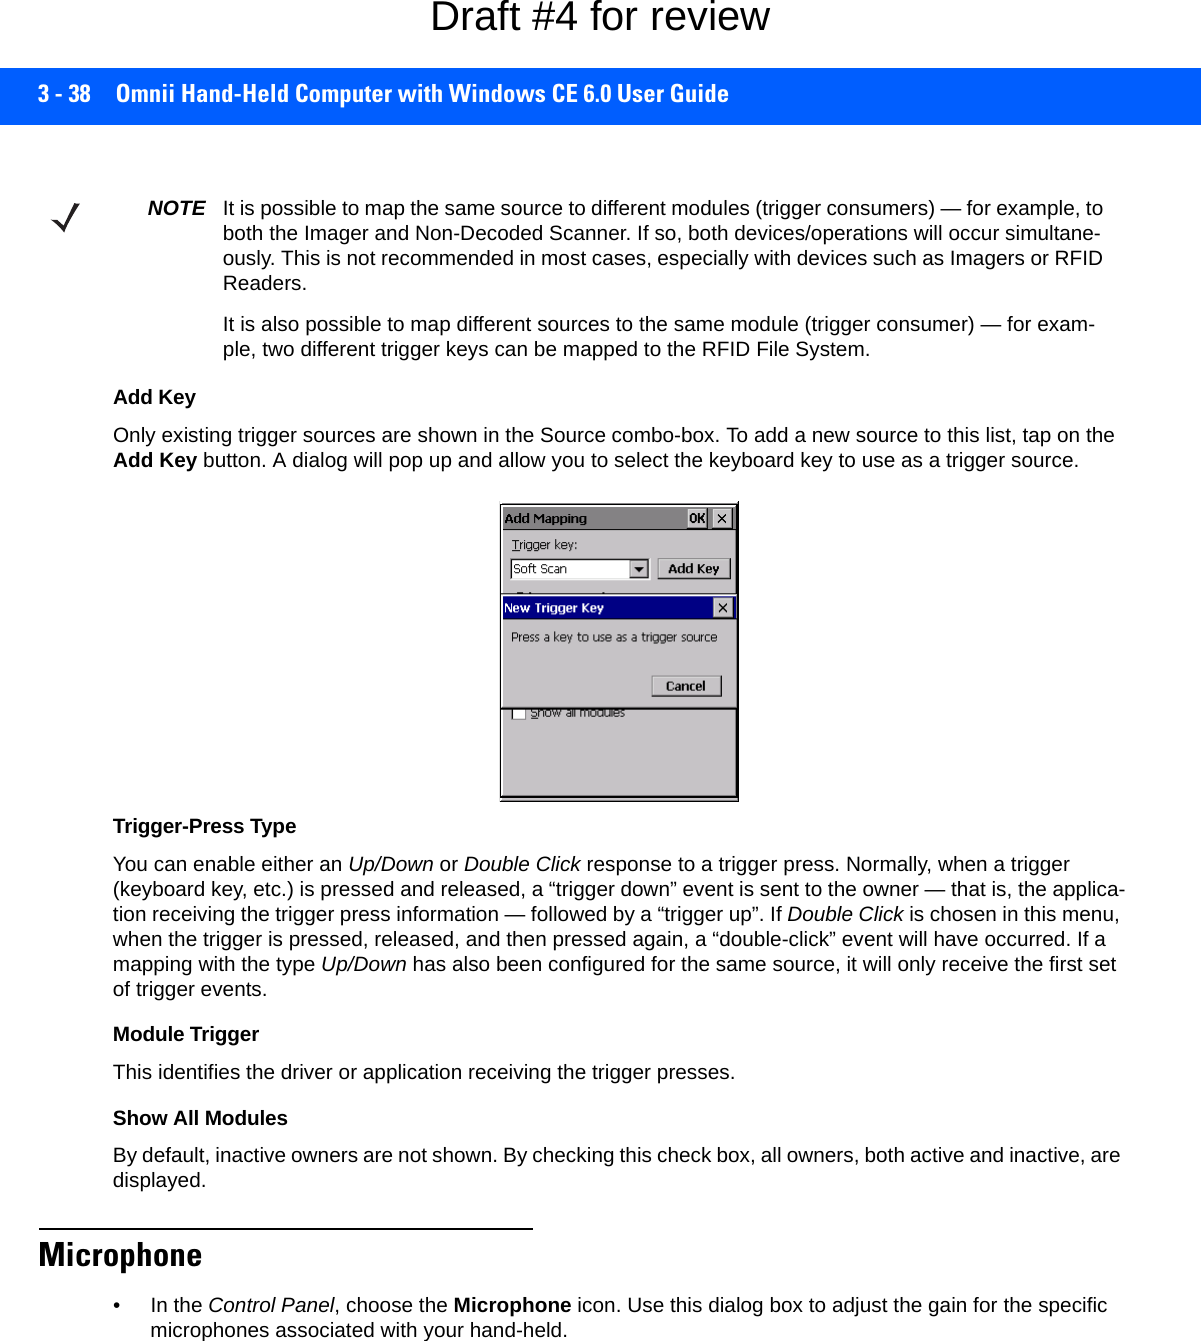
![Configuration 3 - 37Double-ClickWhen a key is pressed and released, then pressed again within the configured time (between 0 to 1000 msec), a double-click occurs. See also Trigger-Press Type on page 3-38.Show All ModulesBy default, the trigger mapping list only shows active mappings. Mappings for drivers or applications that are not currently active are not normally displayed. By checking this check box, all mappings, both active and inac-tive, are displayed.AddTapping this button brings up the Add Mapping dialog (see Add and Edit Trigger Mapping on page 3-37), so that you can add new trigger mappings.EditTapping this button brings up the Edit Mapping dialog (see Add and Edit Trigger Mapping on page 3-37), so that you can edit existing trigger mappings.RemoveTapping this button removes an existing mapping.OKThe OK button in the top right of the Manage Triggers screen saves all changes made. If the cancel button X is tapped instead, or the [ESC] key is pressed, all changes made will be discarded.Add and Edit Trigger MappingThese dialogs allow you to add and edit trigger mappings. Trigger KeyThis drop-down list allows you to specify the source of the trigger events, such as the Soft Scan, Left Scan, etc., for the trigger module selected.IMPORTANT It is not possible to have two or more identical mappings — for example [F1] cannot be mapped to the Non-Decoded Scanner twice — even if the trigger type is different.A keyboard key that is used as a trigger source will no longer generate key data, or perform its normal function. For example, if the space button is used as a trigger source, it will not be able to send space characters to applications.Draft #4 for review](https://usermanual.wiki/Symbol-Technologies/RA1202.User-Manual-1of2/User-Guide-2406595-Page-97.png)
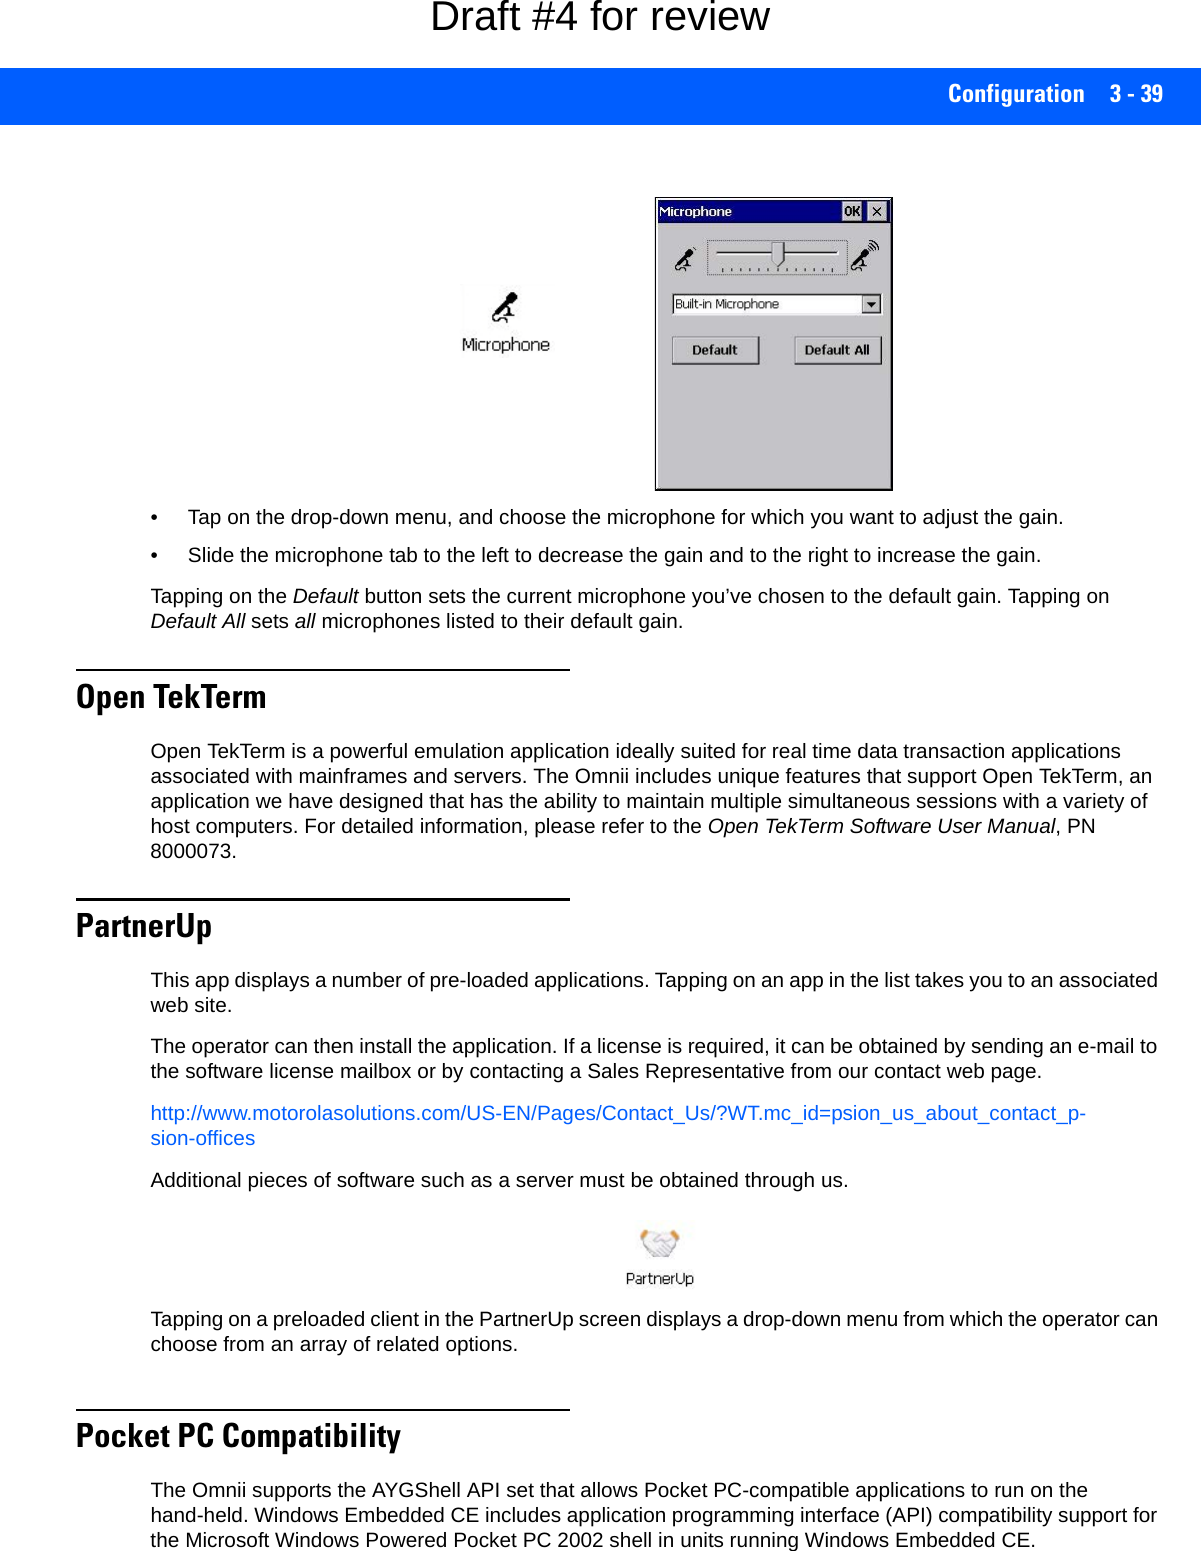
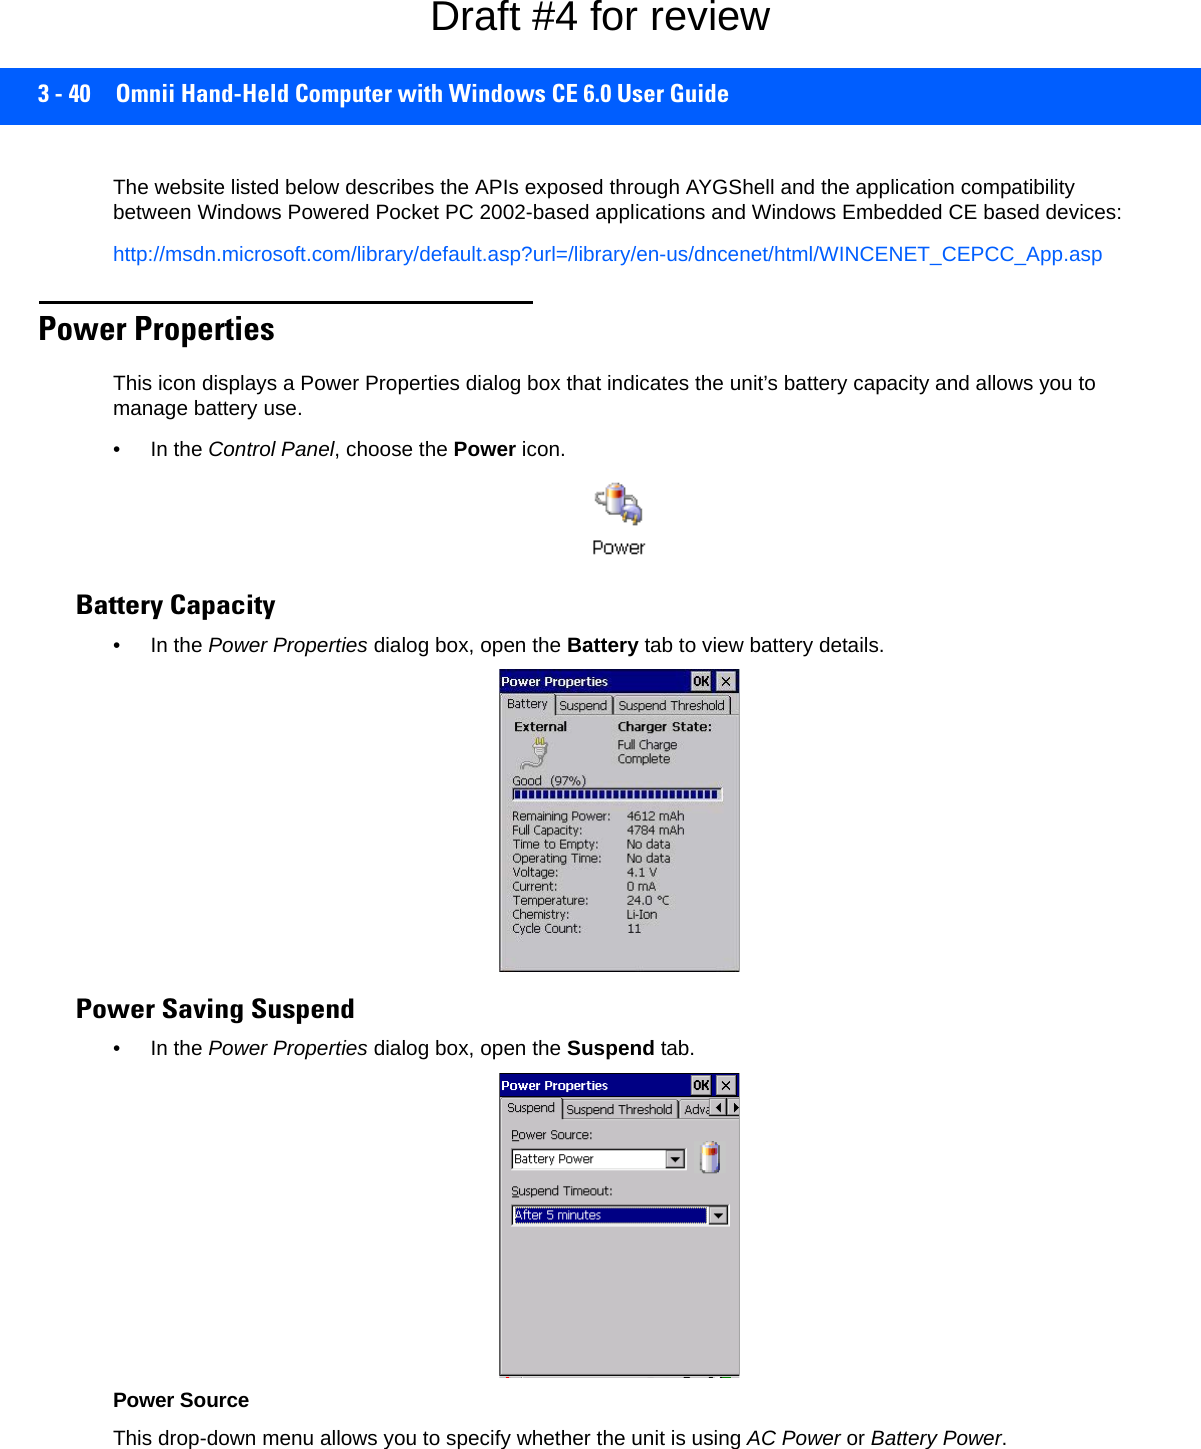
![Configuration 3 - 41Suspend TimeoutWhen the Omnii is idle — not receiving any user input (a key touch, a scan, and so on) or system activity (serial data, an activity initiated by an application, and so on) — the hand-held uses the value assigned in the Suspend Timeout field to determine when the unit will go to sleep (appear to be off). When the time in the Suspend Timeout field elapses without any activity, the unit enters suspend state. In suspend state, the Omnii CPU enters a sleep state, and wireless communication is shut off. The state of the device (RAM contents) is preserved. Pressing [Enter] wakes the system from suspend state. Suspend Threshold and Estimated Battery BackupThe Suspend Threshold adjustment tells the system when to shut down when the battery drains. If you choose Maximum Operating Time, the unit will run until the battery is completely empty; the RAM is only backed up for a short period of time. If you choose Maximum Backup Time, the hand-held shuts off with more energy left in the battery so RAM can be backed up for a longer period of time.The Estimated Battery Backup is the amount of battery power that has been reserved or set aside to protect data until a charged battery can be installed in the hand-held. When the battery capacity is depleted up to the Estimated Battery Backup reserve specified in the Suspend Threshold menu, the Omnii shuts off automatically and uses the reserve power to preserve the data stored on the computer. Once the Omnii shuts down, it cannot be switched on until a fresh battery is installed, or the unit is inserted in a docking station or cradle.IMPORTANT We recommends setting the Suspend value to 3 minutes. To further reduce power con-sumption, carefully consider the duration of time that the display backlight is on (see Backlight on page 3-20).IMPORTANT Selecting Maximum backup time will reserve approximately 20% of the battery capac-ity for memory backup. Once the battery is drained, the system RAM memory is lost and the unit must cold boot.In most real-time transaction environments this is not a problem (it only takes a few seconds to cold boot). Batch transaction environments, where data is not saved to a non-volatile memory (such as an SD FLASH card), may need to pay particular atten-tion to this parameter. We do not recommend the storage of any valuable data in system RAM.The Omnii Windows Embedded CE 6.0 environment does not store any critical data in RAM (such as the registry or file system). If your application does not save data to RAM, we recommend keeping the Suspend Threshold setting as low as possible to maximize battery run time.Draft #4 for review](https://usermanual.wiki/Symbol-Technologies/RA1202.User-Manual-1of2/User-Guide-2406595-Page-101.png)
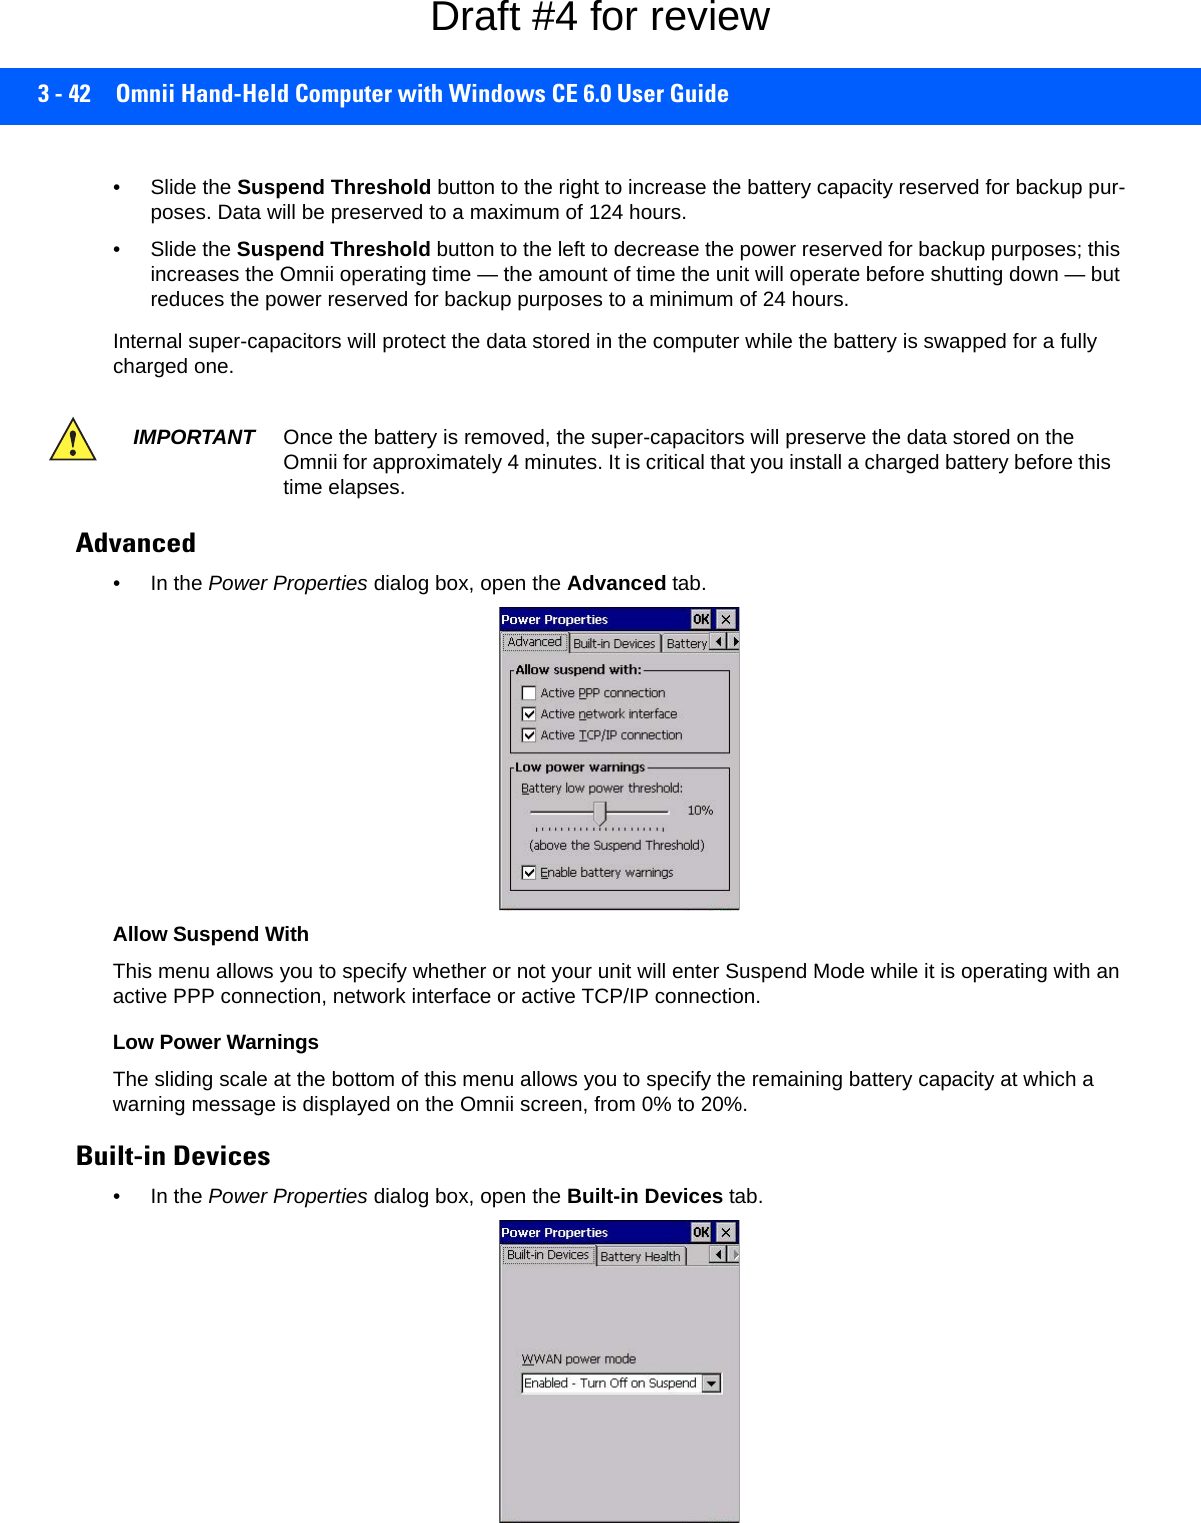
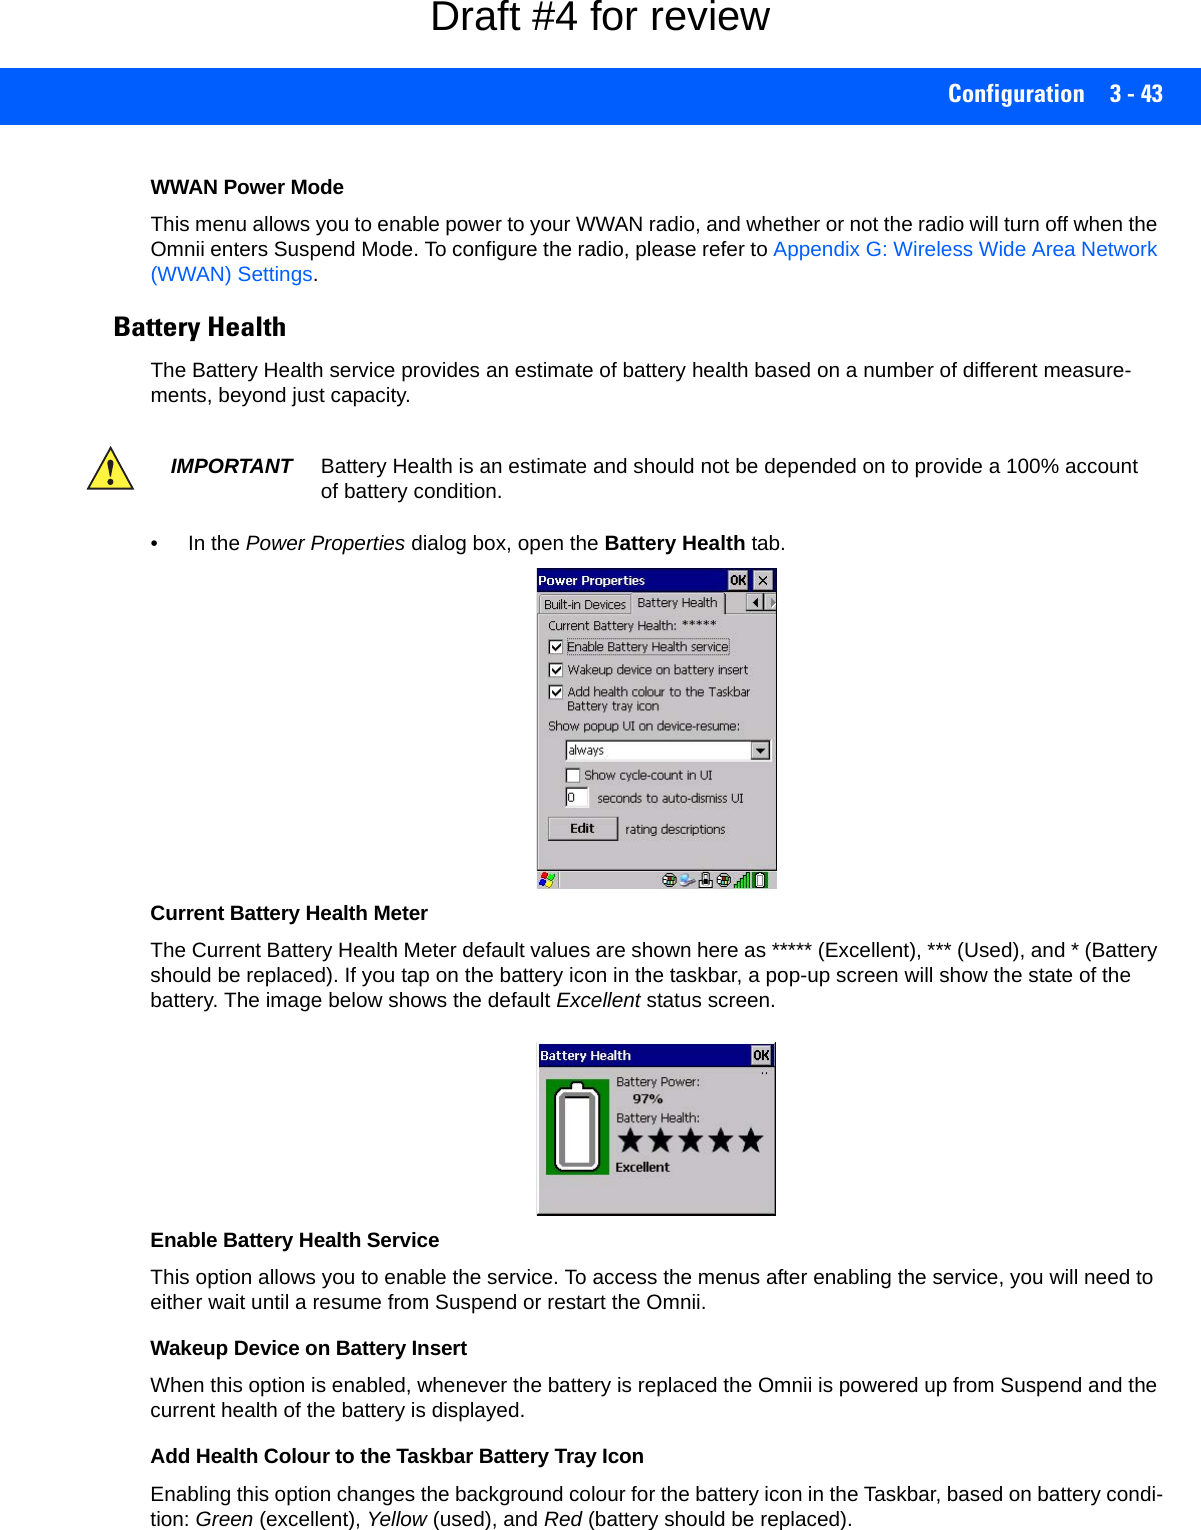
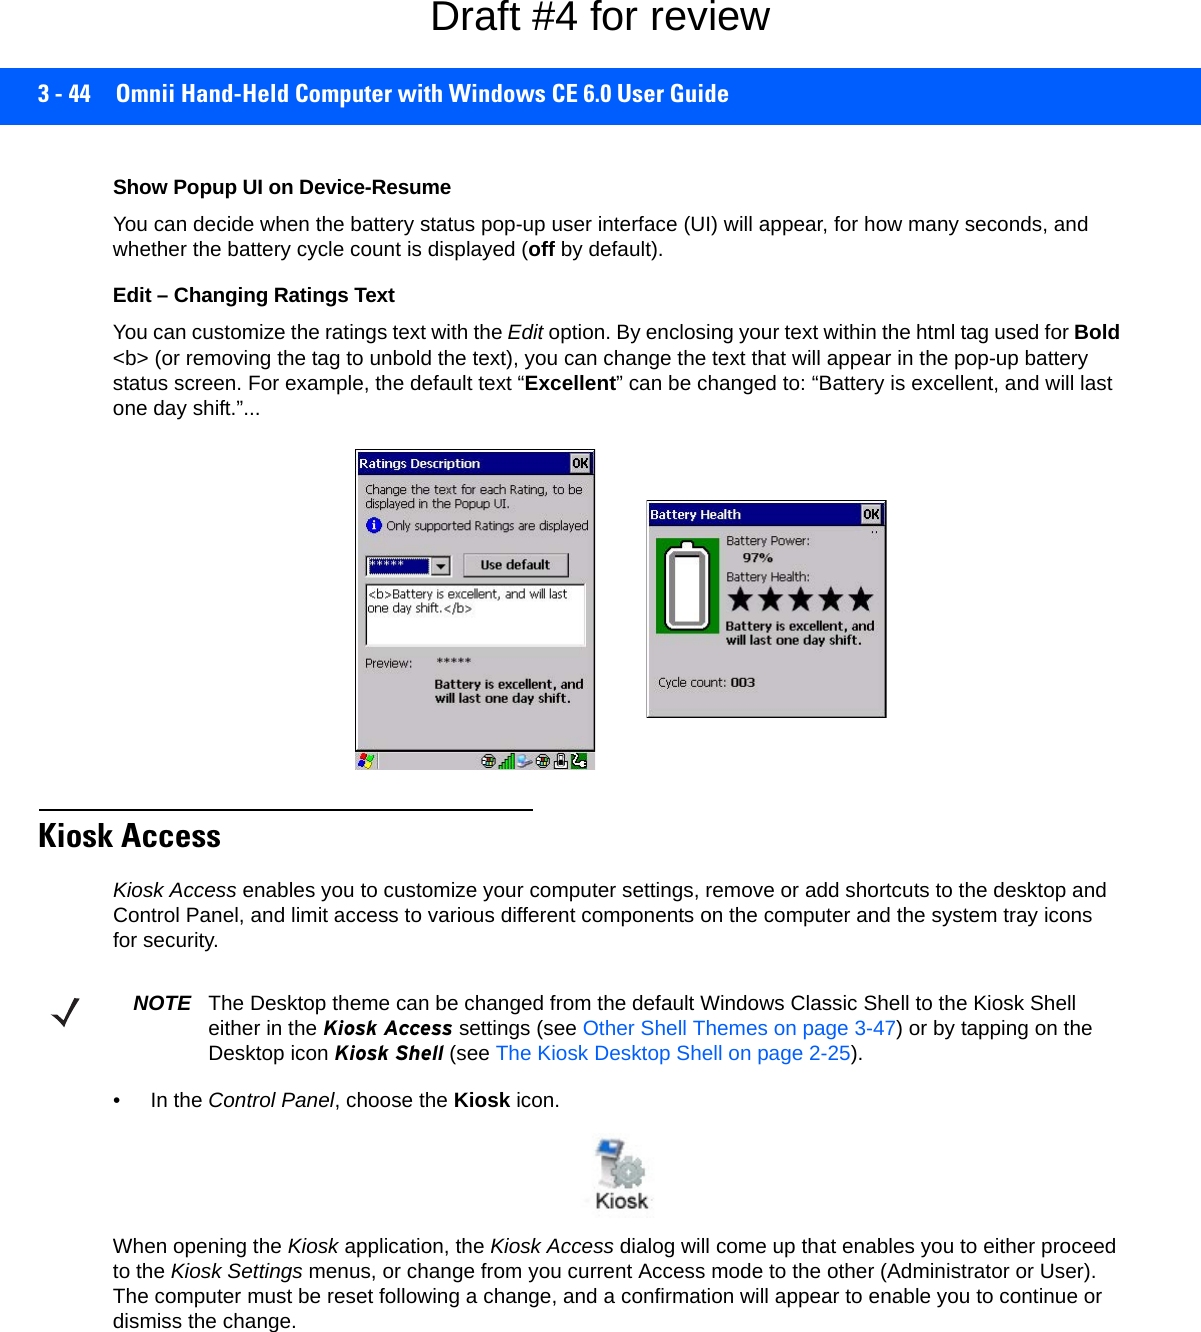
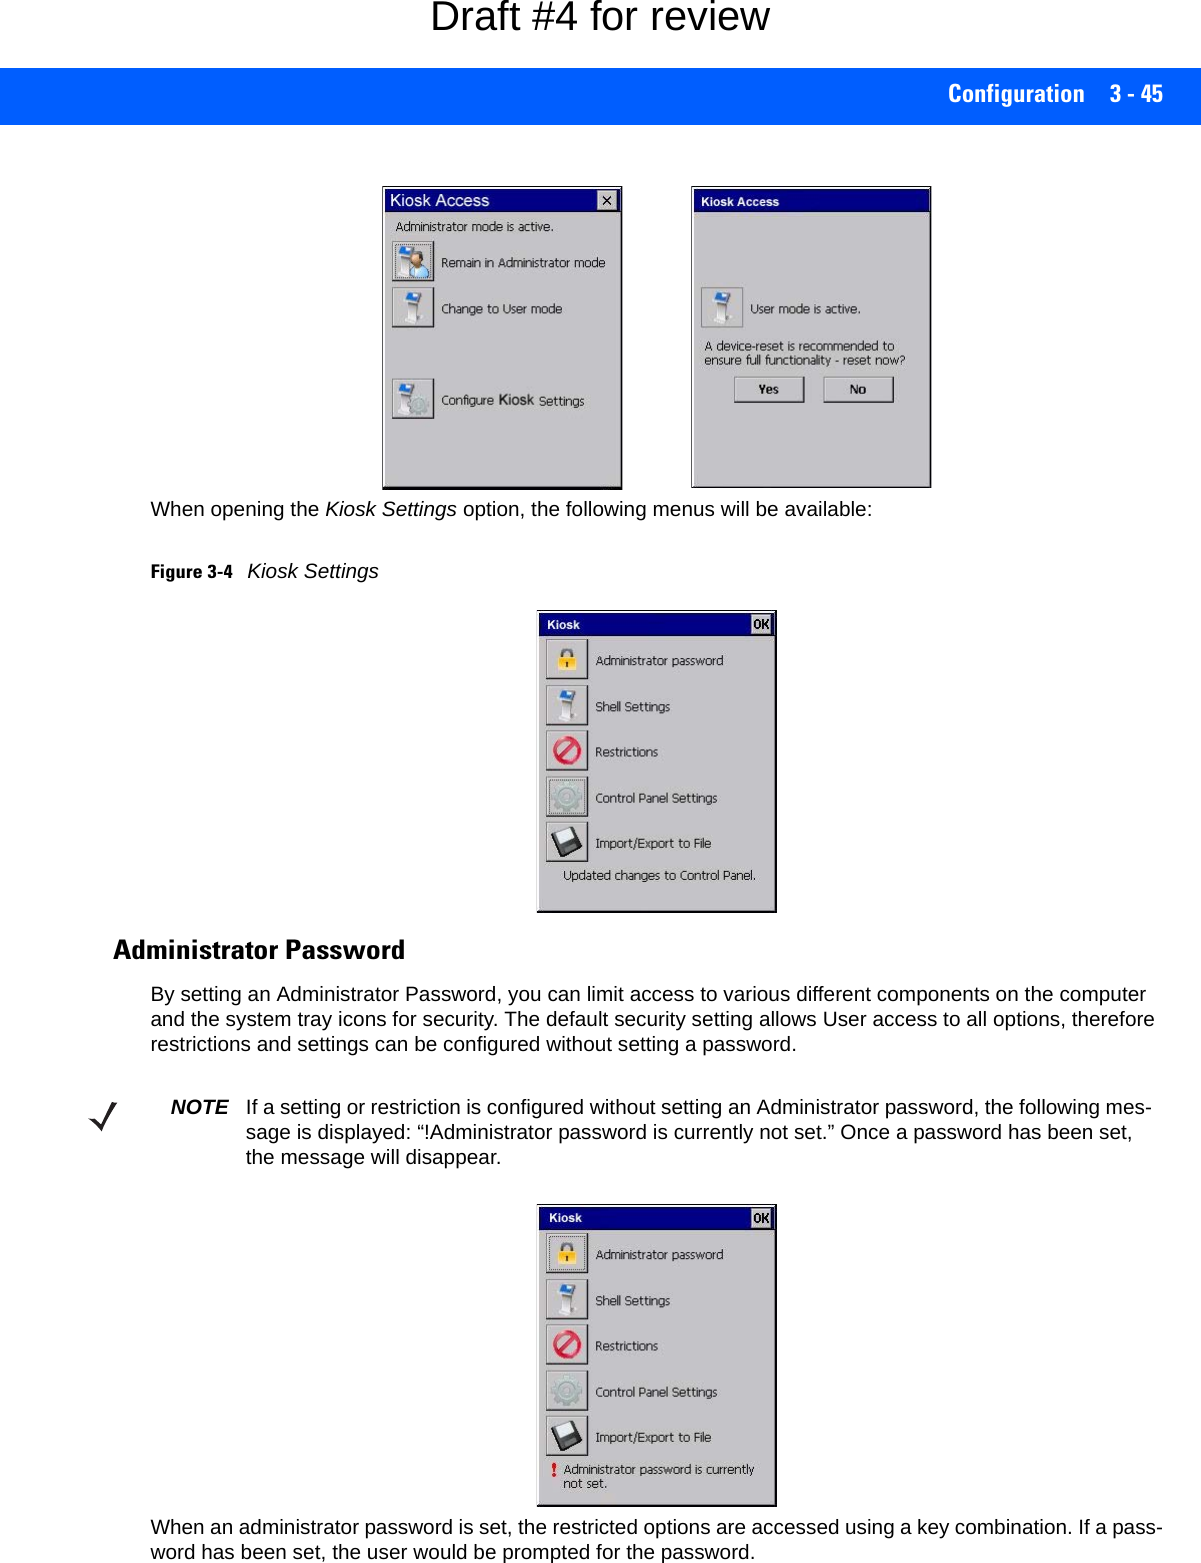
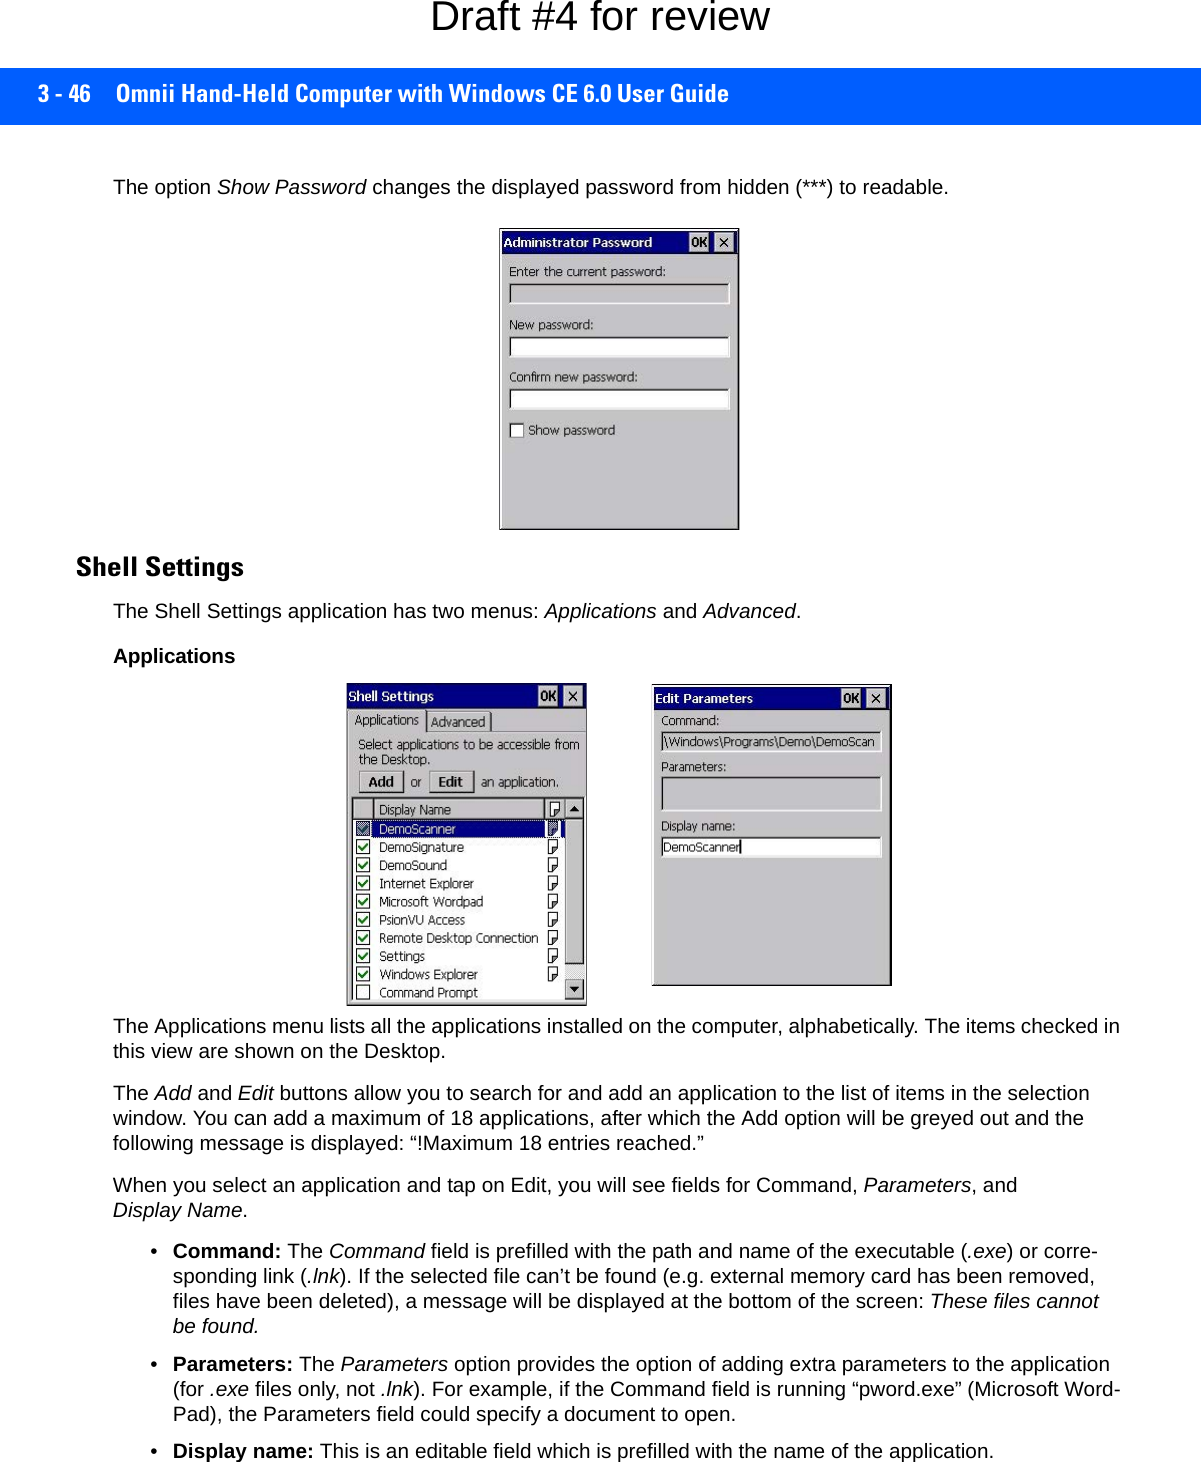
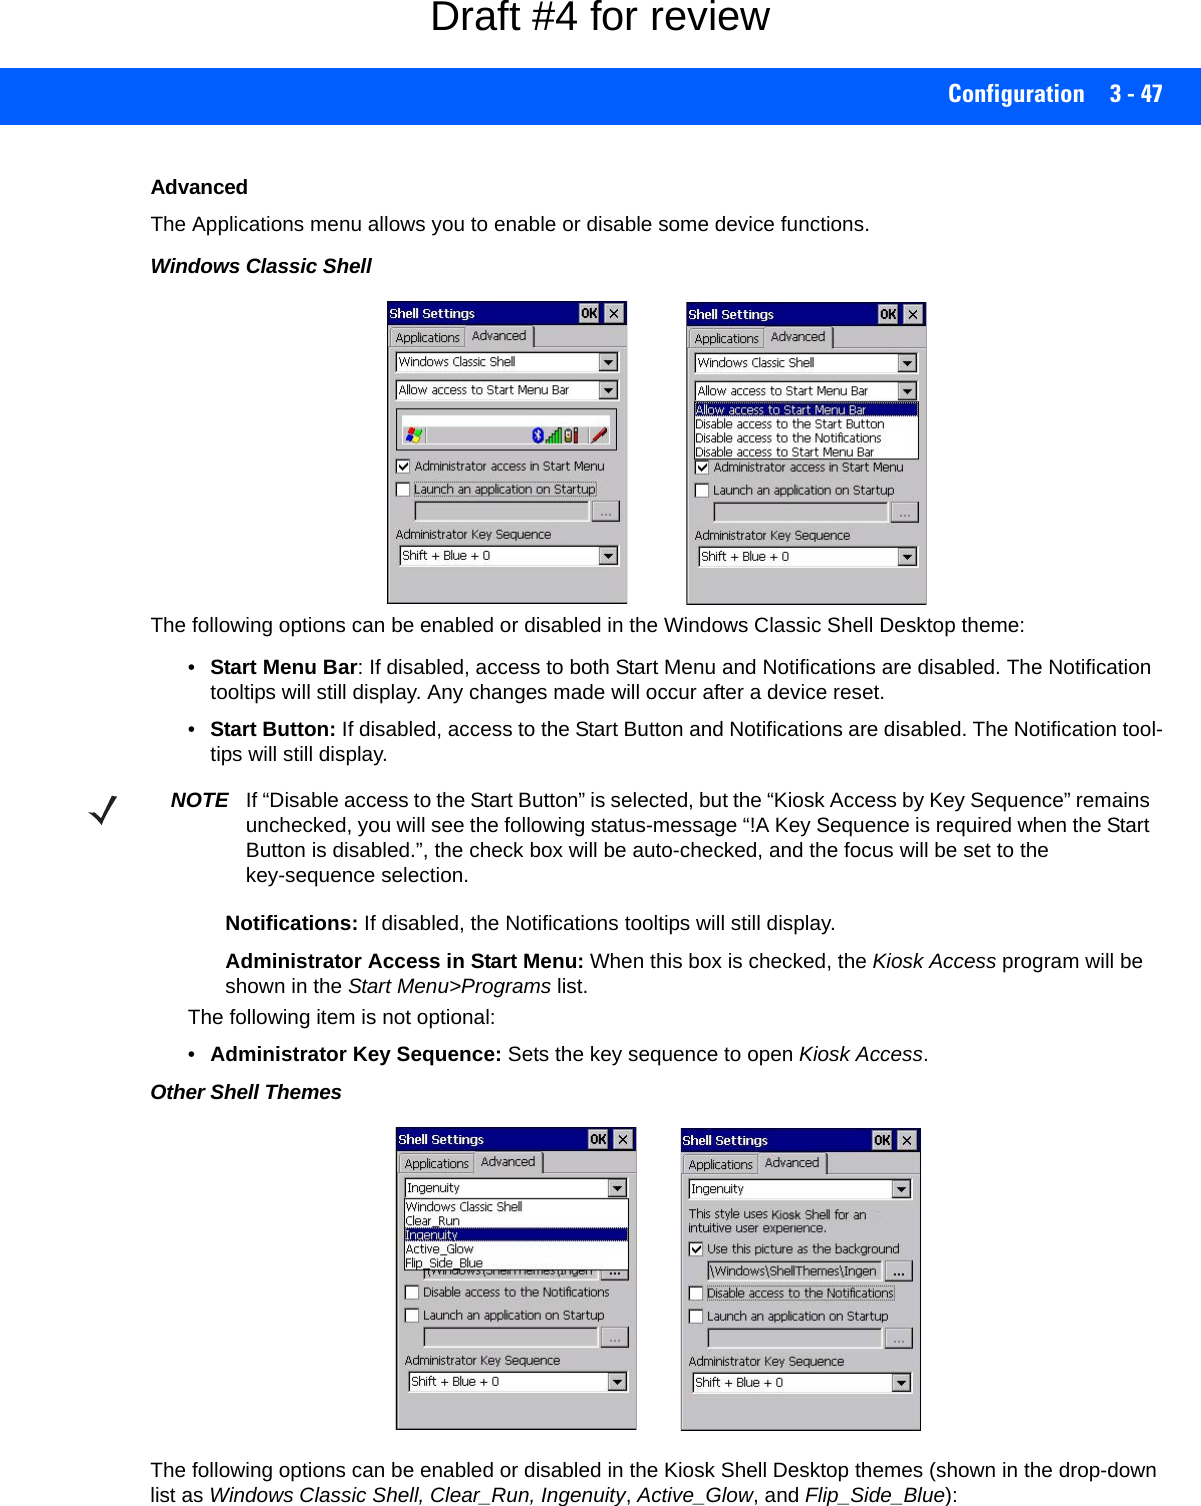
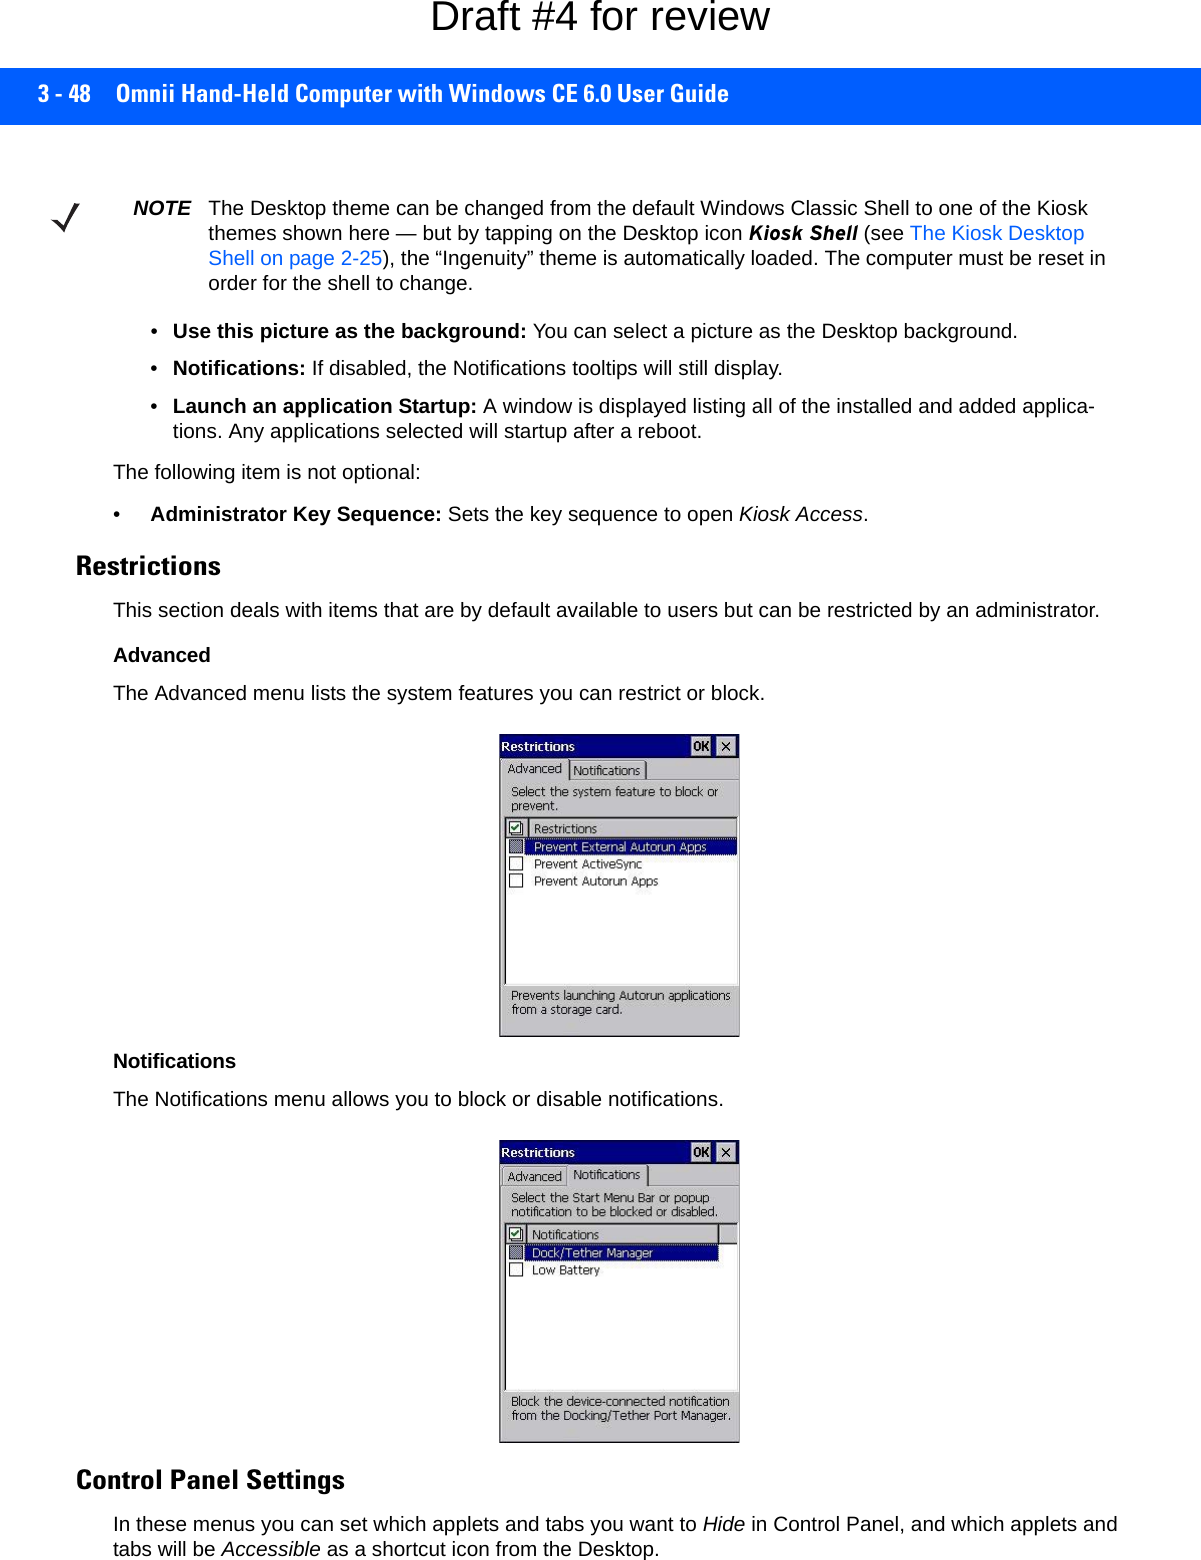
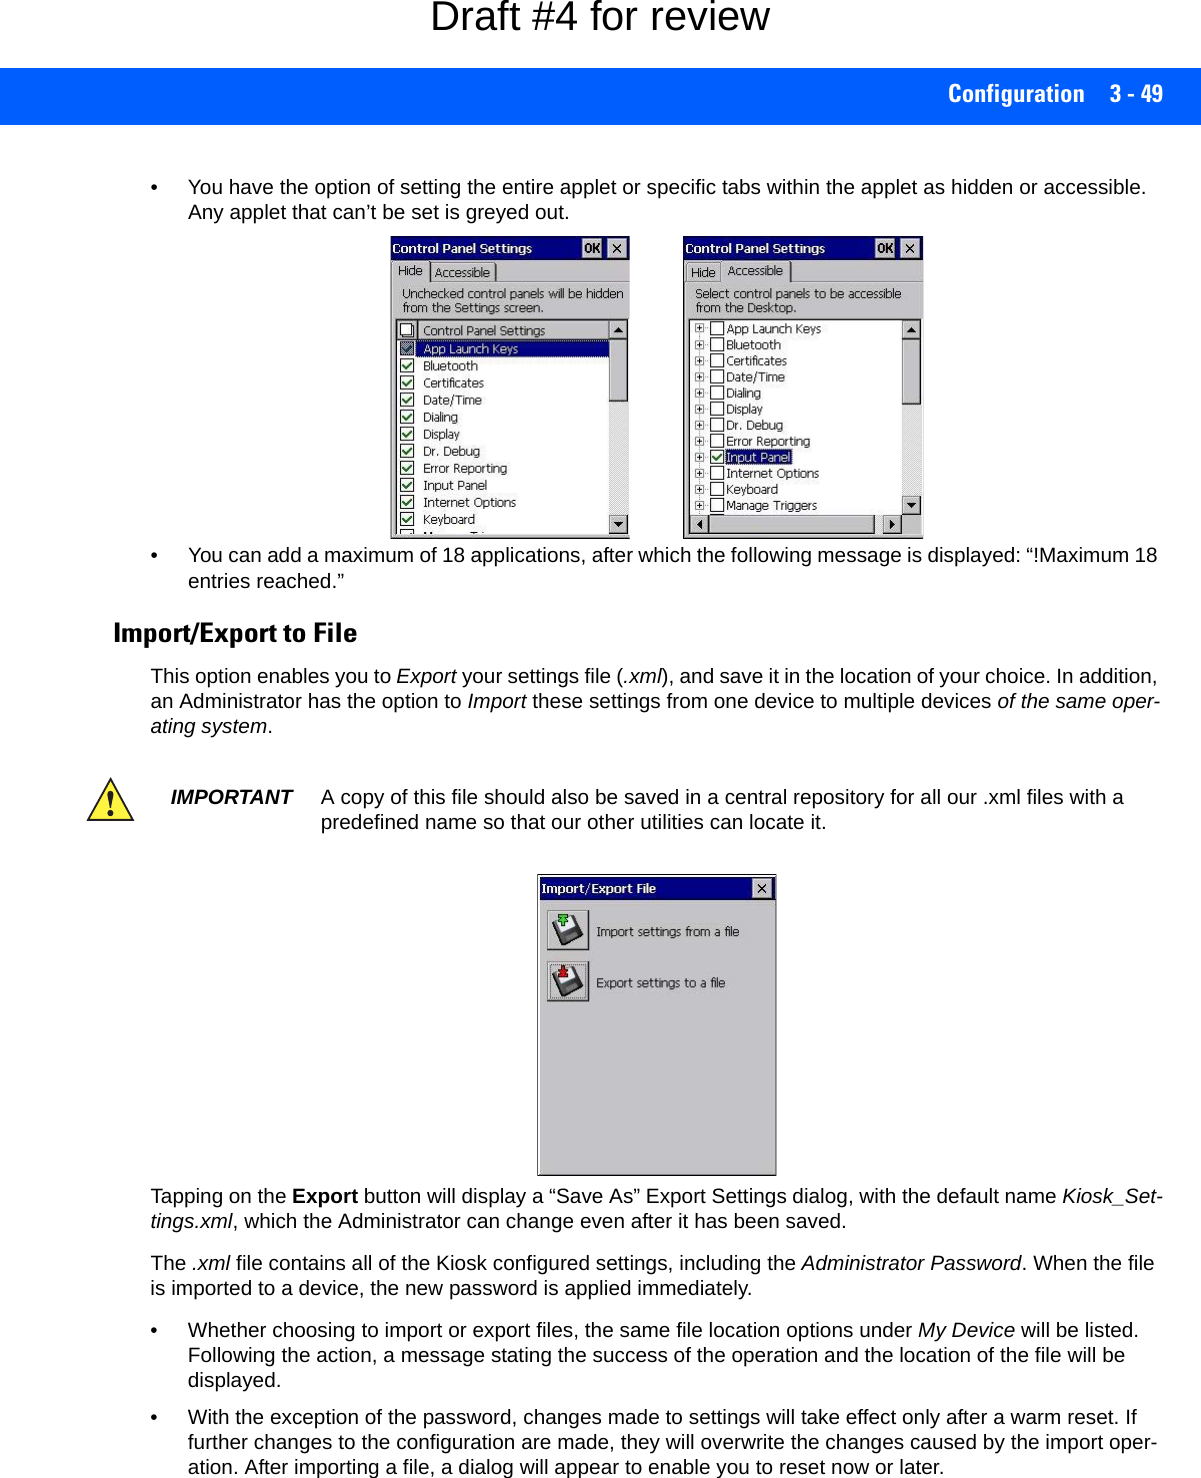
![3 - 50 Omnii Hand-Held Computer with Windows CE 6.0 User GuideRemote Desktop Connection Remote Desktop Connection, located in Start>Programs, is an Omnii application used to connect to a Windows Terminal Server so that you can run a “session” on the Server machine, using the Omnii (Windows Embedded CE device). Go to the following website to find information about setting up this connection: http://www.microsoft.com/en-us/download/default.aspx or contact support services. Locate the office closest to you at: http://www.motorolasolu-tions.com/US-EN/Support/Psion+Services+and+Support?WT.mc_id=psion__support_ScannersThe Scanners icon in the Control Panel provides dialog boxes in which you can tailor barcode scanner config-uration and choose the barcodes your scanner will recognize. The parameters are preset with the default settings of the decoded scanner installed in the unit. You can test the scanner to ensure that it is operating properly by pointing the scanner window at a barcode that your scanner was designed to decode — for example, a 1D UPC barcode or 2D barcode. Press the SCAN key or pistol trigger, and check for a valid decode on the hand-held screen.For a listing of available scanners and their specifications, please refer to Appendix E: Omnii Specifications. NOTE To enable a newly-installed scanner, press and hold down the [FN] key and the [Power] key simultaneously for a minimum of three seconds. Draft #4 for review](https://usermanual.wiki/Symbol-Technologies/RA1202.User-Manual-1of2/User-Guide-2406595-Page-110.png)
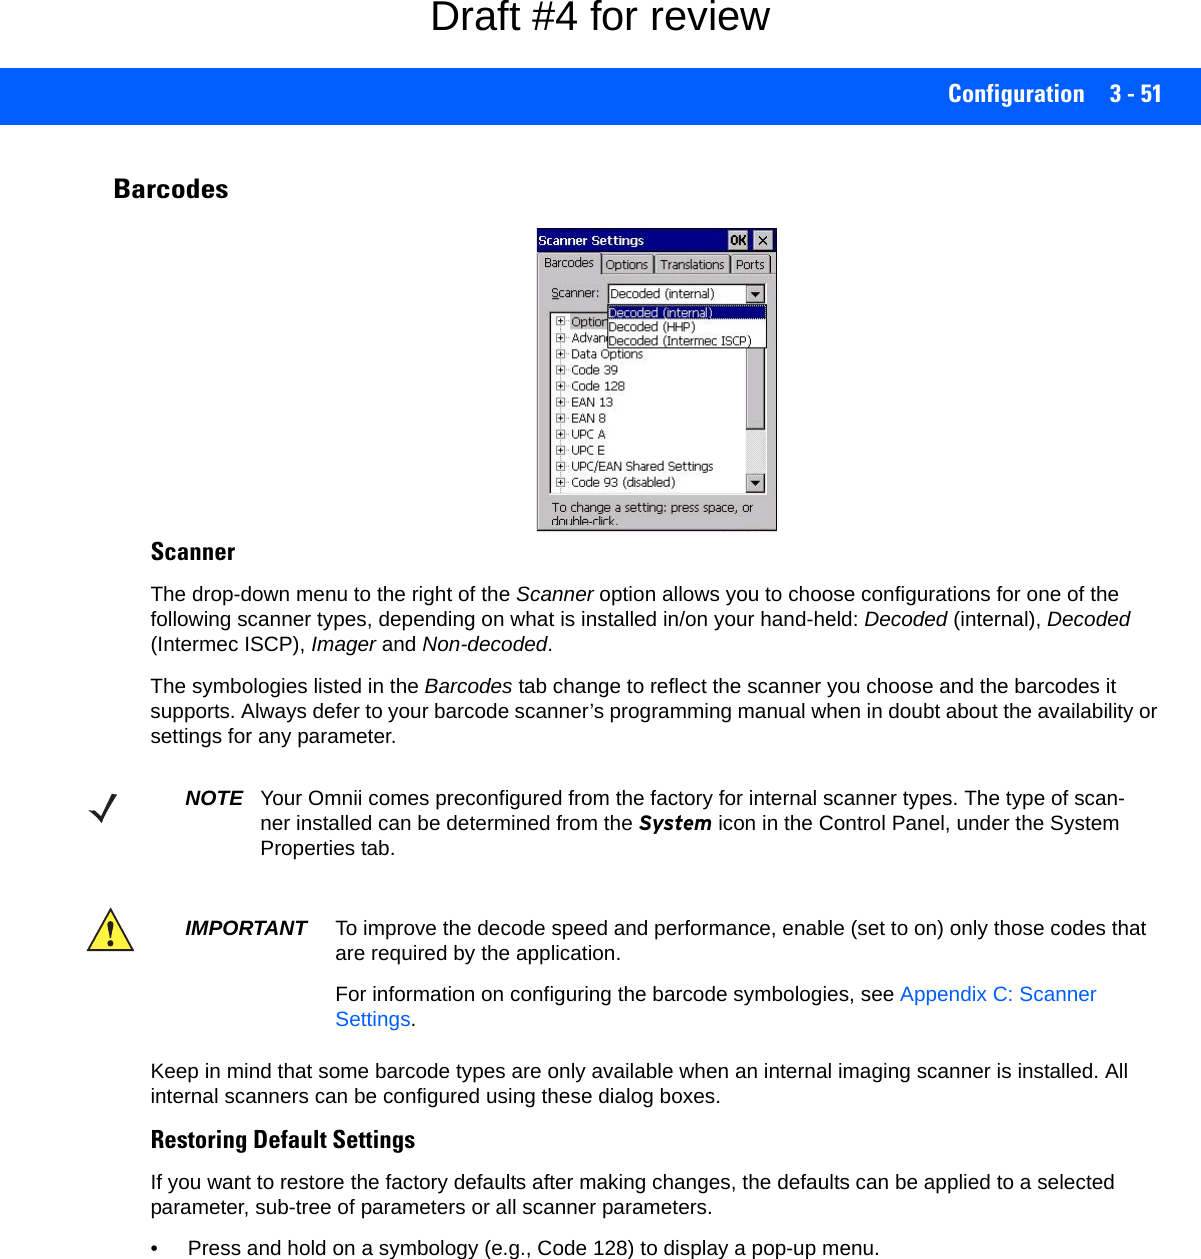
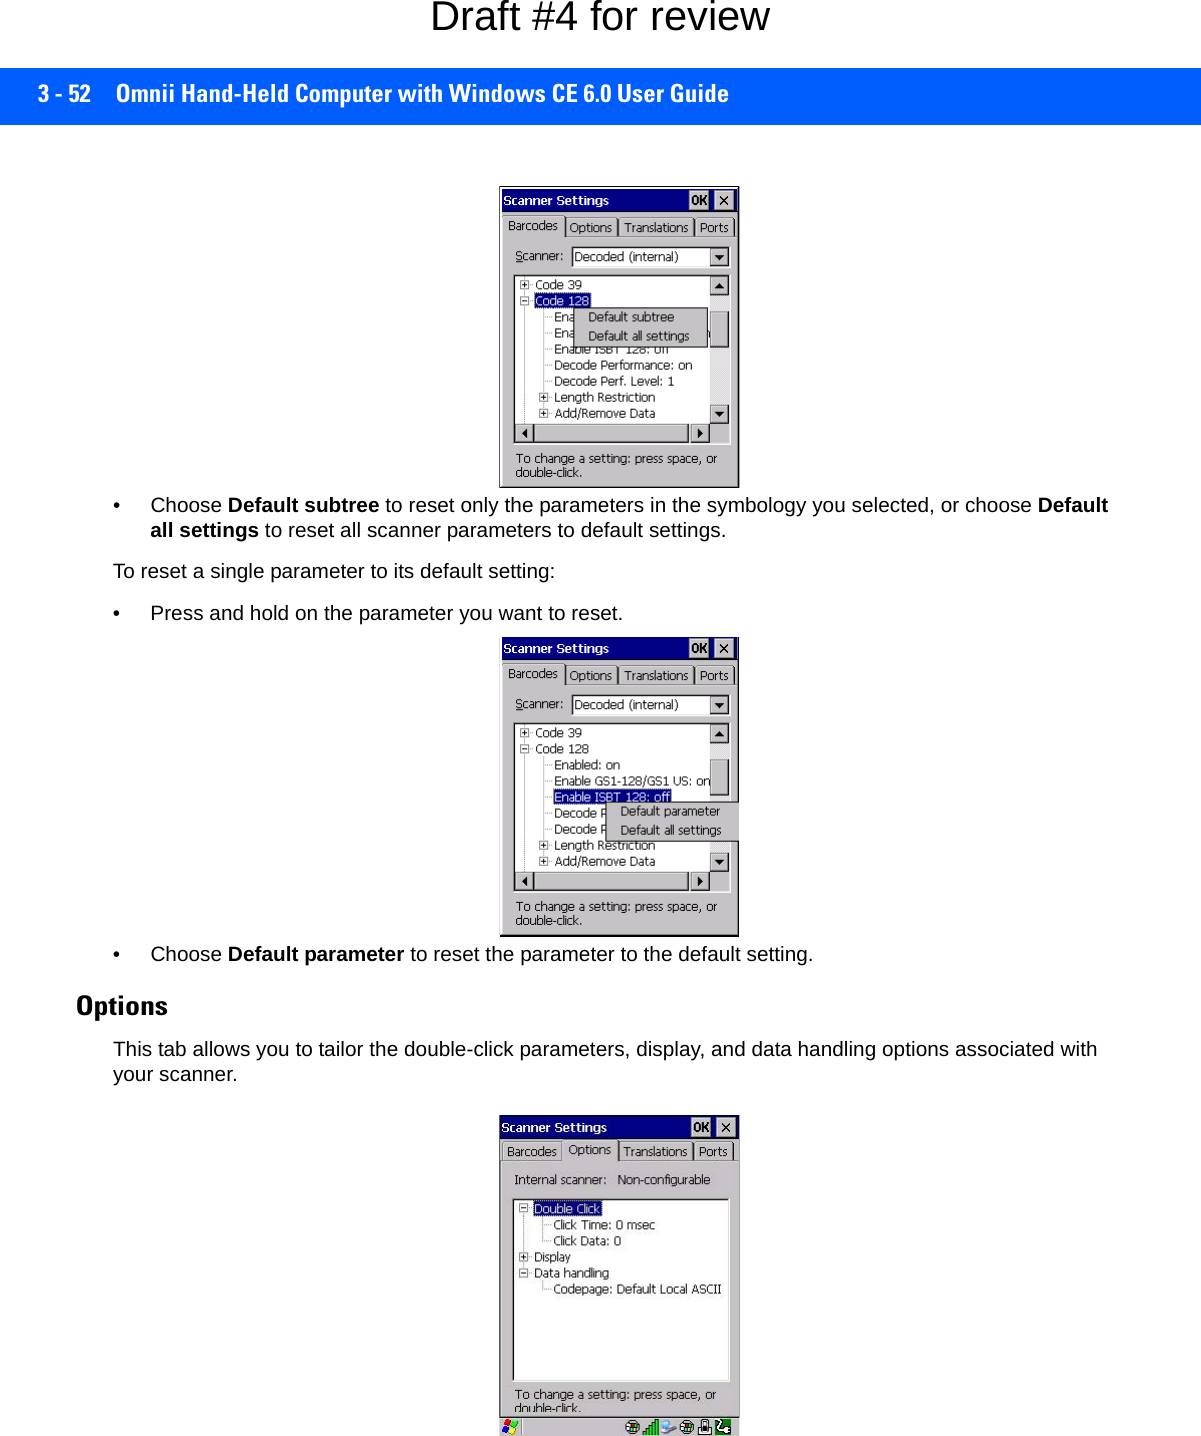
![Configuration 3 - 53Double Click ParametersClick Time (msec)This parameter controls the maximum gap time (in milliseconds) for a double-click. If the time between the first and second clicks of the scanner trigger is within this time, it is considered a double-click. The allowable range is 0 to 1000. A value of zero disables this feature.A double-click produces different results depending on whether or not a value is assigned in the “Click Data” parameter. When a value is not assigned for the “Click Data”, double-clicking the scanner trigger overrides the target dot delay set in the “Dot Time” parameter and initiates a normal scan sweep. If a value is assigned for the “Click Data” parameter, double-clicking the scanner trigger inserts the “Click Data” value rather than initi-ating a scan.Click DataThis parameter determines which character is sent to the application installed in your Omnii following a double-click. A dialog box appears, asking that you press the key you want to insert. The ASCII/Unicode key value of the keypress is displayed. Pressing the [ESC] key in this dialog box resets the data to zero.Display ParametersScan ResultWhen this parameter is enabled, the type of barcode and the result of the scan appear on the screen. Note that this information is only displayed after a successful decode and is visible only while the scanner trigger is pressed. When the trigger is released, this information is cleared from the screen.Scan IndicatorWhen this parameter is enabled, the laser warning logo appears on the display whenever the scanner is acti-vated.Scan Result Time (sec)The value assigned to the Scan Result Time parameter determines how long the scan results of a successful scan are displayed on the screen. Time is measured in seconds, and a value of 0 (zero) disables the param-eter. When you choose this option, a dialog box appears where you can enter a value.Good Scan Beep and Bad Scan Beep These parameters determine whether or not the Omnii emits an audible scanner beep when a good (successful) scan or a bad (unsuccessful) scan is performed. Set these parameters to either on to enable the beeper or off to disable it.Multiple Beep Tones You can set the audible scanner beep to emit a series of three beeps instead of one. Set this parameter to on to enable the multiple beep tones.NOTE To remove the scan result from the screen before the “Result Time” has expired, point the scan-ner away from the barcode and press the trigger.Draft #4 for review](https://usermanual.wiki/Symbol-Technologies/RA1202.User-Manual-1of2/User-Guide-2406595-Page-113.png)
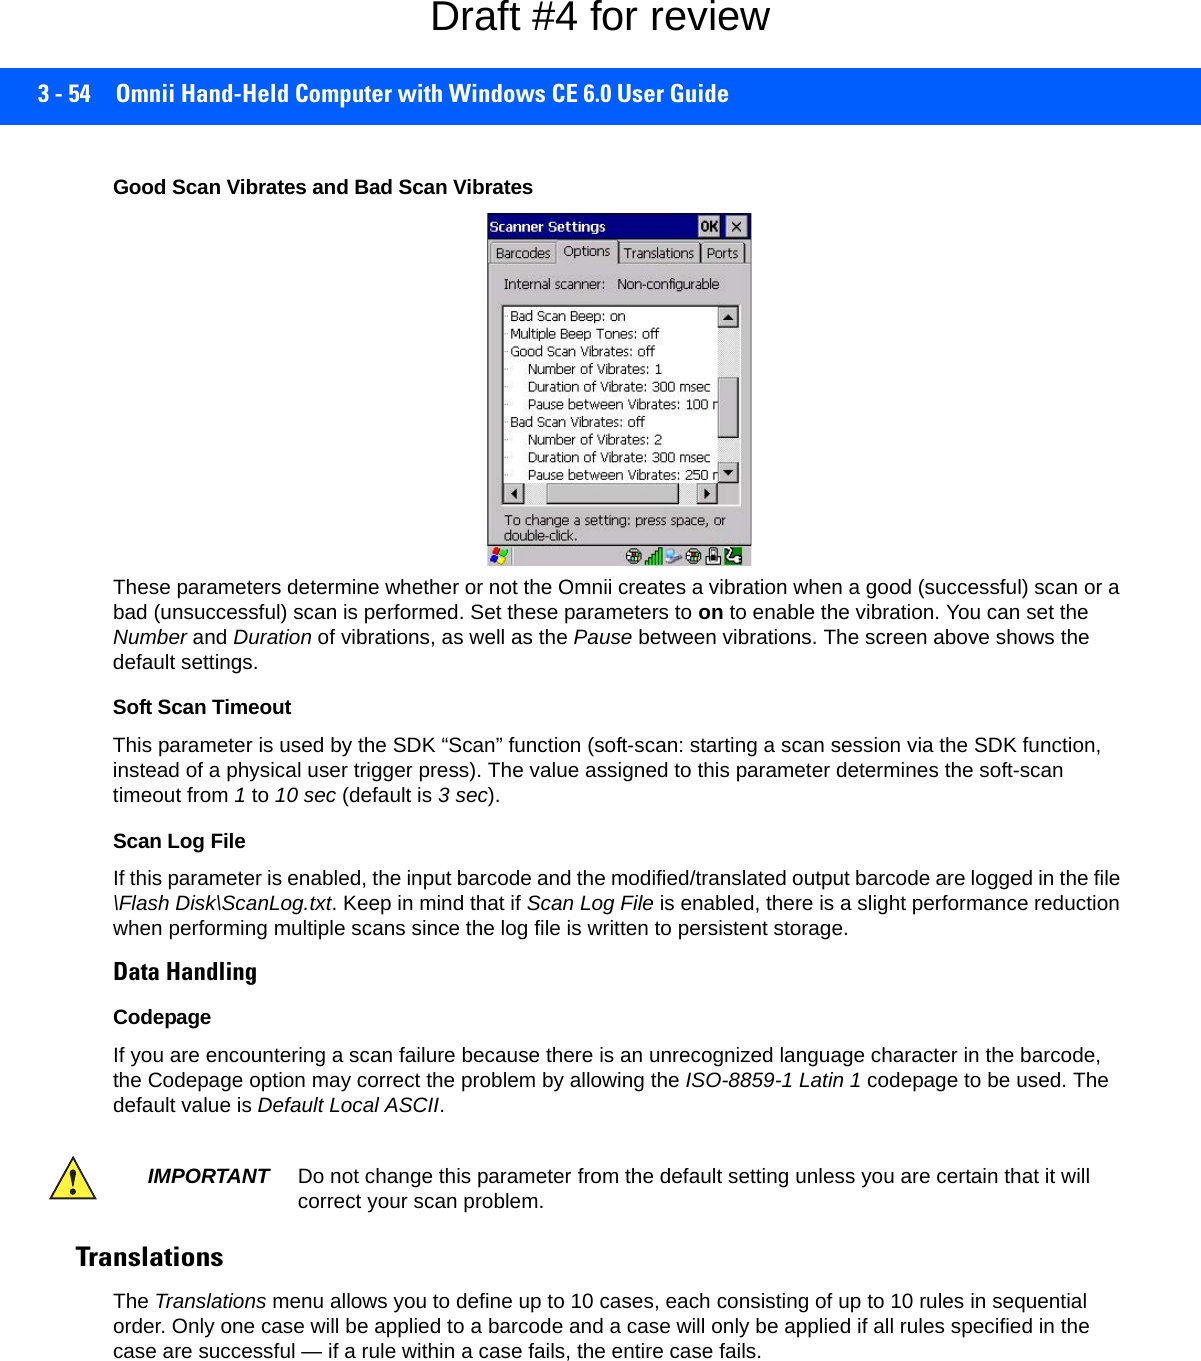
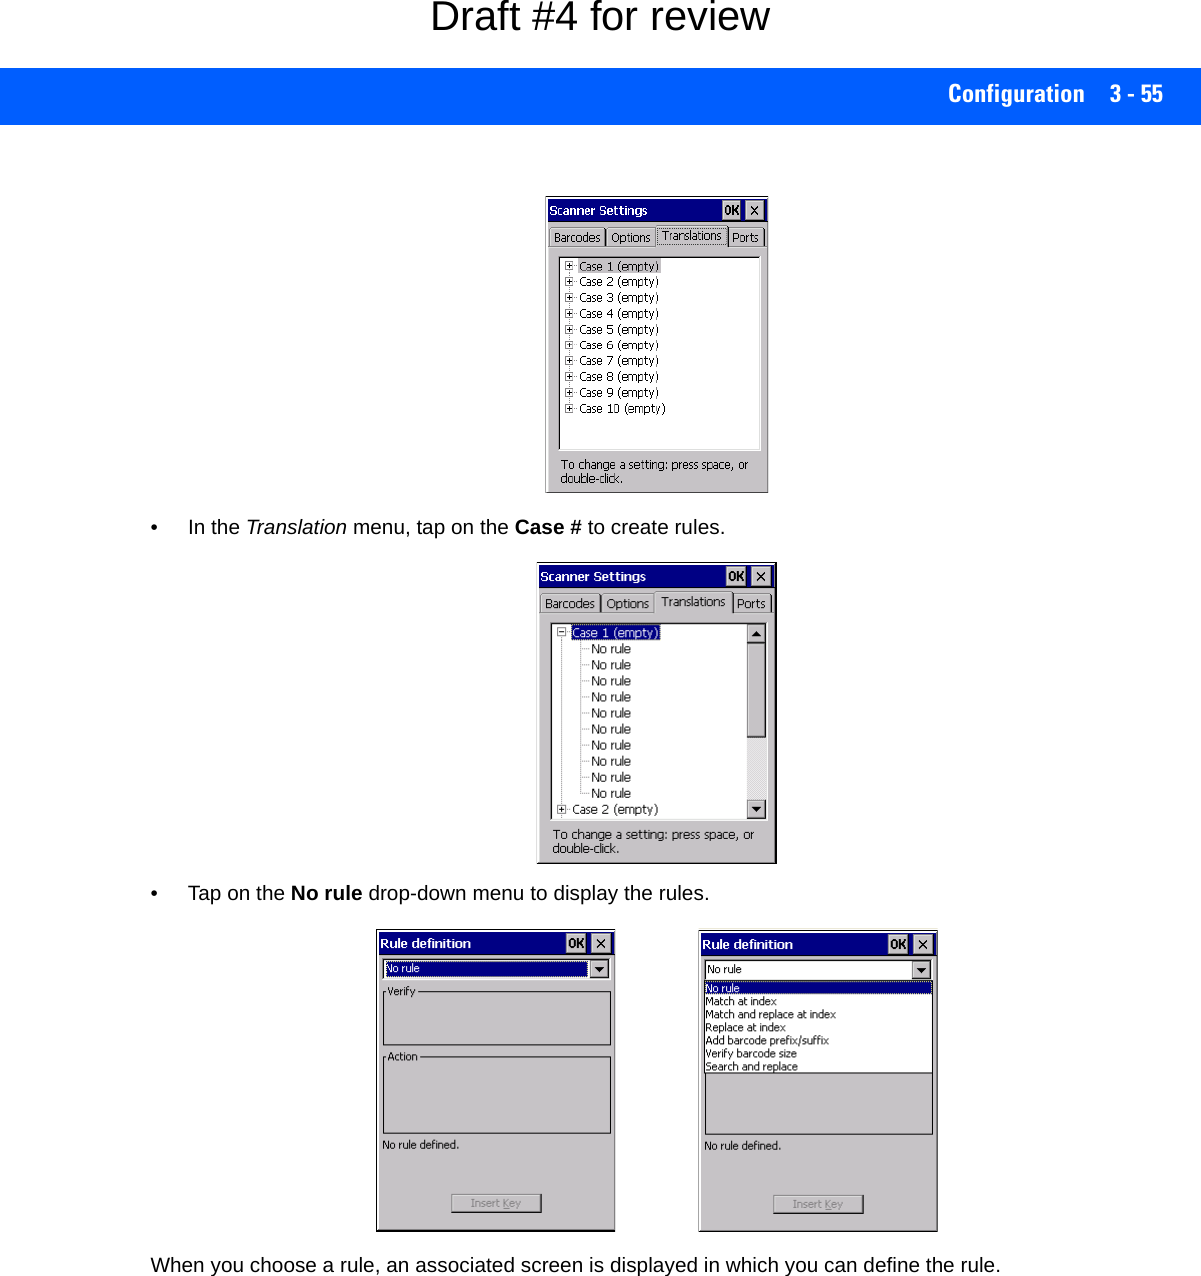
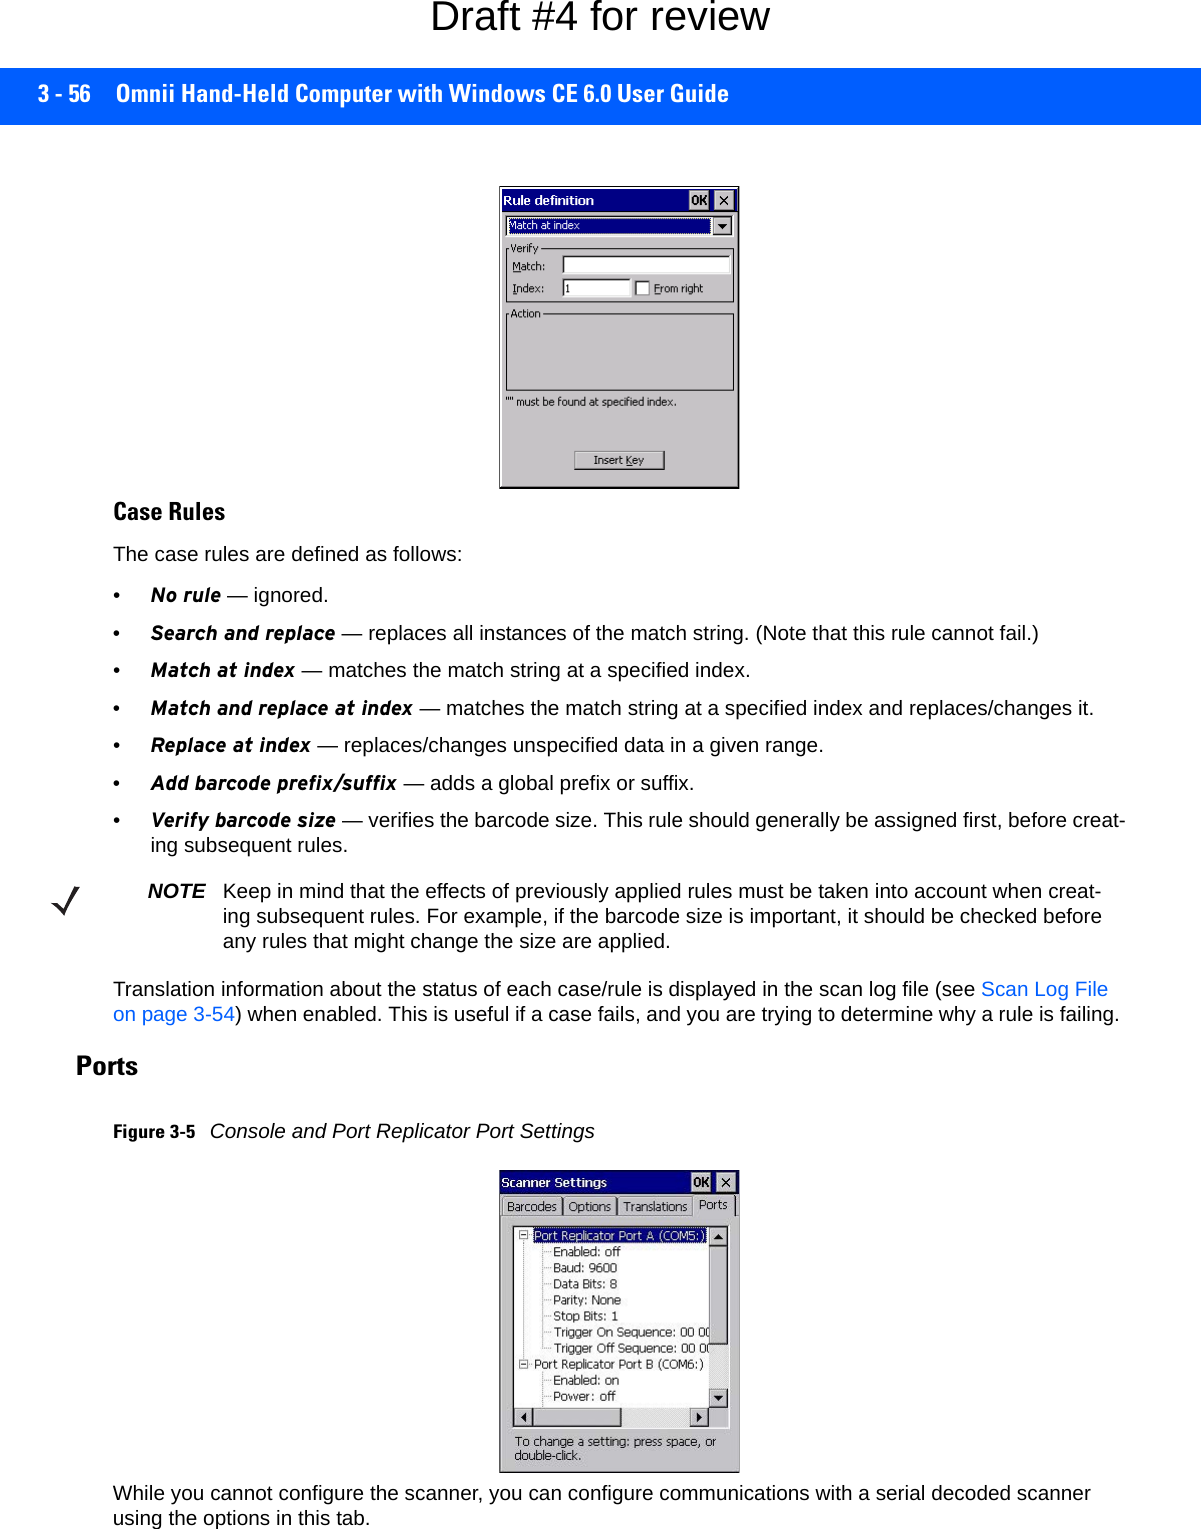
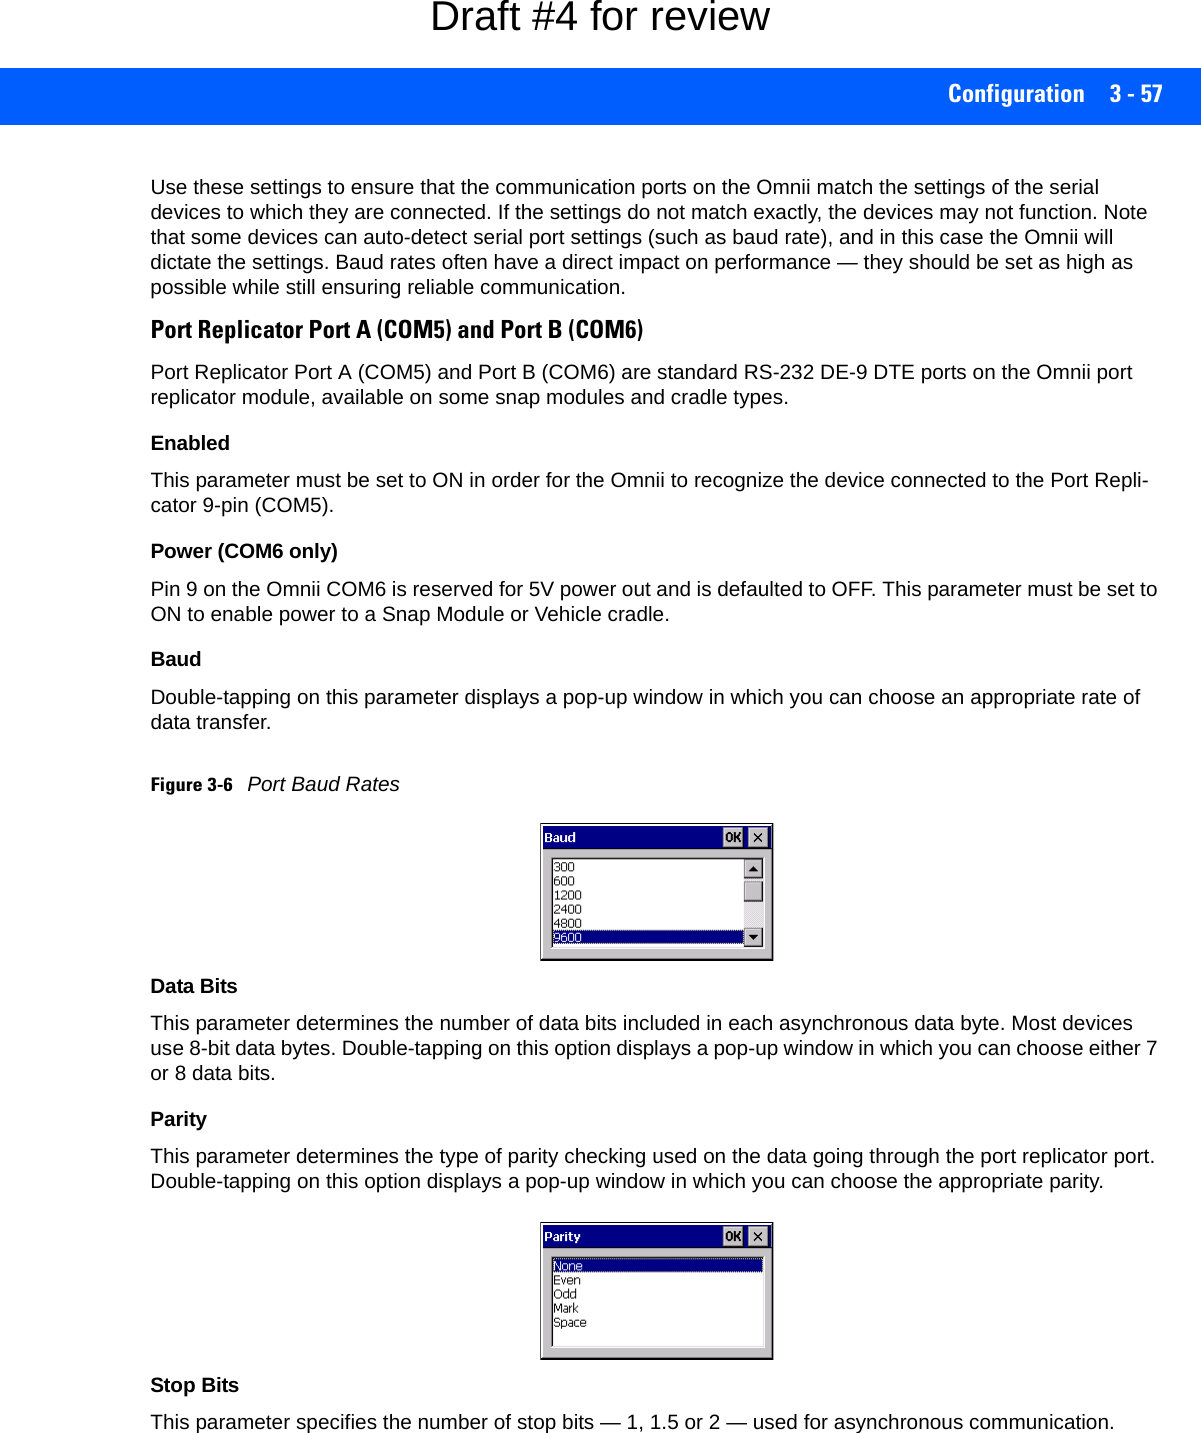
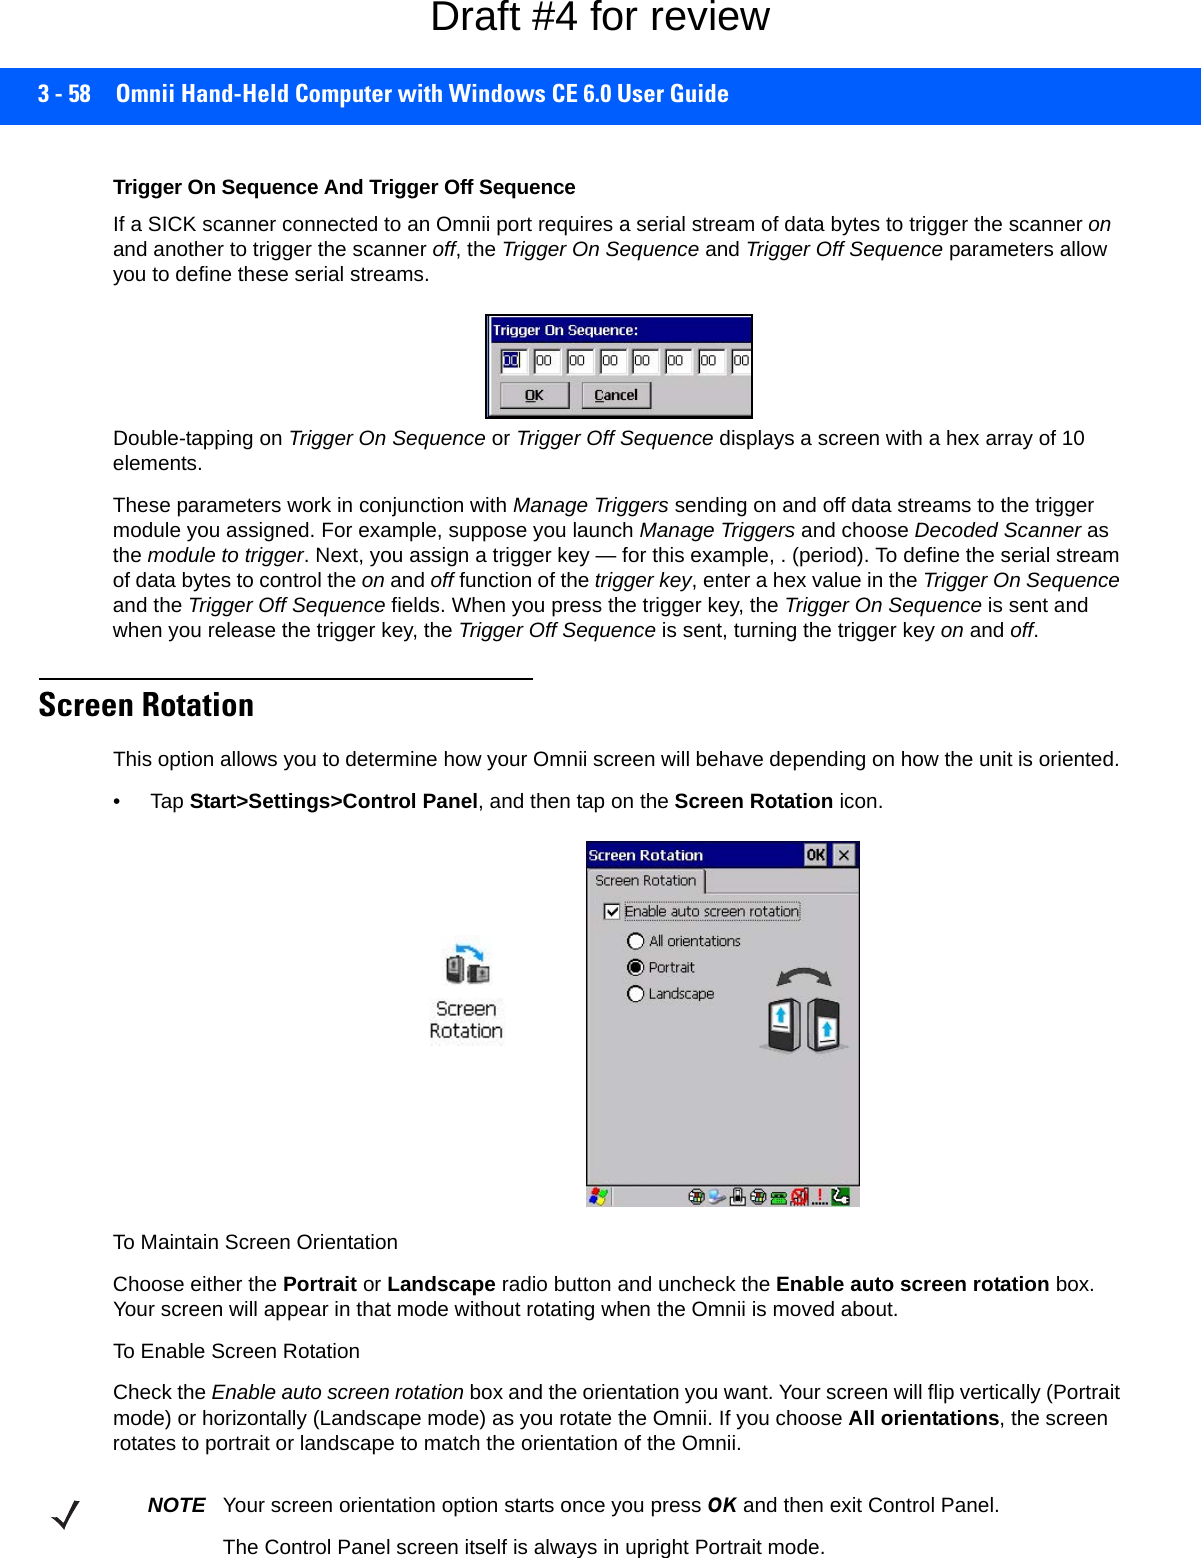
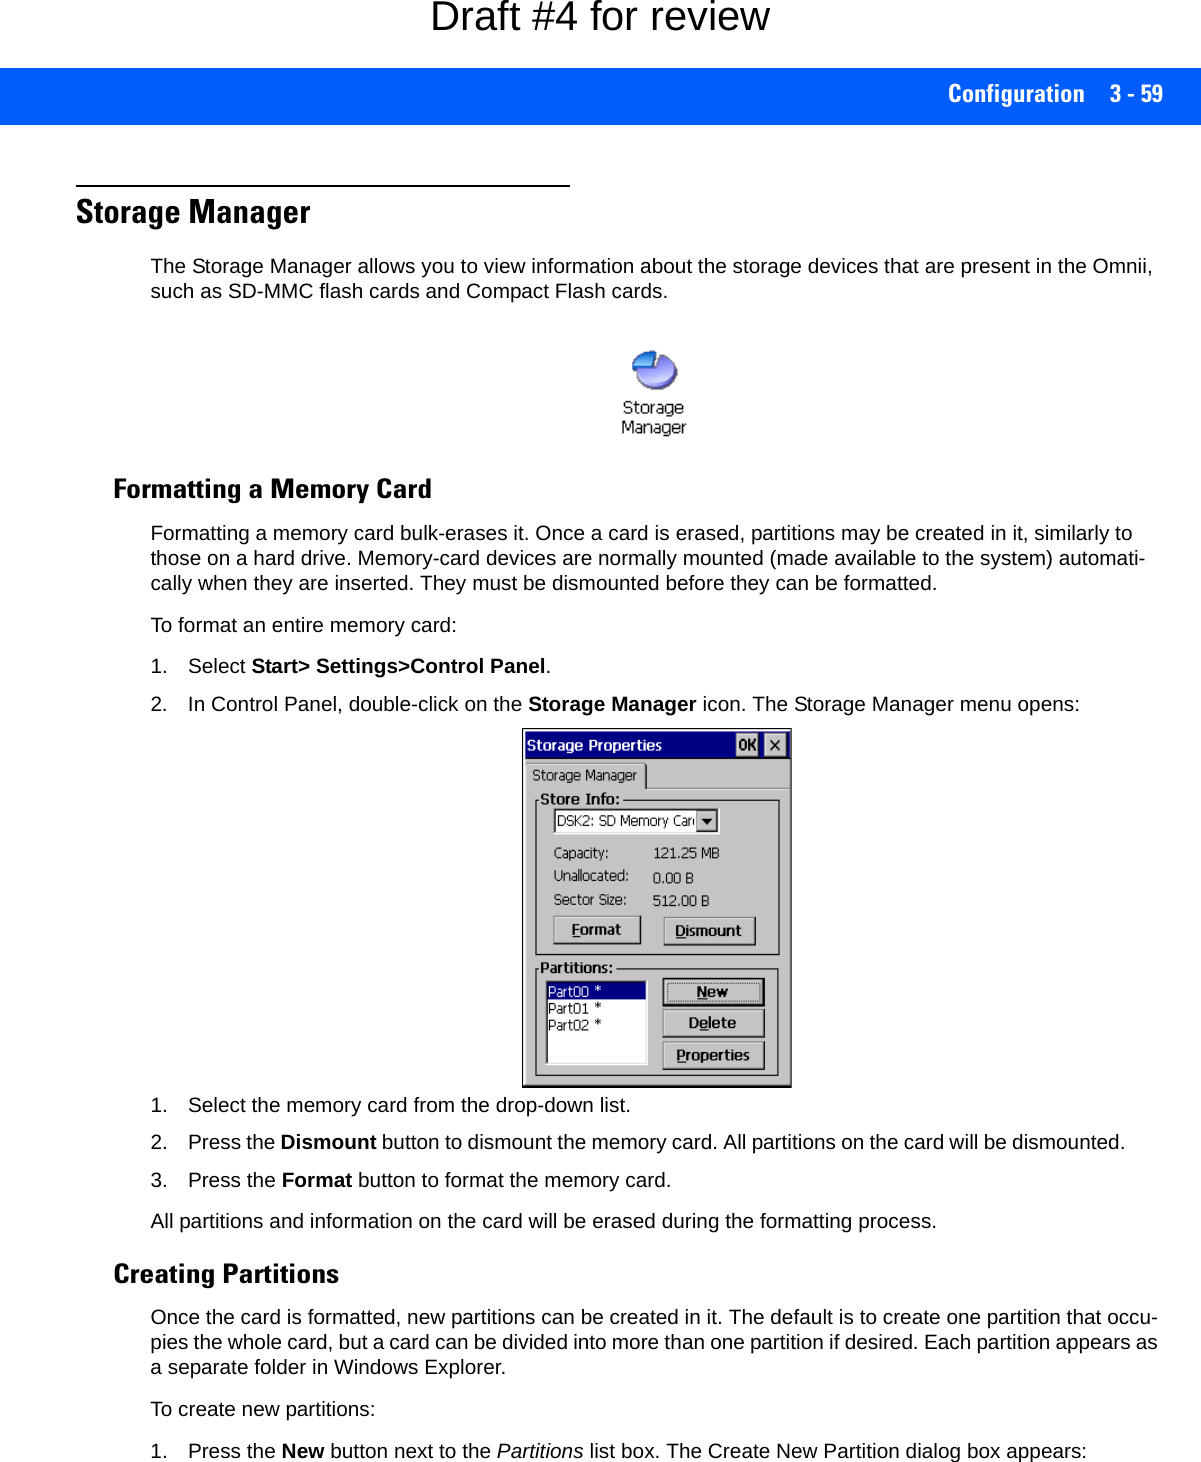
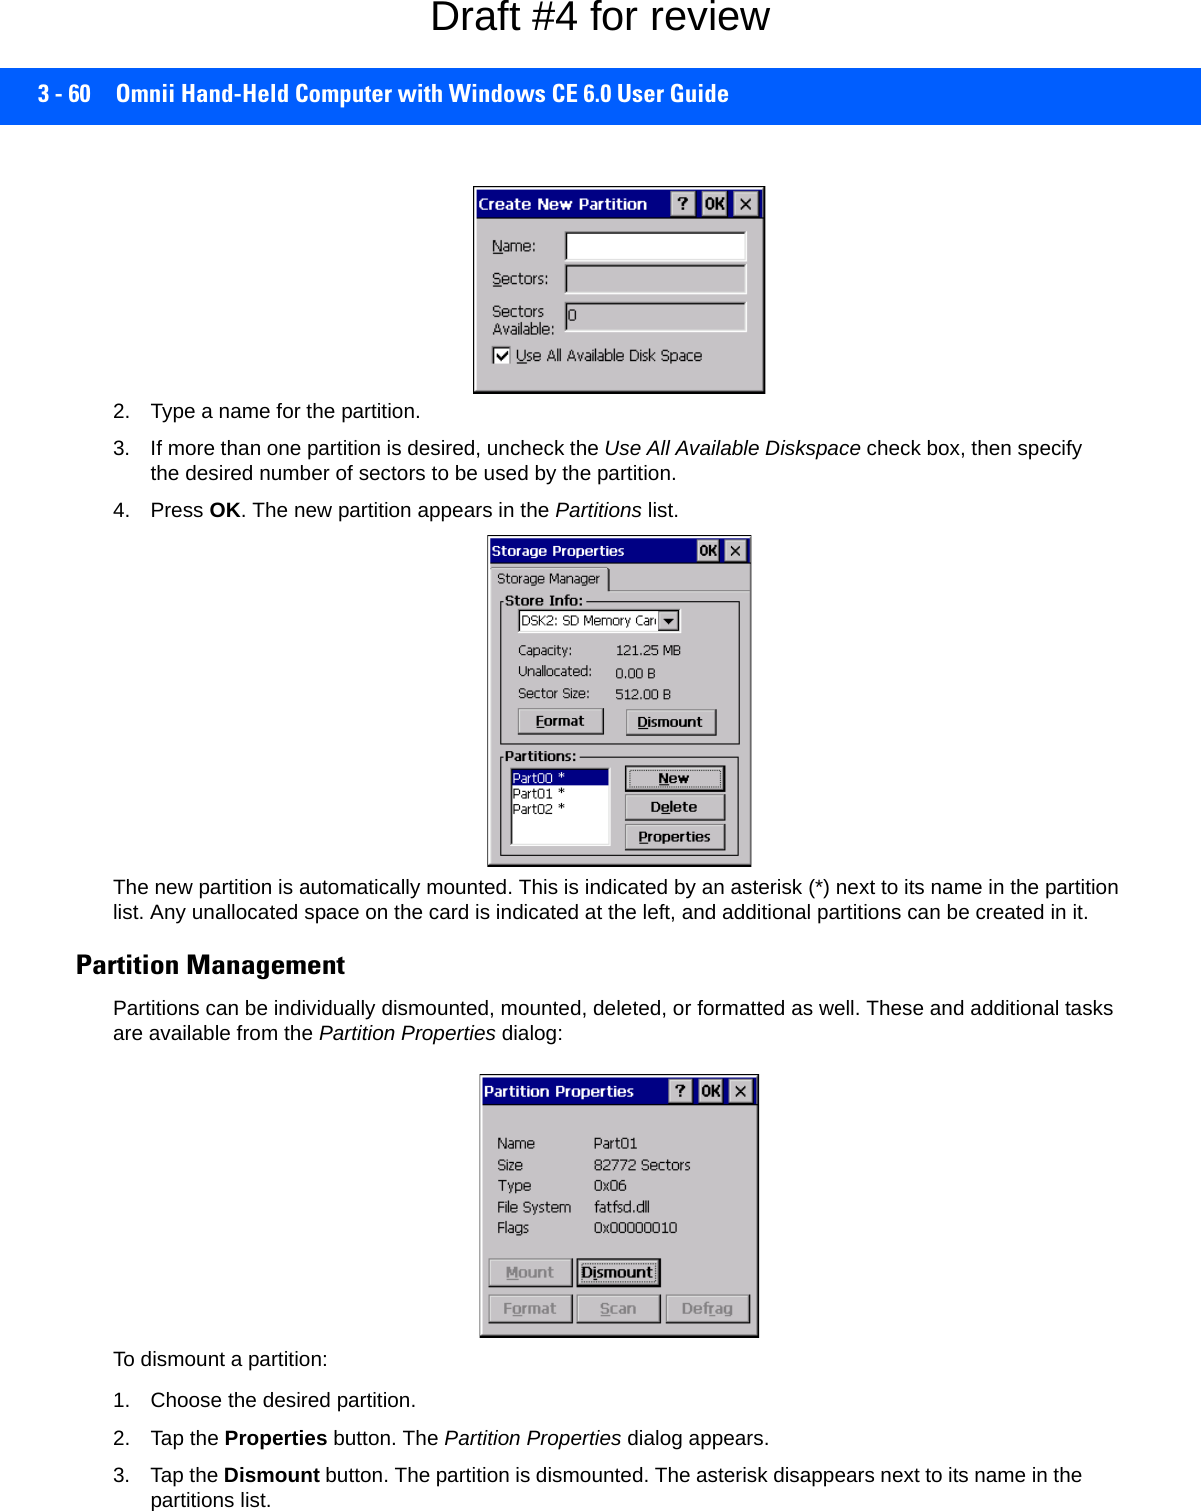
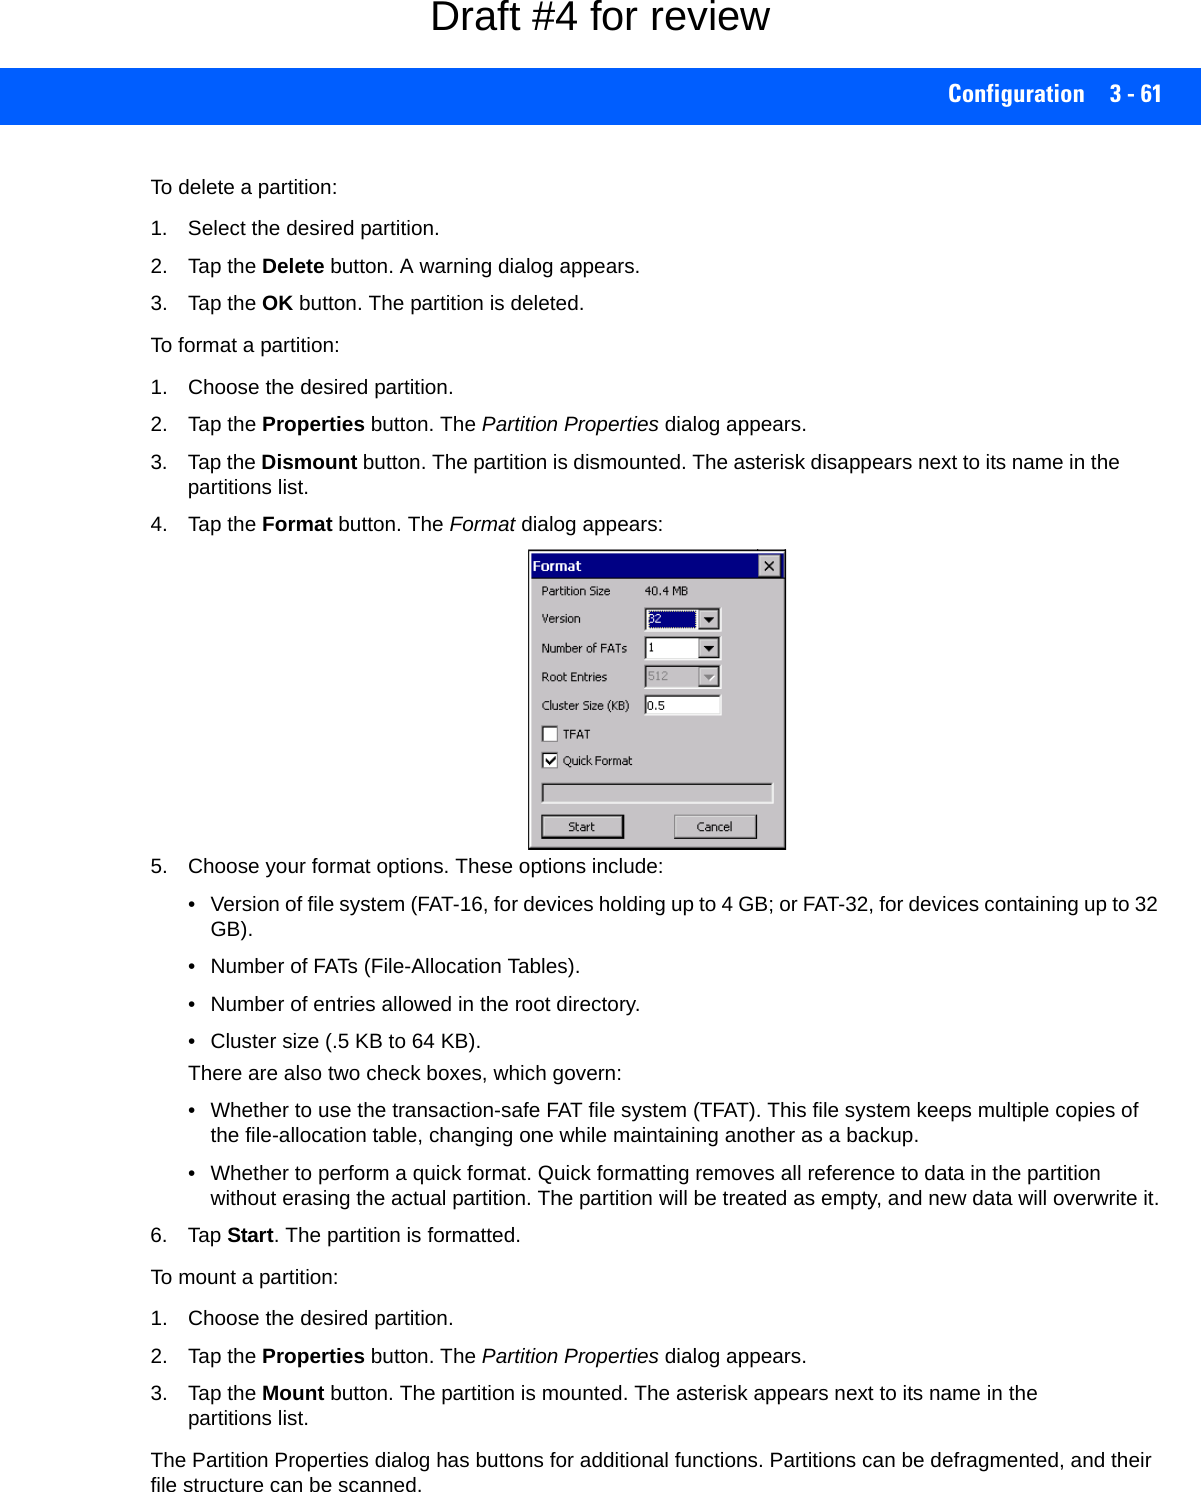
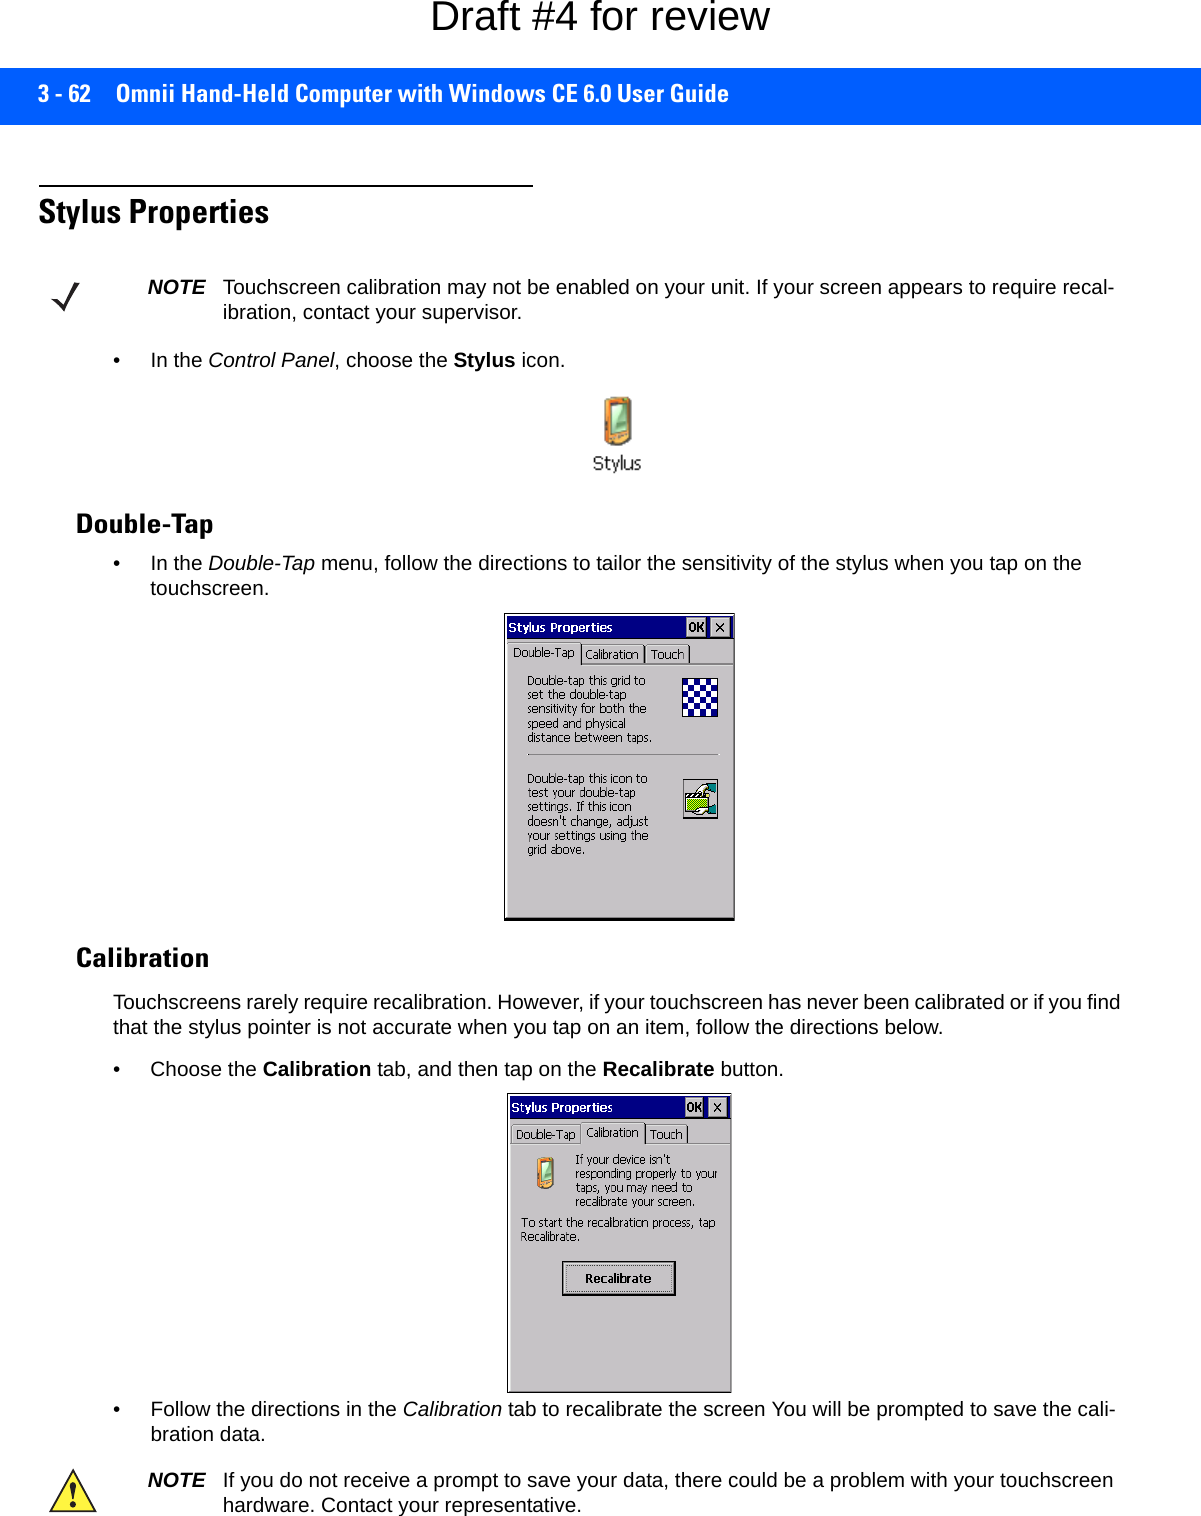
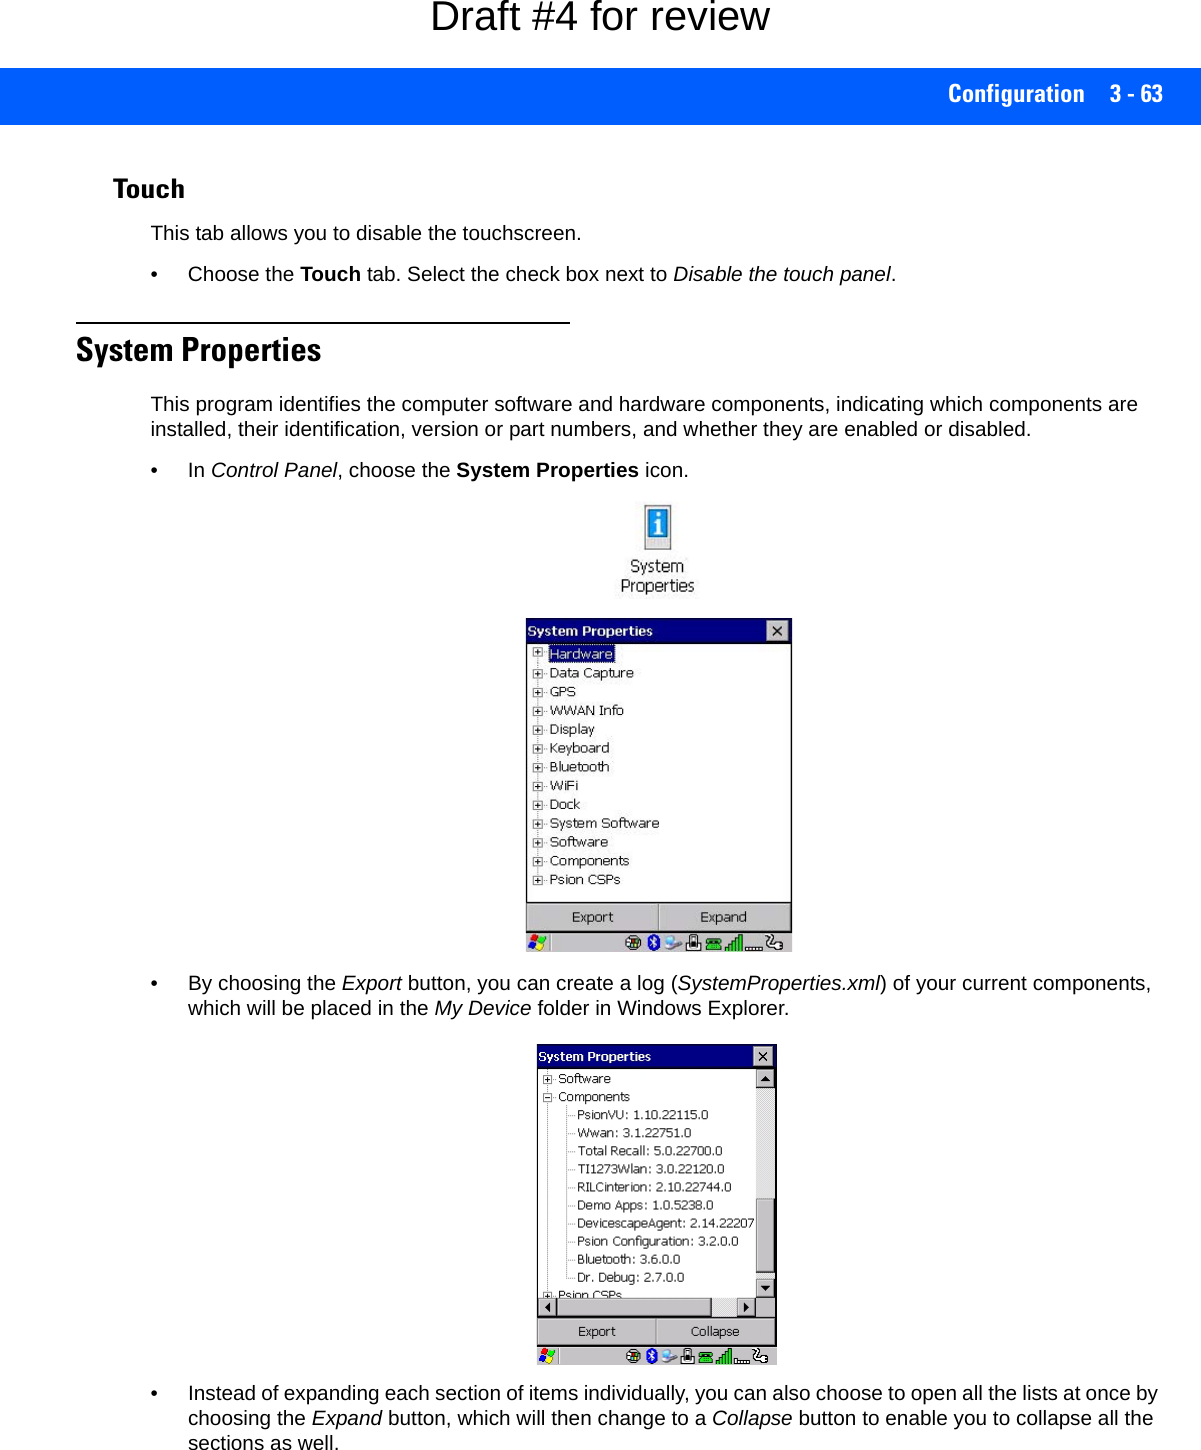
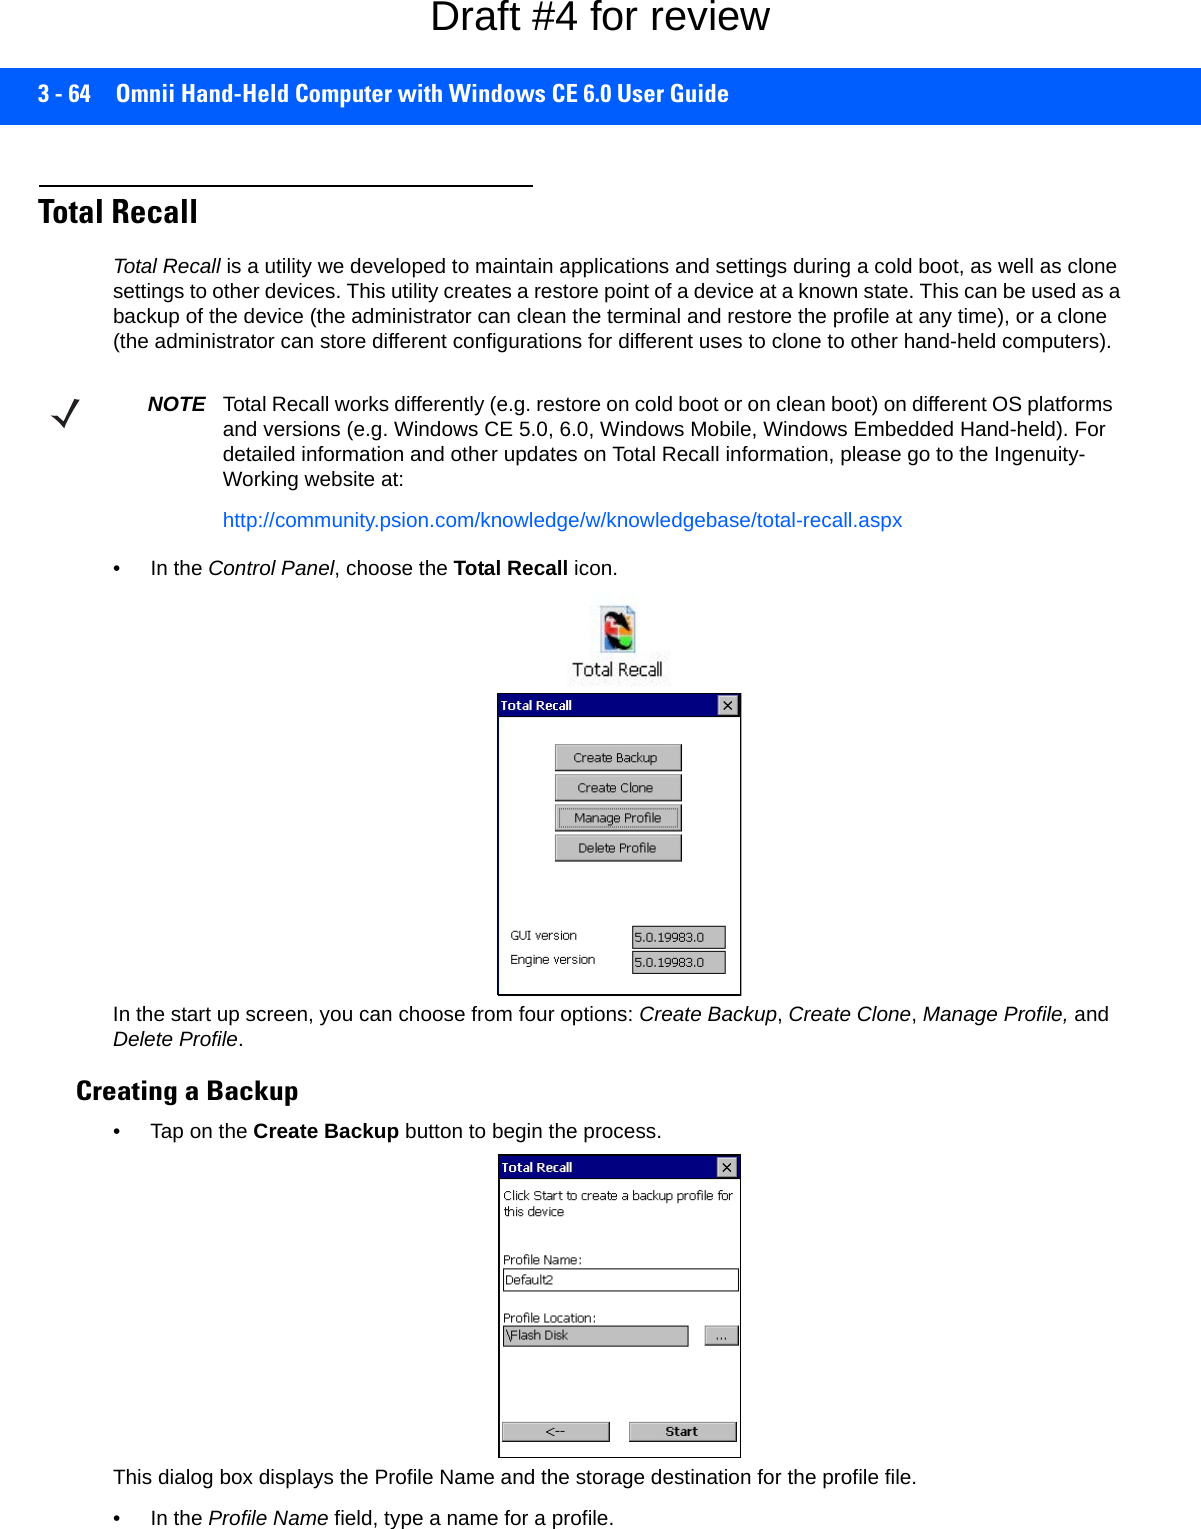
![Configuration 3 - 65• If you want to choose another location for your backup file (optional), tap on the [...] button to the right of the Profile Location field and choose one of a number of folders. -Tap on Start. A backup of the current settings will be created and saved to the specified location. The unit will then reboot.To view profiles and choose restore options, refer to Managing Profiles on page 3-66.Creating a CloneCloning allows you to copy settings or configurations from one computer to another. There are two types of clones to choose from: a Full Clone and a Settings Only Clone.A Full Clone contains all files, most of the registry, and the settings files. A Settings Only Clone can be copied to a wider array of devices, but it should not be used as an autorestore profile. • Tap on the Create Clone button to begin the process. Your Omnii model type and OS will be identified in the cloning statement to ensure that you target devices of the same type. Give the clone profile a name and location, then tap on Next.• In this menu, select All for a Full Clone, or Selected Options for a Settings Only Clone. If you choose Selected Options, a menu will open to enable you to decide which options you want cloned.IMPORTANT Any profile not stored in persistent memory (Flash Disk, external USB drive) will be erased during a clean boot, therefore you should store profiles on a persistent drive.When performing an autorestore, the program only searches for the profile located in the \Flash Disk\TotalRecall folder. If you store your profile anywhere else it will not be restored. Only one profile can reside in that folder.IMPORTANT The target device for a Full Clone MUST have the same model type and OS build as the source, otherwise problems can occur. For example, if the target device has a newer build of the OS, the new build may have a different set of registry keys that may conflict with the source.Draft #4 for review](https://usermanual.wiki/Symbol-Technologies/RA1202.User-Manual-1of2/User-Guide-2406595-Page-125.png)
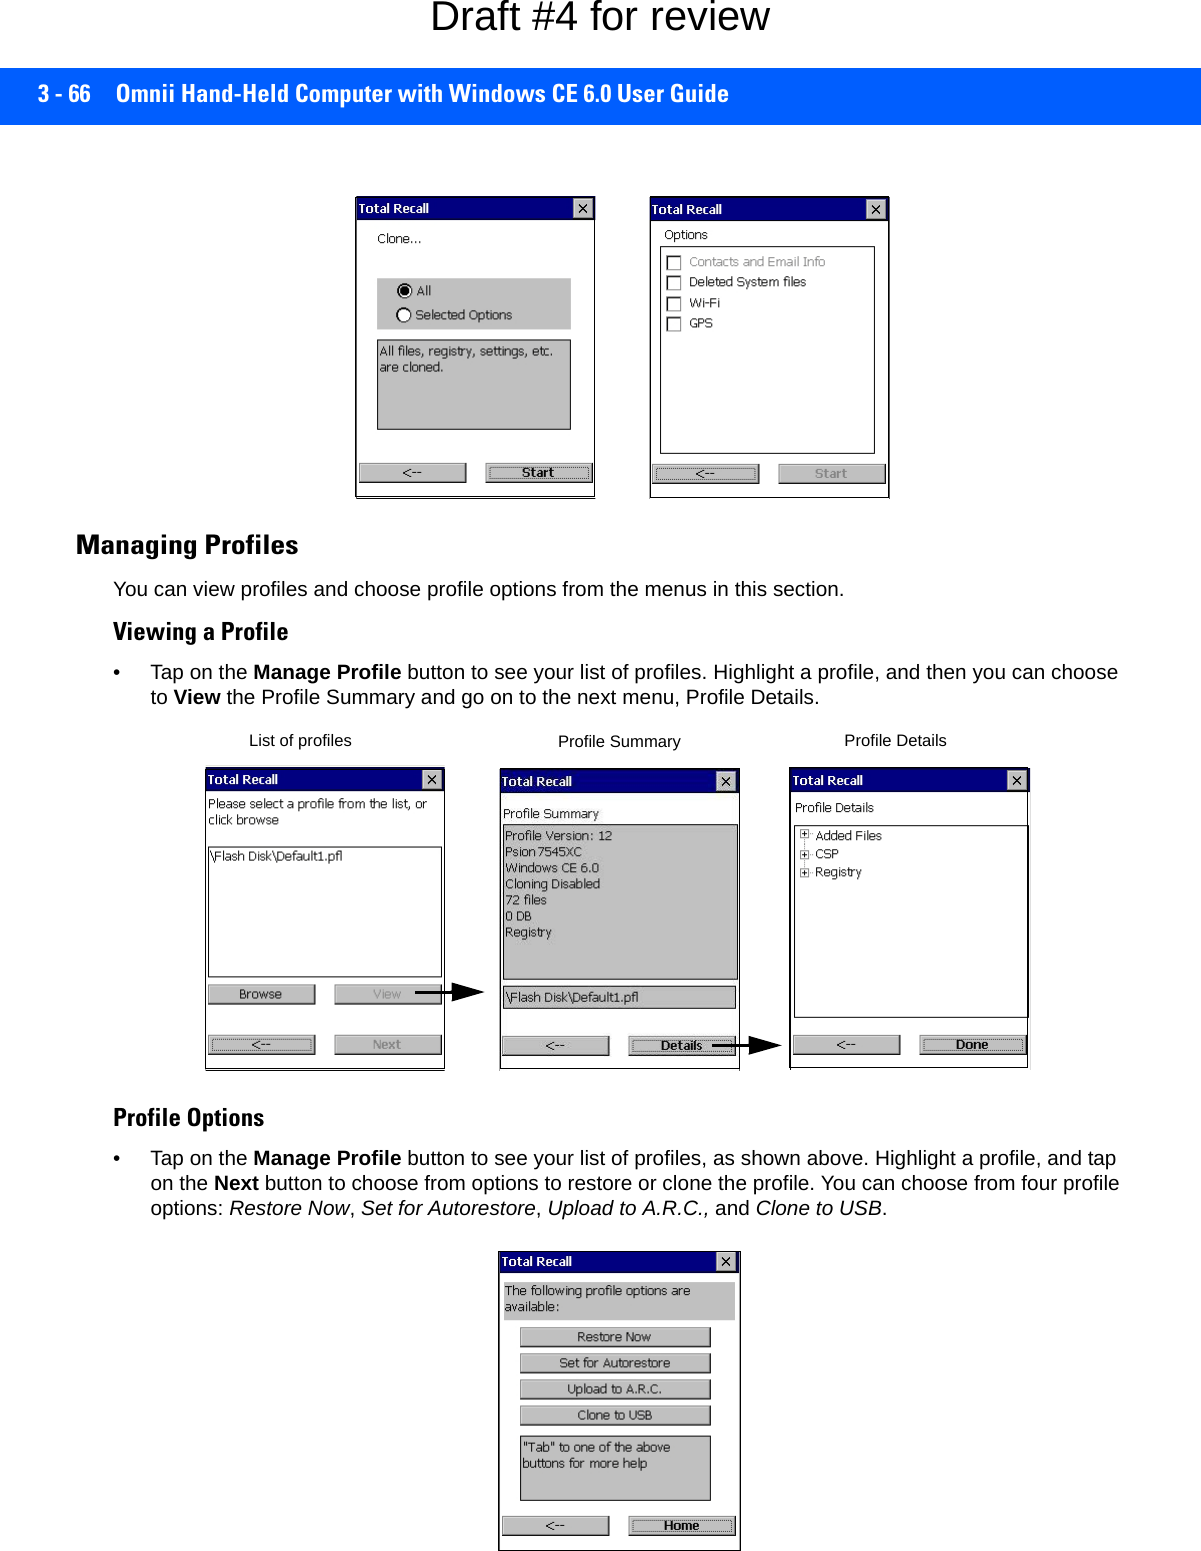
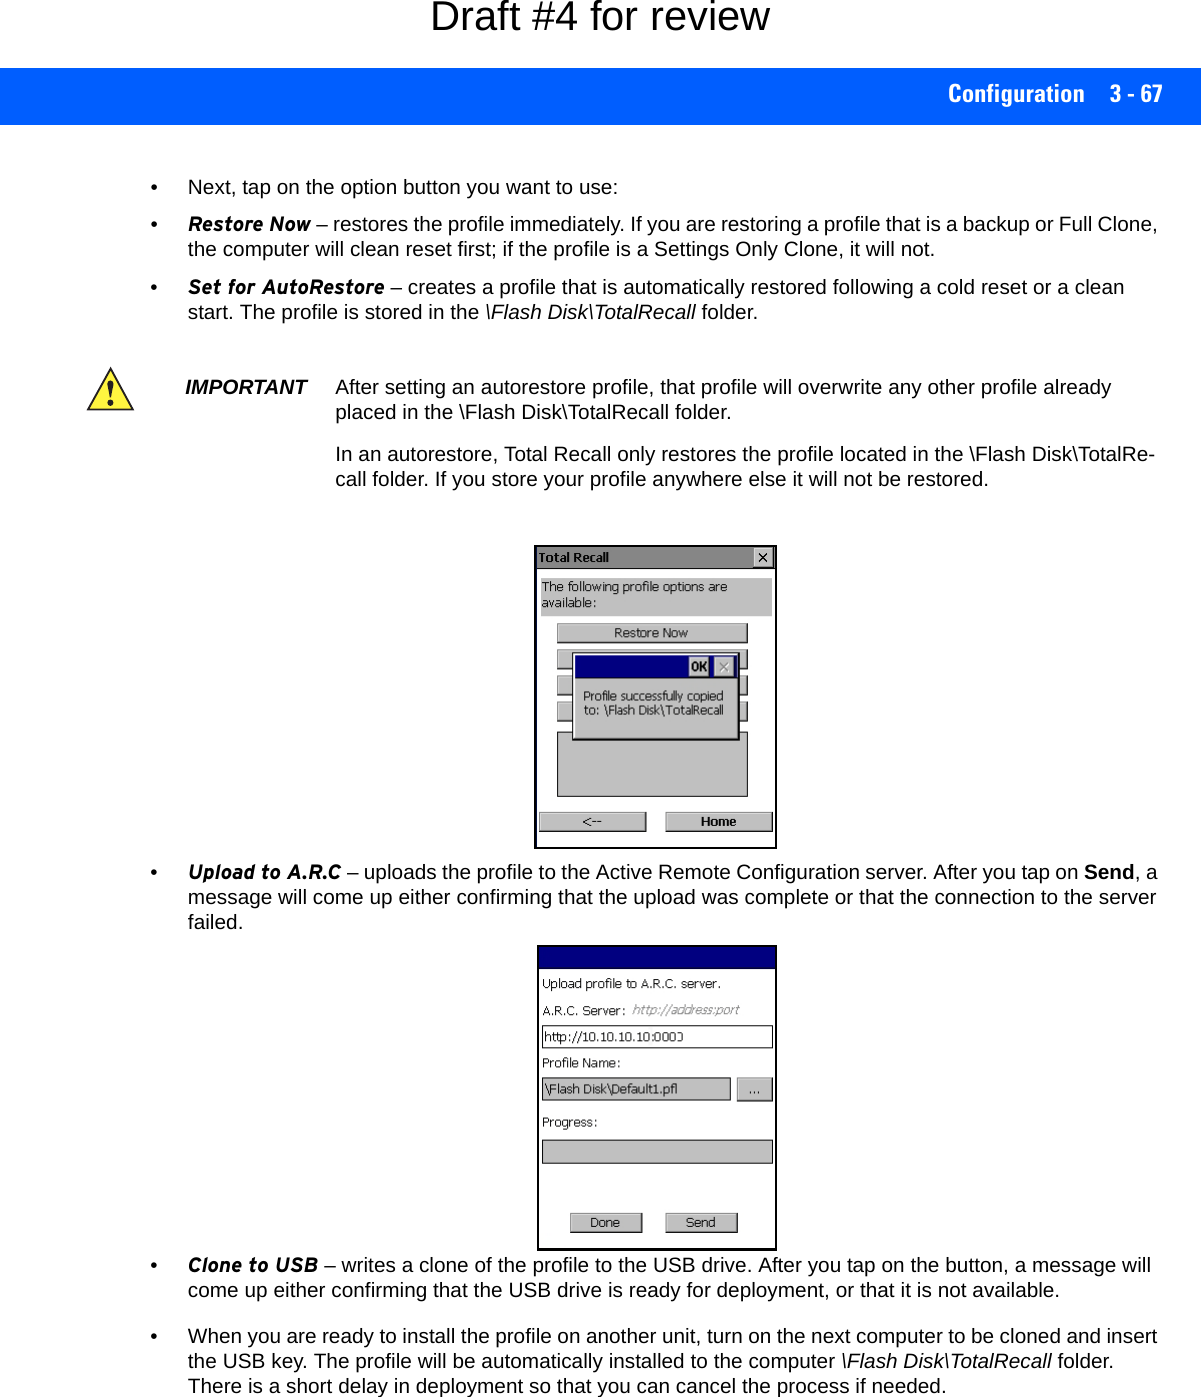
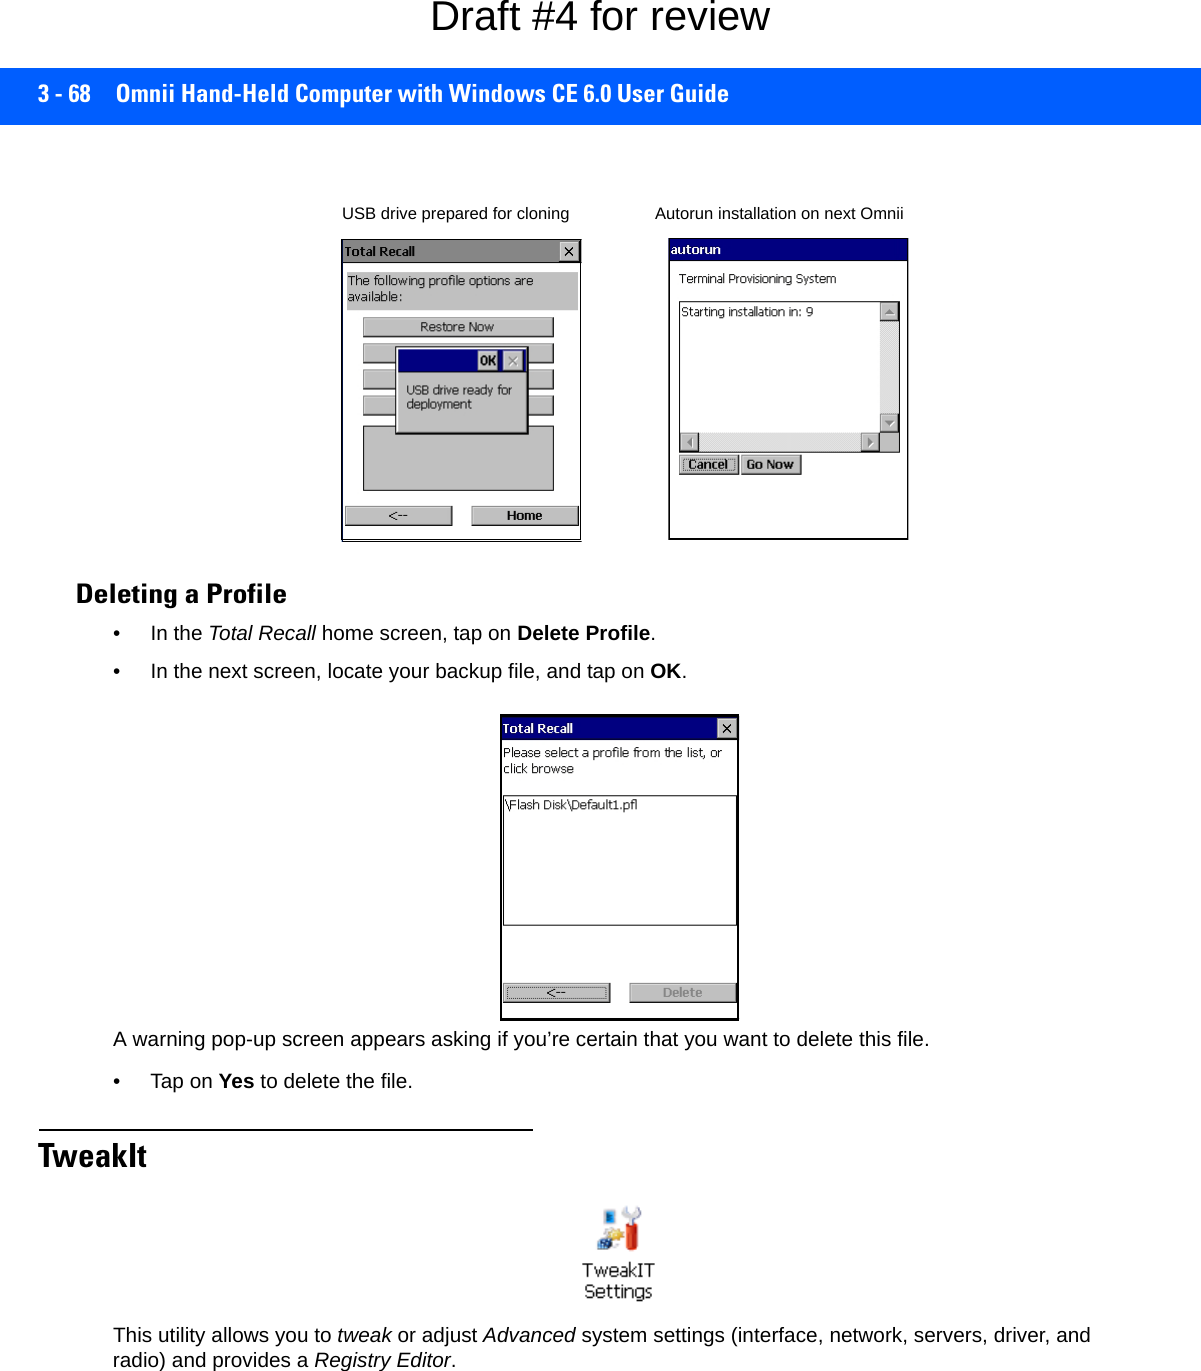
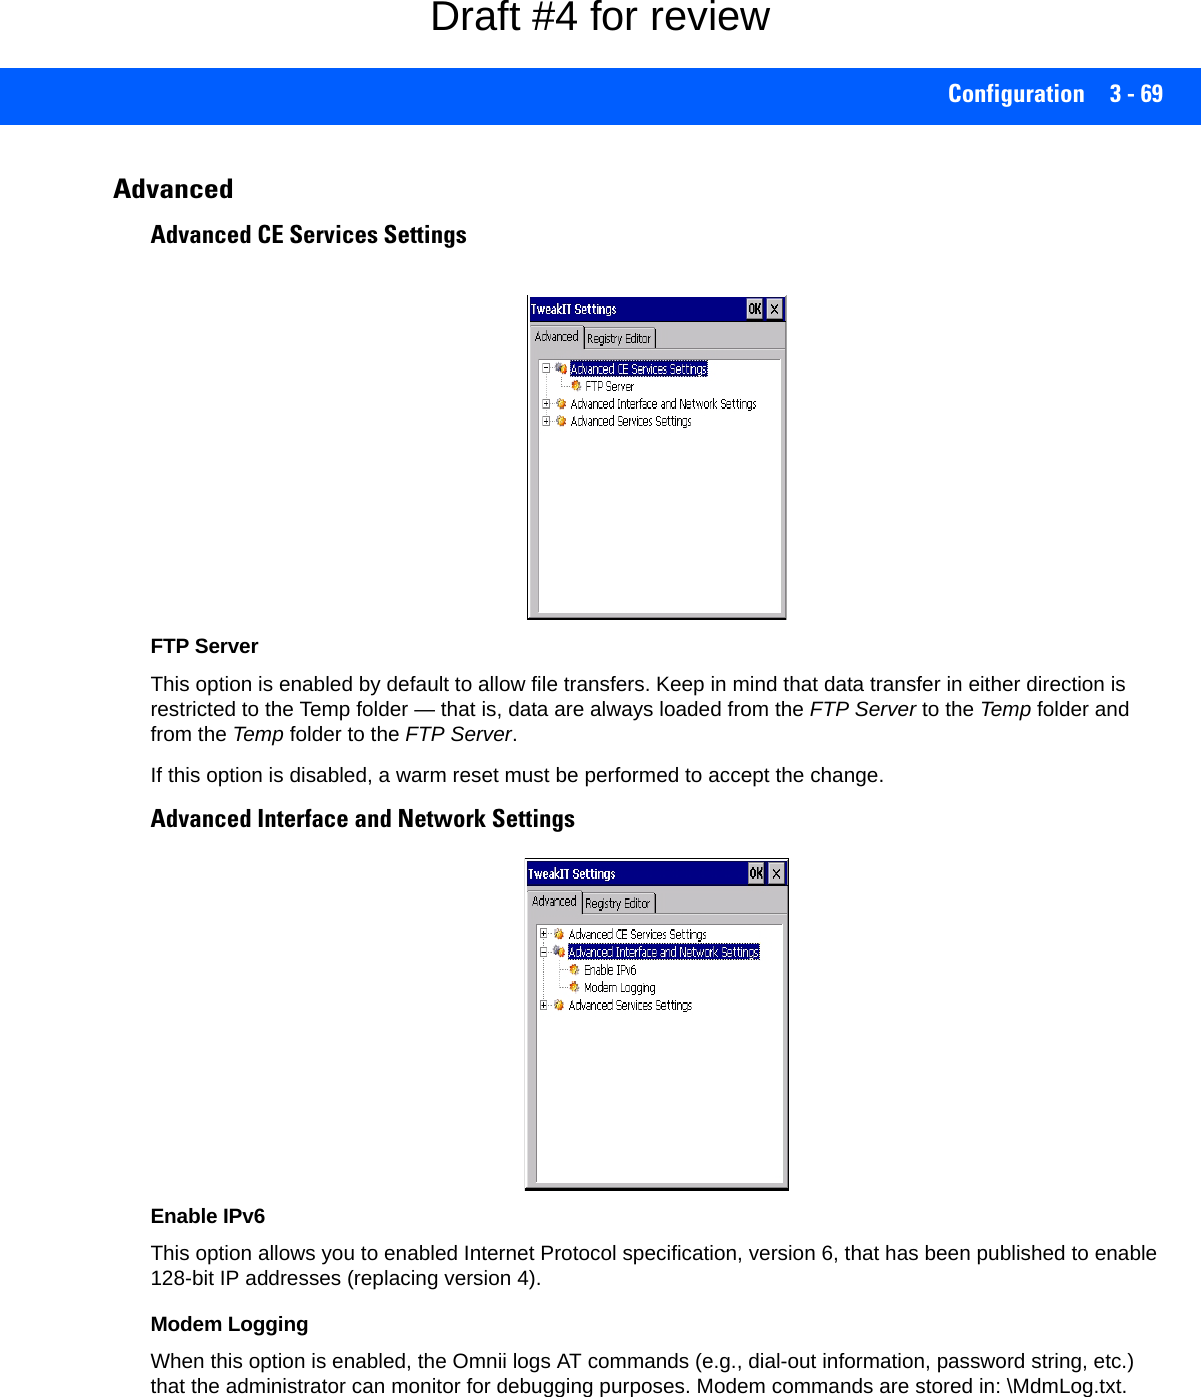
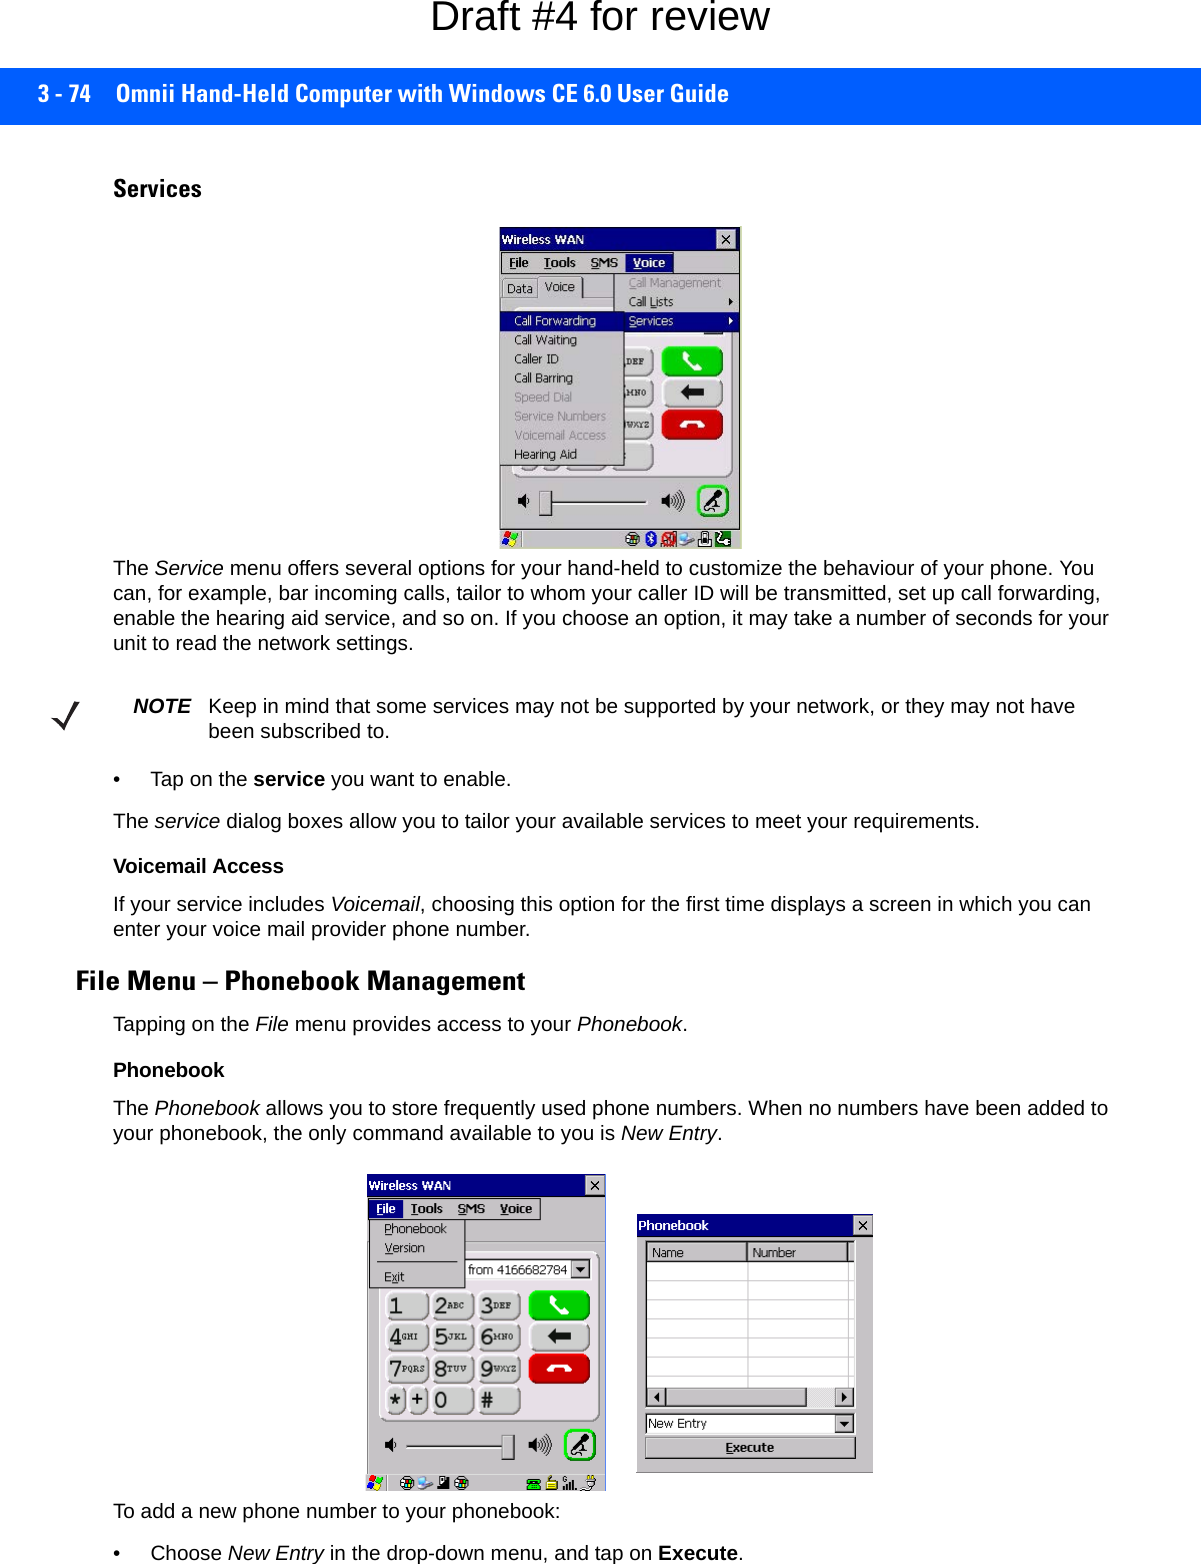
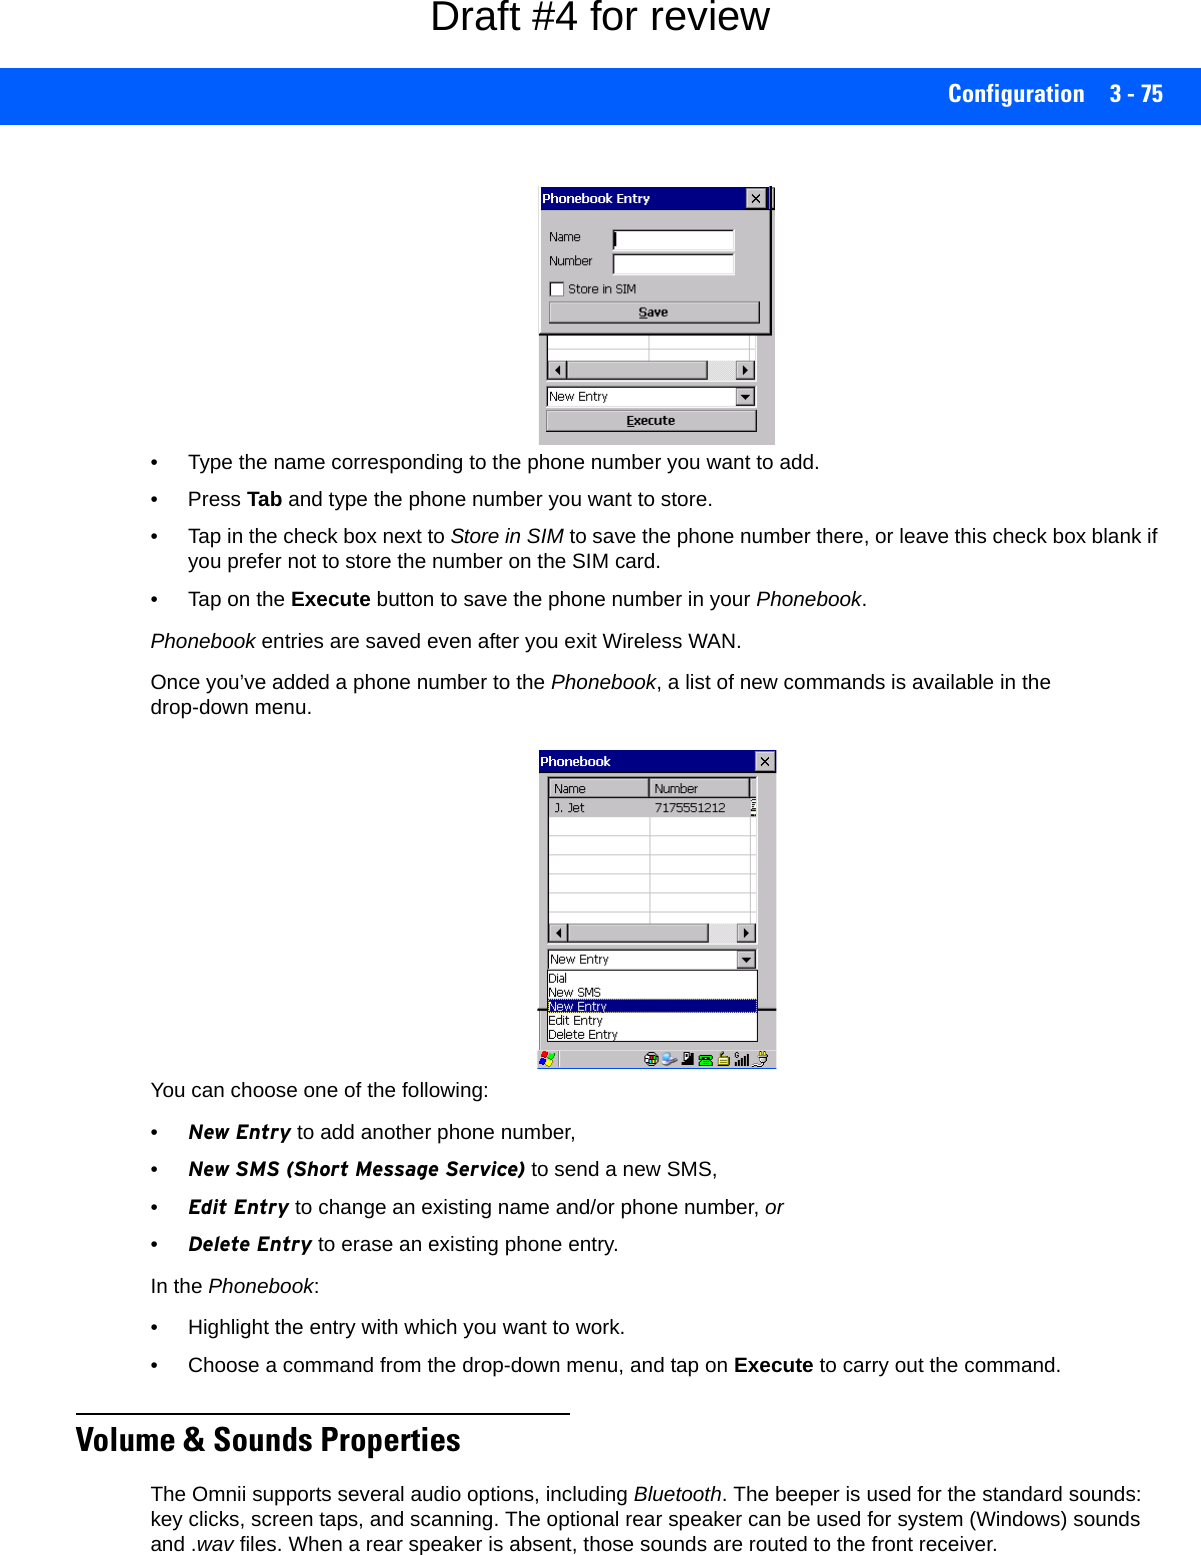
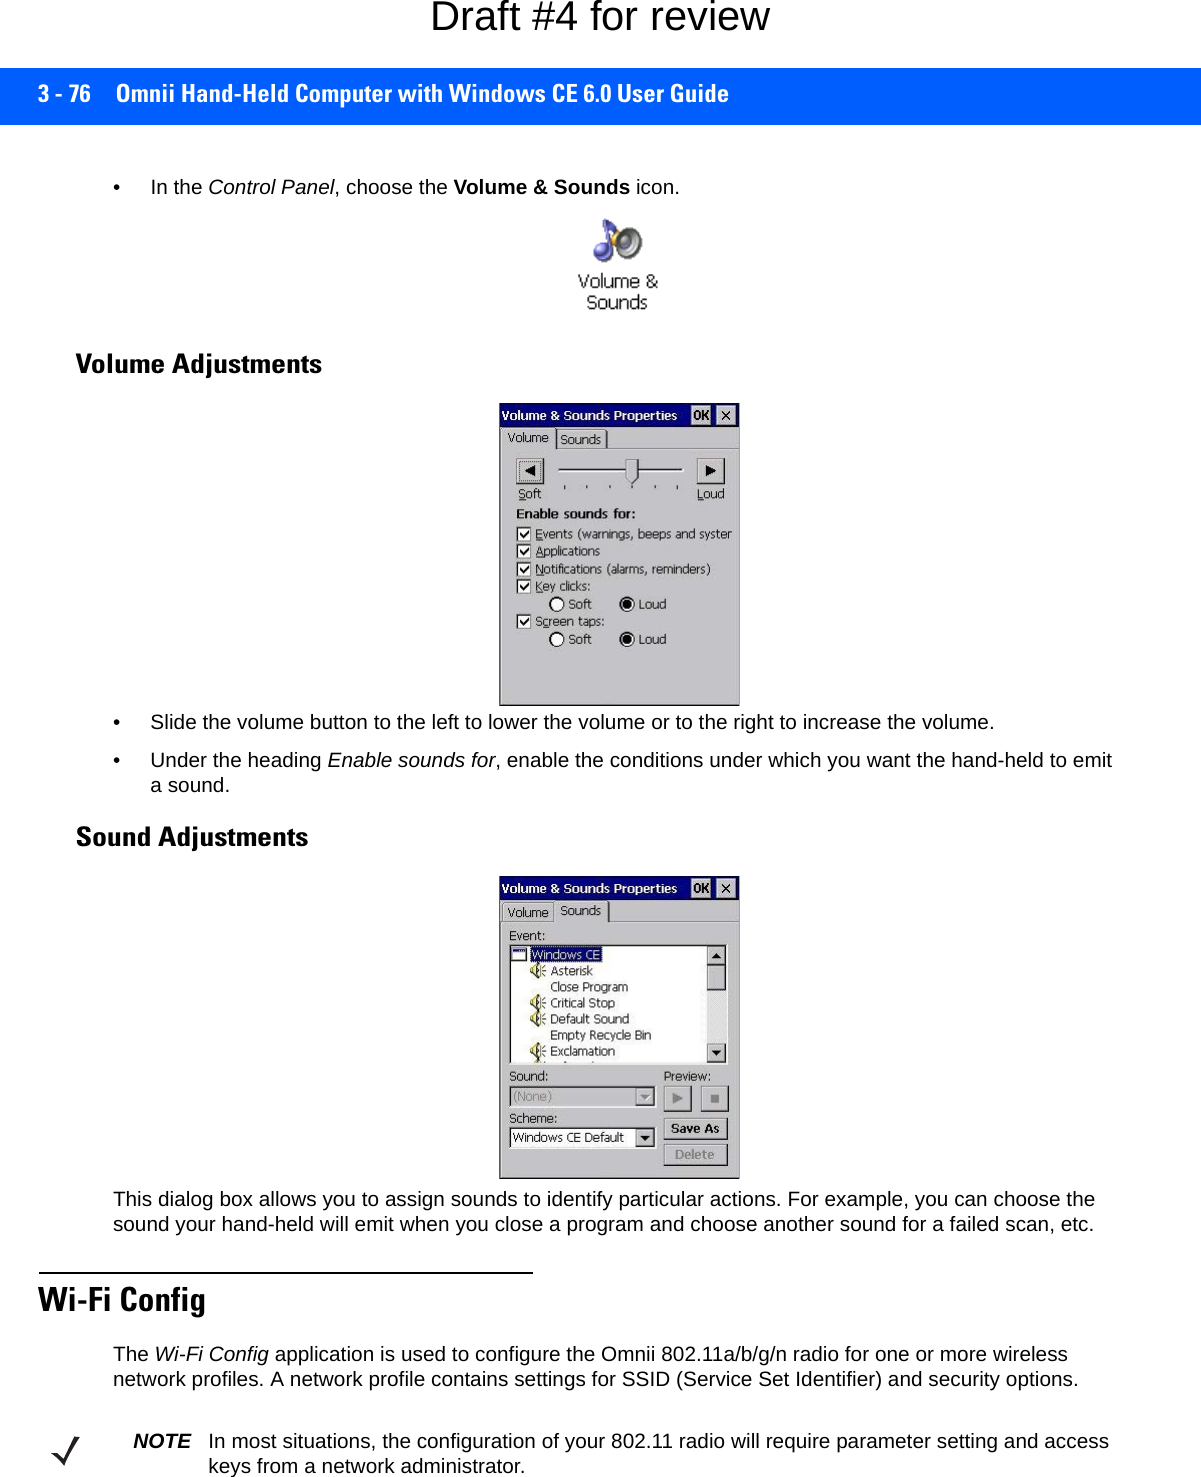
![3 - 70 Omnii Hand-Held Computer with Windows CE 6.0 User GuideAdvanced Services SettingsSNTP (Simple Network Time Protocol) ServerThe SNTP Server Name typed in this dialog box is used to synchronize Omnii time with the server time. A warm reset must be performed once the server name as been entered.Registry EditorThis option is reserved for senior administrators who have a strong understanding of registry keys and values. Voice – Using the WWAN Phone DialerIf the WWAN modem is installed and enabled, the Phone icon and the GSM signal strength icon will appear automatically on the taskbar. • Double click on the Phone icon to access the phone dialer.You can also follow the steps below to access the phone dialer:WARNING! Careless registry editing can cause irreversible damage to the Omnii.NOTE On 55- and 66-key Omnii keyboards, you can also press the [Talk] key to display the phone keypad providing it has been activated. The [Talk] key is labelled with a green telephone receiver icon. Refer to Sending and Ending Calls Using the Omnii Keyboard on page 3-71 for details.Draft #4 for review](https://usermanual.wiki/Symbol-Technologies/RA1202.User-Manual-1of2/User-Guide-2406595-Page-130.png)
![Configuration 3 - 71• To access the dialer, tap on Start>Settings>Control Panel.• Tap on the Wireless WAN icon, and then tap on the Voice tab.The Voice tab displays a phone dialer used to dial phone numbers. The Voice menu provides commands which allow you to manage your phone contacts, view your phone history, and so on.Dialing a NumberTo make a phone call: • Type the recipient’s phone number in the phone number entry field.Send button – tap to dial the number you typed.Backspace button – tap to erase characters in the phone number entry field.End button – tap to disconnect the phone call.Mute button – During a phone call, tap to mute sound transmission. Tap again to restore sound. + button – When making an international call, the + sign can be used as a universal substitute for any international dialing prefix and is guaranteed to work worldwide. The entry sequence must be as fol-lows: + country code followed by phone number.Example: A standard phone number: 011 36 30 275 28466 using the + substitution is typed as follows: +36 30 275 28466The + symbol replaces the universal dialing prefix 011.Sending and Ending Calls Using the Omnii KeyboardThe 55-key and the 66-key Omnii keyboards come equipped with phone keys — each has a [Talk] and an [End] key on the physical keyboard.• Press the [Talk] key to answer a call or to display the onscreen phone keypad so you can initiate a call.• Press the [End] key to terminate a phone call.Send ButtonBackspace ButtonEnd ButtonPhone Number Entry FieldUniversalInternationalDialing Prefix Mute ButtonDraft #4 for review](https://usermanual.wiki/Symbol-Technologies/RA1202.User-Manual-1of2/User-Guide-2406595-Page-131.png)
![3 - 72 Omnii Hand-Held Computer with Windows CE 6.0 User GuideReceiving an Incoming CallTo answer an incoming call:• Tap on the [Talk] button; it’s labelled with a green phone receiver.Voice MenuThis menu allows you to manage calls, view your call history, and if required, assign a call forwarding service to your hand-held.Call ManagementThe Call Management option only becomes available in the Voice menu when at least one phone call is either On hold or Active. When you choose this command, the currently active phone call is listed in a dialog box.[End] key[Talk] keyDraft #4 for review](https://usermanual.wiki/Symbol-Technologies/RA1202.User-Manual-1of2/User-Guide-2406595-Page-132.png)
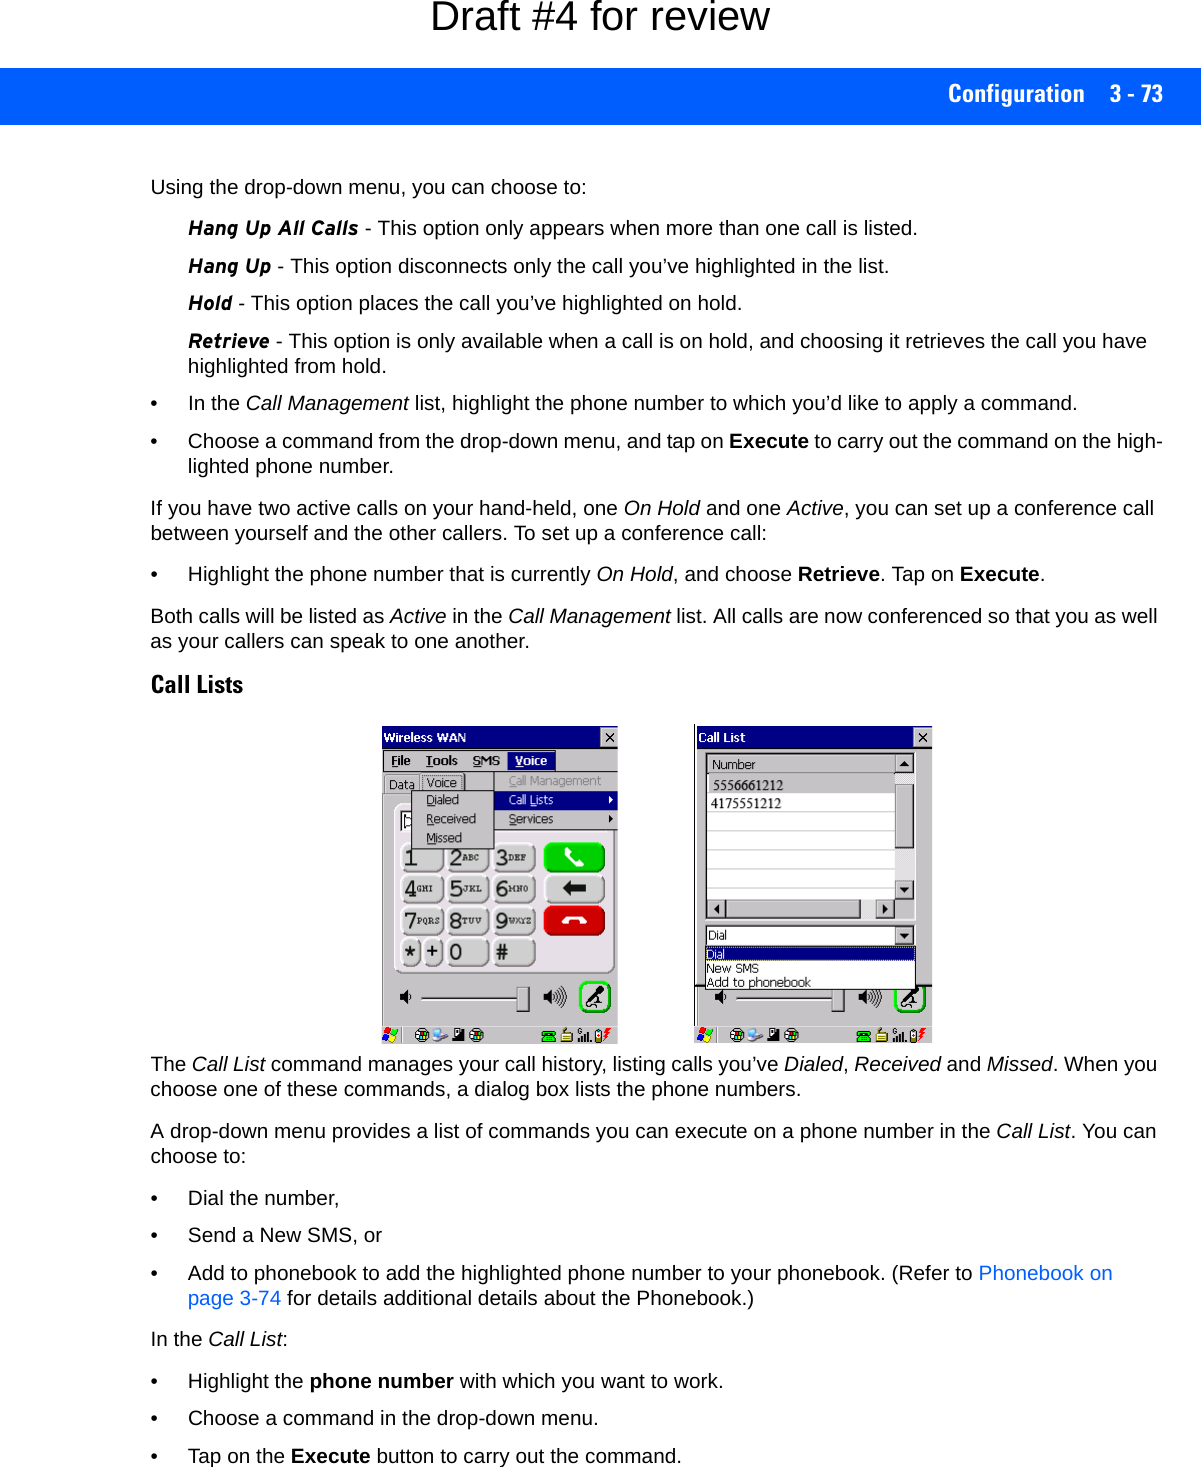
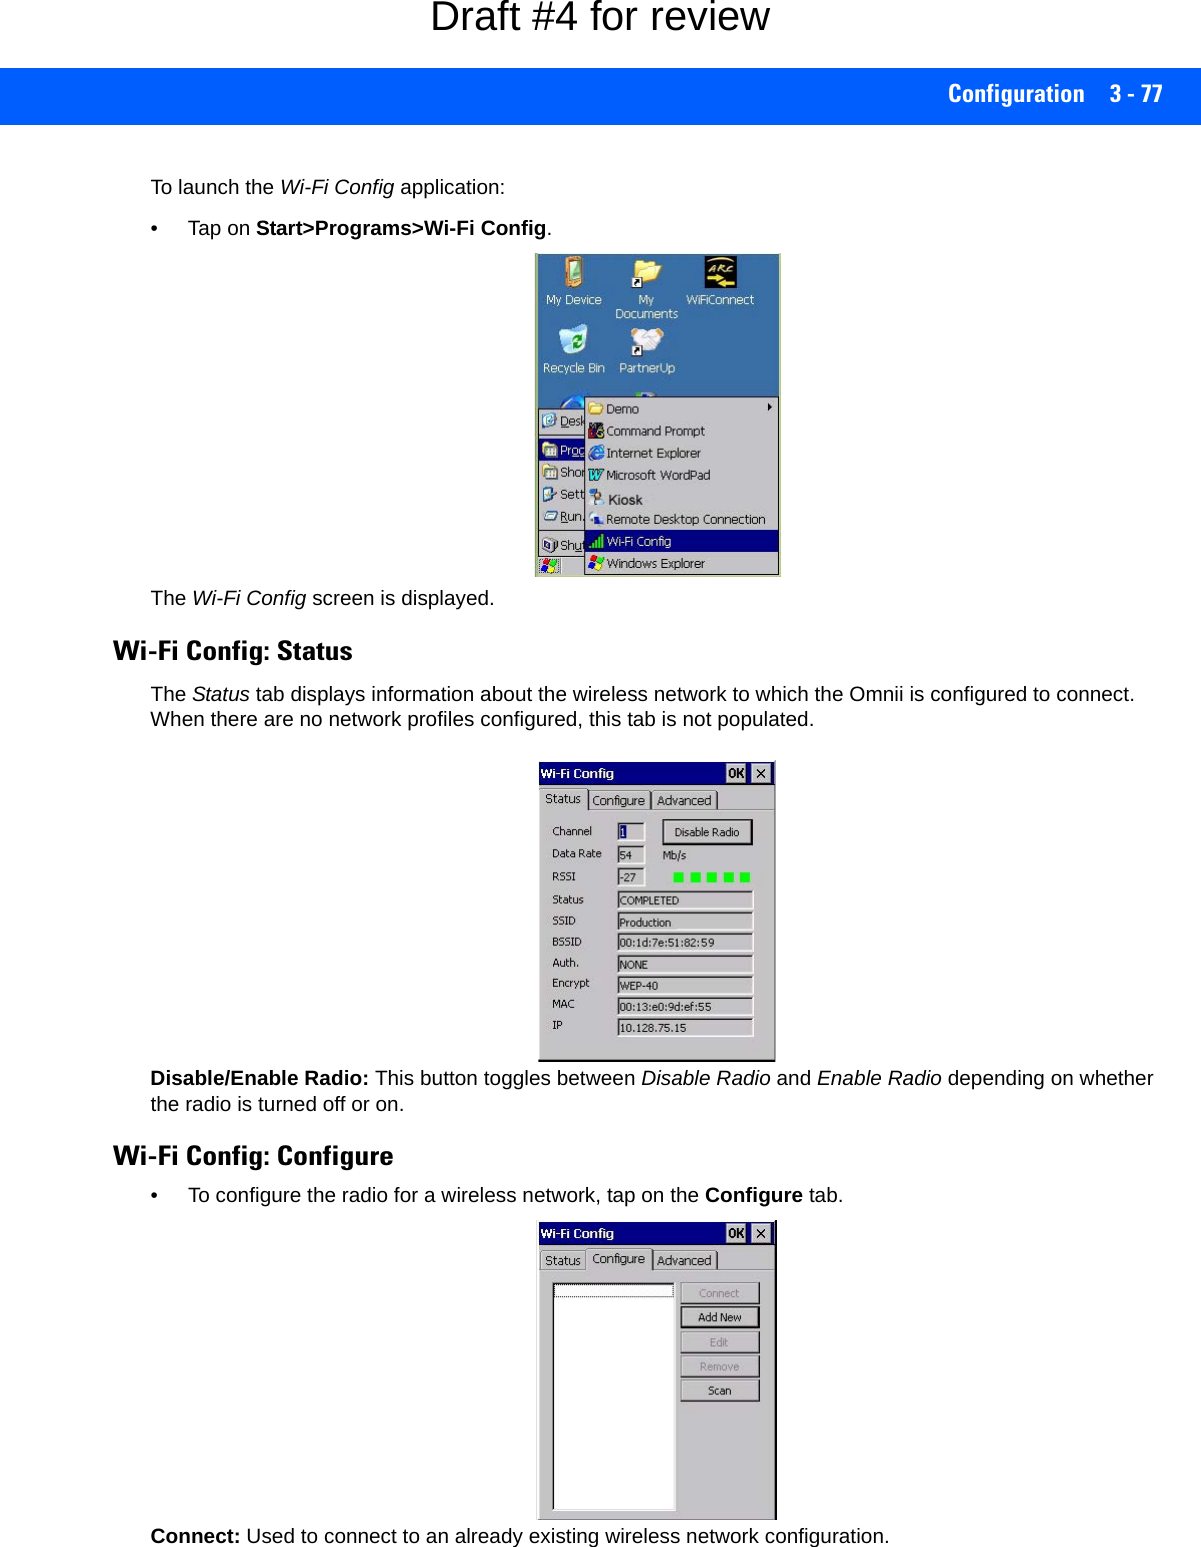
![Configuration 3 - 81Connecting the Wireless NetworkYour configured network is listed in the Configure tab. An [X] next to a network indicates that this is the network to which the Omnii will connect.• Tap on the Connect button to activate your network.The Status tab is displayed. The Status field displays ASSOCIATING while the 802.11a/b/g/n radio attempts to connect to the network. Once the association is complete, the Status tab is populated with the appropriate information about your network.Draft #4 for review](https://usermanual.wiki/Symbol-Technologies/RA1202.User-Manual-1of2/User-Guide-2406595-Page-141.png)
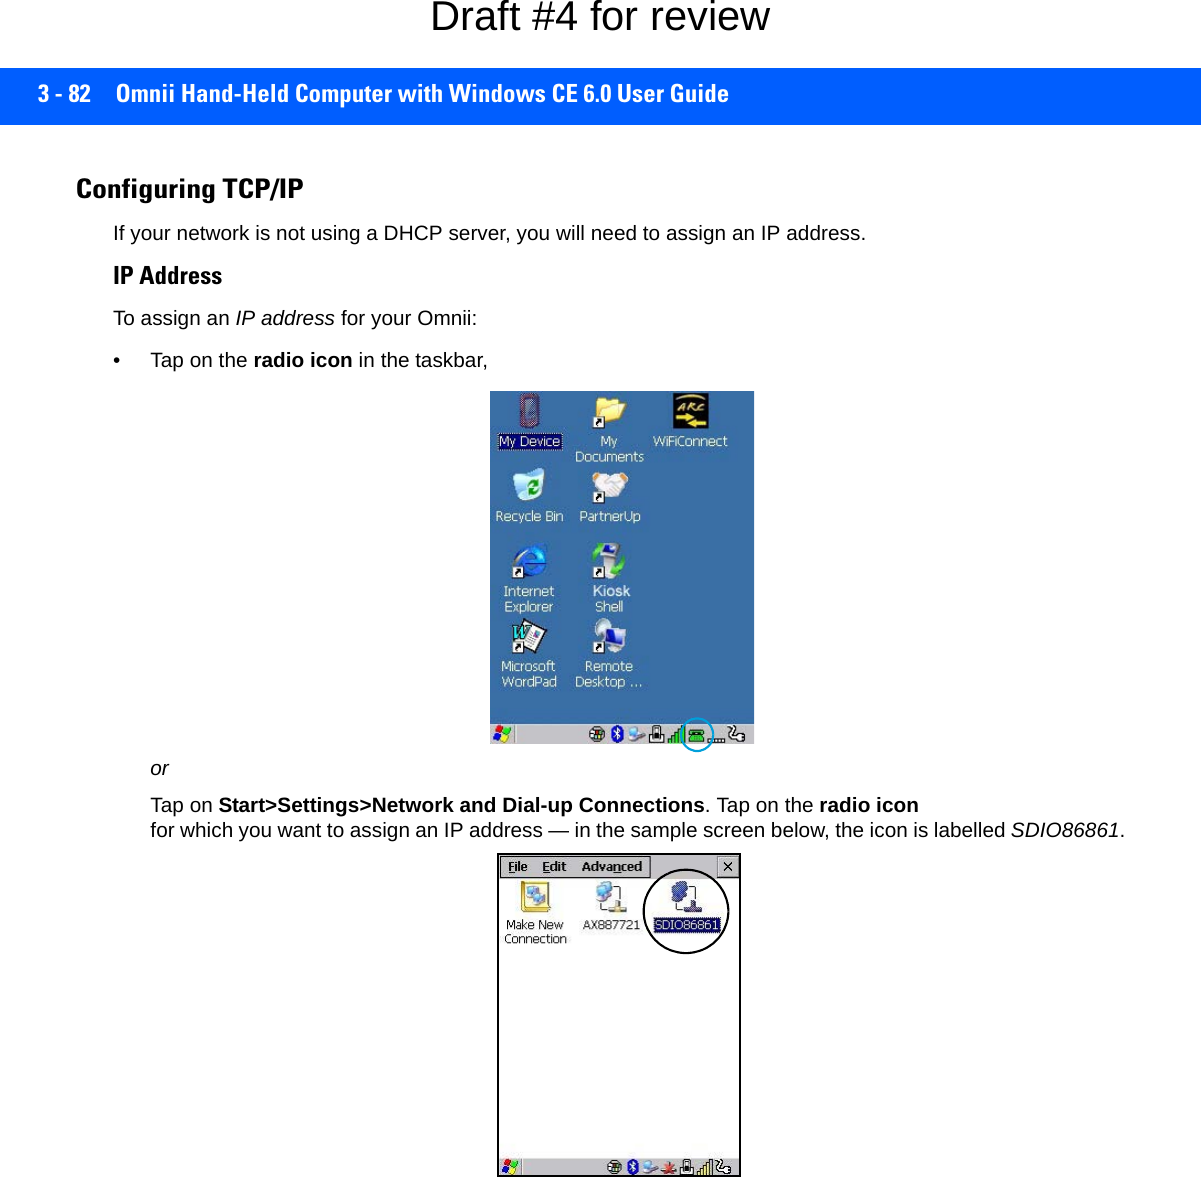
![Configuration 3 - 83The Wireless Statistics screen is displayed.• Tap on the IP Information tab.Figure 3-7SDIO86861 IP Information To define a static IP address:• Tap on the Configure button.• Tap on the radio button next to Specify an IP address to select it.• Type an IP, Subnet Mask and Default Gateway address in the appropriate fields. Press [Enter] to save your information.Name Server• In the SDIO86861 IP Information tab (see Figure 3-7 SDIO86861 IP Information on page 3-83), tap on the Configure button.• Tap on the Name Servers tab.NOTE When DHCP is enabled, tapping the Renew button forces the Omnii to renew or find a new IP address. This is useful if, for example, you are out of communication range for a longer period of time and your hand-held is dropped from the network.NOTE If DHCP is enabled, name server addresses are assigned automatically.Draft #4 for review](https://usermanual.wiki/Symbol-Technologies/RA1202.User-Manual-1of2/User-Guide-2406595-Page-143.png)
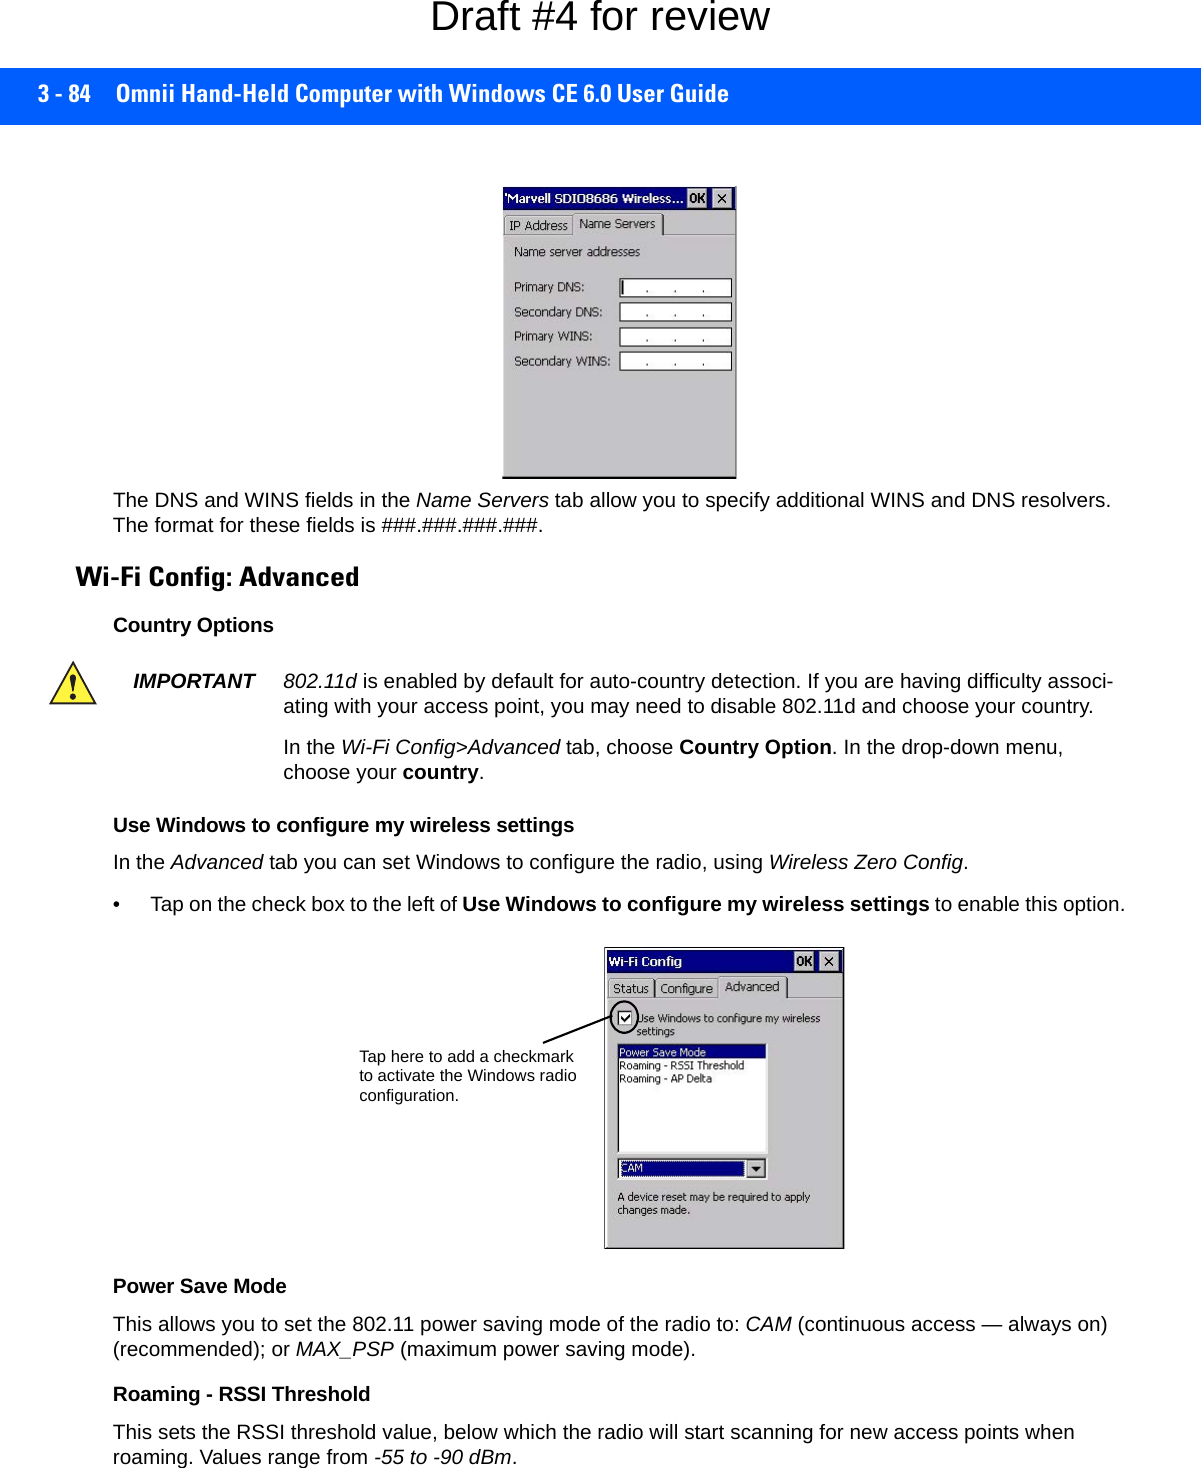
![Configuration 3 - 85Roaming - AP DeltaThis sets how much greater (in dBm) the RSSI of a new access point must be than the RSSI of the currently associated access point in order for the hand-held to initiate a roam. Values range from 5 to 30 dBm. Concluding the Wi-Fi ConfigurationIf you’ve made changes in the Advanced menus, you will need to warm reset your Omnii.• Choose Start>Shutdown>Warm Reset.• A dialog box is displayed letting you know that you will lose all unsaved data. Tap on OK. Once the reset is complete, if you checked the box next to Use Windows to configure my wireless settings, the Wireless Zero Config screen is displayed on the hand-held. Refer to Appendix H: Wireless Zero Config Settings for details.Monitoring the Network ConnectionThe radio signal icon in the taskbar indicates the strength of the communication link with an 802.11 access point. To access the radio signal icon:• Tap on the radio icon in the taskbar to display the wireless statistics dialog box.To access the radio signal icon using the keyboard:• Press the [Windows] key to display the Start Menu.• Highlight Shortcuts and then choose System Tray from the sub-menu.• Use the [LEFT] and [RIGHT] arrow keys to highlight the radio signal icon in the taskbar.• Press [Enter] to display the Wireless Statistics dialog box.WiFi Connect A.R.C.The WiFiConnectARC utility on the desktop provides a quick method to configure a device for use on a private network, primarily for use with Active Remote Configuration (A.R.C.). When you click on this icon, WiFiConnect A.R.C. configures the default WiFi interface. The WEP key is set to PsionPsion123. The SSID is set to Psion. The default interface becomes the active interface. Keep in mind that you must configure the access point and the hand-held(s) to use the same settings.Refer to the Active Remote Configuration (A.R.C.) Administrators Guide, PN 8000252, for details about updating devices on your network. This manual is available at:http://community.psion.com/knowledge/w/knowledgebase/1189.a-r-c-active-remote-configuration.aspxNOTE Moving in and out of the radio coverage area can have varying effects on a network session. At times, you may need to renew your connection by logging in again.Draft #4 for review](https://usermanual.wiki/Symbol-Technologies/RA1202.User-Manual-1of2/User-Guide-2406595-Page-145.png)
