TomTom 4CH6 PND (Personal Navigation Device) User Manual TomTom GO en GB 0908
TomTom International BV PND (Personal Navigation Device) TomTom GO en GB 0908
TomTom >
User manual

̱³Ì±³ÙÑ
ɸ¿¬Ž- ·² ¬¸» ¾±¨ïò
2
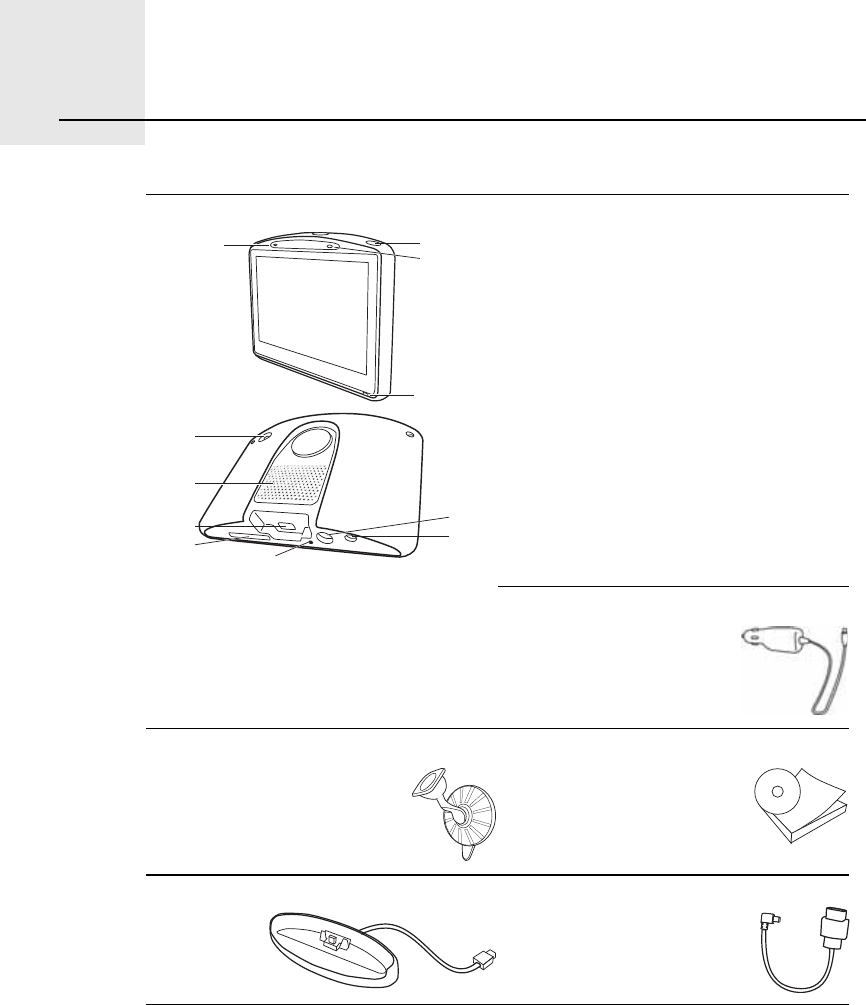
What s in the box
* In the TomTom GO x30 HD Traffic, this is replaced by the TomTom HD
Traffic Receiver.
¿Your TomTomGO
ßMicrophone
ÞCharging light
ÝOn/off button
ÜLight sensor
ÛReset button
ÚSpeaker
ÙMemory card slot (SD card not
included) for optional
additional maps
ØUSB connector
×TomTom connector / RDS-TMC
connector
ÖExternal antenna connector
ÕAudio out connector
¾Car charger*
½Windscreen holder ¼Documentation pack
»Home dock (GO 530, 730, 930) ºUSB cable (GO 630)
ß
Þ
Ý
Ü
Û
Ú
Ù
Ø
Ö
Õ
×
3
ײ½´«¼»¼ ©·¬¸ ̱³Ì±³ÙÑ ¨íðÌ
ײ½´«¼»¼ ©·¬¸ ̱³Ì±³ÙÑ çíð ¿²¼ çíðÌ
ײ½´«¼»¼ ©·¬¸ ̱³Ì±³ÙÑ ¨íð ØÜÌ®¿ºº·½
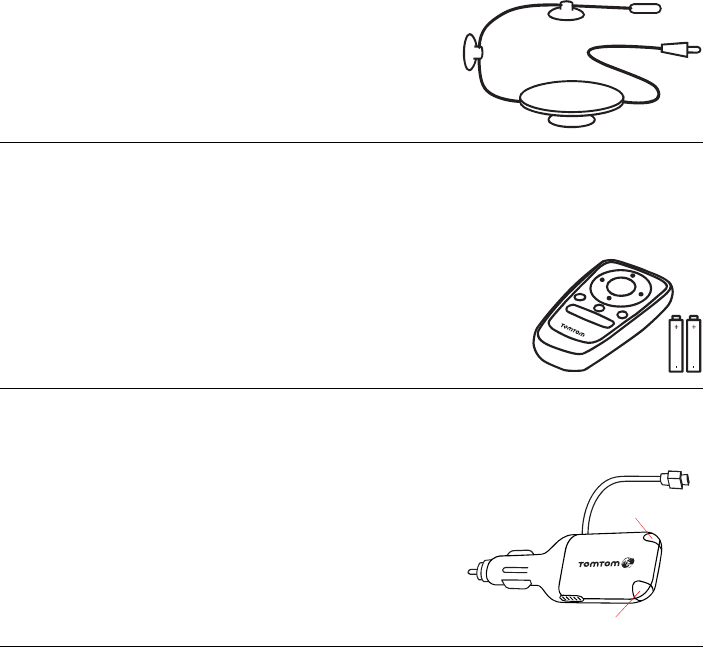
¹RDS-TMC Traffic Receiver
¸Remote control
·TomTom HD Traffic Receiver
ßPower indicator - Red light
ÞHD Traffic Receiver indicator - Blue light ß
Þ
Þ»º±®» §±« -¬¿®¬òòòîò
4
Before you start...
Í©·¬½¸·²¹ ±² ¿²¼ ±ºº
To switch your TomTomGO on or off, press and hold the On/Off button for 2
seconds. The first time you switch on, it may take a short while for your device
to start.
Ò±¬»æ ײ ®¿®» ½¿-»-ô §±«® ÙÑ ³¿§ ²±¬ -¬¿®¬ ½±®®»½¬´§ò ׺ ¬¸·- ¸¿°°»²-ô °®»-- ¬¸»
®»-»¬ ¾«¬¬±²ô ¬¸»² -©·¬½¸ ±² ¬¸» ¼»ª·½» ¿¹¿·²ò
Í»¬¬·²¹ «°
To set up your TomTomGO you need to answer a few questions by tapping
the screen.
׳°±®¬¿²¬: Take care to select the correct language, since the language you
choose will be used for all menus and written instructions.
Þ¿¬¬»®§ ²±¬»-
We recommend that you fully charge your TomTomGO the first time that you
connect it to your computer. It takes up to 2 hours to charge the battery
completely.
When you place your GO in the Home Dock or use the USB cable to connect
to your computer, you are asked if you wish to connect to the computer. If you
select Ò±, the device will switch off if you do not tap the screen for three
minutes. This happens so that the battery can recharge at a faster rate.
For information on connecting to your computer, see Ë-·²¹ ̱³Ì±³ ØÑÓÛ
on page 101.
Ò±¬»æ DZ«® ̱³Ì±³ÙÑ «-»- ¿ -³¿´´ ¿³±«²¬ ±º ¾¿¬¬»®§ °±©»® ¬± ®»³»³¾»®
¬¸» ´¿-¬ -½®»»² ¾»·²¹ -¸±©² ©¸»² ¬¸» ¼»ª·½» ·- -©·¬½¸»¼ ±ººò
׺ §±« ¼± ²±¬ ½¸¿®¹» §±«® ÙÑ º±® ¿ °®±´±²¹»¼ °»®·±¼ ±º ¬·³»ô ¬¸» ²»¨¬ ¬·³» §±«
-¬¿®¬ §±«® ÙÑ ·¬ ©·´´ -¸±© ¬¸» ¼»º¿«´¬ -¬¿®¬·²¹ -½®»»²ò ß´´ ±¬¸»® ¼»ª·½» -»¬¬·²¹-
©·´´ -¬·´´ ¾» ³¿·²¬¿·²»¼ò
׳°®±ª·²¹ ®»½»°¬·±²
If your TomTomGO takes longer than 5 minutes to find your current position,
make sure that the device is in an open space away from tall objects, such as
buildings or trees.

5
When you connect your TomTomGO to your computer, you can use
TomTom HOME to download information about GPS satellite positions during
the next 7 days. This helps your GO to find your position faster.
׳°±®¬¿²¬: Some vehicles have heat reflective shielding in the windscreen.
This may prevent your GO from locating your current position.
The TomTom External Antenna Kit (available for purchase as an accessory)
can help to improve reception.
É·²¼-½®»»² ¸±´¼»®
Use the windscreen holder to install your TomTomGO inside your car.
To attach the holder, press the suction cup firmly to the windscreen in your
car, in an area of the windscreen where the glass is flat.
Make sure that both the holder and your windscreen are clean and dry before
you attach the holder. Place the holder so that it does not interfere with your
view of the road.
ر³» ¼±½µ ñ ËÍÞ ½¿¾´»
The Home Dock or USB cable is used for charging your TomTomGO when it
is not in the car and for connecting your GO to your computer.
When connected to your computer, you can use TomTom HOME to manage
your GO. For information about TomTom HOME, see Ë-·²¹ ̱³Ì±³ ØÑÓÛ
on page 101.
Ì¿µ» ½¿®» ±º §±«® ̱³Ì±³ÙÑ
Never leave your TomTomGO or accessories on view when you leave the car
or they may become an easy target for thieves.
You can set a password for your TomTomGO which must be entered every
time you start your GO. For more information, see Ë-·²¹ ̱³Ì±³ ØÑÓÛ on
page 101.
It is important to take care of your GO.
!Your GO is not designed for use in extreme temperatures and any such
exposure may cause permanent damage.
!Do not open the casing of your GO under any circumstances. Doing so may
be dangerous and will invalidate the warranty.
!Wipe or dry the screen of your GO using a soft cloth. Do not use any liquid
cleaners.
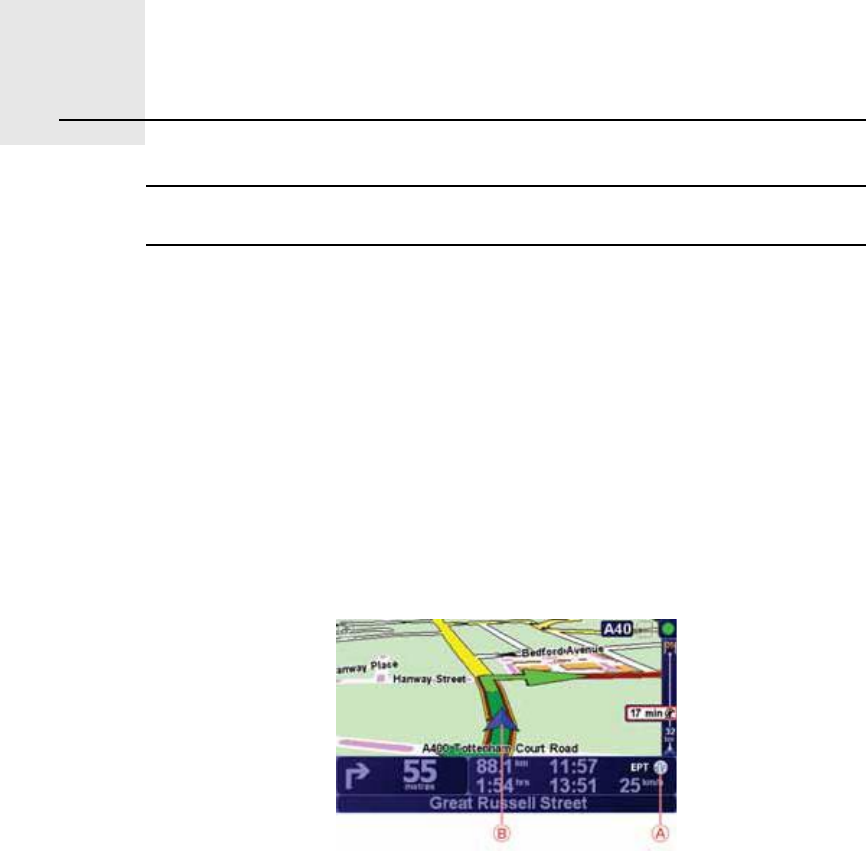
Ü®·ª·²¹ Ê·»©íò
6
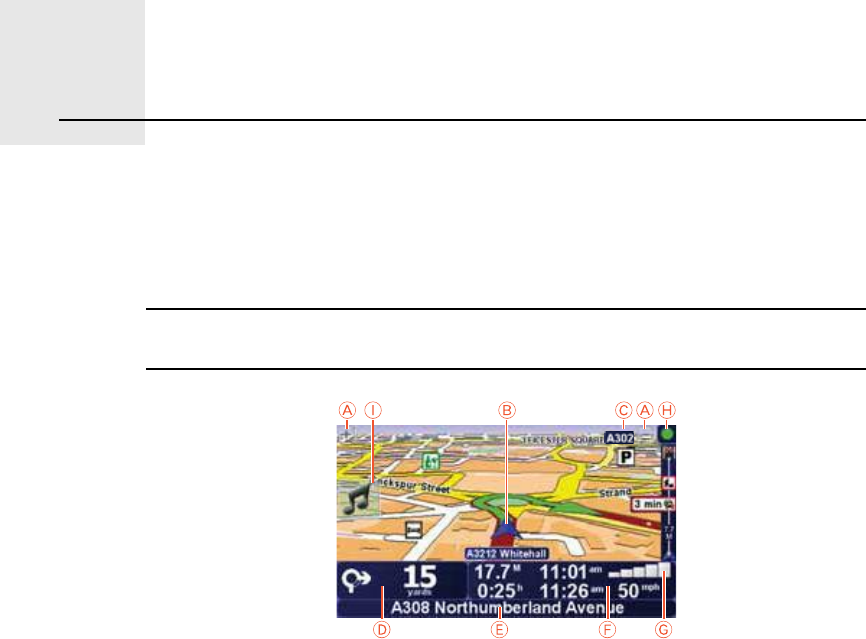
Driving View When your TomTomGO starts, you are shown the Driving View along with
detailed information about your current location.
Tap the centre of the screen at any time to open the Main Menu.
Ò±¬»æ ̸» Ü®·ª·²¹ Ê·»© ·- -¸±©² ·² ¾´¿½µ ¿²¼ ©¸·¬» «²¬·´ §±«® ÙÑ ´±½¿¬»- §±«®
½«®®»²¬ °±-·¬·±²ò
ßTap + and - to zoom in and out.
ÞYour current position.
ÝThe name of the next major road or road sign information, if applicable.
ÜNavigation instruction for the road ahead.
Tap this area to repeat the last spoken instruction and to change the
volume.
ÛThe name of the next street to turn onto.
ÚInformation about your journey such as journey time, remaining distance
and arrival time.
To select what will be shown, tap ͬ¿¬«- ¾¿® °®»º»®»²½»- in the Ю»º»®»²½»-
menu.
ÙGPS signal strength.
ØTraffic bar
To set up Traffic information, tap the Traffic bar to open the Traffic menu or
tap TomTom Ì®¿ºº·½ in the Main Menu.
×Quick menu - For more information, refer to the full manual.
Û²¸¿²½»¼ б-·¬·±²·²¹ Ì»½¸²±´±¹§ìò
7
Enhanced Positioning Technology Ò±¬»æ Û²¸¿²½»¼ б-·¬·±²·²¹ Ì»½¸²±´±¹§ ·- ¿ª¿·´¿¾´» ±² ¬¸» ̱³Ì±³ÙÑ çíð
¿²¼ çíðÌò
Enhanced Positioning Technology or EPT estimates your location when GPS
reception is poor, such as when you drive between tall buildings.
Your GO uses positioning sensors to monitor your acceleration and direction
and then estimates your current location.
EPT only helps your GO to estimate your location. Calculating your precise
location is only possible when your GO receives a strong GPS signal.
When your GO is using EPT to estimate your location, the EPT icon is shown
on the status bar.
Your GO calibrates EPT automatically. If calibration is not complete when your
GO loses GPS reception, EPT cannot be used and the screen is shown in grey,
for example, when there is no GPS reception at the beginning of a journey.
ßEPT icon.
ÞYour current position.
Ý¿´·¾®¿¬·±²
Calibration is done automatically and requires no interaction from you.
However, it is useful to have basic understanding of the calibration procedure.
Your TomTomGO resets the positioning sensors each time the device is
switched on. To help improve accuracy in estimating your location, your GO
calibrates the sensors throughout your journey.
The following conditions are required for successful calibration:
!Your GO is receiving a strong GPS signal.
!The car has been stationary for at least 5 seconds and then travels along a
straight and level section of road for at least one minute.
Ó¿µ·²¹ §±«® º·®-¬ ¶±«®²»§ëò
8
Making your first journey Planning a route with your TomTomGO is easy. To plan your first route, follow
the steps below.
׳°±®¬¿²¬: You should always plan your journey before you start driving. It is
dangerous to plan a route while driving.
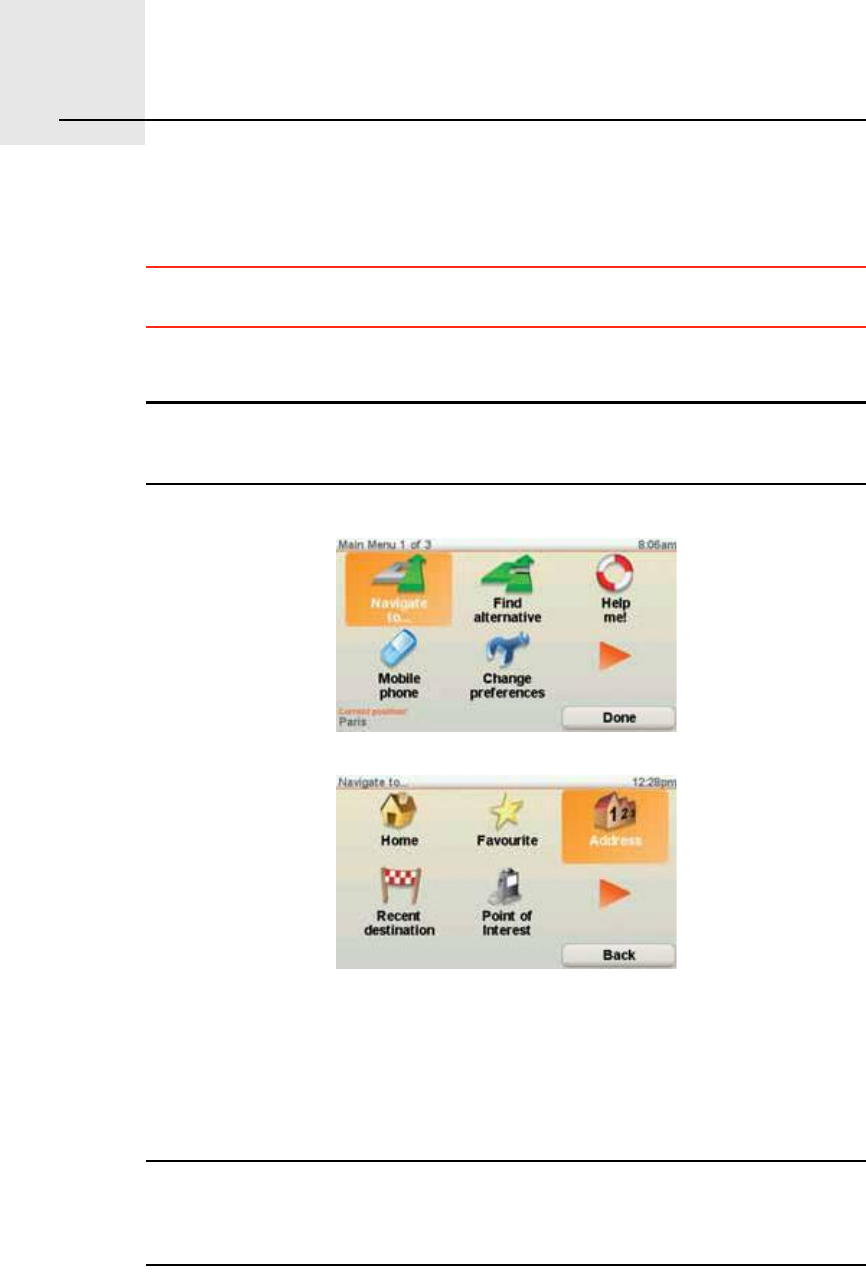
1.Tap the screen to bring up the Main Menu.
Ò±¬»æ ̸» ¾«¬¬±²- ±² §±«® ÙÑ ¿®» -¸±©² ·² º«´´ ½±´±«® «²´»-- ¿ ¾«¬¬±² ·-
½«®®»²¬´§ «²¿ª¿·´¿¾´»ò Ú±® »¨¿³°´»ô ¬¸» ¾«¬¬±² ²¿³»¼ Ú·²¼ ¿´¬»®²¿¬·ª»òòò ·²
¬¸» Ó¿·² Ó»²« ·- ²±¬ ¿ª¿·´¿¾´» «²¬·´ §±« ¸¿ª» °´¿²²»¼ ¿ ®±«¬»ò
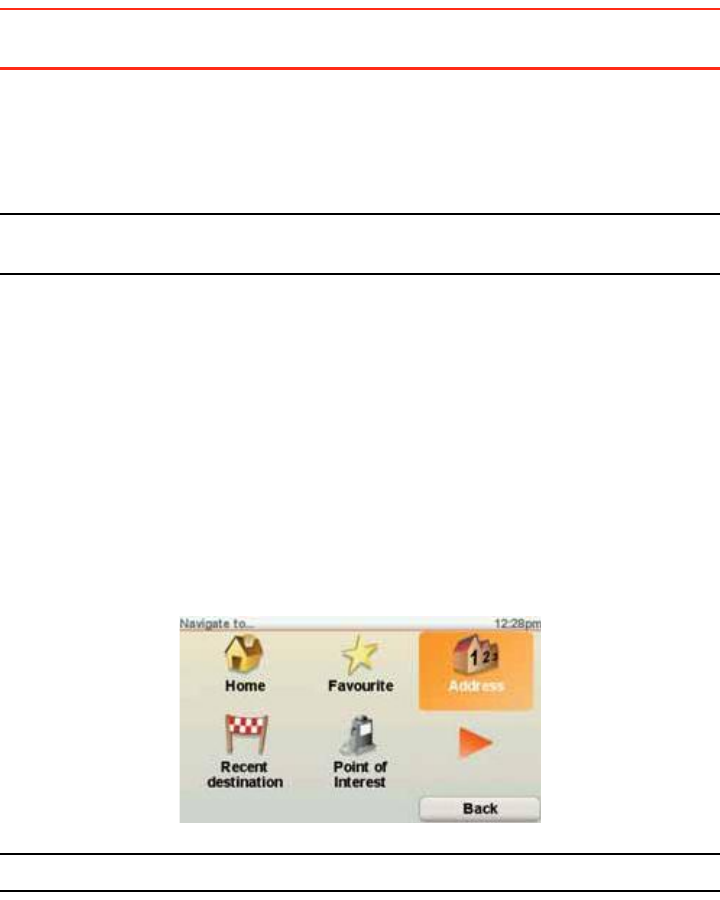
2.Tap Ò¿ª·¹¿¬» ¬±òòò
3.Tap ß¼¼®»--.
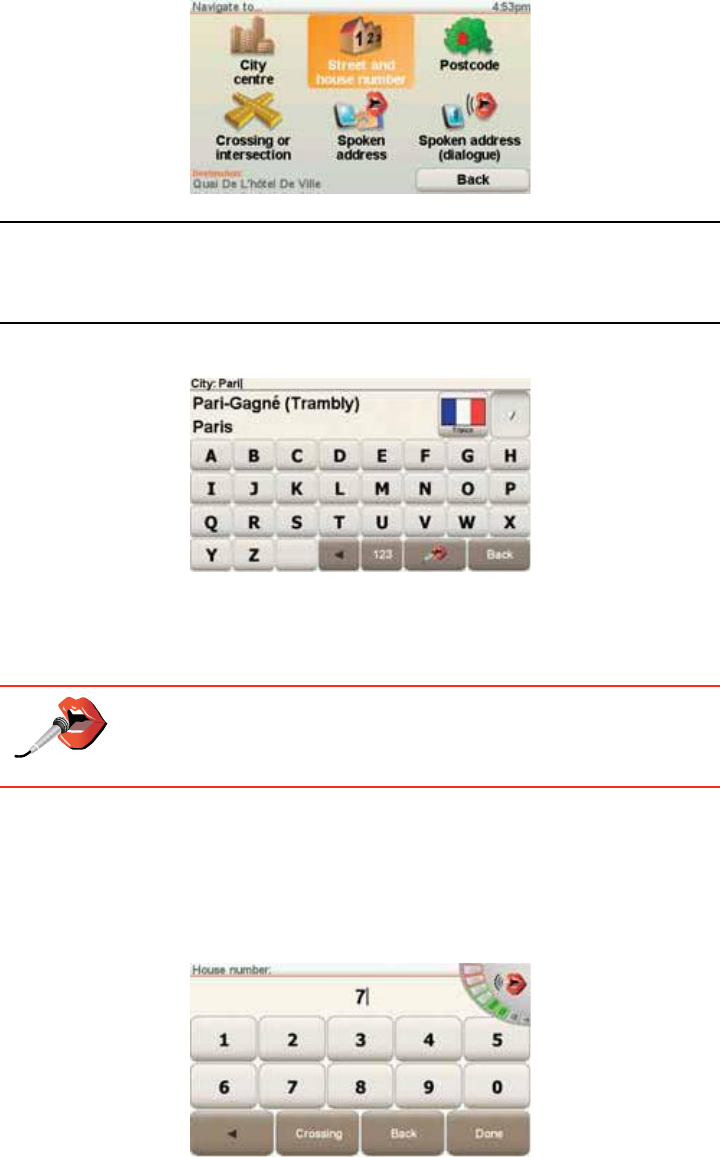
When you enter an address, you can choose from the following options:
!Ý·¬§ ½»²¬®» - tap this button to set your destination as the centre of a city
or town.
!ͬ®»»¬ ¿²¼ ¸±«-» ²«³¾»® - tap this button to set an exact address as your
destination.
!б-¬½±¼» - tap this button to enter a postcode as your destination.
Ò±¬»æ DZ« ½¿² »²¬»® ¿ °±-¬½±¼» º±® ¿²§ ½±«²¬®§ò ײ ¬¸» ËÕ ¿²¼ ¬¸»
Ò»¬¸»®´¿²¼-ô °±-¬½±¼»- ¿®» ¼»¬¿·´»¼ »²±«¹¸ ¬± ·¼»²¬·º§ ¿ ¸±«-» ±² ¬¸»·® ±©²ò
ײ ±¬¸»® ½±«²¬®·»- §±« ½¿² »²¬»® ¿ °±-¬½±¼» ¬± ·¼»²¬·º§ ¿ ¬±©² ±® ¿®»¿ò DZ« ©·´´
¬¸»² ¸¿ª» ¬± »²¬»® ¿ -¬®»»¬ ¿²¼ ¸±«-» ²«³¾»®ò
9
!Ý®±--·²¹ ±® ·²¬»®-»½¬·±² - tap this button to set your destination as the
point where two streets meet.
!Í°±µ»² ¿¼¼®»-- - tap this button to set your destination by announcing
the address to your GO. For more information, see ʱ·½» ¿¼¼®»-- ·²°«¬
on page 21.
For your first journey, we will enter an exact address.
4.Tap ͬ®»»¬ ¿²¼ ¸±«-» ²«³¾»®ò
Ò±¬»æ ɸ»² °´¿²²·²¹ ¿ ¬®·° º±® ¬¸» º·®-¬ ¬·³» §±«® ÙÑ ¿-µ- §±« ¬± ½¸±±-» ¿
½±«²¬®§ò DZ«® ½¸±·½» ·- -¿ª»¼ ¿²¼ «-»¼ º±® ¿´´ ®±«¬»- §±« °´¿²ò
DZ« ½¿² ½¸¿²¹» ¬¸·- -»¬¬·²¹ ¿¬ ¿²§ ¬·³» ¾§ ¬¿°°·²¹ ¬¸» ½±«²¬®§ º´¿¹ò
5.Start to type the name of the town where you want to go.
As you type, the names of the towns that match what you have typed are
shown. When your destination appears in the list, tap the name of the town
to set the destination.
Ì·°: Instead of typing the name, tap this button to say the address
by speaking to your GO.
For more information, see ʱ·½» ¿¼¼®»-- ·²°«¬ on page 21
6.Start to type the name of the street and select it when it is shown.
As with the name of the town, the names of the streets that match what you
have typed are shown. When your destination appears in the list, tap the
name of the street to set the destination.
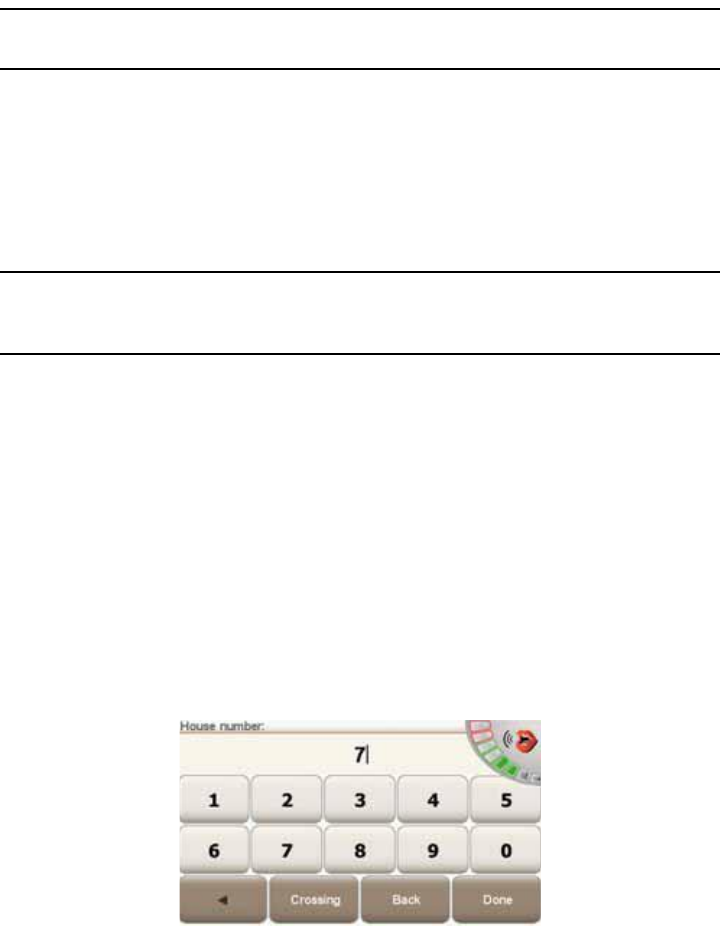
7.Now enter the house number of your destination and then tap ܱ²».
8.Your GO asks if you need to arrive at a particular time. For this exercise, tap
ÒÑ.
10
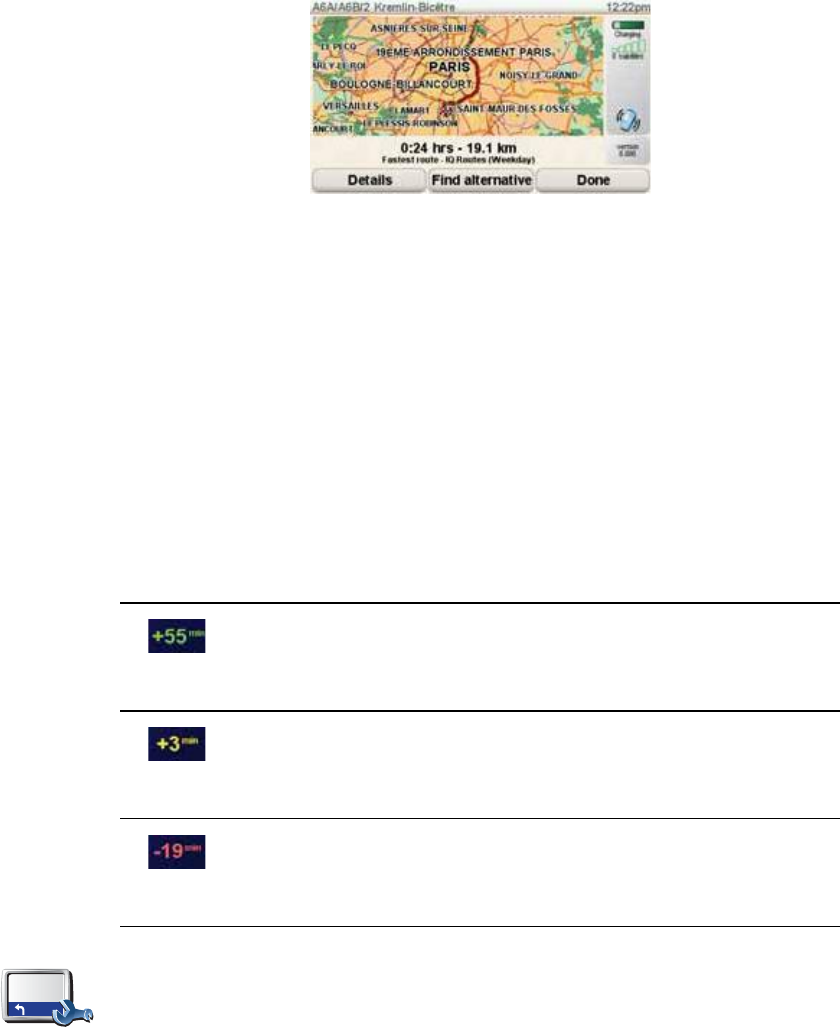
The route is calculated by your GO. IQ RoutesTM is used to plan the best
possible route, using historical information about traffic speed on the roads.
9.When the route has been calculated, tap ܱ²».
Your GO will immediately begin to guide you to your destination, using both
spoken instructions and on-screen directions.
ß®®·ª¿´ ¬·³»-
When you plan a route, your TomTomGO asks you if you need to arrive at a
particular time.
Tap ÇÛÍ to enter a preferred arrival time.
Your GO calculates your arrival time and shows you whether you will arrive
on time.
You can also use this information to work out when you need to leave. If your
GO shows that you will arrive 30 minutes early, you can wait and leave in 30
minutes time, rather than arrive early.
Your arrival time is constantly recalculated during your journey. The status bar
shows whether you will arrive on time or if you are going to be late, as shown
below:
You will arrive 55 minutes before the arrival time you entered.
If the estimated arrival time is more than five minutes before
the time you entered, it is shown in green.
You will arrive 3 minutes before the arrival time you entered.
If the estimated arrival time is less than 5 minutes before the
time you entered, it is shown in yellow.
You will arrive 19 minutes late.
If the estimated arrival time is later than the time you entered,
it is shown in red.
ͬ¿¬«- ¾¿®
°®»º»®»²½»-
Tap ͬ¿¬«- ¾¿® °®»º»®»²½»- in the Preferences menu, to enable or disable
arrival time notifications.
Select the required options on the first menu screen and then tap ܱ²».
To enable arrival time notifications, select ͸±© ´»»©¿§ ¬± ¿®®·ª¿´ ¬·³».
To disable arrival time notifications, unselect ͸±© ´»»©¿§ ¬± ¿®®·ª¿´ ¬·³».
11
ɸ¿¬ ¿®» ¬¸» ±¬¸»® ²¿ª·¹¿¬·±² ±°¬·±²-á
When you tap Ò¿ª·¹¿¬» ¬±òòò, you can set your destination in many ways, not
just by entering the address. The other options are listed below:
ر³»
Tap this button to navigate to your Home location.
You will probably use this button more than any other.
For information about setting your Home location, see ݸ¿²¹» ر³»
´±½¿¬·±² on page 51.
Ú¿ª±«®·¬»
Tap this button to select a Favourite as your destination.
For more information about Favourites, see Ú¿ª±«®·¬»- on page 31.
ß¼¼®»--
Tap this button to enter an address as your destination.
λ½»²¬
¼»-¬·²¿¬·±²
Tap this button to select your destination from a list of places you have
recently used as destinations.
б·²¬ ±º
ײ¬»®»-¬
Tap this button to navigate to a Point of Interest (POI).
For more information about POIs and navigating to a POI, see б·²¬- ±º
ײ¬»®»-¬ on page 37.
Ó§ ´±½¿¬·±²
Tap this button to select your GPS position, as your destination.
For more information about GPS, see Ù´±¾¿´ б-·¬·±²·²¹ ͧ-¬»³ øÙÐÍ÷ on
page 100.
б·²¬ ±² ³¿°
Tap this button to select a point on the map as your destination using the
map browser.
For more information about the map browser, see Ü®·ª·²¹ Ê·»© on page 6.
Ô¿¬·¬«¼»
Ô±²¹·¬«¼»
Tap this button to enter a destination using latitude and longitude values.
̱³Ì±³
Þ«¼¼§
Tap this button to navigate to the current position of a TomTom Buddy.
Don t forget that the Buddy may move before you reach him.
For more information about TomTom Buddies, see ̱³Ì±³ Í»®ª·½»- on
page 65.
12
Í°±µ»² ¿¼¼®»--
Instead of typing addresses, you can now enter an address by speaking to
your GO.
Ò±¬»æ ̸» -°»»½¸ ®»½±¹²·¬·±² º»¿¬«®» ·- ½«®®»²¬´§ ±²´§ ¿ª¿·´¿¾´» º±® »²¬»®·²¹
¿¼¼®»--»- ¿²¼ º±® ®»-°±²¼·²¹ ¬± -°»½·¿´ ²±¬·º·½¿¬·±²-ò
д¿²²·²¹ ¿ ®±«¬» ·² ¿¼ª¿²½»
You can also use your GO to plan journeys in advance by selecting both your
starting point and your destination. You could, for example, do the following:
!Find out how long a journey is going to take before you start.
!Check the route of a journey you are planning.
!Check a route for someone who is coming to visit you, so that you can
explain the route to them.
To plan a route in advance, follow these steps:
1.Tap the screen to bring up the main menu.
2.Tap the arrow button to move to the next menu screen and tap Ю»°¿®»
®±«¬».
3.Select the starting point for your journey in the same way that you would
select your destination.
4.Set the destination for your journey.
5.Choose the type of route that should be planned.
!Ú¿-¬»-¬ ®±«¬» - the route which takes the least time.
!͸±®¬»-¬ ®±«¬» - the shortest distance between the locations you set. This
may not be the quickest route, especially if the shortest route is through
a town or city.
б-·¬·±² ±º
´¿-¬ -¬±°
Tap this button to select your last recorded position, as your destination.
For more information about the GPS, see Ù´±¾¿´ б-·¬·±²·²¹ ͧ-¬»³ øÙÐÍ÷
on page 100.
Í°±µ»²
¿¼¼®»--
ø¼·¿´±¹«»÷
In the Main menu tap Ò¿ª·¹¿¬» ¬±òòò, then tap ß¼¼®»--, then tap Í°±µ»²
¿¼¼®»-- or Í°±µ»² ¿¼¼®»-- ø¼·¿´±¹«»÷ and speak when prompted.
For more information, see ʱ·½» ¿¼¼®»-- ·²°«¬ on page 21
Í°±µ»²
¿¼¼®»--
Ю»°¿®» ®±«¬»
13
!ߪ±·¼ ³±¬±®©¿§- - a route which avoids motorways.
!É¿´µ·²¹ ®±«¬» - a route designed for making the journey on foot.
!Þ·½§½´» ®±«¬» - a route designed for making the journey on a bicycle.
!Ô·³·¬»¼ -°»»¼ - a route for a vehicle which can only be driven at a limited
speed. You have to specify the maximum speed.
6.Your TomTomGO plans the route between the two locations you selected.
Ó±®» ·²º±®³¿¬·±² ¿¾±«¬ ¿ ®±«¬»
You can access these options for the route you last planned, by tapping Ê·»©
®±«¬» in the Main Menu.
To find out about your route in detail, tap the Ü»¬¿·´- button on the route
summary screen.
You can then select from the following options:
Þ®±©-» ¿-
¬»¨¬
Tap this button for a list of all the turn instructions on the route.
This is very useful if you need to explain a route to someone else.
Þ®±©-» ¿-
·³¿¹»-
Tap this button to see each turn in the journey. Tap the right and left arrows
to move forwards and backwards through the journey.
Tap the screen to turn off the 3D display and view the map from above.
Þ®±©-» ³¿°
±º ®±«¬»
Tap this button to see an overview of the route using the map browser.
For more information about the map browser, see Ü®·ª·²¹ Ê·»© on page 6.
͸±© ®±«¬»
-«³³¿®§
Tap this button to open the route summary screen.
Ú·²¼·²¹ ¿´¬»®²¿¬·ª» ®±«¬»-êò
14
Finding alternative routes Once you have planned a route, you may want to change something about the
route, without changing your destination.
ɸ§ ½¸¿²¹» ¬¸» ®±«¬»á
Maybe for one of these reasons:
!You can see a roadblock or a line of traffic ahead.
!You want to travel via a particular location, to pick someone up, stop for
lunch or fill up with petrol.
!You want to avoid a difficult junction or a road you don t like.
Ú·²¼ ¿´¬»®²¿ó
¬·ª»òòò
Tap Ú·²¼ ¿´¬»®²¿¬·ª»òòò in the Main Menu to change the route that is
currently planned.
Then tap one of the options below.
Ý¿´½«´¿¬»
¿´¬»®²¿¬·ª»
Tap this button to calculate an alternative to the route already planned.
Your GO will look for another route from your current location to your
destination.
If you decide you would prefer to use the original route after all, tap
λ½¿´½«´¿¬» ±®·¹·²¿´.
ɸ§ ©±«´¼ × ²»»¼ ¬± ¼± ¬¸·-á
Apart from the roads near your position and near your destination, the new
route will use totally different roads to reach your destination. This is an
easy way of calculating a totally different route.
ߪ±·¼
®±¿¼¾´±½µ
Tap this button if you can see a roadblock or a line of traffic ahead. You then
have to choose how much of the route ahead you want to avoid.
Choose from the different options: 100m, 500m, 2000m, 5000m. Your GO
will recalculate your route avoiding the section of the route for the distance
you selected.
Don t forget that once a new route is calculated, you may have to turn off
the road you are on very soon.
If the roadblock suddenly clears, tap λ½¿´½«´¿¬» ±®·¹·²¿´ to return to your
original route.
15
Ì®¿ª»´ ª·¿òòò
Tap this button to change your route so that it passes a particular location,
perhaps to pick someone up on the way.
You choose the location you want to pass in the same way as you choose a
destination. So you can select from all the same options: for example,
ß¼¼®»--,Ú¿ª±«®·¬»,б·²¬ ±º ײ¬»®»-¬ and б·²¬ ±² ³¿°.
Your GO will calculate a new route to your destination that passes the
location you chose.
Using this button, you can only travel via one location. If you want to pass
more than one, use an Itinerary. For more information, see ׬·²»®¿®§
°´¿²²·²¹ on page 42.
λ½¿´½«´¿¬»
±®·¹·²¿´
Tap this button to return to the original route without deviations to avoid
roadblocks or travelling via particular locations.
ߪ±·¼ °¿®¬ ±º
®±«¬»
Tap this button to avoid a part of the route. Use this button if you see that
your route includes a road or junction you don t like, or which is well-
known for traffic problems.
You then choose the road you want to avoid from a list of the roads on your
route.
Ó·²·³·-»
¬®¿ºº·½ ¼»´¿§-
Tap this button to recalculate your route so that it avoids traffic problems as
much as possible. Your GO will check if there are any traffic problems on
your route and work out the best route to avoid the problems.
For more information about using TomTom Traffic, see ̱³Ì±³ Ì®¿ºº·½ on
page 75.

ͱ«²¼- ¿²¼ ª±·½»-éò
16
Sounds and voices The sound on your TomTomGO is used for features such as:
!Spoken instructions
!Hands-free calls
!Warnings
!Music
For information on making hands-free calls on your GO, see Ø¿²¼-󺮻»
½¿´´·²¹ on page 45.
For information on playing music on your GO, see Ó«-·½ ¿²¼ ³»¼·¿ on page
25
ر© ¼± × ½¸¿²¹» ¬¸» ª±´«³» ´»ª»´á
You can change the volume in three ways:
!Tap the bottom left hand area of the Driving View. The last spoken
instruction is repeated and the volume level is shown.
Move the volume slider to adjust the volume.
!In the Main Menu, tap ݸ¿²¹» °®»º»®»²½»-, then tap ʱ´«³» °®»º»®»²½»-.
Tap Ì»-¬ to check your changes.
!You can set your GO to change the volume automatically depending on
how noisy it is in the car.
ݸ¿²¹·²¹ ¬¸» ª±´«³» ¿«¬±³¿¬·½¿´´§
ʱ´«³»
°®»º»®»²½»-
Your TomTomGO can change the volume automatically.
1.In the Main Menu, tap ݸ¿²¹» °®»º»®»²½»-.
2.Tap ʱ´«³» °®»º»®»²½»-.
3.Select Ô·²µ ª±´«³» ¬± ²±·-» ´»ª»´.
4.Tap ܱ²».

17
Í»´»½¬·²¹ ¿ ª±·½»
ر© ¼± ½±³°«¬»® ª±·½»- ©±®µá
Your TomTomGO makes use of text-to-speech technology to generate
computer voices. A text-to-speech program converts written text, for example
an instruction like "Turn right#, into the sound of a human voice.
The text-to-speech program looks at the whole sentence to make sure that the
sound you hear is as close to the real thing as possible. The program is also
able to recognise and quite accurately pronounce foreign place and street
names. For example, the English voice can read French street names.
Ò±¬»æ ׺ §±« -»´»½¬ ¿ Ø«³¿² ª±·½»ô ¬¸·- ©·´´ ±²´§ ¾» ¿¾´» ¬± ¿²²±«²½»
½±³³¿²¼-ô ¾«¬ ²±¬ -¬®»»¬ ²¿³»-ò ׺ §±« ©±«´¼ ´·µ» -¬®»»¬ ²¿³»- ¬± ¾»
¿²²±«²½»¼ô §±« ©·´´ ²»»¼ ¬± -»´»½¬ ¿ ½±³°«¬»® ª±·½»ò
ײ¬»®²¿´ ¿²¼ »¨¬»®²¿´ -°»¿µ»®-
Your TomTomGO contains a high quality speaker. This is used to play all the
sounds on your GO unless you connect to external speakers.
You can connect external speakers to your GO in the following ways:
!Using an audio cable.
Ò±¬»æ ׺ §±«® ½¿® -¬»®»± ¸¿- ¿ ´·²»ó·² ½±²²»½¬±®ô §±« ½¿² °´¿§ -±«²¼ º®±³ §±«®
ÙÑ ¬¸®±«¹¸ §±«® ½¿® -°»¿µ»®-ò
!Connecting a Bluetooth® Hi-Fi headset or speakers.
!Tuning the FM Transmitter in your GO to use your car radio speakers.
Ò±¬»æ ̸» ÚÓ Ì®¿²-³·¬¬»® ·- ¿ª¿·´¿¾´» ·² ¬¸» ÙÑ ëíðô éíð ¿²¼ çíðò
ÚÓ ¬®¿²-³·¬¬»®
There is an FM Transmitter inside the GO 530, 730, 930 that works like a radio
station. This means you can hear the instructions made by your GO and play
your mp3 songs through your car radio speakers.
ʱ·½»
°®»º»®»²½»-
To change the voice being used by your TomTomGO, tap ʱ·½»
°®»º»®»²½»- in the Preferences menu, then tap ݸ¿²¹» ª±·½». Select a voice
from the list.
Your TomTomGO has two different kinds of voices:
!Computer voices
These are generated by your GO. They provide spoken instructions
while you are driving and can pronounce street names and announce
messages, traffic reports, weather reports, tips and tutorials.
!Human voices
These are recorded by an actor.
Ò±¬»æ Ø«³¿² ª±·½»- ±²´§ °®±ª·¼» -°±µ»² ·²-¬®«½¬·±²-ò

18
Í»¬¬·²¹ «°
!In the Main Menu tap ݸ¿²¹» °®»º»®»²½»-, then tap Í°»¿µ»® °®»º»®»²½»-.
!Switch on your car radio.
!Tune your car radio to a frequency that is not being used by a radio station.
!Tap Change and set the frequency on your GO to use the same frequency
as your car radio.
If you drive into an area where a radio station transmits on the same
frequency you are using for the FM Transmitter, you may have to use
another frequency.
Ò±¬»æ ̸» ÚÓ Ì®¿²-³·¬¬»® ·- ¿ª¿·´¿¾´» ·² ¬¸» ÙÑ ëíðô éíð ¿²¼ çíðò
Ë-·²¹ ³±®» ¬¸¿² ±²» -°»¿µ»®
You can select different speakers to be used for specific events, such as using
the internal speaker for TomTomGO instructions and external speakers for
hearing handsfree phone calls and listening to music.
!Internal speaker
!Bluetooth Hi-Fi device
!Line-out (audio cable)
!FM to your car radio
Ò±¬»æ ̸» ÚÓ Ì®¿²-³·¬¬»® ·- ¿ª¿·´¿¾´» ·² ¬¸» ÙÑ ëíðô éíð ¿²¼ çíðò
×- ·¬ ¼·ºº·½«´¬ ¬± ¸»¿® -°±µ»² ·²-¬®«½¬·±²- ©¸»² ³«-·½ ·- °´¿§·²¹á
When you choose to use a Bluetooth® Hi-Fi device for music and spoken
instructions, you are asked if you want to pause music when spoken
instructions are announced. By default, music is always paused for spoken
instructions.
When you receive a hands-free phonecall, music is always paused and spoken
instructions are not given.
For information about making hands-free calls on your GO, see Ø¿²¼-󺮻»
½¿´´·²¹ on page 45.
Ë-·²¹ ¬¸» ¿«¼·± ½¿¾´»
To play sound through your car stereo or other external speaker using an
audio cable, do the following:
1.Plug the audio cable into the audio out connector on your GO.
2.Plug the audio cable into the line in connector on your car stereo or other
external speaker.
Ò±¬»æ Ò±¬ ¿´´ ½¿® -¬»®»±- ¸¿ª» ¿ ´·²» ·² ½±²²»½¬±®ò ݸ»½µ ¬¸» ³¿²«¿´ º±® §±«®
½¿® -¬»®»± º±® -°»½·º·½ ·²º±®³¿¬·±²ò
3.If you are using your car stereo, select line in connector on your car stereo
as the input source.
4.On your GO, tap Í°»¿µ»® °®»º»®»²½»- in the Preferences menu.

19
5.Select the speaker you want your GO to use for announcing instructions.
!ײ¬»®²¿´ -°»¿µ»®
!Þ´«»¬±±¬¸ Ø·óÚ· ¼»ª·½»
!Ô·²»ó±«¬ ø¿«¼·± ½¿¾´»÷
!ÚÓ ¬± §±«® ½¿® ®¿¼·±
6.Select the speaker you want your GO to use for playing music.
!ײ¬»®²¿´ -°»¿µ»®
!Þ´«»¬±±¬¸ Ø·óÚ· ¼»ª·½»
!Ô·²»ó±«¬ ø¿«¼·± ½¿¾´»÷
!ÚÓ ¬± §±«® ½¿® ®¿¼·±
Ò±¬»æ ̸» ÚÓ Ì®¿²-³·¬¬»® ·- ¿ª¿·´¿¾´» ·² ¬¸» ÙÑ ëíðô éíð ¿²¼ çíðò
7.Tap ܱ²».
8.Your GO asks you whether you want to use an external Bluetooth® Hi-Fi
speaker. Tap ÒÑ.
Your GO will confirm that when the device is connected, the sound you have
selected will be played through the audio cable.
Ò±¬»æ DZ« ½¿²²±¬ ´·-¬»² ¬± §±«® ½¿® -¬»®»± ¿²¼ «-» ¬¸» ¿«¼·± ½¿¾´» ¬± °´¿§
-±«²¼ º®±³ §±«® ÙÑ ±² ¬¸» ½¿® -¬»®»± ¿¬ ¬¸» -¿³» ¬·³»ò
For information about listening to music using your GO, see Ó«-·½ ¿²¼ ³»¼·¿
on page 25.
Ë-·²¹ Þ´«»¬±±¬¸r Ø·óÚ· -°»¿µ»®-
Your GO can play sound through Bluetooth® Hi-Fi speakers, such as a
Bluetooth® Hi-Fi headset, or a car stereo which uses Bluetooth®.
To play sound over Bluetooth® Hi-Fi speakers, do the following:
1.Tap Í°»¿µ»® °®»º»®»²½»- in the Preferences menu.
2.Select the speaker you want your GO to use for announcing instructions.
!Internal speaker
!Þ´«»¬±±¬¸ Ø·óÚ· ¼»ª·½»
!Ô·²»ó±«¬ ø¿«¼·± ½¿¾´»÷
!ÚÓ ¬± §±«® ½¿® ®¿¼·±
3.Select the speaker you want your GO to use for playing music.
!ײ¬»®²¿´ -°»¿µ»®
Í°»¿µ»®
°®»º»®»²½»-
Tap this button to change the speaker settings.
Í°»¿µ»®
°®»º»®»²½»-
Tap this button to change the speaker settings.

20
!Þ´«»¬±±¬¸ Ø·óÚ· ¼»ª·½»
!Ô·²»ó±«¬ ø¿«¼·± ½¿¾´»÷
!ÚÓ ¬± §±«® ½¿® ®¿¼·±
Ò±¬»æ ̸» ÚÓ Ì®¿²-³·¬¬»® ·- ¿ª¿·´¿¾´» ·² ¬¸» ÙÑ ëíðô éíð ¿²¼ çíðò
4.Tap ܱ²».
5.Your GO asks you to confirm that you want to use an external Bluetooth®
Hi-Fi speaker. Tap ÇÛÍ.
Your GO will start searching for Bluetooth® Hi-Fi devices.
6.Select your Bluetooth® Hi-Fi device from the list of devices found by your
GO.
Your GO will try to establish a Bluetooth® connection with your device.
Your device may require you to enter a password on your GO before a
Bluetooth® connection can be established. See the documentation for your
Bluetooth® Hi-Fi device for more information.
Once connected, sound will be played through the external Bluetooth® Hi-Fi
device.
If your GO cannot establish a Bluetooth® connection then all sound will be
played through the internal speaker or through the audio cable if it is
connected to an external audio device with speakers.
ʱ·½» ¿¼¼®»-- ·²°«¬èò
21
Voice address input ׳°±®¬¿²¬: You should always plan your journey before you start driving. It is
dangerous to plan a route while driving.
When you plan a journey with your TomTomGO, instead of tapping the
screen to type in an address, you can use voice address input to say the
address.
Your GO recognises place and street names spoken using the local language
and pronunciation.
It is not possible to use voice address input to say place and street names in
all countries.
Í°±µ»²
¿¼¼®»--
ø¼·¿´±¹«»÷
Tap this button to enter an address using only speech. Using this option,
your GO can recognise the following:
!Commands: Ç»-,Ò±,Þ¿½µ,ܱ²»,ÑÕ,Ý®±--·²¹.
!Street names.
!Place names.
!Numbers: Numbers should be pronounced as individual numerals. For
example, to say the number 35, say, "Three" and then say, "Five."
Using Í°±µ»² ¿¼¼®»-- ø¼·¿´±¹«»÷, you can enter information without
tapping the screen.
Í°±µ»²
¿¼¼®»--
Tap this button to enter an address using both speech and by tapping the
screen. Using this option your GO can recognise the following:
!Street names.
!Place names.
Using Í°±µ»² ¿¼¼®»-- is typically faster than using Í°±µ»² ¿¼¼®»--
ø¼·¿´±¹«»÷.
When this button is shown on the keyboard you can enter information by
speaking instead of typing. Tap this button to enter information using voice
address input.
Ì·°: When this button is shown in grey, you cannot use speech to enter an
address.
22
д¿²²·²¹ ¿ ¶±«®²»§ «-·²¹ ª±·½» ¿¼¼®»-- ·²°«¬
׳°±®¬¿²¬: You should always plan your journey before you start driving. It is
dangerous to plan a route while driving.
To plan a route using speech, do the following:
1.Tap Ò¿ª·¹¿¬» ¬±òòò in the Main menu.
2.Tap ß¼¼®»--.
For this example, we will navigate to an address using only speech to enter
the address.
3.Tap Í°±µ»² ¿¼¼®»-- ø¼·¿´±¹«»÷.
4.Say the city name.
When you say the city name, you are then shown a list of six names that
match what you said.
23
Your GO tells you the name at the top of the list. If the name you hear is
correct, then say, "Done" or "OK" or "Yes" or "One" or tap on the name.
If the city name you hear is not correct, but the name appears in the list, then
say the number next to the correct name or tap on the correct name.
For example, if the correct name is Rotterdam and this name is number two
in the list, you could say, "Two" or tap on the name, Rotterdam.
If the city name is not shown in the list, then say "Back" or "No" or tap the
Þ¿½µ button to return to the previous screen. Then say the city name again.
Ò±¬»æ DZ« ²»»¼ ¬± -¿§ ²«³¾»®- ·² ¬¸» -¿³» ´¿²¹«¿¹» ¬¸¿¬ ·- «-»¼ º±® ³»²«
¾«¬¬±²-ò
5.Say the street name.
As with city name, you are then shown a list of six names that closely match
what you said.
Your GO tells you the name at the top of the list. If the name you hear is
correct, then say, "Done" or "OK" or "Yes" or "One" or tap on the name.
Ò±¬»æ Ü·ºº»®»²¬ ´±½¿¬·±²- ³¿§ ¸¿ª» -·³·´¿® ²¿³»-ô -«½¸ ¿- ¿ ®±¿¼ ¬¸¿¬ ¸¿-
³«´¬·°´» °±-¬½±¼» ´±½¿¬·±²-ò ײ -«½¸ ½¿-»-ô ¿´´ ±º ¬¸»-» ´±½¿¬·±²- ¿®» -¸±©² ·²
¬¸» ´·-¬ ¿²¼ §±« ²»»¼ ¬± ´±±µ ¿¬ ¬¸» -½®»»² ¿²¼ -»´»½¬ ¬¸» ½±®®»½¬ ´±½¿¬·±²ò
If the street name you hear is not correct, but the name appears in the list,
then say the number next to the correct name or tap on the name.
For example, if the correct name is Rembrandtplein and this name is
number three in the list, you could say, "Three" or tap on the name,
Rembrandtplein.
For example, looking at the list shown here, if the correct name is
Rembrandtplein, you could say, "Two" or tap on the name, Rembrandtplein.
If the street name is not shown in the list, then say "Back" or "No" or tap the
Þ¿½µ button to return to the previous screen. Then say the street name
again.
6.Say the house number.
Numbers should be pronounced normally. For example, you would say the
number 357 as one continuous sentence, "Three hundred and fifty seven."
If the number is shown incorrectly, say, "Back" or "No" or tap the Backspace
key. Then say the number again.
24
Ì·°: If you say, "Back" when there are no numbers shown on the screen, then
your GO will return you to the previous screen.
When the number is shown correctly say, "Done" or "OK." Alternatively,
enter the number by tapping the screen.
To select a crossroads as the location, say, "Crossing".
Ò±¬»æ DZ« ²»»¼ ¬± -¿§ ²«³¾»®- ·² ¬¸» -¿³» ´¿²¹«¿¹» ¬¸¿¬ ·- «-»¼ º±® ³»²«
¾«¬¬±²-ò
7.Your GO asks if you need to arrive at a particular time. For this exercise, tap
ÒÑ.
The route is calculated by your GO.
8.When the route has been calculated, tap ܱ²».
Ó±®» ©¿§- ¬± -°»¿µ ¬± §±«® ̱³Ì±³ÙÑ
There are various ways to enter an address using speech.
To see the options available, Tap Navigate to... in the Main menu and then tap
ß¼¼®»--.
Ò±¬»æ б-¬½±¼» ¿¼¼®»-- »²¬®§ ·- ²±¬ °±--·¾´» «-·²¹ -°»»½¸ò
!Ý·¬§ ½»²¬®» - to say the centre of a city or town, tap this button and then tap
the speech button at the bottom of the keyboard on the next screen.
!ͬ®»»¬ ¿²¼ ¸±«-» ²«³¾»® - to say an address, tap this button and then tap
the speech button at the bottom of the keyboard on the next screen.
!Ý®±--·²¹ ±® ·²¬»®-»½¬·±² - to say the point where two streets meet, tap this
button and then tap the speech button at the bottom of the keyboard on the
next screen.
!Í°±µ»² ¿¼¼®»-- - tap this button to enter an address using speech and by
tapping the screen.
!Í°±µ»² ¿¼¼®»-- ø¼·¿´±¹«»÷ - tap this button to enter an address only using
speech. You can still tap the screen for entering certain details if you prefer.

Ó«-·½ ¿²¼ ³»¼·¿çò
25
Music and media ׳°±®¬¿²¬: Only select music and media when you are stationary. It is
dangerous to select songs and make adjustments while you are driving.
Your TomTomGO can play mp3 audio files and Audible® Audiobooks and
display HTML and text documents and photos.
Ò±¬»æ ³°í º·´»- ¿²¼ ß«¼·±¾±±µ- ½¿² ¾» -¬±®»¼ ¿²¼ °´¿§»¼ ±² ¬¸» ÙÑ ëíðô éíð
¿²¼ çíðò
Ы¬¬·²¹ ³«-·½ ¿²¼ °¸±¬±- ±² §±«® ÙÑ
Transfer music files and photos to your TomTomGO from your computer
using TomTom HOME.
For information about using TomTom HOME, Ë-·²¹ ̱³Ì±³ ØÑÓÛ on page
101
д¿§·²¹ ³«-·½ ¿²¼ ¿«¼·±¾±±µ-
1.Tap Ó«-·½ ¿²¼ ³»¼·¿ in the Main Menu.
2.Tap TomTom Ö«µ»¾±¨ to start the Jukebox.
Ò±¬»æ DZ« ½¿² ½®»¿¬» °´¿§´·-¬- «-·²¹ ¿ ¬¸·®¼ó°¿®¬§ ¿°°´·½¿¬·±² ´·µ» ·Ì«²»-ô
Ó«-·½³¿¬½¸ ±® É·²¿³°ò
!д¿§´·-¬ - tap this button to select a playlist.
!ß®¬·-¬ - tap this button to select a song by a particular singer or group.
!ß´¾«³ - tap this button to select from a list of all the albums on your GO.
!ͱ²¹ - tap this button to select from all the songs on your GO.
!Ù»²®» - tap this button to select a particular type of music.
!ß«¼·±¾±±µ- - tap this button to select an Audiobook.
Ò±¬»æ Ò±¬ ¿´´ ³°í º·´»- ½±²¬¿·² ·²º±®³¿¬·±² ¿¾±«¬ ¬¸» -±²¹ô -«½¸ ¿- ¬¸» ¿®¬·-¬
±® ¹»²®»ò ׺ ¬¸» º·´» ½±²¬¿·²- ²± ·²º±®³¿¬·±²ô ¬¸» º·´» ²¿³» ·- «-»¼ ¿- ¬¸» -±²¹
¬·¬´»ò
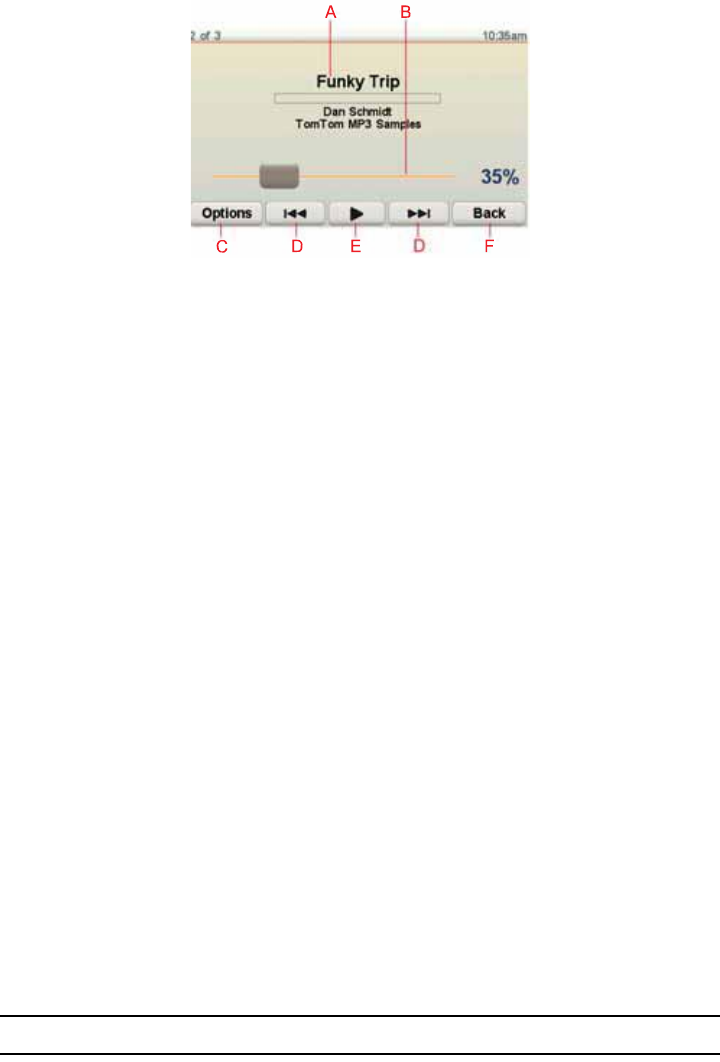
Ò±© °´¿§·²¹
As soon as you choose a song or Audiobook, your TomTomGO starts playing
that song, followed by the rest of the songs on the list.
26
ßInformation about the song.
ÞVolume - change the volume by moving the slider.
ÝThe Ñ°¬·±²- button. You can, for example, choose to repeat a song and
shuffle the songs. You can change these options:
!͸«ºº´» -±²¹- - the next song is selected randomly.
!λ°»¿¬ -±²¹ - repeat the current song.
!λ¼«½» ¾®·¹¸¬²»-- - brightness is only reduced on the playing screen.
!͸±© ³«-·½ ¾«¬¬±² ·² Ü®·ª·²¹ Ê·»© - enables fast access to your music.
!ß«¬±³¿¬·½¿´´§ -©·¬½¸ ¬± Ü®·ª·²¹ ª·»© - when a song begins playing, the
Driving View is shown.
!Í´·¼»-¸±© - your photos are shown while your music is playing..
ÜGo to the previous or next song.
ÛPlay or Pause the selected song.
ÚTap the Þ¿½µ button to go back to the TomTom Jukebox player. The music
will continue to play unless you tap the button д¿§·²¹òòò in the Jukebox to
stop the music.
When you listen to Audiobooks, there are also buttons for going to the next
and previous chapter. When you stop listening to an Audiobook, your GO
remembers where you stopped.
To find out more about Audiobooks, go to the shop area in TomTom HOME.
ÚÓ ¬®¿²-³·¬¬»®
There is an FM Transmitter inside your GO that works like a radio station. This
means you can hear the instructions made by your GO and play your mp3
songs through your car radio speakers.
Ò±¬»æ ̸» ÚÓ Ì®¿²-³·¬¬»® ·- ¿ª¿·´¿¾´» ·² ¬¸» ÙÑ ëíðô éíð ¿²¼ çíðò
Ù»¬¬·²¹ -¬¿®¬»¼
!In the Main Menu tap ݸ¿²¹» °®»º»®»²½»-, then tap Í°»¿µ»® °®»º»®»²½»-.
!Switch on your car radio.
!Tune your car radio to a frequency that is not being used by a radio station.
!Tap Change and set the frequency on your GO to use the same frequency
as your car radio.
If you drive into an area where a radio station transmits on the same
frequency you are using for the FM Transmitter, you may have to use
another frequency.
27
Ë-·²¹ §±«® ·Ð±¼r ©·¬¸ §±«® ̱³Ì±³ÙÑ
You can connect your iPod to your GO with the TomTom iPod Connect Cable,
which is available as an accessory.
You can then control your iPod from your GO. Sound from your iPod will be
played over the internal speaker in your GO, or an external speaker if selected.
For more information about using different speakers, see ײ¬»®²¿´ ¿²¼
»¨¬»®²¿´ -°»¿µ»®- on page 17.
To use your iPod with your GO, do the following:
1.Plug the iPod Connect Cable into your iPod and into the windscreen dock.
2.In the Main Menu, tap Ó«-·½ ¿²¼ Ó»¼·¿ and then ·Ð±¼ ½±²¬®±´.
3.Follow the instructions on the screen to finish the connection.
You can now control your iPod through your GO. You select songs using the
same buttons shown above in Playing music and audiobooks.
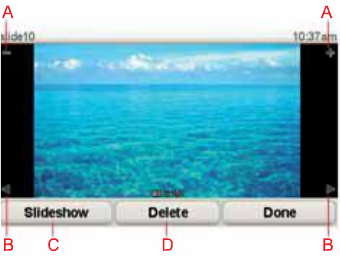
Ô±±µ·²¹ ¿¬ °¸±¬±-
1.Tap Ó«-·½ ¿²¼ ³»¼·¿ in the Main Menu.
2.Tap 豬± ¹¿´´»®§.
The Photo gallery starts, showing small versions (thumbnails) of all the
photos on your GO.
Tap the arrows to move up and down the page of thumbnails.
Tap Í´·¼»-¸±© to start a slideshow.
Tap the thumbnail of a photo to view a large version of that photo.
ßButtons to zoom in and zoom out on the photo.
ÞButtons to move to the next and the previous photo.
ÝTap Í´·¼»-¸±© to start a slideshow.
ÜTap Ü»´»¬» to delete a photo.
Ø»´° ³»ÿïðò
28
Help me! Help me! provides an easy way to navigate to emergency services centres and
other specialist services and contact them by phone.
For example, if you are involved in a car accident, you could use Help me! to
call the nearest hospital and tell them your exact location.
Ì·°: If you do not see the Ø»´° ³»ÿ button in the Main Menu, tap ͸±© ßÔÔ
³»²« ±°¬·±²- in the Preferences menu.
ر© ¼± × «-» Ø»´° ³»ÿ ¬± °¸±²» ¿ ´±½¿´ -»®ª·½»á
You can use Help me! to find and make contact with a service centre.
When you select a service centre, your current location and the phone number
of the POI are shown.
If your phone is connected to your GO, your current location and the service
centre phone number are shown, and your TomTomGO automatically
prepares for making a phone call. The phone call will only be dialled, when you
tap Ü·¿´.
If your phone is not connected, your current location and the service centre
phone number are shown, but your TomTomGO does not prepare for making
a phone call.
To use Help me! to locate a service centre, contact the centre by phone and
navigate from your current location to the centre, do the following:
1.Tap the screen to bring up the Main Menu.
2.Tap Ø»´° ³»ÿ
3.Tap и±²» º±® ¸»´°.
4.Select the type of service you require, for example, Nearest hospital.
5.Select a centre from the list, the nearest is shown at the top of the list.
Your GO shows the location of the service centre on the map and the
contact details.
6.To navigate your way to the centre on foot, tap É¿´µ ¬¸»®».
Your GO starts guiding you to your destination.
29
Ñ°¬·±²-
и±²» º±® ¸»´°
Use your TomTomGO to find the location of a service, and the contact
details.
!Û³»®¹»²½§ -»®ª·½»-
!Û³»®¹»²½§ ¾®»¿µ¼±©² -»®ª·½»-
!Ò»¿®»-¬ °±´·½» -¬¿¬·±²
!Ò»¿®»-¬ ¼±½¬±®
!Ò»¿®»-¬ ¸±-°·¬¿´
!Ò»¿®»-¬ °«¾´·½ ¬®¿²-°±®¬
!Ò»¿®»-¬ ½¿® ®»°¿·® -»®ª·½»-
!Ò»¿®»-¬ ¼»²¬·-¬
!Ò»¿®»-¬ °¸¿®³¿½§
!Ò»¿®»-¬ ª»¬
Ò±¬»æ ײ -±³» ½±«²¬®·»-ô ·²º±®³¿¬·±² ³¿§ ²±¬ ¾» ¿ª¿·´¿¾´» º±® ¿´´ -»®ª·½»-ò
Ü®·ª» ¬± ¸»´°
Use your TomTomGO to navigate your way by road to a service centre.
!Ò»¿®»-¬ ½¿® ®»°¿·® -»®ª·½»-
!Ò»¿®»-¬ ¸±-°·¬¿´
!Ò»¿®»-¬ ¼±½¬±®
!Ò»¿®»-¬ °±´·½» -¬¿¬·±²
!Ò»¿®»-¬ °¸¿®³¿½§
!Ò»¿®»-¬ ¼»²¬·-¬
Ò±¬»æ ײ -±³» ½±«²¬®·»-ô ·²º±®³¿¬·±² ³¿§ ²±¬ ¾» ¿ª¿·´¿¾´» º±® ¿´´ -»®ª·½»-ò
É¿´µ ¬± ¸»´°
Use your TomTomGO to navigate your way on foot to a service centre.
!Ò»¿®»-¬ °»¬®±´ -¬¿¬·±²
!Ò»¿®»-¬ °«¾´·½ ¬®¿²-°±®¬
!Ò»¿®»-¬ °±´·½» -¬¿¬·±²
!Ò»¿®»-¬ °¸¿®³¿½§
!ر³»
!Ò»¿®»-¬ ¼±½¬±®
Ò±¬»æ ײ -±³» ½±«²¬®·»-ô ·²º±®³¿¬·±² ³¿§ ²±¬ ¾» ¿ª¿·´¿¾´» º±® ¿´´ -»®ª·½»-ò
ɸ»®» ¿³ ×á
Your TomTomGO shows your current location.
You can then tap и±²» º±® ¸»´° to select the type of service you want to
contact.
30
Ú·®-¬ ß·¼ ¹«·¼»
Tap this button to read the British Red Cross First Aid guide.
Ѭ¸»® ¹«·¼»-
Tap this button to read a selection of useful guides.
Ú¿ª±«®·¬»-ïïò
31
Favourites
ɸ¿¬ ¿®» Ú¿ª±«®·¬»-á
Favourites are places that you often visit. You can create Favourites so that
you don t have to enter the address every time you want to navigate there.
They don t have to be places you especially like, just useful addresses.
ر© ½¿² × ½®»¿¬» ¿ Ú¿ª±«®·¬»á
From the Main Menu, tap ß¼¼ Ú¿ª±«®·¬».
Ò±¬»æ ̸» ¾«¬¬±² ß¼¼ Ú¿ª±«®·¬» ³¿§ ²±¬ ¾» -¸±©² ±² ¬¸» º·®-¬ °¿¹» ±º ¬¸»
Ó¿·² Ó»²«ò Ì¿° ¬¸» ¿®®±© ¬± ±°»² ±¬¸»® °¿¹»- ·² ¬¸» Ó¿·² Ó»²«ò
You can then select the location of the Favourite from the list below.
Give your Favourite a name that is easy to remember. Your GO will always
suggest a name, usually the address of the Favourite. To enter the name, just
start typing. You don t have to delete the suggested name.
ر³»
You can set your Home location as a Favourite.
Ú¿ª±«®·¬»
You cannot create a Favourite from another Favourite. This option will
always be unavailable in this menu.
To rename a Favourite, tap Ó¿²¿¹» Ú¿ª±«®·¬»- in the Preferences menu.
For more information, see Ó¿²¿¹» Ú¿ª±«®·¬»- on page 51.
ß¼¼®»--
You can specify an address to be a Favourite. When you enter an address,
you can choose from four options.
!Ý·¬§ ½»²¬®»
!ͬ®»»¬ ¿²¼ ¸±«-» ²«³¾»®
!б-¬½±¼»
!Ý®±--·²¹ ±® ·²¬»®-»½¬·±²
32
λ½»²¬
¼»-¬·²¿¬·±²
Select a Favourite location from a list of places you have recently used as
destinations.
б·²¬ ±º
ײ¬»®»-¬
You can add a Point of Interest (POI) as a Favourite.
ܱ»- ·¬ ³¿µ» -»²-» ¬± ¼± ¬¸·-á
If you visit a POI you particularly like, for example a restaurant, you can add
it as a Favourite.
To add a POI as a Favourite, tap this button, then do the following:
1.Narrow your choice of POIs by selecting the area where the POI is.
You can select one of these options:
!ÐÑ× ²»¿® §±« - to search from a list of POIs near your current position.
!ÐÑ× ·² ½·¬§ - to choose a POI in a particular town or city. You have to
specify a town or city.
!ÐÑ× ²»¿® ر³» - to search from a list of POIs near your Home
location.
If you are currently navigating to a destination, you can also select from
a list of POIs which are on your route or near your destination. Choose
one of these options:
!ÐÑ× ¿´±²¹ ®±«¬»
!ÐÑ× ²»¿® ¼»-¬·²¿¬·±²
2.Select the category of POI.
Tap the category of POI if it is shown or tap the arrow to choose from
the complete list.
Tap ß²§ ÐÑ× ½¿¬»¹±®§ to search for a POI by name.
For more information about POIs, see б·²¬- ±º ײ¬»®»-¬ on page 37.
Ó§ ´±½¿¬·±²
Tap this button to add your current position as a Favourite.
For example, if you stop somewhere interesting, while you are there you
can tap this button to create the Favourite.
б·²¬ ±² ³¿°
Tap this button to create a Favourite using the map browser.
Select the location of the Favourite using the cursor, then tap ܱ²».
For more information about the map browser, see Þ®±©-» Ó¿° on page 35.
Ô¿¬·¬«¼»
Ô±²¹·¬«¼»
Tap this button to create a Favourite by entering latitude and longitude
values.
33
ر© ½¿² × «-» ¿ Ú¿ª±«®·¬»á
You will normally use a Favourite as a way of navigating to a place without
having to enter the address. To navigate to a Favourite, do the following:
1.Tap the screen to bring up the Main Menu.
2.Tap Ò¿ª·¹¿¬» ¬±òòò
3.Tap Ú¿ª±«®·¬».
4.Select a Favourite from the list.
Your GO calculates the route for you.
5.When the route is calculated, tap ܱ²».
Your GO will immediately start guiding you to your destination with spoken
instructions and visual instructions on the screen.
ر© ³¿²§ Ú¿ª±«®·¬»- ½¿² × ½®»¿¬»á
You can create up to 48 Favourites. If you want to add more than 48, we
suggest that you make some POI categories and add some of your Favourites
as POIs.
For more information about POIs, see б·²¬- ±º ײ¬»®»-¬ on page 37.
ر© ½¿² × ¼»´»¬» ¿ Ú¿ª±«®·¬»á
1.Tap the screen to bring up the Main Menu.
2.Tap ݸ¿²¹» °®»º»®»²½»- to open the Preferences menu.
3.Tap Ó¿²¿¹» Ú¿ª±«®·¬»-.
Ì·°: Tap the arrow to move to the next page.
4.Tap the Favourite you want to delete.
5.Tap Ü»´»¬».
ر© ½¿² × ½¸¿²¹» ¬¸» ²¿³» ±º ¿ Ú¿ª±«®·¬»á
1.Tap the screen to bring up the Main Menu.
2.Tap ݸ¿²¹» °®»º»®»²½»- to open the Preferences menu.
3.Tap Ó¿²¿¹» Ú¿ª±«®·¬»-.
̱³Ì±³
Þ«¼¼§
Tap this button to make a Favourite of the current position of a TomTom
Buddy.
For more information about TomTom Buddies, see ̱³Ì±³ Í»®ª·½»- on
page 65.
б-·¬·±² ±º
´¿-¬ -¬±°
Tap this button to select your last recorded position as your destination.
For more information about the GPS, see Ù´±¾¿´ б-·¬·±²·²¹ ͧ-¬»³ øÙÐÍ÷
on page 100.

34
Ì·°: Tap the arrow to move to the next page of buttons.
4.Tap the Favourite you want to rename.
5.Tap λ²¿³».
Þ®±©-» Ó¿°ïîò
35
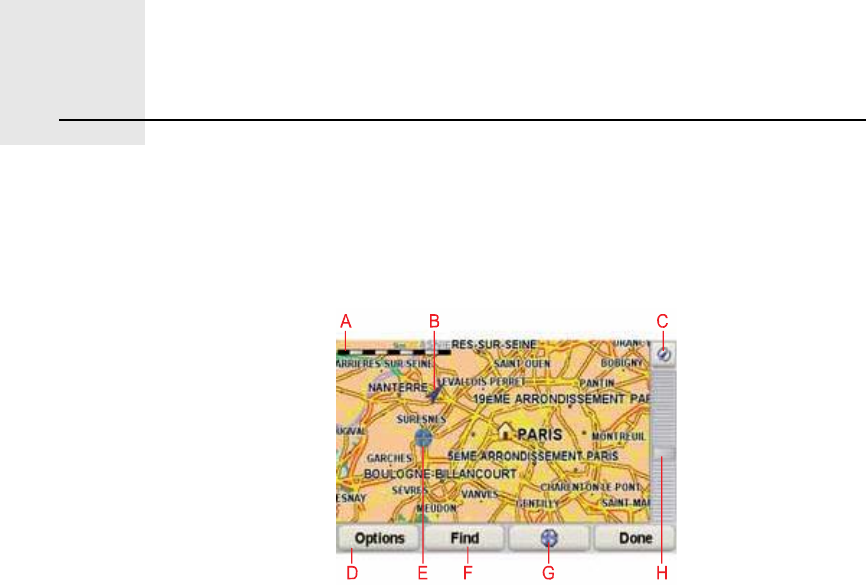
Browse Map To look at the map in the same way as you might look at a traditional paper
map, tap Þ®±©-» ³¿° in the Main Menu.
You can move the map by touching the screen and moving your finger across
the screen.
ßThe scale bar
ÞYour current position.
ÝGPS button
Tap this button to centre the map on your current position.
ÜOptions
ÛThe cursor
ÚThe Find button
Tap this button to find specific addresses.
ÙThe Cursor button
Tap this button to navigate to the cursor position, make a Favourite of the
cursor position, or find a Point of Interest near the cursor position.
ØThe zoom bar
Zoom in and out by moving the slider.
Ý«®-±® ¾«¬¬±²
You can use the map to find addresses and Points of Interest (POIs), for
example, restaurants, train stations and petrol stations.
36
Tap the cursor button then tap one of the following buttons:
Ò¿ª·¹¿¬»
¬¸»®»
Tap this button to navigate to the cursor position. Your GO will calculate the
route.
Ú·²¼ ÐÑ×
²»¿®¾§
Tap this button to find a POI near the cursor position. For example, if you
have found a restaurant to go to, you can search for a parking garage
nearby.
Ý¿´´òòò
Tap this button to call the location at the cursor position. This button is only
available if your GO has the phone number for the location.
The phone numbers of many POIs are stored in your GO. If you enter
phone numbers for POIs that you create, you can also call them.
For more information about hands-free calling, see Ø¿²¼-󺮻» ½¿´´·²¹ on
page 45.
ß¼¼ ¿-
Ú¿ª±«®·¬»
Tap this button to create a Favourite at the cursor position.
For more information about Favourites, see Ú¿ª±«®·¬»- on page 31.
ß¼¼ ¿- ÐÑ×
Tap this button to create a POI at the cursor position.
For more information about POIs, see б·²¬- ±º ײ¬»®»-¬ on page 37.
ݱ®®»½¬
´±½¿¬·±²
Tap this button to correct the location shown at the cursor position.

б·²¬- ±º ײ¬»®»-¬ïíò
37
Points of Interest Points of Interest or POIs are useful places on the map. Here are some
examples:
!Restaurants
!Hotels
!Museums
!Parking garages
!Petrol stations
͸±©·²¹ ÐÑ×- ±² ¬¸» ³¿°
1.Tap ͸±© ÐÑ×- ±² ³¿° in the Preferences menu.
2.Select the POI categories to display on the map.
Tap Ú·²¼ to search for a POI by name.
3.Tap ܱ²».
The POIs you have selected are shown as symbols on the map.
Ý¿´´·²¹ ¿ ÐÑ×
Your TomTomGO knows the phone numbers for many POIs. You can, for
example, call a restaurant to book a table.
For information about using your TomTomGO for hands-free calling, see
Ø¿²¼-󺮻» ½¿´´·²¹ on page 45.
Ò¿ª·¹¿¬·²¹ ¬± ¿ ÐÑ×
You can use a POI as your destination. For example, if you are travelling to an
unfamiliar city, you could choose a POI to help find a parking garage.
1.Tap the screen to bring up the Main Menu.
2.Tap Ò¿ª·¹¿¬» ¬±òòò in the Main Menu.
3.Tap б·²¬ ±º ײ¬»®»-¬.
4.Tap ÐÑ× ·² ½·¬§.
5.Narrow your choice of POIs by selecting the area where the POI is located.
͸±© ÐÑ× ±²
³¿°
38
You can select one of these options:
!ÐÑ× ²»¿® §±« - to choose from a list of POIs near to your current location.
!ÐÑ× ·² ½·¬§ - to find a POI in a particular town or city.
!ÐÑ× ²»¿® ر³» - to choose from a list of POIs near to your Home location.
You can select from a list of POIs which are along your route or close to your
destination. Choose from one of these options:
!ÐÑ× ¿´±²¹ ®±«¬»
!ÐÑ× ²»¿® ¼»-¬·²¿¬·±²
6.Type the name of the town you want to visit and select the town when it
appears in the list.
7.Tap п®µ·²¹ ¹¿®¿¹».
8.Select the category of POI:
Tap ß²§ ÐÑ× ½¿¬»¹±®§ to search for a POI by name.
Tap the category of POI, if it is shown.
Tap the arrow to choose from the complete list of categories. Select the
category from the list or start to type the name of the category and select it
when it appears in the list.
9.Select a parking garage. The distance listed next to each POI is the distance
from the city centre.
10.From the list of POIs shown, select the POI you want to navigate to.
The table below explains the distances listed next to each POI.
If you know the name of the POI, tap Ú·²¼ and type the name. Select it from
the list when it is shown.
11.Select a parking garage. The distance listed next to each POI is the distance
from the city centre.
Once you have selected a POI, the route to the POI is calculated by your
TomTomGO.
The route to the POI is then calculated by your TomTomGO.
POI near youDistance from your current location
POI in cityDistance from the city centre
POI near HomeDistance from your Home location
POI along
route
Distance from your current location
POI near
destination
Distance from your destination
Last POIDistance to the last POI you visited
39
Ó¿²¿¹·²¹ ÐÑ×-
Ò±¬»æ ̸» Ó¿²¿¹» ÐÑ×- ¾«¬¬±² ·- ±²´§ ¿ª¿·´¿¾´» ©¸»² ¿´´ ³»²« ¾«¬¬±²- ¿®»
-¸±©²ò ̱ -¸±© ¿´´ ³»²« ¾«¬¬±²-ô ¬¿° ͸±© ßÔÔ ³»²« ±°¬·±²- ·² ¬¸»
Ю»º»®»²½»- ³»²«ò
You can, for example, do the following:
!Create your own POI categories and add POIs to them.
!Set warnings when you get close to POIs.
ɸ§ ©±«´¼ × ©¿²¬ ¬± ½®»¿¬» ³§ ±©² ÐÑ×-á
A POI acts like a shortcut - once you have saved a location as a POI you never
have to type the address of that POI again. But when you create a POI you can
save more than just the location.
!Phone number - when you create a POI, you can save a phone number with
it.
!Categories - when you create a POI you have to put it in a category.
For example, you could create a category of POIs called %Favourite
restaurants . With each POI, save their phone number so that you can call
them from your GO to reserve a table.
ر© ½¿² × ½®»¿¬» ³§ ±©² ÐÑ×-á
1.Tap the screen to bring up the Main Menu.
2.Tap ݸ¿²¹» °®»º»®»²½»-.
3.Tap Ó¿²¿¹» ÐÑ×-.
4.Before you can add a POI, you have to create at least one POI category.
Every POI is assigned to a POI category. You can only add POIs to POI
categories you have created yourself.
5.Enter a name for your POI category, for example, %Friends or %Favourite
restaurants . Then select a marker for your POI category.
6.Tap ß¼¼ ÐÑ×.
7.Select the POI category in which you want to add the POI.
Ó¿²¿¹» ÐÑ×-
Tap Ó¿²¿¹» ÐÑ×- from the Preferences menu.
ß¼¼ ÐÑ×
½¿¬»¹±®§
Tap ß¼¼ ÐÑ× ½¿¬»¹±®§.
ß¼¼ ÐÑ×
Tap this button to add a POI.
40
8.Select the location of your POI from the list below.
ر³»
You can set your Home location as a POI.
If you want to change your Home location, you can create a POI of the
Home location before you change it.
Ú¿ª±«®·¬»
You can create a POI from a Favourite.
You can only create a limited number of Favourites. If you want to create
more Favourites you have to delete some Favourites first. Before you
delete a Favourite, make it into a POI so that you don t lose the address.
ß¼¼®»--
You can specify an address to be a POI. When you enter an address, you
can choose from four options.
!Ý·¬§ ½»²¬®»
!ͬ®»»¬ ¿²¼ ¸±«-» ²«³¾»®
!б-¬½±¼»
!Ý®±--·²¹ ±® ·²¬»®-»½¬·±²
λ½»²¬
¼»-¬·²¿¬·±²
Select a POI location from a list of places you have recently used as
destinations.
б·²¬ ±º
ײ¬»®»-¬
You can add a Point of Interest (POI) as a POI. For example, if you are
creating a category of POIs for your favourite restaurants, use this option
instead of entering the addresses of the restaurants.
Ó§ ´±½¿¬·±²
Tap this button to add your current position as a POI.
For example, if you stop somewhere you like, while you are there you
can tap this button to create the POI.
б·²¬ ±² ³¿°
Tap this button to create a POI using the map browser.
Select the location of the POI using the cursor, then tap ܱ²».
For more information about the map browser, see Ü®·ª·²¹ Ê·»© on page
6 and ر© ½¿² × ½®»¿¬» ³§ ±©² ÐÑ×-á on page 39
Ô¿¬·¬«¼»
Ô±²¹·¬«¼»
Tap this button to create a POI by entering latitude and longitude values.
̱³Ì±³
Þ«¼¼§
Tap this button to make a POI of the current position of a TomTom Buddy.
For more information about TomTom Buddies, see ̱³Ì±³ Í»®ª·½»- on
page 65.

41
ر© ½¿² × -»¬ ©¿®²·²¹- º±® ÐÑ×-á
1.Tap the screen to bring up the main menu.
2.Tap ݸ¿²¹» °®»º»®»²½»-.
3.Tap Ó¿²¿¹» ÐÑ×-.
Ò±¬»æ ̸» Ó¿²¿¹» ÐÑ×- ¾«¬¬±² ·- ±²´§ ¿ª¿·´¿¾´» ©¸»² ¿´´ ³»²« ¾«¬¬±²- ¿®»
-¸±©²ò ̱ -¸±© ¿´´ ³»²« ¾«¬¬±²-ô ¬¿° ͸±© ßÔÔ ³»²« ±°¬·±²- ·² ¬¸»
Ю»º»®»²½»- ³»²«ò
4.Tap É¿®² ©¸»² ²»¿® ÐÑ×.
5.Select the category of POI you want to be warned about.
Select the category from the list or start to type the name of the category
and select it when it is shown in the list.
6.Set how close the POI should be when you receive a warning.
7.Choose the warning sound for the category of POI you selected.
б-·¬·±² ±º
´¿-¬ -¬±°
Tap this button to select your last recorded position as your destination.
This may be useful if your GO is unable to maintain a strong GPS signal,
for example, when you drive through a long tunnel.
For more information about the GPS, see Ù´±¾¿´ б-·¬·±²·²¹ ͧ-¬»³
øÙÐÍ÷ on page 100.
É¿®² ©¸»²
²»¿® ÐÑ×
Tap this button to receive a warning when you travel near to the location
of a POI.
׬·²»®¿®§ °´¿²²·²¹ïìò
42
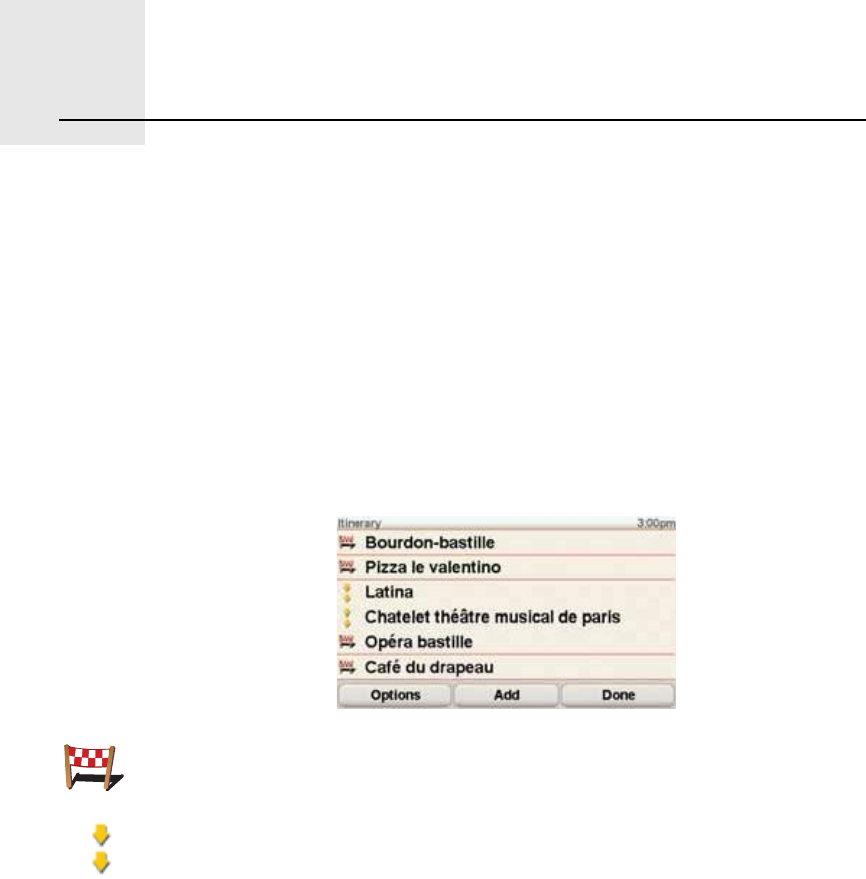
Itinerary planning
ɸ¿¬ ·- ¿² ׬·²»®¿®§á
An Itinerary is a plan for a journey including more locations than your final
destination.
An Itinerary can include the following items:
!Destination - a location on your journey where you want to stop.
!Waypoint - a location on your journey where you want to travel through
without stopping.
Here s an example of an Itinerary:
ɸ»² ©±«´¼ × «-» ¿² ׬·²»®¿®§á
You could use an Itinerary for trips such as:
!A driving holiday through a country with lots of stops.
!A two day car journey with an overnight stop.
!A short drive which passes by Points of Interest.
In all these examples you could tap Ò¿ª·¹¿¬» ¬±òòò for each place. However, if
you use an Itinerary, you can save time by planning everything in advance.
Ý®»¿¬·²¹ ¿² ׬·²»®¿®§
1.Tap the screen to bring up the Main Menu.
2.Tap ׬·²»®¿®§ °´¿²²·²¹.
Destinations are shown using this symbol.
Waypoints are shown using this symbol.
43
Ò±¬»æ ̸·- ¾«¬¬±² ³¿§ ±²´§ ¾» ¿ª¿·´¿¾´» ·º ¿´´ ³»²« ±°¬·±²- ¿®» -¸±©²ò ̱
-¸±© ¿´´ ³»²« ±°¬·±²-ô ¬¿° ͸±© ßÔÔ ³»²« ±°¬·±²-ò
Ú±® ³±®» ·²º±®³¿¬·±²ô -»» Ø·¼¼»² ¾«¬¬±²- ¿²¼ º»¿¬«®»- ±² °¿¹» ìèò
3.Tap ß¼¼ and select a location.
Ì·°æ You can add items to your Itinerary in any order and rearrange the order
later.
ͬ¿®¬ «-·²¹ ¿² ׬·²»®¿®§
Tap Ñ°¬·±²-, then tap ͬ¿®¬ ²¿ª·¹¿¬·±².
To save an Itinerary, tap Í¿ª» ׬·²»®¿®§.
To load a saved Itinerary, tap Ô±¿¼ ׬·²»®¿®§.
To create a new Itinerary, tap Ò»© ׬·²»®¿®§ and to delete one, tap Ü»´»¬»
׬·²»®¿®§.
Ú±´´±©·²¹ ¿² ׬·²»®¿®§
When you use an Itinerary to navigate, the route will be calculated to the first
destination on the Itinerary. Your TomTomGO calculates the remaining
distance and time to the first destination and not for the whole Itinerary.
As soon as you start to use an Itinerary, the route is calculated from your
current position. You do not need to set a departure point.
When you have passed a waypoint or reached a destination, it is marked as
visited.
Waypoints are shown on the map. Your GO will not warn you, when you are
approaching a waypoint or when you arrive at a waypoint.
Ó¿²¿¹·²¹ ¿² ׬·²»®¿®§
Tap an item on your Itinerary to open a menu of buttons for editing the item.
The buttons shown below are available.
׬·²»®¿®§
°´¿²²·²¹
The Itinerary planning screen opens. At first, there are no items on the
Itinerary.
Ó¿®µ ¿-
©¿§°±·²¬
You can change a destination into a waypoint using this button.
Waypoints are locations where you want to pass through on your way to
your chosen destination(s).
Destinations are locations where you want to stop.
This button is only shown if the item you tapped is a destination.
44
Ó¿®µ ¿-
¼»-¬·²¿¬·±²
You can change a waypoint into a destination using this button.
Waypoints are locations where you want to pass through on your way to
your chosen destination(s).
Destinations are locations where you want to stop.
This button is only shown if the item you tapped is a waypoint.
Ó¿®µ •ª·-·¬»¼Ž
Tap this button to miss out part of your Itinerary. Your GO will ignore this
item and all the items before it in the Itinerary.
It will navigate you to the next item in the Itinerary.
This button is only shown if you are still due to visit this item.
Ó¿®µ •¬± ª·-·¬Ž
Tap this button to repeat part of your Itinerary. Your GO will navigate you to
this item followed by the rest of the items in the Itinerary.
This button is only shown if you have already visited this item.
Ó±ª» ·¬»³ «°
Tap this button to move the item up the Itinerary.
This button is unavailable if the item is at the top of the Itinerary.
Ó±ª» ·¬»³
¼±©²
Tap this button to move the item down the Itinerary.
This button is unavailable if the item is at the bottom of the Itinerary.
͸±© ±² ³¿°
Tap this button to see the location of the item on the map.
For more information about the map browser, see Ü®·ª·²¹ Ê·»© on page 6.
Ü»´»¬» ·¬»³
Tap this button to delete the item from the Itinerary.

Ø¿²¼-󺮻» ½¿´´·²¹ïëò
45
Hands-free calling
Ø¿²¼-󺮻» ½¿´´·²¹
If you have a mobile phone with Bluetooth®, you can use your TomTomGO
to make phone calls and send and receive messages.
Ò±¬»æ Ò±¬ ¿´´ °¸±²»- ¿®» -«°°±®¬»¼ ±® ½±³°¿¬·¾´» ©·¬¸ ¿´´ º»¿¬«®»-ò Ú±® ³±®»
·²º±®³¿¬·±²ô ª·-·¬ ©©©ò̱³Ì±³ò½±³ñ°¸±²»-
ݱ²²»½¬·²¹ ¬± §±«® °¸±²»
First you must establish a connection between your mobile phone and your
TomTomGO.
Tap Ó±¾·´» °¸±²» in the Ó¿·² Ó»²« and then follow the instructions on the
screen.
You only need to do this once, after which your TomTomGO will remember
your phone.
Í»¬¬·²¹ «° ̱³Ì±³ Í»®ª·½»-
When you have established a connection with your phone, you can set up a
wireless data connection for TomTom Services.
For information about TomTom Services, see ̱³Ì±³ Í»®ª·½»- on page 65.
Ì·°-
!Make sure that you switch on Bluetooth® on your phone.
!Make sure that your phone is set to %discoverable or %visible to all .
!You may have to enter the password %0000 on your phone in order to
connect to your TomTomGO.
!Make your TomTomGO a trusted device on your phone. Otherwise you
have to enter %0000 every time.
See your phone s user guide for information about Bluetooth® settings.
DZ«® °¸±²»¾±±µ
You can copy your phonebook from your mobile phone to your TomTomGO
so that you can make calls with just a few taps on the screen.
This is the safest way to make hands-free calls.

46
Ò±¬»æ DZ« ½¿² ½±°§ §±«® °¸±²»¾±±µ ¬± §±«® ̱³Ì±³ÙÑ ¿¬ ¿²§ ¬·³»ò Ú®±³
¬¸» Ó±¾·´» °¸±²» ³»²«ô ¬¿° Ù»¬ ²«³¾»®- º®±³ °¸±²»ò
Ò±¬ ¿´´ °¸±²»- ½¿² ¬®¿²-º»® ¬¸»·® °¸±²»¾±±µ ¬± §±«® ÙÑò Ú±® ³±®»
·²º±®³¿¬·±²ô ª·-·¬ ©©©ò̱³Ì±³ò½±³ñ°¸±²»-
Ó¿µ·²¹ ¿ ½¿´´
Once you have established a connection with your phone, you can start
making calls.
1.Tap Ó±¾·´» °¸±²» in the Main Menu.
2.Tap Ý¿´´.
Ò±¬»æ Ó¿µ» -«®» ¬¸¿¬ §±«® °¸±²» ·- ½«®®»²¬´§ -»´»½¬»¼ò ̸» ½«®®»²¬ °¸±²» ·-
-¸±©² ¿¬ ¬¸» ¾±¬¬±³ ±º ¬¸» -½®»»²ò
3.Tap Ò«³¾»® to enter a number to call.
4.Do one of the following:
!Tap ر³» to call your Home location. If you have not entered a number
for your Home location this button is unavailable. To enter a number, tap
ݸ¿²¹» ر³» ²«³¾»® in the и±²» °®»º»®»²½»- menu.
!Tap Ò«³¾»® to enter a number to call.
!Tap б·²¬ ±º ײ¬»®»-¬ to choose a Point of Interest (POI) to call. If your GO
knows the phone number of a POI, this is shown next to the POI.
!Tap и±²»¾±±µ »²¬®§ to select a contact from your phonebook.
Ò±¬»æ ׺ §±« ¸¿ª» ²±¬ ½±°·»¼ §±«® °¸±²»¾±±µ ¬± §±«® ̱³Ì±³ÙÑô ¬¸» ¾«¬¬±²
и±²»¾±±µ »²¬®§ ·- «²¿ª¿·´¿¾´»ò
!Tap λ½»²¬´§ ¼·¿´»¼ to select from a list of people or numbers you have
called recently using your GO.
!Tap λ½»²¬ ½¿´´»® to select from a list of people or numbers who called
you recently. Only calls you have received on your GO are saved in this
list.
For information about POIs, see б·²¬- ±º ײ¬»®»-¬ on page 37.
λ½»·ª·²¹ ¿ ½¿´´
If someone calls you while you are driving, accept or reject the call by tapping
the screen.
ß«¬±ó¿²-©»®
You can tell your TomTomGO to answer every call automatically after a
certain time. Tap и±²» °®»º»®»²½»- in the mobile phone menu, then tap
ß«¬±ó¿²-©»® °®»º»®»²½»-.
Select when your TomTomGO will automatically answer your calls.
͸¿®·²¹ §±«® ̱³Ì±³ÙÑ
To add more phones, do the following. You can establish connections for up
to 5 mobile phones.
1.Tap Ó±¾·´» °¸±²» in the Main Menu.
2.Tap ݱ²²»½¬ ¬± §±«® °¸±²».
47
3.Tap Ú·²¼ ±¬¸»® °¸±²»òòò and follow the instructions on the screen.
To switch between phones, tap ݱ²²»½¬ ¬± §±«® °¸±²» and then select your
phone from the list.
The available buttons are listed below:
λ¼·¿´
Tap this button to redial a telephone number using your mobile phone.
λ¿¼ñÉ®·¬»
³»--¿¹»
Tap this button to read or write a message.
и±²»
Ю»º»®»²½»-
Tap this button to configre how your TomTomGO communicates with your
mobile phone.
Ý¿´´òòò
Tap this button to dial a telephone number using your mobile phone.
Ù»¬ °¸±²»ó
²«³¾»®-
º®±³ °¸±²»
Tap this button to load the contacts and phone numbers from your mobile
phone onto your TomTomGO.
Ó¿²¿¹»
°¸±²»-
Tap this button to manage the mobile phones that will be connected to
your TomTomGO. You can add a profile for up to five different mobile
phones.

Ю»º»®»²½»-ïêò
48
Preferences You can change the way your TomTomGO looks and behaves.
Tap ݸ¿²¹» °®»º»®»²½»- in the Main Menu.
Ø·¼¼»² ¾«¬¬±²- ¿²¼ º»¿¬«®»-
When you first start using your TomTomGO, all the buttons are shown in the
menu.
The buttons for the more advanced features can be hidden. This is a useful
option because you are unlikely to use certain features very often.
Ë-» ²·¹¸¬ ½±´±«®- ñ Ë-» ¼¿§ ½±´±«®-
Ý¿² ³§ ÙÑ ³¿µ» ¬¸·- ½¸¿²¹» ¿«¬±³¿¬·½¿´´§á
Yes. Your GO has a light sensor to tell when it is getting dark.
͸±© º»©»®
³»²« ±°¬·±²-
Tap this button in the Preferences menu, to reduce the number of buttons
that are shown.
You might want to do this so that only frequently used buttons are shown.
When you need to use the buttons that are hidden, you can press ͸±©
ßÔÔ ³»²« ±°¬·±²- in the Preferences menu to show all buttons.
͸±© ßÔÔ
³»²« ±°¬·±²-
Tap this button in the Preferences menu, to show all the buttons available
on your TomTomGO.
Ë-» Ò·¹¸¬
½±´±«®-
Tap this button to reduce the brightness of the screen and show darker
colours on the map.
ɸ»² -¸±«´¼ × «-» ¬¸·-á
When it s dark, it is easier to see the screen if the display on your GO is not
brightly lit.
Ë-» ¼¿§
½±´±«®-
To change back to a brighter screen showing brighter colours on the map,
tap Ë-» ¼¿§ ½±´±«®-.

49
To change to night and day colours automatically, tap Þ®·¹¸¬²»-- °®»º»®»²½»-
in the Preferences menu. Then select Í©·¬½¸ ¬± ²·¹¸¬ ª·»© ©¸»² ¼¿®µ.
͸±© ÐÑ× ±² ³¿°
Í¿º»¬§ °®»º»®»²½»-
ɸ¿¬ ¸¿°°»²- ©¸»² × «-» ¬¸» Ì«®² ±ºº ³¿° ¼·-°´¿§ ±°¬·±²á
When you turn off the map display, instead of seeing your position on a map
in the Driving View, you will only see information about the next instruction.
Tap the button and select an option for when the map should be turned off.
These are the options:
!ß´©¿§- - The map will not be shown and you will only see information
about the next instruction and arrows showing direction.
!ß¾±ª» ¿ ½»®¬¿·² -°»»¼ - you set the speed at which point the map will be
turned off. This option is useful for situations when the map might be
distracting, such as when you are driving fast.
!Ò»ª»® - the map is never turned off.
͸±© ÐÑ× ±²
³¿°
Tap this button to set which categories for the Points of Interest (POIs)
should be shown on the map.
Select the POIs that you want to see on the map from the list.
When you select a POI, it is shown on the map using the symbol you can
see next to each category in the list.
To find a POI category quickly, tap Ú·²¼, then start to type the name of the
POI category. As soon as the category is shown in the list, you can select it.
For more information about POIs, see б·²¬- ±º ײ¬»®»-¬ on page 37.
Í¿º»¬§
°®»º»®»²½»-
Tap this button to set the following safety preferences:
!Ø·¼» ³±-¬ ³»²« ±°¬·±²- ©¸·´» ¼®·ª·²¹
!Í«¹¹»-¬ ¼®·ª·²¹ ¾®»¿µ-
!͸±© -¿º»¬§ ®»³·²¼»®-
!É¿®² ©¸»² ²»¿® °´¿½»- ±º ©±®-¸·° ±® -½¸±±´-
!É¿®² ©¸»² ¼®·ª·²¹ º¿-¬»® ¬¸¿² ¿´´±©»¼
!É¿®² ©¸»² ¼®·ª·²¹ º¿-¬»® ¬¸¿² ¿ -»¬ -°»»¼
!É¿®² ²±¬ ¬± ´»¿ª» ¬¸» ¼»ª·½» ·² ¬¸» ½¿®
If you select one or more of the warnings, you will also be asked to select a
sound to be played whenever a warning is displayed.
Select whether or not your TomTomGO should warn you about which side
of the road you should be driving on.
Decide if you want the map display to be turned off in special
circumstances and press ܱ²».
50
ʱ·½» °®»º»®»²½»-
Ì«®² ±ºº -±«²¼ ñ Ì«®² ±² -±«²¼
Ý¿² × -¬·´´ «-» ³§ ÙÑ ¬± ³¿µ» ¸¿²¼-󺮻» ½¿´´- ©¸»² ¬¸» -±«²¼ ·- ¬«®²»¼ ±ººá
Yes. Turning the sound off does not affect hands-free calling, meaning that
you will still be able to talk to and hear the caller.
ʱ·½»
°®»º»®»²½»-
Tap ʱ·½» °®»º»®»²½»- to manage your TomTom voices. The following
options are available:
!ݸ¿²¹» ª±·½» - tap this button to change the voice that gives you
instructions.
A wide range of recorded human voices and computer voices are
available.
For more information on choosing a voice and the differences between
human and computer voices, see Í»´»½¬·²¹ ¿ ª±·½» on page 17.
!Ü·-¿¾´» ª±·½» - tap this button to disable the use of voices. To enable
voices, tap Û²¿¾´».
!Í°»»½¸ °®»º»®»²½»- - tap this button to set the situations when your
TomTom will read instructions or warnings aloud.
!λ½±®¼ ª±·½» - tap this button to record your own voice for use by your
TomTom. The procedure takes about fifteen minutes, during which time
you will say all the commands that are used by your TomTomGO.
In the Preferences menu, tap ʱ·½» °®»º»®»²½»-, then tap λ½±®¼ ª±·½»
and follow the instructions for recording your voice.
!Ü·-¿¾´» ®»½±®¼»¼ ª±·½»
!Û²¿¾´» ®»½±®¼»¼ ª±·½»
!ܱ©²´±¿¼ ª±·½» - tap this button to download new voices from
TomTom Services and transfer them to your TomTom.
Ì«®² ±ºº -±«²¼
Tap this button to turn off spoken instructions.
The button changes to Ì«®² ±² -±«²¼. If you turn off the sound, warnings
for upcoming POIs are also turned off.
Ì·°-
To change the volume, tap ʱ´«³» °®»º»®»²½»- in the Preferences menu.
For more information, see ʱ´«³» °®»º»®»²½»- on page 51.
To change the volume quickly while you are driving, tap the bottom left-
hand section of the Driving View and move the slider.
You can still listen to music even if you have turned off voice instructions.
For more information, see Í»´»½¬·²¹ ¿ ª±·½» on page 17.

51
ʱ´«³» °®»º»®»²½»-
Ý¿² ³§ ÙÑ ½¸¿²¹» ¬¸» ª±´«³» ¼»°»²¼·²¹ ±² ¸±© ²±·-§ ·¬ ·- ·² ¬¸» ½¿®á
Select Ô·²µ ª±´«³» ¬± ²±·-» ´»ª»´ and your GO will change the volume
according to the background noise. The noise level is constantly monitored by
the microphone on your GO. If there is a lot of noise in the car, your GO will
automatically increase the volume.
For example, if you are driving on the motorway, which is often very noisy, the
volume level on your GO will be increased. When you are driving more slowly
again, the volume level will be lowered by your GO.
Ó¿²¿¹» Ú¿ª±«®·¬»-
ݸ¿²¹» ر³» ´±½¿¬·±²
ܱ × ²»»¼ ¬± «-» ³§ ¿½¬«¿´ ¸±³» ¿¼¼®»-- º±® ¬¸» ر³» ´±½¿¬·±²á
No. Your Home location can be a place you go often, for example, your office.
It can be your actual home address, but it can be any address you like.
ɸ§ -¸±«´¼ × -»¬ ¿ ر³» ´±½¿¬·±²á
Having a Home location means that you have a quick and easy way to navigate
there, by tapping the Home button in the Ò¿ª·¹¿¬» ¬±òòò menu
ʱ´«³»
°®»º»®»²½»-
Tap this button to change the volume for spoken instructions.
This setting does not change the volume of the radio, CDs, or music played
from an iPod® or USB storage device.
Ó¿²¿¹»
Ú¿ª±«®·¬»-
Tap this button to rename or delete Favourites.
To find a Favourite quickly, tap Ú·²¼, then start to type the name of the
Favourite. As soon as the Favourite is shown in the list, you can select it.
For more information about Favourites, see Ú¿ª±«®·¬»- on page 31.
ݸ¿²¹» ر³»
´±½¿¬·±²
Tap this button to set or change your Home location.
52
Ó¿²¿¹» ³¿°-
This button may only be available if all menu options are shown. To show all
menu options, tap ͸±© ßÔÔ ³»²« ±°¬·±²-.
For more information, see Ø·¼¼»² ¾«¬¬±²- ¿²¼ º»¿¬«®»- on page 48.
Ó¿²¿¹» ÐÑ×-
This button may only be available if all menu options are shown. To show all
menu options, tap ͸±© ßÔÔ ³»²« ±°¬·±²-.
For more information, see Ø·¼¼»² ¾«¬¬±²- ¿²¼ º»¿¬«®»- on page 48.
Ó¿²¿¹» ³¿°-
Tap this button to do the following:
!ܱ©²´±¿¼ ¿ ³¿° - you can buy new maps using TomTom HOME.
For more information, see Ë-·²¹ ̱³Ì±³ ØÑÓÛ on page 101.
!Í©·¬½¸ ³¿° - tap this button to change the map you are using.
!Ü»´»¬» ¿ ³¿° - tap this button to delete a map. This might be necessary
to create more space on your GO, for example when you want to load a
different map.
Ò±¬»æ ܱ²Ž¬ ¼»´»¬» ¿ ³¿° «²´»-- §±« ¸¿ª» ¿´®»¿¼§ ³¿¼» ¿ ¾¿½µ«° ±º ¬¸»
³¿°ò ׺ §±« ¼»´»¬» ¿ ³¿° ¾»º±®» §±« ³¿µ» ¿ ¾¿½µ«°ô §±« ©·´´ ²± ´±²¹»® ¾»
¿¾´» ¬± ´±¿¼ ¬¸» ³¿° ±² §±«® ÙÑò
For more information about making a backup, see Ë-·²¹ ̱³Ì±³ ØÑÓÛ
on page 101.
You can also download, add and delete maps using TomTom HOME.
Ó¿²¿¹» ÐÑ×-
Tap this button to do the following:
!Set alerts for when you are near POIs.
For example, your GO can tell you when there is a petrol station nearby.
!Create your own POI categories and add POIs to them.
For example, you could create a category of POIs called "Friends#, and
add all your friends addresses as POIs in the category. You can even add
your friends phone numbers with their address so you can call them
from your GO.
For more information about POIs, see б·²¬- ±º ײ¬»®»-¬ on page 37.

53
ݸ¿²¹» ½¿® -§³¾±´
This button may only be available if all menu options are shown. To show all
menu options, tap ͸±© ßÔÔ ³»²« ±°¬·±²-.
For more information, see Ø·¼¼»² ¾«¬¬±²- ¿²¼ º»¿¬«®»- on page 48.
ݸ¿²¹» îÜñíÜ ¼·-°´¿§ ñ Ì«®² ±² îÜ ¼·-°´¿§
ɸ»² -¸±«´¼ × «-» ¬¸·-á
In some situations, it is easier to see the map from above. Perhaps if the road
network is complicated or for times when you are walking while using your GO
to navigate.
͸±©ñØ·¼» ´¿²» ·³¿¹»-
This button may only be available if all menu options are shown. To show all
menu options, tap ͸±© ßÔÔ ³»²« ±°¬·±²-.
For more information, see Ø·¼¼»² ¾«¬¬±²- ¿²¼ º»¿¬«®»- on page 48.
ݸ¿²¹» ½¿®
-§³¾±´
Tap this button to select a car symbol that will be used to show your current
position in the Driving view.
Ì«®² ±² îÜ
¼·-°´¿§
Tap Ì«®² ±² îÜ ¼·-°´¿§ to change the perspective for viewing the map.
For example, the 2D view shows a two dimensional view of the map as
though viewed from above.
ݸ¿²¹» îÜñíÜ
¼·-°´¿§
To switch the view to a three dimensional perspective, tap ݸ¿²¹» îÜñíÜ
¼·-°´¿§ and select a view from the list.
͸±© ´¿²»
·³¿¹»-
Tap this button to show or hide the arrows that warn you which lane you
need to be in to navigate an approaching road exit or junction.
For more information on lane guidance images, see ß¼ª¿²½»¼ Ô¿²»
Ù«·¼¿²½» on page 99

54
ݸ¿²¹» ³¿° ½±´±«®-
This button may only be available if all menu options are shown. To show all
menu options, tap ͸±© ßÔÔ ³»²« ±°¬·±²-.
For more information, see Ø·¼¼»² ¾«¬¬±²- ¿²¼ º»¿¬«®»- on page 48.
Þ®·¹¸¬²»-- °®»º»®»²½»-
This button may only be available if all menu options are shown. To show all
menu options, tap ͸±© ßÔÔ ³»²« ±°¬·±²-.
For more information, see Ø·¼¼»² ¾«¬¬±²- ¿²¼ º»¿¬«®»- on page 48.
ݸ¿²¹» ³¿°
½±´±«®-
Tap this button to select the colour schemes for day and night map colours.
You can also download more colour schemes from TomTom Services.
Þ®·¹¸¬²»--
°®»º»®»²½»-
Tap this button to set the brightness of the screen.
You can set the brightness separately for day map colours and for night
map colours.
You can also set these options:
!Ì«®² ¾®·¹¸¬²»-- ¼±©² ©¸»² ¼¿®µ - your GO uses a light sensor to detect
the background light level. If this option is selected, as it gets darker,
your GO reduces the brightness of the screen so that it is not distracting.
!Í©·¬½¸ ¬± ²·¹¸¬ ª·»© ©¸»² ¼¿®µ - your GO uses a light sensor to detect
the background light level. If this option is selected, when it gets dark,
your GO uses night colours for the Driving View.
You can set the map colour scheme by tapping ݸ¿²¹» ³¿° ½±´±«®-. For
more information, see ݸ¿²¹» ³¿° ½±´±«®- on page 54.
55
ͬ¿¬«- ¾¿® °®»º»®»²½»-
This button may only be available if all menu options are shown. To show all
menu options, tap ͸±© ßÔÔ ³»²« ±°¬·±²-.
For more information, see Ø·¼¼»² ¾«¬¬±²- ¿²¼ º»¿¬«®»- on page 48.
ß«¬±³¿¬·½ ¦±±³·²¹
This button may only be available if all menu options are shown. To show all
menu options, tap ͸±© ßÔÔ ³»²« ±°¬·±²-.
For more information, see Ø·¼¼»² ¾«¬¬±²- ¿²¼ º»¿¬«®»- on page 48.
ͬ¿¬«- ¾¿®
°®»º»®»²½»-
Tap this button to select the information shown on the status bar:
!λ³¿·²·²¹ ¬·³» - the estimated time left until you reach your destination.
!λ³¿·²·²¹ ¼·-¬¿²½» - the distance left until you reach your destination.
!Ý«®®»²¬ ¬·³»
!ß®®·ª¿´ ¬·³» - your estimated arrival time.
!Í°»»¼
!Ü·®»½¬·±²
!͸±© ²»¨¬ -¬®»»¬ ²¿³» - the name of the next street on your journey.
!͸±© ½«®®»²¬ -¬®»»¬ ²¿³»
!͸±© ´»»©¿§ ¬± ¿®®·ª¿´ ¬·³» - your GO shows how late or early you will
be compared with the preferred arrival time that is set during the
planning of a route.
!͸±© ³¿¨ -°»»¼ ²»¨¬ ¬± -°»»¼ - only available when speed (above) is
also selected.
!͸±© ½±³°¿--
!ر© -¸±«´¼ ¬¸» -¬¿¬«- ¾¿® ¾» ¼·-°´¿§»¼á
ر®·¦±²¬¿´ - If you choose this option, the status bar will be shown at the
bottom of the Driving view.
Ê»®¬·½¿´ - If you choose this option, the status bar will be shown at the
right-hand side of the Driving view.
Ò±¬»æ ׺ ¬¸» -°»»¼ ´·³·¬ º±® ¬¸» ®±¿¼ §±« ¿®» ±² ·- ¿ª¿·´¿¾´»ô ·¬ ·- -¸±©² ²»¨¬
¬± §±«® -°»»¼ò
׺ §±« ¼®·ª» º¿-¬»® ¬¸¿² ¬¸» -°»»¼ ´·³·¬ô §±«® -°»»¼ ·- -¸±©² ·² ®»¼ò
ß«¬±³¿¬·½
¦±±³·²¹
Tap this button to enable or disable automatic zooming in the Driving View.
56
Ï«·½µ ³»²« °®»º»®»²½»-
This button may only be available if all menu options are shown. To show all
menu options, tap ͸±© ßÔÔ ³»²« ±°¬·±²-.
For more information, see Ø·¼¼»² ¾«¬¬±²- ¿²¼ º»¿¬«®»- on page 48.
Ù«·¼»¼ ¬±«®-
This button may only be available if all menu options are shown. To show all
menu options, tap ͸±© ßÔÔ ³»²« ±°¬·±²-.
For more information, see Ø·¼¼»² ¾«¬¬±²- ¿²¼ º»¿¬«®»- on page 48.
Ò¿³» °®»º»®»²½»-
This button may only be available if all menu options are shown. To show all
menu options, tap ͸±© ßÔÔ ³»²« ±°¬·±²-.
For more information, see Ø·¼¼»² ¾«¬¬±²- ¿²¼ º»¿¬«®»- on page 48.
Ï«·½µ ³»²«
°®»º»®»²½»-
Tap this button to choose up to six buttons to be used in the Quick menu.
The Quick menu button enables easy access for your most commonly used
buttons.
The buttons you assign for use with the Quick menu, are shown in the
Driving View.
Ù«·¼»¼ ¬±«®-
Tap this button to show one of the Guided tours on how to use your
TomTomGO.
Ò¿³»
°®»º»®»²½»-
Tap this button to set the information that is shown on the map in the
Driving View. The following options are available:
!͸±© ¸±«-» ²«³¾»®- ¾»º±®» -¬®»»¬ ²¿³»-
!͸±© -¬®»»¬ ²¿³»- - if you are using a computer voice for spoken
instructions and have selected that street names should be read aloud,
you do not need to select this option, since the street names will be read
aloud even though this option is not selected.
!͸±© ²»¨¬ ³±¬±®©¿§ ñ -·¹²°±-¬ - when this option is selected, the next
major road on your route is shown at the top of the screen in the Driving
View.
!͸±© ½«®®»²¬ -¬®»»¬ ²¿³» ±² ³¿°
57
Í»¬ «²·¬-
This button may only be available if all menu options are shown. To show all
menu options, tap ͸±© ßÔÔ ³»²« ±°¬·±²-.
For more information, see Ø·¼¼»² ¾«¬¬±²- ¿²¼ º»¿¬«®»- on page 48.
Ñ°»®¿¬» ´»º¬ó¸¿²¼»¼ ñ Ñ°»®¿¬» ®·¹¸¬ ¸¿²¼»¼
This button may only be available if all menu options are shown. To show all
menu options, tap ͸±© ßÔÔ ³»²« ±°¬·±²-.
For more information, see Ø·¼¼»² ¾«¬¬±²- ¿²¼ º»¿¬«®»- on page 48.
Õ»§¾±¿®¼ °®»º»®»²½»-
Í»¬ «²·¬-
Tap this button to set the type of units that will be shown for the following:
!Distance
!Time
!Latitude and longitude
!Temperature
!Air pressure
Ñ°»®¿¬» ´»º¬ó
¸¿²¼»¼
Tap this button to move important buttons, for example, the ܱ²» and
Ý¿²½»´ buttons as well as the zoom bar, to the left hand side of the screen.
This makes it easier to tap the buttons with your left hand without blocking
the screen.
To move the buttons back to the right hand side of the screen, tap Ñ°»®¿¬»
®·¹¸¬ó¸¿²¼»¼.
Õ»§¾±¿®¼
°®»º»®»²½»-
You use the keyboard to enter your destination or to find an item in a list,
such as a POI.
Tap this button to select the size of the keys on the keyboard and the
keyboard layout. You can select from two sizes:
!Ô¿®¹» µ»§¾±¿®¼
!ͳ¿´´ µ»§¾±¿®¼
Three keyboard layouts are available:
!ßÞÝÜ µ»§¾±¿®¼
!ÏÉÛÎÌÇ µ»§¾±¿®¼
!ßÆÛÎÌÇ µ»§¾±¿®¼
Ò±¬»æ ̸» µ»§¾±¿®¼ ¼±»- ²±¬ ·²½´«¼» ¿½½»²¬- ±º ¿²§ µ·²¼ º±® ¿²§ ´¿²¹«¿¹»
-± §±« ¼±²Ž¬ ¸¿ª» ¬± ©±®®§ ¿¾±«¬ »²¬»®·²¹ ´»¬¬»®- ©·¬¸ ¿½½»²¬-ò Í·³°´§ ¬§°»
¬¸» ´»¬¬»® ©·¬¸±«¬ ¬¸» ¿½½»²¬ ¿²¼ §±«® ÙÑ ©·´´ ®»½±¹²·-» ¬¸» ©±®¼ò
58
д¿²²·²¹ °®»º»®»²½»-
This button may only be available if all menu options are shown. To show all
menu options, tap ͸±© ßÔÔ ³»²« ±°¬·±²-.
For more information, see Ø·¼¼»² ¾«¬¬±²- ¿²¼ º»¿¬«®»- on page 48.
̱´´ ®±¿¼ °®»º»®»²½»-
This button may only be available if all menu options are shown. To show all
menu options, tap ͸±© ßÔÔ ³»²« ±°¬·±²-.
For more information, see Ø·¼¼»² ¾«¬¬±²- ¿²¼ º»¿¬«®»- on page 48.
д¿²²·²¹
°®»º»®»²½»-
Tap this button to set the kind of route planned when you select a
destination.
The following options are available:
!ß-µ ³» »ª»®§ ¬·³» × °´¿²
!ß´©¿§- °´¿² º¿-¬»-¬ ®±«¬»-
!ß´©¿§- °´¿² -¸±®¬»-¬ ®±«¬»-
!ß´©¿§- ¿ª±·¼ ³±¬±®©¿§-
!ß´©¿§- °´¿² ©¿´µ·²¹ ®±«¬»-
!ß´©¿§- °´¿² ¾·½§½´» ®±«¬»-
!ß´©¿§- °´¿² º±® ´·³·¬»¼ -°»»¼
Then answer the following question:
ܱ §±« ©¿²¬ ¬¸» ®±«¬» -«³³¿®§ -½®»»² ¬± ½´±-» ¿«¬±³¿¬·½¿´´§ ¿º¬»® ïð
-»½±²¼-á
̱´´ ®±¿¼
°®»º»®»²½»-
Tap this button to set how your GO handles toll roads if they are on the
route to a destination you set. You can choose from the following options:
!ß-µ ³» ©¸»² ¬¸»®» ¿®» ¬±´´ ®±¿¼- ±² ³§ ®±«¬» - you are asked if you
want to avoid a toll road whenever you plan a route.
!ß´©¿§- ¿ª±·¼ ¬±´´ ®±¿¼-
!Ò»ª»® ¬± ¿ª±·¼ ¬±´´ ®±¿¼-
59
Í»¬ ±©²»®
This button may only be available if all menu options are shown. To show all
menu options, tap ͸±© ßÔÔ ³»²« ±°¬·±²-.
For more information, see Ø·¼¼»² ¾«¬¬±²- ¿²¼ º»¿¬«®»- on page 48.
Í°»¿µ»® °®»º»®»²½»-
This button may only be available if all menu options are shown. To show all
menu options, tap ͸±© ßÔÔ ³»²« ±°¬·±²-.
For more information, see Ø·¼¼»² ¾«¬¬±²- ¿²¼ º»¿¬«®»- on page 48.
Í»¬ ±©²»®
Tap this button to enter your name and address as the owner of your GO
and to change or delete a 4-digit password for your GO.
Ò±¬»æ DZ« ½¿² ±²´§ ½¸¿²¹» ±® ¼»´»¬» ¿ ìó¼·¹·¬ °¿--©±®¼ ±² §±«®
̱³Ì±³ÙÑò
You can create a 4-digit password for your GO using TomTom HOME:
1.Connect your GO to your computer and turn on your GO and your
computer.
TomTom HOME starts automatically.
For information about installing TomTom HOME on your computer, see
Ë-·²¹ ̱³Ì±³ ØÑÓÛ on page 101.
2.From the Options menu in TomTom HOME, click My GO.
3.Click the ON/OFF button on the picture of your GO to start the application
on your computer.
4.From the Main Menu, click ݸ¿²¹» °®»º»®»²½»-.
5.Click Í»¬ Ñ©²»®. You can now set a 4-digit password for your GO.
You can only create a 4-digit password using TomTom HOME.
Í°»¿µ»®
°®»º»®»²½»-
Tap this button to select which speakers are used by your GO for playing
music and spoken instructions.
For more information, see ײ¬»®²¿´ ¿²¼ »¨¬»®²¿´ -°»¿µ»®- on page 17.
The following options are available:
!ײ¬»®²¿´ -°»¿µ»®
!Þ´«»¬±±¬¸ Ø·óÚ· ¼»ª·½»
!Ô·²»ó±«¬ ø¿«¼·± ½¿¾´»÷
!ÚÓ ¬± §±«® ½¿® ®¿¼·±
Ò±¬»æ ̸» ÚÓ Ì®¿²-³·¬¬»® ·- ¿ª¿·´¿¾´» ·² ¬¸» ÙÑ ëíðô éíð ¿²¼ çíðò
60
Ý¿® °®»º»®»²½»-
This button may only be available if all menu options are shown. To show all
menu options, tap ͸±© ßÔÔ ³»²« ±°¬·±²-.
For more information, see Ø·¼¼»² ¾«¬¬±²- ¿²¼ º»¿¬«®»- on page 48.
Ó«-·½ °®»º»®»²½»-
This button may only be available if all menu options are shown. To show all
menu options, tap ͸±© ßÔÔ ³»²« ±°¬·±²-.
For more information, see Ø·¼¼»² ¾«¬¬±²- ¿²¼ º»¿¬«®»- on page 48.
Ý¿®
Ю»º»®»²½»-
Tap this button to change the way your GO responds to events in your car.
!Ô·²µ ²·¹¸¬ ª·»© ¬± ¸»¿¼´·¹¸¬-
!ײ-¬®«½¬·±²- ³«¬» ½¿® ®¿¼·±
Ó«-·½
Ю»º»®»²½»-
Tap this button to change the way your GO behaves when playing music.
!͸«ºº´» -±²¹-
!λ°»¿¬ -±²¹-
!λ¼«½» ¾®·¹¸¬²»--
!͸±© ³«-·½ ¾«¬¬±² ·² Ü®·ª·²¹ Ê·»©
!ß«¬±³¿¬·½¿´´§ -©·¬½¸ ¬± Ü®·ª·²¹ Ê·»©
!Í´·¼»-¸±©
Ò±¬»æ ̸» ÚÓ Ì®¿²-³·¬¬»® ·- ¿ª¿·´¿¾´» ·² ¬¸» ÙÑ ëíðô éíð ¿²¼ çíðò
61
ͬ¿®¬ó«° °®»º»®»²½»-
This button may only be available if all menu options are shown. To show all
menu options, tap ͸±© ßÔÔ ³»²« ±°¬·±²-.
For more information, see Ø·¼¼»² ¾«¬¬±²- ¿²¼ º»¿¬«®»- on page 48.
Þ´«»¬±±¬¸ °®»º»®»²½»-
This button may only be available if all menu options are shown. To show all
menu options, tap ͸±© ßÔÔ ³»²« ±°¬·±²-.
For more information, see Ø·¼¼»² ¾«¬¬±²- ¿²¼ º»¿¬«®»- on page 48.
ͬ¿®¬ó«°
°®»º»®»²½»-
Tap this button to select how your GO will behave when you turn on the
device. The following options are available:
!ݱ²¬·²«» ©¸»®» × ´»º¬ ±ºº - your GO starts and shows the last screen that
was shown when you turned off the device.
!ß-µ º±® ¿ ¼»-¬·²¿¬·±² - your GO starts with Ò¿ª·¹¿¬» ¬±òòò menu. You can
enter a destination immediately.
!͸±© ¬¸» Ó¿·² Ó»²« - your GO starts with the Main Menu.
!ͬ¿®¬ TomTom Ö«µ»¾±¨ - your GO starts by opening the TomTom
Jukebox.
!ͬ¿®¬ Í´·¼»-¸±© - your GO starts by showing a slideshow of the images
stored there. To interrupt the slideshow, tap the screen.
You are then asked if you want to change the picture that is shown
whenever you start your GO.
Tap Ò± to finish or tap Ç»- to see the photos stored on your GO and tap on
a photo to select that photo for use as your start-up picture.
Þ´«»¬±±¬¸
°®»º»®»²½»-
Tap this button to disable or enable Bluetooth functionality on your GO.
Tap ß¼ª¿²½»¼ to set how the Bluetooth connection with your phone wil be
used.
You can select any of the following options:
!Û²¿¾´» ©·®»´»-- ¼¿¬¿
!Û²¿¾´» ¸¿²¼-󺮻» ½¿´´·²¹
In some places, such as hospitals and aeroplanes, you are required to turn
Bluetooth off on all electronic devices.
62
Ü·-¿¾´» ©·®»´»-- ¼¿¬¿ ñ Û²¿¾´» ©·®»´»-- ¼¿¬¿
This button may only be available if all menu options are shown. To show all
menu options, tap ͸±© ßÔÔ ³»²« ±°¬·±²-.
For more information, see Ø·¼¼»² ¾«¬¬±²- ¿²¼ º»¿¬«®»- on page 48.
Í»²¼ñλ½»·ª» º·´»-
This button may only be available if all menu options are shown. To show all
menu options, tap ͸±© ßÔÔ ³»²« ±°¬·±²-.
For more information, see Ø·¼¼»² ¾«¬¬±²- ¿²¼ º»¿¬«®»- on page 48.
Û¼·¬ ̱³Ì±³ Í»®ª·½»- ¿½½±«²¬
This button may only be available if all menu options are shown. To show all
menu options, tap ͸±© ßÔÔ ³»²« ±°¬·±²-.
For more information, see Ø·¼¼»² ¾«¬¬±²- ¿²¼ º»¿¬«®»- on page 48.
Ü·-¿¾´»
©·®»´»-- ¼¿¬¿
Tap this button to block the reception of wireless data. You will still be
connected to your mobile phone via Bluetooth and will still be able to
receive and make hands-free calls. You will not be able to receive any data
that uses a wireless data connection, such as TomTom Traffic.
To turn wireless data on again, tap Û²¿¾´» ©·®»´»-- ¼¿¬¿.
Í»²¼ñλ½»·ª»
º·´»-
Tap this button to send or receive files, such as itineraries and voices, using
your GO with other Bluetooth devices.
Û¼·¬ ̱³Ì±³
¿½½±«²¬
Tap this button to log in to your TomTom account.
If you have more than one TomTom account or if several people are sharing
the same TomTomGO, you can create another TomTom account using a
different email address.
63
Þ¿¬¬»®§ -¿ª·²¹ °®»º»®»²½»-
This button may only be available if all menu options are shown. To show all
menu options, tap ͸±© ßÔÔ ³»²« ±°¬·±²-.
For more information, see Ø·¼¼»² ¾«¬¬±²- ¿²¼ º»¿¬«®»- on page 48.
ݸ¿²¹» ´¿²¹«¿¹»
Í»¬ ½´±½µ
Ø·¼¼»² ¾«¬¬±²- ¿²¼ º»¿¬«®»-
When you first start using your TomTomGO, all the buttons are shown in the
menu.
Þ¿¬¬»®§ -¿ª·²¹
°®»º»®»²½»-
Tap this button to configure your GO to conserve power when possible. The
following options are available:
!Ò»ª»® ¬«®² ±ºº -½®»»²
!Ì«®² ±ºº -½®»»² ¾»¬©»»² ·²-¬®«½¬·±²-
!ß´©¿§- ¬«®² ±ºº -½®»»²
Then select whether or not you want to Í©·¬½¸ ±ºº ©¸»² »¨¬»®²¿´ °±©»® ·-
´±-¬.
ݸ¿²¹»
´¿²¹«¿¹»
Tap this button to change the language used for all the buttons and
messages you see on your GO.
You can choose from a wide range of languages. When you change the
language, you are also given the opportunity to change the voice.
Í»¬ ½´±½µ
Tap this button to select the type of clock that is shown and set the time.
The easiest way to set the time is by tapping the ͧ²½ button. Your GO will
then take the time from GPS information.
For more information about GPS, see Ù´±¾¿´ б-·¬·±²·²¹ ͧ-¬»³ øÙÐÍ÷ on
page 100.
Ò±¬»æ ߺ¬»® «-·²¹ ͧ²½ ¬± -»¬ ¬¸» ¬·³»ô §±« ³¿§ ¸¿ª» ¬± ¿¼¶«-¬ ¬¸» ¸±«®-
¼»°»²¼·²¹ ±² §±«® ¬·³» ¦±²»ò DZ«® ÙÑ ©±®µ- ±«¬ §±«® ¬·³» ¦±²» ¿²¼
¿´©¿§- µ»»°- ¬¸» ¬·³» ½±®®»½¬ «-·²¹ ÙÐÍ ·²º±®³¿¬·±²ò
DZ« ½¿² ±²´§ «-» ͧ²½ ·º §±« ¸¿ª» ÙÐÍ ®»½»°¬·±²ô -± §±« ½¿²²±¬ -»¬ ¬¸»
½´±½µ ·² ¬¸·- ©¿§ ©¸»² §±« ¿®» ·²¼±±®-ò
64
The buttons for the more advanced features can be hidden. This is a useful
option because you are unlikely to use certain features very often.
Ø·¼» ¬·°- ñ ͸±© ¬·°-
This button may only be available if all menu options are shown. To show all
menu options, tap ͸±© ßÔÔ ³»²« ±°¬·±²-.
For more information, see Ø·¼¼»² ¾«¬¬±²- ¿²¼ º»¿¬«®»- on page 48.
λ-»¬ º¿½¬±®§ -»¬¬·²¹-
This button may only be available if all menu options are shown. To show all
menu options, tap ͸±© ßÔÔ ³»²« ±°¬·±²-.
For more information, see Ø·¼¼»² ¾«¬¬±²- ¿²¼ º»¿¬«®»- on page 48.
͸±© º»©»®
³»²« ±°¬·±²-
Tap this button in the Preferences menu, to reduce the number of buttons
that are shown.
You might want to do this so that only frequently used buttons are shown.
When you need to use the buttons that are hidden, you can press ͸±©
ßÔÔ ³»²« ±°¬·±²- in the Preferences menu to show all buttons.
͸±© ßÔÔ
³»²« ±°¬·±²-
Tap this button in the Preferences menu, to show all the buttons available
on your TomTomGO.
Ø·¼» ¬·°-
Tap this button to stop your GO from showing tips.
To turn tips on again, tap ͸±© ¬·°-.
λ-»¬ º¿½¬±®§
-»¬¬·²¹-
Tap this button to restore the factory settings to your TomTomGO.
All your settings, including Favourites, your Home location, warnings for
POIs and any Itineraries you have created, as well as recent destinations
and recent calls and callers, will be deleted.

̱³Ì±³ Í»®ª·½»-ïéò
65
TomTom Services TomTom Services keep you informed and entertained while you re on the
road.
You can subscribe to a range of extras and download them either directly to
your GO, or to your computer from where you can transfer them to your GO.
Ì·°-
!New services are being added regularly. Use TomTom HOME or visit
©©©ò¬±³¬±³ò½±³ñ-»®ª·½»- to find out what s available.
!To download TomTom services to your GO, you need a mobile phone with
Bluetooth and a wireless data connection (GPRS, EDGE, UMTS or CDMA).
Your mobile operator may charge you for using a wireless data connection.
Don t forget that you can download many TomTom services to your
computer without needing to set up a wireless data connection.
!Not all services are available in all countries. For more information, visit
©©©ò¬±³¬±³ò½±³ñ-»®ª·½»-

̱³Ì±³Ó¿° ͸¿®»ïèò
66
TomTomMap Share TomTomMap ShareTM is a free technology that lets you make updates to
your map and if you want to, share those updates with other members of the
TomTomMap Share community.
If you find a street that has recently been blocked to traffic which was open
before, you can use Map Share to update your map and then share the update
with other Map Share members.
You can use Map Shareto send and receive map updates during the first year
after the map s release date. This means that one year after the release date,
you will no longer be able to send or receive map updates for that version of
the map - You will still be able to make updates to your own map for use on
your own device.
When you join the TomTomMap Share community you can keep your maps
up-to-date with the latest updates made by other Map Share community
members.
You choose the type of updates you want and each time you connect your
TomTomGO to TomTom HOME, the map is automatically updated.
̱³Ì±³Ó¿° ͸¿®» ½±³³«²·¬§
To join the Map Share community, do the following:
1.Tap Ó¿° ½±®®»½¬·±²- in the Main Menu.
Ì·°: If you cannot see the Ó¿° ½±®®»½¬·±²- button in the Main Menu, tap ͸±©
ßÔÔ ³»²« ±°¬·±²- in the Preferences menu.
2.Tap ܱ©²´±¿¼ ½±®®»½¬·±²- ³¿¼» ¾§ ±¬¸»®-.
3.Tap Ö±·².
When you connect your TomTomGO to computer, TomTom HOME
automatically downloads any available map updates and sends any changes
you have made, to the Map Share community.
Ó¿° «°¼¿¬»-
There are two types of map update:
!Updates that are immediately shown on the map. These include, changing
the traffic flow of a street, blocking or renaming a street and adding or
editing POIs.
This type of change is immediately shown on your own map. You can hide
these updates at any time in the Map Share preferences menu.
67
For more information on showing and hiding updates, see ݸ¿²¹·²¹ ³§
°®»º»®»²½»- º±® ³¿° «°¼¿¬»- on page 68.
!Updates that are reported to TomTom but not shown immediately on your
map. These include, missing streets, errors in motorway entrances and
exits and missing roundabouts.
This type of update is investigated by TomTom and once verified, is included
in the next map release. These updates are therefore not shared with the Map
Share community.
Ì·°: If you cannot see the Ó¿° ½±®®»½¬·±²- button in the Main Menu, tap ͸±©
ßÔÔ ³»²« ±°¬·±²- in the Preferences menu.
Ó¿µ·²¹ ¿ ³¿° «°¼¿¬»
Ó¿®µ·²¹ ¿ ³¿° »®®±® ©¸·´» ±² ¬¸» ³±ª»
If you notice an item on your map that needs attention, you can mark the
location using the λ°±®¬ button and then enter the details when you are no
longer driving.
To show the λ°±®¬ button in the Driving View, do the following:
1.Tap Ó¿° ½±®®»½¬·±²- in the Main Menu.
Ì·°: If you cannot see the Ó¿° ½±®®»½¬·±²- button in the Main Menu, tap ͸±©
ßÔÔ ³»²« ±°¬·±²- in the Preferences menu.
2.Tap ݱ®®»½¬·±² °®»º»®»²½»-.
3.Tap ܱ²» and then tap ܱ²» again.
4.Select ͸±© ®»°±®¬ ¾«¬¬±², then tap ܱ²».
The λ°±®¬ button is shown on the left-hand side of the Driving View. After
you mark a location, you can add more information about the change when
you open the Ó¿° ½±®®»½¬·±²- menu.
For example, you are driving to a friend's house and you notice that the name
of the street you are on is different from the one on your map. To report the
ݱ®®»½¬ ¿ ³¿°
»®®±®
1.Tap Ó¿° ½±®®»½¬·±²- in the Main Menu.
2.Tap ݱ®®»½¬ ¿ ³¿° »®®±®.
A list of possible map updates is shown.
3.Select the type of update you want to report.
Ò±¬»æ ׺ §±« ¬¿° ß¼¼ ³·--·²¹ ÐÑ× ±® λ°±®¬ ±¬¸»® »®®±® §±« ©·´´ ¾» ¿-µ»¼ º±®
-±³» ¿¼¼·¬·±²¿´ ·²º±®³¿¬·±² ¾»º±®» ¬¸» ²»¨¬ -¬»°ò
4.Select the method you want to use for selecting the location of the
update.
5.When you have found the location, tap ܱ²».
6.Enter update or confirmation of update now.
For more information on the different types of updates you can make, see
Ó¿° «°¼¿¬» ½¿¬»¹±®·»- on page 68.

68
change, tap the λ°±®¬ button and your GO will save your current location.
You can then send the update to TomTomMap Share when you have finished
your journey.
For more information see ݸ¿²¹·²¹ ³§ °®»º»®»²½»- º±® ³¿° «°¼¿¬»- on page
68.
λ½»·ª·²¹ ¬¸» ´¿¬»-¬ ³¿° «°¼¿¬»-
When you connect your TomTomGO to your computer, TomTom HOME
automatically downloads any available map updates and sends any changes
you have made, to the Map Share community.
There are several types of updates which can be set in the Correction
preferences menu.
For information about how to do this, see ݸ¿²¹·²¹ ³§ °®»º»®»²½»- º±® ³¿°
«°¼¿¬»- on page 68.
ݸ¿²¹·²¹ ³§ °®»º»®»²½»- º±® ³¿° «°¼¿¬»-
Correction preferences is used to set the way TomTomMap Share runs on
your device.
You can set the following preferences:
!Choose what types of updates you want to use on your maps.
!Decide if you want to share your updates with others.
!Show or hide the λ°±®¬ button in the Driving View.
To set your preferences, do the following:
1.Tap Ó¿° ½±®®»½¬·±²- in the Main Menu.
2.Tap ݱ®®»½¬·±² °®»º»®»²½»-.
A list of update types is shown.
3.Tick the box next to each update type you want use.
4.Tap ܱ²».
5.Choose how you want to share your map updates with the Map Share
community, then tap ܱ²».
6.Choose if you want to see the λ°±®¬ button in the Driving View.
7.Tap ܱ²».
Ì·°: If you later decide you want to remove updates from the map, clear the
checkbox next to the types of update you want to remove. If you clear all the
checkboxes, your map returns to the original state before the first update.
For more information on how to use the λ°±®¬ button, see Ó¿®µ·²¹ ¿ ³¿°
»®®±® ©¸·´» ±² ¬¸» ³±ª» on page 67.
Ó¿° «°¼¿¬» ½¿¬»¹±®·»-
There are several types of update that you can make to a map.
69
To make an update to your map, tap Ó¿° ½±®®»½¬·±²- in the Main Menu then
tap ݱ®®»½¬ ¿ ³¿° »®®±®. The following types of updates are shown.
ø˲÷¾´±½µ
-¬®»»¬
Tap this button to block or unblock a street. You can block or unblock the
street in one or both directions.
For example, to correct a street near to your current location, do the
following:
1.Tap ø˲÷¾´±½µ -¬®»»¬.
2.Tap Ò»¿® §±« to select a street near your current location. You can select
a street by name, a street near your Home location or a street on the
map.
3.Select the street or section of a street you want to correct by tapping it
on the map.
The street you select is highlighted and the cursor shows the name of
the street.
4.Tap ܱ²».
Your device shows the street and whether the traffic is blocked or
allowed in each direction:
5.Tap one of the direction buttons to block or unblock the flow of traffic in
that direction.
6.Tap ܱ²».
The next time you connect your device to TomTom HOME, your updates
are shared with the TomTomMap Share community.
못®-» ¬®¿ºº·½
¼·®»½¬·±²
Tap this button to correct the traffic direction of a one-way street, where the
direction of traffic is different to the direction shown on your map.
Ò±¬»æ 못®-» ¬®¿ºº·½ ¼·®»½¬·±² ±²´§ ©±®µ- º±® ±²»ó©¿§ -¬®»»¬-ò ׺ §±« -»´»½¬
¿ ¬©±ó©¿§ -¬®»»¬ §±« ©·´´ ¾» ¹·ª»² ¬¸» ½¸¿²½» ¬± ¾´±½µñ«²¾´±½µ ¬¸» -¬®»»¬
®¿¬¸»® ¬¸¿² ½¸¿²¹·²¹ ¬¸» ¼·®»½¬·±²ò
70
Û¼·¬ -¬®»»¬
²¿³»
Tap this button to change the name of a street on your map.
For example, to rename a street near to your current location:
1.Tap Û¼·¬ -¬®»»¬ ²¿³»ò
2.Tap Ò»¿® §±«.
3.Select the street or section of a street you want to correct by tapping it
on the map.
The street you select is highlighted and the cursor shows the name of
the street.
4.Tap ܱ²».
5.Type the correct street name.
6.Tap ܱ²».
ݸ¿²¹» ¬«®²
¼·®»½¬·±²-
Tap this button to change and report incorrect road turn directions.
ݸ¿²¹» ®±¿¼
-°»»¼
Tap this button to change and report road speed limit.
ß¼¼ ³·--·²¹
ÐÑ×
Tap this button to add a new Point of Interest (POI).
For example to add a new restaurant near to your current location:
1.Tap ß¼¼ ³·--·²¹ ÐÑ×.
2.Tap λ-¬¿«®¿²¬ in the list of POI categories.
3.Tap Ò»¿® §±«.
4.Select the location of the missing restaurant.
You can select the location by entering the address or by selecting the
location on the map. Select Ò»¿® §±« or Ò»¿® ¸±³» to open the map at
your current location or at your Home location.
5.Tap ܱ²».
6.Type the name of the restaurant then tap ÑÕ.
7.If you know the telephone number of the restaurant you can type it, then
tap ÑÕ.
If you don t know the number, just tap ÑÕ without typing a number.
-¼¶ªº¾µ-ªµ
ª¿¾½µ½ -¼²

71
Û¼·¬ ÐÑ×
Tap this button to edit an existing POI.
You can use this button to make the following changes to a POI:
!Delete the POI.
!Rename the POI.
!Change the telephone number of the POI.
!Change the category that a POI belongs to.
!Move the POI on the map.
λ°±®¬ ±¬¸»®
»®®±®
Tap this button to report other types of update.
These updates are not immediately corrected on your map. Your
TomTomGO sends a special update report to TomTomMap Share.
You can report missing streets, errors in motorway entrances and exits and
missing roundabouts. If the update you want to report is not covered by
any of these report types, enter a general description then tap Ѭ¸»®.
Ì®¿ºº·½ ·²º±®³¿¬·±²ïçò
72
Traffic information You can obtain traffic information in three ways:
!TomTom HD Traffic
!TomTom Traffic
!Traffic Message Channel (TMC)
׳°±®¬¿²¬: Reliable TMC Traffic reception is highly dependent upon optimal
antenna placement, vehicle features such as windscreen reflective shielding,
the surrounding environment such as mountains and high buildings and RDS-
TMC Radio station transmission signal strength.
Some vehicles have a heat reflective shield embedded in the windscreen
which might prevent a navigation device from locating your current position.
If this is a problem in your vehicle, use the TomTom External Antenna Kit
(available as an accessory).
̱³Ì±³ ØÜ Ì®¿ºº·½
TomTom HD Traffic is a unique TomTom service for receiving up-to-date
traffic information. It helps you plan the smartest route possible to your
destination.
To use TomTom HD Traffic you need a TomTom HD Traffic Receiver.
Ò±¬»æ ̸» ØÜ Ì®¿ºº·½ λ½»·ª»® ·- ·²½´«¼»¼ ©·¬¸ ̱³Ì±³ÙÑ ëíðñéíðñçíð
ØÜÌ®¿ºº·½ò Ê·-·¬ ©©©ò¬±³¬±³ò½±³ ¬± º·²¼ ±«¬ ·º ¬¸» ØÜ Ì®¿ºº·½ λ½»·ª»® ·-
¿ª¿·´¿¾´» ¿- ¿² ¿½½»--±®§ ·² §±«® ®»¹·±²ò
For more information about HDTraffic, see ̱³Ì±³ ØÜ Ì®¿ºº·½ ·²º±®³¿¬·±²
on page 90.
Í»¬¬·²¹ «° ̱³Ì±³ ØÜ Ì®¿ºº·½
To start using TomTom HD Traffic, you need to connect your TomTom HD
Traffic Receiver to your TomTom navigation device:
1.Insert the HD Traffic Receiver into your car s cigarette lighter.
The red Power indicator turns on.
2.Insert the USB cable into your navigation device.
73
The blue HD Traffic Receiver indicator flashes while your HD Traffic
Receiver attempts to connect to the TomTom HD Traffic Receiver service.
When the connection is made, the HD Traffic Receiver indicator stops
flashing and stays lit.
You can now begin using your HD Traffic Receiver.
Í¿º»¬§ Ò±¬·½»
A TomTom HD Traffic Receiver contains a GSM module which can interfere
with electrical devices such as cardiac pacemakers, hearing aids and aviation
equipment.
Interference with these devices may endanger the health or life of others.
Do not use near unprotected electrical units nor in areas where the use of
mobile telephones is prohibited, such as hospitals and airplanes.
̱³Ì±³ Ì®¿ºº·½
TomTom Traffic is a TomTom Service, available as a subscription, for
receiving up-to-date traffic information from the best local sources.
Ò±¬»æ ̱³Ì±³ Ì®¿ºº·½ ·- ²±¬ ¿ª¿·´¿¾´» ·² ¿´´ ½±«²¬®·»- ±® ¿®»¿-ò Ù± ¬±
¬±³¬±³ò½±³ñ-»®ª·½»- ¬± ½¸»½µ ¿ª¿·´¿¾·´·¬§ ·² §±«® ½±«²¬®§ò
To use TomTom Traffic, you will need to establish a wireless data connection
(GPRS, EDGE, UMTS, CDMA) between your TomTom device and a Bluetooth
enabled mobile phone and you must have a wireless data subscription with
your mobile network operator. For more information, go to ¬±³¬±³ò½±³ñ
°¸±²»-
To use TomTom Traffic, do the following:
1.Tap TomTom Ì®¿ºº·½ in the Main Menu.
You will be prompted to set up a wireless data connection with your mobile
phone, and then to enter your MyTomTom account details.
2.Tap Û²¿¾´» Ì®¿ºº·½.
For more information, see ̱³Ì±³ Ì®¿ºº·½ on page 75.

74
̸» Ì®¿ºº·½ Ó»--¿¹» ݸ¿²²»´ øÌÓÝ÷
TMC transmits traffic information as a radio signal and is available free-of-
charge in many countries.
TMC is not a TomTom Service, but is available when using the TomTom RDS-
TMC Traffic Receiver. The TomTom RDS-TMC Traffic Receiver is included
with some products and available as an accessory for others.
Ò±¬»æ ̱³Ì±³ ·- ²±¬ ®»-°±²-·¾´» º±® ¬¸» ¿ª¿·´¿¾·´·¬§ ±® ¯«¿´·¬§ ±º ¬®¿ºº·½
·²º±®³¿¬·±² °®±ª·¼»¼ ¾§ ÌÓÝò
ÌÓÝ ·- ²±¬ ¿ª¿·´¿¾´» ·² ¿´´ ½±«²¬®·»- ±® ®»¹·±²-ò Ù± ¬± ¬±³¬±³ò½±³ñ®¼-󬳽
¬± ½¸»½µ º±® ¿ª¿·´¿¾·´·¬§ ·² §±«® ½±«²¬®§ ±® ®»¹·±²ò
For more information, see Ì®¿ºº·½ ·²º±®³¿¬·±² «-·²¹ ÎÜÍóÌÓÝ on page 82.
̱³Ì±³ Ì®¿ºº·½îðò
75
TomTom Traffic TomTom Traffic is a TomTom Service for receiving up-to-date traffic
information. TomTom Traffic requires a Bluetooth enabled mobile phone and
a wireless data connection (GPRS, EDGE, UMTS, CDMA).
TomTom Traffic uses the most up-to-date information from the best local
sources. For more information about subscribing see ¬±³¬±³ò½±³ñ-»®ª·½»-
Í»¬¬·²¹ «° ̱³Ì±³ Ì®¿ºº·½
To use TomTom Traffic, you need to establish a connection between your
mobile phone and your TomTom device. If you have not already done so, tap
Ó±¾·´» °¸±²» in the Ó¿·² Ó»²« to establish this connection and then do the
following:
1.Tap TomTom Ì®¿ºº·½ in the Main Menu.
2.Tap Û²¿¾´» Ì®¿ºº·½.
Ò±¬»æ ̱³Ì±³ Ì®¿ºº·½ ®»¬®·»ª»- ¬®¿ºº·½ ·²º±®³¿¬·±² «-·²¹ ¿ ©·®»´»-- ¼¿¬¿
½±²²»½¬·±² ±² §±«® ³±¾·´» °¸±²»ò DZ« ³«-¬ »-¬¿¾´·-¸ ¿ Þ´«»¬±±¬¸ ½±²²»½¬·±²
¾»¬©»»² §±«® °¸±²» ¿²¼ §±«® ¼»ª·½» ¿²¼ §±« ³«-¬ ¿´-± ¸¿ª» ¿ ©·®»´»-- ¼¿¬¿
-«¾-½®·°¬·±² ©·¬¸ §±«® ³±¾·´» ²»¬©±®µ ±°»®¿¬±®ò
3.Enter your username and password.
The Traffic sidebar is shown on the right-hand side of the Driving View and
your device retrieves the latest traffic information from TomTom.
The following symbols are shown at the top of the Traffic sidebar:
Your device is busy retrieving traffic information.
Traffic information is up to date.
76
Ì·°: Providing you have a connection between your device and mobile phone,
You can retrieve the latest traffic information straight away by tapping the
Ë°¼¿¬» ¬®¿ºº·½ ·²º± button in the Traffic menu.
Ë-·²¹ ̱³Ì±³ Ì®¿ºº·½
Traffic information has not been updated for at least 15 minutes.
Traffic information has not been updated for at least 30 minutes.
Traffic information has not been updated for at least 45 minutes.
Traffic information has not been updated for at least one hour.
No connection is available between your TomTom device and
your mobile.
If you have a route planned on your device and there are any incidents on
that route, the Traffic sidebar on the right side of the Driving View warns
you. An example of a Traffic sidebar with a traffic warning is shown on the
left. For information on the Traffic sidebar, see ̸» Ì®¿ºº·½ -·¼»¾¿® on page
77.
In the example on the left there is a traffic jam on your route that will cause
an expected delay of 38 minutes, 20 km ahead of you. To find the quickest
route to your destination, do the following:
1.Tap the Traffic sidebar.
Ì·°: If you have trouble tapping the Traffic sidebar and the Main Menu is
being displayed instead of the traffic menu, try tapping your finger half on
the Traffic sidebar and half off the screen.
2.Tap Ó·²·³·-» ¬®¿ºº·½ ¼»´¿§-.
Your device looks for the quickest route to your destination.
It is possible that the new route may also include traffic delays, or may
even be the same route as before. You can re-plan the route to avoid all
delays, but this new route will take longer than the quickest route already
shown.
3.Tap ܱ²».
Ì·°: You can let your TomTom device automatically minimise traffic delays
for you. To do this, see ݸ¿²¹·²¹ ¬®¿ºº·½ °®»º»®»²½»- on page 77.
íè ³·²
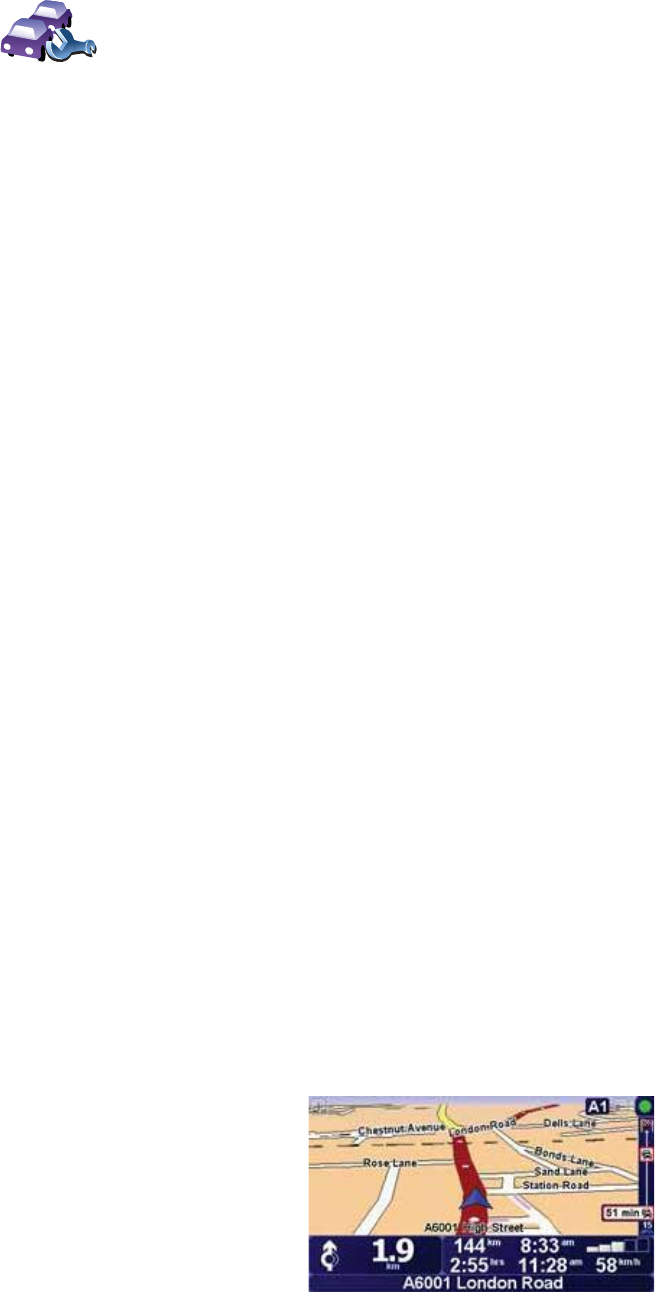
77
ݸ¿²¹·²¹ ¬®¿ºº·½ °®»º»®»²½»-
Use the ݸ¿²¹» Ì®¿ºº·½ °®»º»®»²½»- button to choose how traffic information
works on your device.
3.Select or clear the check box next to each preference you want to change.
4.Tap ܱ²».
5.If you chose to automatically update traffic information while on route (one
of the options shown above), you are asked if you want to limit how often
that information is updated.
Tap Ò± to use the default interval of 4 minutes.
Tap Ç»- if you want to change the frequency of your automatic traffic
updates.
6.Tap ܱ²».
̸» Ì®¿ºº·½ -·¼»¾¿®
The Traffic sidebar shows you the traffic incidents on your route. It shows the
following information:
!A symbol for each traffic incident in the order they occur along your
planned route.
!The estimated delay of the next traffic incident on your route.
!The distance from your current location to the first incident on the Traffic
sidebar.
An example of a Traffic sidebar is shown below.
ݸ¿²¹» Ì®¿ºº·½
°®»º»®»²½»-
To change your traffic preferences, do the following:
1.Tap the TomTom Ì®¿ºº·½ button in the Main Menu on your device.
2.Tap ݸ¿²¹» Ì®¿ºº·½ °®»º»®»²½»-.
You can change the following preferences:
!ß«¬±³¿¬·½¿´´§ ³·²·³·-» ¼»´¿§- ¿º¬»® »ª»®§ ¬®¿ºº·½ «°¼¿¬» - if you select
this option, your device automatically recalculates your route when new
delays occur on your route.
!ß«¬±³¿¬·½¿´´§ «°¼¿¬» ¬®¿ºº·½ ·²º± ©¸·´» ±² ®±«¬» - if you select this
option, your device automatically updates traffic information whenever
you have a route planned.
!Þ»»° ©¸»² ¬®¿ºº·½ -·¬«¿¬·±² ±² ®±«¬» ½¸¿²¹»- - if you select this option
your device beeps when a new traffic incident occurs on your current
route.
!ß-µ º±® ¬®¿ºº·½ «°¼¿¬»- ©¸»² °®»°¿®·²¹ ¿ ®±«¬» - if you select this
option, your device asks if you want to update traffic information before
looking for any delays on routes that you plan.
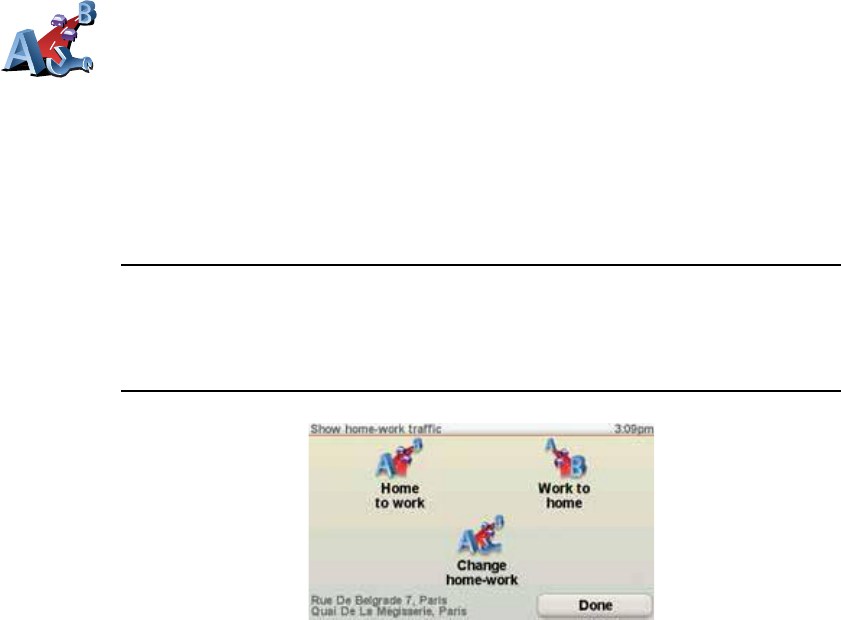
78
In the example, the Traffic sidebar shows you that there are two incidents
ahead. Both incidents are traffic jams, the first is 15km ahead and is expected
to delay you by at least 51 minutes.
To re-plan your route to avoid these incidents, tap the Traffic sidebar to open
the TomTom ¬®¿ºº·½ menu, then tap Ó·²·³·-» ¬®¿ºº·½ ¼»´¿§-. For more
information see Ë-·²¹ ̱³Ì±³ Ì®¿ºº·½ on page 76.
Ó¿µ·²¹ ½±³³«¬·²¹ ¬± ©±®µ »¿-·»®
The ر³» ¬± ©±®µ or ɱ®µ ¬± ¸±³» buttons in the Traffic menu lets you
check your route to and from work with one tap of a button. When you use
either of these buttons, your device checks the route for possible delays, and
if it finds any, provides you with the possibility to avoid them.
The first time you use ر³» ¬± ©±®µ, you must set your traffic home and work
locations, do the following:
You can now use the ر³» ¬± ©±®µ and ɱ®µ ¬± ¸±³» buttons of the Show
home-work traffic menu.
Ò±¬»æ ̸» ¸±³» ´±½¿¬·±² §±« -»¬ ¸»®» ·- ²±¬ ¬¸» -¿³» ¿- ¬¸» ¸±³» ´±½¿¬·±²
§±« ½¿² -»¬ ·² ¬¸» Ю»º»®»²½»- Ó»²«ò ײ ¿¼¼·¬·±²ô ¬¸» ´±½¿¬·±²- §±« «-» ¸»®»
¼± ²±¬ ¸¿ª» ¬± ¾» §±«® ¿½¬«¿´ ¸±³» ¿²¼ ©±®µ ´±½¿¬·±²-ò ׺ ¬¸»®» ·- ¿²±¬¸»®
®±«¬» ¬¸¿¬ §±« ±º¬»² ¬®¿ª»´ô §±« ½¿² -»¬ ɱ®µñر³» ¬± «-» ¬¸»-» ´±½¿¬·±²-
·²-¬»¿¼ò
For example, to check for delays on your route home, do the following:
1.Tap the TomTom Ì®¿ºº·½ button in the Main Menu on your device.
2.Tap ͸±© ¸±³»ó©±®µ ¬®¿ºº·½.
3.Tap ɱ®µ ¬± ¸±³».
The route summary screen is shown. In this example, you can see that there
are some traffic incidents on your route that could mean a delay of up to 25
minutes.
ݸ¿²¹» ¸±³»ó
©±®µ
1.Tap the TomTom Ì®¿ºº·½ button in the Main Menu on your device.
2.Tap ͸±© ¸±³»ó©±®µ ¬®¿ºº·½.
3.Tap ݸ¿²¹» ¸±³»ó©±®µ
4.Set your home location
5.Set your work location.
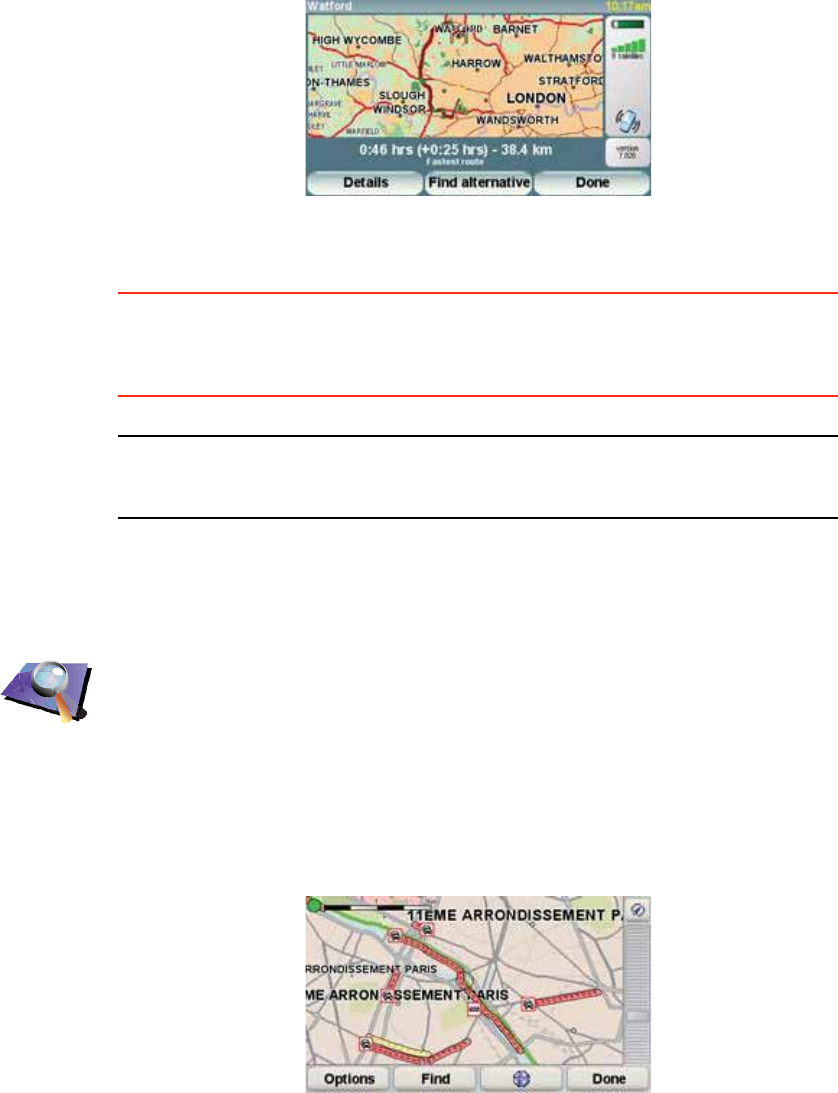
79
To see if there is a quicker way home, you could now tap the Ú·²¼ ¿´¬»®²¿¬·ª»
button and then tap Ó·²·³·-» ¬®¿ºº·½ ¼»´¿§-.
Ì·°æ You can let your device automatically look for alternative routes by
selecting ß«¬±³¿¬·½¿´´§ ³·²·³·-» ¼»´¿§- ¿º¬»® »ª»®§ ¬®¿ºº·½ «°¼¿¬» in your
Traffic preferences. For more information, see ݸ¿²¹·²¹ ¬®¿ºº·½ °®»º»®»²½»-
on page 77.
Ò±¬»æ ׬ ·- °±--·¾´» ¬¸¿¬ ¬¸» ¿´¬»®²¿¬·ª» ®±«¬» ½±«´¼ ¾» ´±²¹»® ¬¸¿² §±«® ±®·¹·²¿´
±²» ø»ª»² ©·¬¸ ·¬- ¼»´¿§-÷ò ׺ ¬¸·- ·- ¬¸» ½¿-»ô §±« ½±«´¼ ¿´©¿§- ¬®§ «-·²¹ ¬¸»
Ú·²¼ ¿´¬»®²¿¬·ª» ¾«¬¬±² ¿¹¿·²ò
ݸ»½µ·²¹ ¬®¿ºº·½ ·²½·¼»²¬- ·² §±«® ¿®»¿
Get an overview of the traffic situation in your area, using the map. To find
local incidents and their details, do the following:
Ì®¿ºº·½ ·²½·¼»²¬-
Traffic incidents are displayed both on the Driving View and also on the Traffic
sidebar as small symbols. There are two type of symbols:
!Symbols shown in a red square are incidents that Traffic can help you avoid.
Þ®±©-» ³¿°
1.Tap the TomTom Ì®¿ºº·½ button in the Main Menu on your device.
2.Tap Þ®±©-» ³¿°.
The map browser screen is shown.
3.Tap the blue compass image in the top right of the screen.
The map centres itself on you current location, and any traffic incidents in
the area are shown as small symbols. These symbols are described in,
Ì®¿ºº·½ ·²½·¼»²¬- on page 79.
4.Tap on any traffic incident to get more information.
A second screen is shown that gives you detailed information about the
incident you chose. To display information about surrounding incidents
use the left and right arrows at the bottom of this second screen.
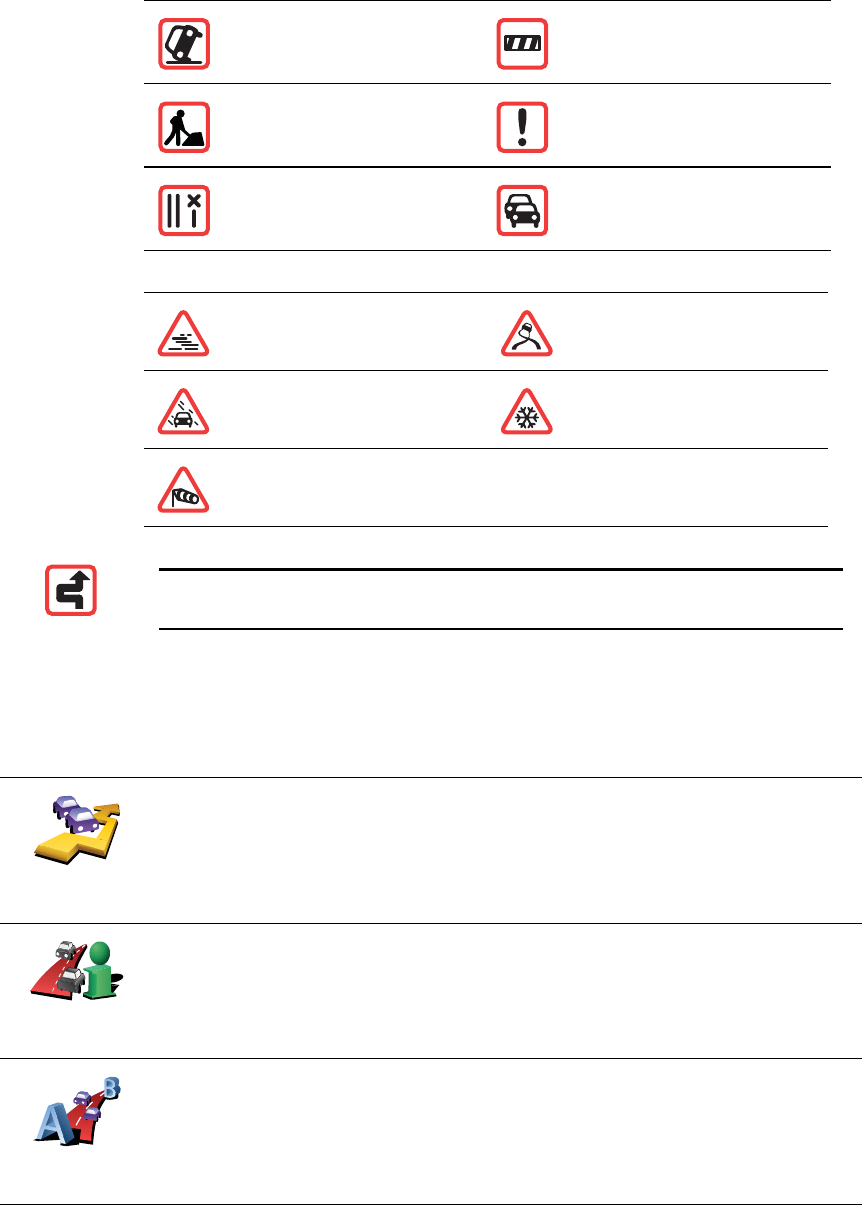
80
!Symbols shown in a red rectangle are weather related, because of their
nature, you cannot use Traffic to avoid them.
Traffic incident symbols and their meaning are shown below:
Weather related symbols and their meaning are shown below:
Ì®¿ºº·½ ³»²«
Either, tap the Traffic sidebar in the Driving View or tap TomTom Ì®¿ºº·½ in the
Main Menu to open the Traffic menu. The following buttons are available:
ß½½·¼»²¬Î±¿¼ ½´±-»¼
α¿¼ ©±®µ-Ì®¿ºº·½ ·²½·¼»²¬
Ѳ» ±® ³±®» ´¿²»-
½´±-»¼ Ì®¿ºº·½ ¶¿³
Ú±¹×½»
ο·²Í²±©
É·²¼
Ò±¬»æ ̸» ·²½·¼»²¬ ¿ª±·¼»¼ -§³¾±´ ·- -¸±©² º±® ¿²§ ¬®¿ºº·½ ·²½·¼»²¬ ¬¸¿¬
§±« ¿ª±·¼ «-·²¹ ̱³Ì±³ Ì®¿ºº·½ò
Ó·²·³·-»
¬®¿ºº·½ ¼»´¿§-
Tap this button to re-plan your route based on the latest traffic
information.
͸±© ¬®¿ºº·½ ±²
®±«¬»
Tap this button to see an overview of all traffic incidents on your route.
You can use the left and right buttons on the resulting screen to see more
detailed information about each of these incidents.
͸±© ¸±³»ó
©±®µ ¬®¿ºº·½
Tap this button to calculate and show the quickest route from your home
location to your place of work and back.
See Ó¿µ·²¹ ½±³³«¬·²¹ ¬± ©±®µ »¿-·»® on page 78.
81
λ¿¼ ¿´±«¼
¬®¿ºº·½ ·²º±
Tap this button to read aloud all traffic incidents along your route.
Ë°¼¿¬» ¬®¿ºº·½
·²º±
Tap this button to get the latest traffic information straight away rather
than waiting for an automatic update.
For more information on automatic traffic updates, see ݸ¿²¹·²¹ ¬®¿ºº·½
°®»º»®»²½»- on page 77.
Ü·-¿¾´» Ì®¿ºº·½
Tap this button to disable TomTom Ì®¿ºº·½.
Ø»´°
Tap this button to view the guided tour on how to use TomTom Ì®¿ºº·½.
Þ®±©-» ³¿°
Tap this button to browse the map and see the traffic information
displayed on the map.
See ݸ»½µ·²¹ ¬®¿ºº·½ ·²½·¼»²¬- ·² §±«® ¿®»¿ on page 79.
ݸ¿²¹» Ì®¿ºº·½
°®»º»®»²½»-
Tap this button to change your preferences for how TomTom Ì®¿ºº·½
works on your device.
See ݸ¿²¹·²¹ ¬®¿ºº·½ °®»º»®»²½»- on page 77.
Ì®¿ºº·½ ·²º±®³¿¬·±² «-·²¹ ÎÜÍóÌÓÝîïò
82
Traffic information using RDS-TMC
̸» Ì®¿ºº·½ Ó»--¿¹» ݸ¿²²»´ øÌÓÝ÷
The Traffic Message Channel (TMC) is not a TomTom Service. FM radio
stations in several countries broadcast TMC information as part of their
programming. TMC is also known as RDS-TMC traffic information.
Your TomTom navigation device uses this information to warn you about
traffic delays along your route and how you can avoid them.
To use TMC traffic information, you need the TomTom RDS-TMC Traffic
Receiver that comes with selected TomTom navigation devices or is available
as an accessory. For more information on which TomTom devices support
RDS-TMC receivers, visit ©©©ò¬±³¬±³ò½±³.
Ò±¬»æ ̱³Ì±³ ·- ²±¬ ®»-°±²-·¾´» º±® ¬¸» ¿ª¿·´¿¾·´·¬§ ±® ¯«¿´·¬§ ±º ¬®¿ºº·½
·²º±®³¿¬·±² °®±ª·¼»¼ ¾§ ÌÓÝò
ÌÓÝ ·- ²±¬ ¿ª¿·´¿¾´» ·² ¿´´ ½±«²¬®·»- ±® ®»¹·±²-ò Ê·-·¬ ©©©ò¬±³¬±³ò½±³ ¬±
½¸»½µ ·º ·¬ ·- ¿ª¿·´¿¾´» ·² §±«® ½±«²¬®§ ±® ®»¹·±²ò
Í»¬¬·²¹ «° ÌÓÝ
To start using TMC all you need to do is connect the RDS-TMC Traffic Receiver
to your TomTom navigation device.
׳°±®¬¿²¬: When you install your navigation device in your car, don t block
the driver s view of the road.
1.Connect the RDS-TMC Traffic Receiver to your navigation device.
2.Connect the Car Charger to the RDS-TMC Traffic Receiver and then plug the
Car Charger into your car s cigarette lighter socket.
Ò±¬»æ ̸» ÎÜÍóÌÓÝ ®»½»·ª»® ¼±»- ²±¬ ©±®µ ·º ¬¸» Ý¿® ݸ¿®¹»® ·- ²±¬
½±²²»½¬»¼ò
3.Place the transparent suction cup at the tip of the antenna firmly against the
upper left of your car windscreen.
83
4.Then place the remaining suction cups along the edge of the windscreen,
as shown, and keep the cable straight.
5.Switch on your navigation device.
The Traffic bar is shown in the Driving View and your navigation device
searches for a radio station that carries RDS-TMC information.
The following symbols are shown at the top of the Traffic sidebar:
Your navigation device is searching for a radio station that carries
RDS-TMC on that radio frequency.
Your navigation device is tuned to a radio station that carries RDS-
TMC on that radio frequency and has the latest RDS-TMC traffic
information.
Your navigation device is waiting to download the latest RDS-TMC
traffic information as soon as it is available.
84
Ë-·²¹ ÎÜÍóÌÓÝ ¬®¿ºº·½ ·²º±®³¿¬·±²
ݸ¿²¹·²¹ ¬®¿ºº·½ °®»º»®»²½»-
Use the ݸ¿²¹» Ì®¿ºº·½ °®»º»®»²½»- button to choose how traffic information
works on your device.
Your device receives traffic information when it is broadcasted.
If there are any incidents on your route the Traffic sidebar on the right side
of the Driving View warns you. An example of a Traffic sidebar with a traffic
warning is shown to the left. For information on the Traffic sidebar, see ̸»
Ì®¿ºº·½ -·¼»¾¿® on page 87.
In the example on the left there is a traffic jam on your route with an
expected delay of 38 minutes, 20 km ahead of you. To find the quickest
route to your destination, do the following:
1.Tap the Traffic sidebar.
Ì·°: If you have trouble tapping the Traffic sidebar and the Main Menu is
being displayed instead of the traffic menu, try tapping your finger half on
the Traffic sidebar and half off the screen.
2.Tap Ó·²·³·-» ¬®¿ºº·½ ¼»´¿§-.
Your device looks for the quickest route to your destination.
It is possible that the new route may also include traffic delays, or may
even be the same route as before. You can re-plan the route to avoid all
delays, but this new route will take longer than the quickest route already
shown.
3.Tap ܱ²».
Ì·°: It is possible to let your TomTom device automatically minimise traffic
delays for you, to do this, see ݸ¿²¹·²¹ ¬®¿ºº·½ °®»º»®»²½»- on page 84.
íè ³·²
ݸ¿²¹»
Ì®¿ºº·½
°®»º»®»²½»-
To change your traffic preferences, do the following:
1.Tap the TomTom Ì®¿ºº·½ button in the Main Menu on your device.
2.Tap ݸ¿²¹» Ì®¿ºº·½ °®»º»®»²½»-.
You can change the following preferences:
!ß«¬±³¿¬·½¿´´§ ³·²·³·-» ¼»´¿§- ¿º¬»® »ª»®§ ¬®¿ºº·½ «°¼¿¬» - if you select
this option, your device automatically recalculates when new delays
occur on your route.
!Þ»»° ©¸»² ¬®¿ºº·½ -·¬«¿¬·±² ±² ®±«¬» ½¸¿²¹»- - if you select this option
your device beeps when a new traffic incident occurs on your current
route.
!ß-µ º±® ¬®¿ºº·½ «°¼¿¬»- ©¸»² °®»°¿®·²¹ ¿ ®±«¬» - this option has no
effect in RDS traffic.
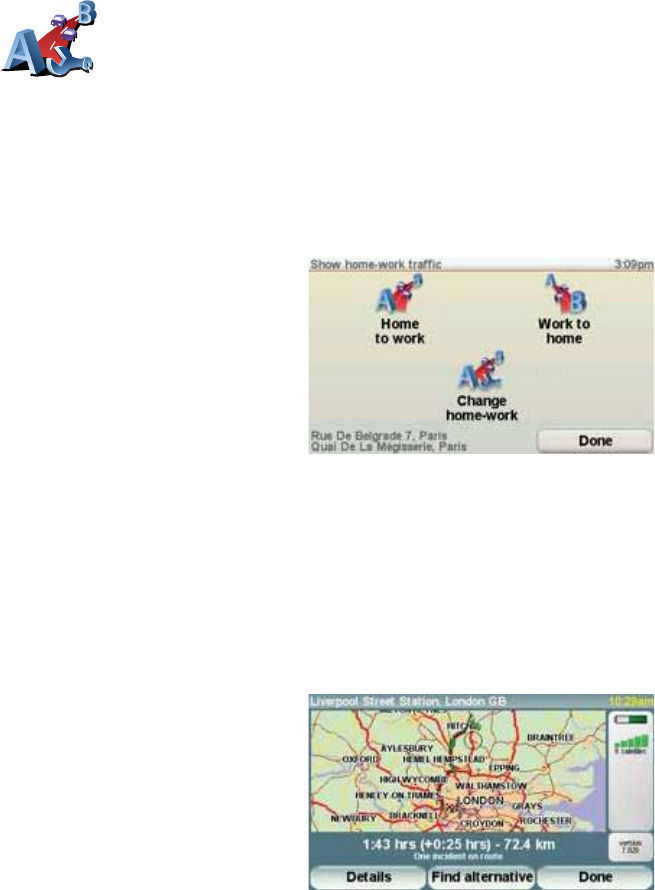
85
Ó¿µ·²¹ ½±³³«¬·²¹ ¬± ©±®µ »¿-·»®
The ر³» ¬± ©±®µ or ɱ®µ ¬± ¸±³» buttons in the Traffic menu lets you
check your route to and from work with one tap of a button. When you use
either of these buttons, your device checks the route for possible delays, and
if it finds any, provides you with the possibility to avoid them.
The first time you use ر³» ¬± ©±®µ, you must set your traffic home and work
locations, do the following:
You can now use the ر³» ¬± ©±®µ and ɱ®µ ¬± ¸±³» buttons of the Show
home-work traffic menu.
For example, to check for delays on your route home, do the following:
1.Tap the TomTom Ì®¿ºº·½ button in the Main Menu on your device.
2.Tap ͸±© ¸±³»ó©±®µ ¬®¿ºº·½.
3.Tap ɱ®µ ¬± ¸±³».
The route summary screen is shown. In this example, you can see that there
is a single incident on your route that could mean a delay of up to 25 minutes.
3.Select or clear the check box next to each preference you want to change.
4.Tap ܱ²».
Your device lists the countries that have radio stations providing RDS-
TMC traffic information that you can currently receive. Normally you can
leave this set to ß²§ ½±«²¬®§ ø-¬®±²¹»-¬ -·¹²¿´÷. For more information
about this country setting, see ݸ±±-·²¹ ¬¸» ½±®®»½¬ ½±«²¬®§ º±® ÎÜÍó
ÌÓÝ ®»½»°¬·±² on page 87.
5.Tap ܱ²».
ݸ¿²¹» ¸±³»ó
©±®µ
1.Tap the TomTom Ì®¿ºº·½ button in the Main Menu on your device.
2.Tap ͸±© ¸±³»ó©±®µ ¬®¿ºº·½.
3.Tap ݸ¿²¹» ¸±³»ó©±®µ
4.Set your home location
5.Set your work location.
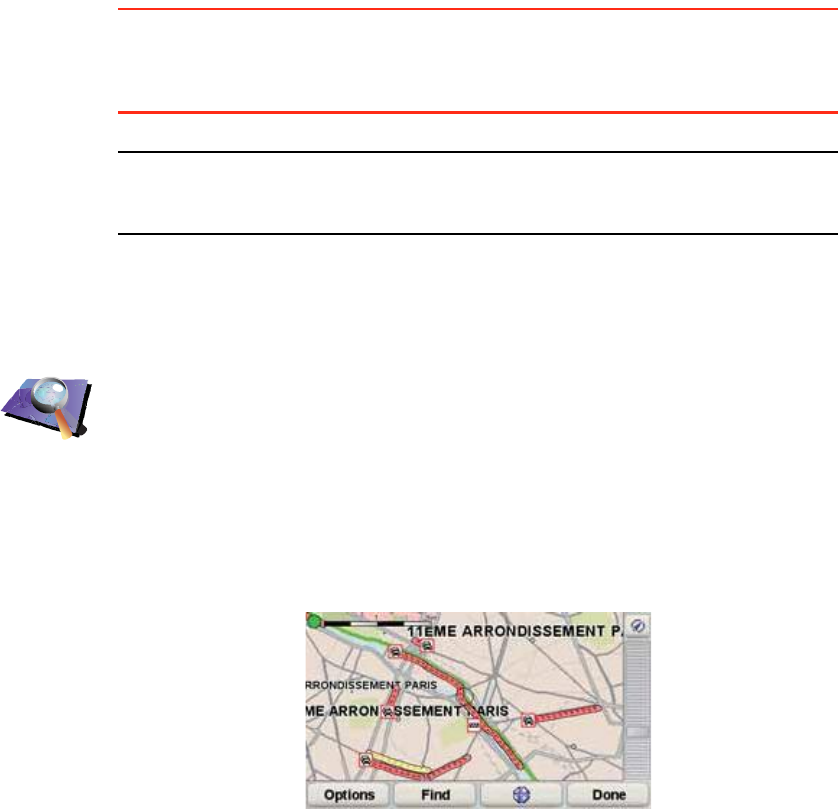
86
To see if there is a quicker way home, you could now tap the Ú·²¼ ¿´¬»®²¿¬·ª»
button and then tap Ó·²·³·-» ¬®¿ºº·½ ¼»´¿§-.
Ì·°æ You can let your device automatically look for alternative routes by
selecting ß«¬±³¿¬·½¿´´§ ³·²·³·-» ¼»´¿§- ¿º¬»® »ª»®§ ¬®¿ºº·½ «°¼¿¬» in your
Traffic preferences. For more information, see ݸ¿²¹·²¹ ¬®¿ºº·½ °®»º»®»²½»-
on page 84.
Ò±¬»æ ׬ ·- °±--·¾´» ¬¸¿¬ ¬¸» ¿´¬»®²¿¬·ª» ®±«¬» ½±«´¼ ¾» ´±²¹»® ¬¸¿² §±«® ±®·¹·²¿´
±²» ø»ª»² ©·¬¸ ·¬- ¼»´¿§-÷ò ׺ ¬¸·- ·- ¬¸» ½¿-»ô §±« ½±«´¼ ¿´©¿§- ¬®§ «-·²¹ ¬¸»
Ú·²¼ ¿´¬»®²¿¬·ª» ¾«¬¬±² ¿¹¿·²ò
ݸ»½µ·²¹ ¬®¿ºº·½ ·²½·¼»²¬- ·² §±«® ¿®»¿
Get an overview of the traffic situation in your area, using the map. To find
local incidents and their details, do the following:
Þ®±©-» ³¿°
1.Tap the TomTom Ì®¿ºº·½ button in the Main Menu on your device.
2.Tap Þ®±©-» ³¿°.
The map browser screen is shown.
3.Tap the blue compass image in the top right of the screen.
The map centres itself on you current location, and any traffic incidents in
the area are shown as small symbols. These symbols are described in,
Ì®¿ºº·½ ·²½·¼»²¬- on page 88.
4.Tap on any traffic incident to get more information.
A second screen is shown that gives you detailed information about the
incident you chose. To display information about surrounding incidents
use the left and right arrows at the bottom of this second screen.

87
Í»¬¬·²¹ ¬¸» ®¿¼·± º®»¯«»²½§ º±® ÎÜÍóÌÓÝ ·²º±®³¿¬·±²
If you know the frequency of a particular radio station you want to use for RDS-
TMC traffic information, do the following to set the frequency manually:
To activate this feature, you must first enable manual tuning. To do this, tap
the Traffic bar in the Driving View, then tap ݸ¿²¹» Ì®¿ºº·½ °®»º»®»²½»-. Select
Ì«²» ³¿²«¿´´§ ¾§ »²¬»®·²¹ ¿ º®»¯«»²½§ and then tap ܱ²».
Your TomTom device looks for your radio station. If it doesn't find a radio
station at the frequency you set, it automatically continues to search for the
next available station.
ݸ±±-·²¹ ¬¸» ½±®®»½¬ ½±«²¬®§ º±® ÎÜÍóÌÓÝ ®»½»°¬·±²
If you are driving close to a country border, your device may tune to a radio
station from a neigbouring country. If this happens you will only receive RDS-
TMC traffic information for that country. To set the country you want to receive
traffic information for, do the following:
1.Tap the Traffic sidebar in the Driving View.
2.Tap ݸ¿²¹» Ì®¿ºº·½ °®»º»®»²½»-.
A list of preferences you can choose is shown, these preferences are
described in ݸ¿²¹·²¹ ¬®¿ºº·½ °®»º»®»²½»- on page 84.
3.Tap ܱ²».
A list of neigbouring countries is shown.
4.Tap on the country that you want to receive traffic reports for.
Your TomTom device then searches for a radio station in the country you have
chosen.
̸» Ì®¿ºº·½ -·¼»¾¿®
The Traffic sidebar is shown on the right side of the Driving View when
TomTom Ì®¿ºº·½ is switched on. The Traffic sidebar shows you the traffic
incidents on your route. It shows the following information:
!A symbol for each traffic incident in the order they occur along your
planned route.
!The estimated delay to the next traffic incident on your route.
!The distance from your current location to the next incident on your route.
An example of a Traffic sidebar is shown below.
Ì«²» ³¿²«¿´´§
1.Tap the Traffic sidebar in the Driving View.
2.Tap Ì«²» Ó¿²«¿´´§.
3.Enter the frequency of the radio station.
4.Tap ܱ²»ò
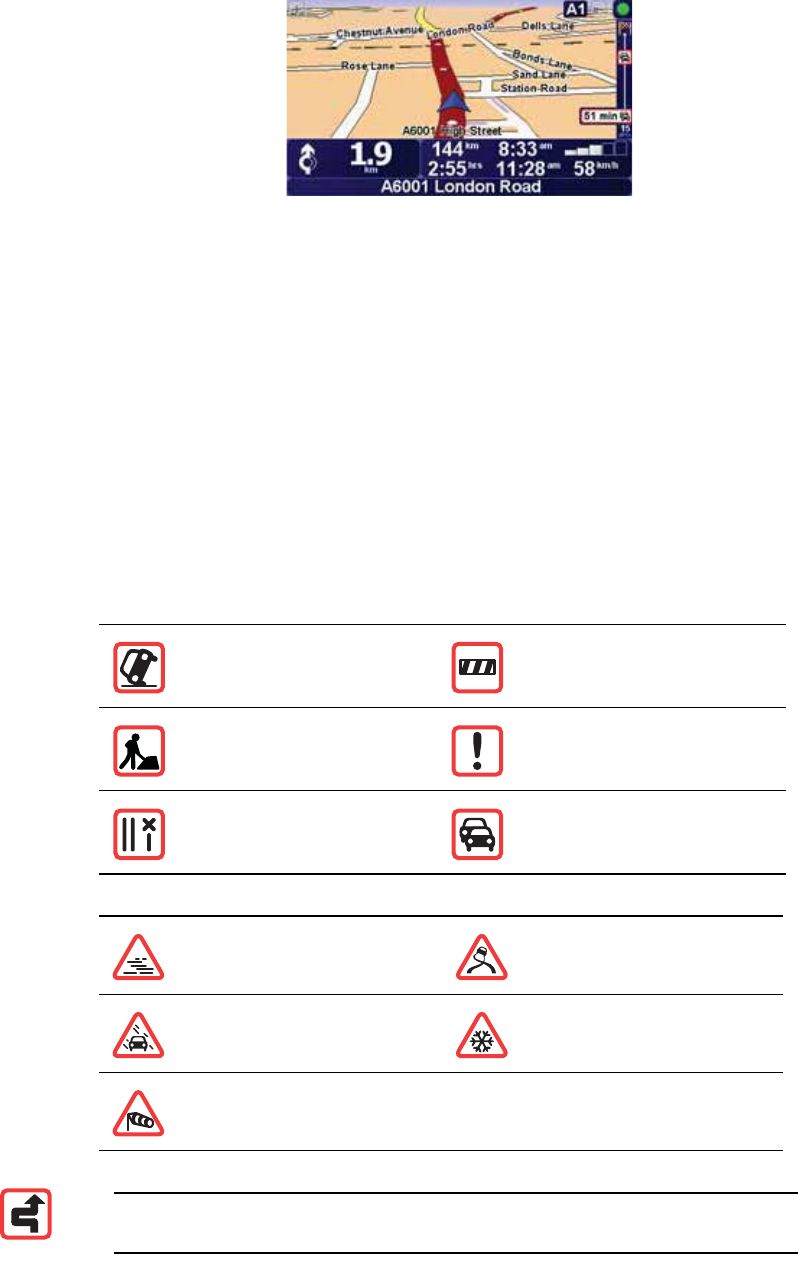
88
In the example, the Traffic sidebar shows you that there are two incidents
ahead. Both incidents are traffic jams, the first is 15km ahead and is expected
to delay you by at least 51 minutes.
To re-plan your route to avoid these incidents, tap the Traffic sidebar to open
the TomTom ¬®¿ºº·½ menu, then use Ó·²·³·-» ¬®¿ºº·½ ¼»´¿§-. For more
information see Ë-·²¹ ÎÜÍóÌÓÝ ¬®¿ºº·½ ·²º±®³¿¬·±² on page 84.
Ì®¿ºº·½ ·²½·¼»²¬-
Traffic incidents are displayed both on the Driving View and also on the Traffic
sidebar as small symbols. There are two type of symbols:
!Symbols shown in a red square are incidents that Traffic can help you avoid.
!Symbols shown in a red rectangle are weather related, because of their
nature, you cannot use Traffic to avoid them.
Traffic incident symbols and their meaning are shown below:
Weather related symbols and their meaning are shown below:
ß½½·¼»²¬Î±¿¼ ½´±-»¼
α¿¼ ©±®µ-Ì®¿ºº·½ ·²½·¼»²¬
Ѳ» ±® ³±®» ´¿²»-
½´±-»¼ Ì®¿ºº·½ ¶¿³
Ú±¹×½»
ο·²Í²±©
Wind
Ò±¬»æ ̸» ·²½·¼»²¬ ¿ª±·¼»¼ -§³¾±´ ·- -¸±©² º±® ¿²§ ¬®¿ºº·½ ·²½·¼»²¬ ¬¸¿¬
§±« ¿ª±·¼ «-·²¹ ̱³Ì±³ Ì®¿ºº·½ò
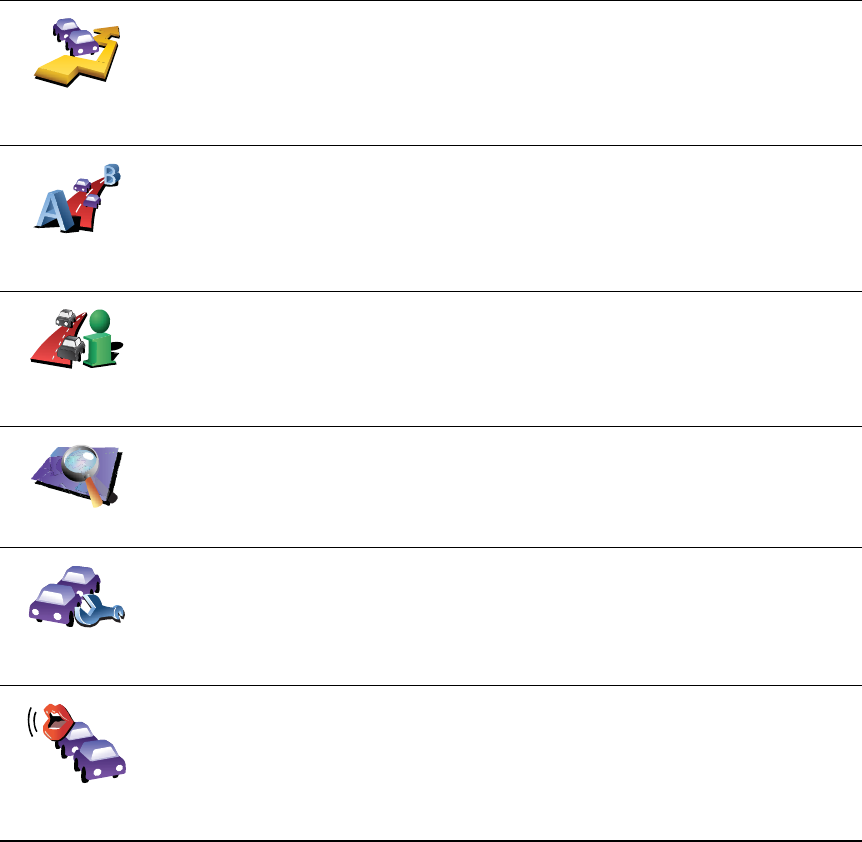
89
Ì®¿ºº·½ ³»²«
Tap the Traffic sidebar in the Driving View to open the Traffic menu. The
following buttons are available:
Ó·²·³·-»
¬®¿ºº·½ ¼»´¿§-
Ó·²·³·-» ¬®¿ºº·½ ¼»´¿§-
Replans your route based on the latest traffic information.
͸±© ¸±³»ó
©±®µ ¬®¿ºº·½
Checks the traffic along your Home to Work route.
See Ó¿µ·²¹ ½±³³«¬·²¹ ¬± ©±®µ »¿-·»® on page 85.
͸±© ¬®¿ºº·½ ±²
®±«¬»
Tap this button to show areas of traffic congestion along your current
route.
Þ®±©-» ³¿°
Shows an overview of traffic incidents on the map.
See ݸ»½µ·²¹ ¬®¿ºº·½ ·²½·¼»²¬- ·² §±«® ¿®»¿ on page 86.
ݸ¿²¹» Ì®¿ºº·½
°®»º»®»²½»-
Changes the settings for Traffic services.
See ݸ¿²¹·²¹ ¬®¿ºº·½ °®»º»®»²½»- on page 84.
λ¿¼ ¿´±«¼
¬®¿ºº·½ ·²º±
Tap this button to read aloud all traffic incidents along your route.
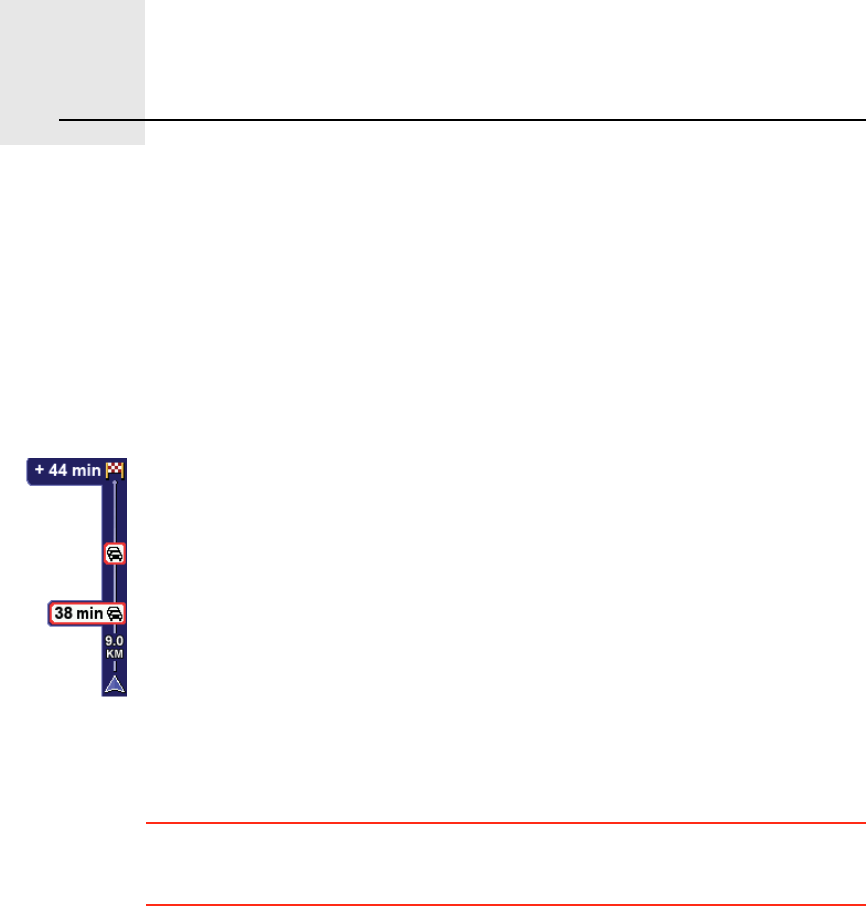
̱³Ì±³ ØÜ Ì®¿ºº·½ ·²º±®³¿¬·±²îîò
90
TomTom HD Traffic information TomTom HD Traffic is a unique TomTom service for receiving up-to-date
traffic information. It helps you plan the smartest route possible to your
destination.
Your device automatically receives updated traffic information. When you
plan a journey, your route is calculated by taking into account the current local
traffic conditions. If any delays are found on your route, you are given the
chance to re-plan a faster route avoiding one or more incidents.
Ë-·²¹ ̱³Ì±³ ØÜ Ì®¿ºº·½
To find the quickest route to your destination, do the following:
1.Tap the sidebar.
Ì·°: If you have trouble tapping the sidebar and the Main Menu is being
displayed instead of the traffic menu, try tapping your finger half on the
sidebar and half off the screen.
2.Tap Ó·²·³·-» ¬®¿ºº·½ ¼»´¿§-.
Your device looks for the quickest route to your destination.
It is possible that the new route may also include traffic delays, or may even
be the same route as before. You can re-plan the route to avoid all delays,
but this new route will take longer than the quickest route already shown.
3.Tap ܱ²».
The HDTraffic sidebar on the right side of the Driving View, warns you
about any traffic incidents on your route.
In the example shown here, the sidebar warns of a traffic jam on your route
that is 9 kms ahead and will cause an expected delay of 38 minutes. The
total delay over your route is 44minutes (including other additional
incidents further along your route).
For more information about the sidebar, see ̸» ØÜÌ®¿ºº·½ -·¼»¾¿® on
page 91.

91
Ì·°: You can let your TomTom device automatically minimise traffic delays for
you, to do this, see ݸ¿²¹·²¹ ØÜÌ®¿ºº·½ °®»º»®»²½»- on page 91.
ß«¬±³¿¬·½¿´´§ ³·²·³·-» ¼»´¿§-
You can set HDTraffic to automatically minimise any delays for you whenever
new traffic information becomes available. To set HDTraffic to automatically
minimise delays, do the following:
1.Tap TomTom Ì®¿ºº·½ in the Main Menu.
2.Tap ݸ¿²¹» Ì®¿ºº·½ °®»º»®»²½»-.
3.Select ß«¬±³¿¬·½¿´´§ ³·²·³·-» ¼»´¿§- ¿º¬»® »ª»®§ ¬®¿ºº·½ «°¼¿¬».
4.Tap ܱ²».
ݸ¿²¹·²¹ ØÜÌ®¿ºº·½ °®»º»®»²½»-
Use the ݸ¿²¹» Ì®¿ºº·½ °®»º»®»²½»- button to choose how HDTraffic works on
your device.
̸» ØÜÌ®¿ºº·½ -·¼»¾¿®
The HDTraffic sidebar shows you traffic incidents on your route, displaying
the following information:
!A symbol for each traffic incident in the order they occur along your
planned route.
!The estimated delay of the next traffic incident on your route.
!The estimated delay for all incidents on your route.
!The distance from your current location to the next incident on the
HDTraffic sidebar.
Ò±¬»æ ̸» ½±´±«® ±º ¬¸» -·¼»¾¿® ½¸¿²¹»- ½±´±«® ¼»°»²¼·²¹ ±² ¸±© ±´¼ ¬¸»
¬®¿ºº·½ ·²º±®³¿¬·±² ·- ±² §±«® ¼»ª·½»ò Ú±® ³±®» ·²º±®³¿¬·±² ±² ©¸¿¬ ¬¸»-»
½±´±«®- ³»¿²ô -»» ØÜÌ®¿ºº·½ -·¼»¾¿® ½±´±«®- ±² °¿¹» çíò
ݸ¿²¹» Ì®¿ºº·½
°®»º»®»²½»-
To change your traffic preferences, do the following:
1.Tap TomTom Ì®¿ºº·½ in the Main Menu.
2.Tap ݸ¿²¹» Ì®¿ºº·½ °®»º»®»²½»-.
You can change the following preferences:
!ß«¬±³¿¬·½¿´´§ ³·²·³·-» ¼»´¿§- ¿º¬»® »ª»®§ ¬®¿ºº·½ «°¼¿¬» - your
device automatically recalculates your route when new delays occur
on your route.
!Þ»»° ©¸»² ¬®¿ºº·½ -·¬«¿¬·±² ±² ®±«¬» ½¸¿²¹»- - your device beeps
when a new traffic incident occurs on your current route.
!͸±© ¬·³» ¹¿·² -¬¿¬·-¬·½- ±² ¼»ª·½» -¸«¬ ¼±©² - your device will
show you a summary of how much time you have saved using
HDTraffic when you reach your destination (providing it is more than
5 minutes) and also whenever you turn off your device.
3.Select or clear the check box next to each preference you want to
change.
4.Tap ܱ²».
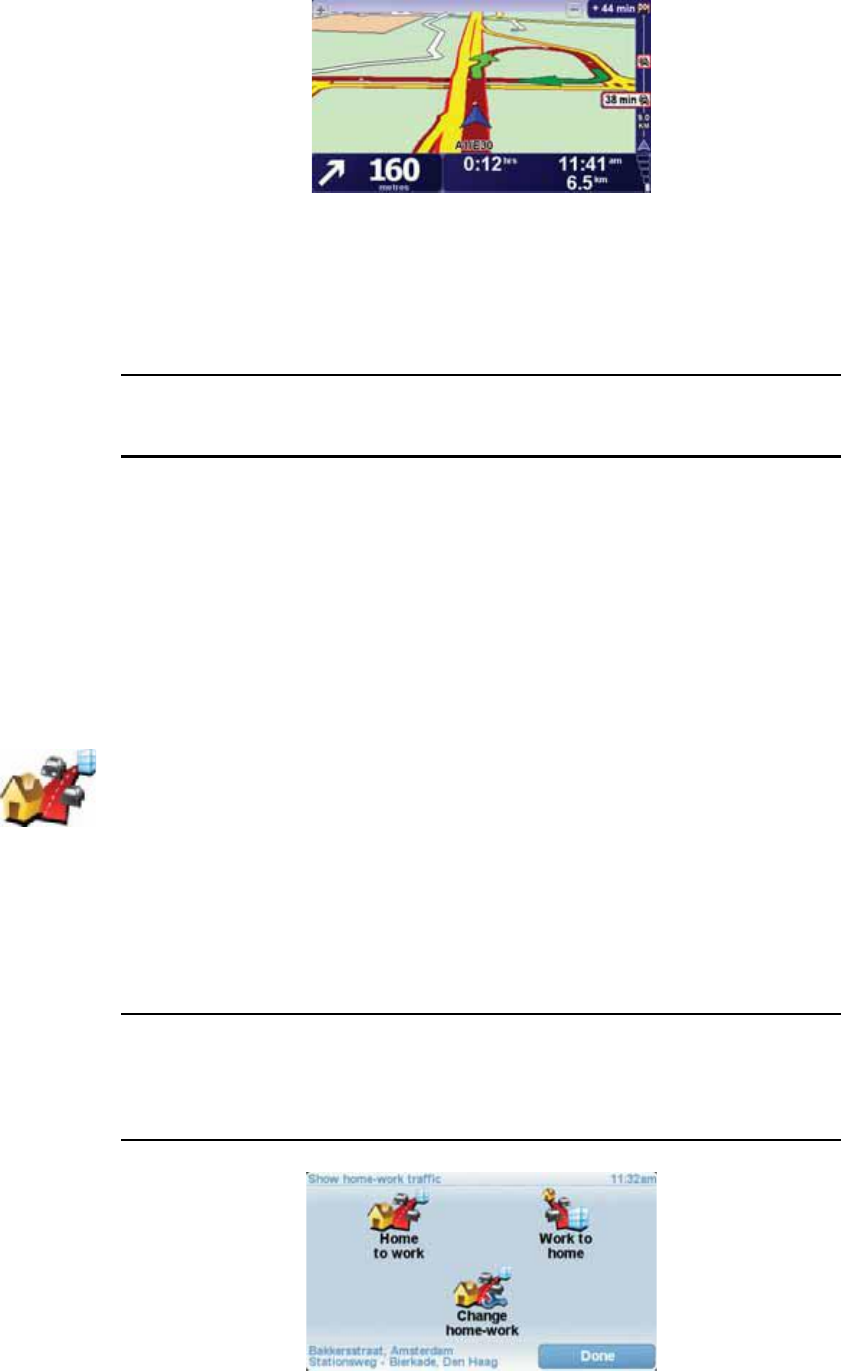
92
An example of an HDTraffic sidebar is shown below.
In the example, the sidebar shows you that there are two incidents ahead.
Both incidents are traffic jams, the first is 9km ahead and is expected to delay
you by at least 38 minutes.
To re-plan your route to avoid these incidents, tap the sidebar to open the
TomTom ¬®¿ºº·½ menu, then tap Ó·²·³·-» ¬®¿ºº·½ ¼»´¿§-.
Ò±¬»æ ̱ ³¿µ» ¬¸» Ì®¿ºº·½ -·¼»¾¿® ³±®» ®»¿¼¿¾´» -±³» ·²½·¼»²¬- ³¿§ ²±¬ ¾»
-¸±©²ò ̸»-» ·²½·¼»²¬- ©·´´ ¿´©¿§- ¾» ±º ³·²±® ·³°±®¬¿²½» ¿²¼ ±²´§ ½¿«-»
-¸±®¬ ¼»´¿§-ò
For more information see Ë-·²¹ ̱³Ì±³ ØÜ Ì®¿ºº·½ on page 90.
Ó¿µ·²¹ ½±³³«¬·²¹ ¬± ©±®µ »¿-·»®
The ر³» ¬± ©±®µ or ɱ®µ ¬± ¸±³» buttons in the Traffic menu lets you
check your route to and from work with one tap of a button. When you use
either of these buttons, your device checks the route for possible delays and
if it finds any, provides you with the possibility to avoid them.
The first time you use ر³» ¬± ©±®µ, you must set your traffic home and work
locations, do the following:
You can now use the ر³» ¬± ©±®µ and ɱ®µ ¬± ¸±³» buttons of the Show
home-work traffic menu.
Ò±¬»æ ̸» ¸±³» ´±½¿¬·±² §±« -»¬ ¸»®» ·- ²±¬ ¬¸» -¿³» ¿- ¬¸» ¸±³» ´±½¿¬·±²
§±« ½¿² -»¬ ·² ¬¸» Ю»º»®»²½»- Ó»²«ò ײ ¿¼¼·¬·±²ô ¬¸» ´±½¿¬·±²- §±« «-» ¸»®»
¼± ²±¬ ¸¿ª» ¬± ¾» §±«® ¿½¬«¿´ ¸±³» ¿²¼ ©±®µ ´±½¿¬·±²-ò ׺ ¬¸»®» ·- ¿²±¬¸»®
®±«¬» ¬¸¿¬ §±« ±º¬»² ¬®¿ª»´ô §±« ½¿² -»¬ ɱ®µñر³» ¬± «-» ¬¸»-» ´±½¿¬·±²-
·²-¬»¿¼ò
ݸ¿²¹»
¸±³»ó©±®µ
1.Tap TomTom Ì®¿ºº·½ in the Main Menu.
2.Tap ͸±© ¸±³»ó©±®µ ¬®¿ºº·½.
3.Tap ݸ¿²¹» ¸±³»ó©±®µ
4.Set your home location
5.Set your work location.
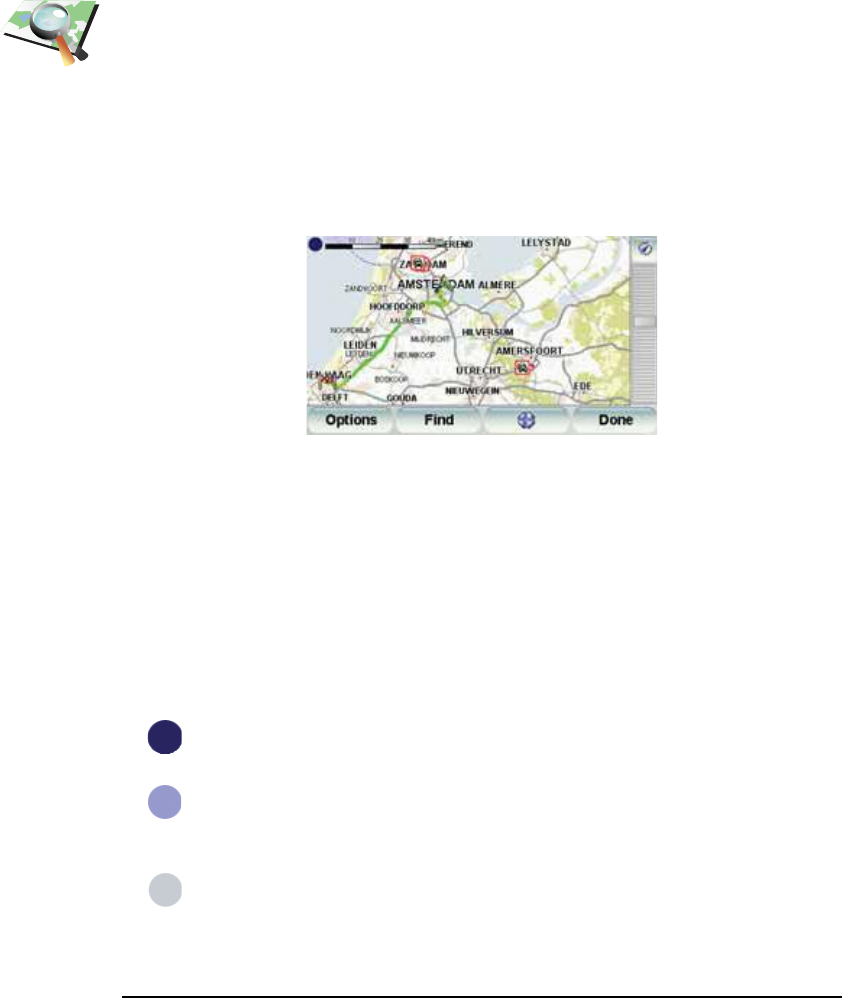
93
For example, to check for delays on your route home, do the following:
1.Tap TomTom Ì®¿ºº·½ in the Main Menu.
2.Tap ͸±© ¸±³»ó©±®µ ¬®¿ºº·½.
3.Tap ɱ®µ ¬± ¸±³».
The driving view is shown. If the Traffic sidebar shows any delays on your
route, tap the Traffic sidebar and then Ó·²·³·-» ¬®¿ºº·½ ¼»´¿§- to see your
fastest route to home.
ݸ»½µ·²¹ ¬®¿ºº·½ ·²½·¼»²¬- ·² §±«® ¿®»¿
Get an overview of the traffic situation in your area, using the map. To find
local incidents and their details, do the following:
ØÜÌ®¿ºº·½ -·¼»¾¿® ½±´±«®-
The HDTraffic sidebar changes colours depending on how old the traffic
information is on your device. The sidebar colours are:
Ò±¬»æ ̸» ¬®¿ºº·½ ·²º±®³¿¬·±² ±² §±«® ¼»ª·½» ·- «°¼¿¬»¼ ¿«¬±³¿¬·½¿´´§ ¿²¼ ¬¸»
ØÜÌ®¿ºº·½ -·¼»¾¿® ©·´´ ²±®³¿´´§ ®»³¿·² ¼¿®µ ¾´«»ò ر©»ª»®ô ·¬ ·- °±--·¾´» ¬¸¿¬
¼»ª·½» ³·¹¸¬ ²±¬ «°¼¿¬» ¬®¿ºº·½ ·²º±®³¿¬·±²ô ·º º±® »¨¿³°´» ¬¸»®» ·- ²± ±® °±±®
Þ®±©-» ³¿°
1.Tap TomTom Ì®¿ºº·½ in the Main Menu.
2.Tap Þ®±©-» ³¿°.
The map browser screen is shown.
3.Tap the blue compass image in the top right of the screen.
The map centres itself on you current location and any traffic incidents in
the area are shown. The symbols used to show traffic incident are
described in Ì®¿ºº·½ ·²½·¼»²¬- on page 94.
4.Tap on any traffic incident to get more information.
A screen is shown that gives you detailed information about the incident
you chose. To display information about surrounding incidents use the
left and right arrows at the bottom of this screen.
Ü¿®µ ¾´«» - The traffic information on your device is up to date.
Ô·´¿½ - The traffic information on your device has not been
updated for at least 10 minutes. HDTraffic still warns you about
traffic incidents, but the information is at least ten minutes old.
Ù®»§ - The traffic information on your device has not been
updated for at least 15 minutes. HDTraffic will only warn you
about traffic incidents once it has been able to update this
information.
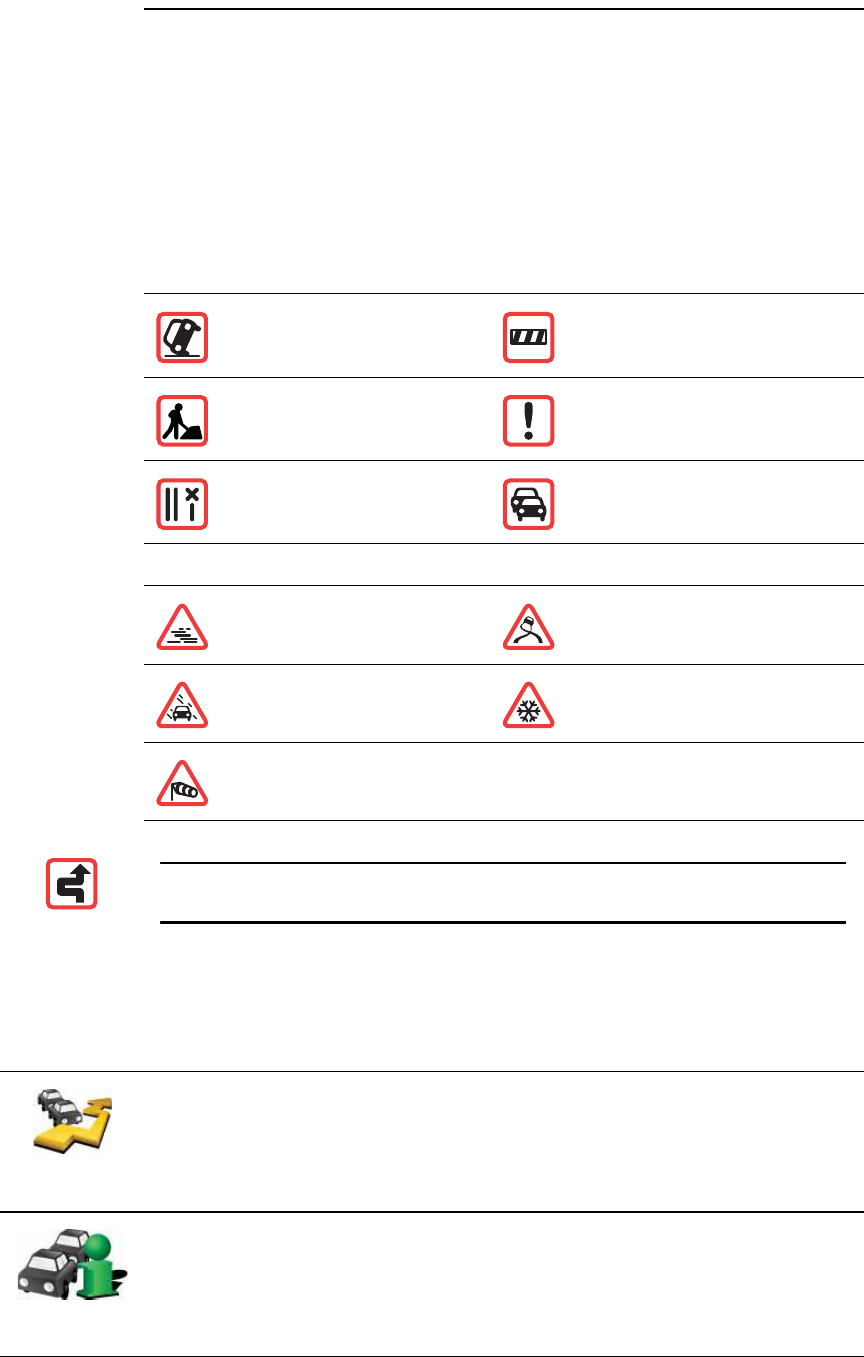
94
²»¬©±®µ ½±ª»®¿¹» ·² §±«® ¿®»¿ô ±® §±« ¿®» ¼®·ª·²¹ ·² ¿ ½±«²¬®§ ±¬¸»® ¬¸¿² ¬¸»
±²» º±® ©¸·½¸ §±« °«®½¸¿-»¼ ̱³Ì±³ ØÜ Ì®¿ºº·½ò
Ì®¿ºº·½ ·²½·¼»²¬-
Traffic incidents are displayed as small symbols on the Driving View and the
HDTraffic sidebar. There are two type of symbols:
!Symbols shown in a red square are incidents that HDTraffic can help you
to avoid.
!Symbols shown in a red triangle are weather related and are for information
only. You cannot use HDTraffic to avoid them.
Traffic incident symbols:
Weather related symbols:
Ì®¿ºº·½ ³»²«
To open the Traffic menu, tap the HDTraffic sidebar in the Driving View or tap
TomTom Ì®¿ºº·½ in the Main Menu. The following buttons are available:
ß½½·¼»²¬Î±¿¼ ½´±-»¼
α¿¼ ©±®µ-Ì®¿ºº·½ ·²½·¼»²¬
Ѳ» ±® ³±®» ´¿²»- ½´±-»¼Ì®¿ºº·½ ¶¿³
Ú±¹×½»
ο·²Í²±©
É·²¼
Ò±¬»æ ̸» ·²½·¼»²¬ ¿ª±·¼»¼ -§³¾±´ ·- -¸±©² º±® ¿²§ ¬®¿ºº·½ ·²½·¼»²¬ ¬¸¿¬
§±« ¿ª±·¼ «-·²¹ ̱³Ì±³ ØÜ Ì®¿ºº·½ò
Ó·²·³·-»
¬®¿ºº·½ ¼»´¿§-
Tap this button to re-plan your route based on the latest traffic information.
͸±© ¬®¿ºº·½
±² ®±«¬»
Tap this button to get an overview of any traffic incidents along your route.
Use the left and right buttons of the overview screen to see more detailed
information about each incident. You can also use the λ°´¿² button of the
overview screen to replan your route avoiding the traffic incidents.
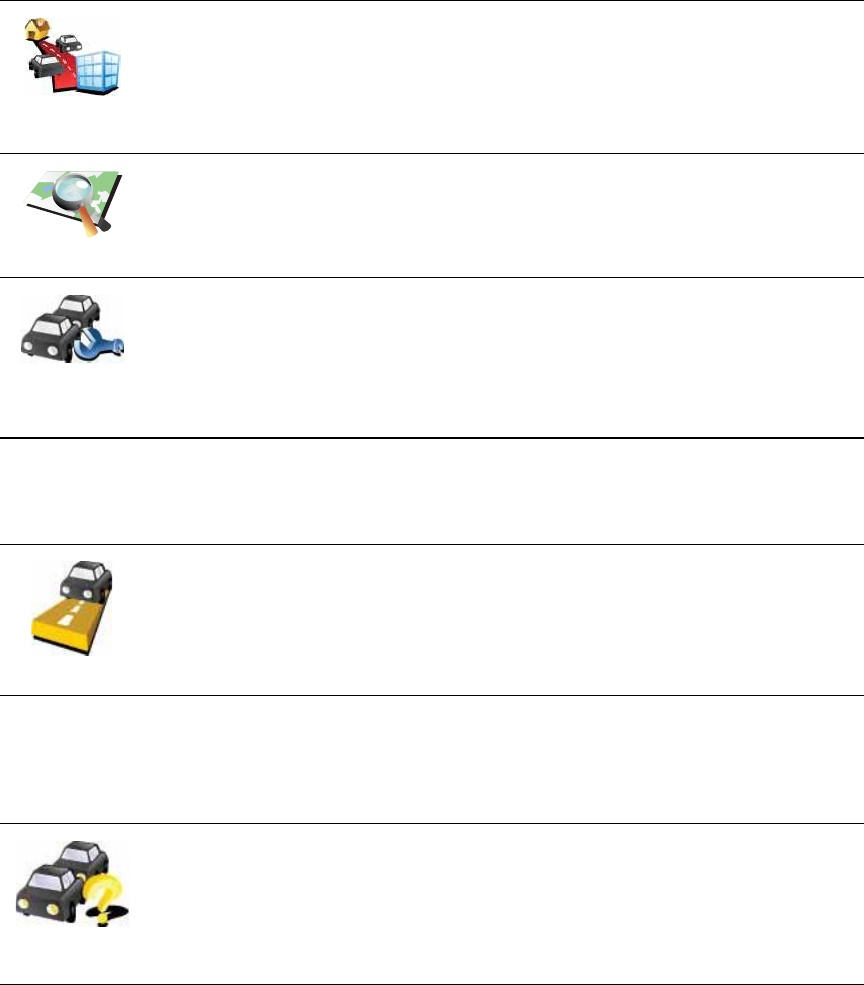
95
In addition to the above buttons, there are a further two buttons that relate to
TomTom HD Traffic. The first is the ß½½±«²¬ ײº± button, that can be found in
the Main Menu.
The second additional button can be found in the Ù«·¼»¼ ¬±«®- menu. To
open the Ù«·¼»¼ ¬±«®- menu, tap the HDTraffic sidebar in the Driving View or
tap TomTom Ì®¿ºº·½ in the Main Menu. The following button relates to
HDTraffic.
͸±© ¸±³»ó
©±®µ ¬®¿ºº·½
Tap this button to calculate and show the quickest route from your home
location to your place of work and back.
See Ó¿µ·²¹ ½±³³«¬·²¹ ¬± ©±®µ »¿-·»® on page 92.
Þ®±©-» ³¿°
Tap this button to browse the map and see the traffic information displayed
on the map.
See ݸ»½µ·²¹ ¬®¿ºº·½ ·²½·¼»²¬- ·² §±«® ¿®»¿ on page 93.
ݸ¿²¹»
Ì®¿ºº·½
°®»º»®»²½»-
Tap this button to change your preferences for how TomTom HD Traffic
works on your device.
See ݸ¿²¹·²¹ ØÜÌ®¿ºº·½ °®»º»®»²½»- on page 91.
ß½½±«²¬ ײº±
Tap this button to see information about your HDTraffic subscription. A
screen is shown that tells you when your subscription started and how
long it is before it ends.
̱³Ì±³
Ì®¿ºº·½
Tap this button to see a short guided tour of how to use TomTom HD
Traffic.
λ³±¬» ½±²¬®±´îíò
96
Remote control ׳°±®¬¿²¬: This TomTom product is Bluetooth enabled. Please note that in
certain environments such as hospitals or airplanes, you are required to
switch off Bluetooth, on all electronic devices.
ײ-»®¬·²¹ ¬¸» ¾¿¬¬»®·»-
1.Hold the sides of the remote control and press the latch on the back of the
device.
The keypad lifts out from the back of the device, as shown in the diagram.
Take care not to drop the keypad.
2.Place the batteries in the remote control. Make sure you put the batteries in
the correct way round, as shown on the remote control.
3.Replace the battery cover and press any button to switch on your remote
control.
Your remote control starts searching for your TomTomGO.
Ò±¬»æ ׺ §±« ¼± ²±¬ «-» §±«® ®»³±¬» ½±²¬®±´ º±® îð -»½±²¼-ô ·¬ ¹±»- ·²¬± °±©»®
-¿ª·²¹ ³±¼»ò
׺ §±« ¼± ²±¬ «-» §±«® ®»³±¬» ½±²¬®±´ º±® ±²» ¸±«®ô ¬¸» ®»³±¬» ½±²¬®±´
-©·¬½¸»- ±ºº ½±³°´»¬»´§ò
Ю»-- ¿²§ ¾«¬¬±² ¬± -©·¬½¸ §±«® ®»³±¬» ½±²¬®±´ ±²ò
97
Û-¬¿¾´·-¸·²¹ ¿ ½±²²»½¬·±²
Before your remote control can communicate with your TomTomGO, you
need to establish a Bluetooth connection between your remote control and
your GO. This Bluetooth process is also known as %pairing .
The first time you switch on your remote control, it tries to establish a
connection with the nearest GO.
To establish a connection, do the following:
1.Switch on your TomTomGO and tap Þ´«»¬±±¬¸ °®»º»®»²½»- in the
Preferences menu.
2.Tap Û²¿¾´» Þ´«»¬±±¬¸.
3.Press any button on your remote control to switch it on.
Your remote control communicates with your GO and you are asked if you
want to accept the connection.
4.Tap Ç»- to accept the connection.
The next time you use your remote control, it looks for your GO. If your GO
is switched off or is not within range, the remote control searches for
another GO.
Ô·¹¸¬-
Þ´«»¬±±¬¸
°®»º»®»²½»-
Ò±¬»æ ̸·- ¾«¬¬±² ³¿§ ±²´§ ¾» ¿ª¿·´¿¾´» ·º ¿´´ ³»²«
±°¬·±²- ¿®» -¸±©²ò ̱ -¸±© ¿´´ ³»²« ±°¬·±²-ô ¬¿°
͸±© ßÔÔ ³»²« ±°¬·±²- ·² ¬¸» Ю»º»®»²½»- Ó»²«ò
No light - your remote control is switched off or in
power saving mode.
Flashing blue light - your remote control is searching
for your GO.
Solid blue light - your remote control is connected to
your GO.
Red light - battery power is low. Replace the batteries
as soon as possible.

98
Þ«¬¬±²-
ßArrow buttons:
!Move the cursor in menus.
!Up and down buttons: zoom in and out on the map.
!Left and right buttons: go to the previous and next song.
ÞSelect button:
!Opens the Main Menu.
!Selects a menu button.
!Selects an item in a list, such as a list of POIs.
ÝSoft buttons:
!Select the left, middle and right buttons in menus.
!The middle button plays and pauses tracks when
playing music.
!Select the bottom left and right areas of the screen in the
Driving View.
ÜVolume controls:
!Turn the volume up and down.
Þ
Ü
Ý
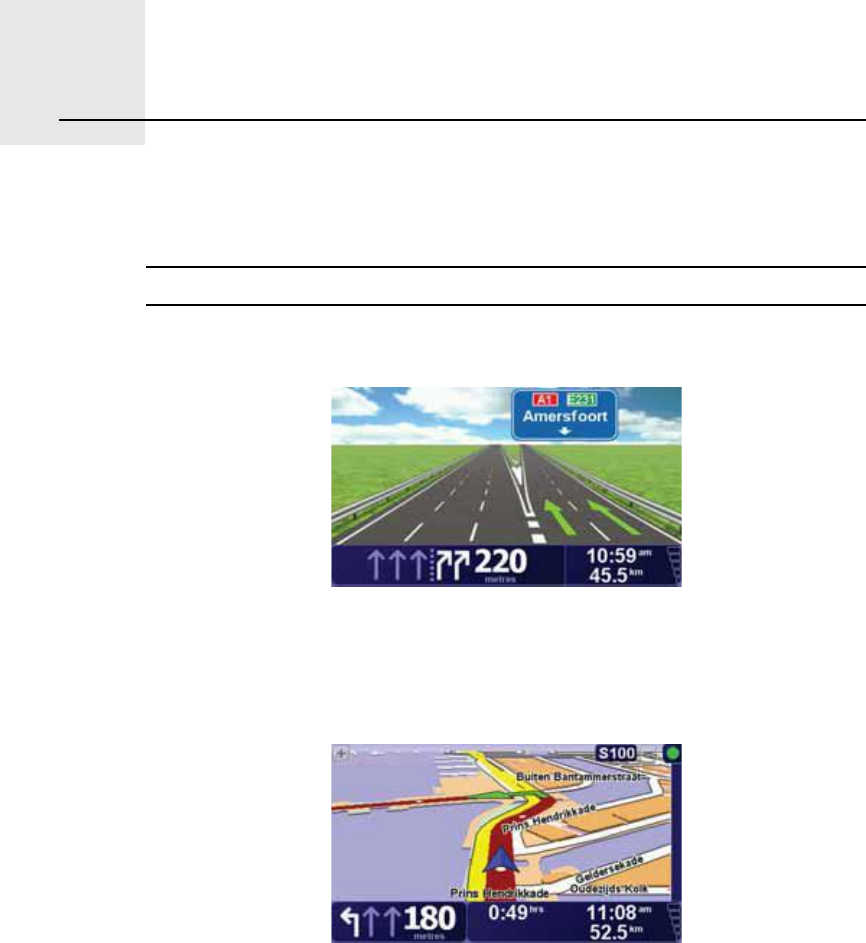
ß¼ª¿²½»¼ Ô¿²» Ù«·¼¿²½»îìò
99
Advanced Lane Guidance Your TomTomGO helps you prepare for motorway exits and junctions by
showing you which lane you should be in.
Ò±¬»æ ̸·- ·²º±®³¿¬·±² ·- ²±¬ ¿ª¿·´¿¾´» º±® ¿´´ ¶«²½¬·±²- ±® ·² ¿´´ ½±«²¬®·»-ò
For some exits and junctions, an image shows the turning and the lane you
should take.
To turn the images off, tap Ø·¼» ´¿²» ·³¿¹»- in the Preferences menu.
For other exits and junctions, your GO shows the lane you should take in the
Status bar. To turn this guidance off, tap ݸ¿²¹» °®»º»®»²½»- in the Main
Menu, then tap ͬ¿¬«- ¾¿® °®»º»®»²½»-. Clear the checkbox for ͸±© ´¿²»
¹«·¼¿²½».

ر© ¼±»- ²¿ª·¹¿¬·±² ©±®µáîëò
100
How does navigation work?
Ù´±¾¿´ б-·¬·±²·²¹ ͧ-¬»³ øÙÐÍ÷
In order to navigate you to your destination, your TomTomGO must know
where you are now. To find your current position, your GO uses the Global
Positioning System (GPS). GPS is available for free and without subscription.
The GPS uses satellites to transmit signals to GPS receivers. Your
TomTomGO has a built-in GPS receiver. Using the GPS signal, your GO can
work out where you are and how fast you are going. GPS signals work in all
weather, anywhere in the world.
Ò±¬»æ DZ«® ̱³Ì±³ÙÑ ¼±»- ²±¬ ¬®¿²-³·¬ §±«® °±-·¬·±²ô -± ±¬¸»®- ½¿²²±¬ «-»
·¬ ¬± ¬®¿½µ §±« ©¸·´» §±« ¿®» ¼®·ª·²¹ò DZ« ½¿² ¸±©»ª»® -»²¼ §±«® °±-·¬·±² ¬±
̱³Ì±³ Þ«¼¼·»-ò Ú±® ³±®» ·²º±®³¿¬·±²ô ª·-·¬ ¬±³¬±³ò½±³ñ-»®ª·½»-
Ú·²¼·²¹ §±«® °±-·¬·±² º¿-¬»®
If you use your TomTomGO in combination with TomTom HOME, your GO
will download information about where the GPS satellites are going to be for
the next 7 days.
With this information, your GO will be able to find your current position very
quickly when it is first switched on.
Ó¿°-
Once your TomTomGO knows where you are and you have told it where you
want to go, it uses the digital map on the memory card or hard disk to work
out the best route to your destination.

Ë-·²¹ ̱³Ì±³ ØÑÓÛîêò
101
Using TomTom HOME TomTom HOME is a free software program for your computer that enables
you to:
!Manage maps, voices, POIs and more.
!Transfer music and photos to your TomTom.
!Buy TomTom services and manage your subscriptions.
!Update your TomTom with the latest software and services automatically.
!Make and restore backups.
!Set a password to restrict access.
!Read the full version of the user manual.
ײ-¬¿´´·²¹ ̱³Ì±³ ØÑÓÛ
To install TomTom HOME on your computer, do the following:
1.Connect the Home Dock to your computer using the USB cable.
2.Make sure your computer is connected to the internet.
3.Place your TomTom device in the Home Dock and switch it on.
The latest version of TomTom HOME is downloaded and installed.
You can also install TomTom HOME from the CD supplied or download it from
the TomTom website. For more information, go to ¬±³¬±³ò½±³ñ¸±³»
Once installed, TomTom HOME starts automatically when you connect your
TomTom device to your computer.
ØÑÓÛ Ø»´° ̱°·½-
In the TomTom HOME Help topics you can find all kinds of tips and tricks on
how to use TomTom HOME.
ӧ̱³Ì±³ ß½½±«²¬
In order to buy content and services through TomTom HOME you will have to
set up a MyTomTom account for the device you want to buy the content for.
You will be asked to create an account when you start using TomTom HOME.

̱³Ì±³ ´·³·¬»¼ ©¿®®¿²¬§îéò
102
TomTom limited warranty
ÉßÎÎßÒÌÑÎ
Non-U.S. and non-Canadian purchases: If you have made your purchase
outside the United States and Canada, this Limited Warranty is granted by and
this Limitation of Liability is stipulated for the benefit of TomTom International
B.V., Rembrandtplein 35, 1017 CT Amsterdam (The Netherlands).
ÉØßÌ ÌØ×Í ÉßÎÎßÒÌÇ ÝÑÊÛÎÍ
1) TomTom International B.V. ("TomTom#) warrants to you that the Hardware
will be free from defects in workmanship and materials under normal use
("Defects#) for a period of one (1) year from the date that the Hardware was
first purchased by you ("Warranty Period#). During the Warranty Period the
Hardware will be repaired or replaced at TomTom s choice ("Limited
Warranty#) without charge to you for either parts or labour. This Limited
Warranty covers the replacement of the Hardware only. If the Hardware is
repaired after the Warranty Period has expired, the Warranty Period for the
repair will expire six (6) months after the date of repair.
ÉØßÌ ÌØ×Í ÉßÎÎßÒÌÇ ÜÑÛÍ ÒÑÌ ÝÑÊÛÎ
2) The Limited Warranty does not apply to normal wear and tear, does not
apply when the Hardware is opened or repaired by someone not authorized
by TomTom and does not cover repair or replacement of any Hardware or part
thereof damaged by: misuse, moisture, liquids, proximity or exposure to heat
and accident, abuse, non-compliance with the instructions supplied with the
Hardware, neglect or misapplication. The Limited Warranty does not cover
physical damage to the surface of the Hardware. This Limited Warranty does
not cover any software that may accompany or be installed on the Hardware.
The Limited Warranty does not cover the installation, removal or maintenance
of the Hardware or any costs related herewith.
ØÑÉ ÌÑ ÓßÕÛ ß ÉßÎÎßÒÌÇ ÝÔß×Ó
3) In order to make a claim of a Defect, you must contact TomTom by email
during the Warranty Period via www.tomtom.com to explain the Defect and to
obtain an RMA number (Return Materials Authorization) if necessary. You
must return the Hardware during the Warranty Period, along with an
explanation of the Defect, to the address provided to you by TomTom. If a
defect arises and a valid claim under this Limited Warranty is received by
TomTom after the first one hundred and eighty (180) days of the Warranty
Period, TomTom is entitled to charge you for any reasonable shipping and
handling costs made in connection with the repair or replacement of the
Hardware. You must comply with any other return procedures stipulated by
TomTom, if any.
103
ÇÑËÎ ÔÛÙßÔ Î×ÙØÌÍ
4) Some countries may not allow the exclusion or limitation of damages. If any
part of this Limited Warranty is held to be invalid or unenforceable, the
remainder of the Limited Warranty shall nonetheless remain in full force and
effect.
5) This Limited Warranty is the only express warranty made to you and is
provided in lieu of any other express warranties or similar obligations (if any)
created by any advertising, documentation, packaging, or other
communications.
6) Except for the Limited Warranty and to the maximum extent permitted by
applicable law, TomTom and its suppliers provide the Hardware "AS IS AND
WITH ALL FAULTS#, and hereby disclaim all other warranties and conditions,
whether express, implied or statutory, including, but not limited to, any (if any)
implied warranties, duties or conditions of satisfactory quality, of fitness for a
particular purpose, of reliability or availability, of accuracy or completeness of
responses, of results, of workmanlike effort, of lack of viruses, and of
reasonable care and skill, all with regard to the Hardware, and the provision of
or failure to provide support or other services, information, software, and
related content through the Hardware or otherwise arising out of the use of the
Hardware. Also, there is no warranty or condition of quiet enjoyment, quiet
possession, or non-infringement with regard to the Hardware. This exclusion
does not apply to (i) any implied condition as to title and (ii) any implied
warranty as to conformity with description.
7) This Limited Warranty does not affect any legal rights under applicable
national legislation governing the sale of consumer goods.
8) This Limited Warranty cannot be transferred to any other person.
Ô×Ó×ÌßÌ×ÑÒ ÑÚ Ô×ßÞ×Ô×ÌÇ
9) Neither TomTom nor its suppliers shall be liable to you or to any third party
for any damages either direct, indirect, incidental, consequential or otherwise
(including in each case, but not limited to, damages for the inability to use the
equipment or access data, loss of data, loss of business, loss of profits,
business interruption or the like) arising out of the use of or inability to use the
Hardware even if TomTom has been advised of the possibility of such
damages.
10) Notwithstanding any damages that you might incur for any reason
whatsoever (including, without limitation, all damages referenced herein and
all direct or general damages in contract or anything else), the entire liability
of TomTom and any of its suppliers shall be limited to the amount actually paid
by you for the Hardware.
11) TomTom shall not be liable for (i) any fraud on the part of its employees
and/or agents; or (ii) any fraudulent misrepresentation on the part of its
employees and/or agents.
12) Notwithstanding the above, neither party s liability for death or personal
injury resulting from its own negligence shall be limited.

ß¼¼»²¼«³îèò
104
Addendum
׳°±®¬¿²¬ Í¿º»¬§ Ò±¬·½»- ¿²¼ É¿®²·²¹-
Ù´±¾¿´ б-·¬·±²·²¹ ͧ-¬»³
The Global Positioning System (GPS) is a satellite-based system that provides
location and timing information around the globe. GPS is operated and
controlled under the sole responsibility of the Government of the United
States of America which is responsible for its availability and accuracy. Any
changes in GPS availability and accuracy, or in environmental conditions, may
impact the operation of your TomTom device. TomTom does not accept any
liability for the availability and accuracy of GPS.
Ë-» ©·¬¸ Ý¿®»
Use of a TomTom device for navigation still means that you need to drive with
due care and attention.
ß·®½®¿º¬ ¿²¼ ر-°·¬¿´-
Use of devices with an antenna is prohibited on most aircraft, in many
hospitals and in many other locations. A TomTom device must not be used in
these environments.
Þ¿¬¬»®§
This product uses a Lithium-Polymer battery. Do not use it in a humid, wet
and/or corrosive environment. Do not put, store or leave your product in or
near a heat source, in a high temperature location, in strong direct sunlight, in
a microwave oven or in a pressurized container, and do not expose it to
temperatures over 60C (140F). Failure to follow these guidelines may cause
the Lithium-Polymer battery to leak acid, become hot, explode or ignite and
cause injury and/or damage. Do not pierce, open or disassemble the battery.
If the battery leaks and you come into contact with the leaked fluids, rinse
thoroughly with water and seek medical attention immediately. For safety
reasons, and to prolong the lifetime of the battery, charging will not occur at
low (below 0C/32F) or high (over 45C/113F) temperatures.
Temperatures: Standard operation: -10C (14F) to +55C (131F); short period
storage: -20C (-4F) to + 60C (140F); long period storage: -20C (-4 F) to
+25C (77F).
THE LITHIUM-POLYMER BATTERY CONTAINED IN THE PRODUCT
MUST BE RECYCLED OR DISPOSED OF PROPERLY. USE YOUR
TomTom ONLY WITH THE SUPPLIED DC POWER LEAD (CAR
CHARGER/BATTERY CABLE) AND AC ADAPTER (HOME CHARGER)
FOR BATTERY CHARGING.
To recycle your TomTom unit please see your local approved TomTom
service center.

105
ÝÛ Ó¿®µ·²¹
This equipment complies with the requirements for CE
marking when used in a residential, commercial, vehicular or
light industrial environment.
ÎúÌÌÛ Ü·®»½¬·ª»
ÙÑ ëíðô êíðô éíðô çíð
www.tomtom.com/lib/doc/CE DoC__GO520 720 920.pdf
λ³±¬» ½±²¬®±´
www.tomtom.com/lib/doc/CE DoC_GO Remote.pdf
̱³Ì±³ ØÜ Ì®¿ºº·½ λ½»·ª»®
www.tomtom.com/lib/doc/hdtreceiver/Document.pdf
Hereby, TomTom declares that the devices listed above are in compliance
with the essential requirements and other relevant provisions of the EU
Directive 1999/5/EC.
The declaration of conformity can be found at the web address given above
with each device.
Hiermit erklärt TomTom, dass dieses persönliche Navigationsgerät die
grundlegenden Anforderungen und andere relevante Bestimmungen der EU-
Richtlinie 1999/5/EG erfüllt.
Die Konformitätserklärung für das jeweilige Gerät finden Sie unter der
vorgenannten Internetadresse.
Par la présente, TomTom déclare que les appareils répertoriés ci-dessus sont
conformes aux principales exigences et autres dispositions applicables de la
directive UE 1999/5/CE.
La déclaration de conformité est consultable à l'URL indiquée ci-dessus pour
chaque appareil.
Por la presente, TomTom declara que los dispositivos que aparecen en la lista
mostrada anteriormente cumplen con las exigencias y otras disposiciones
relevantes de la Directiva de la UE 1999/5/CE.
Se puede consultar la declaración de conformidad en la dirección de Internet
mostrada sobre cada dispositivo.
Con la presente, TomTom dichiara che i dispositivi elencati sopra sono
conformi ai requisiti essenziali e alle clausole pertinenti della Direttiva 1999/5/
EC dell'UE.
La dichiarazione di conformità è reperibile agli indirizzi Web forniti con ciascun
dispositivo.
Hierbij verklaart TomTom dat bovenstaande navigatiesystemen in
overeenstemming zijn met de essentiële vereisten en andere relevante
bepalingen van richtlijn 1999/5/EG.
De conformiteitsverklaring voor elk navigatiesysteem kan worden
geraadpleegd op het bovenstaande internetadres.
TomTom erklærer herved, at de ovenfor anførte produkter er i
overensstemmelse med de væsentligste krav og andre relevante
bestemmelser i Europa-Parlamentets og Rådets direktiv 1999/5/EF.
Overensstemmelseserklæringen kan findes på den webadresse, der er anført
ved hvert enkelt produkt ovenfor.

106
Härmed förklarar TomTom att enheterna som listas ovan följer väsentliga krav
och andra relevanta föreskrifter i EU-direktiv 1999/5/EC.
Konformitetsdeklarationen finns på webbadressen som anges ovan för varje
enhet.
Täten TomTom vakuuttaa, että edellä mainitut laitteet täyttävät EU-direktiivin
1999/5/EY olennaiset vaatimukset ja sen muut asiaankuuluvat määräykset.
Vaatimustenmukaisuusvakuutus on katsottavissa kunkin laitteen kohdalla
annetusta web-osoitteesta.
A TomTom vem por este meio declarar que os equipamentos constantes na
lista atrás descrita estão em conformidade com os requisitos essenciais e
outras disposições aplicáveis da Directiva UE 1999/5/CE.
A declaração de conformidade está disponível no endereço web indicado em
cima com cada equipamento.
Hermed erklærer TOMTOM at ovennevnte enheter er i overensstemmelse
med krav og andre relevante bestemmelser i henhold til EU-direktiv 1999/5/
EU.
Denne komformitetserklæringen finnes på ovenstående nettadressen som
leveres sammen med hver enhet.
Firma Tomtom o wiadcza, e urz dzenie wymienione poni ej jest zgodne z
zasadniczymi wymaganiami oraz innymi stosownymi postanowieniami
Dyrektywy EU 1999/5/EC.
Deklaracja zgodno ci dla ka dego urz dzenia znajduje si na podanej stronie
internetowej.
Spole nost TomTom tímto prohla;uje, =e vý;e uvedená za ízení spl ují
v;echny základní po=adavky a dal;í p íslu;ná ustanovení Sm rnice EU 99/5/
ES.
Prohlá;ení o shod naleznete na webové adrese uvedené u jednotlivých
za ízení.
Burada, TomTom yukar da listelenen cihazlar n 1999/5/EC Avrupa Birli i
Direktifi'nin temel gereksinimlerine ve di er ilgili hükümlere uygun oldu unu
beyan eder.
Uygunluk bildirimi her bir cihaz için yukar da verilen web adreslerinde
bulunabilir.
A TomTom ezennel kijelenti, hogy a fent felsorolt eszközök megfelelnek az
1999/5/EC EU irányelv alapvet követelményeinek és egyéb rá vonatkozó
rendelkezéseinek.
A megfelel ségi nyilatkozat az egyes eszközök felett látható webcímeken
található.
Käesolevaga deklareerib TomTom, et ülalnimetatud seadmed vastavad EL
direktiivi 1999/5/EÜ põhinõuetele ja muudele tingimustele.
Vastavusdeklaratsiooni võib leida iga seadme kohal toodud veebiaadressilt.
Ar ;o TomTom pazi o, ka iepriek; min t s ier ces atbilst ES direkt vas 1999/5/
EK b tiskaj m pras b m un citiem svar gajiem nosac jumiem.
Atbilst bas deklar cija ir pieejama t mek a adres , kas min ta pie katras
iepriek; min t s ier ces.

107
TomTom parei;kia, kad toliau pateikti reginiai atitinka svarbiausius ir kitus
reikalingus ES direktyvos 1999/5/EC reikalavimus bei nuostatus.
Atitikties deklaracij galima rasti su kiekvienu renginiu pateiktoje interneto
svetain je.
Per la present, TomTom declara que els aparells enumerats a dalt compleixen
els requisits essencials i altres disposicions rellevants de la Directiva 1999/5/
CE de la UE.
La declaració de conformitat es troba a l adreça web indicada a dalt amb cada
aparell.
Spolo nos TomTom vyhlasuje, =e toto zariadenie vyhovuje základným
po=iadavkám a al;ím základným predpisom smernice EÚ 1999/5/EC.
Prehlásenie o zhode nájdete na webovej adrese uvedenej pri jednotlivých
zariadeniach.
ÉÛÛÛ Ü·®»½¬·ª»
This symbol on the product or its packaging indicates that this
product shall not be treated as household waste. In line with EU
Directive 2002/96/EC for waste electrical and electronic equipment
(WEEE), this electrical product must not be disposed of as unsorted
municipal waste. Please dispose of this product by returning it to the
point of sale or to your local municipal collection point for recycling.
Dieses auf dem Produkt oder der Verpackung angebrachte Symbol zeigt an,
dass dieses Produkt nicht mit dem Hausmüll entsorgt werden darf. In
Übereinstimmung mit der Richtlinie 2002/96/EG des Europäischen Parlaments
und des Rates über Elektro- und Elektronik-Altgeräte (WEEE) darf dieses
Elektrogerät nicht im normalen Hausmüll oder dem Gelben Sack entsorgt
werden. Wenn Sie dieses Produkt entsorgen möchten, bringen Sie es bitte zur
Verkaufsstelle zurück oder zum Recycling-Sammelpunkt Ihrer Gemeinde.
Ce symbole sur le produit ou son emballage signifie que ce produit ne doit pas
être traité comme un déchet ménager. Conformément à la Directive 2002/96/
EC sur les déchets d équipements électriques et électroniques (DEEE), ce
produit électrique ne doit en aucun cas être mis au rebut sous forme de d échet
municipal non trié. Veuillez vous débarrasser de ce produit en le renvoyant à
son point de vente ou au point de ramassage local dans votre municipalité, à
des fins de recyclage.
Dit symbool op het product of de verpakking geeft aan dat dit product niet bij
het huishoudelijk afval mag worden gegooid. In navolging van richtlijn 2002/
96/EG van het Europees Parlement en de Raad betreffende afgedankte
elektrische en elektronische apparatuur (AEEA) mag dit elektrische product
niet als ongescheiden huisvuil worden weggedaan. Breng dit product terug
naar de plaats van aankoop of naar het gemeentelijke afvalinzamelingspunt
voor recycling.
Questo simbolo sul prodotto o sulla relativa confezione indica che il prodotto
non va trattato come un rifiuto domestico. In ottemperanza alla Direttiva UE
2002/96/EC sui rifiuti di apparecchiature elettriche ed elettroniche (RAEE),
questo prodotto elettrico non deve essere smaltito come rifiuto municipale
misto. Si prega di smaltire il prodotto riportandolo al punto vendita o al punto
di raccolta municipale locale per un opportuno riciclaggio.
Este símbolo en el producto o su embalaje indica que el producto no debe
tratarse como residuo doméstico. De conformidad con la Directiva 2002/96/
CE de la UE sobre residuos de aparatos eléctricos y electrónicos (RAEE), este
producto eléctrico no puede desecharse con el resto de residuos no
clasificados. Deshágase de este producto devolviéndolo al punto de venta o a
un punto de recogida municipal para su reciclaje.

108
Dette symbol på produktet eller emballagen angiver, at produktet ikke må
behandles som husholdningsaffald. I henhold til EU-direktiv 2002/96/EF om
affald af elektrisk og elektronisk udstyr (WEEE) må dette udstyr ikke
bortskaffes som usorteret husholdningsaffald. Bortskaf dette produkt ved at
returnere det til salgsstedet eller til det lokale indsamlingssted, så det kan
genbruges.
Den här symbolen på produkten eller förpackningen anger att produkten inte
ska hanteras som hushållsavfall. I linje med EU-direktiv 2002/96/EG om avfall
som utgörs av eller innehåller elektriska eller elektroniska produkter (WEEE)
får denna elektriska produkt inte bortskaffas som osorterat kommunalt avfall.
Bortskaffa den i stället genom att lämna in den på försäljningsstället eller din
lokala återvinningsstation.
Tämä symboli tuotteessa tai sen pakkauksessa osoittaa, että tätä tuotetta ei
saa käsitellä kotitalousjätteenä. EU:n sähkö- ja
elektroniikkalaiteromudirektiivin (2002/96/EY) mukaisesti tätä
elektroniikkalaitetta ei saa laittaa lajittelemattoman yhdyskuntajätteen sekaan.
Hävitä laite palauttamalla se ostopaikkaan tai viemällä se elektroniikkaromun
keräyspisteeseen.
Este símbolo no produto ou na embalagem indica que o produto não deve ser
tratado como lixo doméstico. De acordo com a Directiva Europeia 2002/96/EC
sobre resíduos sólidos de equipamento eléctrico e electrónico (WEEE), este
produto eléctrico não pode ser deitado fora juntamente com o lixo municipal
indiferenciado. Por favor, no final da vida útil deste produto, devolva-o ao
estabelecimento de aquisição, ou entregue-o no local de recolha apropriado
para reciclagem designado pelo seu município.
Tento symbol na výrobku nebo na balení znamená, =e výrobek nepat í do
domácího odpadu. Vsouladu se sm rnicí EU . 2002/96/ES oodpadních
elektrických aelektronických za ízeních (OEEZ) se tento elektrický výrobek
nesmí likvidovat jako net íd ný komunální odpad. P i likvidaci tento výrobek
vrat%te prodejci nebo ho odevzdejte krecyklaci do komunálního sb rného
za ízení.
See sümbol tootel või pakendil viitab sellele, et antud toodet ei tohi hävitada
koos majapidamisprügiga. Vastavalt EL direktiivile 2002/96/EÜ, mis käsitleb
elektri- ja elektroonikaseadmete jäätmeid (WEEE), ei või antud toodet visata
majapidamisjäätmete hulka. Palun tagastage antud toode taaskasutamise
eesmärgil müügipunkti või kohaliku piirkonna jäätmekogumise punkti.
Ez a jel a terméken vagy annak csomagolásán azt jelenti, hogy ezt a terméket
nem kezelheti háztartási hulladékként. Az elektromos és elektronikus
berendezések hulladékairól szóló 2002/96/EK (WEEE) irányelvnek megfelel en
ezt az elektromos berendezést tilos szortírozatlan, közösségi hulladékgy jt be
dobni. A terméket használata befejeztével vigye vissza az eladási ponthoz vagy
a helyi közigazgatási újrahasznosító gy jt helyre.
Fis simbolis ant produkto arba jo pakuot s rei;kia, kad jis neturi b ti
utilizuojamas kartu su buitin mis atliekomis. Pagal ES Direktyv 2002/96/EB
d l elektros ir elektronin s rangos atliek (WEEE), ;io elektros gaminio
negalima i;mesti su buitin mis atliekomis. F gamin reikia gr =inti t viet ,
kur jis buvo pirktas, arba miesto atliek perdirbimo punkt .
Fis simbols uz produkta vai t iesai ojuma nor da, ka ;o produktu nedr kst
izmest m jsaimniec bas atkritumos. Saska ar ES Direkt vu 2002/96/EC par
elektrisko un elektronisko iek rtu atkritumiem (EEIA), ;o elektrisko iek rtu ir
aizliegts nodot kop ar citiem ne;irotiem sadz ves atkritumiem. L dzu
nododiet ;o iek rtu atpaka t s tirdzniec bas viet vai J su tuv kaj
sabiedriskaj iek rtu sav k;anas punkt to p rstr dei.
Je li na produkcie lub jego opakowaniu umieszczono ten symbol, wówczas w
czasie utylizacji nie wolno wyrzuca tego produktu wraz z odpadami
komunalnymi. Zgodnie z Dyrektyw Nr 2002/96/WE w sprawie zu ytego
109
sprz tu elektrycznego i elektronicznego (WEEE), niniejszego produktu
elektrycznego nie wolno usuwa jako nie posortowanego odpadu
komunalnego. Prosimy o usuniecie niniejszego produktu poprzez jego zwrot
do punktu zakupu lub oddanie do miejscowego komunalnego punktu zbiórki
odpadów przeznaczonych do recyklingu.
Tento symbol na výrobku alebo jeho balení znamená, =e výrobok nepatrí do
domáceho odpadu. V súlade so smernicou 2002/96/ES o odpade z elekrických
a elektronických zariadení (OEEZ) sa toto elektrické zariadenie nesmie
odstranovat% ako netriedený komunálny odpad. Výrobok odstránte jeho
vrátením v mieste nákupu alebo odovzdaním v miestnom zbernom zariadení
na recyklovanie.
Ñ°»®¿¬·±² ±º ÚÓ ¬®¿²-³·¬¬»® ·² ¬¸·- ¼»ª·½»
This equipment may be operated in these countries / Dieses Gerät darf in
folgenden Ländern betrieben werden / Deze apparatuur mag in de volgende
landen worden gebruikt / Cet appareil peut être utilisé dans les pays suivants/
Questo dispositivo può essere utilizzato nei seguenti paesi / Este equipo
puede utilizarse en estos países / Dette udstyr må benyttes i følgende lande /
Denna enhet får användas i följande länder / Laitetta saa käyttää seuraavissa
maissa / Este equipamento pode ser utilizado nos seguintes países / Toto
vybavení smí být pou íváno v následujících zemích / Toto vybavenie môe
by pou ívané v týchto krajinách / Ezt a berendezést a következ országokban
lehet m ködtetni / Urz dzenie zosta o dopuszczone do u ytku w
nast puj cych krajach / Seda seadet saab kasutada järgmistes riikides / Fi
ranga gali veikti tokiose valstyb se / Fo aparat ru dr kst lietot ;d s valst s:
AT, CH, CZ, DE, DK, EE, FI, GB, LI, LU, NO, PT, SE
GO 530, GO 630, GO 730 and GO 930 devices should not be used for FM
transmission while connected to a computer with a USB cable.
Die Geräte GO 530, GO 630, GO 730 und GO 930 dürfen nicht für die UKW-
Übertragung (als FM-Transmitter) genutzt werden, während sie über ein USB-
Kabel mit einem Computer verbunden sind.
Les appareils GO 530, GO 630, GO 730 et GO 930 ne doivent pas être utilisés
à des fins de transmission FM lorsqu'ils sont connectés à un ordinateur par un
câble USB.
Los dispositivos GO 530, GO 630, GO 730 y GO 930 no deben utilizarse para
transmisión FM mientras estén conectados a un ordenador con un cable USB.
I dispositivi GO 530, GO 630, GO 730 e GO 930 non devono essere usati per la
trasmissione di un segnale FM quando collegati a un computer per mezzo di
un cavo USB.
De navigatiesystemen GO 530, GO 630, GO 730 en GO 930 zijn niet geschikt
voor FM-transmissie wanneer ze op een computer zijn aangesloten met
behulp van een USB-kabel.
Produkterne GO 530, GO 630, GO 730 og GO 930 må ikke anvendes til FM-
transmission, mens de er tilsluttet en computer via et USB-kabel.
GO 530-, GO 630-, GO 730- och GO 930-enheter skall inte användas för FM-
sändning när de är anslutna till en dator via en USB-kabel.
GO 530-, GO 630,- GO 730- ja GO 930 -laitteita ei tulisi käyttää FM-lähetykseen
silloin, kun laite on kytkettynä tietokoneeseen USB-johdolla.
Os equipamentos GO 530, GO 630, GO 730 e GO 930 não devem ser utilizados
para transmissão FM enquanto estiverem ligados a um computador com um
cabo USB.

110
Enhetene GO 530, GO 630, GO 730 og GO 930 bør ikke benyttes til FM-
overføring mens de er koblet til en datamaskin med USB-kabel.
Urz dzenia GO 530, GO 630, GO 730 i GO 930 nie powinny by u ywane do
transmisji FM w czasie, w którym s pod czone do komputera za pomoc
kabla USB.
Za ízení GO 530, GO 630, GO 730 a GO 930 není vhodné pou=ívat pro FM
vysílání v dob , kdy jsou pomocí USB kabelu p ipojena k po íta i.
GO 530, GO 630, GO 730 ve GO 930 cihazlar USB kablosuyla bir bilgisayara
ba l yken FM iletimi için kullan lamaz.
A GO 530, a GO 630, a GO 730 és a GO 930 eszközöket nem szabad FM
jeladásra használni, amikor egy USB-kábellel hozzá vannak csatlakoztatva egy
számítógéphez.
Seadmeid GO 530, GO 630, GO 730 ja GO 930 ei tohi kasutada FM
ülekanneteks, kui need on USB-kaabli abil arvutiga ühendatud.
Mode us GO 530, GO 630, GO 730 un GO 930 aizliegts lietot FM raid ;anai,
kam r tie ar USB kabeli ir piesl gti datoram.
renginiai GO 530, GO 630, GO 730 ir GO 930 neturi b ti naudojami perduoti
signalus FM da=niais, kai jie prijungti prie kompiuterio USB kabeliu.
Els aparells GO 530, GO 630, GO 730 i GO 930 no s'han d'emprar per a
transmissions FM quan estan connectats a un ordinador amb un cable USB.
Zariadenia GO 530, GO 630, GO 730 a GO 930 nepou=ívajte na vysielanie FM,
ak sú prostredníctvom kábla USB pripojené k po íta u.
̸·- ܱ½«³»²¬
Great care was taken in preparing this manual. Constant product development
may mean that some information is not entirely up-to-date. The information in
this document is subject to change without notice.
TomTom shall not be liable for technical or editorial errors or omissions
contained herein; nor for incidental or consequential damages resulting from
the performance or use of this material. This document contains information
protected by copyright. No part of this document may be photocopied or
reproduced in any form without prior written consent from TomTom
International B.V.
ﮬ ²«³¾»®-
TomTom GO: 4CH5.000.00, 4CH5.000.01, 4CH7.000.00, 4CH9.000.00

ݱ°§®·¹¸¬ ²±¬·½»-îçò
111
Copyright notices w îððè ̱³Ì±³ ײ¬»®²¿¬·±²¿´ ÞÊô ̸» Ò»¬¸»®´¿²¼-ò ̱³Ì±³‡ ¿²¼ ¬¸» þ¬©±
¸¿²¼-þ ´±¹± ¿®» ¿³±²¹ ¬¸» ¬®¿¼»³¿®µ-ô ¿°°´·½¿¬·±²- ±® ®»¹·-¬»®»¼ ¬®¿¼»³¿®µ-
±©²»¼ ¾§ ̱³Ì±³ ײ¬»®²¿¬·±²¿´ ÞòÊò Ñ«® ´·³·¬»¼ ©¿®®¿²¬§ ¿²¼ »²¼ «-»®
´·½»²-» ¿¹®»»³»²¬ º±® »³¾»¼¼»¼ -±º¬©¿®» ¿°°´§ ¬± ¬¸·- °®±¼«½¬å §±« ½¿²
®»ª·»© ¾±¬¸ ¿¬ ©©©ò¬±³¬±³ò½±³ñ´»¹¿´
Ü¿¬¿ ͱ«®½»
w îððè Ì»´» ߬´¿- ÒòÊò Þ¿-»¼ «°±²æ
̱°±¹®¿º·-½¸» ±²¼»®¹®±²¼ ݱ°§®·¹¸¬ w ¼·»²-¬ ª±±® ¸»¬ µ¿¼¿-¬»® »² ¼»
±°»²¾¿®» ®»¹·-¬»®-ô ß°»´¼±±®² îððèò
w Ñ®¼²¿²½» Í«®ª»§ ±º Ò±®¬¸»®² ×®»´¿²¼ò
w ×ÙÒ Ú®¿²½»ò
w Í©·--¬±°±ò
w ÞÛÊô ÙÆ ïíêèñîððèò
w Ù»±²»¨¬ñܻ߹±-¬·²·ò
w Ò±®©»¹·¿² Ó¿°°·²¹ ß«¬¸±®·¬§ô Ы¾´·½ α¿¼- ß¼³·²·-¬®¿¬·±² ñ
w Ó¿°-±´«¬·±²-ò w ÜßÊò
̸·- °®±¼«½¬ ·²½´«¼»- ³¿°°·²¹ ¼¿¬¿ ´·½»²-»¼ º®±³ Ñ®¼²¿²½» Í«®ª»§ ©·¬¸ ¬¸»
°»®³·--·±² ±º ¬¸» ݱ²¬®±´´»® ±º Ø»® Ó¿¶»-¬§Ž- ͬ¿¬·±²»®§ Ѻº·½»ò w Ý®±©²
½±°§®·¹¸¬ ¿²¼ñ±® ¼¿¬¿¾¿-» ®·¹¸¬ îððèò ß´´ ®·¹¸¬- ®»-»®ª»¼ò Ô·½»²½» ²«³¾»®
ïðððîêçîðò
Ì»¨¬ ¬± Í°»»½¸ ¬»½¸²±´±¹§ô w îððè Ô±¯«»²¼± ÌÌÍò ß´´ ®·¹¸¬- ®»-»®ª»¼ò
Ô±¯«»²¼± ·- ¿ ®»¹·-¬»®»¼ ¬®¿¼»³¿®µò ©©©ò´±¯«»²¼±ò½±³
ß°°´»r ¿²¼ ·Ð±¼r ¿®» ¬®¿¼»³¿®µ- ±º ß°°´» ݱ³°«¬»®ô ײ½òô ®»¹·-¬»®»¼ ·² ¬¸»
ËòÍò ¿²¼ ±¬¸»® ½±«²¬®·»-ò
ß«¼·¾´»rô ß«¼·¾´»Ô·-¬»²»®r ¿²¼ ß«¼·¾´»³¿²¿¹»®r ¿®» ®»¹·-¬»®»¼
¬®¿¼»³¿®µ- ±º ß«¼·¾´»ô ײ½ò ɸ»² °«®½¸¿-·²¹ ¿²¼ «-·²¹ ß«¼·¾´» ½±²¬»²¬ §±«
²»»¼ ¬± ¿¹®»» ¬± ¬¸» ¬»®³- ¿²¼ ½±²¼·¬·±²- ¿- °±-¬»¼ ·² ¬¸» Ô»¹¿´ Ò±¬·½»-
©©©ò¿«¼·¾´»ò½±³ò

112
ͱ«²¼Ý´»¿®‡ ¿½±«-¬·½ »½¸± ½¿²½»´´¿¬·±² -±º¬©¿®» wß½±«-¬·½ Ì»½¸²±´±¹·»-
ײ½ò
ÓÐÛÙ Ô¿§»®óí ¿«¼·± ½±¼·²¹ ¬»½¸²±´±¹§ ´·½»²-»¼ º®±³ Ú®¿«²¸±º»® ××Í ¿²¼
̸±³-±²ò
Í«°°´§ ±º ¬¸·- °®±¼«½¬ ¼±»- ²±¬ ½±²ª»§ ¿ ´·½»²-» ²±® ·³°´§ ¿²§ ®·¹¸¬ ¬±
¼·-¬®·¾«¬» ½±²¬»²¬ ½®»¿¬»¼ ©·¬¸ ¬¸·- °®±¼«½¬ ·² ®»ª»²«»ó¹»²»®¿¬·²¹ ¾®±¿¼½¿-¬
-§-¬»³- ø¬»®®»-¬®·¿´ô -¿¬»´´·¬»ô ½¿¾´» ¿²¼ñ±® ±¬¸»® ¼·-¬®·¾«¬·±² ½¸¿²²»´-÷ô
-¬®»¿³·²¹ ¿°°´·½¿¬·±²- øª·¿ ײ¬»®²»¬ô ·²¬®¿²»¬- ¿²¼ñ±® ±¬¸»® ²»¬©±®µ-÷ô ±¬¸»®
½±²¬»²¬ ¼·-¬®·¾«¬·±² -§-¬»³- ø°¿§ó¿«¼·± ±® ¿«¼·±ó±²ó¼»³¿²¼ ¿°°´·½¿¬·±²- ¿²¼
¬¸» ´·µ»÷ ±® ±² °¸§-·½¿´ ³»¼·¿ ø½±³°¿½¬ ¼·-½-ô ¼·¹·¬¿´ ª»®-¿¬·´» ¼·-½-ô
-»³·½±²¼«½¬±® ½¸·°-ô ¸¿®¼ ¼®·ª»-ô ³»³±®§ ½¿®¼- ¿²¼ ¬¸» ´·µ»÷ò ß²
·²¼»°»²¼»²¬ ´·½»²-» º±® -«½¸ «-» ·- ®»¯«·®»¼ò Ú±® ¼»¬¿·´-ô °´»¿-» ª·-·¬
³°í´·½»²-·²¹ò½±³
ͱ³» ·³¿¹»- ¿®» ¬¿µ»² º®±³ ÒßÍߎ- Û¿®¬¸ Ѿ-»®ª¿¬±®§ò
̸» °«®°±-» ±º ÒßÍߎ- Û¿®¬¸ Ѿ-»®ª¿¬±®§ ·- ¬± °®±ª·¼» ¿ º®»»´§ó¿½½»--·¾´»
°«¾´·½¿¬·±² ±² ¬¸» ײ¬»®²»¬ ©¸»®» ¬¸» °«¾´·½ ½¿² ±¾¬¿·² ²»© -¿¬»´´·¬» ·³¿¹»®§
¿²¼ -½·»²¬·º·½ ·²º±®³¿¬·±² ¿¾±«¬ ±«® ¸±³» °´¿²»¬ò
̸» º±½«- ·- ±² Û¿®¬¸Ž- ½´·³¿¬» ¿²¼ »²ª·®±²³»²¬¿´ ½¸¿²¹»æ
»¿®¬¸±¾-»®ª¿¬±®§ò²¿-¿ò¹±ªñ
This equipment has been tested and found to comply with the limits for a class B digital device, pursuant to part 15 of
the FCC Rules. These limits are designed to provide reasonable protection against harmful
interference in a residential
installation.
This equipment generates, uses and can radiate radio frequency energy and, if not installed and used in accordance
with the instructions, may cause harmful interference to radio communications. However, there is no guarantee that
interference will not occur in a particular installation. If this equipment does cause harmful interference to radio or
television reception, which can be determined by turning the equipment off and on, the user is encouraged to try to
correct the interference by one or more of the following measures:
---Reorient or relocate the receiving antenna.
---Increase the separation between the equipment and receiver.
---Connect the equipment into an outlet on a circuit different from that to which the receiver is connected.
---Consult the dealer or an experienced radio/TV technician for help.
This device complies with Part 15 of the FCC Rules. Operation is subject to the following two conditions:
1. This device may not cause harmful interference.
2. This device must accept any interference received, including interference that may cause undesired operation.
You are cautioned that changes or modifications not expressly approved by the party responsible for
compliance could
void your authority to operate the equipment.
1. This Transmitter must not be co-located or operating in conjunction with any other antenna or transmitter.
2. This equipment complies with FCC RF radiation exposure limits set forth for an uncontrolled environment. This
equipment should be installed and operated with a minimum distance of 20 centimeters between the radiator and your
body.
This digital apparatus does not exceed the Class B limits for radio noise emissions from digital apparatus as set out in
the interference-causing equipment standard entitled “Digital Apparatus,” ICES-003 of IndustryCanada.
Cet appareil numérique respecte les limites de bruits radioélectriques applicables aux appareils numériques de Classe
B prescrites dans la norme sur le material brouilleur: “Appareils Numériques,” NMB-003 édictéepar l’
Industrie. (1) this
device may not cause interference,and (2) this device must accept any interference, including interference that may
cause undesired operation of the device."