Wiltronic 797TPC GSM/GPRS/EDGE 850/1900, WCDMA Bands (II & V), BT, 802.11 b/g/n, GPS Mobile Internet Device User Manual 797TPC g

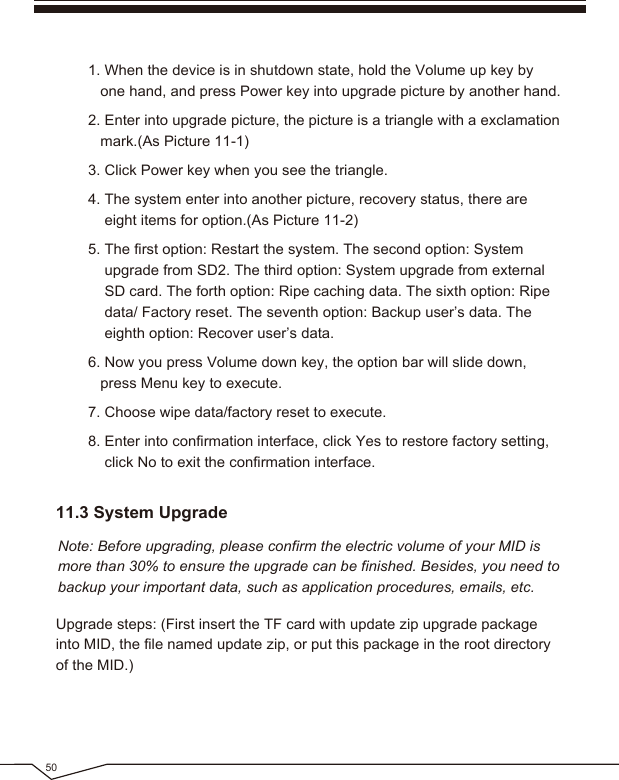
Wiltronic Corporation GSM/GPRS/EDGE 850/1900, WCDMA Bands (II & V), BT, 802.11 b/g/n, GPS Mobile Internet Device 797TPC g
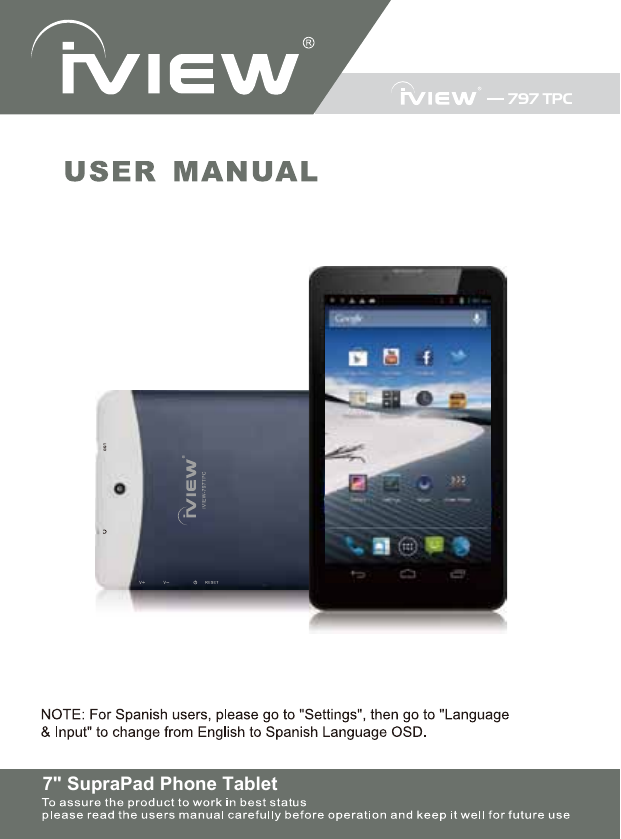
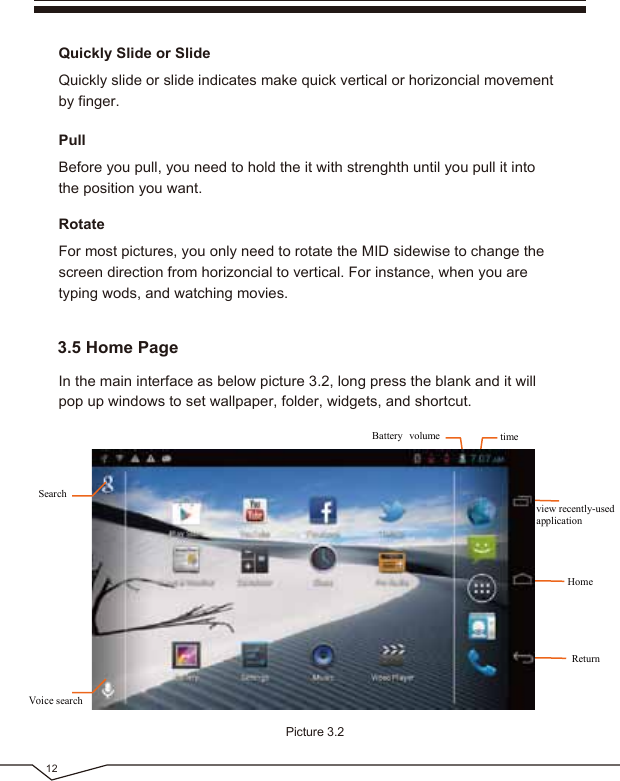
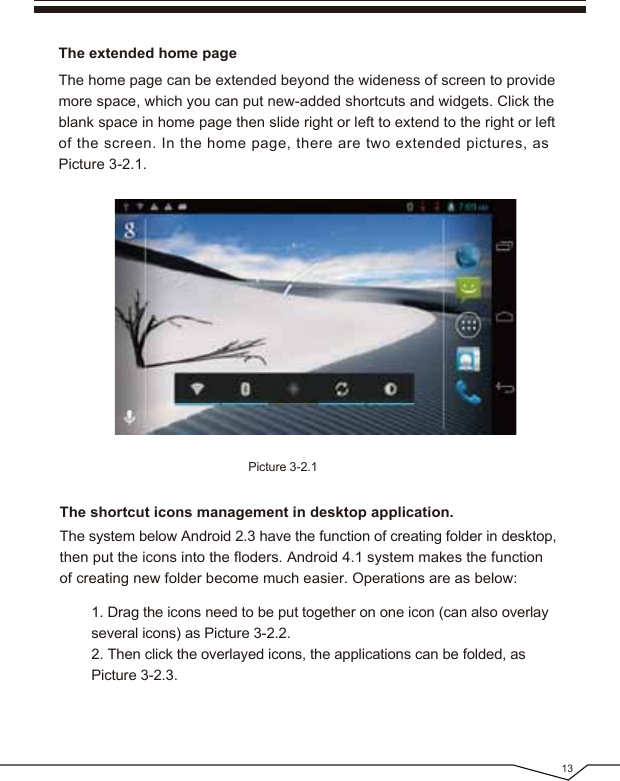
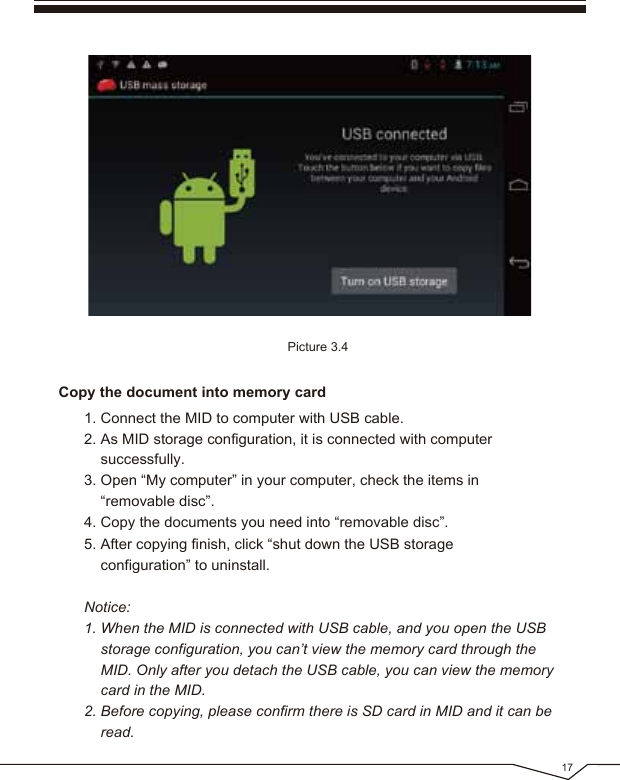
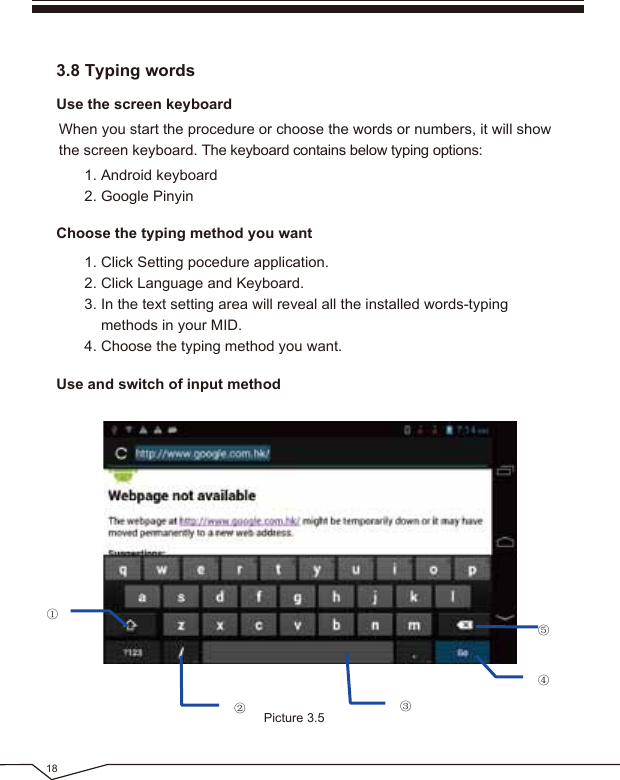
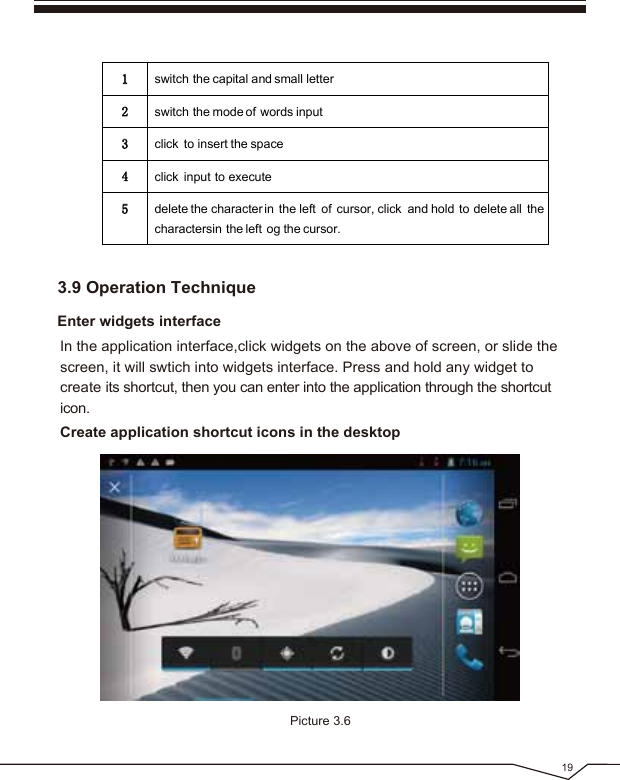
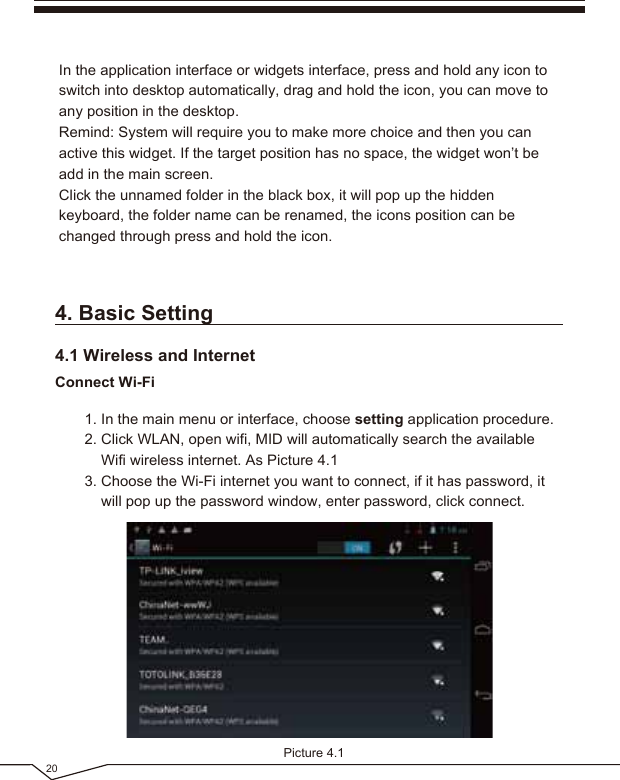
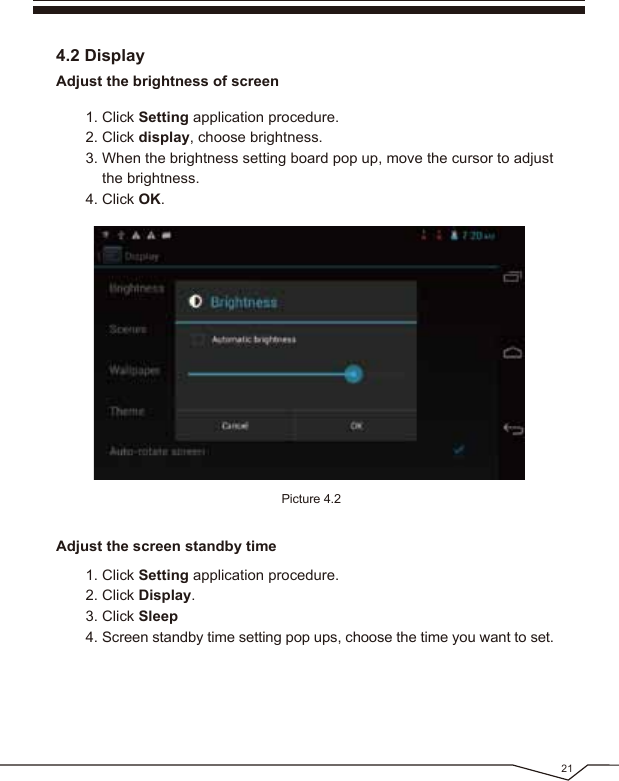
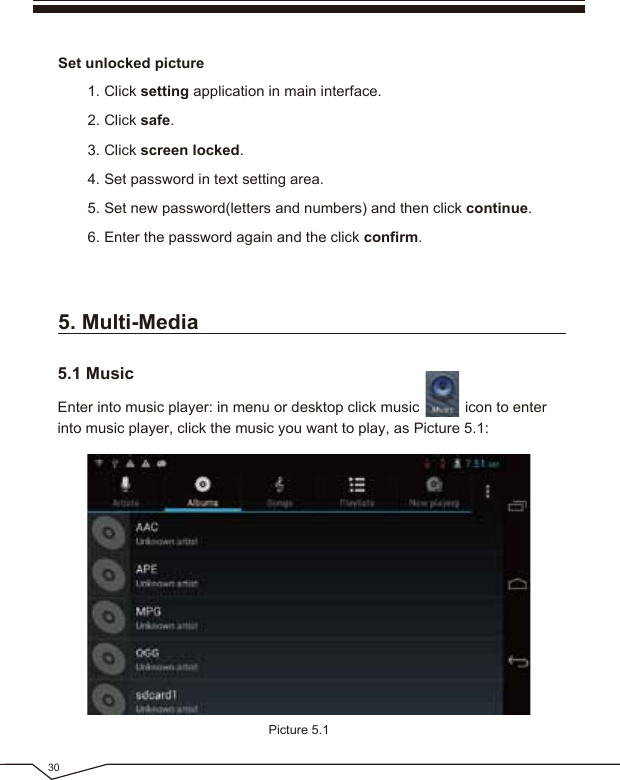
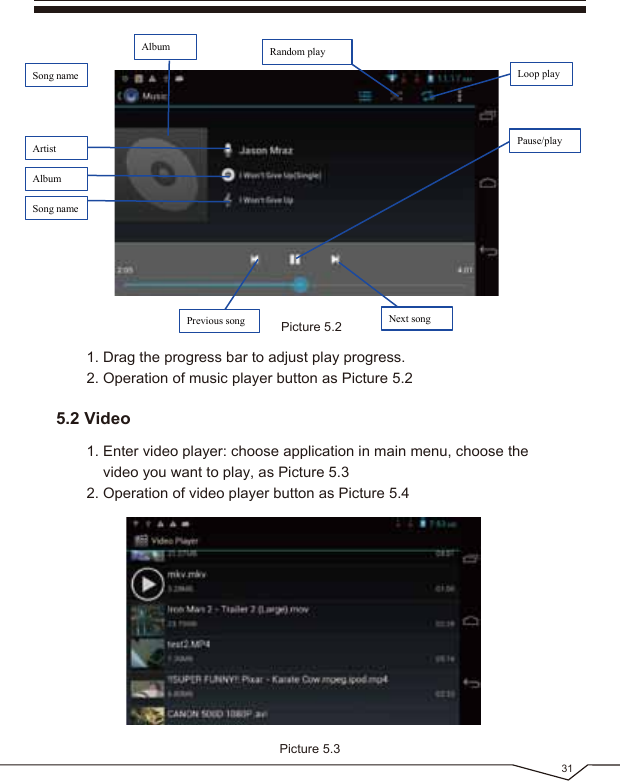
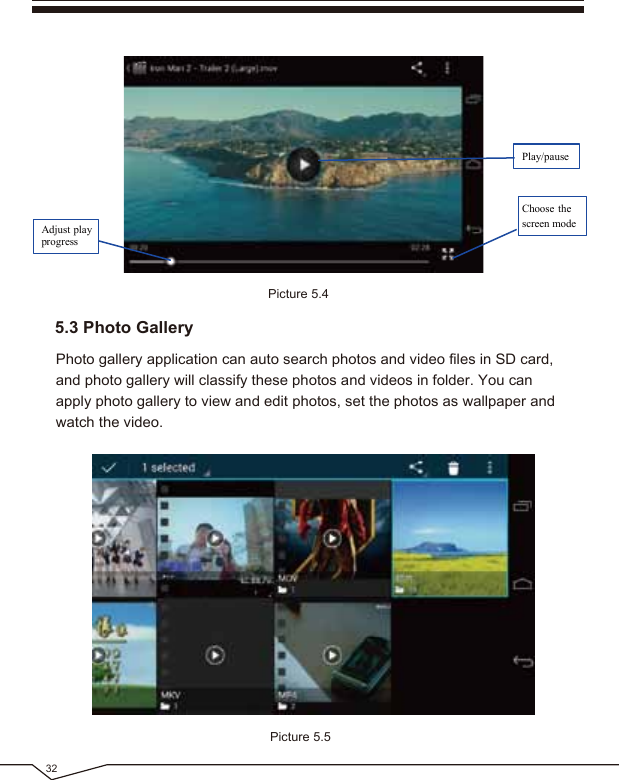
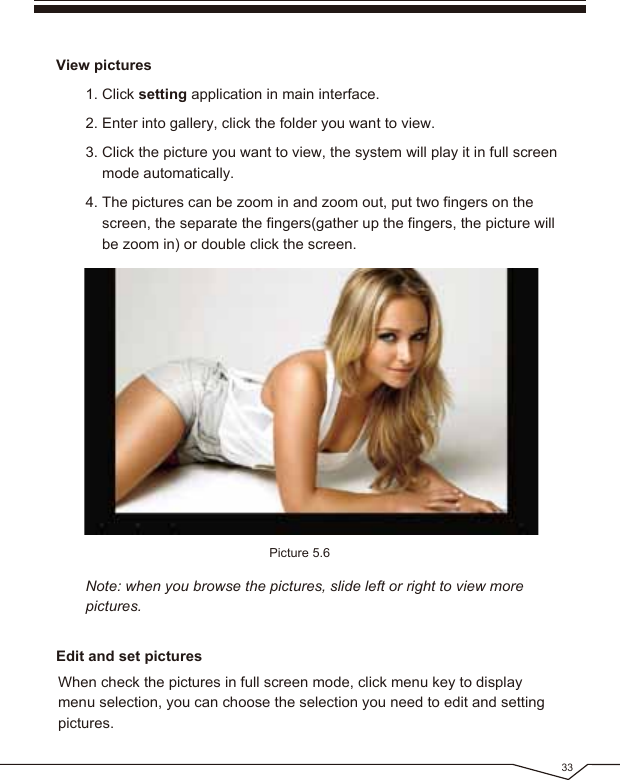
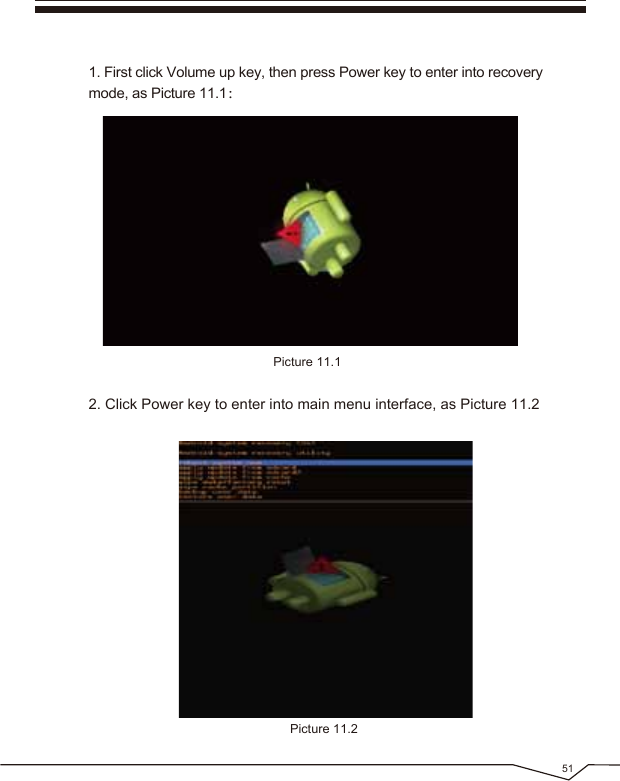
Users Manual

797 TPC7" SupraPad Phone Tablet
iVIEW-1030TPC(10    Tablet PC ) (9.7   Tablet PC with Quad Core)iVIEW-999TPC(9.7   Tablet PC with Dual Core)iVIEW-975TPCII(9   Tablet PC with Dual Core) iVIEW-920TPC(7.85   Tablet PC with Quad Core)iVIEW-785TPC(7   Tablet PC with Phone)iVIEW-797TPC (Color)(7   Tablet PC with Quad Core)iVIEW-788TPC (Color)(9   Tablet PC )iVIEW-900TPCII
(Miracast / WIFI Display on TV)Mira Dongle(6   Tablet PC with Phone)iVIEW-600TPC(4.3   Tablet PC )iVIEW-420TPC(Converter Box)iVIEW-3500STBII(6.5   Tablet PC with Phone)iVIEW-650TPC(7   Tablet PC with Dual Core)iVIEW-778TPC(7   Tablet PC with Dual Core)iVIEW-776TPC(7   Tablet PC with Dual Core)iVIEW-777TPCII
Content1. Introduction .................................................................................... 3   1.1 Acknowledgement..................................................................... 3   1.2 Announcements.........................................................................3   1.3 Safety Instruction.......................................................................4   1.4 Appearance and button.............................................................5   1.5 Abbreviation/Terminology..........................................................72. MID Introduction .............................................................................7   2.1 MID Accessories Introduction....................................................7   2.2 MID Operation and Preparation ................................................8   2.3 MID Status and Reminder .........................................................83. Quick Start Guide ......................................................................... .9   3.1 Keys Function............................................................................9   3.2 Startup and Shutdown.............................................................10   3.3 Open and Close the Screen....................................................10   3.4 Usage of Touch Screen...........................................................11   3.5 Main Interface......................................................................... 12   3.6 Visit Application Procedures....................................................15   3.7 USB Connection......................................................................16   3.8 Words Input.............................................................................18   3.9 Application Technique............................................................. 194. Basic Setting................................................................................20   4.1 Wireless and Internet...............................................................20   4.2 Display.....................................................................................21   4.3 FM Transmission.....................................................................22   4.4 Management of Application ....................................................23   4.5 SD Card and MID Storage......................................................23   4.6 Date and Time ........................................................................24   4.7 Language Setting....................................................................26   4.8 USB mode choice ...................................................................26   4.9 About Tablet............................................................................27   4.10 Fixed-time Startup and Shutdown.........................................281
   4.11 Security Setting.....................................................................285. Multi-Media.................................................................................. 30   5.1 Music......................................................................................30   5.2 Video...................................................................................... .31   5.3 Photo Gallery.........................................................................32   5.4 Camera....................................................................................34   5.5 FM Radio ................................................................................356. Communication Function.............................................................37   6.1 Phone......................................................................................37   6.2 Text Messaget.........................................................................38   6.3 Contact List.............................................................................397. Internet..........................................................................................40   7.1 Browser....................................................................................40   7.2 Email........................................................................................41   7.3 3G Internet...............................................................................438. GPS Function...............................................................................439. Other Application Procedures ......................................................44   9.1 Clock.......................................................................................44   9.2 Calculator................................................................................44   9.3 File Manager............................................................................45   9.4 Recorder.................................................................................4710. Installation of Procedures...........................................................48   10.1 Installation.............................................................................48   10.2 Uninstall.................................................................................48   10.3 Update Path...........................................................................4911. System Upgrade........................................................................49   11.1 Preparation for System upgrade............................................49   11.2 Restore Factory Setting.........................................................49   11.3 System Upgrade...................................................................5012. Troubles Shooting.......................................................................54   Appendix 1....................................................................................552
1. Introduction1.1 AcknowledgementiVIEW's new 7'' SupraPad 797TPC is the next-generation tablet PC with 2G/3G Phone and dual SIM Cards and supports frequencies to cover most countries in the world. It features with 7'' high resolution screen and strong processors of Dual Core A7 CPU providing access to the web for news, weather, or local business info; downloading thousands of Apps from the Android Play Store to tap your need, such as games, favorite movie clips, music, and YouTube videos. With built-in bluetooth you can connect to Bluetooth speaker system and earphone to listen to music, or connect to a bluetooth keyboard for easy typing, and send files to another tablet or mobile phone with bluetooth function. The GPS feature is another plus that helps with the road navigation. With memory of 8GB, you may store plenty of pictures, movies, and documents. Expansion storage is up to 32GB via Micro Card Reader slot. iVIEW-797TPC SupraPad is your all-in-one tablet that you can't live without.●   Please always keep the MID dry. To avoid the device short trouble,       corrosion fault and electric short. Please prevent the device, battery and      charger from water and moisture, and don’t operate the device or         charger by wet hand. ●   To avoid failure of device, battery and charger, please prevent the device,       battery, charger from violent shock or shake.●   To avoid failure of device, battery and charger, please prevent the device,        battery, charger of all over heating or too cold circumstance.1.2 AnnouncementsPreventive maintainance●   Never shock, throw, prod the MID, or drop, extrude, bend the MID.3
4●   Never disassemble the device and accessories arbitrarily, otherwise the      device and accessories are not in our company warranty scope.●   Never use the MID when driving car, in order to ensure safe driving.●   In the medical area, please abide by related rules and regulations. Please      shut down the MID when it is near to the medical area.●   To avoid the wireless signal to interrupt the plane- controlled signal, please      shut down the MID or using airplane mode when you are boarding a flight.●   To avoid electronic equipment failure, please shut down the MID in the       vicinage of high-accuracy electronic equipments.●   Please don’t disassemble the MID and accessories. Only authorized      agent has access to service the MID.●   Please keep the MID far away from magnetic equipments, the radiation      of MID may erase the data stored in the magnetic equipments.●   Never use the MID in the vicinage of high temperature, inflammable gas     ( gas station)●   Protect the MID and accessories from kids reach scope, and avoid the      kids to use the MID without parents’ supervision.●   Please comply with related rules and regulations, and respect others’      privacy and legal rights while using the MID.●   Please strictly adhere to related instructions in the manual when using      USB cable to ensure the safety of the MID or PC.●   Never use the MID in bathroom or other humid environment, and please      protect the MID from liquid wash or wet.Before the operation of the MID, please read this chapter and teach your kids about these information. For further details, please refer to the safety instructions and announcement.1.3 Safety Instruction
51.4 Appearance and button:* Touch panel7” Capacitive touch panel: During the operation, you can click and drag items on the  touch panel.Earphone JackUSBPowerVolume-Volume+touch PanelFornt CameraBack CameraMIC
6To power on: Press and hold the power button, the system will enter the main interface.To power off: In the main menu interface, press the power button for about 5 seconds to power off, the system will appear "power off" option, click ”ok” and you can safely power off.* POWER The buttons Volume + / Volume- located on the side of the tablet which allow to adjust volume.Lock screen: Press power button to lock screen or unlock screen.【Remark】: When the power ran out, the system will power off automatically.* Volume + / Volume-Front 0.3MP, Back 2.0MP.* Front Camera, back CameraPortable exchangeable memory chip for phone function.* SIM CardCard Reader Slot: External micro SD card.* Card Reader3.5 mm standard earphone jack.* Earphone jackMicro USB Jack: You can use it to connect the computer for data transmission, charging, or use the USB charger to charge. * Micro USB
71.5 Abbreviation/Terminology* Reset When the tablet fails to respond when buttons are pressed, using a thin small object (such as a paperclip) to press RESET button, the tablet will force to reset.【Remark】: Unless it’s unable to power off by normal procedure, otherwise                         don’t use the reset option.2. MID Introduction●   MID complete device2.1 MID Accessories IntroductionPackage:Below items are included in your tablet package:Abbreviation/Terminology Full Name DescriptionMID Mobile Internet Device Mobile Internet TerminalWIFI Wireless Fidelity Base on IEEE 802.11b standardwireless LANTF TransFlash Alternative name Micro SD, superminiature memory card
●   SIM card adapter *2●   User manual●   OTG cable●   Power adaptor8●   USB cable●   Earphone2.2 MID Operation and Preparation2.3  MID Status and ReminderBattery ChargingIf this navigator is first used, please use AC adaptor to fully charge it.Reminder IconsWhen some remind message appears in your reminder window, please click column and slip the screen to open the reminder list. Choose the menuyou need, and confirm the information. Then you can close the reminder window through clicking the column to slide up. Please refer to below status icons:  1. Apply the power adptor to charge for MID.2. Don’t pull out the adaptor while charging.
9Reminder board Reminder icons will work whiles receiving emails. When WIFI is open, you can open the reminder board to view the detailed information.Open the reminder boardWhen the reminder column shows new reminder icon, please hold the column and slip down your finger, then the reminder board is opened.New email Airplane Mode onUSB connected USB adjustmentconnectedReturn button DownloadingDisplay recently-usedapplication Home buttonCurrent electricvolumeWIFI connected,internet is available3. Quick Start Guide3.1 Keys FunctionKeys Function Description:
103.2 Startup and Shut downStartupLong press POWER key for three seconds, you can enter into startup picture. The system enters into screen lock status, please unlock it.Shut down1. Long press POWER, it will popoup Shut down window.2. Shut down window contains options: Power off, Reboot, Airplane     mode, profiles.3. Then click Power off.Power button Short press to sleep/wake up, long press to startupand Shut down.Volume+(up) Increase the volumeVolume-(down) Decrease the volumeHOME button (home) Click it in anyinterface will return to main interface.Back button (back) Click it in any interface will return to previous menuMenu button This button will display in menu interface.Display recently-used application Display recently browsed history3.3 Open and Close of the ScreenScreen will be closed on its own when no operation is taking place.1. Screen will be closed on its own if no operation is taking place for     some to save battery power.2. When screen is open, press POWER key, the screen will be closed     immediately.
113.4 Usage of Touch ScreenOpen the screen when it is closed.MID operating methodsThere are below methods to view the main screen, menu and application procedure in your MID.If the screen is closed, short press POWER to open the screen. The screen will be locked open it, it will show the picture as below picture, left slide to unlock and enter into camera, right slide the unlock icon to unlock the screen.Picture 3.1Click Press onIf you want to open some item( textbox or the link in the webpage), or shortcut and main procedure move, you can press on this item.When you want to use the screen keyboard typing or choose application in the main interface, you only need to touch it by your finger.
123.5 Home PageIn the main interface as below picture 3.2, long press the blank and it will pop up windows to set wallpaper, folder, widgets, and shortcut.Quickly Slide or SlideQuickly slide or slide indicates make quick vertical or horizoncial movement by finger. PullBefore you pull, you need to hold the it with strenghth until you pull it into the position you want.RotateFor most pictures, you only need to rotate the MID sidewise to change the screen direction from horizoncial to vertical. For instance, when you are typing wods, and watching movies.Picture 3.2Voice searchReturnHomeview recently-used applicationtimeBattery volumeSearch
13The extended home pageThe home page can be extended beyond the wideness of screen to provide more space, which you can put new-added shortcuts and widgets. Click the blank space in home page then slide right or left to extend to the right or left of the screen. In the home page, there are two extended pictures, as Picture 3-2.1.Picture 3-2.1The shortcut icons management in desktop application.The system below Android 2.3 have the function of creating folder in desktop, then put the icons into the floders. Android 4.1 system makes the function of creating new folder become much easier. Operations are as below: 1. Drag the icons need to be put together on one icon (can also overlay several icons) as Picture 3-2.2. 2. Then click the overlayed icons, the applications can be folded, as Picture 3-2.3.
14Picture 3-2.2Picture 3-2.3
15Change the wallpaper of desktop1. In home page, long press any blank space in main screen, it will     pop up a window to change the wallpaper. 2. Click the gallery or wallpaper gallery to select the wallpaper.Voice search1. Touch microphone icon         . 2. Choose in the Google selection according to your own need.3. Set the language you need in voice search window, and click confirm.4. Speak to the microphone you need to search, the browser will open     the search result list.Note: Before voice searching, please make sure your internet is well connected.2. Drag the icon to the above of the removed icon till the icon becomes red,      then move your finger to delate the icon.Remove the icons in desktop1. Press and hold the icons need to be remove, then on the right above     of the screen,                       icon will appear.Click         in Picture 3.2, enter into main interface as Picture 3.3, choose the application procedure you want to visit.3.6 Visit Application Procedures
16MID storage configuration3.7 USB ConnectionBefore transmitting documents, you have to conduct storage configuration for your MID: 1. Connect the MID and computer by USB cable, the reminder column     will show the remind information.2. Open the reminder board; please view the MID status and reminder     to learn how to open the board.3. In the reminder board, click the “USB Connected”, it will as below     Picture 3.4, then click “open USB storage configuration”.4. Now the USB is connected successfully.Picture 3.3Return to home page
175. After copying finish, click “shut down the USB storage     configuration” to uninstall.Notice: 1. When the MID is connected with USB cable, and you open the USB       storage configuration, you can’t view the memory card through the    MID. Only after you detach the USB cable, you can view the memory     card in the MID.2. Before copying, please confirm there is SD card in MID and it can be     read.Copy the document into memory card1. Connect the MID to computer with USB cable.2. As MID storage configuration, it is connected with computer     successfully.3. Open “My computer” in your computer, check the items in     “removable disc”.4. Copy the documents you need into “removable disc”.Picture 3.4
18Use the screen keyboardChoose the typing method you wantUse and switch of input method3.8 Typing wordsWhen you start the procedure or choose the words or numbers, it will show the screen keyboard. The keyboard contains below typing options:1. Android keyboard2. Google Pinyin1. Click Setting pocedure application.2. Click Language and Keyboard.3. In the text setting area will reveal all the installed words-typing     methods in your MID.4. Choose the typing method you want.Picture 3.5①②③⑤④
19Enter widgets interface3.9 Operation TechniqueIn the application interface,click widgets on the above of screen, or slide the screen, it will swtich into widgets interface. Press and hold any widget to create its shortcut, then you can enter into the application through the shortcut icon.1switch the capital and small letter2switch the mode of words input3click to insert the space4click input to execute5delete the character in the left of cursor, click and hold to delete all thecharactersin the left og the cursor.Create application shortcut icons in the desktop Picture 3.6
Picture 4.120In the application interface or widgets interface, press and hold any icon toswitch into desktop automatically, drag and hold the icon, you can move toany position in the desktop.Remind: System will require you to make more choice and then you canactive this widget. If the target position has no space, the widget won’t beadd in the main screen.Click the unnamed folder in the black box, it will pop up the hidden keyboard, the folder name can be renamed, the icons position can be changed through press and hold the icon.4. Basic Setting4.1 Wireless and Internet1. In the main menu or interface, choose setting application procedure.2. Click WLAN, open wifi, MID will automatically search the available     Wifi wireless internet. As Picture 4.13. Choose the Wi-Fi internet you want to connect, if it has password, it     will pop up the password window, enter password, click connect.Connect Wi-Fi
214.2 DisplayAdjust the brightness of screen1. Click Setting application procedure.2. Click display, choose brightness.3. When the brightness setting board pop up, move the cursor to adjust     the brightness.4. Click OK.1. Click Setting application procedure.2. Click Display.3. Click Sleep4. Screen standby time setting pop ups, choose the time you want to set.Adjust the screen standby timePicture 4.2
Picture 4.4221. Click Setting application procedure.2. Click FM transmitter.3. Operate as below picture.4.3 FM TransmissionAdjust the brightness of screenPicture 4.3
Picture 4.523Check the SD card and MID available space1. Choose Setting procedure in the application procedure list.2. Choose application, after entering, you can manage and delete     installed applications.4.4 Management of Application Procedure1. Click Setting application procedure.2. Click Storage.3. Check the available space of SD card.4. Check the MID internal storage space.Safely remove SD cardSafely remove SD card can protect SD card and extend working life of SD card.4.5 SD Card and MID Storage
According to the preset, system will voluntarily apply the date, zone, and time provided by internet.Picture 4.624Remark: Removing SD card safely can protect SD efficiently and extend SD card life time.1. Click Setting application procedure.2. Slide down the screen, then click date and time.1. Click Setting application procedure.2. Click Storage.3. Click Remove SD card.4. Now it is safe to remove SD card.4.6 Date and Time
25Picture 4.73. Turn off “auto setting of date and time”.4. Turn off “auto setting zone’.5. Click Zone Selecting, then choose the zone lists. Slide down the list     to view more zones.6. Click Date setting, then click upper or down button to adjust date,     month, and year, click setting when you finish selection.7.  Click Time setting, then click upper or down button to adjust hour     and minute, click AM or PM to change morning or afternoon ( there      is no such selection when you use 24-hour format). Click Setting to      finish.8.  Click 24-hour format, switch between 12-hour or 24-hour format, the     time format you choose will be used on the alarm clock.9.  Click date format setting, then choose the time format you want to      show on MID.
Note: If you use the time internet provided, you will not able to set the date, time and time zone.1. Click Setting application procedure.2. Click Language and keyboard.3. Click Language Selection, then choose the language you want, slide    down to view more languages.4.7 Language Setting26Picture 4.8Choose the USB work mode: OTG/HOST/SLAVE...... ...4.8 USB mode choice
Picture 4.9271. Click Setting application procedure.2. Click About Tablet, you can view the electric status messages and     version No.View the MID Status1. Click Setting application procedure.2. Click About Tablet.3. Click System update, update as steps.(Please make sure there is     new version TF card in device before installation)System update1. Click Setting application procedure.2. Click About Tablet.3. You can view model NO., electric volume and internal version.View system versionUSB: Choose USB host mode in work, this mode can be mounted U plate and peripheral equipment4.9 About Tablet
1. Click Setting application procedure.2. Click fixed-time startup and shutdown.3. Operate as below Picture 4.10View system version4.10 Fixed-time Startup and ShutdownLock the touch screen by unlock icon or password to protect your MID.Note: You should enter the passcode after setting screen locked.Picture 4.10284.11 Safety SettingSet locked screenSet unlocked picture1. Click setting application in main interface.2. Click safe.3. Click locked the screen. 4. Choose picture in text setting area.5. Click next following the remind message.Open/Closefixed-time shutdownClick to enterinto fixed-timestartup settingClick to enter intofixed-time shutdownsetting
6. The unlocked pattern board pop up, there are nine touch spots,    connect 4 points from vertical, horizontal or diagonal direction. As     Picture 4.11, move your finger from the screen when finish. The     system will record your new unlock pattern.7. Click continue.8. When you see the reminder, enter the unlock pattern, then click confirm.Picture 4.1129Set unlock PIN code1. Click setting application in main interface.2. Click safe.3. Click screen locked.4. Choose PIN in text setting area. 5. Enter new PIN code(numbers) and click continue.6. Enter new PIN code again and click confirm.
Set unlocked picture1. Click setting application in main interface.2. Click safe.3. Click screen locked.4. Set password in text setting area.5. Set new password(letters and numbers) and then click continue.6. Enter the password again and the click confirm.5. Multi-MediaPicture 5.130Enter into music player: in menu or desktop click music           icon to enter into music player, click the music you want to play, as Picture 5.1: 5.1 Music
Picture 5.2AlbumPause/playNext songPrevious songArtistAlbumSong nameSong nameRandom playLoop playPicture 5.3311. Drag the progress bar to adjust play progress.2. Operation of music player button as Picture 5.21. Enter video player: choose application in main menu, choose the     video you want to play, as Picture 5.3     2. Operation of video player button as Picture 5.45.2 Video
32Picture 5.5Photo gallery application can auto search photos and video files in SD card, and photo gallery will classify these photos and videos in folder. You can apply photo gallery to view and edit photos, set the photos as wallpaper and watch the video.5.3 Photo GalleryPicture 5.4Adjust playprogressPlay/pauseChoose thescreen mode
View pictures1. Click setting application in main interface.2. Enter into gallery, click the folder you want to view.3. Click the picture you want to view, the system will play it in full screen     mode automatically.4. The pictures can be zoom in and zoom out, put two fingers on the     screen, the separate the fingers(gather up the fingers, the picture will     be zoom in) or double click the screen.33Edit and set pictures Note: when you browse the pictures, slide left or right to view more pictures.Picture 5.6When check the pictures in full screen mode, click menu key to display menu selection, you can choose the selection you need to edit and setting pictures.
1. Click menu key to display menu selection.2. Then click crop, click and drag related area to adjust the cropper.3. Click cropper and drag it inside and outside to adjust the image.4. After adjust the size you want, click crop.5. If you wish to give up to crop, click cancel to return to picture browse.Crop1. Open a picture, use virtual key to click menu key, display menu selection.2. Click slide show, it will auto loop play(or choose         button in picture folder)Edit and set pictures 345.4 CameraIn the main interface or desktop, click camera application procedure         , enter into camera.Operation of camera button as Picture 5.71. Click menu key, display the menu selection. 2. Click edit.3. Adjust the brightness, style, color setting in selection.4. Click save.5. If you want to give up edit, click return key, click not to return to     picture browse. EditSwitch camera: choose Menu key, click switch front/back camera, as Picture 5.7
Picture 5.7355.5 FM RadioClick          in the main interface or desktop to enter into FM radio interface:Picture 5.8Enter intochannel listPlay/pauseSave buttonPreviouschannelNext channelCurrentfrequencyView the pictures and videosSwitch front/back cameraClick it to take picturesSubmenuFull screen play mode.Camera shooting
Picture 5.936RDS setting: click Menu key in interface, click                 button, enter into RDS setting as Picture 5.9, and choose the selection you want to addSearch channel: Click “Menu” in the main interface, click search button, it will start to auto search channels, the searched channels will be saved in the channels list.Save channels: Click       button in the main interface to save the channel, and the channel will be saved in channels list.
37Picture 6.1DisplayphonenumbersDial phonenumbersThe area ofdial phone6. Communication Function1 Click Phone application procedure2 Operate as Picture 6.16.1 Phone
38Picture 6.32  Click “Edit new message” irectly inputphonenumberAdd receiverSendmessagePicture 6.2Edit newmessage6.2 Text Message1  Enter into main menu, choose           application procedure.   Search textmessage
39Picture 6.46.3 Contact ListClick Contact list            in the main interface, enter into the contact list as Picture 6.4Search contact: click            button, enter into search function Add contact: click          button, enter into add contact interface.
40Picture 7.2Picture 7.1Click address bar to input the website, click start, enter into related webpage, then you can browse the website information, as Picture 7.27. Internet7.1 BrowserIn case of Wi-Fi or mobile internet is connected well (Please refer to Chapter 4.1 for wireless and internet setting), click IE browser           in the main menu or desktop to enter the IE interface, as Picture 7.1.Addresscolumn
411. After you click the sending email icon        , you can see the email setting guide, which can help you to set. 2. Input your email address and password.3. Click “Next step” button, choose your email type is POP3 or IMAP.4. Click “Next Step” button to check whether the email box can    receive or send emails5. Input the email account and display the email subiject, and click finish. 6. If the email box is available, you will enter into your mail box automatically.a. Email SettingPicture 7.37.2 EmailEmail application procedure contains email setting guide, you can add the external POP3 OR IMAP email account of normal web email service provider (For instance, Yahoo, Gmail, Hotmail and 163), as Picture 7.3
423. Click Account4. Press the account you want to delete.5. Click confirm to remove.1. Enter into your mail box.2. Press Menu key.         You can delete POP3 or IMAP email account from your MID Click        .b. Delete the email account1. Click          to display your mail box.2. Click the inbox, it will refresh the new emails automatically; click it to     read new email.3. Press Menu key. Menus will pop up.4. Click Edit  to enter into new email editing interface.5. Input the receiver’s email address. 6. Input the subject and email content.7. If you want to add attachment, click menu key, the menu pop up.8. Click “Add attachment” (pictures, video).9. Click “send” to send the email out.c. Send E-mail
43Picture 7.4Add attachment1. Turn off the device and plug in 3G card.2. Turn on the device.3. Unlock to enter into system, make sure the MID can search signal.(Note: 3G internet can’t be used with wifi internet at the same time, the system is defaulted to use Wifi internet. If you wish to use 3G internet, please turn off wifi internet.)7.3 3G Internet8. GPS Function8.1 GPS Navigation
441. Click       .2. Enter into the basic board of calculator.3. Soft touch the numbers or operator in calulator to calculate.Map of the third parties is required for MID internal GPS satellite signal receiver positioning, after installation the device can accurately implement traffic real-time navigation, meet the needs of outdoor navigation.9.2 CalculatorPicture 9.1Set alarm9. Other Application Procedures9.1 ClockClick Clock procedure, enter into below interface as Picture 9.1.There are clock, picture, music and homepage buttons.
45Picture 9.2Picture 9.39.3 File ManagerFile manager will copy, cut, delete, rename the documents or the folder in the TF card, it also will share the files, install apk etc.In the main menu or desktop, click the document manager icon         to enter into documents manager.ExternalSD cardRAM
46Picture 9.4a、Copy, cut, delete, rename the files and folder: choose the file or folder, Press and holdthe file or folder to enter into the interface as Picture 9.4, you can operate the file or folder.b、Choose any file, Press and hold it, it will pop up “share”, choose the share way you want in the listPicture 9.5
47Picture 9.69.4 Recorderc、Install apk file:Choose the file suffixed .apk in the file manager, you can install the third part software as reminder.d、Build new folder: Choose the menu you want to build the file, click Menu key, choose new folder, you can build new folder as reminderIn the main interface or desktop, click recorder icon          to enter into recordinterface, click record key            to start record. Click Stop key           to stop recording. Click Play key             to play the recorded sound. The system will auto remind you to use or abandon this record, please choose it manually.Play the record: choose the video player to play the recorded sound, choose the recorded sound in the source manager, and click it to play.
481. Click setting icon in main interface.2. Click manage application procedure, list all the application     procedures insralled in the system.3. Click the APK you want to uninstall, click uninstall. 4. Click confirm to finish uninstallation.Uninstall application procedure10.2 Uninstall10. Installation of Procedures1. Click “file manager” application procedure; choose the application     procedure you need to install.2. Hold the application procedure you need to install.3. It pop up install, click install apk.4. Finish the installation as guide, it will operate.Note: The third party procedure searched from internet to use on the system are all suffixed with APK.10.1 InstallationInstall the third party application procedureYou can gain the third party application procedure which match the Android system from internet, and install it by yourself in MID. Copy the application procedure into SD card, and insert in the MID.Skill: The procedure manager installed by system has many convinent         methods to uninstall, after opening procedure manager, click          uninstall, it will list all the application procedures installed by system.
491. Download the system upgrade pack to your computer from related      websit.2. Prepare the toolf for system upgrade; one TF card, file sytem FAT or      FAT 23 format both ok.11.2 Restore Factory SettingWhen your MID occures some serious mistake or unlocked passwords are forgotten, you can apply restore factory setting to return to factory status. Restore the factory setting will delete all the data such as exisiting application procedures and user’s setting, so do remember to backup your data.11. System Upgrade1. Download the latest application procedure from appointed website.2. Download form the Android system related software forum in the     internet.Update the application procedures of Android system10.3 Update PathYou can download the software upgrade pack from website, then use the upgrade pack to upgrade the system version of MID.Download the upgrade procedurePreapration for system upgrade:11.1 Preparation for System upgrade
50Upgrade steps: (First insert the TF card with update zip upgrade package into MID, the file named update zip, or put this package in the root directory of the MID.)1. When the device is in shutdown state, hold the Volume up key by     one hand, and press Power key into upgrade picture by another hand.2. Enter into upgrade picture, the picture is a triangle with a exclamation    mark.(As Picture 11-1)3. Click Power key when you see the triangle.4. The system enter into another picture, recovery status, there are     eight items for option.(As Picture 11-2)5. The first option: Restart the system. The second option: System     upgrade from SD2. The third option: System upgrade from external     SD card. The forth option: Ripe caching data. The sixth option: Ripe     data/ Factory reset. The seventh option: Backup user’s data. The     eighth option: Recover user’s data.6. Now you press Volume down key, the option bar will slide down,    press Menu key to execute. 7. Choose wipe data/factory reset to execute.8. Enter into confirmation interface, click Yes to restore factory setting,     click No to exit the confirmation interface.11.3 System UpgradeNote: Before upgrading, please confirm the electric volume of your MID is more than 30% to ensure the upgrade can be finished. Besides, you need to backup your important data, such as application procedures, emails, etc.
51Picture 11.1Picture 11.22. Click Power key to enter into main menu interface, as Picture 11.21. First click Volume up key, then press Power key to enter into recovery mode, as Picture 11.1:
52Picture 11.3Picture 11.43. Move the cursor by volume down, choose apply update from SD card, as Picture 11.34. Click volume up key enter into this menu, click update.zip, as Picture 11.4
53Picture 11.5Picture 11.65. Click volume up key to upgrade, as Picture 11.57. Short press volume up key to exit upgrade mode, MID will enter into restart the system automatically.6. When the upgrade is finished, it will return to the main interface automatically, as Picture 11.6
54●  Make sure the wireless router of internet service can work in normal.●  Ensure the MID and wireless router in certain distance, and no wall     or other barrier between them.●  Ensure the user name and password both correct.●  Ensure your internet is well connected.●  Make sure your email setting way is correct.●  Keep your system time and local time consitent. 12. Troubles Shooting1. The first startup of MID is slow2. MID can’t connect Wi-Fi3. MID feels hotAfter the MID system upgraded, the first startup need to install the pre-installed application softwares, the lead time is around 2-3 minutes, the startup afterwards will be much quicker.When many application procedures are used in meanwhile, or the brightness of screen open to the lightest or under charging, MID may feel fever. It is normal.4. Email can’t be set or Registeration of application procedure.When you install some third party application procedure, it may cause abnormal work, you can press Reset key(next to power port) to reset the system. 5. The system is abnormal and can’t work.
55●  Please keep the distance between from route to MID in effective range.●  Please restart WIFI and try again.6. The webpage can’t be opened7. MID works terribly slow sometimesIt is normal phenomenon. Please turn off some application you don’t need in advanced task management, or uninstall some third party application to release more system resources.Appendix 1Product Parameters:Items Details DescriptionBasicParametersMID Model No. iView-797TPCCPU MediaTek 6577 Cortex A7, Dual Core CPU Frequency 1.2 GHzDDR-RAM 1GBNAND FLASH 8GBOperation System Android 4.1Internet Mode GSMData Service GPRSMHzCamera Front 0.3MP / Rear 2.0MPUSB port Micro USB 2.0battery 2500 mAh / 3.7VAC adaptor Input voltage DC 5V, current 1.5AMemory card Micro SD card,Maximum storage 32GMain screen7.0 inch Hi-fi TFT display screen, with resolution of1024*6002G GSM Phone: 850/ 900/1800/1900MHz3G WC DMA P  8 50 / 19 0 0/ 2 10 0MHzhon e :
56BasicFunctionsGPS Navigation Built-in GPS satellite signal receiver can search the fixedposition accuratelyGSMcommunicationBuilt-in 3G modules, you can achieve wirelesscommunication function through SIM cardBluetooth Built-in Bluetooth module, support FTP file delivery, youcan share various fascinating documents in vicinity.G-sensor Switch from crosswise and erect screen freely and supportall kinds of gravity-reacted games, which can experiencereal game enjoyments.FM/receivertransmissionUnique FM transmitter function. The product can transmitnavigation voice to FM receiving device through FM, andthen play by car speaker; you can enjoy perfect acousticfun. FM can bring many channels for your option.ApplicationprocedureVideo play Support 3GP、MP4 format, with maximum resolution of720*576Music play built-in music player, support MP3/AAC/AMR/WAVformatGames support installation of Android third party gamesInput method Android keyboard, Google Pinyin input methodPicture view Support JPG、BMP、PNG、GIF format pictures viewOFFICE software Support office (word 、excel read and edit),support PDFviewer
Warning StatementChanges or modifications not expressly approved by the party responsible for compliance could void the user’s authority to operate the equipment.This equipment has been tested and found to comply with the limits for a Class B digital. device, pursuant to Part 15 of the FCC Rules. These limits are designed to provide reasonable protection against harmful interference in a residential installation. This equipment generates uses and can radiate radio frequency energy and, if not installed and used in accordance with the instructions, may cause harmful interference to radio communications. However, there is no guarantee that interference will not occur in a particular installation. If this equipment does cause harmful interference to radio or television reception, which can be determined by turning the equipment off and on, the user is encouraged to try to correct the interference by one or more of the following measures:‐‐ Reorient or relocate the receiving antenna.‐‐ Increase the separation between the equipment and receiver.‐‐ Connect the equipment into an outlet on a circuit different from that to which the receiver is connected.‐‐ Consult the dealer or an experienced radio/TV technician for help.15.19 Labelling requirements.This device complies with part 15 of the FCC Rules. Operation is subject to the followingtwo conditions:(1) This device may not cause harmful interference.(2) this device must accept any interference received, including interference that may causeundesired operation.SAR tests are conducted using standard operating positions accepted by the FCC/IC with the phonetransmitting at its highest certified power level in all tested frequency bands, although the SAR isdetermined at the highest certified power level, the actual SAR level of the phone while operatingcan be well below the maximum value, in general, the closer you are to a wireless base stationantenna, the lower the power output.The SAR limit of (FCC) is 1.6 W/kg averaged over one gram of tissue. Device types: BR07  has also been tested against this SAR limit. The highest SAR value reported under this standard during product certification for when properly worn on the body is 0.882W/kg. This device was tested for typical body-worn operations with the back of the handset kept1.0cm from the body. To maintain compliance with FCC RF exposure requirements, use accessories that maintain a 1.0cm separation distance between the user's body and the back of the handset. The use of belt clips, holsters and similar accessories should not contain metalliccomponents in its assembly.Non-compliance with the above restrictions may result in violation of RF exposure guidelines.Use Conditions:This device complies with Industry Canada licence-exempt RSS standard(s): Operation is subject to the following Two conditions:(1) this device may not cause interference, and (2) this device must accept any interference, including interference that may cause undesired operation of the device. CAN ICES-3 B)/NMB-3(B)Le présent appareil est conforme aux CNR d’Industrie Canada applicables aux appareils radio exempts de licence. L’exploitation est autorisée aux deux conditions suivantes : (1) l’appareil ne doit pas produire de brouillage, et (2) l’utilisateur de l’appareil doit accepter tout brouillage radioélectrique subi, même si le brouillage est susceptible d’en compromettre le fonctionnement.Note: The manufacturer is not responsible for any radio or TV interference caused by unauthorized modifications to this equipment. Such modifications could void the user’s authority tooperate the equipment.
6.

Navigation menu