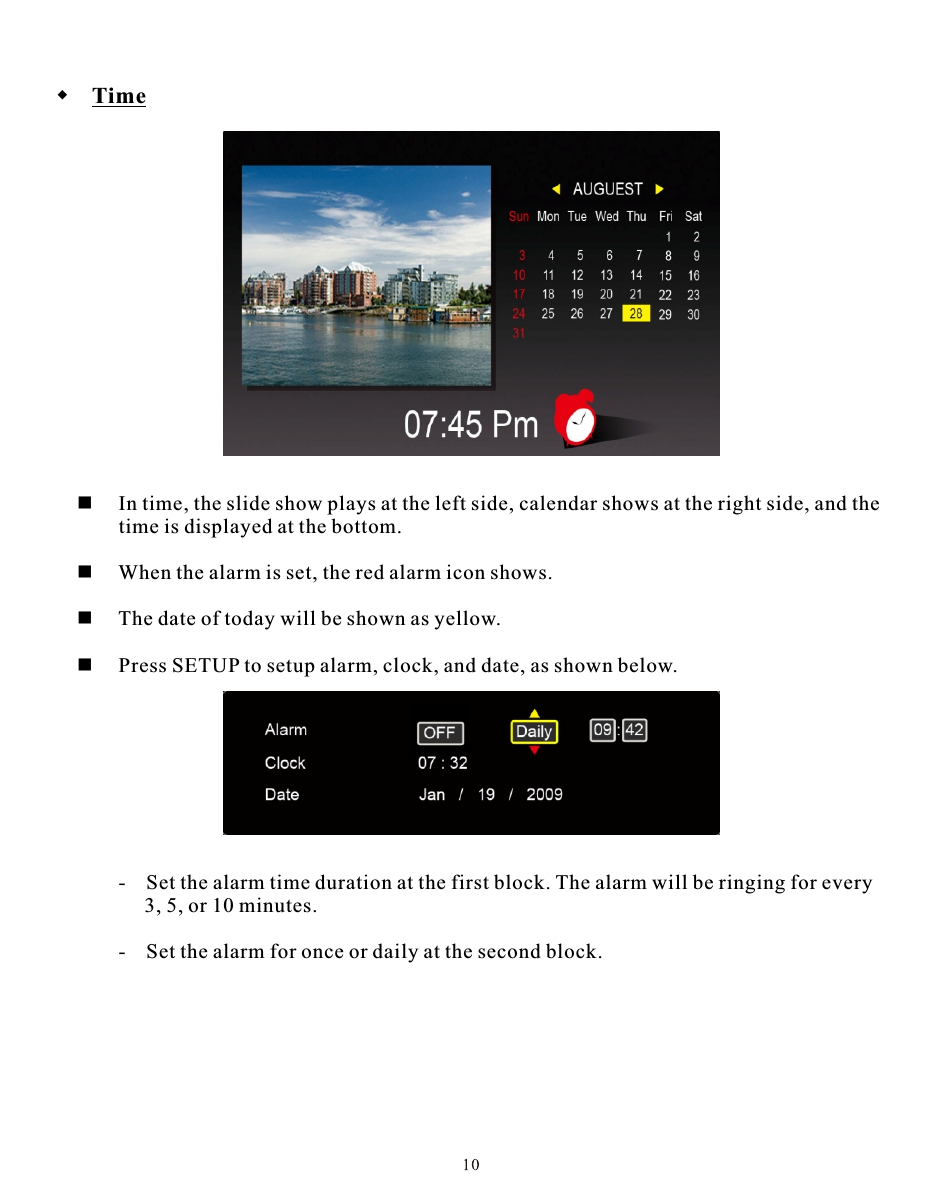
Win Accord 6226-19W Digital Photo Frame User Manual

WIN ACCORD LTD., Digital Photo Frame

User Manual

Table of ContentsTable of Contents..…………………………………………………..…………………2Important Safety Precautions............................................................................3      Cleaning the LCD Screen. ..….…...……………………………………………….3Cleaning the Digital Picture Frame....…………………………………………….3What's in the Box…………………………..…………………………………………..4Identifying the Parts…………….…….…………………………………………..4Replacing Remote Control Battery….………..…………………………………...5Product Specification…………………………….……………………………………6Features…………………………….…..………………………………………….6Specification……………………….…..…………………………………………..6Using the Digital Picture Frame……….……………………………………………..7Select Mode………………….…..…………………………………………………7Card Selection……………….……..……………………………………………...7Photo…………………...….………..……………………………………………..8Music………………...…….……...……………………………………………….8Video………………..…….………………………………………………………..9File Management……...….………………………………………………………..9Time………………………...…………………………………………………….10Frequently Asked Questions………………………………………………………...11
Important Safety PrecautionsAlways follow these basic safety precautions when using your Digital Picture Frame. This will reduce the risk of fire, electric shock, and injury.Warning: To reduce the risk of fire or shock hazard, do not expose this product to rain or                    moisture.Warning:  To prevent the risk of electric shock, do not remove the cover. There are no                     user-serviceable parts inside. Refer all servicing to qualified personnel.  The Digital Picture Frame is for indoor use only.  Unplug the Digital Picture Frame before performing care and maintenance.  Do not clock the ventilation holes on the back of the Digital Picture Frame at any time.  Keep your Digital Picture Frame out of direct sunlight and heat sources.  Protect the power cord. Route power cords so that they are not likely to be walked on    or pinched by items places on or against them. Pay particular attention to the point            where the cord attaches to the Digital Picture Frame.       Only use the AC adapter included with the Digital Picture Frame. Using any other power           adapter will void your warranty.       Unplug the power cord from the outlet when the unit is not in use.Cleaning the LCD ScreenTreat the screen gently.To clean fingerprints or dust from the LCD screen, it is recommended to use a soft, non-abrasivecloth such as a camera lens cloth to clean the LCD screen.If you use a commercial LCD cleaning kit, do not apply the cleaning liquid directly to the LCDscreen. Clean the LCD screen with cleaning cloth moistened with the liquid.Cleaning the Digital Picture FrameClean the outer surface of the Digital Picture Frame (excluding the screen) with a soft cloth dampened with water.
What's In the BoxIdentifying the Parts SpeakerFunction Buttons4-in-1 card readerUSB hostMini USBDC in jackAdjustable StandDigital Picture FramePower AdapterRemote ControlUSB CableUser's Manual Zoom InEXITROTATIONSELECTSLIDESHOWSTOPSETUPPOWERVolume ControlDirection ControlENTERDIGITAL PICTURE FRAMECompact Flash   SlotTM
Replacing the Remote Control BatteryIf the remote control stops working or works improperly, replace the battery (CR2025 lithium battery) with a new one.1. Pull out the battery holder.2. Remove the old battery from the holder and then put a new battery with “+” facing up.3. Insert the battery holder back to the remote control.WarningBattery may explode if mistreated. Do not recharge, disassembleor dispose of in fireNotes    When the lithium battery becomes weak, the operating distance of the Remote Control          may shorten, or the Remote Control may not function properly. In this case, replace the          battery with a CR2025 lithium battery. Use of another battery may present a risk of fire           or explosion.     Dispose the used batteries as specified by the local authorities.  Do not leave the Remote Control in a very hot and humid place.  Incorrect use of the battery may cause leaking and corrosion.   - When the Remote control will not be used for a long period of time, remove the                       -   Incorrectly inserting, shorting, dismantling, or heating the battery, or throwing it                  into a fire may cause the battery to rupture and leak.battery from the remote control to prevent leaking and corrosion.
Product SpecificationProduct                     Resolution               Memory Card          Formats                                                        Image Formats         Audio Formats         Video Formats         USB Ports                Power Input              Power Output           Internal                     SpeakersCertification            19” Digital Photo Frame1440X900 pixelSecure Digital™, Multi-Media Card™, Memory Stick™,Memory Stick Pro™, Memory Stick Duo™, Memory Stick ProDuo™, Compact Flash™, and USB flash drivesJPEG, BMP, PNG, GIF, TIFFMP3, WAV, WMA, AACMPEG1/2/4, M-JPEG, AVI, DivxUSB 2.0 (Host) x 1, mini-USB x 1AC 100V~240V, 50~60HzDC 12V 4A   CE / FCC / RoHS Features      Specification3W X 2 Image rotation, zoom in, background music  Display files by name or by date ArcSoft™  effects: Dynamic Lighting, Face Beautify, and Face Tracking
Using the Digital Picture FrameAfter the Digital Picture Frame is turned on, the slide show starts automatically after 2 seconds. Press EXIT button to Select Mode screen. Select ModeIn Select Mode, you will see below screen. There are 6 options: Card Selection, Photo, Music, Video, File Management, and Time.  Card SelectionIf there is not any memory card inserted, “Internal Memory” shows. When the memory cardis inserted, ex. SD card, the icon will change to SD; if the MS card is inserted, the icon will change to MS. The card also can be selected by pressing ENTER on the Card Selection icon.
 Photo  By pressing SETUP, there are options of File Sorting, Copy Photo (memory card to         internal memory), Delete Photo (from internal memory), Factory Default, Select Card,        Display Image Size, Magic Window, Slideshow Transition, Slideshow Speed, ArcSoft™         Screen Effect, and Adjust LCD Color. Music     In Music, slideshow plays while the music is playing. The music information and the         play time are shown at the right side of the slideshow. The control buttons are at the         bottom. to     By pressing SETUP, there are options of File Sorting, Copy Music (memory card to  internal memory), Delete Music (from internal memory), Factory Default, Select         Card, and Audio Playback Repeat.     To show the music file list, move to the most right control button and press ENTER.     By pressing ZOOM or ENTER once, the single photo displays.        -   Press ENTER to start or pause the slideshow.        -   Press ZOOM to zoom in the image.        -   Press ROTATE to rotate the image 90° counterclockwise.       -   Press SELECT to select or unselect the image(s). The selected images can be             copied or deleted at one time.
 Video  In Video, the file list will be on the left side and the preview will be on the right side. File Management  In File, the file list will be on the left side and the image previews will be shown on the         right side. For video and music files, only the file information will be shown on the         right side.     Press ENTER on video/music files to play the video/music. Press ENTER on image  files to view the image on full screen; press ENTER again to start the slideshow.     Press SELECT to select the files.     By pressing SETUP, there are options of Copy Files (memory card to internal memory),         Delete Files (internal memory), Factory Default, and Select Card.  Press ENTER to play the video, RIGHT to forward, LEFT to backward, UP to play last   video, and DOWN to play next video.  By pressing SETUP, there are options of File Sorting, Copy Movie (memory card to  internal memory), Delete Movie (internal memory), Factory Default, Select Card, and         Video Playback Repeat.
 Time     In time, the slide show plays at the left side, calendar shows at the right side, and the         time is displayed at the bottom.     When the alarm is set, the red alarm icon shows.     The date of today will be shown as yellow.     Press SETUP to setup alarm, clock, and date, as shown below.-   Set the alarm time duration at the first block. The alarm will be ringing for every      3, 5, or 10 minutes.-   Set the alarm for once or daily at the second block.
Frequently Asked QuestionsQ:  How do I set up my Digital Picture Frame?A:  It is very simple to get you Digital Picture Frame out of the box and running in just a few       minutes. Just plug the power adapter into the Digital Picture Frame and into a standard        wall socket. Insert a memory card into the appropriate card slot on the side of the Digital       Picture Frame and turn it on. Your first slideshow will automatically start to play.Q:  What memory cards can the Digital Picture Frame read?A:  Compatible memory cards include Secure Digital™, Multi-Media Card™, Memory        Stick™, Memory Stick Pro™, Memory Stick Duo™, Memory Stick Pro Duo™, and        Compact Flash™.Q:  I set up the Digital Picture Frame; why does it not turn on?A:  The adapter may be not securely connected to the Digital Picture Frame or wall socket, or       the Power Switch may not be on. Please check if the adapter is properly plugged to the       Digital Picture Frame and the wall socket.Q:  I have a memory card in the Digital Picture Frame; why can't I view my photos?A:  First, check whether the memory card is one of the listed above and the images are one of       the formats listed in the Specification on page 6. Second, turn the Digital Picture Frame       off and make sure that the memory card is facing the correct direction and is inserted all       the way into the card slot and. Third, turn the Digital Picture Frame on; you should see the        . Follow the instruction of Card Selection to select your memory card.Note: Some digital cameras save images in other formats. Please refer to your camera's       manual if your photo format is not listed in the Specification.Q:  Why is the picture display slower with some pictures and faster with others?A:  Higher resolution pictures will be loaded slowly. Try to use lower resolution pictures or        down sampling your images. See your camera's operating manual for details on downsizing        your photos.Q:  Does the Digital Picture Frame support all JPEG files?A:  No. The Digital Picture Frame supports the JPEG files taken by a digital camera. It may        not read all image files downloaded from the Internet or from other graphic applications.Select Mode Screen
Changes or modifications not expressly approved by the party responsible for compliance could void the user's authority to operate the equipment. This equipment has been tested and found to comply with the limits for a Class B digital device, pursuant to Part 15 of the FCC Rules.  These limits are designed to provide reasonable protection against harmful interference in a residential installation. This equipment generates uses and can radiate radio frequency energy and, if not installed and used in accordance with the instructions, may cause harmful interference to radio communications.  However, there is no guarantee that interference will not occur in a particular installation.  If this equipment does cause harmful interference to radio or television reception, which can be determined by turning the equipment off and on, the user is encouraged to try to correct the interference by one or more of the following measures:-- Reorient or relocate the receiving antenna.   -- Increase the separation between the equipment and receiver.     -- Connect the equipment into an outlet on a circuit different from that to which the receiver is connected.   -- Consult the dealer or an experienced radio/TV technician for help

Navigation menu