Wintecronics TR68A Car Alarm Transceiver User Manual manual
Wintecronics Ltd Car Alarm Transceiver manual
UserManual.wiki
>
Wintecronics
>
TR68A User Manual
User Manual
Navigation menu
Upload a User Manual
Namespaces
Wiki Guide
HTML
PDF
Info
Views
User Manual
Discussion / Help
Navigation
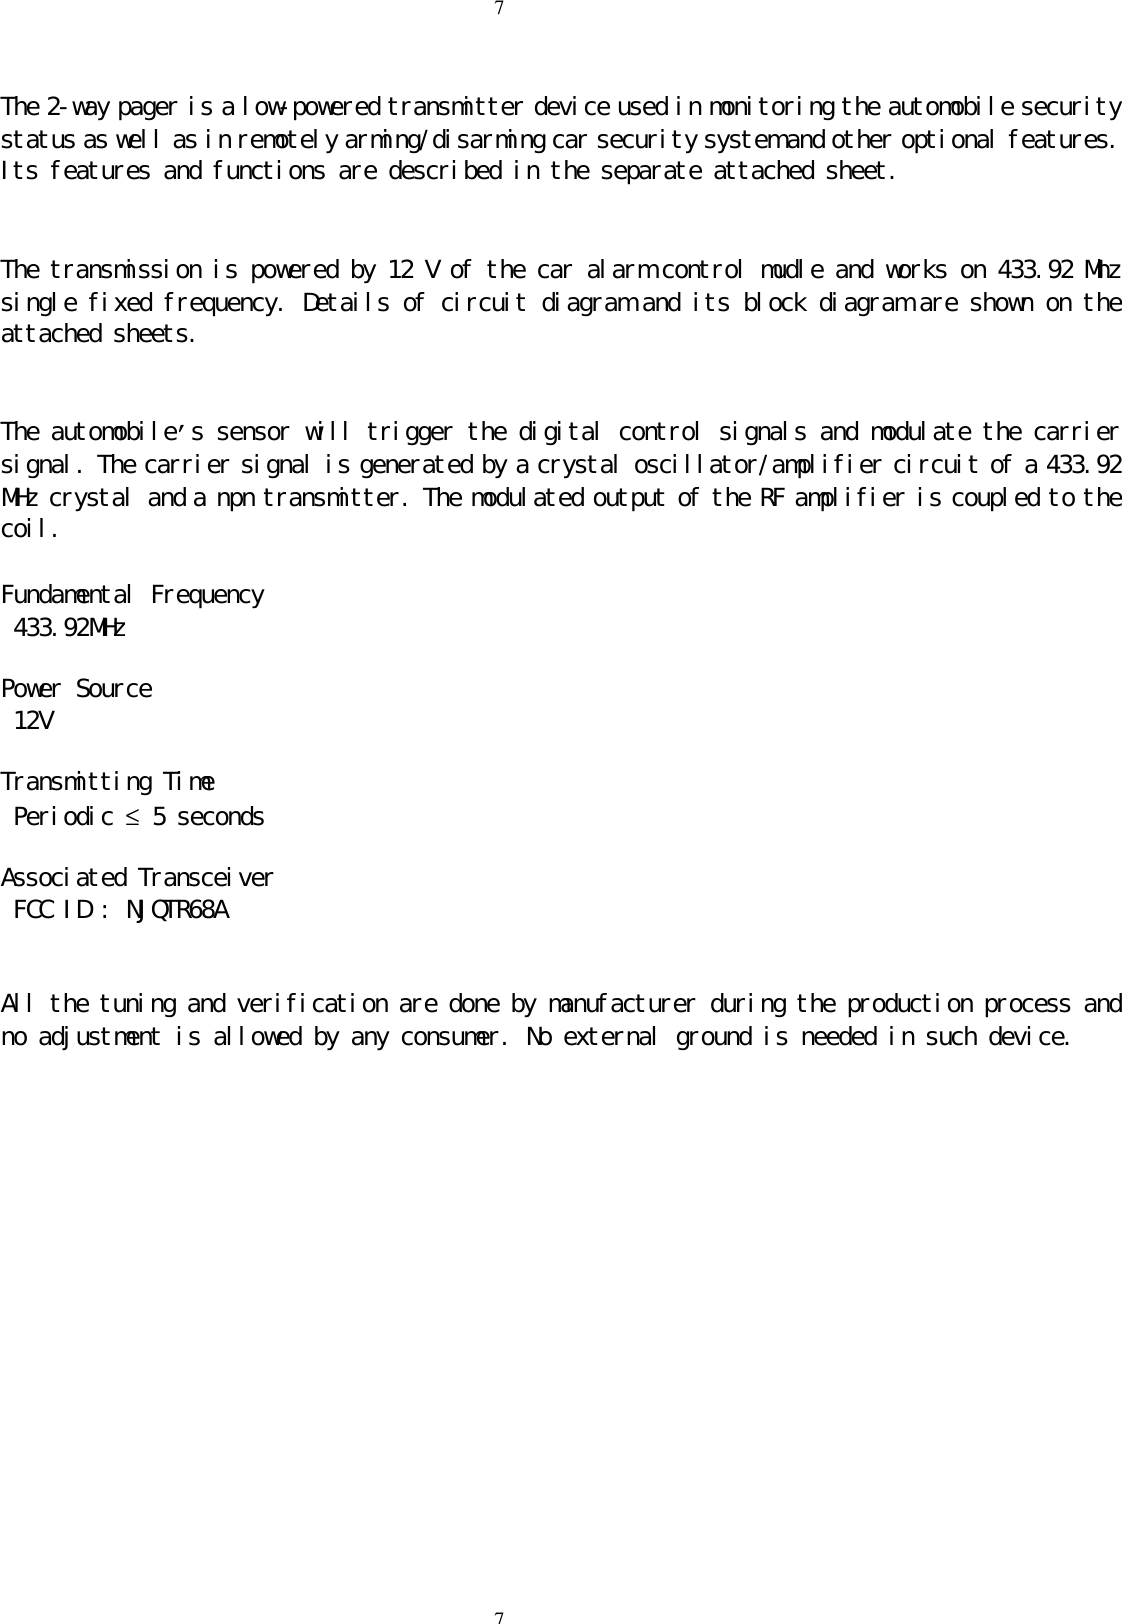
![11MODEL TR68A USER’S MANUAL※ PRE-INSTALLATION CHECK1. For safety sake, check first if your ignition key can activate engine start while the hand gear is engaged. Ifengine starting is possible while hand gear is engaged , the gear mode must be in “manual hand gear mode”during installation ( Refer to the operation guide ) .2. Check if immobilization feature is present in your auto mobile [A1].If so, another accessory ( Item no: 444 )isrequired to enable remote engine start and this is buyable from the same dealer.3. Check the circuits and their current first. Refer to [ Installation diagram for input / output current values]. Ifthe output current is lower than requirement, additional relays must be added.]※ Check the followings after installation of alarm system1. Installation is abnormal if the remote engine start can be done under these conditions (a) the gear is engaged(b) ignition key is in “Ignition On Mode” (c) the engine hood is open ( d) the hand brake is not engaged.2. The remote control should enable operation of functions in the same way as the original ignition key. Ifremote control can hardly remote engine start, the installation abnormal. Check the related circuit connectionof the ignition cylinder.3. For servicing , repair and valet parking, “ Valet Mode “ must be set to “ON”REMOTE CONTROL FEATURES1. Remote door lockTo lock door , press button【 】, siren chirps once and parking light flashes once.Middle button of the remote transmitter lights up with 1 buzzer sound.[ If remote’s buzzer makes 4 sounds,system is not working normally.]2. Remote door unlockTo remote unlock the locked vehicle, press button【 】, siren chirps twice and parking light flashes twice.Upper LED lights up with 2 buzzer sounds.3. Two steps door unlock or Channel # 3 [ Refer o Features Programmed Table , at # 32]Another accessory buyable from the same dealer is required to have this feature. A press on button【 】canunlock driver’s door and longer press on the same button can unlock all other doors. Siren chirps 3 times andparking light flashes 3 times.The remote Upper LCD lights up with 3 buzzer sounds.4. Car locator / searchTo locate the car, press button【】, siren chirps 6 times with 6 parking light flashes. The remote LED indicates car’s status with melody5. Remote engine startTo remote engine start, press and hold this button【 】; siren chirps 3 times with 3 parking light flashes.The remote lower-LED lights up with melody upon engine start success ( LED blinks differently dependingon car’s status of unlock/lock ).For runtime setup, refer to Program Table at # 30. Engine run stops when preset time expires.6. Remote activate engine run timeFollowing the success of engine start, press engine run time button to automatically add up engine runtime with5 min stepup for each button press .Maximum 20 min runtime can be attained . Engine stops automaticallywhen the runtime expires. [Refer to Remote Transmitter’s Features]7. Remote engine stopTo remote stop engine run (excluding engine run by ignition key) , press and hold the button【 】 .Car enginestops with 2 confirming siren chirps & 2 parking light flashes. The remote lower-LED sounds melody , the lower-LED does not light up .(The rest LED may light updepending on lock / unlock status)](https://usermanual.wiki/Wintecronics/TR68A/User-Guide-182695-Page-1.png)
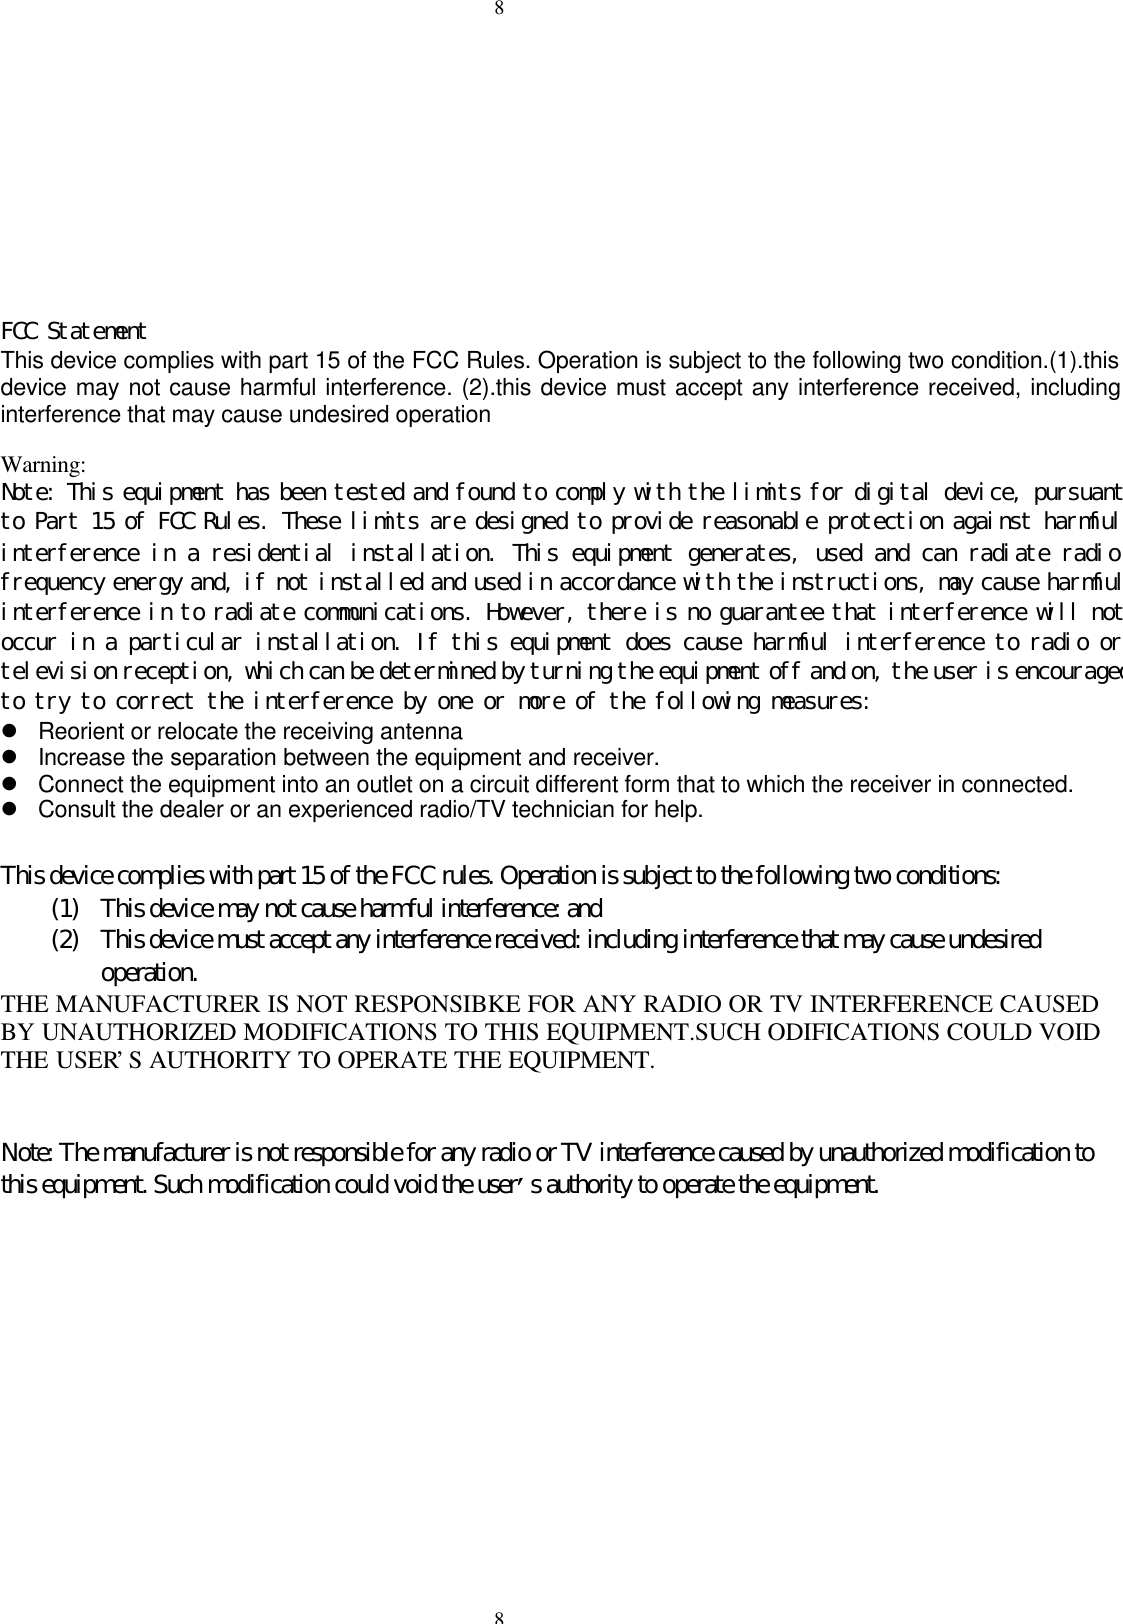
![228. Remote temperature-controlled start on/off [Refer to Remote Transmitter’s Features]This feature enables engine start automatically when the pre-set temperature is reached. The engine runningwill stop when the pre-set runtime expires. [refer to Features Program Table at 31 ]9. Programmed daily start time on/off [ refer to Features Program Table, at # 32]Daily start time can be programmed. Decide and set daily start time exactly at the desired time of the day .Oncethis feature is “ ON ” ; from the next day, your car will auto engine start at pre-set time daily.10. Trunk release ( activate channel # 1 )To release trunk regardless of the car’s lock or unlock status, press and hold button【】 . The parking lightflashes twice to confirm trunk release。 The remote transmitter sounds melody , LED lights up to show car status11. Headlight delay ( activate channel # 2) [refer to Features Program Table ,at # 31 ]To have head delay, press buttons and simultaneously either in arm or disarm modes. Following 2parking light flashes, headlight stays on 30 sec before it automatically turns off. The remote transmitter sounds melody and LED lights up to show car status12. Defective zones alert upon remote startRemote engine start fails if there is a defective zone like the trunk being released or handbrake un-engaged The remote transmitter reflects with 4 buzzer sounds and its LED lights up to show car status.13. Status CheckPress button【 】to monitor the latest vehicle status. The parking light flashes 3 times. The remote transmitter sounds melody and its LED lights up to show vehicle’s status.14. Remote valet mode [ refer to Features Program Table 1 at # 31 or Remote Transmitter’s Features]Press button , and to switch valet mode “ON” ; car’s parking light flashes 4 times, its sirenchirps 4 times; the remote transmitter reflects with 3 buzzer sounds with its upper- and middle-LED blinking awhile . Under valet mode ”ON” , the remote engine start is not operative while other features are still operative.All features become operative when the valet mode is turned “OFF”.To switch valet mode “OFF” , press and hold all , and simultaneously for a few sec, siren chirps 3times; The remote transmitter reflects with 3 buzzer sounds with all LED blinking a while.15. Remote siren ( horn ) on/off [ refer to Features Programmed Table at #30 or Remote Transmitter’sFeatures ]Different programming can set the siren’s ( horn’s ) sound loud / soft or mute as desired.16. Status feedback & confirmation signal [Refer to Remote Transmitter’s Features ]Having received transmitter’s command and successfully processed its command, the main system will sendsfeedback signal to the transmitter which will then reflect with confirmation signal or latest status reports by itsbuzzer sound and/ or LED lights.FEATURES OF MAIN UNIT17. System’s code-learning from 4 different transmitters[Refer to Code Learning at #29]The main unit can learn coding from 4 remote transmitters.18. Power failure memoryThe main unit retains the memory of last settings if its power source is disrupted.19. Low voltage auto engine-restThe main unit will terminate engine running if its power voltage becomes low at 5 v.20. Safety remote engine start/stop engine circuitFor each time of remote engine start, the main unit will perform check on related circuit .Only in perfectcondition of all switches , will the engine start.21. Smart of engine crank circuitHaving received remote engine start signal by remote transmitter, the system will try engine starting. Crankingwill automatically terminate immediately after engine-start success.22. Success of engine start diagnosed RPM/voltage [ Refer to the Installation Diagram, note (9) ]The main unit will diagnose the engine-start success be means of RPM or voltage sensing.](https://usermanual.wiki/Wintecronics/TR68A/User-Guide-182695-Page-2.png)
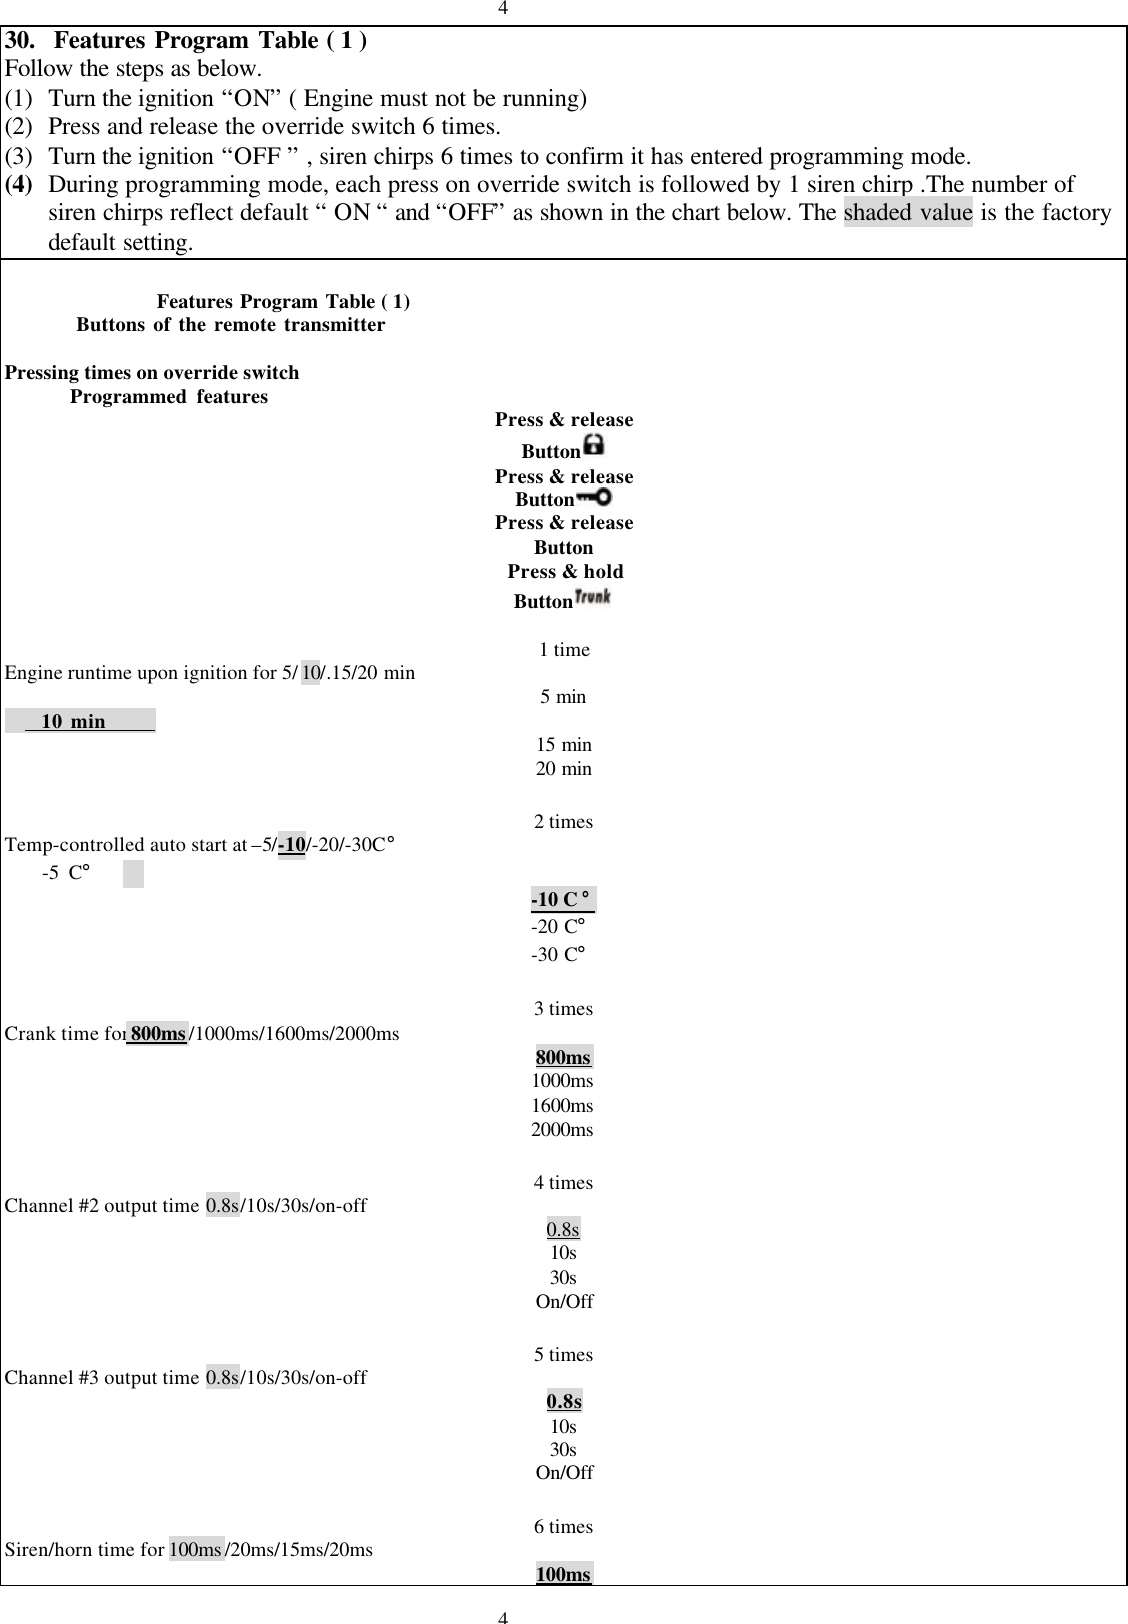
![3323. Valet mode by override switch [ Refer to Features Program Table ,at # 32 ]While valet mode”ON”, all other functions are still operative except for the engine-start which will not beoperable unless valet mode is switched “OFF”.24. Auto relockAfter car door is unlocked , it will automatically relock itself if nobody opens the door within 15 sec.25. Safety door lock/unlock upon ignition on/off [ refer to Features Program Table, at # 33 ]The central door locking system will be activated and all doors are automatically locked if the ignition is turnedon. All doors will be unlocked immediately the ignition is turned off.26. Immobilizer by-pass features [ Refer to Installation diagram note ( 5).]In case of inability to remote start your car with original immobilizer, this system feature can overcome thisproblem by means of by-passing the immobilizer feature.。27. Remote start with automatic and manual gear [ Refer to Installation diagram note (10) ]Auto transmission gear : The remote transmitter is compatible with this type. The automobile must be in free gear mode otherwise the auto remote start is not operative.Manual gear car : To enable remote engine start for this type, following steps must be done.(a) Engage the hand brake while the engine is running(b) Press the remote engine start button of the remote transmitter and try to complete steps (c) and ( d )within 30 secs.(c) While the engine is still running, turn the ignition “OFF”(d) Open the car door and re-close it .Power door lock is activated.( The engine will automaticallystop running at the same time). All the features become operative now.※ If there is any mistake in any of the above steps, the system can fail its remote engine start.28. LED Status indicatorMount the LED status indicator in the interior of the car at an visible place. Car owner can learn the currentsetting status of main unit. Refer to the table below.Normal mode* * * * * * * * * *Programmed daily start-time in standby mode** ** ** ** ** ** ** **Temperature-controlled start in standby mode*** *** *** *** *** ***Temperature-controlled & daily start-time in standby mode**** **** **** **** ****Valet mode on***** ***** ***** ***** ***** *****29. Code learning of remote transmittersFollow the steps as below.(1) Turn the ignition “ON” ( Engine must not be running)Press and hold override switch for about 6 sec and release after the siren chirps 4 times when the mainsystem has entered learning mode.(2) Press and hold remote transmitter’s button , and simultaneously till the siren chirps 1 time. Dothe same step (2) with other remote transmitters one after another , to let the main system learn codes ofeach transmitter. (maximum 4 remotes can be learned )※ Note: The previously-memorized coding will be erased each time learning mode is activated.](https://usermanual.wiki/Wintecronics/TR68A/User-Guide-182695-Page-3.png)
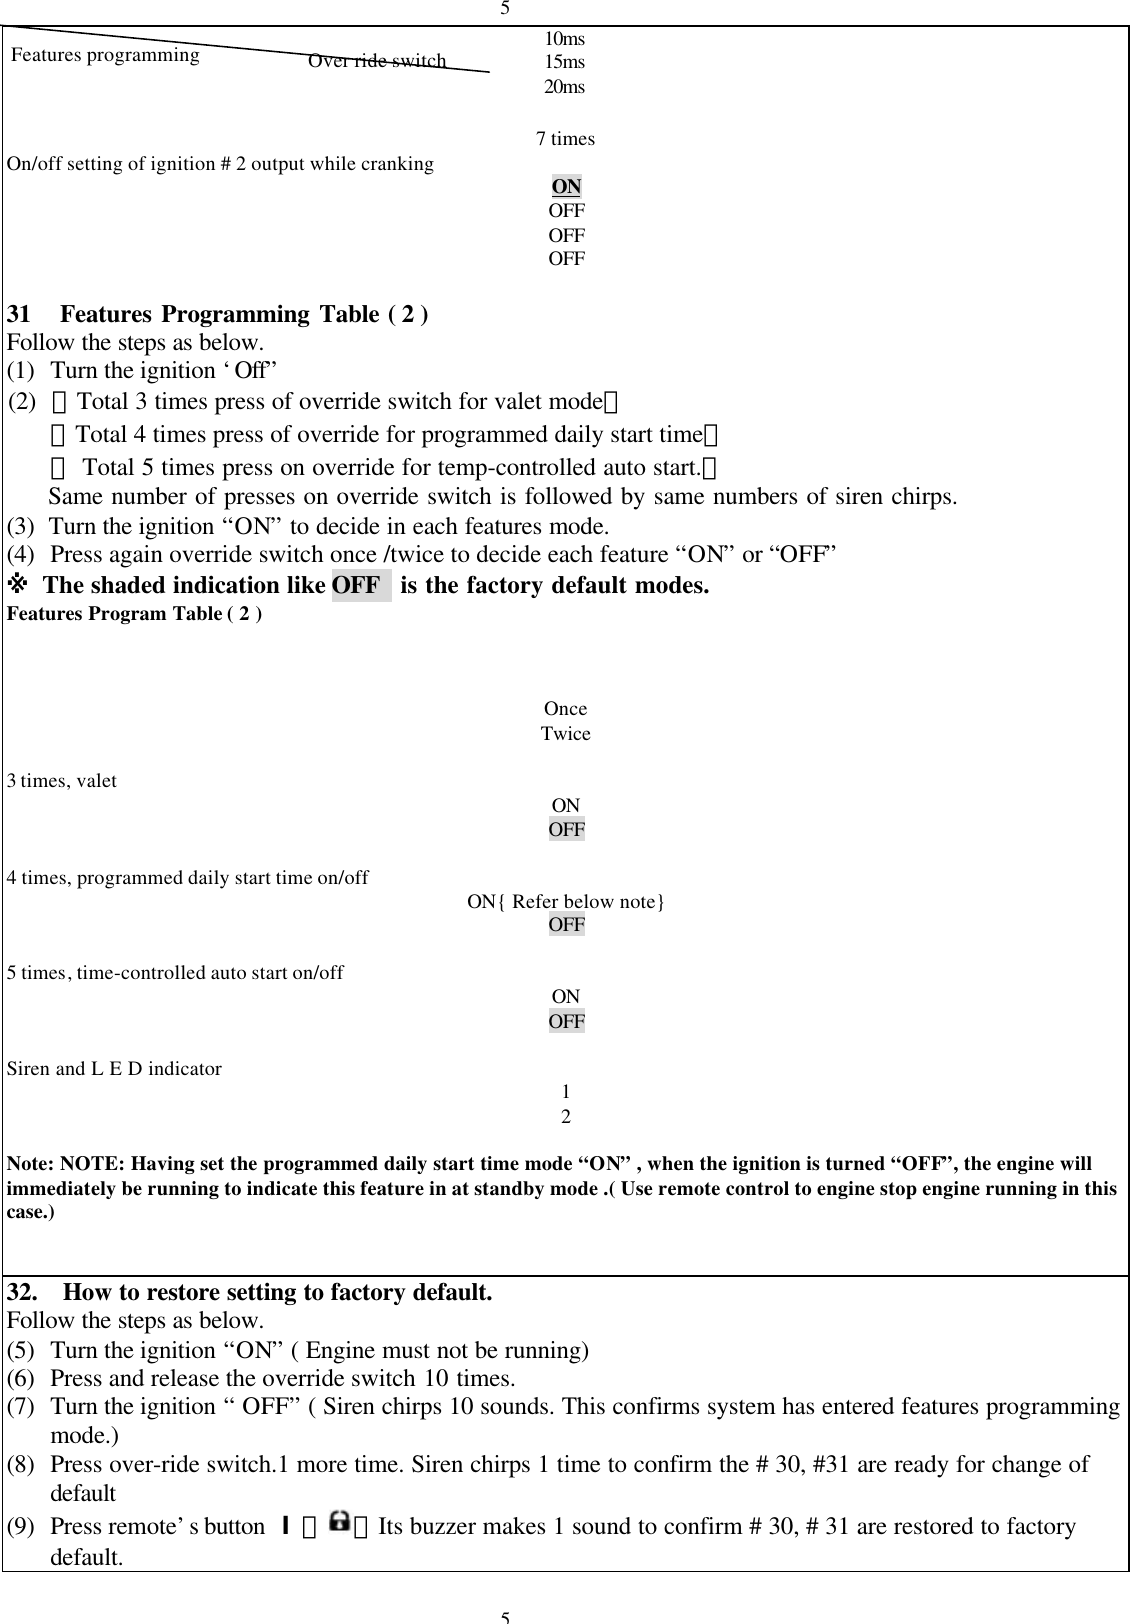
![6633. 程式設定開關功能表 [ 3 ]硬體程式設定功能表[3]Set no項目出廠原設定值/offonSet 4Ignition 預熱時間汽油柴油Set 3Central lock time0.8s3.6sSet 2Unlock 2 step/ch333. Pre-programmed Hardware Features Table ( 3 ) Pre-programmed hardware features [ selectable by mode switches] Mode switch FeaturesFactory default/ Off onMode switch # 4Remote start pre-ignition time GasolineDieselMode switch # 3Central lock delay time 0.8 sec3.6 secMode switch # 22 steps unlock , Ch # 3 2 step UnlockCh # 3Mode switch # 1Safety door lock / unlock upon ignition on / off OffOnBlack wireAuto gear / manual hand gear Auto gearFor manual gear, cut the wire loop (Refer to wiring installation guide Note (10)](https://usermanual.wiki/Wintecronics/TR68A/User-Guide-182695-Page-6.png)